
 These cream-filled chocolates are so smooth and rich you won’t be able to stop at just one!
I work in a genetics lab. Every year at Christmas my co-worker Gail brings in the most wonderful candy I’ve ever eaten. Every year I ask for the recipe and she smiles and says that she can give me the recipe but that I’d need to visit and learn the recipe from her. Now that I’ve made it, I understand. This is not a typical Easybaked recipe, it’s very involved. It’s fun and challenging and oh- soooo worth the effort though!
Gail recently retired and about a week ago I visited her in her kitchen to learn how to make opera creams.
This is a recipe passed down to her from her mom, who had all kinds of thoughts about the making of this candy. My favorite was that the recipe works best on sunny days and if it’s raining you might as well just wait to make it another day. We had a beautiful sunny December day to make our candy on, so I’m sure she would have approved.
Lets start with the recipe– that’s the easy part. I’m going to post it twice– once with pictures and videos and once just straight so you can read it easier.

INGREDIENTS:
- 4 c. sugar
- 2 c. heavy cream
- 1/8 t. cream of tartar
- 2 T light corn syrup
- 1 1/2 t. vanilla
- 1 t butter
- 1/4 t. salt
- Chocolate (of your choice) for dipping- we used tempered dark chocolate bits
DIRECTIONS:
- Put sugar, cream, cream of tartar and corn syrup into a large saucepan and mix well.
- Use a pastry brush and a little water to brush all of mixture down the sides of the pan to remove any sugar stuck to the sides.


- Cover pan and bring to a boil.
- When boiling, uncover and clip a candy thermometer to the side of the pan.
- Bring mixture to 240F degrees
- (While you are waiting for this to come to temp, butter the bottom and sides of a shallow glass or ceramic dish.)


- Remove from stove and add salt, butter and vanilla– do not stir!
- Pour mixture into buttered dish (don’t use plastic!) and allow this to cool completely (we put it on the back porch where it was cool and this took 2 hours)
- Spoon cooled mixture onto clean countertop (it will be like a very sticky caramel)


- Work with hands until firm and creamy- it takes 20-30 minutes and this is pure craziness….here are the stages to expect:
- sticky caramel- fairly firm
- slimy/ buttery texture– almost like its falling apart
- sticky but workable
- so sticky that you literally cannot move your fingers and you are sure you will have to get the mixture surgically removed.
- no longer sticky- but like playdough with little crumbs falling off at the edges…keep kneading!
- Finally creamy and smooth- kneads together in one beautiful dough- like ball.
I filmed Gail as she went through this process. Click HERE to see the near-miraculous transformation from sticky to creamy smooth!
- Place this ball of filling in a dish, cover with a damp towel and refrigerate for 2 days….yes. TWO DAYS.
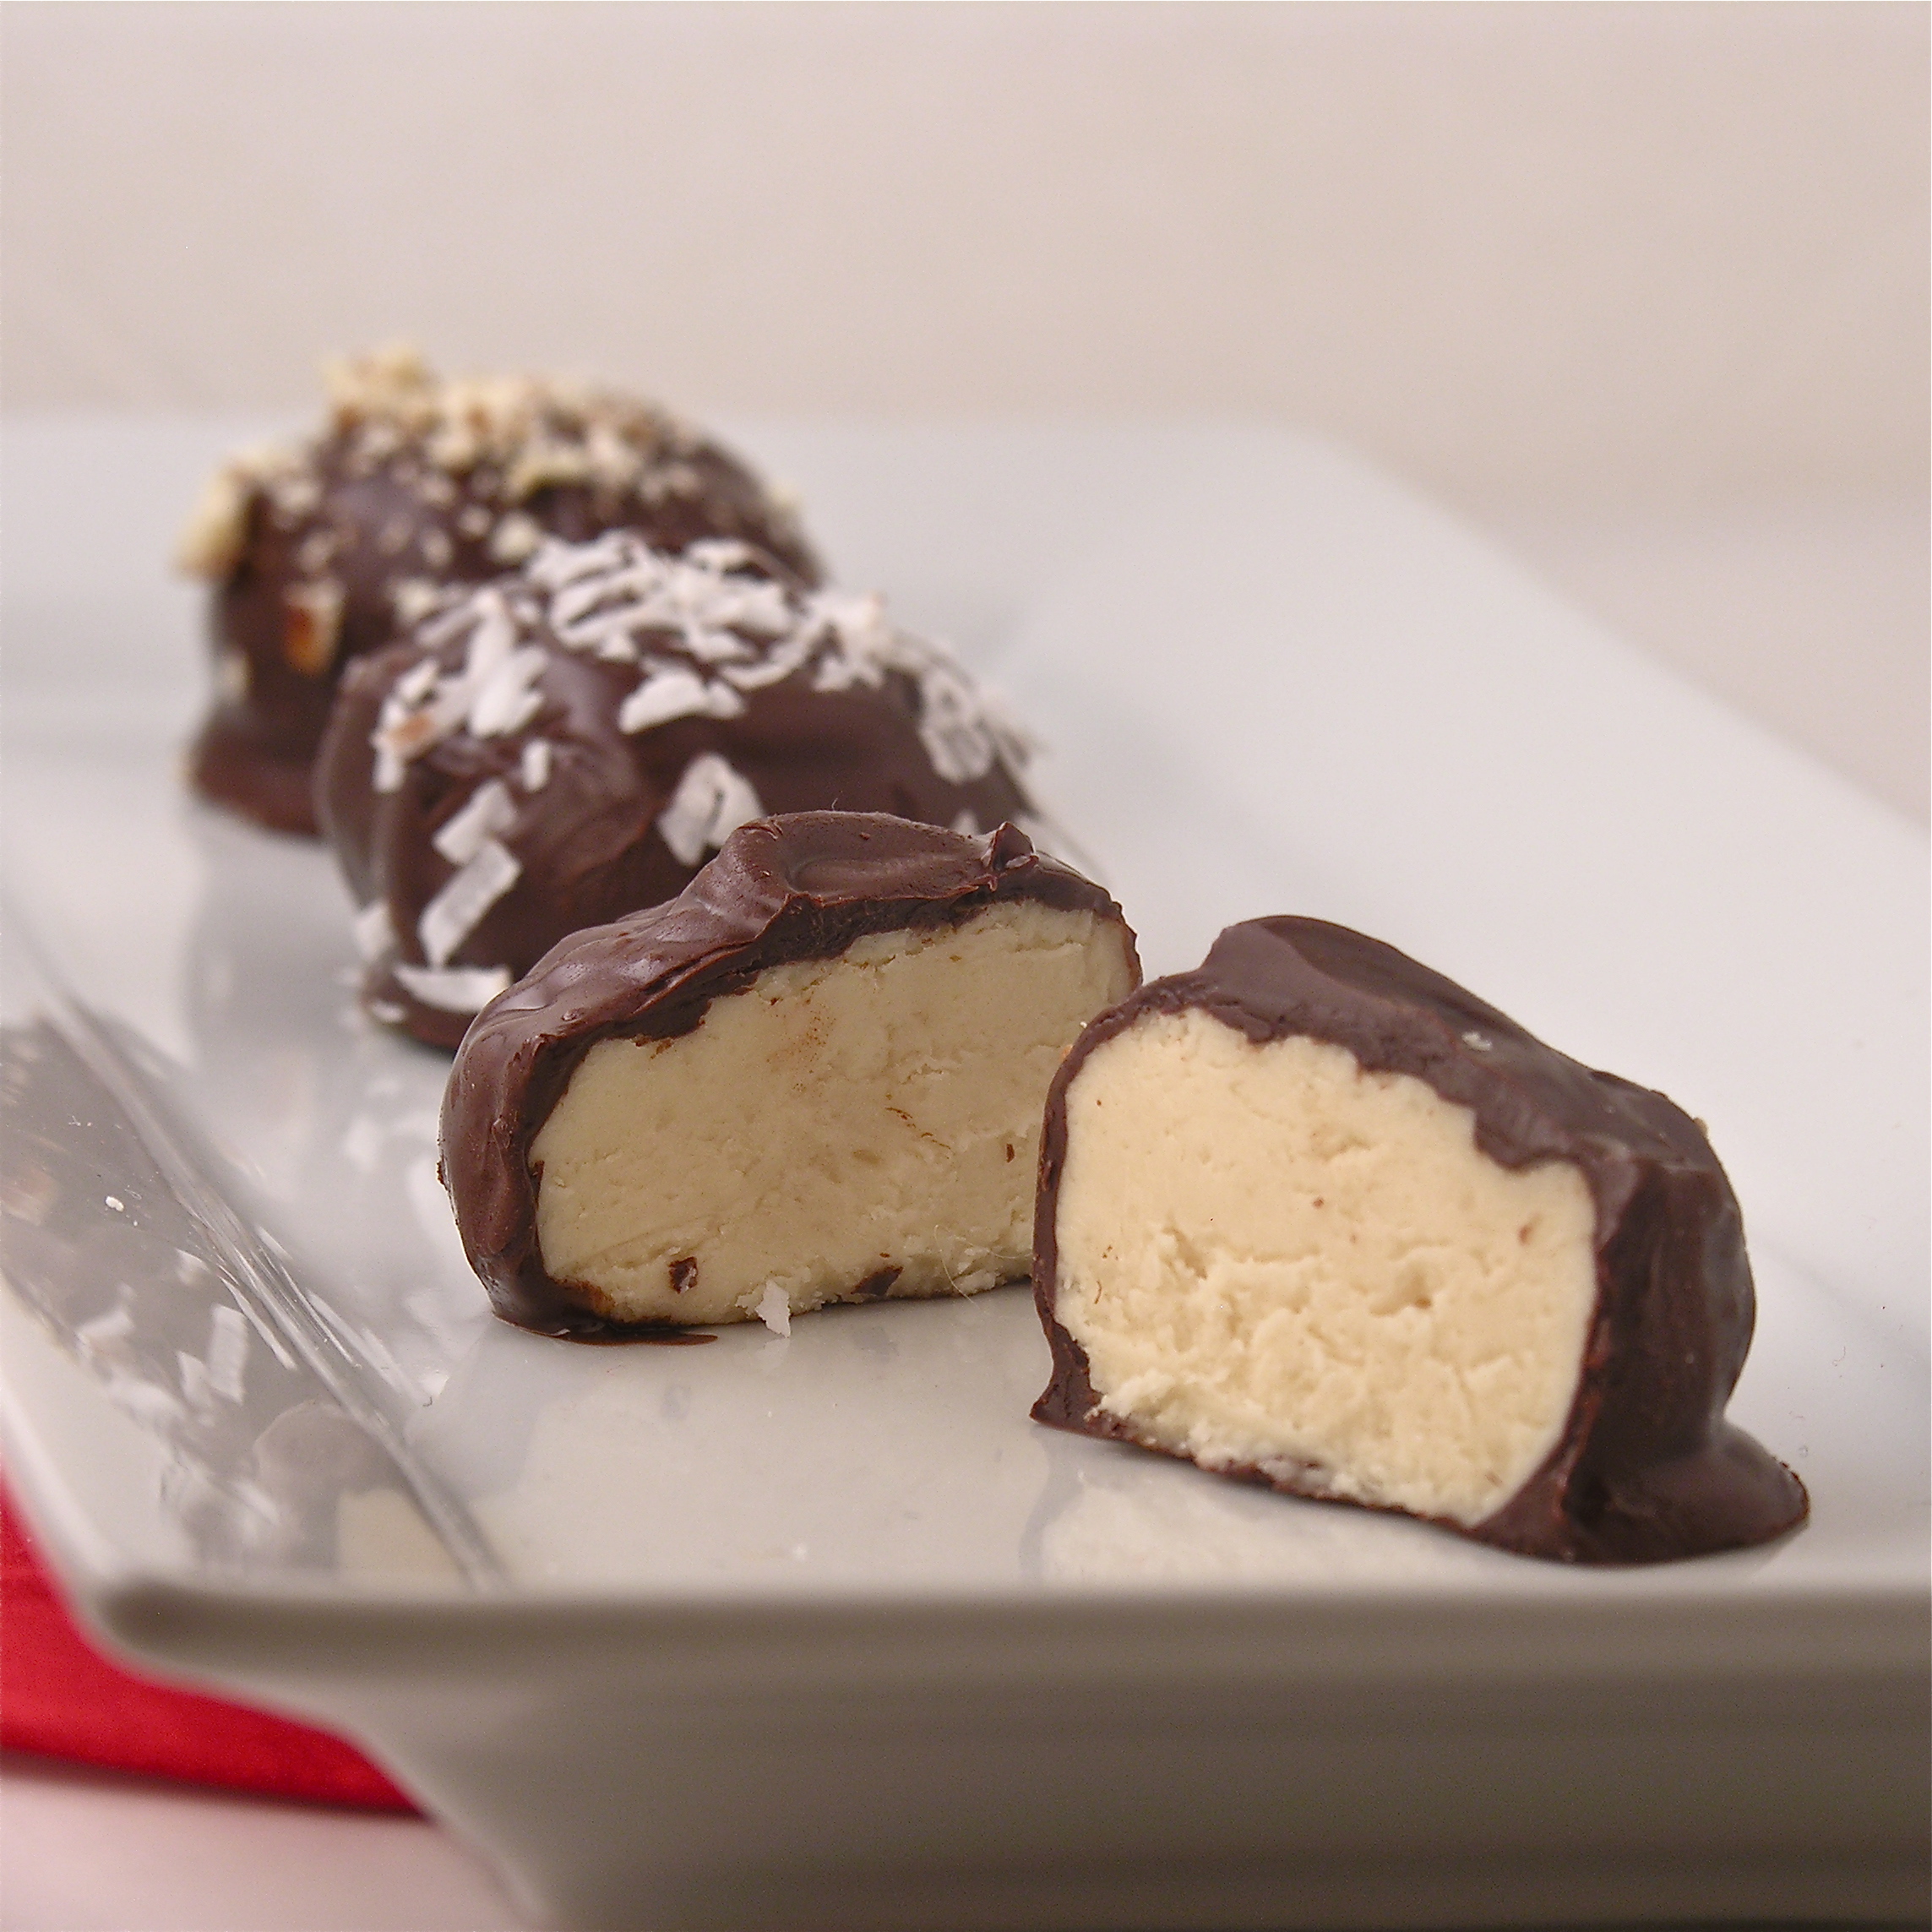
- Bring cream filling back to room temp and roll into balls.


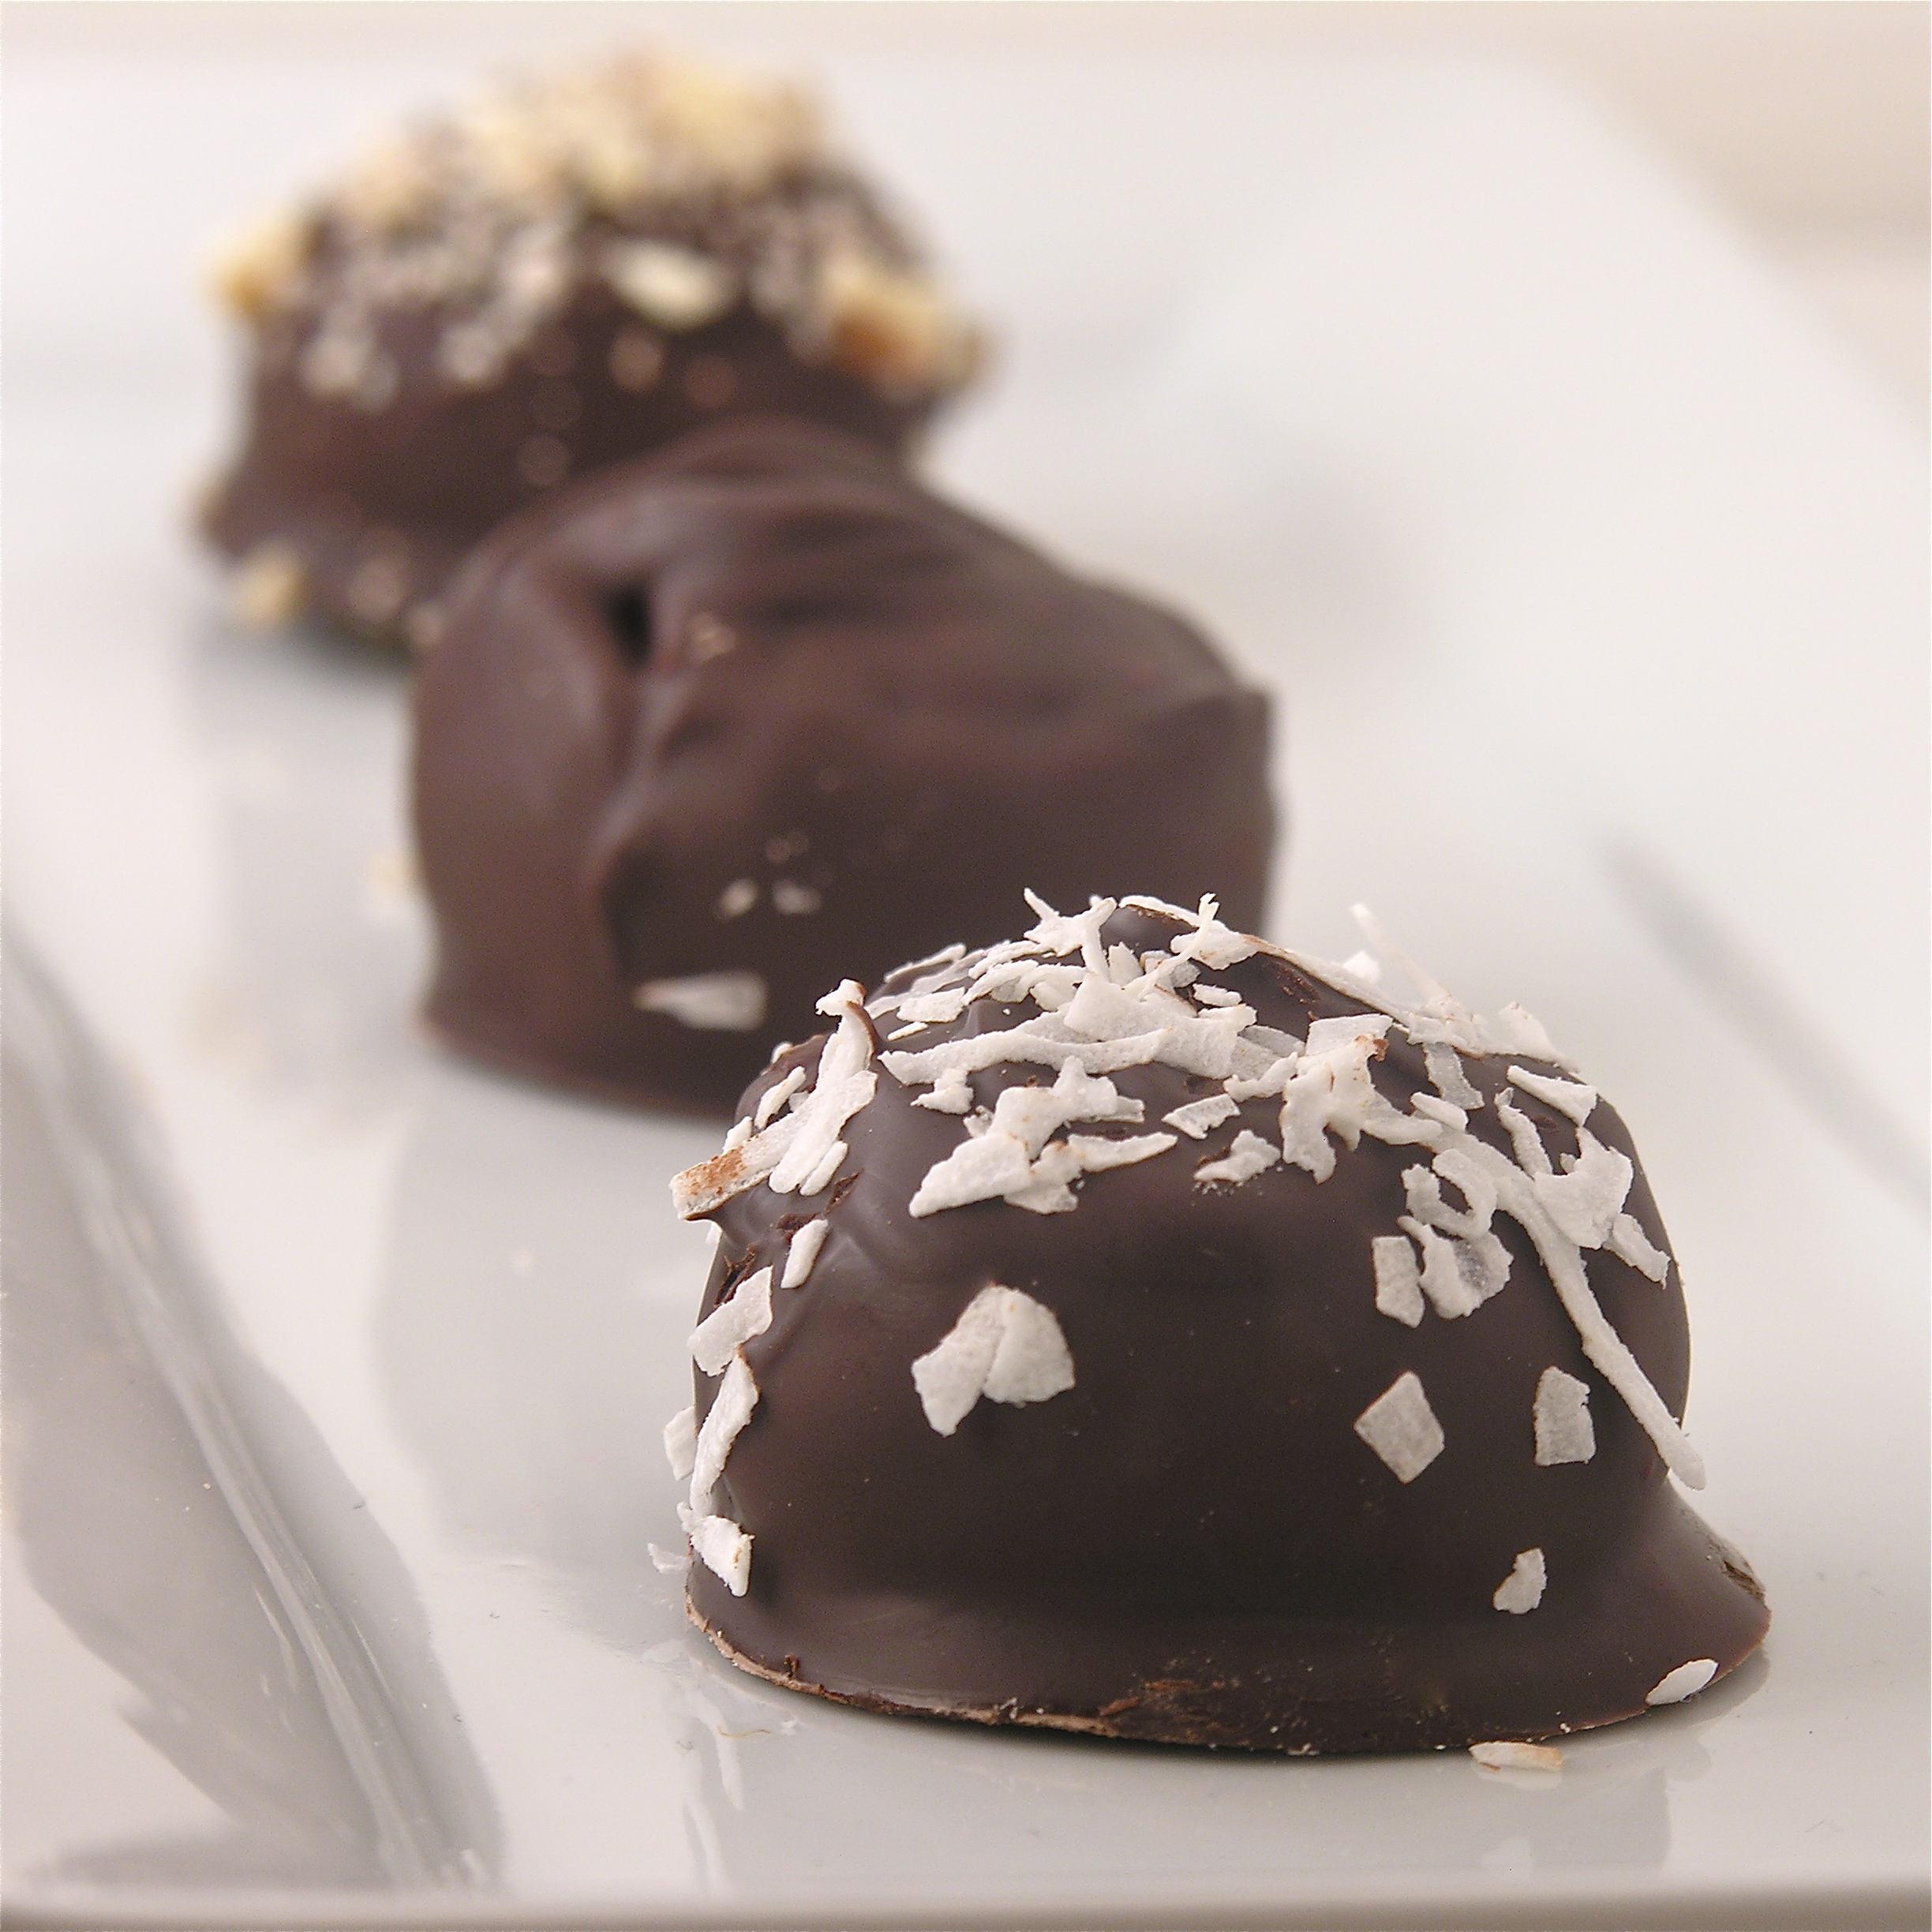
- Dip into melted chocolate and cool.
- You can mix nuts or coconut into the cream if you like, or just leave them plain.

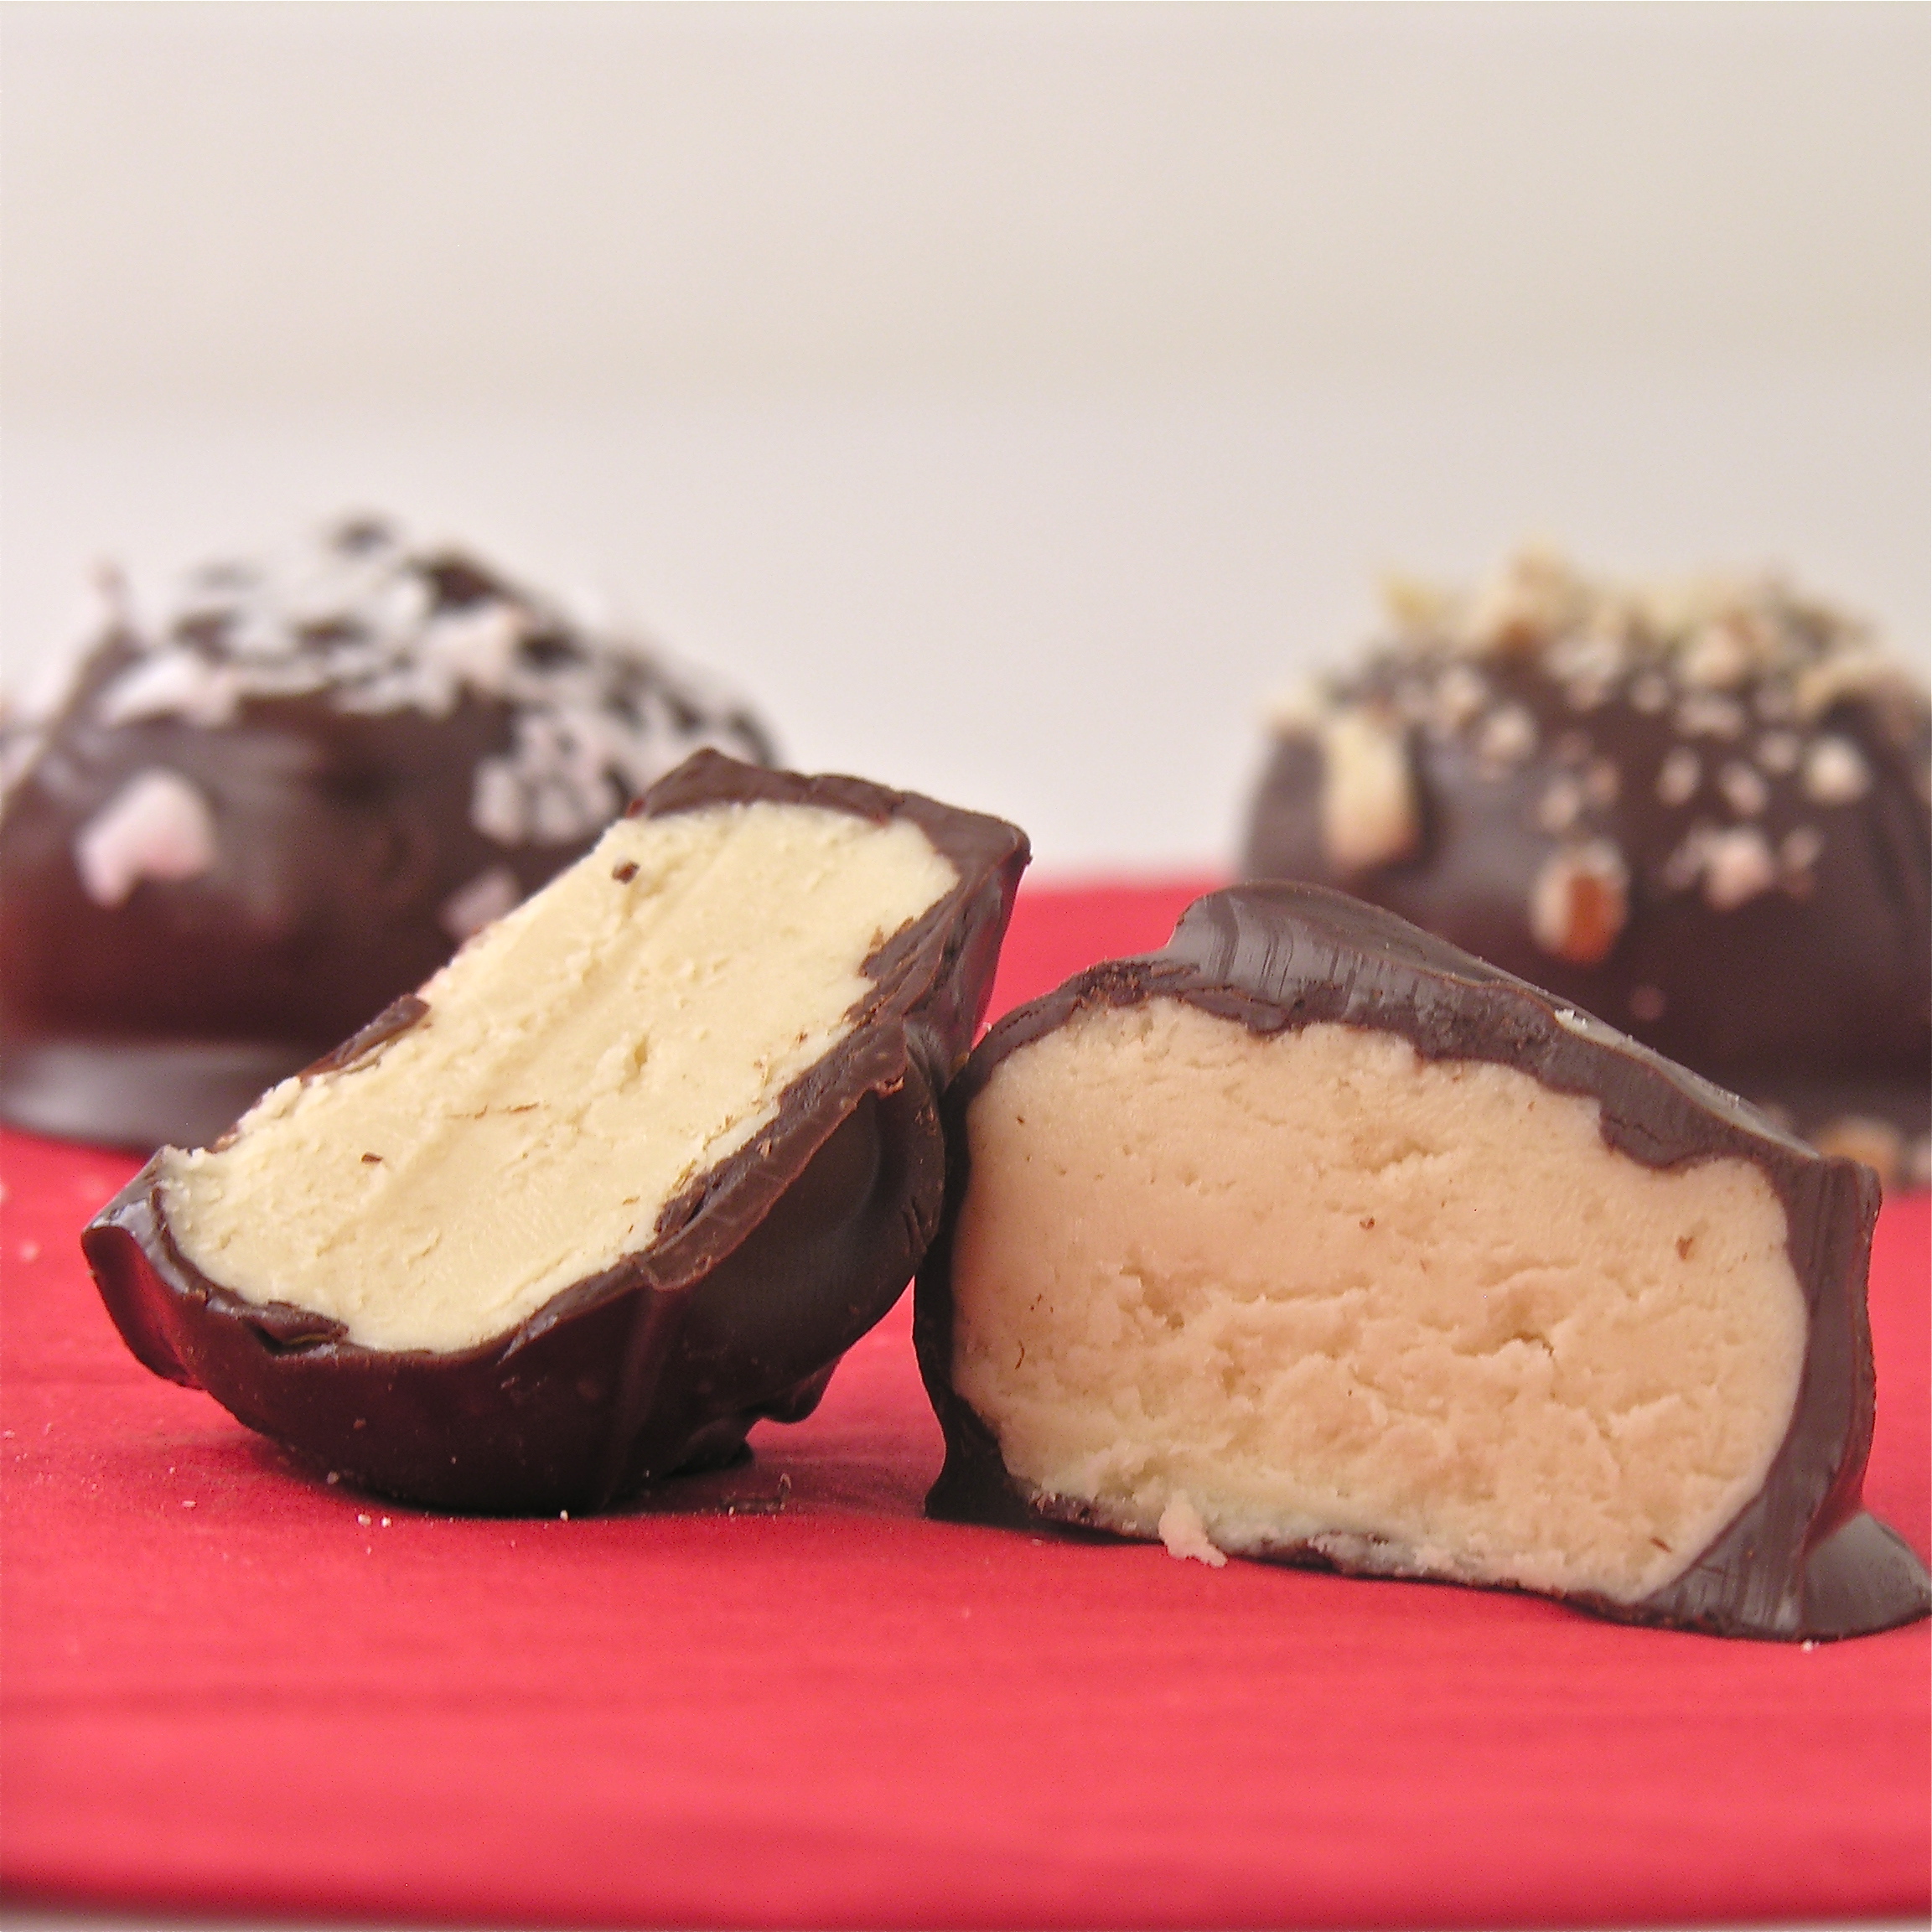 My thoughts: amazingly yummy. The cream is just like no other candy I’ve tried. It is worth every bit if the effort it took us to make these. I found myself cringing as people popped them whole into their mouths though…I kept thinking, “SAVOR those!!! You’ve no idea how hard I worked on them!!!” So hard, in fact that I took a two hour nap when I got home!

 Now for the recipe in an easy-to-read format:
INGREDIENTS:
- 4 c. sugar
- 2 c. heavy cream
- 1/8 t. cream of tartar
- 2 T light corn syrup
- 1 1/2 t. vanilla
- 1 t butter
- 1/4 t. salt
- Chocolate (of your choice) for dipping- we used dark tempered chocolate bits
DIRECTIONS:
- Put sugar, cream, cream of tartar and corn syrup to a large saucepan and mix well.
- Use a pastry brush and a little water to brush all of mixture down the sides of the pan to remove any sugar stuck to the sides.
- Cover pan and bring to a boil.
- When boiling, uncover and clip a candy thermometer to the side of the pan.
- Bring mixture to 240F degrees
- (While you are waiting for this to come to temp, butter the bottom and sides of a shallow glass or ceramic dish.)
- Remove from stove and add butter and vanilla– do not stir!
- Pour mixture into buttered dish (don’t use plastic!) and allow this to cool completely (we put it on the back porch where it was cool and this took 2 hours)
- Spoon cooled mixture onto clean countertop (it will be like a very sticky caramel)
- Work with hands until firm and creamy.
- Place this ball of filling in a dish, cover with a damp towel and refrigerate for 2 days.
- Bring cream filling to room temp and roll into balls.
- Dip into melted chocolate and cool.
- You can mix nuts or coconut into the cream if you like, or just leave them plain.

A huge “thank-you” to Gail for spending so much time teaching me her family recipe! We had such a fun day together cooking AND trying lime phosphates while we waited for candy to cool!

Enjoy!!!!! ~r
Other (easier!) Christmas recipe ideas from Easybaked~ Click on the image to be taken to the recipe:


These sound awesome and I love hand me down recipes!
I do too!! And thanks!!
These look amazing! I am so intimidated by most candy making recipes (especially those that require a thermometer), but your creations look so good… and I bet they were worth the effort! 🙂
This is my 1st candy thermometer recipe– I felt very brave. It went better than I thought 😉
Nom nom nom!! 😀
😉
Ruthanne!
these are beautiful! and it seems like such a fun experience to learn from Gail! 🙂 Thanks to you and her for sharing this recipe (although it looks tough).
The opera cream results sure look amazing!!
Happy holidays dear!
felicia
Happy Holidays to you too Felicia!!
Ok,once again we are so alike! This is the same thing that my grandmother used to make. We call it Opera Fudge, and it is my favorite Christmas candy! Love you!
No way! That’s so cool Meg! Made me laugh! Hope you guys all have a Merry Christmas (enjoy eating all your fun fancy desserts!!!!)
These look absolutely divine, and indeed an art to make them. I am drooling over the photos. And such an old recipe. Beautiful and perfect when they knew how to make things wonderfully simple.
Thank you! I found myself thinking about simpler times when recipes could take time and technique. It made me happy to get a taste of those moments. There is a beauty in old recipes.
These really do look like they are worth the effort—and those lime phosphates don’t look too bad, either 😉
They are worth it –and the phosphates were AMAZING…lime with marshmallow fluff on top…Gail talked me into trying one and I’m so glad she did!
What a fun experience for you and they look perfect for the holidays! Happy holidays to you!
what a crazy recipe! sounds yummy though!
Omg those look delicious!! So indulgent! I have a similar type of recipe that has more of a soft creamy interior like a Ferrero Roche with peanut butter and cream and its a vegan recipe but doesn’t taste like it at all! You might like it, especially since they are so easy and fast to make! They are my ShotglassTruffles! These are just gorgeous. I’m salivating!
Beyond delicious!!
I wish you a merry christmas and a wonderful new year.Thank you for sharing these wonderful recipes. see you again in 2013.kisses
Thank you- same to you!!
I made the Opera Creams today and was impressed with how easy the making of the “taffy” was. I separated the taffy into four balls and added flavorings (lemon, maple, strawberry extracts) to three of them and kneaded each individual ball. This took all day to my surprise. I’m a bit concerned about the finished “play dough” like balls because mine are hard as a rock. It was amazing how quickly it dried and hardened when it got to this stage, so quickly in fact I felt I flubbed up. None of the balls took longer than 35 minutes to knead. All four are covered and in the refrigerator like the directions say to do. My concern is………..am I going to be able to roll this mixture into bite size balls or have I created a big mess? LOL, anyway, a taste of each before placing in the fridge was very pleasing to the taste buds. It’s going to be hard waiting two days to finish this project. I also wanted to let you know how much I appreciated the video it was helpful, just wish it had parts of the entire process. Thank you for sharing your talent, ideas and Gail’s family recipe with us. Veeclaire
Well- you are a brave soul to try this recipe- and even braver to experiment with it on the 1st time out! That 2 days of waiting is a killer, isn’t it? I sincerely hope that it all works out for you- I know that our finished dough had a play-dough consistency- as long as you can roll it into balls and dip it in chocolate,it should be fine. Those 2 days in the fridge do something with the sugars to create a smoother consistency too. Best of luck- let us know how it turns out!
Happy to report that the two day wait was well worth it. The “play dough” balls were easily manipulated into shapes then returned to fridge for an hour. It was fun, I made different shapes for each flavor, square, rectangle, mounds and balls so I could distinguish each one. I removed a dozen at a time and dipped them and waited another hour before tasting the finished product. My husband was so amazed I made these……………OMGoodness those are delicious! I have to agree with him and you……..savor each piece, enjoy the flavor and the creamy consistency, they are so worth the time and effort. I will do this again, and again, and again. Thank you so much for sharing this recipe, I enjoyed my 3 day adventure. Just for reference my batch made 7.25 dozen. Veeclaire
I’m sooo glad they were as good for you as they were when I made them with Gail! Yay! Thanks so much for sharing your experience with us!!!!!:)
Pingback: Lime Soda Cupcakes! | eASYbAKED
Your description was spot on and the video showed it beautifully. I have my batch sitting in fridge and I am just busting for it to be ready. I could eat it just as is. What a great experience.
I’m so glad you are trying them! It is quite a process, but there’s nothing quite like the flavor and creamy texture of these…I’ve been craving them lately and wondering if I have the time to make them again…. enjoy!!!!!
Quick question: At what point would you add flavorings, such as liqueur or brandy? I was thinking it would be best to do it just before the kneading process, but if I was making four or five different fillings, it sure would be nice to knead the whole batch almost to completion and then add the flavorings at the end. Thoughts?
You can add the flavorings after the cream is made- you’ll have to experiment with how much to add. I think a little will go a long way!! This is also when you would add nuts or coconut. Have fun!
Thanks, that’s encouraging! I do a hundred pushups every morning, but kneading those small batches was more work than that. I have a lot of respect for Gail.
Btw, just in case someone else is as bad at reading directions as I am, I ignored your “Do not stir!” warning and the whole thing turned out very grainy. But, I just put everything back in the pan and brought it back up to temperature again and it was fine the second time around. So, the recipe is somewhat forgiving for people like me.
Haha!! I had a lot if respect for Gail too! That kneading is a killer!!! Thanks for the tip- I bet someone else will need it down the road 🙂
I have been looking for something similar to the maple creams my mother use to make. After reading & watching the video, I thought I just HAVE to try this! So…I did. It was interesting to watch it go through the various stages during kneading, but freaky cool how it all of a sudden pulls together into the final product. It’s true that during one stage, it is stuck all over your hands & fingers & you are NOT going to pull it off, you have to keep on kneading it. I found for myself, it was more like working it, not kneading at that point. But then again, there was no other way to do it. It took me 30 minutes on my first batch. Plus it was a rainy day with high humidity. Anywho…right after pulling it off the heat, when you put in the vanilla & butter, I omitted the vanilla & added approx. 1 1/2 tsp of maple flavoring. Waa-Laa! It is hands down, the BEST maple creme I have ever tasted. So now I know I can tweak this to change the center to whatever my heart desires! Mint is next, and I’ve already decided for Valentine’s Day, I’m going to try fine diced maraschino cherries. Everyone who tasted the maple creme remarked how the candy just melts in your mouth. LOVE, LOVE, LOVE this recipe! Now, if anyone can share the secret to a good recipe for dipping, I would much appreciate it. I used 2 cups dark semi sweet chocolate melted in a double boiler and added 2 TBS vegetable oil to the melted chocolate at the end. As long as the candy was refrigerated it was fine, but room temp the chocolate became too soft.
Thank you SO much for sharing your experience with this recipe! Maple cream sounds like a wonderful option! I’m in awe that you are excited to make these again! I love the finished product SO much, but every time I think about making them I think- no time for THAT! Lol. I keep hoping Gail will make them and bring me some! I use the tempered chocolate chips for dipping. Wilton is ok, but I like a better tasting chocolate (since the centers are such a labor of love!) I usually use CK (Country Kitchen) Products for these. They have tempered chocolate chips that are really good. You can order online.
no reply explains how to store or how long they will last outside of the refrigerator
That’s a good question Lee. I know that my friend Gail, who made them for us every Christmas, just stored them in a cookie tin. I know that I personally kept them for at least a week at room temp and they were fine. I can ask Gail about that the next time I see her though!
I stored mine in an air tight plastic container in the refrigerator for a good 2 weeks. It was a great way to control my consumption because I had to pull out just what I wanted & bring to room temperature before eating. Refrigeration did not change the texture or taste.
My first attempt is in the fridge for the 2 day resting period. I only let the candy cool about 30 minutes and then I poured onto a slab of marble and “kneading” it with a cake boss spatula. That was a great technique. I never got gooey hands and it all came together in 15 minutes. I only made a half recipe. I kneaded some toasted coconut in a small batch–we shall see. I’d like to know what brand of chocolate most people dip their candy in? Thank you for the recipe.
I wonder if you would be able to use the dough hook on a kitchen aide stand mixture to do all the kneading?
Others have tried this with success it seems! I do not have a mixer (on my wish list) but that sounds like an awesome idea!!!
Just finished making these. .they are chilling right now. They are fabulous! I cheated a bit and put this in my kitchenaid with the paddle attachment and set it on 3..let it work it’s magic for 35 minutes and it’s perfect. Best maple creams I’ve ever made. Thank you soooooo much for sharing the recipe.
Oh- great idea putting your mixer to work!!!! Thanks for sharing!!!!
I’ve made these twice now and they are absolutely phenomenal! I did all of the kneading of the candy on a marble slab and a silicone spatula (a Cake Boss cake spatula). It really makes it much much easier. Takes me 15-20 minutes for it to go through all the stages without getting a drop on my hands! I know the recipe sounds complicated but honestly it just seems almost fool proof. The video makes all the difference in the world! I never would have believed that the early stages of kneading would yield such a creamy delish end product. I made 2 half batches last weekend and put Maple flavoring in one of them. Oh wow that is excellent. They keep great in the fridge for several weeks. I can’t thank you enough for the recipe and video. Priceless!
I’m SO glad that you love them so much! I think they are one of the best candies I’ve ever had- and they are totally worth the effort. Thanks for the tips- anything that makes the process easier is a plus!!! 🙂
Thanks for the tip on the mixer. I will definitely use mine moving forward.
I’m afraid I’ve done something wrong. The batch after the cooling process seems gritty. In the middle of the kneading, but concerned I’ve made an error. Thoughts?
Hmm…. I don’t have any ideas about why it seems gritty? Did it sort out once you kneaded it completely? I just made these last week (being brave…) and my stages felt a little different than the last time I made them (more sticky- less of the “slimy” stage)- and I had to knead them for almost an hour. But they turned out great- even thought they felt wrong mid-process. Hope they worked out for you!!!
Two separate batches failed. After much thought, I have come to the conclusion that I did 2 things wrong. 1. 1. First batch crystallized due to me not cleaning the sides with a wet pastry brush well enough. I was concerned too much water running down into the mixture would be a bad thing. WRONG!
2. Second batch- I was using a larger, wider bottomed heavy Dutch oven for the cooking process. It took a lot longer to bring to the 240*
3. Third batch came out beautiful! Cleaned sides WELL with wet astray brush & switched back to an old heavy pressure cooker- smaller width & tall sides.
Correction- did not clean sides with an ashtray brush! Lol. Darn auto correct. It was a wet pastry brush. 😂
That actually made me laugh out loud 😂 nothing like a few ashes in your Christmas candy! YOU get the award of the day for persistence!!! I’m so glad you solved the problem- and I know for sure that your comments will help others get this right the 1st time. Man, aren’t they SO GOOD when you get them right?!? I hate the process, but they are just so good that I can’t stop making them for every Christmas!!!! 🙂 Enjoy!!!
I’m a weirdo. I actually love the kneading process. But then again, it doesn’t take much to entertain me. Lol. This time, I divided the batch in half, added maple flavor in top, then kneaded. The other half- peppermint! Holy moly! The peppermint is to die for!
Pingback: Using Tartaric Acid in Cheese Making & Much More! | A Better Whey
Can you kneed filling for opera cteams with a kitchen aid stand mixer instead of by hand?
I personally haven’t done this, but if you read through all these wonderful comments, there are others who have done it successfully! I’m always afraid they won’t be as creamy/smooth, and I don’t yet own a stand mixer 😦 someday….! 🙂
I made a half batch of these and they were wonderful. I used the “fudge” method, which seems a lot easier. Basically you let the mixture cool from 240F to 110F without touching it, then beat it like crazy. I used a hand-held electric mixer instead of kneading or beating by hand, and it turned out great. It’s less messy this way.
The texture is like nothing I ever had before. It was so good that I ate it all before I had a chance to dip them in chocolate. Maybe next time :).
Hi Mike 🙂 SO sorry it took me forever to reply to you- I took a two year break from blogging- but I’m back! This is a super helpful comment- as many people have been asking if you can use a mixer and if you do, what technique they should use. For SURE using a mixer would be easier than doing this all by hand. And yes, the creaminess of these is like nothing I’ve ever had! 🙂
Do you think you could use the kitchen aid for the kneading process?
Hi Maryanne 🙂 SO sorry it took me forever to reply to you- I took a two year break from blogging- but I’m back! I’m honestly not sure- I think other commenters have given mixed reviews on this. I’d give it a try myself, but I don’t own a mixer 🙂 If you tried it, let us know how it worked!
Made the filling today in my brand new kitchenaid mixer. Once it got to creamy stage, I turned it out and kneaded more by hand. It does not look as firm as Gail’s looks in the video and I’ve been kneading forever. Will it set up more in the fridge? I don’t think it’s firm enough to shape into balls and warm chocolate will probably melt the filling as it is right now.
Hi Sandy 🙂 SO sorry it took me forever to reply to you- I took a two year break from blogging- but I’m back! I’m honestly not sure how to answer your question, as I’ve only ever done the kneading by hand- not with a mixer. Others have commented here that the mixer worked well for them- so maybe they have some ideas?
I have been making these for Christmas for years but this year I had a game changer! My mother bought me a silicone dough mat that sticks to the counter top or table. It made kneading this stuff 100 times easier!!! If you are going to make these o highly recommend getting one.
Can the opera cream candy be left out at room temperature? If so can this candy be shipped?
Thanks
Hi Rose,
It can stay out at room temp, and (assuming you aren’t mailing to a warm location), I think they’d ship just fine!
Thank you so much for this recipe! I’ve been searching for one like this (cooked and creamy) for several years. The explanation of the stages during kneading made all the difference for me. Who would have guessed that it would go thru all those stages before become creamy and not sticky? I made mine with half brown sugar to simulate See’s Bordeaux chocolates. I also use a silicone spatula and stir constantly cleaning the sides of the pan while it’s cooking to avoid crystallization.
Fun! I am really glad you found us! 🙂
Pingback: ≫ ácido tartárico | elaboración de queso
Pingback: 16 Desserts That Start With O (Easy Recipe)