Tag Archives: whipping cream

Tres Leches Layer Cake

Posted on


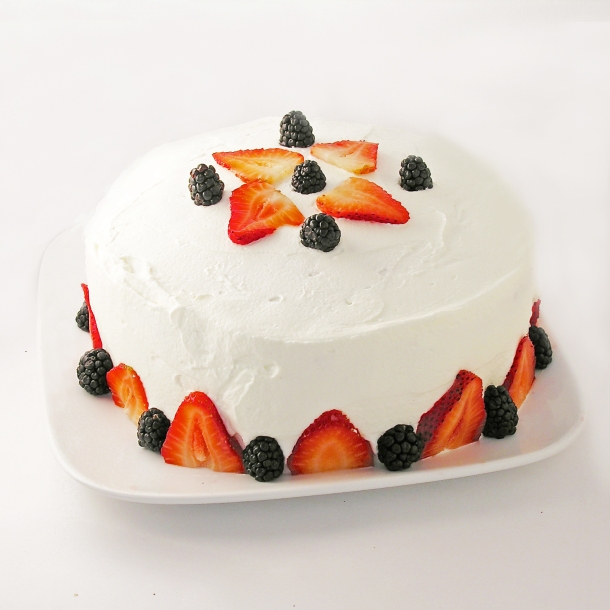
Tres Leches Cake!!!!

This traditional sponge cake is soaked in a vanilla 3-milk sauce and layered with dulce de leche.  Topped with whipped cream and fresh fruit, it is a light and refreshing dessert.

It’s nearly Cinco de Mayo time!  I first tried Tres Leches cake in Mexico.  I had taken a group from our church down to a tiny village in Sinaloa.  We had spent the week building, painting, doing electrical work and laying cement.  It was my birthday while I was there, and some of the ladies from the church made me a HUGE tres leches cake.  It was DELICIOUS!  When I asked for the recipe, they all looked at me funny and said- it’s tres leches cake..? (like everyone knows how to make that!!!)

Tres Leche Cake in MexicoSince then, I’ve tried this cake at other places in Mexico and in the states.  I’ve noticed that there are two kinds:  The firm, sweet and moist kind, and the dripping with milk kind.  I really don’t like the dripping with milk kind…that consistency is really gross to me- and cake should never be gross!

I researched lots of recipes, and discovered that there are two varieties: a butter based sponge cake and an egg based sponge cake.  The egg based one is the one I liked.  It soaks up all that yummy sauce and stays firm, while the other just sits in a puddle of sauce…YUCK!

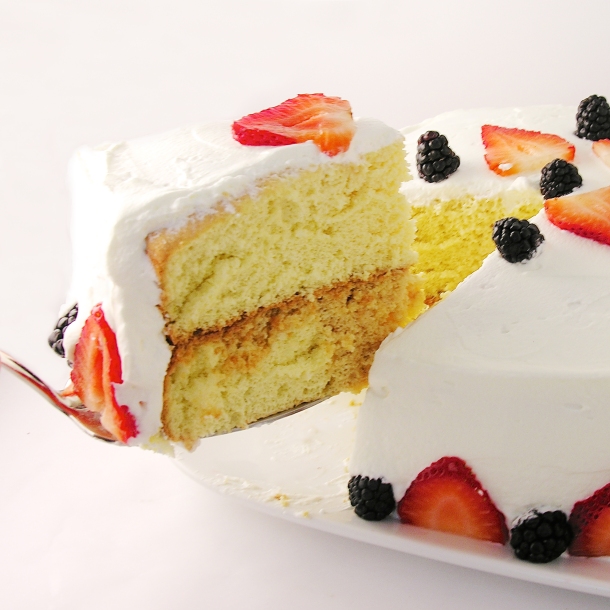
Tres Leches Cake!!!!All of that said, this is an egg based recipe that I found on a lovely blog called Pati’s Mexican Table.  My research paid off- this was a FABULOUS cake!  Here’s the recipe: (printable version)

INGREDIENTS

Cake

  • 9 eggs, separated
  • 1 cup sugar
  • 1 tablespoon vanilla extract
  • 2 cups all purpose flour

Vanilla Sauce:

  • 1 (14oz) can sweetened condensed milk (I used La Lechera brand)
  • 1 (12oz) can evaporated milk
  • 1/2 cup heavy cream
  • 1 tablespoon vanilla extract

Topping/filling

  • 2 cups heavy whipping cream
  • 1/4 cup confectioners’ sugar
  • fresh fruit for garnish
  • 1 (13.4 oz) can of La Lechera Dulce de Leche (or make your own here)

DIRECTIONS:

  • Preheat oven to 360F degrees and spray two 8 or 9 inch cake pans with non-stick spray.  Cut a circle out of parchment paper to place in the bottom of each pan to help these cakes come out of the pan cleanly.
  • Divide eggs into 2 bowls.  Put the egg whites into a large mixing bowl and the yolks into a medium bowl.
  • Beat the egg whites on medium-high until they form soft peaks.  Add sugar and beat on high until they form stiff peaks (this will take 4-5 minutes, depending on your mixer).
  • Beat the egg yolks on high for 5 to 6 minutes until they increase in volume and turn a creamy yellow.
  • Beat the vanilla into the egg yolks until combined.
  • Add the yolks to the whites and use a spatula or large spoon to gently fold them together.
  • Add flour and gently mix until completely combined.
  • Divide batter evenly between the 2 pans and bake for 20-25 minutes.  The tops should be golden and when a toothpick is inserted in the center, it should come out clean.
  • Cool completely, run a small knife around the edges and tip cakes over on a plate.  Remove parchment paper.
  • Make sauce by combining the 3 milks (condensed, evaporated and cream) together with the vanilla.
  • Poke (lots!) of holes in the top of each cake with a fork and carefully pour sauce over the top, dividing it evenly between the 2 cakes.
  • Place one cake on a serving plate, spread dulce de leche caramel over the top, stack second cake on top.
  • Make frosting by beating together the whipping cream and powdered sugar, until stiff peaks form.
  • Frost cake and serve with fresh fruit. Refrigerate until serving.
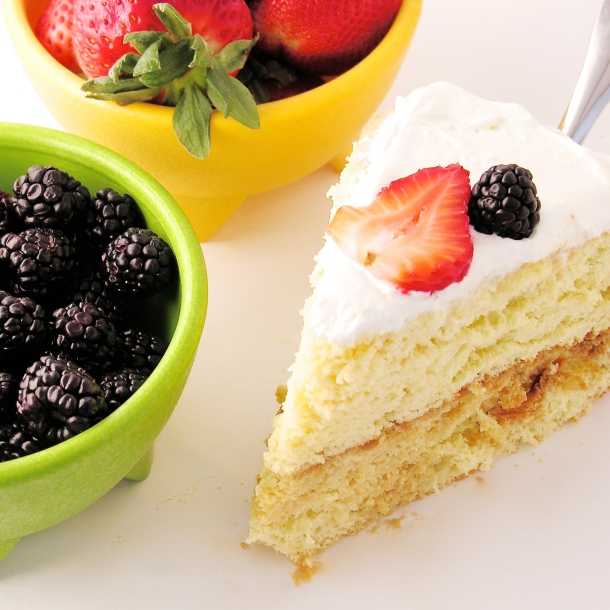
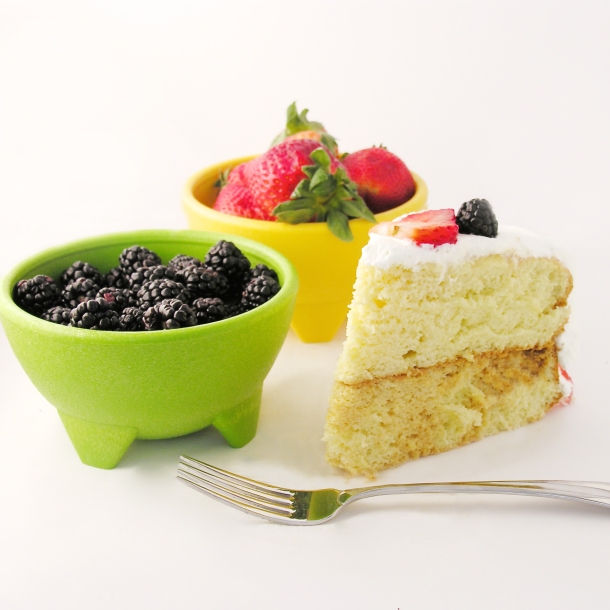
Tres Leches Cake with caramel and fruitMy thoughts:  I was so pleased with how yummy this cake was.  The sponge cake is very firm and easy to work with, even when it’s soaked with sauce.  You can make this in a 9×13 inch pan too- I just wanted the tall layer cake look~ and that caramel in the middle?  Oh my… take a look at my pictures- it partially soaks in to that bottom layer and gives it a rich caramel flavor.  I think you all are going to love this cake!!  I hope you get a chance to try it!!!  Enjoy!!!!  ~r

Tres Leches Cake!!!!Other cinco de Mayo recipe ideas:

Alfajores-- yummy dulce de leche filling!Confetti Cake Filled with CandyCreamy Mango Pops!Mexican Chocolate Milk

Chocolate Ganache Brownies

Posted on

Ganache Brownies
These dense chocolate brownies are topped with a rich chocolate ganache.  You won’t be able to eat just one!!

It’s November.  Time for turkey and thankfulness.  One of the things I am incredibly thankful for is my wonderful family.  We are spread over many states and have many interests, but one thing we all love:  dessert.  This month I am going to feature some of our family’s best dessert recipes– just to get you all ready to bring some mouthwatering treats to your Thanksgiving feast!

This brownie recipe is from my Aunt Sara.  She’s known in our family for her wonderful layered salad, but since this is a blog about sweets, that recipe will have to wait for another day.

Aunt Sarah and her granddaughter Sierra

Aunt Sarah and her granddaughter Sierra

Several years ago I asked everyone in our family to submit recipes to compile into a family cookbook.  SO many wonderful things (with the exception of “Feline Delight”, submitted by my Uncle Keith and my dad, involving a stew made from the family pet…. a joke, of course!)  My Aunt Sara turned in this brownie recipe and I’ve always wanted to try it but just hadn’t taken the time until right now.

The verdict:  AMAZING.  These are the most fudge- like brownies I’ve ever had.  If you prefer cake-like brownies just stop reading right here….because these are rich, heavy, delicious bits of chocolate joy.

Ganache Brownies
So, lets get you the recipe so you can try these yummy treats! (printable version)

INGREDIENTS:

Brownie:

  • 1 stick (1/2 cup) butter
  • 2/3 cup chocolate (I used Nestle’ dark chocolate chips)
  • 4 eggs
  • 1/4 teaspoon salt
  • 2 cups granulated sugar
  • 1 teaspoon vanilla
  • 1 cup flour
  • 1 cup chopped nuts (optional)

Frosting:

  • 1/2 cup whipping cream
  • 1 cup chocolate (Aunt Sara uses Ghiradelli, I just used the rest of the Nestle’ dark chips)

DIRECTIONS:

Brownie:

  • Preheat oven to 325F degrees
  • Place butter and chocolate into a microwave safe bowl and melt in 30 second increments, stirring between, until melted and smooth.
  • Beat eggs and salt until they turn a light yellow color.
  • Add sugar to egg mixture gradually, and then beat until thick and creamy (about 15 minutes).
  • Fold in melted chocolate/butter mixture.
  • Add flour and vanilla and beat until smooth.
  • Fold in nuts.
  • Lightly spray a 9×13 pan with cooking spray and pour batter in.
  • Bake at 325F degrees for 25-30 minutes.  Toothpick should not come out clean- if you over-bake them they will be dry.

Frosting:

  • Place chocolate (either chips, or chopped up) into a bowl.
  • Bring whipping cream to a boil over the stove.
  • Pour hot cream over chocolate and whisk until smooth.
  • Refrigerate about 20 minutes, until thick enough to spread, but not completely set.
  • Spread over brownies and enjoy!!!

Ganache Brownies
My thoughts:  These are wonderfully gooey and rich- my perfect kind of brownie!  The only downside of these is having to beat the eggs for 15 minutes.  If you have a stand mixer you won’t mind it, but I have a hand mixer…seemed like an eternity!  Once I tasted them, it was worth every second though!  Thanks for the wonderful recipe Aunt Sara!!  Love you!  ~r

Other brownie recipes to fill your November with yummy goodness:

Caramel Fudge Brownies!!Fudge Brownie!Mint Creme Brownie CupsBrownie Oreo Cookie Cup

Opera Creams

Opera Cream Candy These cream-filled chocolates are so smooth and rich you won’t be able to stop at just one!

I work in a genetics lab.  Every year at Christmas my co-worker Gail brings in the most wonderful candy I’ve ever eaten.  Every year I ask for the recipe and she smiles and says that she can give me the recipe but that I’d need to visit and learn the recipe from her.  Now that I’ve made it, I understand.  This is not a typical Easybaked recipe, it’s very involved.  It’s fun and challenging and oh- soooo worth the effort though!

Gail recently retired and about a week ago I visited her in her kitchen to learn how to make opera creams.

This is a recipe passed down to her from her mom, who had all kinds of thoughts about the making of this candy.  My favorite was that the recipe works best on sunny days and if it’s raining you might as well just wait to make it another day.  We had a beautiful sunny December day to make our candy on, so I’m sure she would have approved.

Lets start with the recipe– that’s the easy part.  I’m going to post it twice– once with pictures and videos and once just straight so you can read it easier.

Gail's moms recipe card

INGREDIENTS:

  • 4 c. sugar
  • 2 c. heavy cream
  • 1/8 t. cream of tartar
  • 2 T light corn syrup
  • 1 1/2 t. vanilla
  • 1 t butter
  • 1/4 t. salt
  • Chocolate (of your choice) for dipping- we used tempered dark chocolate bits

DIRECTIONS:

  • Put sugar, cream, cream of tartar and corn syrup into a large saucepan and mix well.
  • Use a pastry brush and a little water to brush all of mixture down the sides of the pan to remove any sugar stuck to the sides.

Use a pastry brush to brush water down sides of panGail and her moms candy thermometer

  • Cover pan and bring to a boil.
  • When boiling, uncover and clip a candy thermometer to the side of the pan.
  • Bring mixture to 240F degrees
  • (While you are waiting for this to come to temp, butter the bottom and sides of a shallow glass or ceramic dish.)

Bring to 240F degreesDon't stir!!!

  • Remove from stove and add salt, butter and vanilla– do not stir!
  • Pour mixture into buttered dish (don’t use plastic!) and allow this to cool completely (we put it on the back porch where it was cool and this took 2 hours)
  • Spoon cooled mixture onto clean countertop (it will be like a very sticky caramel)

Pour into a non-plastic dishCooled mixtureKnead into a soft cream

  • Work with hands until firm and creamy- it takes 20-30 minutes and this is pure craziness….here are the stages to expect:
  1. sticky caramel- fairly firm
  2. slimy/ buttery texture– almost like its falling apart
  3. sticky but workable
  4. so sticky that you literally cannot move your fingers and you are sure you will have to get the mixture surgically removed.
  5. no longer sticky- but like playdough with little crumbs falling off at the edges…keep kneading!
  6. Finally creamy and smooth- kneads together in one beautiful dough- like ball.

I filmed Gail as she went through this process.  Click HERE to see the near-miraculous transformation from sticky to creamy smooth!

  • Place this ball of filling in a dish, cover with a damp towel and refrigerate for 2 days….yes. TWO DAYS.
  • Bring cream filling back to room temp and roll into balls.

Roll into ballsDip into chocolate...

  • Dip into melted chocolate and cool.
  • You can mix nuts or coconut into the cream if you like, or just leave them plain.


Opera Cream CandyMy thoughts: amazingly yummy.  The cream is just like no other candy I’ve tried.  It is worth every bit if the effort it took us to make these.  I found myself cringing as people popped them whole into their mouths though…I kept thinking, “SAVOR those!!!  You’ve no idea how hard I worked on them!!!”  So hard, in fact that I took a two hour nap when I got home!

Opera cream CandyNow for the recipe in an easy-to-read format:

INGREDIENTS:

  • 4 c. sugar
  • 2 c. heavy cream
  • 1/8 t. cream of tartar
  • 2 T light corn syrup
  • 1 1/2 t. vanilla
  • 1 t butter
  • 1/4 t. salt
  • Chocolate (of your choice) for dipping- we used dark tempered chocolate bits

DIRECTIONS:

  • Put sugar, cream, cream of tartar and corn syrup to a large saucepan and mix well.
  • Use a pastry brush and a little water to brush all of mixture down the sides of the pan to remove any sugar stuck to the sides.
  • Cover pan and bring to a boil.
  • When boiling, uncover and clip a candy thermometer to the side of the pan.
  • Bring mixture to 240F degrees
  • (While you are waiting for this to come to temp, butter the bottom and sides of a shallow glass or ceramic dish.)
  • Remove from stove and add butter and vanilla– do not stir!
  • Pour mixture into buttered dish (don’t use plastic!) and allow this to cool completely (we put it on the back porch where it was cool and this took 2 hours)
  • Spoon cooled mixture onto clean countertop (it will be like a very sticky caramel)
  • Work with hands until firm and creamy.
  • Place this ball of filling in a dish, cover with a damp towel and refrigerate for 2 days.
  • Bring cream filling to room temp and roll into balls.
  • Dip into melted chocolate and cool.
  • You can mix nuts or coconut into the cream if you like, or just leave them plain.

Opera Cream Candy

A huge “thank-you” to Gail for spending so much time teaching me her family recipe!  We had such a fun day together cooking AND trying lime phosphates while we waited for candy to cool!

Having fun while the candy cools!

Enjoy!!!!!  ~r

Other (easier!) Christmas recipe ideas from Easybaked~ Click on the image to be taken to the recipe:

Chocolate molten lava cupcakesCake balls filled with cream cheese frostingChocolate bonbonsHot Chocolate Pops!

Chocolate Lava Cupcakes

Posted on

These rich chocolate cupcakes are made with a cake mix, but filled with warm chocolate fudge that pours out when you take a bite~ yum!!!!!

INGREDIENTS: (makes 18-20 cupcakes)

  • One boxed dark chocolate cake mix (plus water, eggs and oil to make according to box)
  • 1 c. semi sweet chocolate chips
  • 1/2 c. whipping cream
  • 1/4 c. cocoa powder
  • 1/2 c. white baking chips

DIRECTIONS:

  • Heat semi-sweet chips and whipping cream in the microwave, stirring every 30 seconds until completely melted and smooth, making a ganache.
  • Refrigerate for about 2 hours, until hardened to a soft fudge consistency.
  • Scoop small balls of cold chocolate ganache out of bowl using a small cookie scoop (I highly recommend a small cookie scoop for this job- the chocolate is sticky and hard to work with until it is rolled in cocoa- a scoop makes it so much easier!)
  • Roll balls in cocoa powder and keep refrigerated until use.
  • Preheat oven to 350F degrees
  • Make cake mix according to box and spoon about 1 1/2 tablespoons of batter in 18-20 cupcake liners in tins.
  • Gently press a ball of ganache into the center of each cupcake.

  • Cover each ball with a small scoop of cake batter- just enough to cover the ball completely.
  • Bake at 350F for the time recommended on the box.
  • Remove from oven and serve warm with ice cream and drizzles of white chocolate.

If you aren’t serving immediately, warm each cupcake in the microwave for 15-20 seconds before serving.

My thoughts: I’ve had many a molten lava cake and cupcake before, but usually they fall apart right out of the pan.  These cupcakes hold together beautifully and don’t leak all that warm fudge out until they are cut into.  They are perfect re-heated and sooooo yummy with a little ice cream and raspberry sauce.  A perfect treat for a chilly fall day!!  Enjoy!!  ~r

Other cupcake recipes you might enjoy: (click on the image to be taken to the recipe)