Category Archives: Cakes

Toilet Paper Cake

Posted on

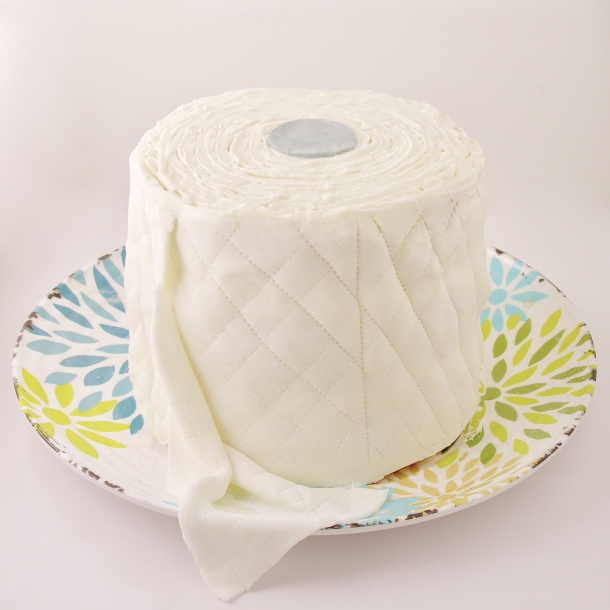
Can’t find TP at the grocery? This cake will NOT solve that problem for you, but it might make you and your family laugh- and that counts for a lot right now!

Well, here we are. About a month into this craziness called Coronavirus. First of all, for my readers and fellow bakers that have been directly affected by this pandemic- hugs to you. We all have been affected to some degree, but some of you have been ill with it, had family ill with it, and maybe even lost someone close to you. My husband and I were just talking about how numbing the numbers are each day. We keep saying things like, “oh- look only 14 deaths in our state today!” And then we remember that those 14 people were deeply loved members of families, and it hits home. This recipe is fun, and maybe even funny, but I don’t want to make light of the terrible situations that many of you are living through right now. 

Just a month ago, my husband and I celebrated our one year anniversary with a long weekend trip to Florida. We had a wonderful meal at a beach-side restaurant and walked the beach afterwards, picking up seashells. Yesterday was exactly one month later and it felt like 5 months had passed. So much has changed in one little month! I knew I wanted to make a cake for my hubby for our 13 month celebration (we celebrate everything!) and this little TP cake- celebrating a whole month of TP concern- made us both smile. 

Here’s the deal: I am NOT(!!!) a cake decorator! I cannot even frost a layer cake without it looking super homemade. Cupcakes? Yes. Cake? NO WAY. So I thought about just trying to frost the cake and adding the little cut-out for the center of the roll, but when it was all finished the frosting looked terrible. I’d made fondant for the little grey circle on top, so I rolled the rest of it out, cut it to the height and circumference of the cake, and slapped it on the outer edges. It looks messy- but in a genuinely toilet-papery kind of way 🙂 How’d I make the pattern on it? While sewing masks earlier this week, I caught a glimpse of my pattern marking wheel, and decided I could roll this over the fondant to make those little serration marks. 

The cake is coconut, with toasted coconut filling (YUM!!)- but you can use any flavor or type of cake with this. Here is how I did mine: 

INGREDIENTS: (cake/filling)

  • 1 white cake mix (with water, oil and eggs to make according to box)
  • 1 cup of toasted coconut
  • 1 stick of butter, softened
  • 1/2 cup powdered sugar
  • 2 teaspoons coconut flavoring
  • About 1/2 cup cream of coconut (optional- just makes cake moist and adds more flavor)


DIRECTIONS: (cake/filling)

Make cake according to package and bake in three 6″ pans according to package. 

Remove cakes from pans and cool completely.

Place butter, powdered sugar, and coconut flavoring in a mixing bowl and beat on high until light and very fluffy (about 2 minutes). 

Fold in the toasted coconut and set aside. 

When cakes are cool, place one on serving plate and drizzle with cream of coconut.

Top this with 1/2 of the filling mixture and spread to edges. 

Repeat this with the next layer, and set cake aside.

INGREDIENTS: (frosting)

  • 1 stick (1/2 cup) butter (softened)
  • 1/2 cup Crisco
  • 1 tsp clear vanilla (or any flavoring you might want!)
  • 4 c. powdered sugar
  • 1 Tablespoon of half-and half cream.

DIRECTIONS: (frosting)

Beat together butter, Crisco and vanilla with a mixer until smooth.

Add powdered sugar gradually and mix until combined and a little crumbly.

Add half and half cream and mix on low.  You might need to add a little more until frosting is a thick but smooth consistency.

INGREDIENTS: (fondant)

  • 4 cups mini marshmallows (half of a 16 oz. bag)
  • 4 cups powdered sugar- plus a little for dusting.
  • 2 tsp water
  • 1/2 teaspoon of clear vanilla
  • black gel color to make center of roll
  • brown gel color if you want to add a poo or two 🙂 

DIRECTIONS: (fondant)

Place your mini marshmallows and water into a large mixing bowl and microwave on high for about one minute- until they are puffy and melted.

Stir them together with a rubber spatula until they are completely smooth (if not melted completely, put them back in the microwave on high for 5-10 seconds).

Add clear vanilla and mix well.

Add about 1/4 of the powdered sugar, stir until smooth, add another 1/4 and stir.  It will become difficult to stir and very sticky.

Pour the rest of the powdered sugar onto a clean counter or cutting board.

Scrape the sticky fondant mixture out of the bowl and onto the powdered sugar and begin to knead it together with clean (powder sugar coated!) hands.  It will gradually become like a smooth clay consistency.  Use a metal scraper to keep it from sticking to the counter/ board.

This can now be colored with gel, rolled out and cut, or stored (tightly wrapped) in the fridge for about one week.  Want a picture tutorial of this process? Check out this post

Assembly: (the fun part!)

Use the frosting to place a thin, smooth layer over the entire cake. Let this harden a bit while you prepare your fondant. 

Color a small ball of fondant a grey color. Roll this out on a clean and powder-sugared counter and use a small circle cookie cutter to cut the center of the roll out. Set aside.

Roll the remaining white fondant out into a large flat rectangle. Measure your cake height and circumference and then trim the rectangle into this size using a ruler and knife. I made mine a tiny bit longer so it would drape off the end like TP does. 

Frost the cake again with a thicker layer, making sure it is as smooth as possible. Gently fold the fondant strip a couple of times so it is easier to handle, and then carefully press it against the sides of the cake, lining the top edge up with the top of the cake. Once you are all the way around, gently lay the extra across the front and on the plate. Mine wasn’t even close to perfect- it was bumpy, and wrinkly. Normally, I would smooth this out, but I left it because it looked more like TP — all messy! 

Place the grey center on the cake’s top, and use a toothpick to draw a spiral in the frosting out from the center to the edges. 

Finally, (if you have one!) use a pattern marking wheel to make the pattern on your fondant resemble TP. You could also use a toothpick- but that seems like a lot of work? Brainstorm ideas for an item you might have lying around that could do this otherwise. 

I had extra fondant, so I colored it brown, rolled it into a little poo and added it to the side of the cake- with a little flag. Then, I stepped back and laughed. Which was good for my soul 🙂 

My thoughts: There are ways to make this easier. You could buy fondant, you could skip the fondant entirely and decorate with frosting (if you are gifted in cake decorating skills), you can skip adding the little poo… I know this cake is a little more complicated that what I usually share, but it seems like we all have a little extra time these days to fuss over a cake- especially one that makes us all smile.

Enjoy! ~r

Other fun baking ideas for your shelter-in-place time: 


Tie Dye Slime Cake for Halloween!

Posted on

Slime Cake1

This deliciously scary layer cake has all the fun colors of Halloween, with green slime oozing out of the layers!

I think that of all the desserts I create all year long, the October ones are my favorite. There is just something fun about the purples and greens and oranges this time of year- and the “yuck” factor that actually tastes amazing. This cake has all the colors, all the feels, and that slimy green layer? It is actually white chocolate pudding that is absolutely delicious.

This filling is inspired by our Toxic Slime Cupcakes from a few years ago. I loved the flavor of the pudding slime so much that I wanted to use it in something else. The cake-of-many-colors is inspired by our Tie Dye cake recipe from a few years back. Put the two together and you have this Franken-dessert mash-up. Just in time for Halloween!

Slime cake3

Want to know how we made it? Here you go: (printable recipe)

Ingredients: 

  • One white cake mix (plus eggs, oil and water to make according to package)
  • One chocolate cake mix (plus eggs, oil and water to make according to package)
  • Food coloring gels in orange, green, purple and black 
  • Two large boxes of instant White Chocolate pudding mix (plus milk to make according to package)
  • 2 sticks of salted butter
  • 2 sticks of unsalted butter
  • 3 cups of powdered sugar
  • 2 teaspoons of vanilla
  • Halloween sprinkles 

Directions: 

  • Make two cake mixes according to package.
  • Use black food coloring gel to make chocolate cake a black color
  • Divide white cake batter into three bowls and add color gels to make them orange, green and purple.
  • Spray three 9 inch pans with cooking spray and cut a round piece of parchment paper to fit in the bottom of each. If you don’t have three pans, bake layers one at a time.
  • Starting with black, place a circle of batter in the middle of each pan. Tap it to make it spread out a bit (batter should not be at the edges yet). Add a circle of green in the center of the black, tap until both colors spread a little. Repeat with orange and then start again with black and repeat all colors, ending with black (because you have more batter in that color). 

Tie Dye Method1

  • Place cakes in a 350F degree oven and bake according to package (mine took about 25 min). 
  • Remove from oven, tip out of pan, and cool completely on a cake rack. 
  • Trim the top of each layer so that it is flat. 
  • Make 2 boxes of pudding according to package, and use green food color to tint it a slimy shade of green. 
  • Make frosting by placing the butter (at room temp), powdered sugar and vanilla into a large bowl and beating it on high until light and fluffy. 
  • Divide frosting into 3 bowls- one bowl for the purple should have about 3/4 of the frosting, the other two should have the rest split in two for orange and green. Use food color gels to color these. 

Assembly of the cake: 

  • Place purple icing in a large zip-top bag fitted with a large round (2A) Wilton decorating tip. Pipe icing around the top of a layer to form a “wall” to hold the pudding slime on the cake. 
  • Spoon 1/2 of the green slime pudding on top of the cake, and spread it to the frosting edges. 

  • Gently place a cake layer on top of the pudding and repeat the process once more, ending with the top layer of cake. 
  • Frost the entire cake in purple and then, using a round (2A) Wilton tip, pipe round dots all over the top of the cake in the 3 colors. 
  • Finish with a sprinkle of eyeballs and bones- or any other fun Halloween candy. 
  • Enjoy!

Slime cake4

My thoughts: YUM!!!  This cake is so good with that white chocolate pudding as a filling. Goodness. You could make this recipe easier by doing either one element or the other (make a purple cake with slime- or make a tie-dye cake with regular filling). Also- you will have a little left-over black batter. I went a little heavier on the black layers to make up the difference, but still had a little left. I really hope you get a chance to try this recipe! Enjoy!! ~r

Slime cake2

Other fun Halloween recipes to try:(click on photo to open recipe)

Chocolate Cake Roll with a Cinnamon Caramel Filling

Posted on

Cake Roll1I love my pumpkin roll recipe. It’s one of my favorite parts of baking in the Fall. I’ve been highly unsuccessful, however, in finding a chocolate cake roll recipe that I love- either it tastes great but cracks like crazy, or it rolls well buts tastes like cardboard. One of my goals over the past 2 years of blog-absence was to create a chocolate cake roll recipe that works AND tastes great.

This is it! It rolls beautifully (I had only one small crack) and tastes like a rich, but not-too-sweet, fudge brownie. Perfect!

Of course you can fill this roll with a multitude of things, but I chose a creamy Dulce de Leche caramel filling with cinnamon.

Cake Roll3

Ready to try this? Here’s the recipe: (printable version)

Ingredients: 

Cake:

  • 2/3 cup flour
  • 1/3 cup unsweetened cocoa powder
  • 1 ½ teaspoon baking powder
  • 1 ½ teaspoon salt
  • 5 eggs
  • 2/3 cup sugar
  • 3 tablespoons vegetable oil
  • 2 teaspoons vanilla

Filling:

  • 3 sticks (1.5 cups) of salted butter, softened to room temperature
  • One can (13.4 oz) Dulce de Leche (I used Nestle’s La Lechera)
  • 1 1/2 teaspoons of cinnamon

Topping:

  • 1 Tablespoon of cinnamon
  • 2 Tablespoons of cocoa powder (mix them together in a small dish)

Directions:

Cake:

  • Heat oven to 350 degrees F and lightly spray a 17 x 12 inch jelly roll pan with non-stick cooking spray. Line the pan with parchment paper with about an inch of extra paper on the 17-inch sides (so you can lift the cake out of the pan easily once it bakes). Note: make sure your paper is nice and flat- the non-stick spray will help hold it down. Mine folded a little and you can see a few bumps on my roll where the batter baked over the fold.
  • Add flour, cocoa powder, baking powder, and salt in a medium bowl stirring gently until just combined.
  • In a large bowl, beat eggs and granulated sugar for about 1 minute until thick. Add in the oil and vanilla extract, and beat together until combined.
  • Add dry ingredients to wet, and mix gently until just combined. The batter will be like a runny brownie batter.
  • Spread the batter evenly into prepared pan, and bake for 12-16 minutes, or until top of cake springs back when touched.
  • Carefully lift the parchment paper and cake out onto a flat (and heat-safe) surface. Then slowly, using your hands (careful, it will be hot!), roll the cake  – rolling from one short (12-inch) end to the other— until it is completely rolled up.
  • Wrap tightly in a towel and place in refrigerator until completely cooled (an hour or so).

CakeRoll6Cake Roll5

  • While the cake is cooling, make the caramel and cinnamon filling (see below).
  • Once the cake has cooled completely, place it on a flat surface, remove the towel, and unroll it carefully until it is flat again (it’s ok if the ends curl up a bit).

Filling: (make while cake cools)

  • Place butter in mixing bowl and beat on high until whipped and smooth.
  • Add Dulce de Leche and cinnamon to butter and beat on high for about 2 minutes until smooth and creamy.

Assembly: 

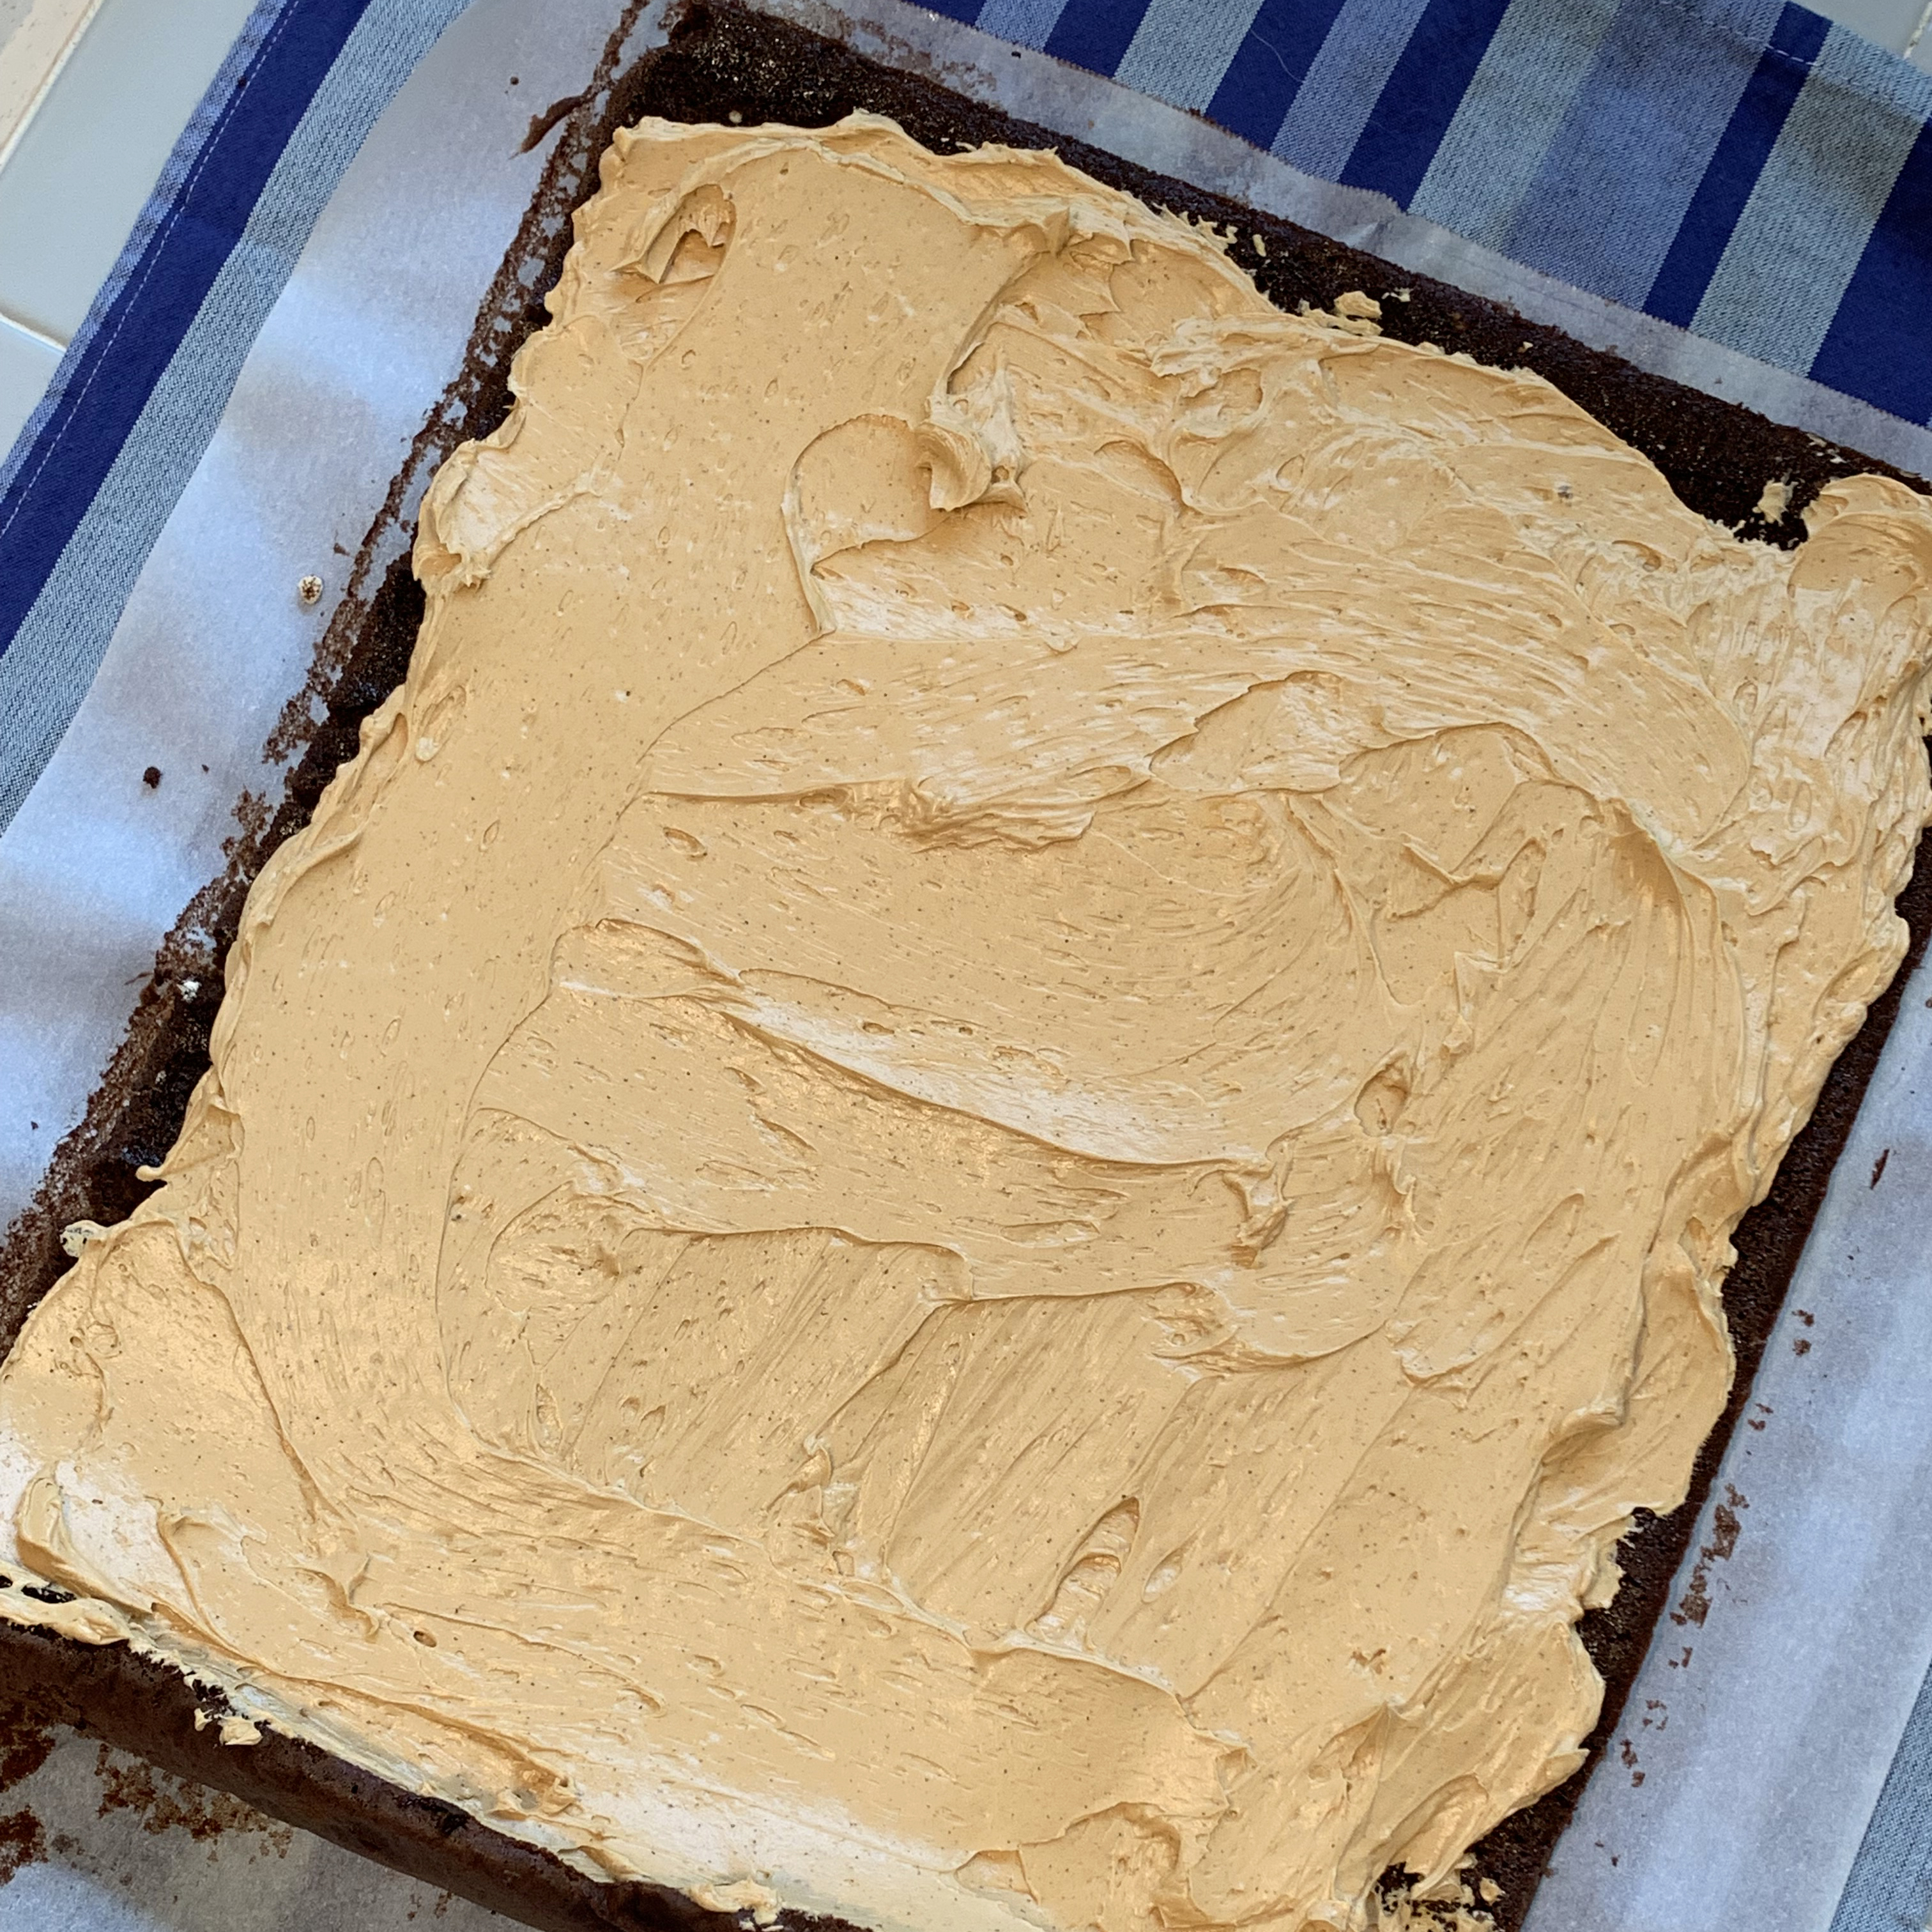
  • Spread the filling evenly over unrolled cake, leaving a small border on all sides (the filling will spread out as you roll it back up).  Then carefully re-roll the cake, gently peeling away the parchment paper as you roll until you can completely remove and discard it. Tightly wrap the chocolate roll in plastic wrap or Press-n-Seal and refrigerate at least one hour until completely set.

Cake Roll8Cake Roll7

  • Lightly dust with cocoa powder and cinnamon mixture (you could also add a chocolate glaze to the top if you have cracks or you want the dessert to be sweeter).
  • To serve, remove and unwrap the chocolate roll, transfer it to your serving dish and slice.
  • Keep leftovers tightly wrapped and refrigerated for up to 4 days.

Cake Roll2

My thoughts: Yum! I loved this cake roll- I almost feel like it should be called a brownie roll because it is so dense and rich. This is not a super sweet dessert- my husband said it would be better with a sweet chocolate glaze on top- but I loved the rich cocoa/cinnamon flavor. If you like a not-so-sweet but rich and cocoa-y dessert, this one’s for you! Enjoy!! ~r

Cake Roll4

I’m MARRIED!!! (plus a great recipe for fondant…)

Posted on

Reception29e

My last post here was two years ago yesterday. I was beginning to feel like creating content for this site was work instead of joy, and a hobby should always bring joy! I’ve just started to feel like I miss creating and sharing recipes though, so I am back, checking in with you all, and hoping to share new things here again- maybe a little less frequently than my usual one time per week though!

So… a lot has happened in these two years! Just after I posted my last recipe here, I began walking every morning with a friend I’d known for about 8 years named Nick. We walked all that fall, winter and spring and became really close friends. Last summer he asked if I’d be interested in dating (which I was!), in December he proposed, and we were married 5 months ago! It is such a wonderful thing to have someone to walk life with. He is an incredible man, and I’m so thankful that God brought us together!

Plus he loves desserts as much (maybe more!) than I do!

58578414_10155950238392513_5197066502976569344_n

So obviously our wedding cake was a really important element of our wedding! My dear friends Megan and Wendy Davis from Happily Ever After Cakes did our cake and it was incredible on several levels.

First: They live almost 10 hours away. They made the cakes, drove them cross-country and assembled them here.

Second: Our wedding theme was confetti, and they matched our colors perfectly in fondant.

Third: It was a 5 layer cake- and each layer was a different flavor with a different filling. And all of the flavors were epic. I tried them all (of course!)

Reception28.2e

Wendy and Megan make delicious cake (top secret recipe) and amazing fillings, but what puts their cakes over the top is their made-from-scratch fondant. I usually want to peel fondant off to get rid of it- but not this. It’s soft, and sweet, and absolutely delicious.

Megan shared their recipe with me on a visit several years ago, and I posted about it here. I thought it was worth a second share though- just in case you missed it the 1st time, so here you go: (printer-friendly recipe)

INGREDIENTS:

  • 4 cups mini marshmallows (half of a 16 oz. bag)
  • 4 cups powdered sugar- plus a little for dusting.
  • 2 tsp water
  • 1/2 teaspoon of clear vanilla
  • gel colors to color fondant as desired

DIRECTIONS:

  • Place your mini marshmallows and water into a large mixing bowl and microwave on high for about one minute- until they are puffy and melted.
  • Stir them together with a rubber spatula until they are completely smooth (if not melted completely, put them back in the microwave on high for 5-10 seconds).
  • Add clear vanilla and mix well.
  • Add about 1/4 of the powdered sugar, stir until smooth, add another 1/4 and stir.  It will become difficult to stir and very sticky.
  • Pour the rest of the powdered sugar onto a clean counter or cutting board.
  • Scrape the sticky fondant mixture out of the bowl and onto the powdered sugar and begin to knead it together with clean (powder sugar coated!) hands.  It will gradually become like a smooth clay consistency.  Use a metal scraper to keep it from sticking to the counter/ board.
  • This can now be colored with gel, rolled out and cut, or stored (tightly wrapped) in the fridge for about one week.  
  • Have your cupcakes or cake all made and cooled.
  • Make enough fondant to cover your item(s).  Here is a great chart by Wilton to help you determine how much you’ll need for various projects.
  • Make up some  thick buttercream icing (recipe here) and you are ready to go!

Reception28.1e

My thoughts: YAY! It is fun to be at a place where I can jump back into sharing my ideas here again. I’ve missed you all! Until the next recipe….

Reception27e

Enjoy!


A New Year’s Collection of Top Recipes on Easybaked!!

new-years-collection

Happy New Year, friends! One of my favorite parts of marking the end of one year and the beginning of the next is looking back at all the things that made the previous year wonderful! One of the really fun things to look at is my statistics for this blog. A LOT of you visited us here this year!  Thank you!!!  I am always fascinated by which recipes really took off and became HUGE hits- and I’m always a tiny bit disappointed by the ones that I thought were AMAZING, that didn’t really catch anyone’s attention.

I have lots of fun recipes lined up to share with you in January, but this week- as we welcome 2017- here are the top picks from 2016.

Just click on a photo to see the recipe- and enjoy!!! ~r

new-years-collection2

Strawberry Lemonade layer cake

Viewed 203,655 times in one month alone! The cupcake version of these is really popular too.

Classic Cheesecake with Sour Cream topping

Seriously, that cheesecake is maybe the best recipe on this blog. You have GOT to try it!!!! 🙂

Oreo pops

When this was 1st posted, there were NO other Oreo Pops on the internet- so I like to think that the Oreo Pop craze started here! We certainly have had fun creating all sorts of them for every holiday!

Bailey's Cupcakes

This recipe was from a failed audition for The Great American Baking Show, and a new friend!

Turtle Bundt

This is the most recent big hit on Easybaked- and it is really easy to make!

So, those were the top 5 in all-time views this year… but what were my favorites from 2016? These three!

new-years-collection8

new-years-collection9

This is the star of 2016. It is SO yummy and got rave reviews every time I made it. A massive layer of cookie dough in the middle of a cake? Does it get any better than that???

Marshmallow Stuffed Oreos

2016 was also my year to turn those healthy little Oreo Thins into amazing stuffed Oreos! These marshmallow ones… oh my! We also stuffed Oreos with Key Lime Pie, Pumpkin Pie and Cookie Butter!

Cookie Monster Oreos!

These win my personal “cutest” recipe award for 2016! I loved making them and making cute little stickers to seal the bags I gifted them in too! So fun!

I’ve been asked many times what my all-time favorite recipe on Easybaked is. I’ve got SO many favorites- but if I had to pick one, it would be my Caramel Fudge Brownies. I love them because they are my mom’s famous mint brownies with my favorite caramel added in place of the mint- and they are just the BEST chocolate fix ever.

Caramel Fudge Brownies!!

I hope you have enjoyed this round-up of recipes!

HAPPY NEW YEAR!!!!!!


Strawberry Cream Confetti Cups!

strawberry-cream-confetti-cups

Nothing says “Happy New Year” like confetti!!!  These cakes, baked in cups, have confetti in every fun bite!

Confession: I am a confetti addict. I LOVE it. I don’t mind vacuuming it up for months after New Year’s Eve- at all! A few years ago we piled as much confetti as we could on my ceiling fan blades and at midnight we turned on the fan. Ah— SO much fun!!!!  You should totally try it. As a side note… on Cinco de May0 we also piled little candies on the fan and turned it on. We called it a “FAÑATA” ! 🙂 It hurt a little…but the memories!!!

Someday I want to be in Times Square on NYE…mainly for the confetti, but this year I will celebrate at my dad’s, and I have serious doubts about the level of confetti at our party…but he reads my blog, so maybe he will be inspired by my ideas! (*hint *hint dad…!)

Whether your party includes real confetti or not, these cups of cake will add some edible confetti to the celebration! Plus the strawberry and cream flavors… oh my.

Here’s how we made them: (printable recipe here)

INGREDIENTS: (makes 12-16 cups of cake, or 24 cupcakes)

  • One boxed strawberry cake mix (plus water, oil and eggs to make according to package)
  • 2 cups (seriously- or more…) confetti sprinkles
  • 2 sticks (1 cup) salted butter, softened
  • 2 sticks (1 cup) unsalted butter, softened
  • 3 cups powdered sugar
  • 2 teaspoons of clear vanilla
  • A little white food coloring to brighten up the frosting (if desired!)
  • 12-16 (8 oz.) party cups. I got mine at Target in the dollar section, but there are all sorts on Amazon- like these. (or make these as cupcakes with polka dot cupcake liners!!)

DIRECTIONS:

  • Preheat oven to 350F degrees and place cups on cookie sheets (preferably the sort with edges, to prevent sliding!)
  • Make cake according to package.
  • Mix in a cup of confetti sprinkles, and spoon batter into cups, filling them about 1/2 full.
  • Bake according to package directions for cupcakes- but add a little extra time since they are bigger, and test with a toothpick. When it comes out clean, they are done!

*Note: I was a little uncomfortable baking in these paper cups- so I kept a constant eye on them. I’m not sure if they can burn- I suppose it depends on the cup- and I read about people who made cupcakes in Starbucks coffee cups and just did it with no problems. Please be careful though- and use your good judgement about baking in paper cups. If you have any hesitation, use cute cupcake liners instead! 😉

  • Remove from oven and allow them to cool completely.
  • Make frosting by combining butters, powdered sugar and vanilla in a large mixing bowl. Beat on high until very light and fluffy (about 4-5 minutes). Add white coloring if desired.
  • Scoop frosting on top of each little cake and then press the frosting into a bowl filled with confetti sprinkles to coat the top completely.

confetti-cupcakes2 confetti-cups7

confetti-cups

My thoughts: These are a delicious and pretty way to say “Happy New Year!!!” I hope you love them as much as I do!!!

confetti-cups6

confetti-cups3

Other fun New Year’s treats to make for your party! (click on a photo to see the recipe)

Confetti cookies!Ball Drop CupcakesPink Champagne Cupcakes1Raspberry Confetti Kisses

Caramel Pecan Cup of Cake!

caramel-pecan-cupcakes

Take a plain cupcake and turn it into a layered work of art this Thanksgiving!

Everyone loves those beautiful layered trifle desserts. This recipe creates individual layered desserts. Aren’t they fun?? I used butter pecan cupcakes with yummy caramel sauce, pecans and homemade butter cream frosting. They were delicious! You can use this idea with literally ANY combination of flavors though! Get all the flavors of a “filled” cupcake- but SO much easier to assemble!

caramel-pecan-cupcakes

Plus, you can wrap them up in cello bags with pretty fall ribbon and ties for an elegant holiday dessert!

caramel-pecan-cupcakes

Can you tell that I enjoyed taking pictures of these!?!  Here is how we made them (printable recipe here):

INGREDIENTS: (Makes 24 cups of cake!)

Cake:

  • One boxed cake mix (plus oil, water and eggs to make according to package). I used Betty Crocker’s Butter Pecan cake mix. It was AMAZING!!!!!!!

Caramel sauce:

  • 32 unwrapped Kraft caramels
  • 1 can (14 oz) sweetened condensed milk
  • 1/2 cup (1 stick) butter, softened

Buttercream:

  • 4 sticks of butter (softened)
  • 3 cups of powdered sugar
  • 1 teaspoon of vanilla
  • You will also need 4-5 pecan halves per cup- and small clear Solo cups!

DIRECTIONS:

  • Make cake mix according to package and bake in 24 cupcake tins as directed by box (spray the pans with non-stick spray if you don’t use liners!). Cool.
  • Make caramel sauce by placing caramels, butter (1 stick) and sweetened condensed milk into a saucepan.
  • Melt over stove, stirring constantly, until caramels are entirely melted and smooth. 
  • Cool and place in a zip-top bag.
  • Make buttercream by placing 4 sticks of softened butter, powdered sugar and vanilla in a large mixing bowl. 
  • Use hand mixer to beat on high for 2-3 minutes until light and fluffy. 
  • Place frosting in a zip-top bag that has been fitted with a decorating tip. Set aside.
  • To assemble, cut a cupcake in half. Pipe a little bit of frosting into bottom of cup and press cupcake bottom in cup.
  • Clip a corner off the bag of caramel and pipe along edge of cup on top of cupcake bottom. 

caramel-pecan-cupcakescaramel-pecan-cupcakes

  • Press pecans into caramel along edges
  • Pipe a little frosting between pecans (only use a little- mine had a touch too much icing in the middle- you could even skip this step and just have frosting on the bottom and top)
  • Place top of cupcake on, pipe a little more caramel on top of cupcake, and pipe a swirl of frosting on top. 
  • Add a pecan and decorate as desired. I used cute icing leaves by Wilton that I found at Michael’s.

caramel-pecan-cupcakescaramel-pecan-cupcake

  • You’ll want to wrap these up or put them in an air-tight container to keep them fresh. I chose cello bags and ribbon ties- and they made me smile 🙂 These stay fresh for 3-4 days when covered.

caramel-pecan-cupcakes

My thoughts: These got RAVE reviews. Personally, I thought they were a little sweet and I wished I had used less frosting (plus I ran out of frosting with 3 to go!) so use a little less than pictured (or make a little more…if you really like frosting!!) One of my friends HIGHLY recommended crumbled bacon as a layer in these 🙂 The GREAT news is that you literally can add anything you want to make these into your family’s favorite dessert!  Enjoy!!  ~r

caramel-pecan-cupcakes

Other yummy pecan and/or caramel treats here on Easybaked! (click on a photo to see the recipe)

Praline Cupcakes1Turtle Bundt CakeMarshmallow Turtle Pops!Turtle Cheesecake

Fall Marshmallow Cakes

Posted on

marshmallow cake

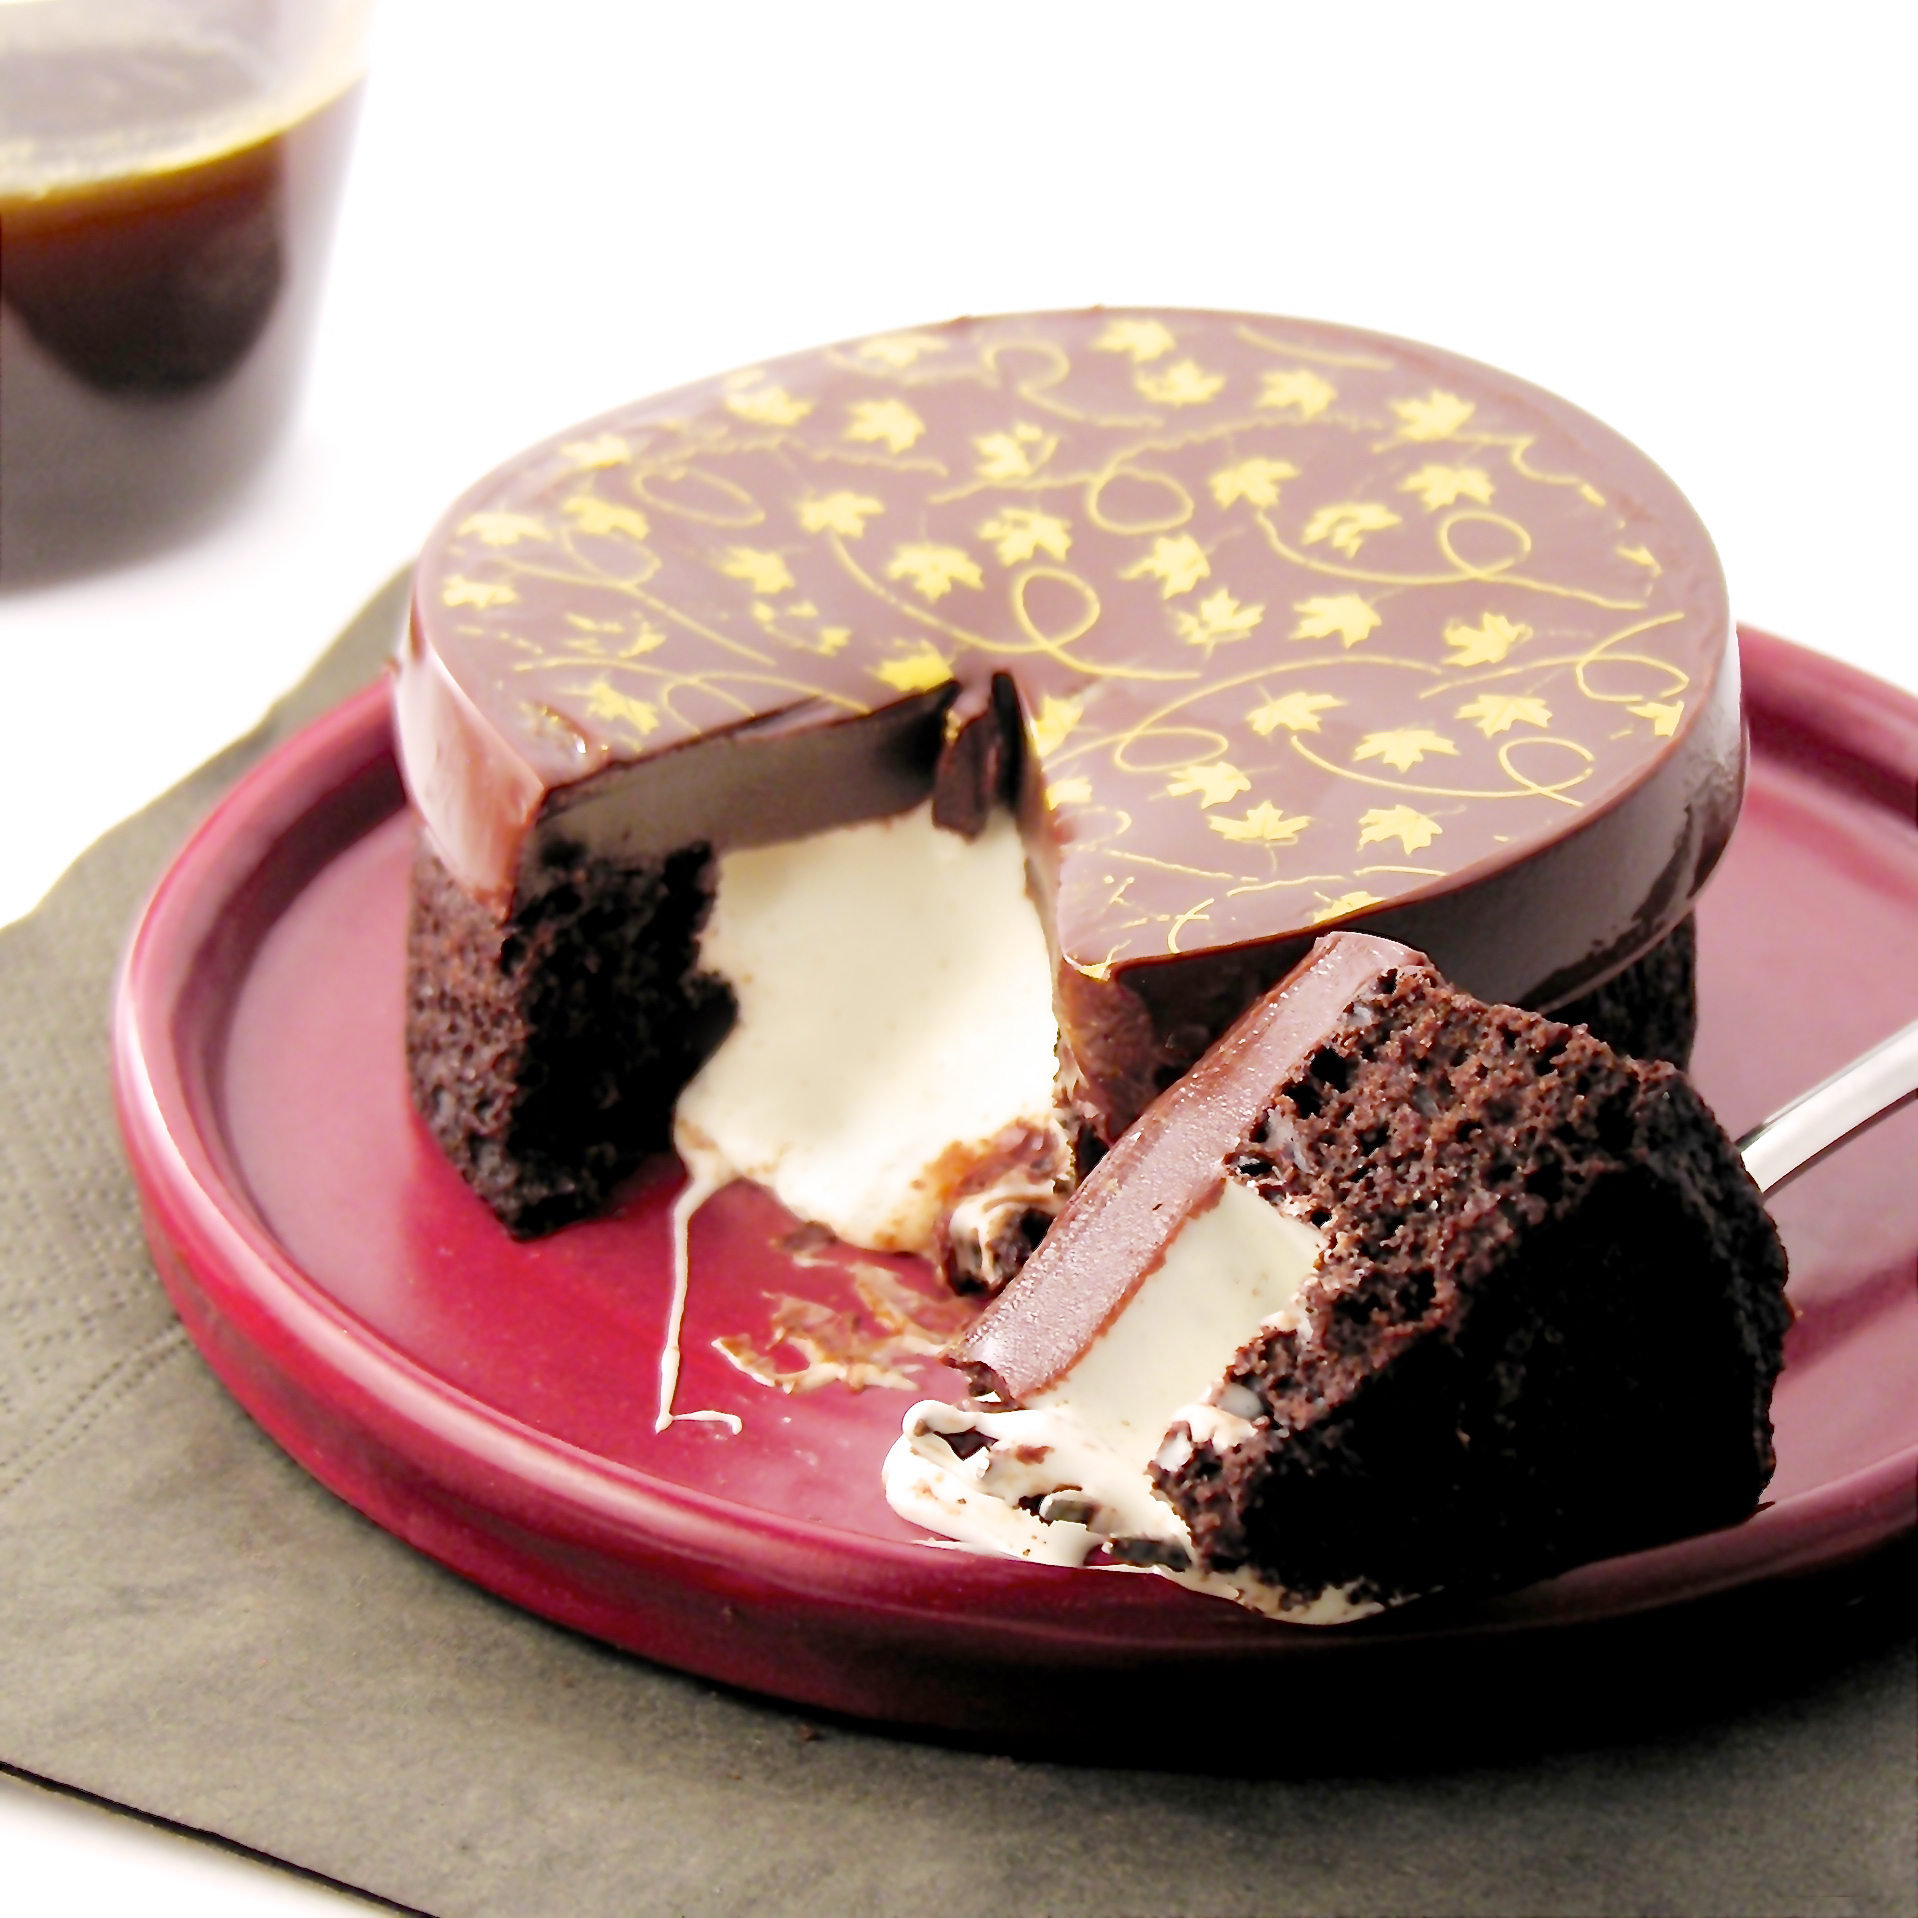
These delicious little chocolate cakes are filled with creamy sweet marshmallow, and decorated to make everyone at your fall table smile!

I’ve been craving HoHos lately. Do they even still make those? Seems like Hostess went out of business awhile back…? Anyway- or those Little Debbie Swiss Cake Rolls. Both of those desserts remind me of high school lunches. My friends and I would sit at lunch, peel them apart in layers, and talk about boys and such while we ate them.

Anyway… so I started thinking about a way to do a grown-up version of these flavors. My friend Angie gave me SUCH a fun pan- it makes little cakes with a cavity in the center that holds filling. See what I mean HERE. I’ve used these pans before here on Easybaked and they seemed perfect for this idea. Instead of topping cake with cake—- I topped each cake with a thick layer of chocolate glaze that was decorated with chocolate transfers.

I love how they turned out! This was my 1st time using transfers, and they are a little fussy- but the wow factor….!!!!!

marshmallow cake

Mmmm……!! So there is some special equipment to make these exactly like I did (cake pans, silicone molds to make the top chocolate layer). If you hate to purchase the pans and chocolate mold, make these as cupcakes. Fill them with marshmallow and pour the glaze over the top. Or make this as a layer cake maybe- with the marshmallow in the middle and the glaze drizzled over the top?

However you choose to make it, the flavors are wonderful together!

Here’s how we put these together. (Printable recipe here)

Ingredients (makes 8 mini cakes)

Cake:

  • 1 chocolate cake mix (plus water, oil and eggs to make according to package)

Filling:

  • 2 cups marshmallow creme
  • 1/2 cup butter, softened
  • 1/4 cup powdered sugar

Topping:

  • 2 cups chocolate chips
  • 12 tablespoons of butter
  • 1 large (12″x16″) chocolate transfer sheet (here is where I got mine)

Directions:

  • Start with the chocolate toppers. To add a chocolate transfer on top, cut 8 circles in a 4 inch diameter. I traced the pans with a marker and the cut the transfer just inside the line. Place the smooth side down and the rough side up inside a 4 inch silicone cake mold (I got mine here, in the medium size).
  • Place chocolate chips and 12 tablespoons of butter into a microwave safe dish and melt in 30 second increments, stirring between until smooth.
  • Gently spoon chocolate over the top of each transfer until it is covered completely. 
  • Freeze for about 20 minutes- until completely hard.
  • Gently peel away the silicone mold, leaving the chocolate. Keep this chocolate in the freezer until use.

chocolate transferschocolate transfers

  • Repeat process (re-melt chocolate glaze if needed) until you have 8 toppers in the freezer.
  • Make cake according to mix and bake in 4 pans as directed on box. Only fill the pans 1/2 full, or they will overflow. And grease the pans generously!!! My 1st batch stuck a little.
  • You will need to bake two batches to get your 8 cakes. Cool completely.
  • Make filling by beating together the marshmallow creme and the butter until smooth and light (about 2 minutes).
  • Slowly add the powdered sugar, beating on low until it is fully mixed in, and then increasing to high and beating until light and fluffy (another 2 minutes or so).
  • Place filling into a zip top bag and zip it tightly closed. Clip a corner off and squeeze filling into each open cake cavity. 
  • Gently set a chocolate topper over the filling, pressing it lightly against the filling. As the topper warms to room temperature, it will soften and stick more firmly to the cake. 
  • Gently peel away the plastic from the top of the transfer.


marshmallow cakemarshmallow cake

  • Keep at room temperature until serving. Kept covered, these can be stored for two to three days.
  • Enjoy!

marshmallow-cake

My thoughts: If you don’t mind the extra equipment and a little bit of time, these are positively the most elegant and delicious little cakes! I had so much fun serving these as individual desserts- and everyone loved them. If what you are aiming for is extra special- this is your dessert. If you need your chocolate fix right now? Get those Little Debbies!!! 😉 ~r

Other fall treats here on Easybaked:

Pecan Pie CupcakesPumpkin Pie Cutout cookies!Honey cookies cut into leaf shapes!Acorn Candy

A Collection of 10 Halloween Treats!

Posted on

halloween dessert collection

toxic slime cupcakes

Mummy Oreo Pops

spider web cookies

Candy Corn Cups

Halloween Cake

halloween swirled cookies

broken glass cupcakes

halloween ginger cookies

spider egg cupcakes

wormy cupcakes

My thoughts: These are some of my favorites!!!! Click on a photo to see each recipe. Enjoy!!!  ~r

10 Fun Dessert Recipes for Father’s Day!

Posted on

Golf Cupcakes!!!!

Father’s Day is upon us! I love this day. I have such a great dad- he is adventurous, wise, funny and so much fun to spend time with. I’ve created many recipes here at Easybaked on his behalf, and thought I would gather them all into one little post for you!

Dads come in all varieties with all sorts of interests and hobbies. If your dad is a golfer, try the Hole-in-one Cupcakes pictured above. They use a Lindt chocolate truffle as a golf ball- which is cute and SO yummy eaten with that cupcake!

If your dad is the grill-master of your family, you might make him BBQ Cupcakes– or Hamburger Cookies– or maybe both!

BBQ Grill Cupcakes!!

Hamburger Cookie!

He loves football??? Hopefully he loves the Green Bay Packers… the only team truly worth cheering for….!

Make him delicious dark chocolate Football Cookies, fun little First Down Oreo Pops, OR Cheesehead Cupcakes (Go Packers!) At the very least you can entertain him with stories of how you use your tire pressure gauge with that last recipe…

Chocolate Football Cookies!


Football Field Oreo Pops


Cheesehead Cupcakes!!!!!

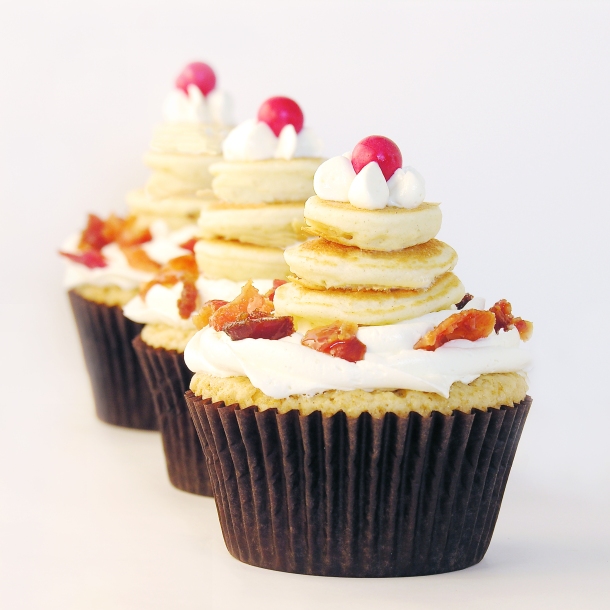
Maybe your dad is a foodie. He loves his bacon and doughnuts! We’ve got both of those covered! Our Pancake and Bacon Cupcakes are actually incredibly delicious! I was skeptical- and I made them- but they got five stars in my book! We also have some pretty amazing Doughnut Cupcakes– that actually taste like doughnuts!

Pancake Cupcakes!!!!


Cream filled doughnut cupcake

Finally, for the fisherman fathers out there….. Fishing Bobber Cupcakes– that use Lindt Truffles as an adorable bobber on waves of blue icing- and Fishing Pond Cupcakes– stocked with little goldfish crackers!

Bobber Cupcakes1


Fish Pond Cupcakes9

That makes 10 incredibly fun, unique and delicious recipes! But I need to add one more… in honor of my dad, who spent his life working in a medical laboratory and literally spent an hour this morning over breakfast telling me all the horrible things they used to have to mouth-pipette back when he started in the profession in the 1960’s… (like formaldehyde… as one of the less nasty things…)

For you dad…(and all scientist dads out there!) Toxic Sludge Cupcakes! These are unbelievable delicious… that green goo is white chocolate pudding and it is SO good inside these cupcakes… makes me smile 🙂

Toxic Slime-filled Cupcakes!

Happy Father’s Day! I hope you have a chance to bake some sweet treats to celebrate your dad this weekend!  ~r

13422342_10153594155067513_6491943221366895816_o

Dad and my sweet puppy this morning **smile**

Some of my dad’s other favorites through the years:

Pecan Pie CupcakesKey Lime Cupcakes!Caramel Fudge Brownies!!frozen s'more cups