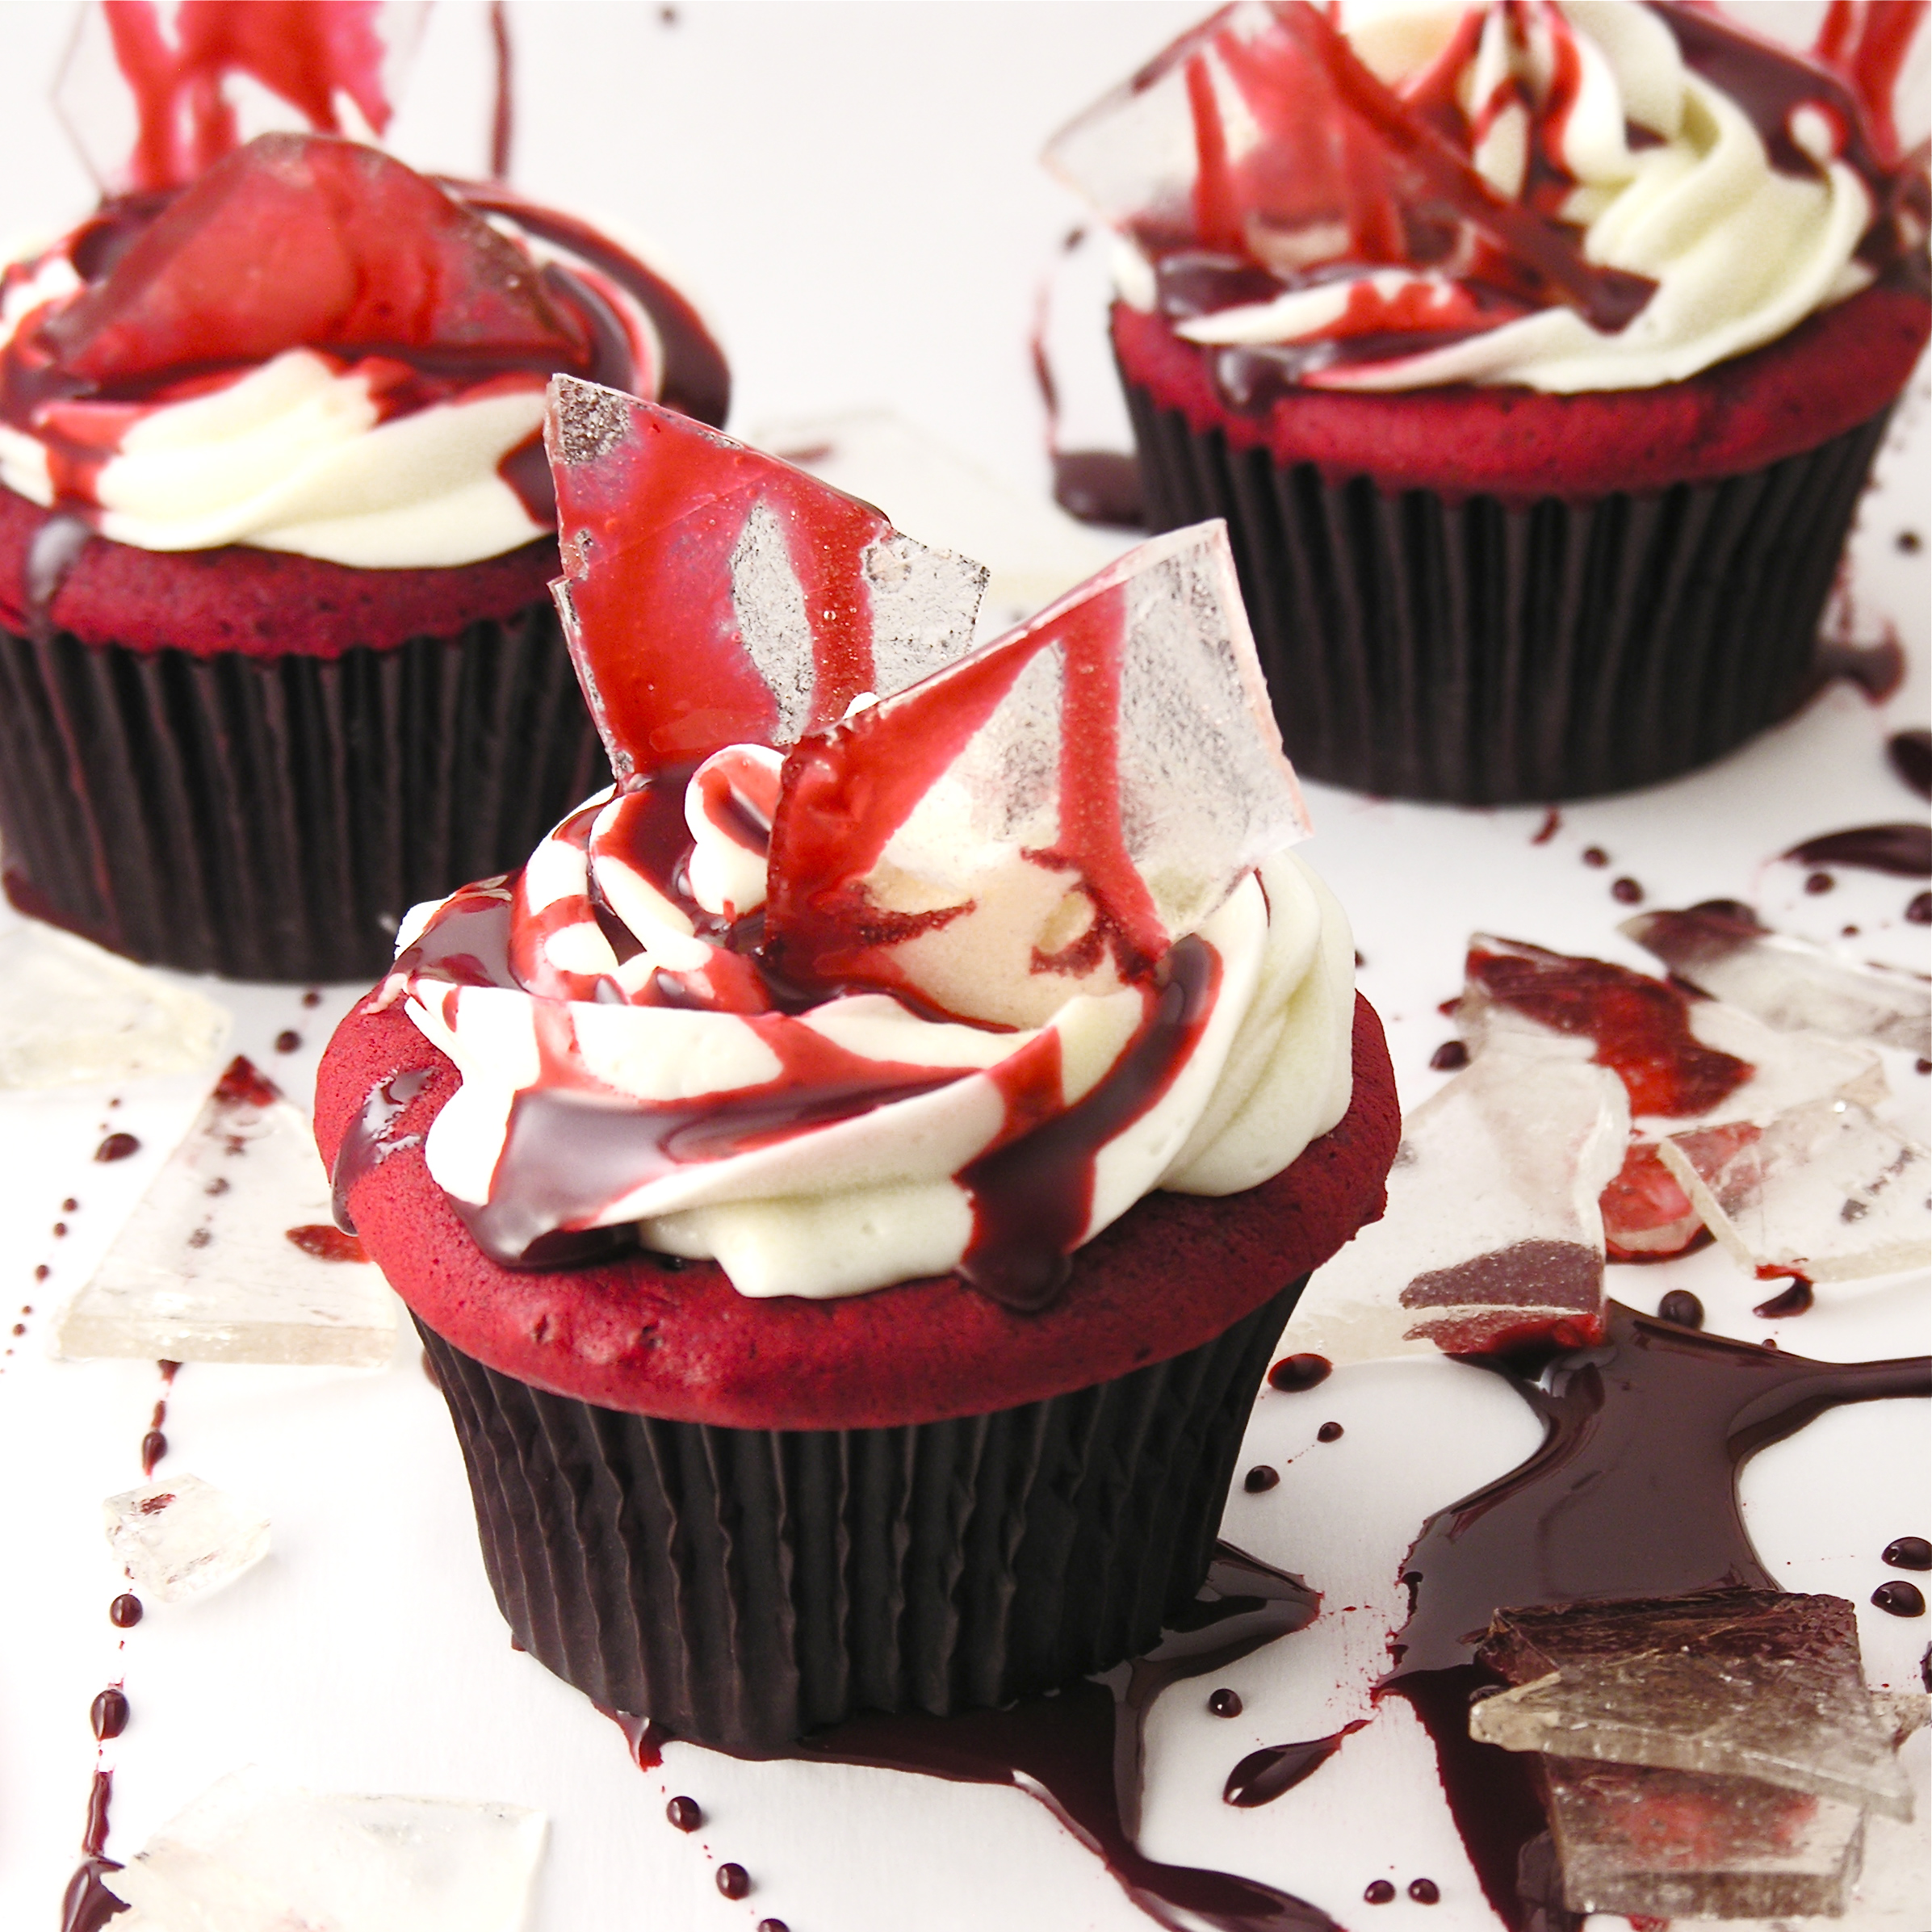

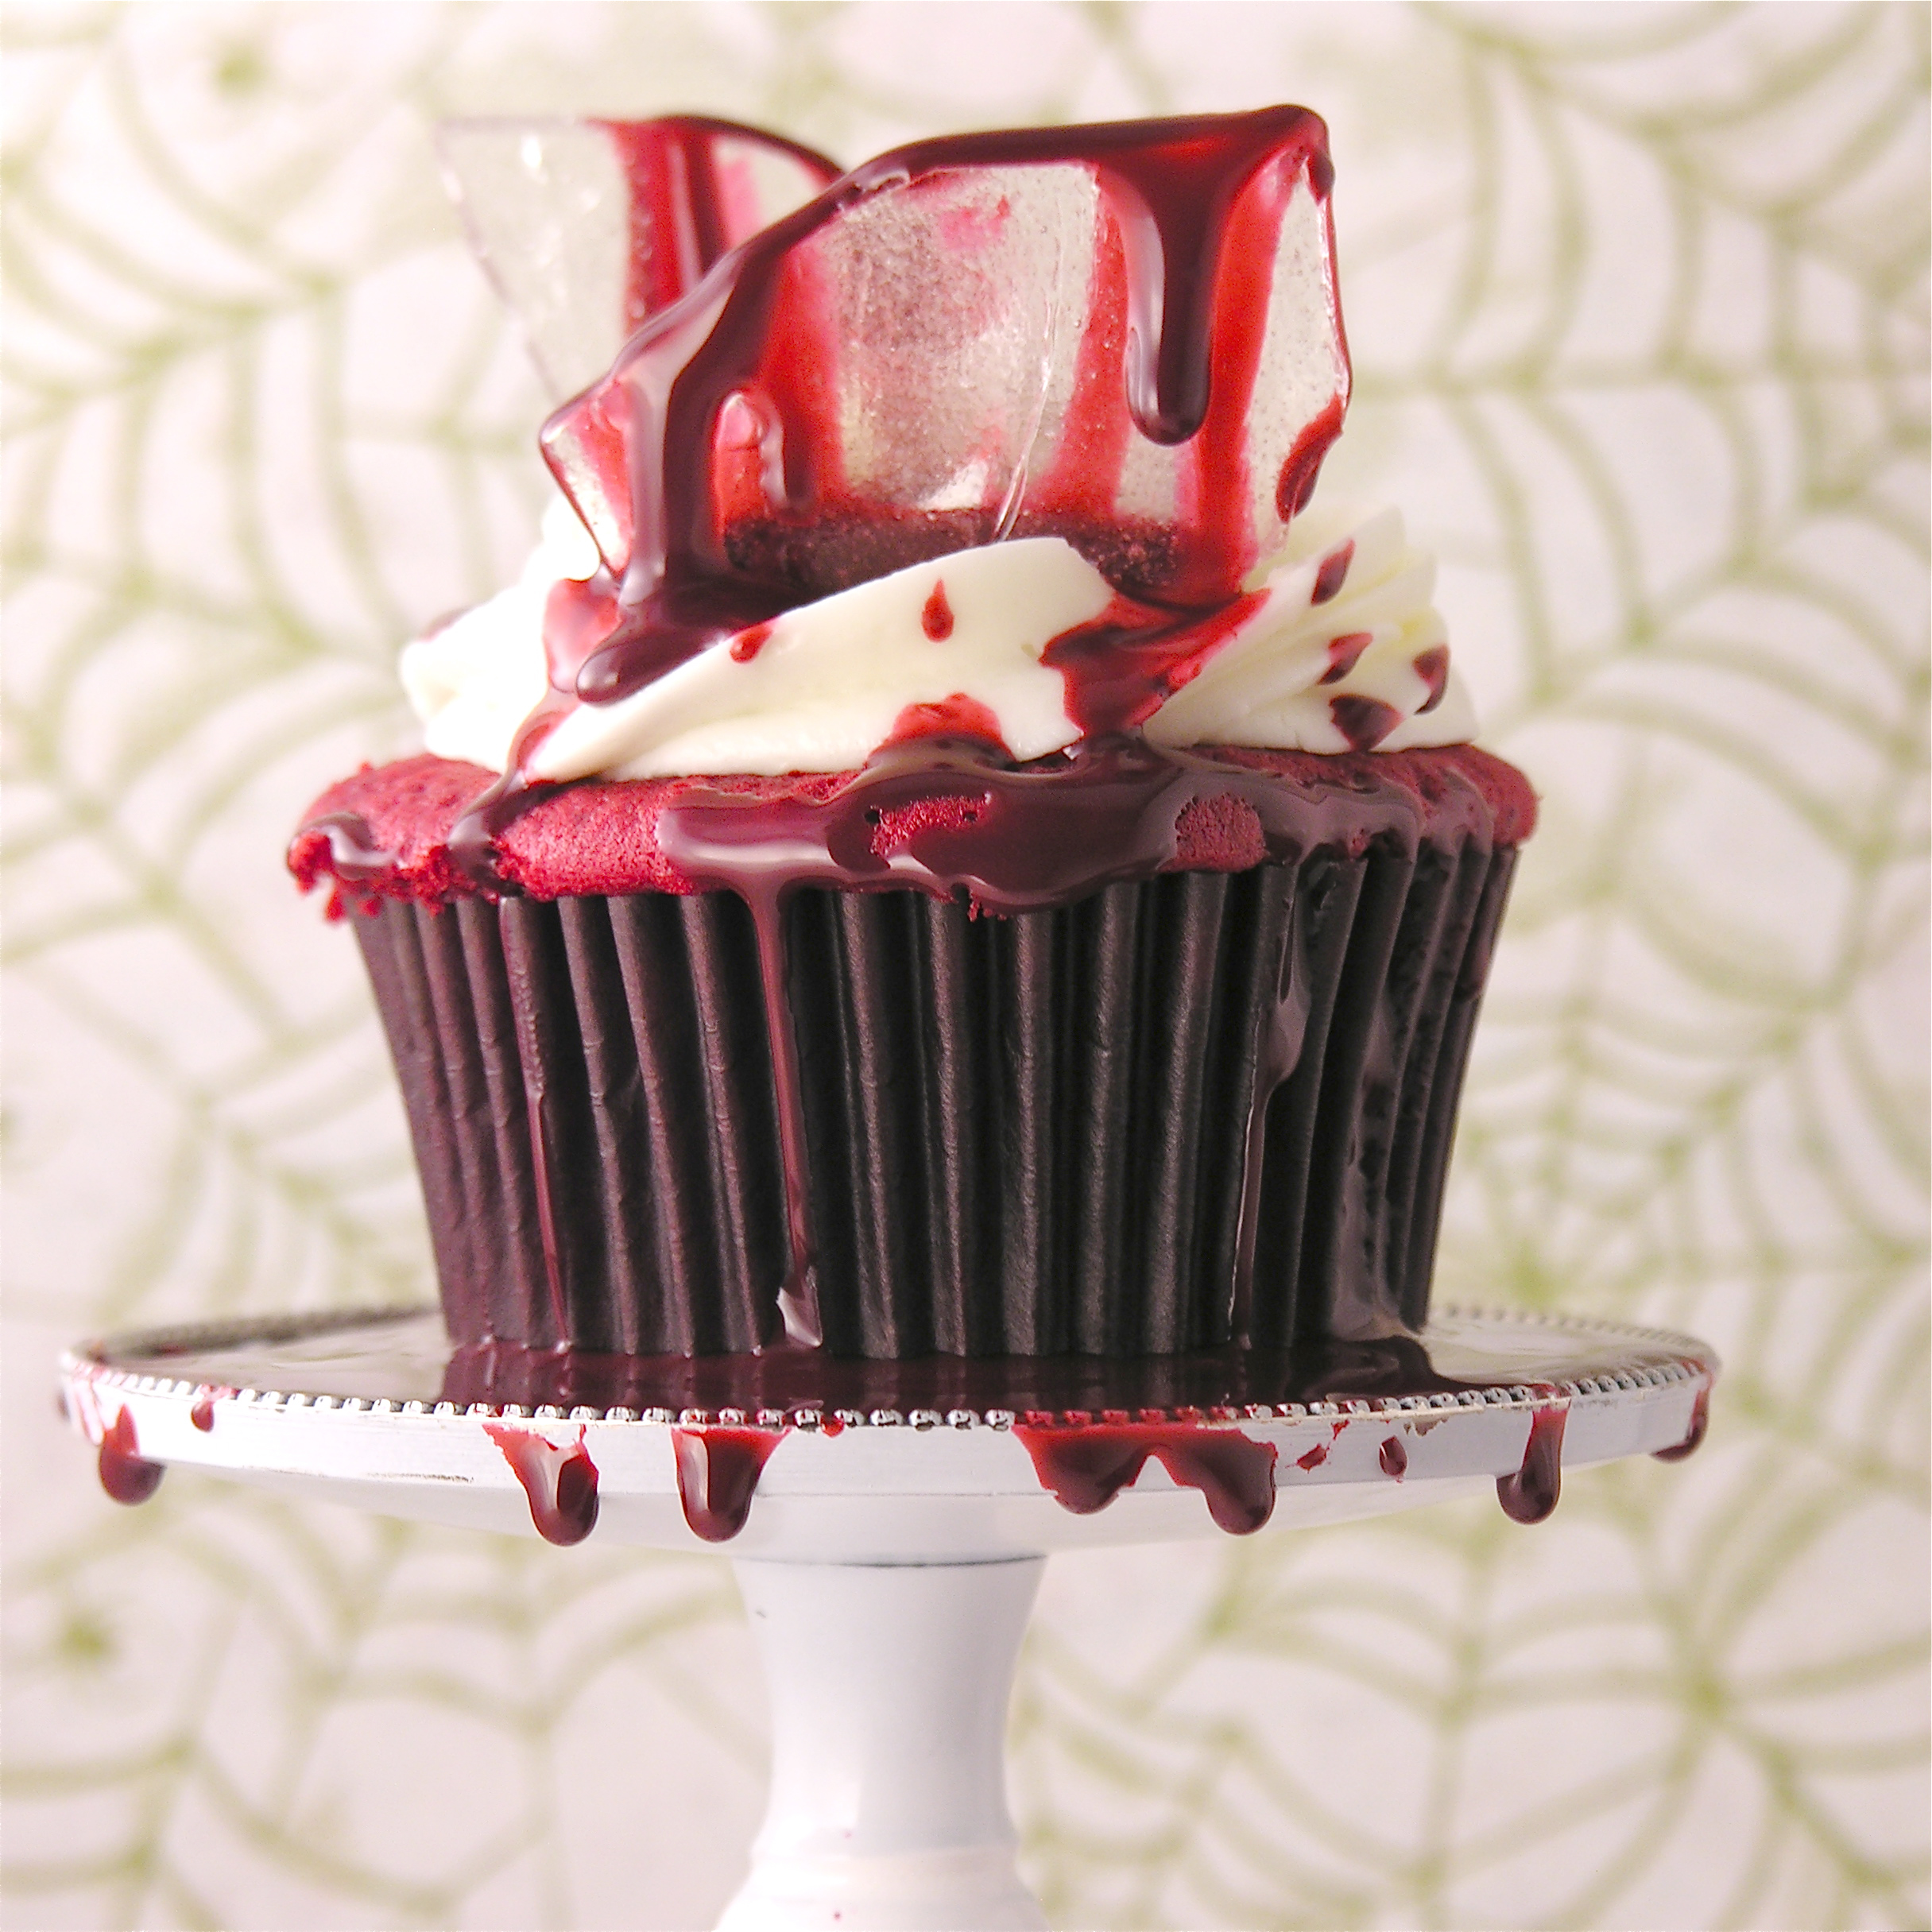
These delicious Red Velvet cupcakes with smooth cream cheese icing are topped with all the makings of a horror movie (or, according to my friend Ricky, a Stephen King novel!). These are just in time for your creepy October festivities!!
[and if you aren’t a fan of the decorations, they are an amazing cupcake all by themselves!]
Ok. These were really fun to make. I’d seen SO many examples of these online– this is not an original idea. However, I made it my goal to create these in the easiest possible way, with the fewest steps and NO candy thermometers! Not original, but EASY!!!

Note: I did a cake mix fix by swapping out the water and oil for milk and butter and adding one extra egg. It was SO good! (Thanks for the idea Rex!) Heavy and moist cupcakes with exceptional flavor. I highly recommend it, but you can certainly make the mix as directed for these cupcakes.
Here’s how they are made: (printable recipe)
INGREDIENTS:
The cupcakes:
- One boxed Red Velvet cake mix
- Milk (in the same amount as the water required by the mix)
- Eggs (in the same amount as required by the mix PLUS one extra egg)
- Butter (twice the amount of oil required by mix- for example if the box calls for 1/2 cup of oil you would use 1 cup of butter). Measure and then melt before adding to mix.
The icing:
- 1 package (8 oz) cream cheese (softened)
- 1/2 cup of butter (softened)
- 1 teaspoon vanilla
- dash of salt
- 4 cups powdered sugar
- 1 cup white chocolate chips (melted)
The glass candy:
- 1 cup of granulated sugar
- 1/2 cup of light corn syrup
- 1 teaspoon of clear flavoring (I used raspberry)
The edible blood:
- 1 (14 oz.) can of sweetened condensed milk
- Red gel food coloring
- Black gel food coloring
- 1 teaspoon of clear flavoring (I used raspberry)
DIRECTIONS:
I recommend making the decorations 1st (the glass and “blood”) and keeping them until just before your party to decorate with. They will both keep for several days, so you can make them ahead of time.
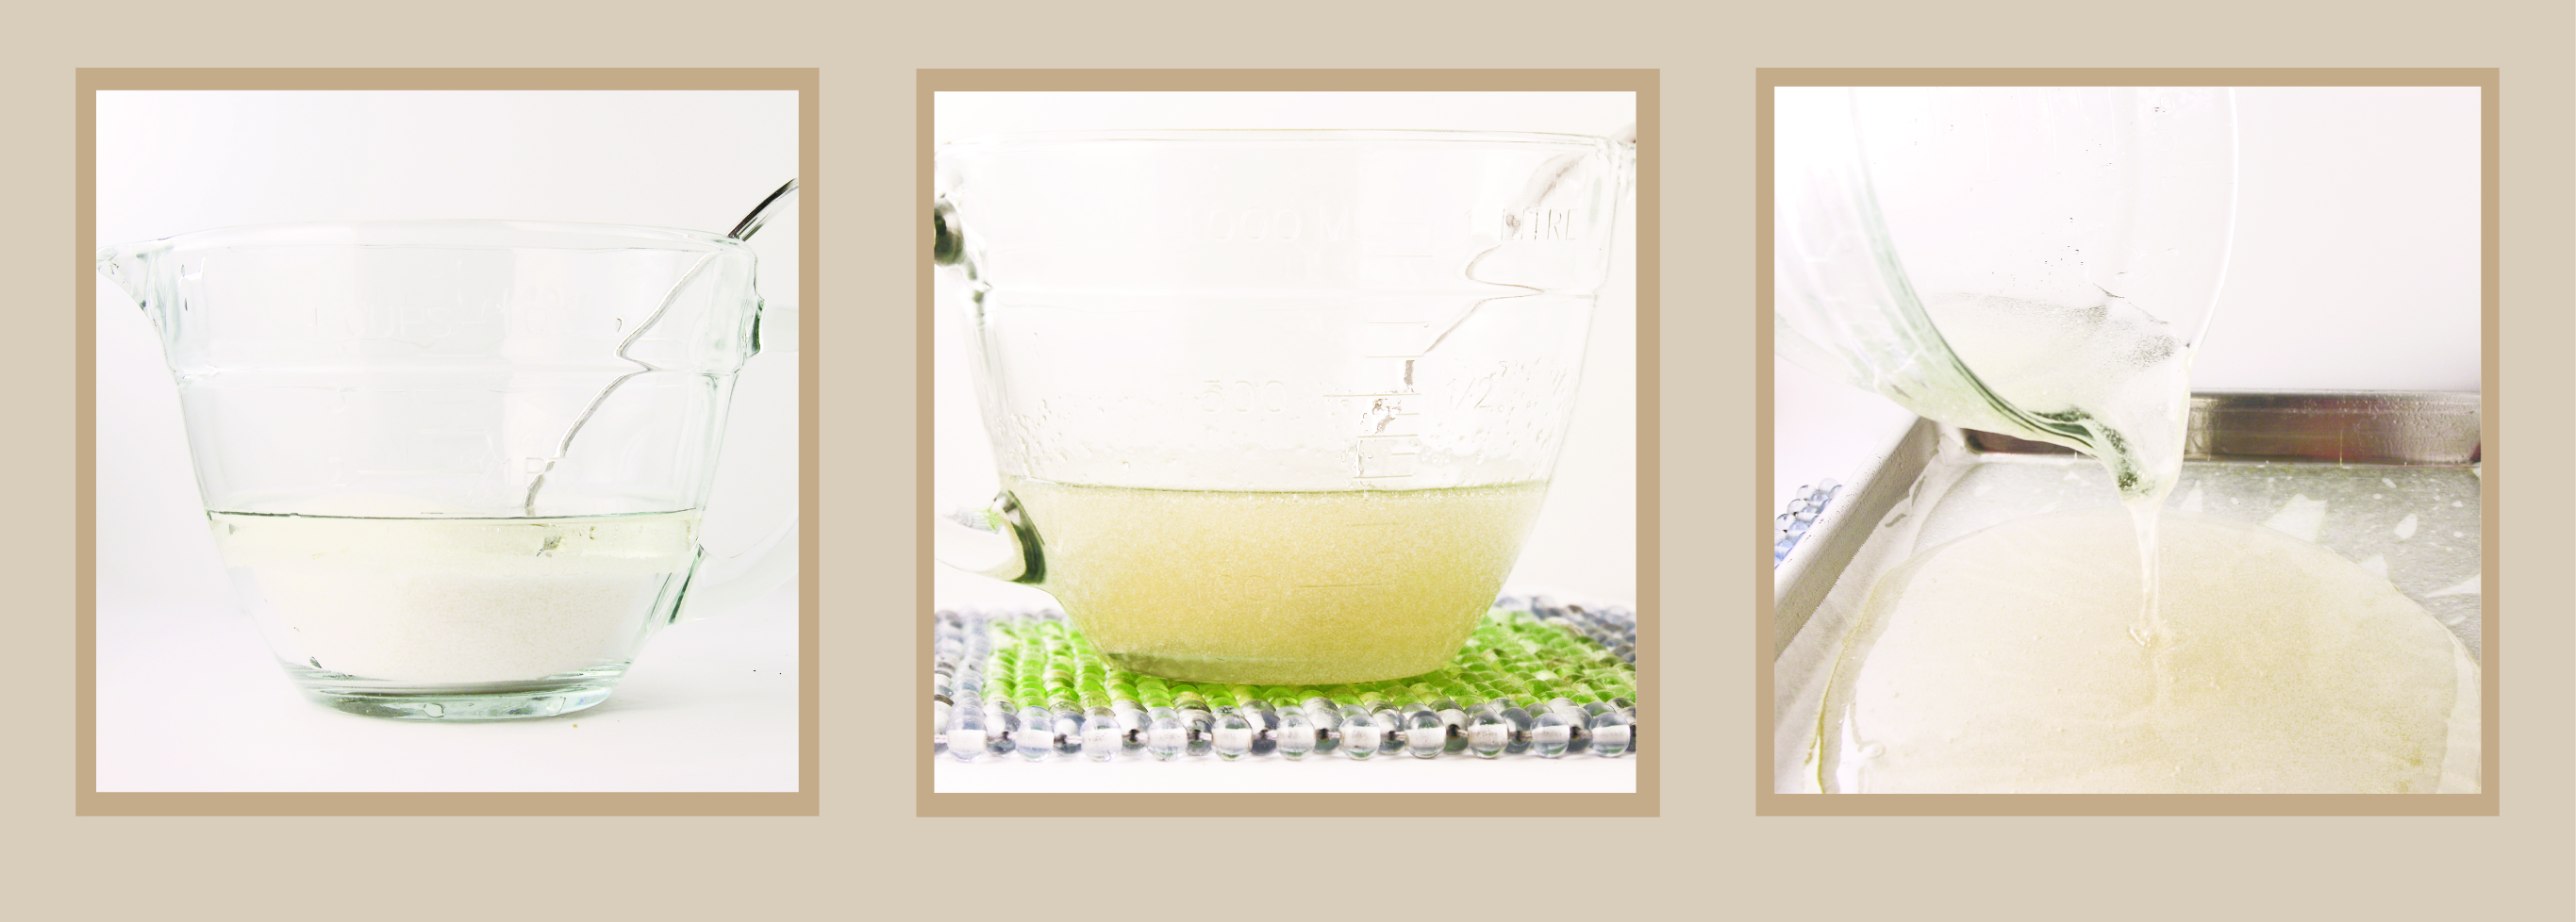
Candy Glass:
- Cover a cookie sheet with wax paper and spray the wax paper liberally with non-stick spray.
- Place granulated sugar and corn syrup into a microwave safe bowl and mix them together.
- Cover bowl with plastic wrap.
- Microwave on high for 3 minutes.
- Remove from Microwave and CAREFULLY remove plastic wrap (beware of hot steam!)
- Stir well and re-cover with fresh plastic wrap.
- Microwave on high for another 3 minutes, but watch mixture after about 2 minutes. Because microwaves vary, you need to watch it to make sure it doesn’t start to turn color. If you cook it too long it will be an amber color instead of the nice clear glass you want. My microwave was perfect at 2 and 1/2 minutes.
- CAREFULLY remove from microwave and CAREFULLY remove plastic wrap.
- This is soooo hot and sticky– using caution to not touch any of the hot candy, pour it out over the greased wax paper and allow it to sit and harden completely (at least a couple of hours)
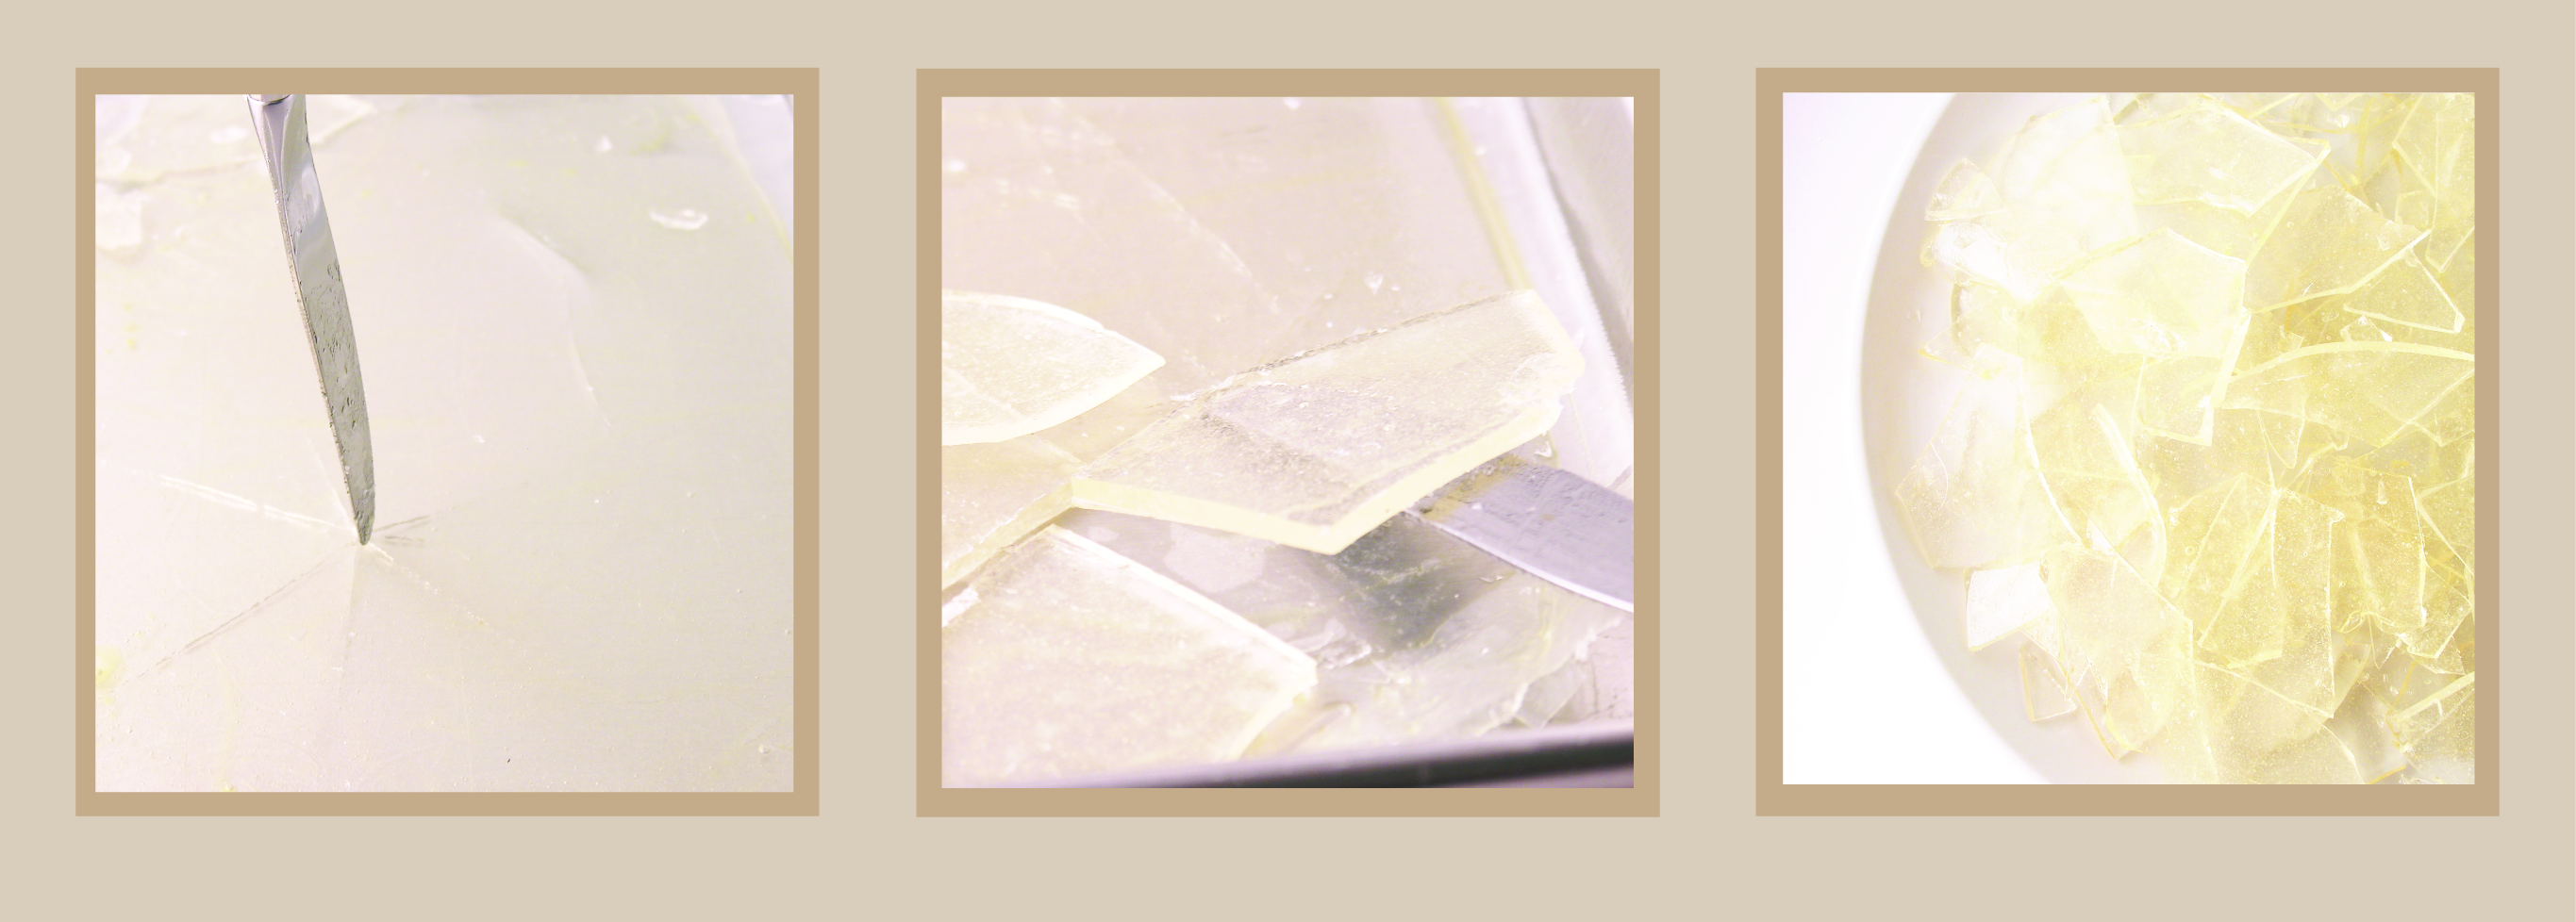
- When candy glass is hard, tap a knife tip into glass to break it into sharp pieces.
- Carefully (the pieces are actually sharp!) push pieces up off of wax paper and onto a plate.
- Candy glass can be kept in a zip top bag or an air tight container for about a week. Moisture (including the moisture from the frosting on the cupcakes) will eventually start to break the glass down.
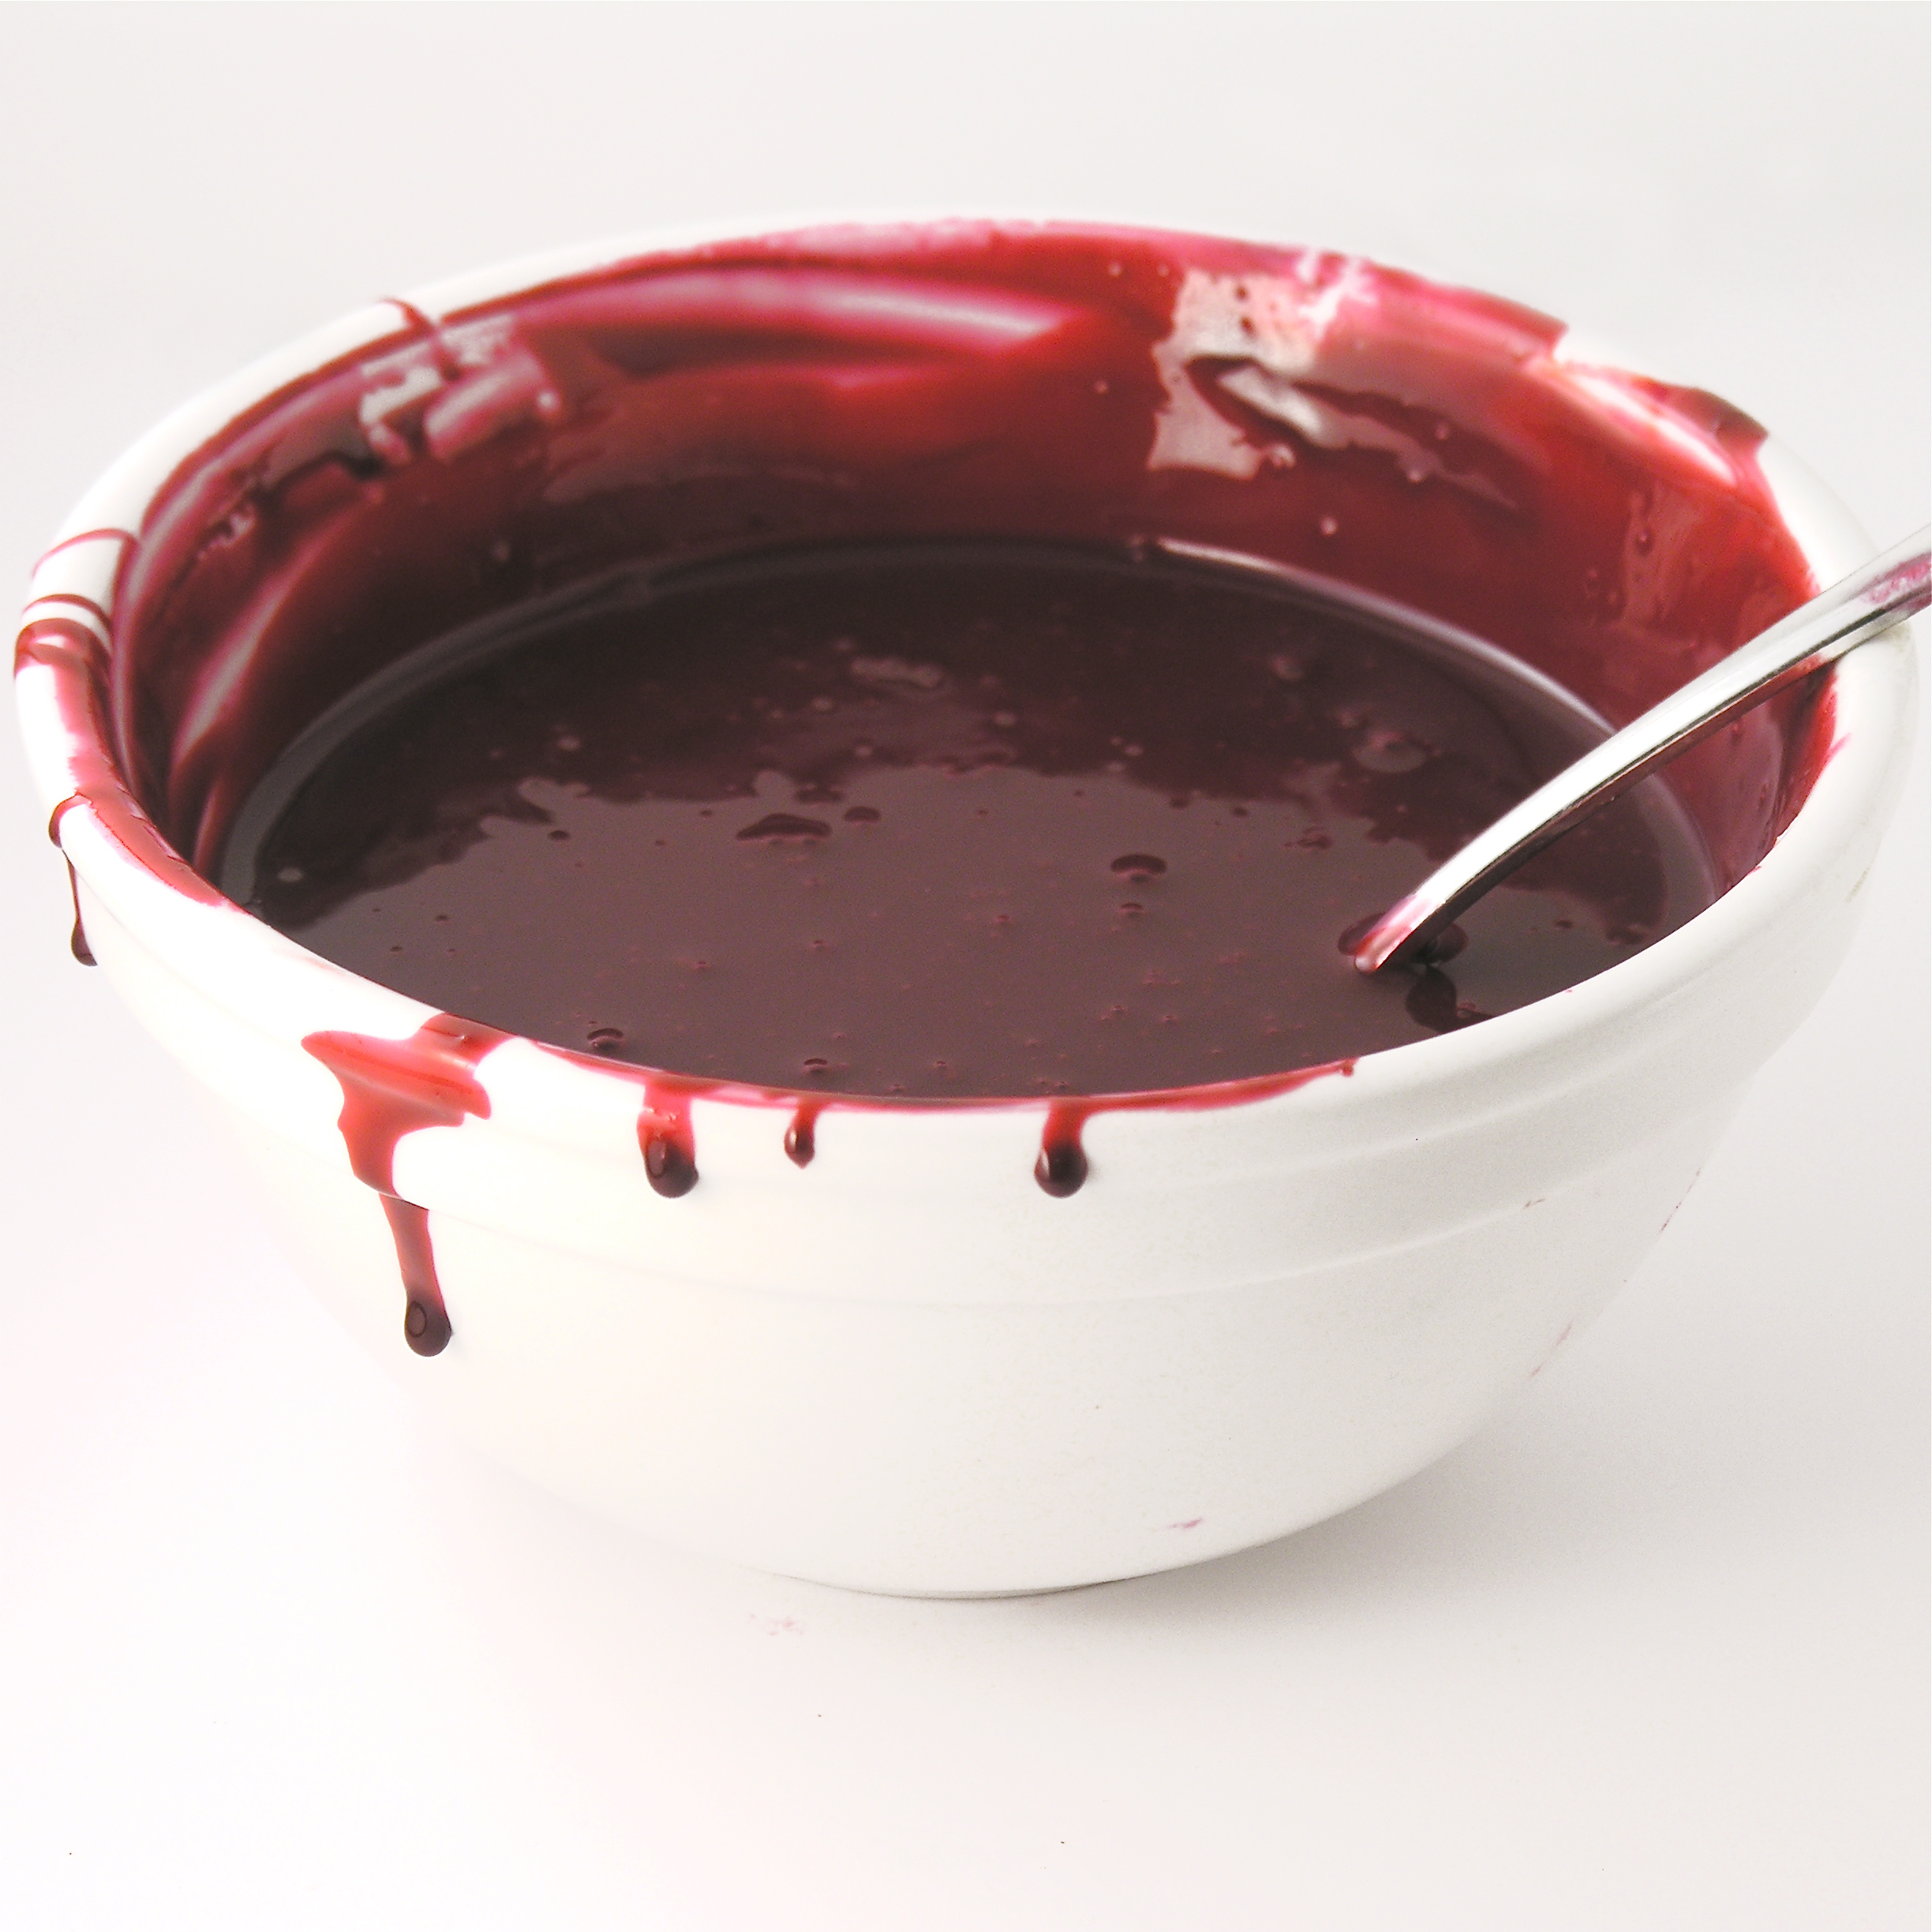
Edible Blood:
- Place sweetened condensed milk into a small bowl and mix in red food color gel and flavoring until you get a brilliant red color. Add a TINY bit of black (use a toothpick- black goes a long way!).
- Mix and adjust until you get a nice dark red color.
- Spoon “blood” into a zip-top bag and seal TIGHTLY. Keep refrigerated until use.
 Cupcakes:
- Make cake mix according to box (swapping in cake mix “fix” ingredients if desired)
- Divide equally into 24 cupcake liners in cupcake tins.
- Bake at 350F degrees according to times on box.
- Remove cupcakes from oven and cool completely.
Frosting:
- On medium speed, beat together cream cheese, butter, vanilla, and salt until creamy.
- Gradually add powdered sugar, beating until smooth.
- Melt white chocolate chips in the microwave in 30 second increments, stirring between, until smooth.
- Add melted white chocolate to icing and beat on low until completely combined.
- Place in a zip-top bag fitted with a decorating tip and pipe frosting on top of cooled cupcakes.
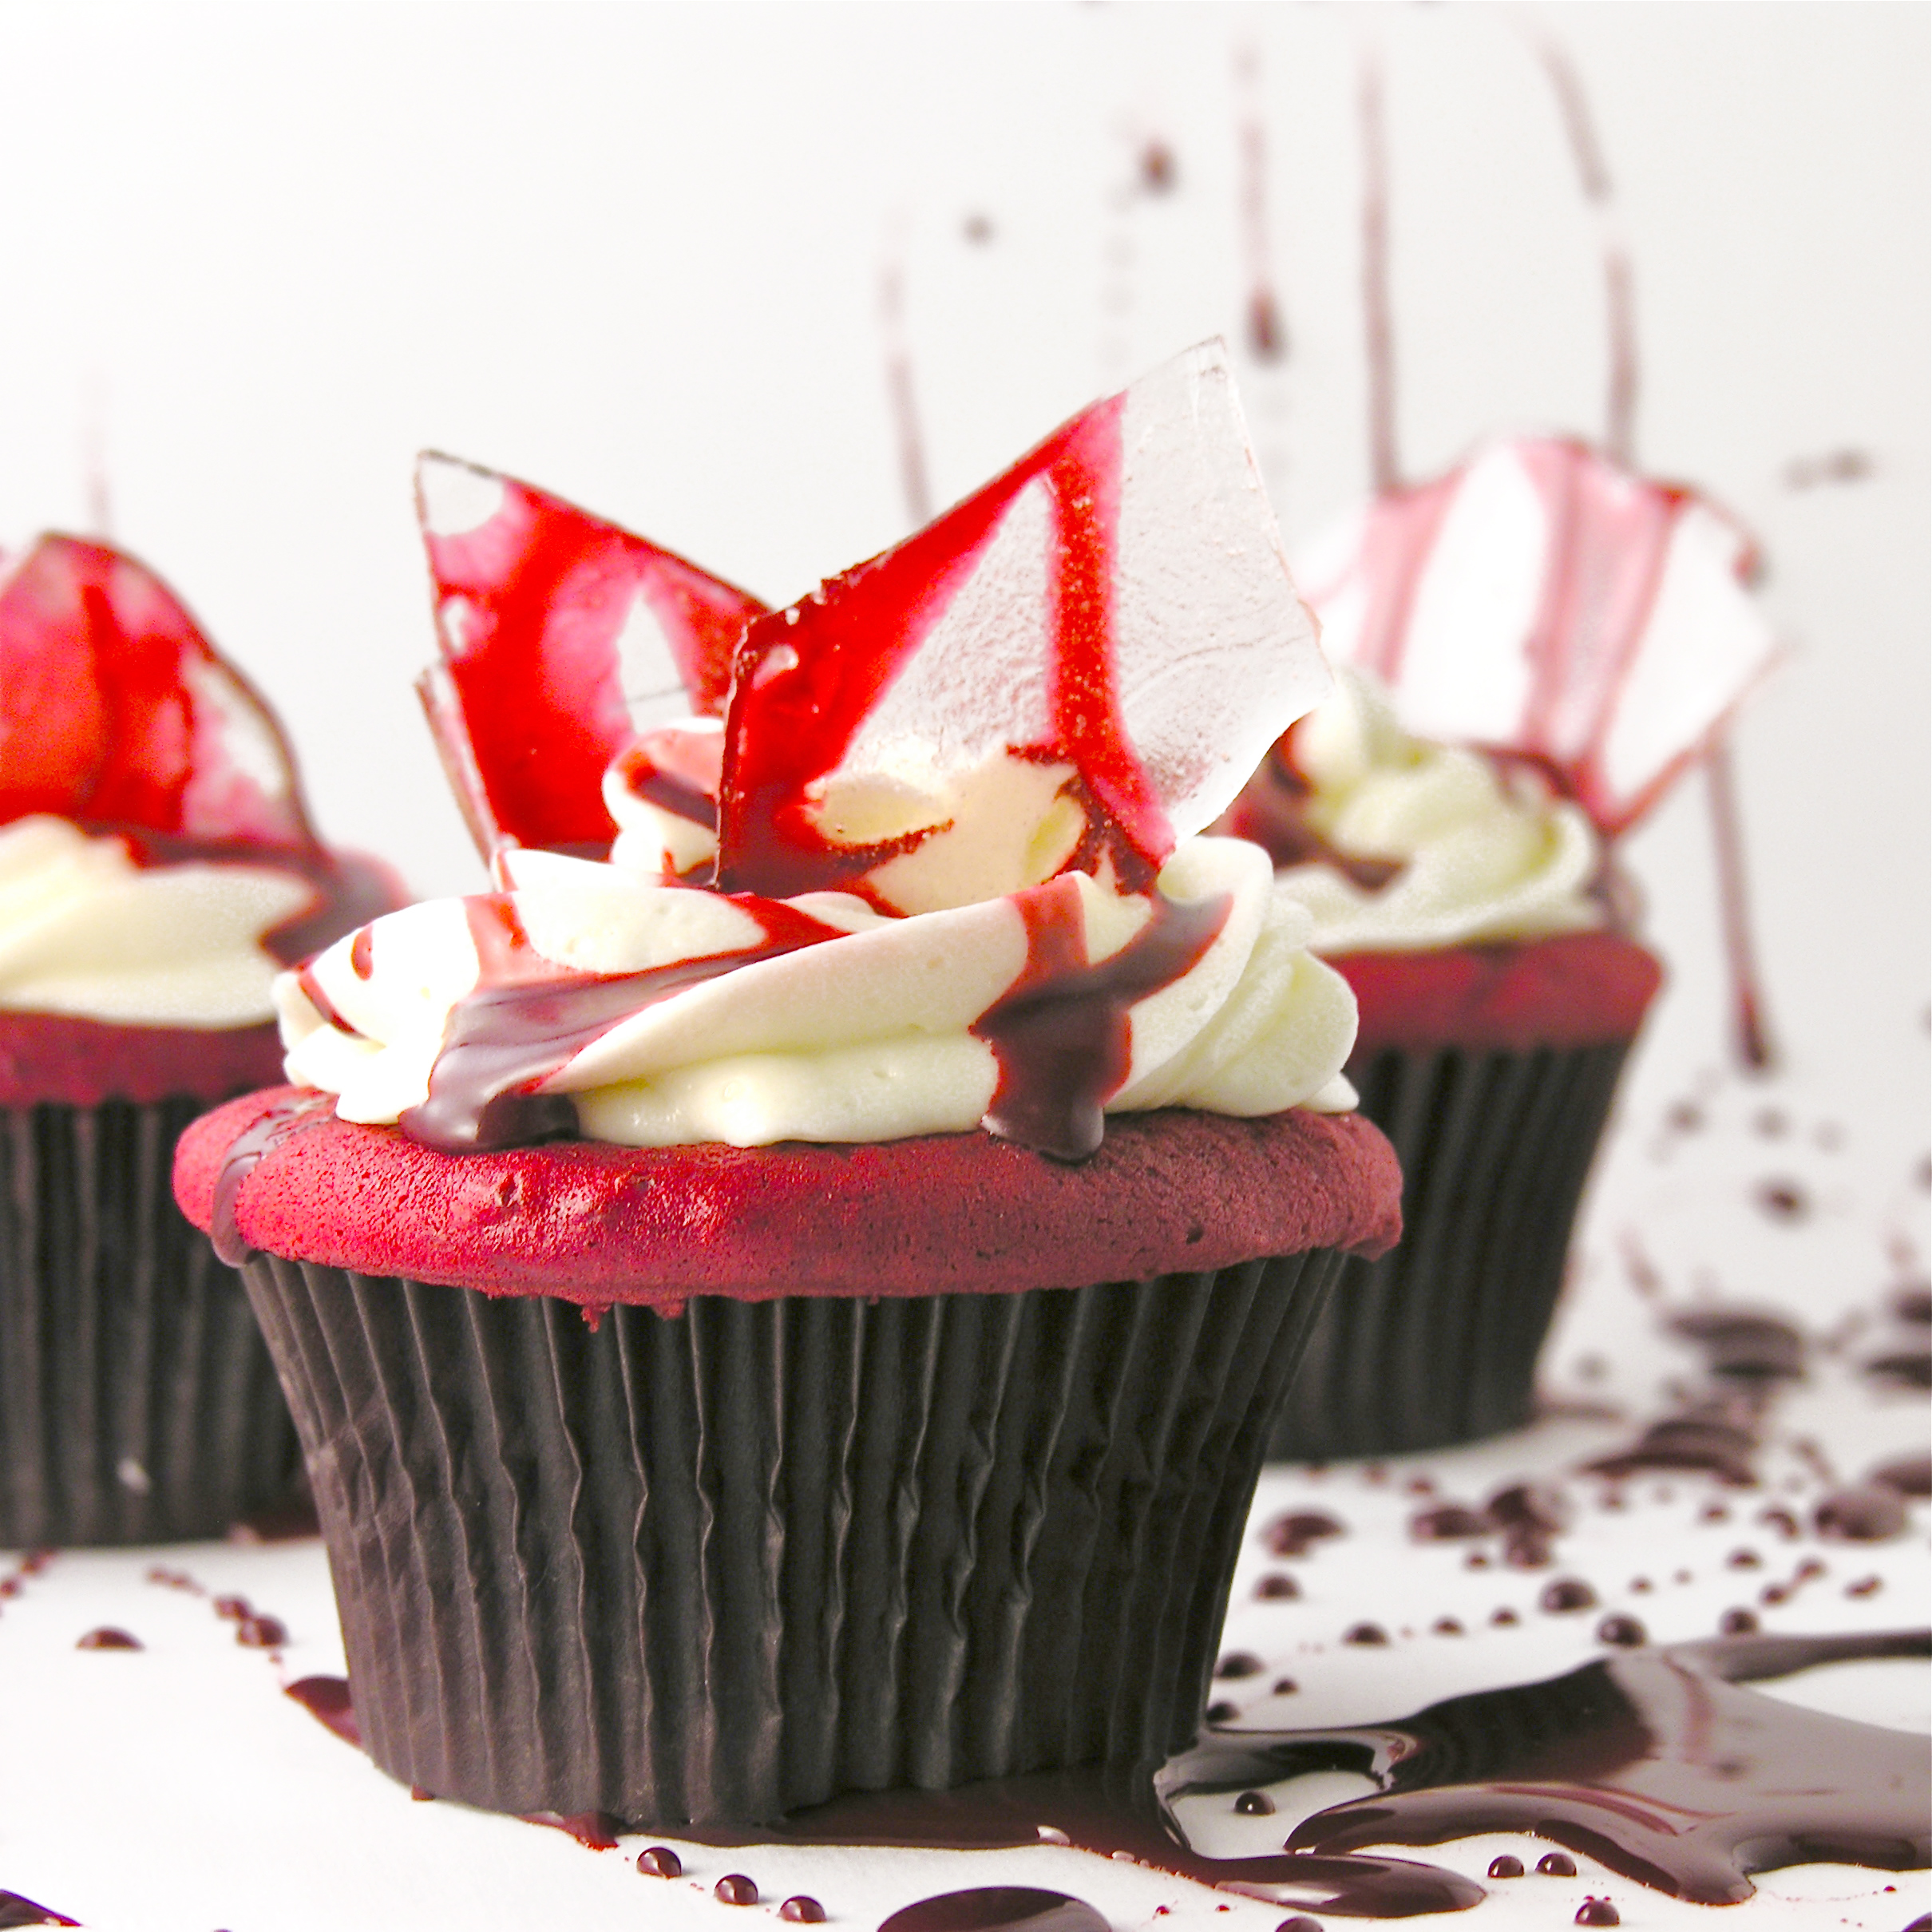
Decorating:
- Put parchment paper on a counter to protect it from all that red food coloring.
- [or- use a large platter or tray that you will serve the cupcakes on- blood splatter and all!]
- Place frosted cupcakes on protected surface and press 2 to3 pieces of glass into the top of each.
- Clip the corner on the bag of edible blood and drizzle over the top of the glass and the cupcakes, allowing it to drip down the sides of both.
- Serve the same day after decorating.
- Use care transporting and serve with plates and forks, or you will all have red fingers!!

My thoughts: These are such yummy cupcakes all by themselves. But the decorating was SO much fun! My friend Amber helped and we both were a little in awe of how realistic they looked…and how yummy they tasted! I wasn’t sure how the sweetened condensed milk would taste on the cupcakes, but I added a little raspberry flavor and oh my…so good!
Setting up for photos was fun too…splattering fake blood everywhere and letting it drip off my cupcake stand was interesting…not my typical cupcake photo shoot!
I really hope you get a chance to try these– even if you just go for the yummy cupcake recipe minus the drama!
I will leave you with a little insiders look at my picture-taking experience:
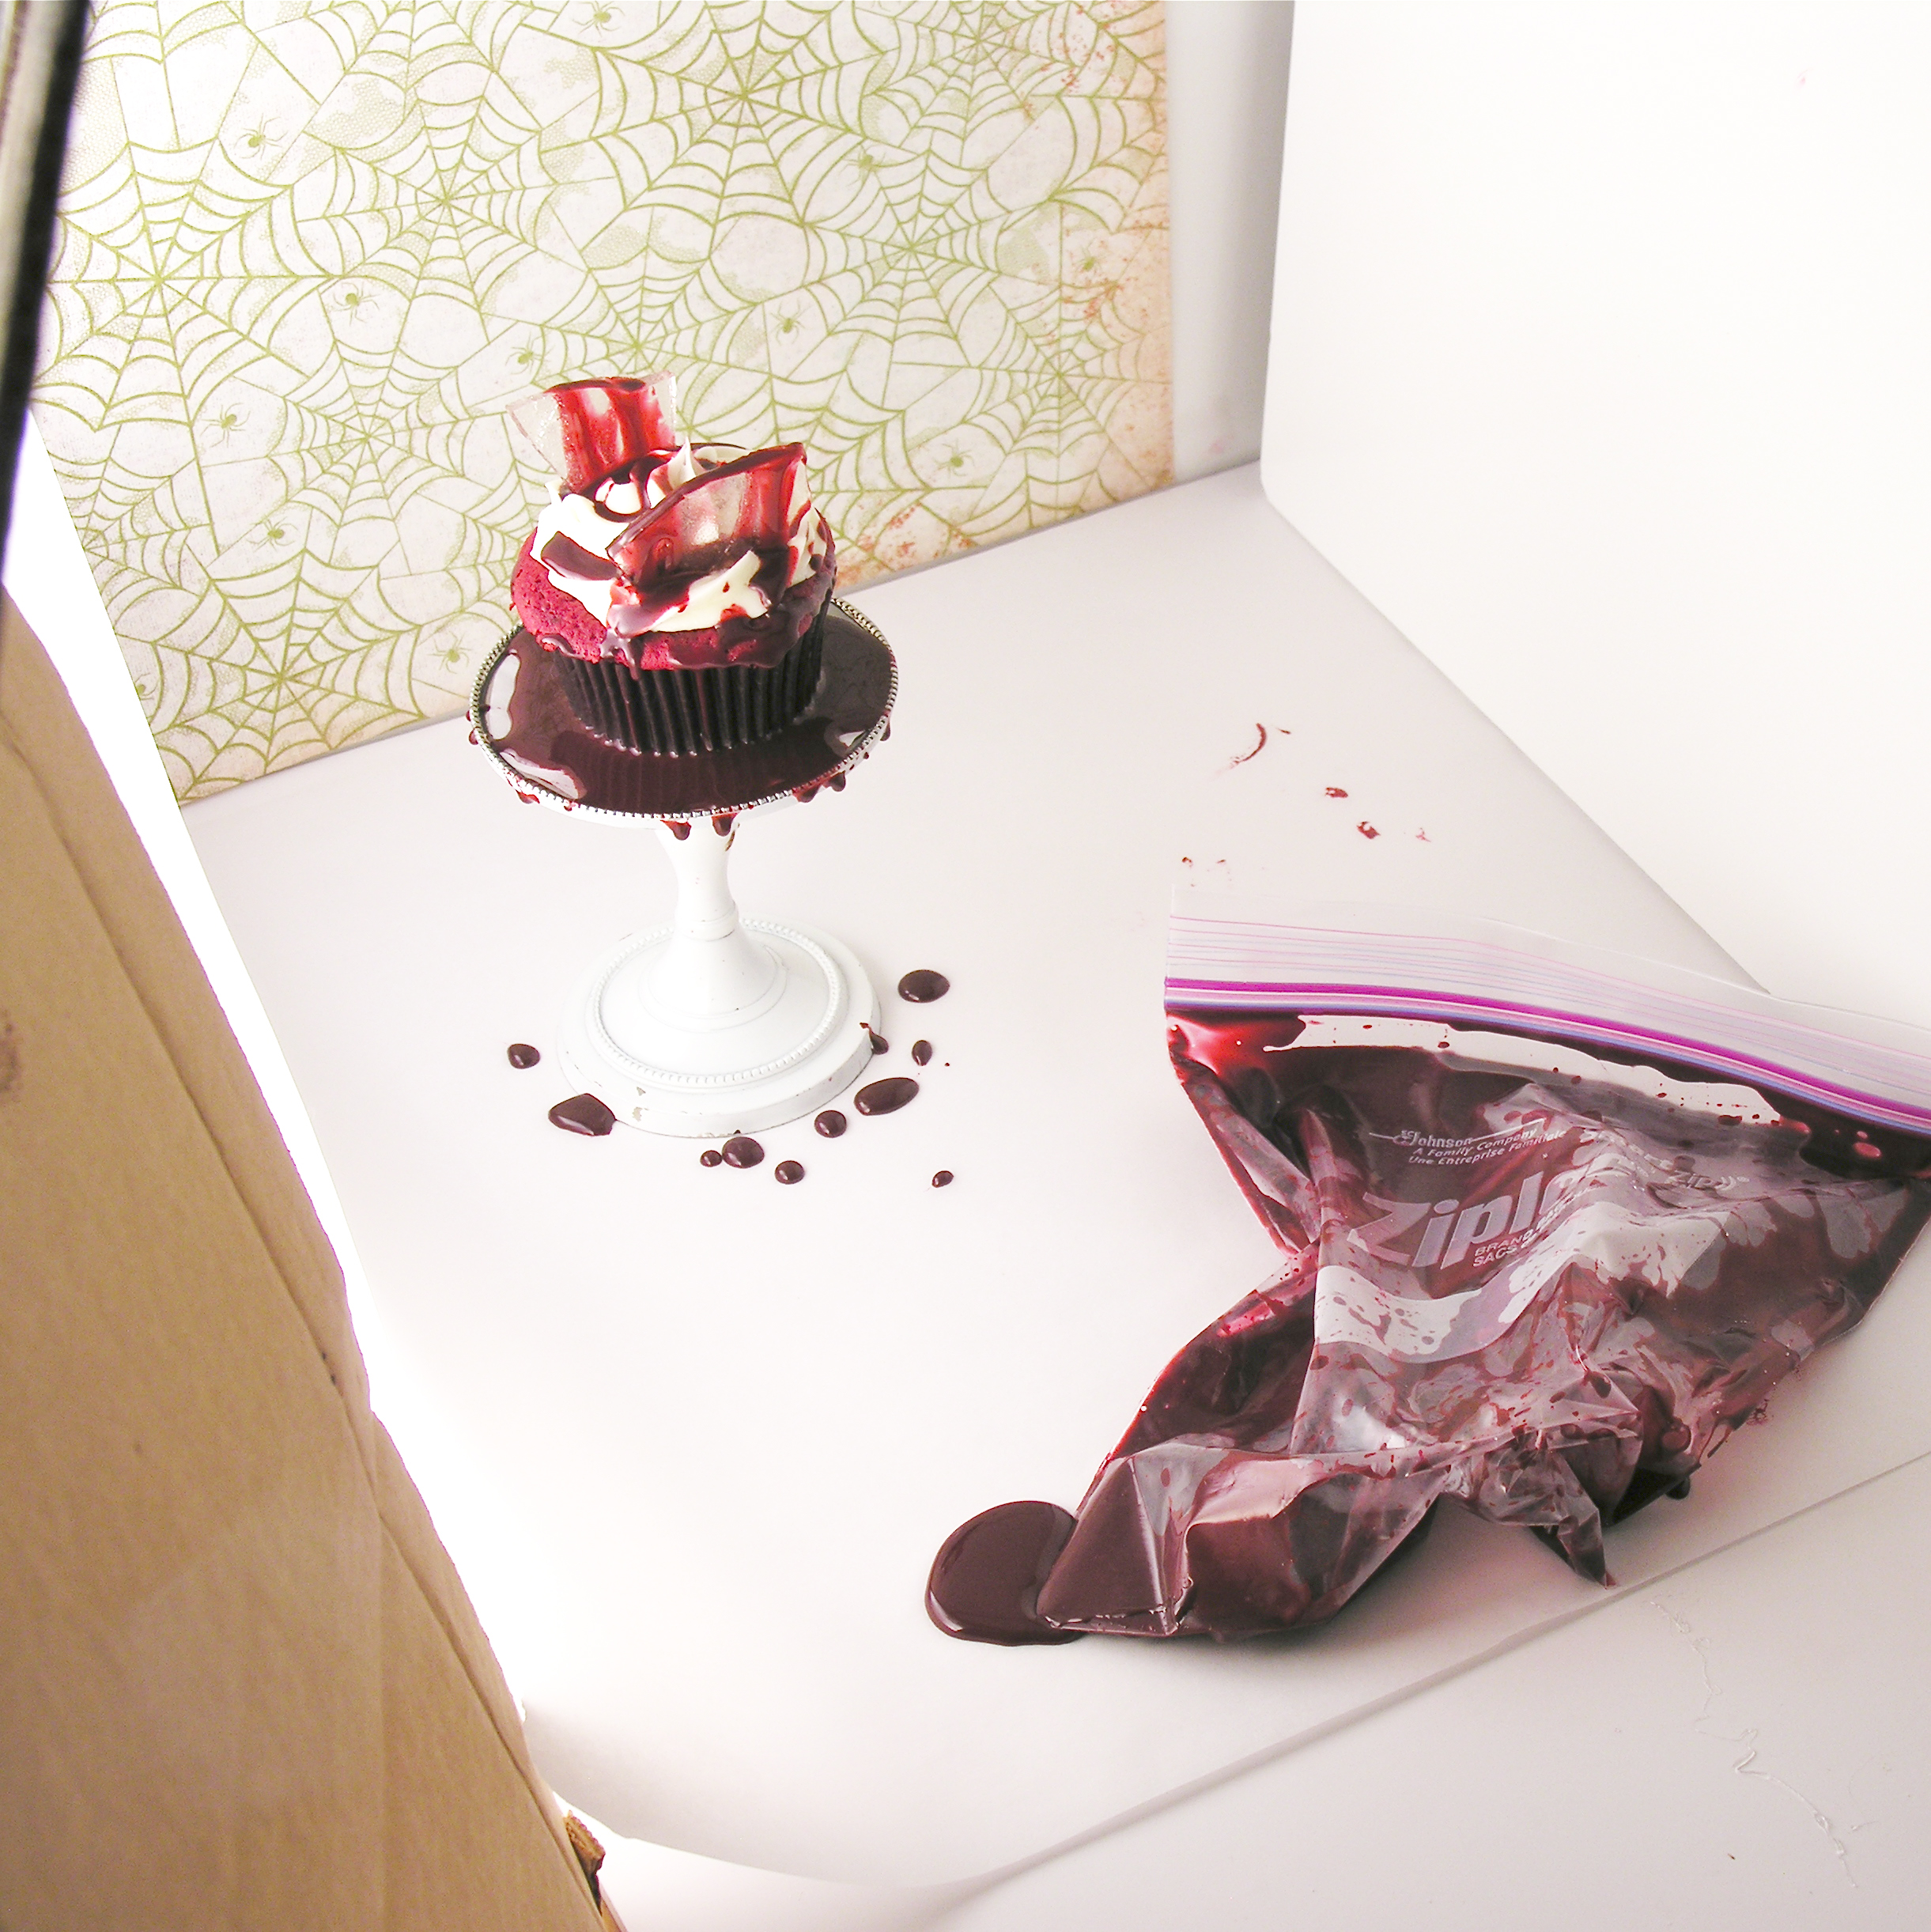

So fun!!!
Here are some other fun “creepy” October recipes to try:


How cool! 🙂
Thanks!!:)
These are awesome!
Thank you 🙂
I love the look of these cupcakes! So creepy and such a piece of art all at the same time. Love it!
Thank you so much. It genuinely felt like a work of art once we finished. It was really fun!
Wow – that really looks like blood – I love it!
Lol- thanks! I used to work in the blood bank at a local hospital and once I got it into the zip top bag it was a little *too* realistic for me. I kept saying out loud- I should *not* be putting this on cupcakes!!!
This is a combination of creepy and cool!!! I love it!
I’m so glad you do! They make me smile/cringe too:)
These are wicked 🙂 Lovely cupcakes
What a great idea! Gorgeous photos!
Thanks so much!!!
Pingback: 125 Creative DIY Halloween Ideas
These cupcakes are so cool! I love them! I truly can’t wait to try and make them myself this Halloween! The idea is so creative and I absolutely love the glass candy pieces, they look so realistic. The edible blood was equally as impressive. You took some fantastic photos as well, good job!
Goodness- thanks so much Sarah! I’m so glad you’re going to try them- I think you’ll have fun decorating them and watching the reactions of the people you serve them to 🙂
Pingback: Self-Filled Cupcake | Zlater Family CookBook
Where do u get the clear flavoring?
Hi! Most flavorings are clear- I used McCormick raspberry- which has just the slightest pink tint. There are just a few flavors you need to watch for- vanilla you can buy specifically clear, but flavors like maple, coffee, root beer, etc. might be more difficult to find.
Ok thank you so much! 🙂
I can’t wait to make them for my family for Halloween!!
I attempted the rock candy and it did not harden over night. It also feels more like extremely sticky taffy. I put it in the fridge since it was mildly humid in my apartment, which helped but the stuff is now stuck to the wax paper. I tried a second time…. And it’s going the same way. Help!
Cook it longer. When you make candy, you typically use a candy thermometer. The candy goes through stages-like soft ball, hard ball, crack and hard crack depending on how hot it gets. There are dozens of recipes out there for candy glass that use a thermometer. I went with the microwave version because its quicker and easier. You want this candy to be at a hard crack stage which is about 300F. Because microwave wattage varies, your cook times might be different than mine (the downfall of this method). Because its still soft, you need to cook it longer- get it to a higher temp. I erred on the side of too long on my 1st attempt- that’s when it starts to caramelize the sugar and turn it brown. You want to stop cooking it just before a color change. If you want a more precise method, grab a candy thermometer and do this on the stove. Good luck!!! :0)
Oh my …these look so gruesome, I’d feel rather cannibalistic eating them (but totally indulgent too I reckon 😉 ). Your photos are amazing – do you have special lighting/area etc for setting the pictures up? Thanks!
Thank you! They are pretty gruesome- lol! I talk a little but about my photography in the “about” section of easybaked. I am an *amateur* photographer- lol! I use a DIY light box and halogen lighting (the dual lights you’d use in your garage…?). I did upgrade my camera, but I just like my old-fashioned way of setting up…? There are some GREAT collections of photos out on the web- that show the finished product and then show the set up. My favorite was in a bath tub- she set up there because it was by a window and the lighting was good. If I find that site I will link it here for you:)
Thank you SO much! The bath tub idea is so crazy I can see it working! Almost all the lights in our house are low energy, dim yellowing things, so after 5pm photos are out of the question as there’s no light good enough for them 😉
Hi! I’ve been eyeing these cupcakes for a while, and it’s lovely to see an easy recipe! But about the glass, I was wondering – is the plastic wrap necessary? Do you know what would happen if I don’t use plastic wrap? I don’t use it often and it’s not something I have lying around 🙂
I’m not certain if you could cook it without. You could try? Maybe you could cover your microwave safe bowl with a paper plate or paper towel? You would just need to try it and see. Good luck!!!!
Thank you!! My friends and I made a pouch for Halloween and they turned out great!
Yay! Glad you had success! I’ve had a few friends send me pictures if their creations and I laugh every time- they are just so gruesome!!!!
Hi these look Awesome!!!
I made them but had trouble with the blood coming out a nice black colour.
Can you provide the exact brand & amount/size of colouring you used.
Thx!
Hi! I can’t give you an exact measurement, but I used Wilton brand gel colorings. I used maybe 1/8 of a teaspoon of red and just a tiny bit of black on a toothpick. With just red it comes out looking like cherry pie filling- that touch of black darkens it just enough to make it look like blood. You can add more black to make it darker, but use the black VERY sparingly. I felt like I used a little too much, and I couldn’t fix it with more red…so I just went with the darker color.
Hope this helps!!
would stretching out the mix with corn syrup work if it gets too dark ?
I’m not sure? I’m guessing not, only because you’d have to get the sugar in the newly added corn syrup up to the correct temp or it would just make it sticky- not breakable. But try it and see?
I just could not resist making these my friends think im a genius ! clearly im not… fantastic… !
I’m so had you tried them! Aren’t they fun?? 🙂
I would like to try the broken glass for a Halloween party I am going to. I’ve never worked with candy/sugar like this before. Are you saying you microwaved yours for a total of 5.5 minutes or only 2.5 minutes? The instructions say to do it for 3 min and than another 3 min – checking at 2 min, so I wasn’t sure. Also, what size cookie sheet? I attempted this (still cooling) and it didn’t even remotely cover my cookie sheet. I am actually not sure it is going to be enough.
Thanks! Great idea!
Hi! I microwaved mine for a total of 5.5 minutes. You are correct- the instructions say 3 minutes, and then another 3 minutes, starting to check at 2. A full size cookie sheet is best. It will not fill the cookie sheet, which is good. You don’t want to have it go over the edges. As you pour it out, it will spread to a pretty good thickness over the bottom of the sheet. I used my spoon to spread it a little thinner, but it starts hardening almost immediately. I’m thinking you will have enough 🙂 Enjoy!!
Hi Easybaked! I can’t wait to try these for a party tonight! Thank you so much for sharing and for making it easy! I think I might try them as ice cream cone cupcakes which I’m hoping will make them even more gruesome.. we shall see. I’m curious about your changes to the cupcake recipe. Do the come out denser like scratch cupcakes with this recipe modification? Thanks! Tina
Great idea! Yes- the cupcakes are more dense and rich. They taste more like from-scratch. Have fun!!!
Pingback: Found Our Halloween Treat For Next Year! | Chicago School of Glass Art
Pingback: Creepy Earthworm Cupcakes | eASYbAKED
Im in the process of making these and my sugar mixture won’t harden 😦 I left it overnight and its still mushy. 😦
You need to cook it longer. The microwave method is very easy, but it is less precise than using a candy thermometer. You want the glass to be at a high enough temp to harden and crack when it cools, so if it didn’t harden, it didn’t reach a high enough temp.
Pingback: Happy Halloween – idea’s for throwing a fun filled party | Rianna Elizabeth
Thanks for the awesome post. They are perfection! I am making these this weekend for a bake-off. I am using a scratch cake recipe and borrowing your glass and blood recipes. I am very excited about assembling them. Can you tell me more about the glass breaking down after assembly. How long will they look amazing after the “blood” is dripped over the glass? I don’t want to put them together too soon.
Oh fun!!!! Mine started breaking down and looking bubbly/ getting gooey after about 8 hours. So I’d just decorate the morning of- if you have the glass and blood ready to go it really goes quick to decorate. I’d add them as close to serving time as you can- good luck!!!! You’ll have to let us know if you win:)
Pingback: Why Halloween is an Excuse to Make Your Favorite Cake
Do you keep the ‘glass’ in a container in the refrigerator or just on the counter?
The counter is fine- but refrigerate the “blood” until use 🙂
Hi! I LOVED the broken glass recipe! Worked first go and is so damn easy! Thank you so much for this. 🙂
Yay! I’m glad you tried them- these are one of my favorite halloween recipes too- fun and easy! Thanks for stopping by!
Pingback: Experimental Food – My Red Velvet Cake Quest I | feedwise
Pingback: Bloody Broken Glass Cupcake – Best Cheap Easy Halloween Party Food Dessert - HoliCoffee
I want to make these for Halloween for my forensic science class but the problem is it’s my 6th hour (12:50 pm) and I would have to make them before school starts so around 7 am or 7:15. I’m afraid that the glass will break down or something would go wrong, do you have any ideas on how to prevent this?
Sure (what a fun idea, by the way!!!) Make the cupcakes and “blood” the night before. Keep the blood in a (tightly zipped!) ziptop bag. Make the glass in the morning and once it is cool, break it up and place it also in a zip-top bag, sealed tightly shut. Just before serving, put glass into cupcakes and clip a corner off that bag of “blood” and drizzle it on top. Fun!!! Or have them decorate their own. Just remember that the blood stains everything it touches red 🙂
Pingback: 13 cakes to make Halloween creep-licious | Mum's Grapevine
Pingback: Over 30 fun Halloween cupcakes - A girl and a glue gun
How long will the fake blood keep in the fridge? Have a few Halloween parties over the next 2 weekends and might need to use it in a week again for more cupcakes. Thanks!
I’m not positive, but I googled how long sweetened condensed milk will keep once opened (since that is essentially all it is…) and it seems like the most common answer was to not store it in the can, and that it would be ok from one to two weeks in the fridge. Hope that helps! Have fun!!!
Pingback: 10 Spooky Halloween Treats for Monsters of All Ages
Pingback: Nerdie Foodie Fridays: Zombie Week |
Pingback: Halloween Special: Creepy Broken Glass Cupcakes! | AMCARMEN'S KITCHEN
Pingback: Halloween party food! | The Spice
Thank you for the recipe and the inspiration! These would be perfect for a Game of Thrones party 😉
Thanks! I haven’t seen Game of Thrones (or read it), but you are not the 1st person to tell me this 🙂
Pingback: Nerdie Foodie: Zombie Week - Nerdy Curiosities
Pingback: 10 Blood Halloween Cupcakes Recipes Ideas - Food Recipee
Pingback: 20 Chic Ideas For a Halloween-Themed Rehearsal Dinner | Getting Married Website
Pingback: 20 Chic Ideas For a Halloween-Themed Rehearsal Dinner - FLYING SAUCER
Pingback: Halloween fürs Büro | Der Nordseeblog
Pingback: 30 Yummy Halloween Cupcake Recipes - Festival Around the World
Pingback: 13 Easy and Fun Halloween Party Ideas - Zed and Echo
just a question- is the blood thick enough to be a filling in the middle of the cupcake?
So sorry it took me so long to answer:) I’ve been on a break from blogging. It is not thick enough to use as a filling. I’d recommend using vanilla or white chocolate pudding and coloring it instead. That makes a nice “oozy” consistency that is firm enough for the middle of a cupcake.
Pingback: 10 Superior Halloween Meals Concepts That Are Certain To Be A Hit | | Wow Home
My glass came out really sticky???? It still cracked and we had a blast making them.
Try cooking it just a bit longer, and be careful to not store it in a humid or warm place 🙂 Glad you had fun anyway!!!!
Hi
The broken glass cupcakes are fantastic! I’m going to try them this Halloween, a question, the colouring gel for the blood, when you eat does the blood stain your skin around your mouth ?!! That sounds like a silly question, but was wondering???
Thank you
Maybe a little? Just like any other red food colored food would 🙂 Hope you get a chance to try them!
Been looking at these cupcakes for years waiting for a chance to make them, this year I am hosting a scary dessert contest at work and they all know to expect cupcakes from me, but they wont expect these amazing cupcakes!! so excited!!!
Pingback: April Fool’s!!! (a collection of our best “fooled-ya’ recipes!) | EASYBAKED
I have tried these broken glass cupcakes before with the dreaded candy thermometer..and the candy glass came out amber..So to use a microwave I was very skeptical..I mixed the corn syrup and sugar which looked like a thick glob..put it in microwave..after 5.5 minutes..I was surprised and impressed..The candy glass was clear like real glass..I would highly recommend this method..instead of using the dreaded candy thermometer..it works every time..who would of thought a microwave..
Pingback: 21 Cute Halloween Cupcakes Ideas For Celebration That'll You Love!