Category Archives: Candy

Monster Mash Treats

Posted on

Cookie Monster 1-2

Take your favorite MONSTER cereal (or any other favorite cereal) and make these cute little monsters with it. Delicious and such a fun treat for Halloween!

Monster Mash2-2

Have you ever tried the fun “Monster” cereals from General Mills? As a kid, these were available all year long, but I only see them at Halloween now (so if you want to try this recipe with these cereals, you’ll need to get them in September and October- sorry friends in other countries!). I’m certain that this same recipe will work with a variety of other cereals. I was thinking that Reese’s Puffs might be fun and super yummy.

Read the rest of this entry

Gingerbread Turkey Cookies

Posted on

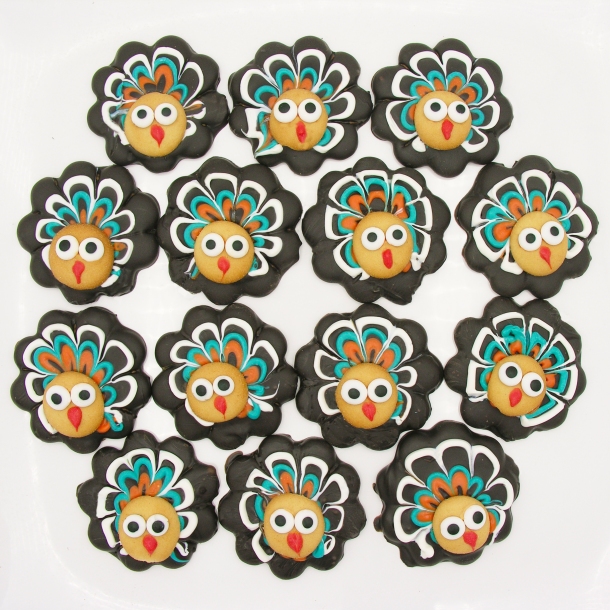
Turkey Cookie4-1These no-bake turkey cookies have a blast of ginger, vanilla and chocolate in each bite. Plus aren’t they cute? And not a single piece of candy corn in sight!

Turkey Cookie1-1I set out on a mission this week. To create a cute turkey cookie without using candy corn. Because candy corn is gross, in my opinion, and it seems to be the staple of all things “turkey” in the baked goods realm. I knew I wanted to use Anna’s Swedish Thin Cookies as my base, because they have that beautiful scalloped edge, and they are DELICIOUS. They come in ginger, orange, almond and (maybe?) mint- I haven’t seen the mint recently, so maybe not. And- before you think you won’t be able to find them, they are at most Walgreens, Walmarts, and (of course!) at Amazon- you maybe haven’t ever noticed them before.

So one Anna’s cookie, one mini Nilla Wafer, a little colored chocolate, candy eyes, and voila! An adorable and tasty turkey cookie- just in time for Thanksgiving!

I also want to say- once you get your chocolates melted, these go together fast. They are a super quick way to make people smile over the holidays.

Turkey Cookie5-1Want some instructions? (Printable version here)

Ingredients: (makes about 32 turkey cookies)

  • One box of Anna’s Swedish Thins in whatever flavor you like best
  • One box of mini Nilla Wafers
  • One bag of Wiltons Candy Melts in dark chocolate
  • 1/4 bag of Wilton’s candy melts in blue, white and orange
  • 3 small zip-top bags
  • Toothpicks
  • Just a few Wilton’s candy melts in red.
  • Candy eyeballs (2 for each cookie)

Directions:

  • Unwrap Anna’s cookies and Nilla wafers and place in small bowls for easy reach.
  • Lay a piece of parchment paper on your countertop.
  • Place dark chocolate candy melts in a large bowl, and blue, white and orange melts each in their own smaller bowls.
  • Melt all candy melts (except red) in the microwave (30 second increments, stirring between, until melted and smooth).
  • Carefully spoon the blue, white, and red melts into individual zip-top bags, zip them shut, and clip a small corner off the bottom of the bag with scissors. 
  • Place these warm bags of melts on a warm plate, and cover with a warm towel (to prevent them from hardening up while you use them). 
  • Place one Ginger Thin in the dark chocolate melts- top down. Turn it over with a fork (covering both sides with chocolate), and then lift it up on the fork and tap the fork against a side of the bowl to allow excess chocolate to drip off cookie. Slide covered cookie off fork and onto parchment paper. 
  • Pipe a line of white melts around the top edge of the cookie- almost in a circle. Then pipe a blue line inside the white, and an orange inside of that.

Turkey Cookie6-1 Turkey Cookie7-1

  • Use a toothpick to pull the lines of color to the lower center of the cookie, pulling in along the lines of the cookie’s scalloped edge. 
  • Place a mini Nilla Wafer on the bottom center of cookie.

Note: Only do one to two cookies at a time. You want the dark chocolate on the cookie to still be soft when you pull your lines of color in. If your dark chocolate in the bowl begins to cool and harden, just pop it back in the microwave for 30 seconds.

Turkey Cookie8-1 Turkey Cookie9-1

  • After all cookies are decorated and all have a Nilla Wafer placed, glue eyes on by using a little of the left-over white melts and a toothpick. Dab a little of the melts on the back of an eye and then press it onto the Nilla Wafer. 
  • Add a few red melts to your orange ones and re-melt for the beaks. Use a toothpick to draw little beaks on each bird. 
  • Enjoy!

Turkey Cookie3-1My thoughts: Sometimes the way I “see” a potential idea in my head just doesn’t work when I make it, but these are even more cute (and they were much easier) than I expected. If you want a fun little edible craft to add to your Thanksgiving table, these really are so perfect! I hope you get a chance to make them! ~r

Turkey Cookie2-1Want a few more fun recipes for Turkey Day??? Here you go! (just click on a photo to see the recipe)

teepee1 pumpkin-pie-cutouts1 pumpkin-oreo4 acorn-square-wm

No-Bake Easter Nest Cookies

Posted on

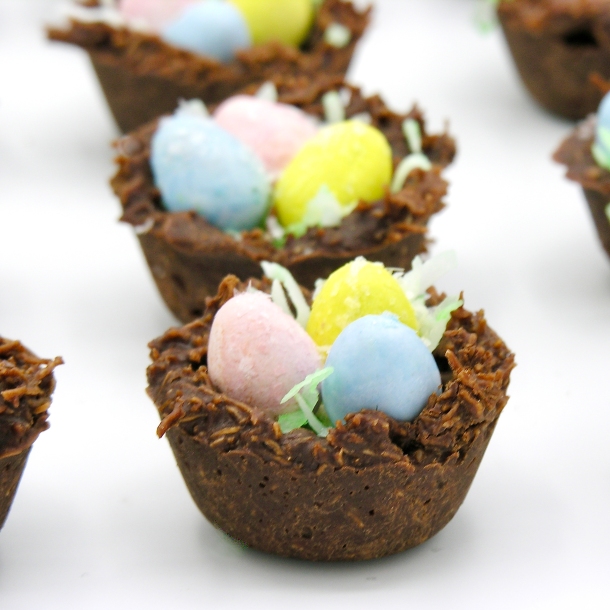
Easter nest 4-1These crunchy little nest cookies are filled with the (seriously addictive!) Cadbury mini eggs and a pinch of coconut. A perfect Easter treat! 

Easter nest 6-1

I just want you to know… I am the owner of the perfect no-bake cookie recipe. It’s my mom’s recipe, and it is perfect because it was the recipe we grew up enjoying. My mom passed away about 6 years ago, and I cherish every recipe I have of hers. When I was thinking about making Easter nest cookies, this recipe was the 1st to pop into my head. For sure I could have made it with the traditional oatmeal, but that’s not very nest-y, is it? So I used shredded wheat (the big ones!) I had to look a little bit to find the full-size shredded wheat (there are like a million flavors of mini!), but I found it- and it worked perfectly. I see you, chow-mien nest-makers- but I just could not bring myself to cover chow mien noodles in chocolate. Ewww. Sorry. Sticking with cereal here 🙂

Easter Nest 2-1

Want to know how to make these little nest cookies? Here is the recipe: (printable version)

Ingredients: (makes 24 mini nest cookies)

  • 2 cups sugar
  • 1/2 cup milk
  • 1/2 cup margarine (or one stick of butter)
  • 1/2 cup cocoa
  • 1/2 cup peanut butter (creamy)
  • 3 teaspoons vanilla extract
  • 4 cups of broken up shredded wheat (this was 9 big pieces, broken up)
  • 1/2 cup coconut (optional) with a tiny bit of green food coloring
  • 72 mini Cadbury eggs (just get a big bag- you’ll want the rest- I promise!)

Directions: 

  • Crunch up the shredded wheat until you have 4 cups.
  • If you use coconut, place it in a zip-top bag with the food coloring and shake until green.
  • Spray a mini-muffin tin with non-stick spray and set aside. 
  • Measure sugar, milk, margarine, and cocoa into a large saucepan. 
  • Heat until boiling (stirring constantly) and then boil for 2 minutes. 
  • Add peanut butter and vanilla. Stir until smooth. 
  • Take off heat, and add Shredded wheat, stirring until it is completely coated. I recommend adding it one cup at a time and using a little less if it gets too thick to stir well.
  • Working quickly, spoon or scoop into mini-muffin tin. 
  • Use a tart shaper or a rounded measuring spoon to press the center in (spray this item with cooking spray between each nest to keep it from sticking). 
  • Sprinkle a little coconut over each nest. 
  • Press three eggs into each nest. 

Nest process1Process3Process2

  • Allow nests to cool and harden.
  • Use a small knife to pop nests out of pan. 
  • Enjoy! 

Easter nest 5-1

My thoughts: I love how interesting these cookies taste with a different cereal added! For sure the shredded wheat gives these a more nest-like appearance. I really wanted to get the Cadbury eggs that are shimmery, but I couldn’t find them at my grocery, so I sprinkled a few edible sparkles over the top. 

If you want to try these with the oatmeal (and experience one of my favorite cookies from childhood), I will leave you with my mom’s original recipe (in her handwriting :)). I actually remember her writing this out for me (from memory). I’d just gotten my 1st apartment out of college and was craving these and she pulled out her notepad and jotted this down for me.

Just a note though- she NEVER used butter (even though the recipe says butter). Butter translated to her was always Country Crock. I use margarine as well- just to be true to her recipe- but I’m sure butter works fine too. Enjoy! ~r

Mom's recipe

Looking for other fun recipe ideas for Easter? We have lots of them! Just click a photo to see the recipe!

babychicks3cadbury-egg1dscn8243jelly-bean-cookies1

Fall Peanut Butter Crisps

Posted on

Fall Peanut Butter Crisps1

These beautiful fall cookies are special– not just because they are salty, sweet, crispy deliciousness– but because they use up your kids’ Halloween candy!!!!

So… Halloween is over, and you are likely in possession of more candy than you know what to do with. The chocolate will be gone in days, and then the name-brand candy will slowly get picked away at. But there are always those candies that sit in the bottom of the plastic pumpkin until Thanksgiving. For me, those candies were always Bit-o-Honey and the bright orange and black-wrapped “Peanut Butter Kisses“. These are a candy that only seems to make an appearance at Halloween. A combination of taffy and peanut butter, they just always seem to make the left-over candy list.

But not any more!!!  Go ahead, dig through all of that Halloween candy and pull these little guys out- they make the best filling for these beautiful cookies!

Fall Peanut Butter Crisps2

You can also grab other candies to fill these cookies with- rolos, kisses, peppermint patties, mini snickers… all work in this recipe! I actually began making these crisp cookies with Rolos about 5 years ago at Christmas.

Fall Peanut Butter Crisps5

Want the recipe? Here it is!! (printable version)

Ingredients: (makes 20 cookies)

  • 40 Ritz crackers
  • 20 Peanut Butter Kisses (or other small candy that melts at a low temperature)
  • 1 bag of Wilton’s dark chocolate candy melts
  • 1 chocolate transfer sheet (I used 12×16″, and I got mine here). 

Directions: 

  • Preheat oven to 350F degrees. 
  • Place 20 Ritz crackers on a cookie sheet, bottoms up. 
  • Unwrap all 20 peanut butter kisses, and set one on each Ritz cracker. 
  • Place cookie sheet in oven for about 4-5 minutes- check! Candy should be soft but not completely melted. 
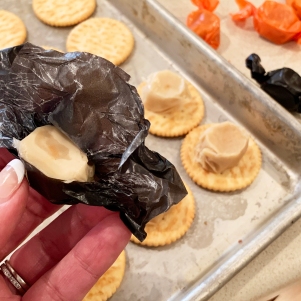
  • Remove from oven, and place Ritz cracker, bottom side down, on top of candy and press to spread candy to edge.


  • Place entire tray in freezer to chill for a few minutes.
  • Melt chocolate candy melts in a bowl in the microwave for about 2-3 minutes, stirring once every 30 seconds, until completely melted and smooth.
  • Place parchment paper on a cookie sheet (that fits in your freezer!)
  • Cut chocolate transfer sheet into 20 squares.
  • Take a cookie, place it in the melted chocolate and cover it completely. Use a fork to pick it up and tap on the side of the bowl until all excess chocolate drips off the bottom. Slide bottom along edge of bowl, and using fork, slide onto parchment paper.
  • Immediately place chocolate transfer sheet square on top of the melted chocolate (you’ll need to put the rough side down- the smooth side up) and gently press it into contact with the entire top of the cookie. Repeat 20 times.
  • Place entire cookie sheet into the freezer for 5 minutes or so. As soon as you remove it, gently peel off the transfer sheet from each cookie- and enjoy!!!

How-to-crisps8

My thoughts: There are three things that I love about these cookies…

  1. They are EASY to make- they take almost no time but look so fancy!
  2. They are CHEAP to make- the Ritz crackers and peanut butter candies are really inexpensive (I got mine at the Dollar Store), the chocolate isn’t too costly, and the transfer sheet is like $4.40, but SO worth it! (you could use sprinkles instead, to cut the cost even more though!)
  3. They keep for a long time. Put these little guys in cello bags, tie them up, and use them to decorate your place settings at Thanksgiving! 

They also can use a variety of candies up- and you can decorate them so many fun ways! 

Fall Peanut Butter Crisps3

Go – find your kids’ candy and re-purpose it into these beautiful, crunchy, deliciously salty but sweet treats!

Need other ideas for using up that Halloween candy? This is a project we have a few ideas for! Click on a photo to see the recipe.


Seashell Oreo Pops!

Posted on

Turn your Oreos into a celebration at the beach! Sand Dollars, Sea Scallops and cute little fish. So much delicious fun!


There’s just something about the beach that makes my heart happy! Have you ever been to Sanibel Island in Florida? It’s right by Fort Meyers. Growing up, our family spent nearly every Thanksgiving at a little condo on the beach there. They have some of the best seashell hunting in North America. As a little girl, I had a shell identification book and a big pail, and I spent hours and hours combing the beach for shells. Sand dollars were one of my favorites!

This past spring, I used chocolate covered sunflower seeds in several projects, and thought about how much they remind me of the little centers of sand dollars. So I had to try! I also made some sea scallops using…wait for it… Wheat Thin crackers to make those little shell points (and they are a super yummy salty-sweet combo!) 🙂


Here is how we made these little Oreo pops:

Fish Oreo Pops are from an earlier recipe here on Easybaked. You can find them by clicking here.

These were featured in our cookbook for kids, Life Is Sweet: 12 Baking Devotions for Kids.

Sand Dollars:

Ingredients: (makes about 24 pops)

  • One package of Double Stuff Oreos
  • 2 (12 oz.) bags of Wiltons Candy Melts in white
  • Chocolate covered sunflower seeds (I used blue)
  • 24 Lollipop sticks
  • Small pearl decorating sprinkles
  • Small treat bags and ribbon, if you want to package them up to give away.

Directions: (Need a little visual help?  Click here.)

  • Carefully twist apart all Oreo cookies.  Do this slowly and gently- and expect that some will break. 
  • Melt about 1/4 cup white candy melts using a microwave-safe bowl in the microwave in 30 second increments, stirring between until completely melted and smooth.
  • Use a lollipop stick to make an indentation in the white filling of an Oreo.
  • Dip the end of the stick into the candy melts, spread a little on top of the white filling and then press the stick into the indentation.
  • Place the top of the Oreo back on and allow the candy melts to harden and cement the cookie back together with the stick inside. I like to stick these in the freezer to get nice and hard.
  • While you wait, melt your remaining white candy melts in the same manner as previously.
  • Once the cookies are firmly hardened back together, pick one up (using the stick) and dip it into the bowl of white candy melts. 
  • Spoon candy melts over the top and sides.
  • Gently lift the Oreo out of the candy melts, and tap the stick on the side of the bowl to allow the excess melts to drip off.
  • Slide the bottom of the Oreo against the edge of the bowl to remove excess candy melts.
  • Gently set the coated Oreo on clean parchment or wax paper.
  • Immediately, set the sunflower seeds as shown at the center of the cookie.
  • Place pearl sprinkles as shown, between sunflower seeds.
  • Serve as-is, or package up for giving away by sliding each cookie into a little treat bag and tying with a ribbon.

Scallops: 

Ingredients: (makes about 24 pops)

  • One package of Double Stuff Oreos
  • 3-4 (12 oz.) bags of Wiltons Candy Melts in various colors
  • A few wheat thin crackers
  • 24 Lollipop sticks
  • A toothpick to pull through colors and make design.
  • Small treat bags and ribbon, if you want to package them up to give away.

Directions: (Need a little visual help?  Click here.)

  • Carefully twist apart all Oreo cookies.  Do this slowly and gently- and expect that some will break. 
  • Melt about 1/4 cup candy melts (any color) using a microwave-safe bowl in the microwave in 30 second increments, stirring between until completely melted and smooth.
  • Use a lollipop stick to make an indentation in the white filling of an Oreo.
  • Dip the end of the stick into the candy melts, spread a little on top of the white filling and then press the stick into the indentation.
  • Set 1/2 of a Wheat thin cracker on top of candy melts at the top (so just the points poke out when the top is back on).


  • Place the top of the Oreo back on and allow the candy melts to harden and cement the cookie back together with the stick inside. I like to stick these in the freezer to get nice and hard.
  • While you wait, pick your “main color” and melt those candy melts in the same manner as previously.
  • Also melt smaller amounts of two to three other colors. Spoon these into zip top bags and seal them up. Wrap them in a warm towel to keep them melted and smooth.
  • Once the cookies are firmly hardened back together (about 10 minutes in a freezer), pick one up (using the stick) and dip it into the bowl of candy melts. 
  • Spoon candy melts over the top and sides.
  • Gently lift the Oreo out of the candy melts, and tap the stick on the side of the bowl to allow the excess melts to drip off.
  • Slide the bottom of the Oreo against the edge of the bowl to remove excess candy melts.
  • Gently set the coated Oreo on clean parchment or wax paper.
  • Immediately, clip a corner off a bag of colored candy melts and pipe a couple curved lines on top of Oreo. 
  • Repeat these lines with other colors and then place bags back inside warm towel. 
  • Use a toothpick to pull lines up from the bottom through these colors (see photos)


  • Sprinkle with a little gold sugar and add a candy pearl if you want.
  • Repeat this process with remaining Oreos. You may need to repeat the melting process for the  small bags of colors. If you need to do this, try making one of these colors your “main” color and decorating with the others!
  • Serve as-is, or package up for giving away by sliding each cookie into a little treat bag and tying with a ribbon.
  • ENJOY!

My thoughts: I experimented a little with the sand dollars. I had some butterscotch candy melts that I used with brown sunflower seeds- they are cute too- but I love the white ones best! I was really happy with how these turned out, and they really aren’t too difficult to put together- especially if you have made Oreo pops before. I hope you get a chance to try these for your next beach party! Happy summer to you!!!!  ~r

Other fun beach- themed ideas here at Easybaked (click on a photo to see a recipe):

White Chocolate Lemonade Cups

Posted on

Creamy, whipped, lemonade filling spooned into cute little white chocolate cups! A fun, fancy and delicious summer dessert!

Did you know that there are silicone molds for little shot glasses?!? You would think I’d have seen these somewhere along my road of dessert blogging, but I hadn’t. I stumbled on a clearance rack full of them and lightbulbs started going on in my head with ideas for fun ways to use this mold! SUCH a fun idea!

Aren’t they cute?!? I made my cups out of white chocolate and then filled these with a creamy lemonade filling that I use quite a bit here for various desserts. You can eat it straight (I may have sampled a bit as I was filling cups…), pipe it on cupcakes, layer it in cake, ooooorrrr serve it in tasty little chocolate cups! Fun….!!!!!

Here is how we made them (makes 8- 10 filled cups): (printable recipe here)

First of all, you need a Wilton’s shot glass mold (and if you get it from my link on Amazon I will get a small percentage of what you pay, making it possible for me to buy brownie ingredients, which is the next fun project I have in mind for these shot glass molds!)

INGREDIENTS: 

  • 2 bags of Wilton’s Candy Melts in bright white.
  • 1/2 package (4 oz) of Philadelphia Cream Cheese (softened to room temperature)
  • 1/2 packet of Kool Aid drink mix (any flavor~ if you use a lemonade, add it to taste, as it will be more tart than the other flavors)
  • 1 (7 oz) jar of Jet-Puffed Marshmallow Creme
  • 1 tub (8 oz) of Cool Whip (thawed in refrigerator, divided)
  • Fun sprinkles

DIRECTIONS:

  • Melt Candy Melts in microwave in 30 second increments, stirring in between until melted and smooth.
  • If desired, drop a few sprinkles into each cavity of the mold (that is how I got the colors at the rim of the “glass”).
  • Carefully spoon melted white chocolate into molds (I placed the melts in a zip-top bag, zipped it shut tight, clipped a corner and piped it into the molds to make sure I got it all the way to the bottom without bubbles). 
  • Tap on countertop and set (level!) in freezer for 10-15 minutes until hard.
  • Pop cups out of molds and set aside. 
  • While cups are hardening, make filling by creaming together lemonade/other unsweetened drink mix flavor with cream cheese.
  • Fold in marshmallow and then fold in 1/2 of Cool Whip until smooth.
  • You could spoon this into the little cups, but I piped the filling in (again- to make it easy to get all the way to the bottom of each cup). 

  • Spoon remainder of Cool Whip into a zip-top bag that has been fitted with a large decorating tip. Zip it tightly shut and pipe swirls on top of each cup. 
  • Add sprinkles (and I added a little bit of a straw to each one too, because….soooo cute! 🙂
  • Enjoy!

My thoughts: These are such a fun idea for showers and other celebrations that call for something unique and yet yummy! You’ll want to keep these refrigerated (cream cheese and Cool Whip) until you serve them, but pull them out and let them soften up before serving (the chocolate is really yummy to break apart and eat with the cream!!!) Enjoy! ~r

Other mini- desserts that are party-perfect! (click on a photo to see the recipe)

Honeycomb Oreo Pops- with Bees!

Posted on

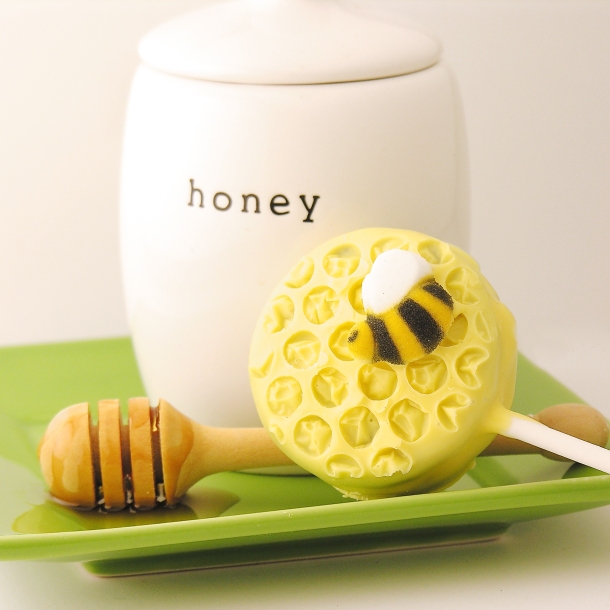
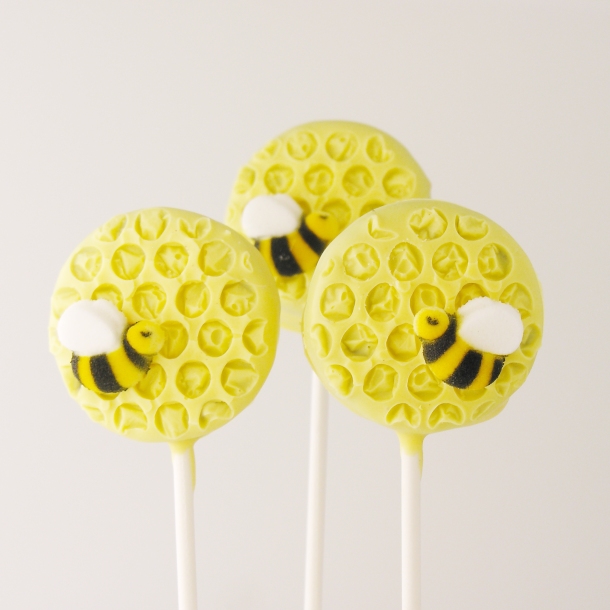
Adorable Honeybee Oreo Pops are sure to make your summer picnics more fun!!!

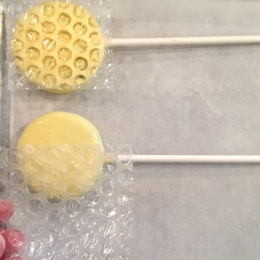
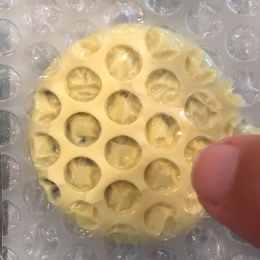
There is something so fun about using bees and honeycomb as a dessert decoration. I originally wanted to use a chocolate transfer with a honeycomb design on these- but I couldn’t find the transfers available in the states (except for in bulk- which I definitely did NOT need!). I decided to experiment with bubble wrap instead and they turned out SO cute. Goodness- I love these. When I gave them away to friends they all asked how I made the honeycomb. I thought it would be obvious that I’d used bubble wrap, but all they could see was the honeycomb until I explained.

These are maybe one of the easiest Oreo pops I’ve done. You really need to try them!

Here’s how we made them: (printable recipe here)

(If you have never made Oreo Pops before, check out our tutorial here.)

INGREDIENTS: (makes about 24 pops)

  • One package of Double Stuff Oreos
  • 2 bags of Wilton’s candy melts in yellow
  • 1/4 cup of Wilton’s candy melts in white
  • Candy bees (I got mine here)

DIRECTIONS:

  • Gently twist apart all Oreos.
  • Melt white candy melts in the microwave in 30 second increments, stirring between until melted and smooth.
  • Dip end of a lollipop stick into the white chocolate, spread a little on the top of the white Oreo filling and then press the stick flat into the center of the filling.
  • Place top of Oreo on, and set on a cookie sheet. When all Oreos have sticks inserted, pop these in the freezer for 15-20 minutes (until they are nice and firmly set).
  • While these chill, cut bubble wrap (try to find a small bubble variety- I used 1/8″ bubbles) into squares just big enough to cover the top of an Oreo.
  • Melt yellow candy melts in the microwave in 30 second increments, stirring between until melted and smooth.
  • Spoon yellow melts over the top of each chilled Oreo pop, making sure all sides are completely covered. Tap stick against side of bowl to remove excess candy melts and slide bottom against edge of bowl to take excess off.
  • Set coated pop on a sheet of parchment paper and gently press bubble wrap on top.

  • Repeat this with all Oreo pops and allow candy melts to harden completely (refrigerate to speed process up)
  • Gently peel bubble wrap off top of Oreo (I thought it might pop and leave plastic behind, but it came off perfectly!)
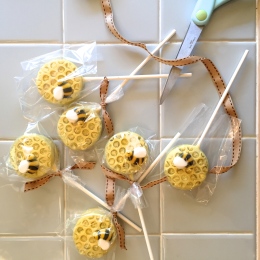
  • Use remaining candy melts to “glue” a bee on top. Simply use a toothpick or small knife to wipe a bit of melted yellow candy on the back of a candy bee, and set it on top. Allow this to harden. 

  • Place each Oreo into a little cello bag, and tie with ribbon for a cute summer treat that will keep for weeks in a cool place! ENJOY!!!!

My thoughts: SO FUN!!!!  Oreo pops are always fun- no matter what they are decorated with- but these Oreo pops are just especially cute! Goodness. I love them! Perfect for the end of a picnic or for a honeybee themed party! I hope you get a chance to try these out! Enjoy! ~r

Like cute bugs? We have a few recipes here for your summer insect enjoyment 🙂 (click on a photo to see the recipe)

Smoke Bomb Oreo Pops!

Posted on

These adorable smoke bomb Oreos will be the hit of your July 4th parties!

It’s hard to believe that July is just around the corner– but it is! I love summer, and making fun patriotic treats always reminds me of pool parties and days at the beach on Lake Michigan 🙂 I made smoke-bomb brownies last year, and they were such a hit that I decided to turn them into Oreo pops this year!

Cute, yummy and SO easy to make ahead and have ready for all your summer celebrations!

Here’s how we made them: (printable recipe here)

INGREDIENTS: (makes about 30 pops)

  • One package of Double Stuff Oreos
  • 2 bags of Wilton’s candy melts in red
  • 1/4 cup of Wilton’s candy melts in white
  • Twizzlers Pull-n-Peel licorice in red/white/blue (or licorice strings of another variety)
  • Large star sprinkles
  • Tiny star spinkles

DIRECTIONS:

  • Gently twist apart all Oreos.
  • Melt white candy melts in the microwave in 30 second increments, stirring between until melted and smooth.
  • Dip end of a lollipop stick into the white chocolate, spread a little on the top of the white Oreo filling and then press the stick flat into the center of the filling.
  • Place top of Oreo on, and set on a cookie sheet. When all Oreos have sticks inserted, pop these in the freezer for 15-20 minutes (until they are nice and firmly set).
  • While these chill, cut licorice strings into about 30 (1 inch) segments.
  • Melt red candy melts in the microwave in 30 second increments, stirring between until melted and smooth.
  • Dip the end of a licorice string into the red melts and then set flat against a large star sprinkle and allow this to harden- this will basically “glue” the star onto the end of the licorice. 
  • Gently dip chilled Oreo in red candy melts, using a spoon to cover all sides. Tap stick against side of bowl to drain excess. Set on parchment paper.
  • While candy melts are still soft, set end of licorice into the top of the Oreo and sprinkle with tiny stars.
  • Allow everything to harden up, and then slide each pop into a small cello bag and tie with ribbon (alternatively, store in an airtight container with parchment paper as layers between).
  • Enjoy!

My thoughts: These are easy little treats to make- and they have OREOS inside- so they are delicious too! (If you have never made Oreo Pops before, check out our tutorial here.) ENJOY!

Other fun and very patriotic desserts for your July: (click on photo to see recipe)


Baseball Brownie Cups!

Posted on

Dense chocolate brownie cups topped with fudge and a dome of creamy peppermint topping! These baseball brownies are a perfect idea for Father’s Day!

Our day to celebrate dad is almost here! I happen to have a pretty incredible dad. By the time this posts he will be in Canada fishing with my uncles and cousins (does Father’s Day get better than that??) I’ve celebrated all of his various hobbies over the years…fishing, golfing, football (watching), setting off epic firework shows… but I hadn’t made anything baseball. Until now. Let me introduce to you, the YUMMIEST baseballs you will ever meet!

Seriously- they are almost too cute to eat!!

Now, these look difficult to make. Let me assure you that they are not- until you pipe those little laces on top. Then, if you have shaky hands like me, these are AGONY. Just being honest. 🙂 If you have a steady hand (or have a friend to help) you will zip through that piping like nothing though! Promise.

Here is how we made these (printable recipe here):

Ingredients: (makes 24 baseball brownies)

Baseballs: (make these 1st)- you will need a little chocolate bomb mold to make these:

  • 5 cups powdered sugar
  • 8 tablespoons (1/2 cup) melted butter
  • 2 teaspoons peppermint extract
  • Food color in white
  • One bag of Wilton’s Candy melts in white
  • About 1/2 cup of Wilton’s Candy melts in red.

Brownies: 

  • 1cup butter
  • 2 cup sugar
  • 3 eggs
  • 2 teaspoons vanilla
  • 2 cups flour
  • 1/2 cup cocoa
  • 1/2 teaspoon salt
  • 1 cup milk

Chocolate Glaze:

  • 6oz. semi-sweet chocolate chips
  • 6 tablespoons butter (do not substitute margarine here!)
  • Green jimmies for grass!

DIRECTIONS:

Mint Baseballs:

  • Melt white candy melts in microwave in 30 second increments, stirring between until smooth.
  • Use a pastry brush to brush melts into a chocolate bomb mold and freeze for a couple minutes until hard.
  • Make mint filling  by adding melted butter to sugar and extract.
  • Mix well, using water to bring it to a thick but spreadable consistency.
  • Add white food coloring to make it pure white (the butter gives it a slightly yellow color)
  • Place filling into a large zip-top bag and seal tightly.
  • Cut a corner off bag and pipe mint filling into each white shell- filling them about 3/4 full.
  • Use a knife to spread mint filling to edges. It will dip in at the center just a bit- and you want this. If it is full all the way across it doesn’t settle on the curved top of the brownie well (see the gap along the bottom in the below photo).
  • Refreeze these for a few minutes before gently popping them out and setting them on a plate. 
  • Repeat this process until you have 24 mint bombs ready.


Brownies:

  • Preheat oven to 350F.
  • Cream butter and sugar together. 
  • Beat in eggs, cocoa, vanilla and salt.
  • Add flour and milk (alternating them and mixing well in between)
  • Spoon evenly into 24 cupcake liners in a cupcake tin.
  • Bake at 350F degrees for 15-18 minutes (don’t over bake- they will start to pull away from the liner)
  • Cool.  
Chocolate Glaze:
  • Melt butter and chocolate together in the microwave in 30 second increments, stirring in between until completely melted and smooth.
  • Set aside until bombs ready to assemble.
  • Assemble the brownies by spooning a little chocolate glaze on top of a brownie and spreading to all edges.
  • Place a “baseball” in the center and sprinkle jimmies around edge.
  • Allow this all to harden up (refrigerate to speed process up).
  • Melt red candy melts in microwave in 30 second increments, stirring between until smooth.
  • Place melted candy melts into a bag or squeeze bottle fitted with a tiny writing tip (I used a Wilton’s 1.5 size).
  • Carefully pipe laces on top of baseballs (use photo as a guide) and allow these to harden.
  • Store in a lightly sealed container for 3-4 days.
  • Enjoy!

See how the center of each baseball needs to accommodate the dome-shaped top of the brownie? Here is what happens if you fill them too flat:

See along the edge how it doesn’t connect well? Yeah. Don’t do that. 🙂

My thoughts: Yes, these take some work. But they are SO CUTE!! I’ve spent way more effort on recipes that didn’t score this high in the fun/cute category. If you are going to waste time making something- waste it making these! Plus they are the BEST brownies… I promise. Delicious. 🙂 

My dad doesn’t play much baseball anymore- but he used to, and I have fond memories of playing hours of catch in the backyard with him. Just for fun, here’s a throwback to his baseball days:

That’s me in the 70’s bib 🙂 And here we are now:

Happy Father’s Day dad! Love you!!!!!!

I know you will probably stop right here on this idea, but just in case you are making TWO desserts for dad, here’s a few other ideas. Click on a photo to see the recipe:


Spring Flower Oreo Pops!

Posted on

Make a bouquet of Oreo flowers for mom this Mother’s Day!

This is the third Oreo Pop recipe I’ve used these cute little sunflower seeds in this spring- and it might be my favorite! The fun bright colors just make you smile. Tie them up in little cello bags with pretty ribbon and they make the perfect Mother’s Day treat next weekend!

You’re smiling aren’t you? Just guessing… 🙂 I absolutely LOVE these- and the color combinations are only limited to the colors you can find in the sunflower seeds. Mine are a combination of Trader Joe’s and JoAnn’s Fabric ones. You can get them online- or maybe even at your grocery! Different companies make different colors. The JoAnn ones gave me those pretty teal blue and shiny purple ones. I just used little pearl sprinkles for the centers.

Here’s how we made these fun little pops:

(If you have never made Oreo Pops before, check out our tutorial here.)

INGREDIENTS: (makes 24-30 Oreo pops)

  • One box of Double Stuff Oreos
  • 1/4 cup of Wilton’s Candy Melts in white.
  • Wilton’s Candy Melts in a variety of colors (you’ll need at least 2 bags of them)
  • Chocolate-covered sunflower seeds
  • Edible pearl sprinkles in a variety of colors

DIRECTIONS:

  • Gently twist apart all Oreos.
  • Melt white candy melts in the microwave in 30 second increments, stirring between until melted and smooth.
  • Dip end of a lollipop stick into the white chocolate, spread a little on the top of the white Oreo filling and then press the stick flat into the center of the filling.
  • Place top of Oreo on, and set on a cookie sheet. When all Oreos have sticks inserted, pop these in the freezer for 15-20 minutes (until they are nice and firmly set).
  • Melt one color of Candy Melts in the microwave in 30 second increments, stirring between until melted and smooth.
  • Gently dip Oreo in Candy Melts, using a spoon to cover all sides. Tap stick against side of bowl to drain excess. Set on parchment paper.
  • While Candy Melts are still soft, set a pearl sprinkle at the center and then gently place sunflower seeds around the pearl in the shape of a flower (as pictured). Allow Candy Melts to harden completely.
  • Repeat with other colors of Candy Melts.
  • Store in a sealed container for 2-3 weeks. You can also tie them individually in small cello bags and store for the same timeframe. (These are a perfect treat to mail to mom or grandma!!!!)
  • Enjoy!

My thoughts: I will never pick a bouquet of flowers without thinking of my mom 🙂 She never had a summer day where there wasn’t a huge bouquet of fresh-cut flowers from her garden sitting in the center of the kitchen table. This is her third Mother’s Day in heaven, but I know these would have made her smile if she was here.

Happy Mother’s Day, Mom. I love you, and miss you!

We have lots of fun recipe ideas for Mother’s Day! Click a photo to see the recipe:

Looking for that perfect gift for moms and grandmas? Get them my cookbook- specially designed to use with kids and grandkids, teaching them both kitchen skills and about God’s love for them! Fun!!! Click on the following link to find out more about it: Life Is Sweet: 12 Baking Devotions for Kids.

HAPPY MOTHER’S DAY!!!