RSS Feed

Tag Archives: coconut

Coconut Passion Fruit Cupcakes

Posted on

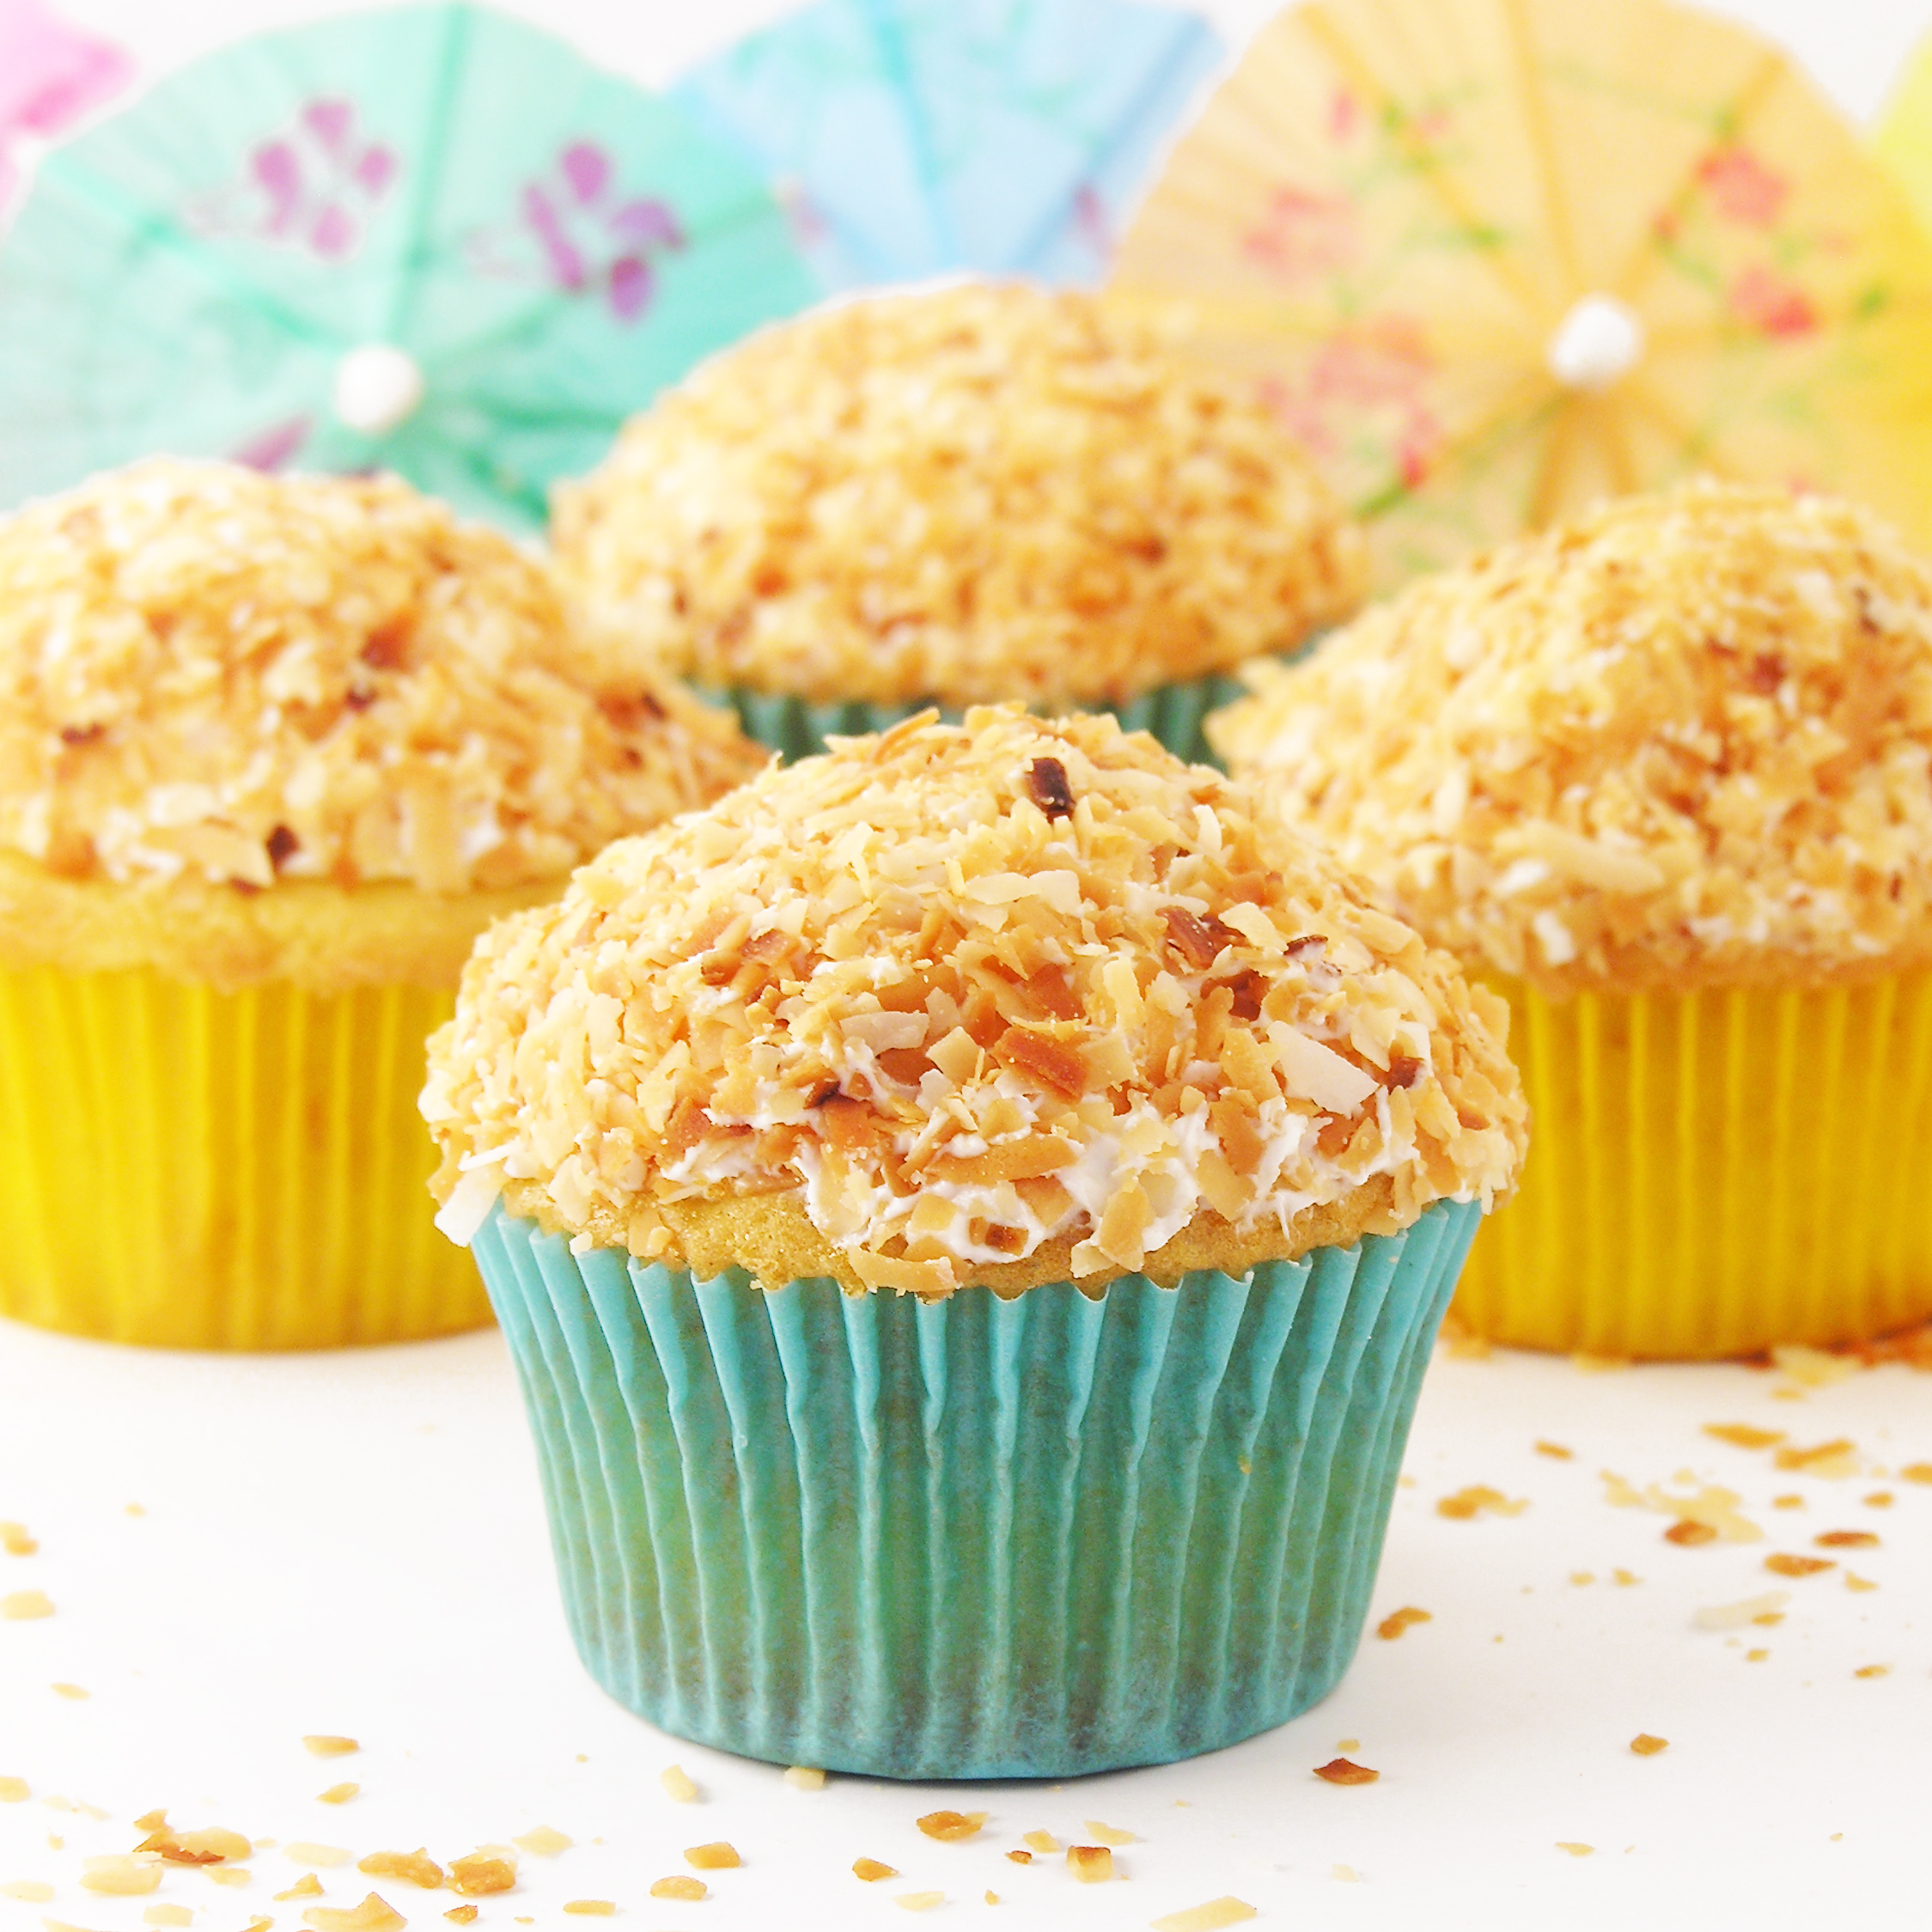
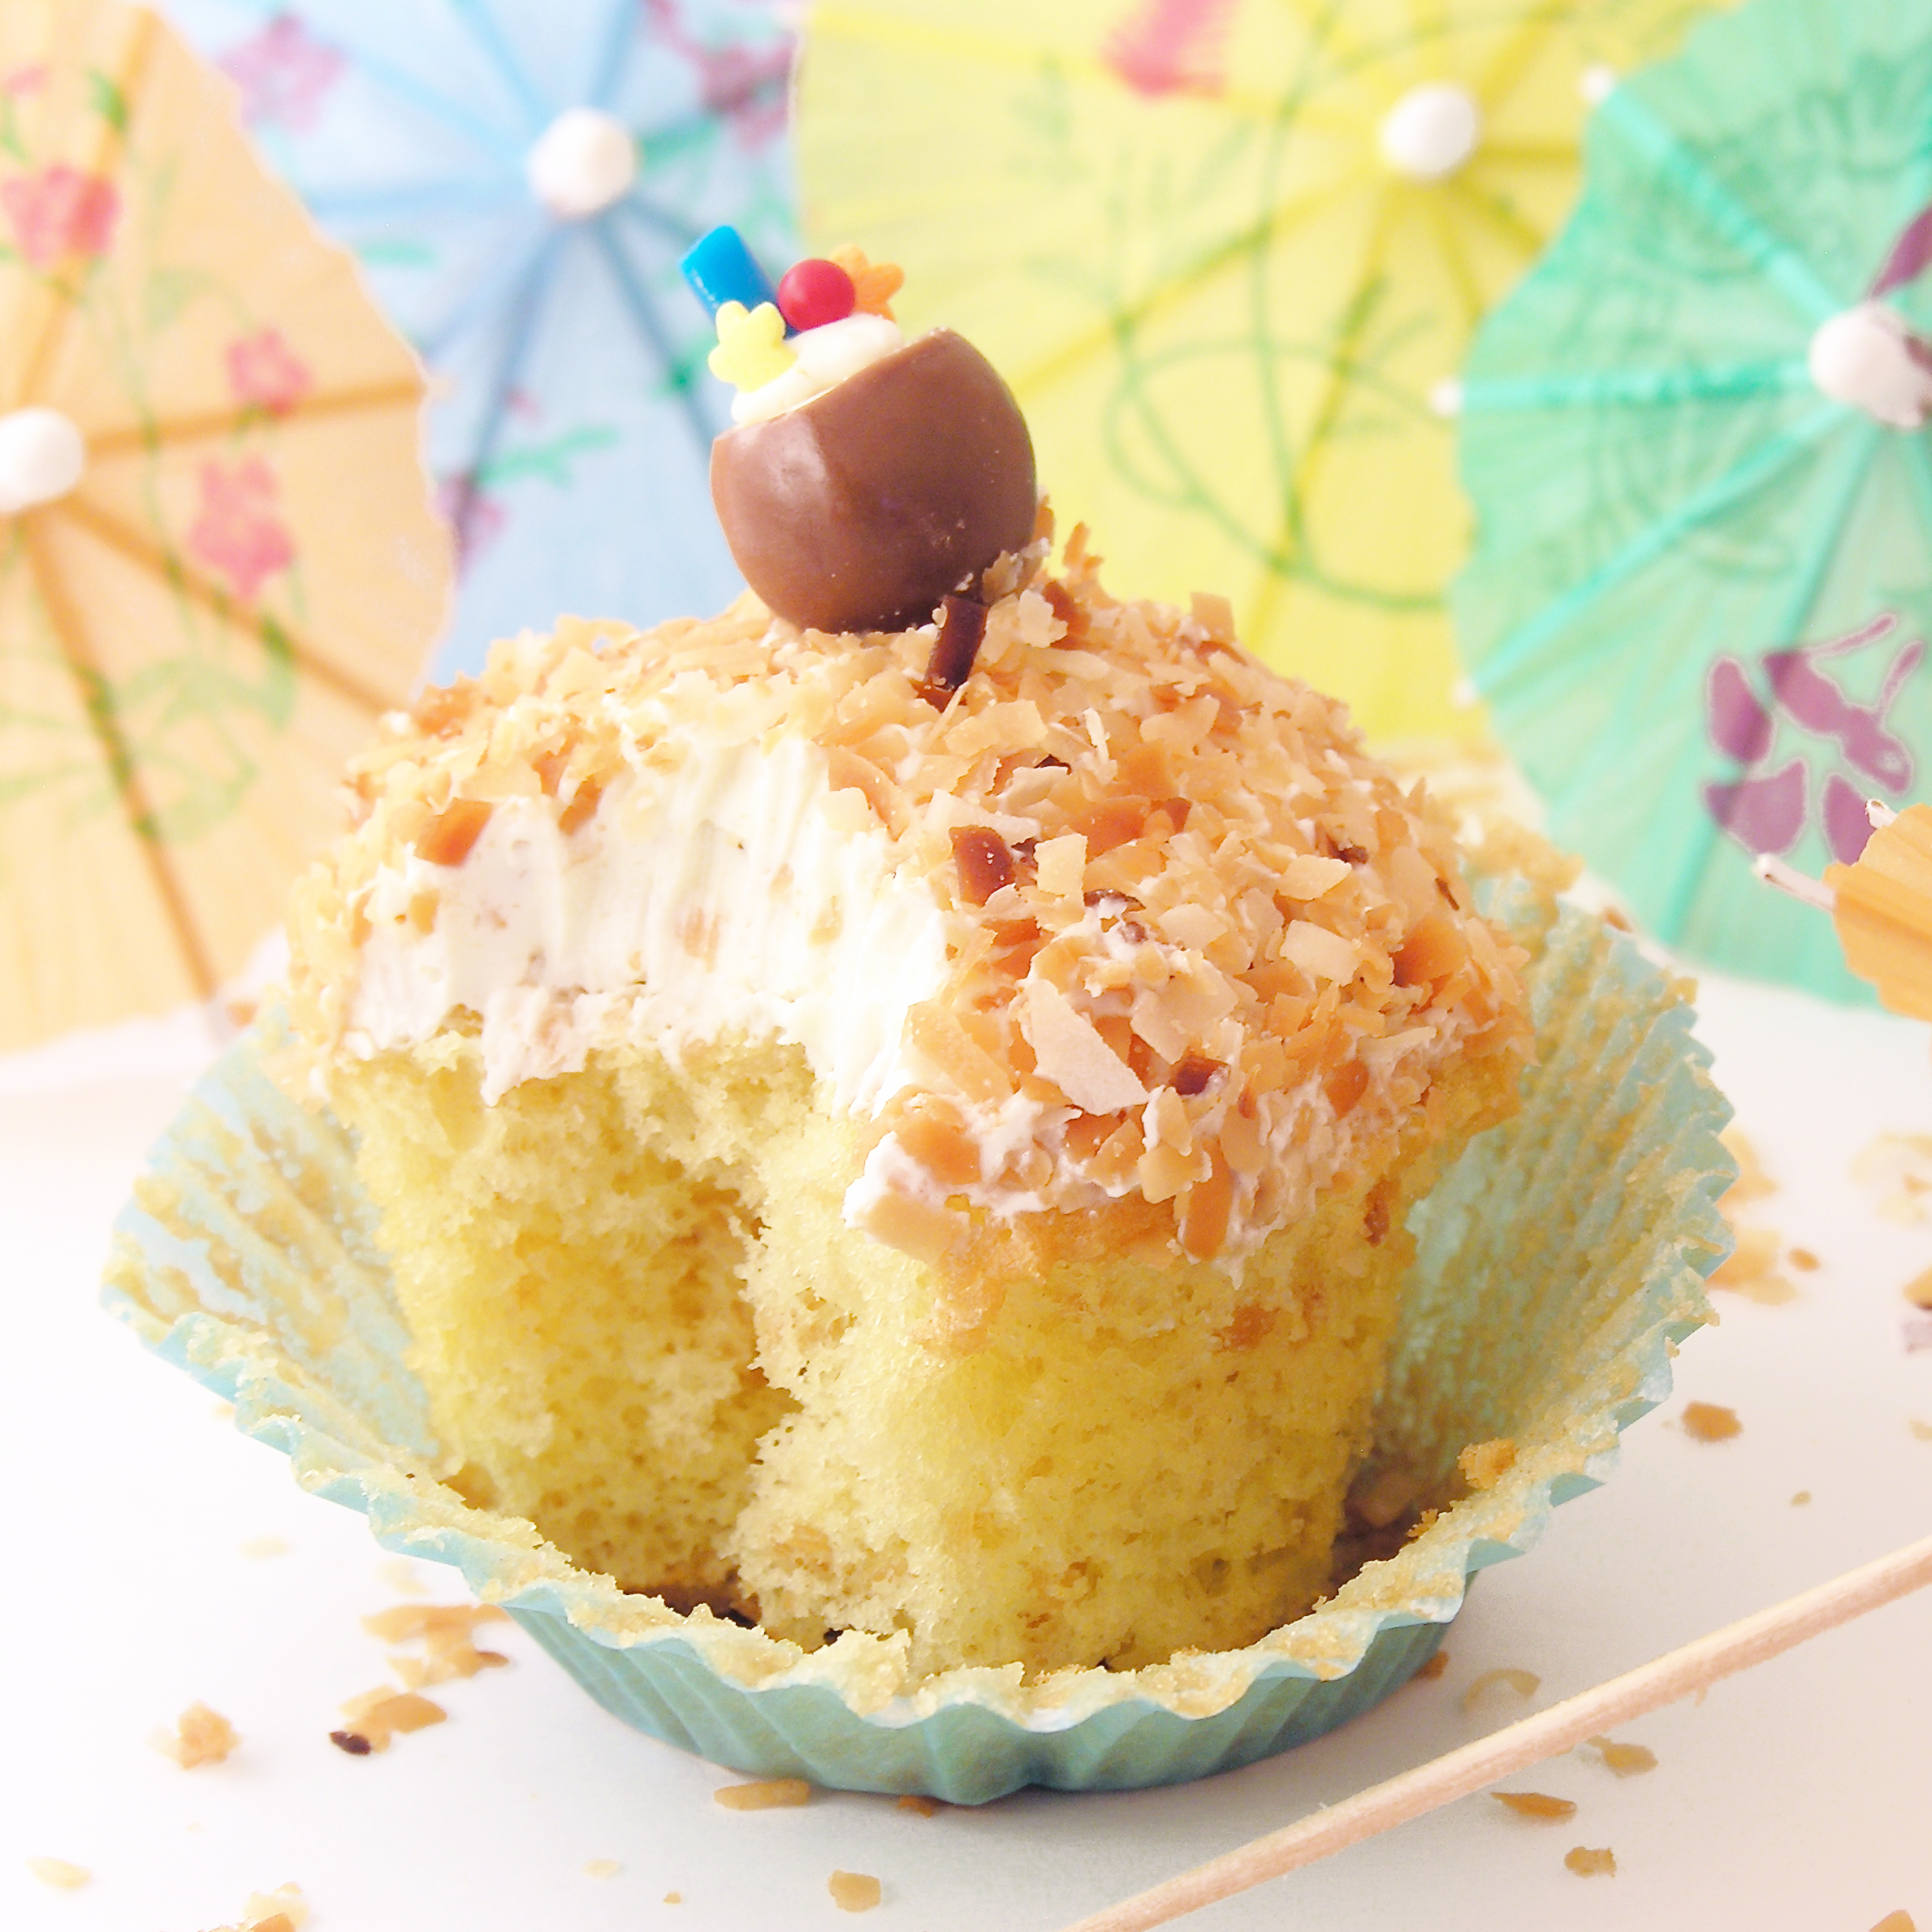
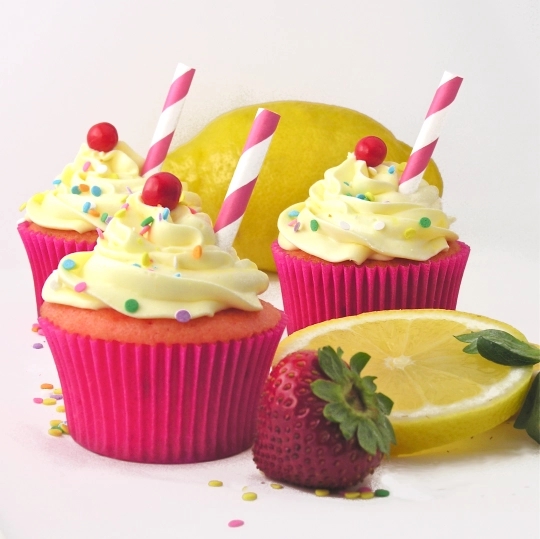
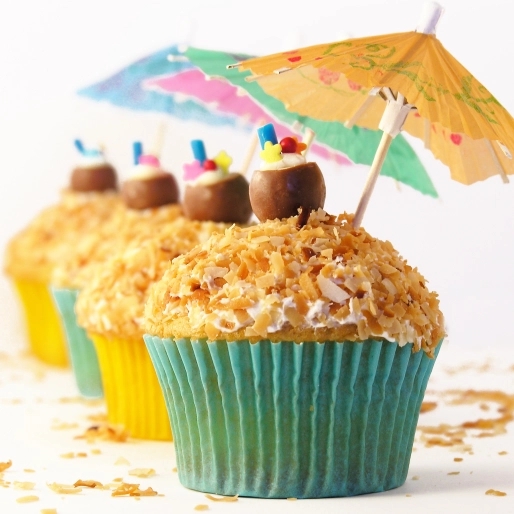
These pretty little cupcakes are a perfect spring treat! A delicious passion fruit filling inside the coconut cupcake puts them over the top with flavor, and it is SO easy to make (forget all those little passionfruit seeds!) These are a must-make recipe to celebrate the beginning of summer!

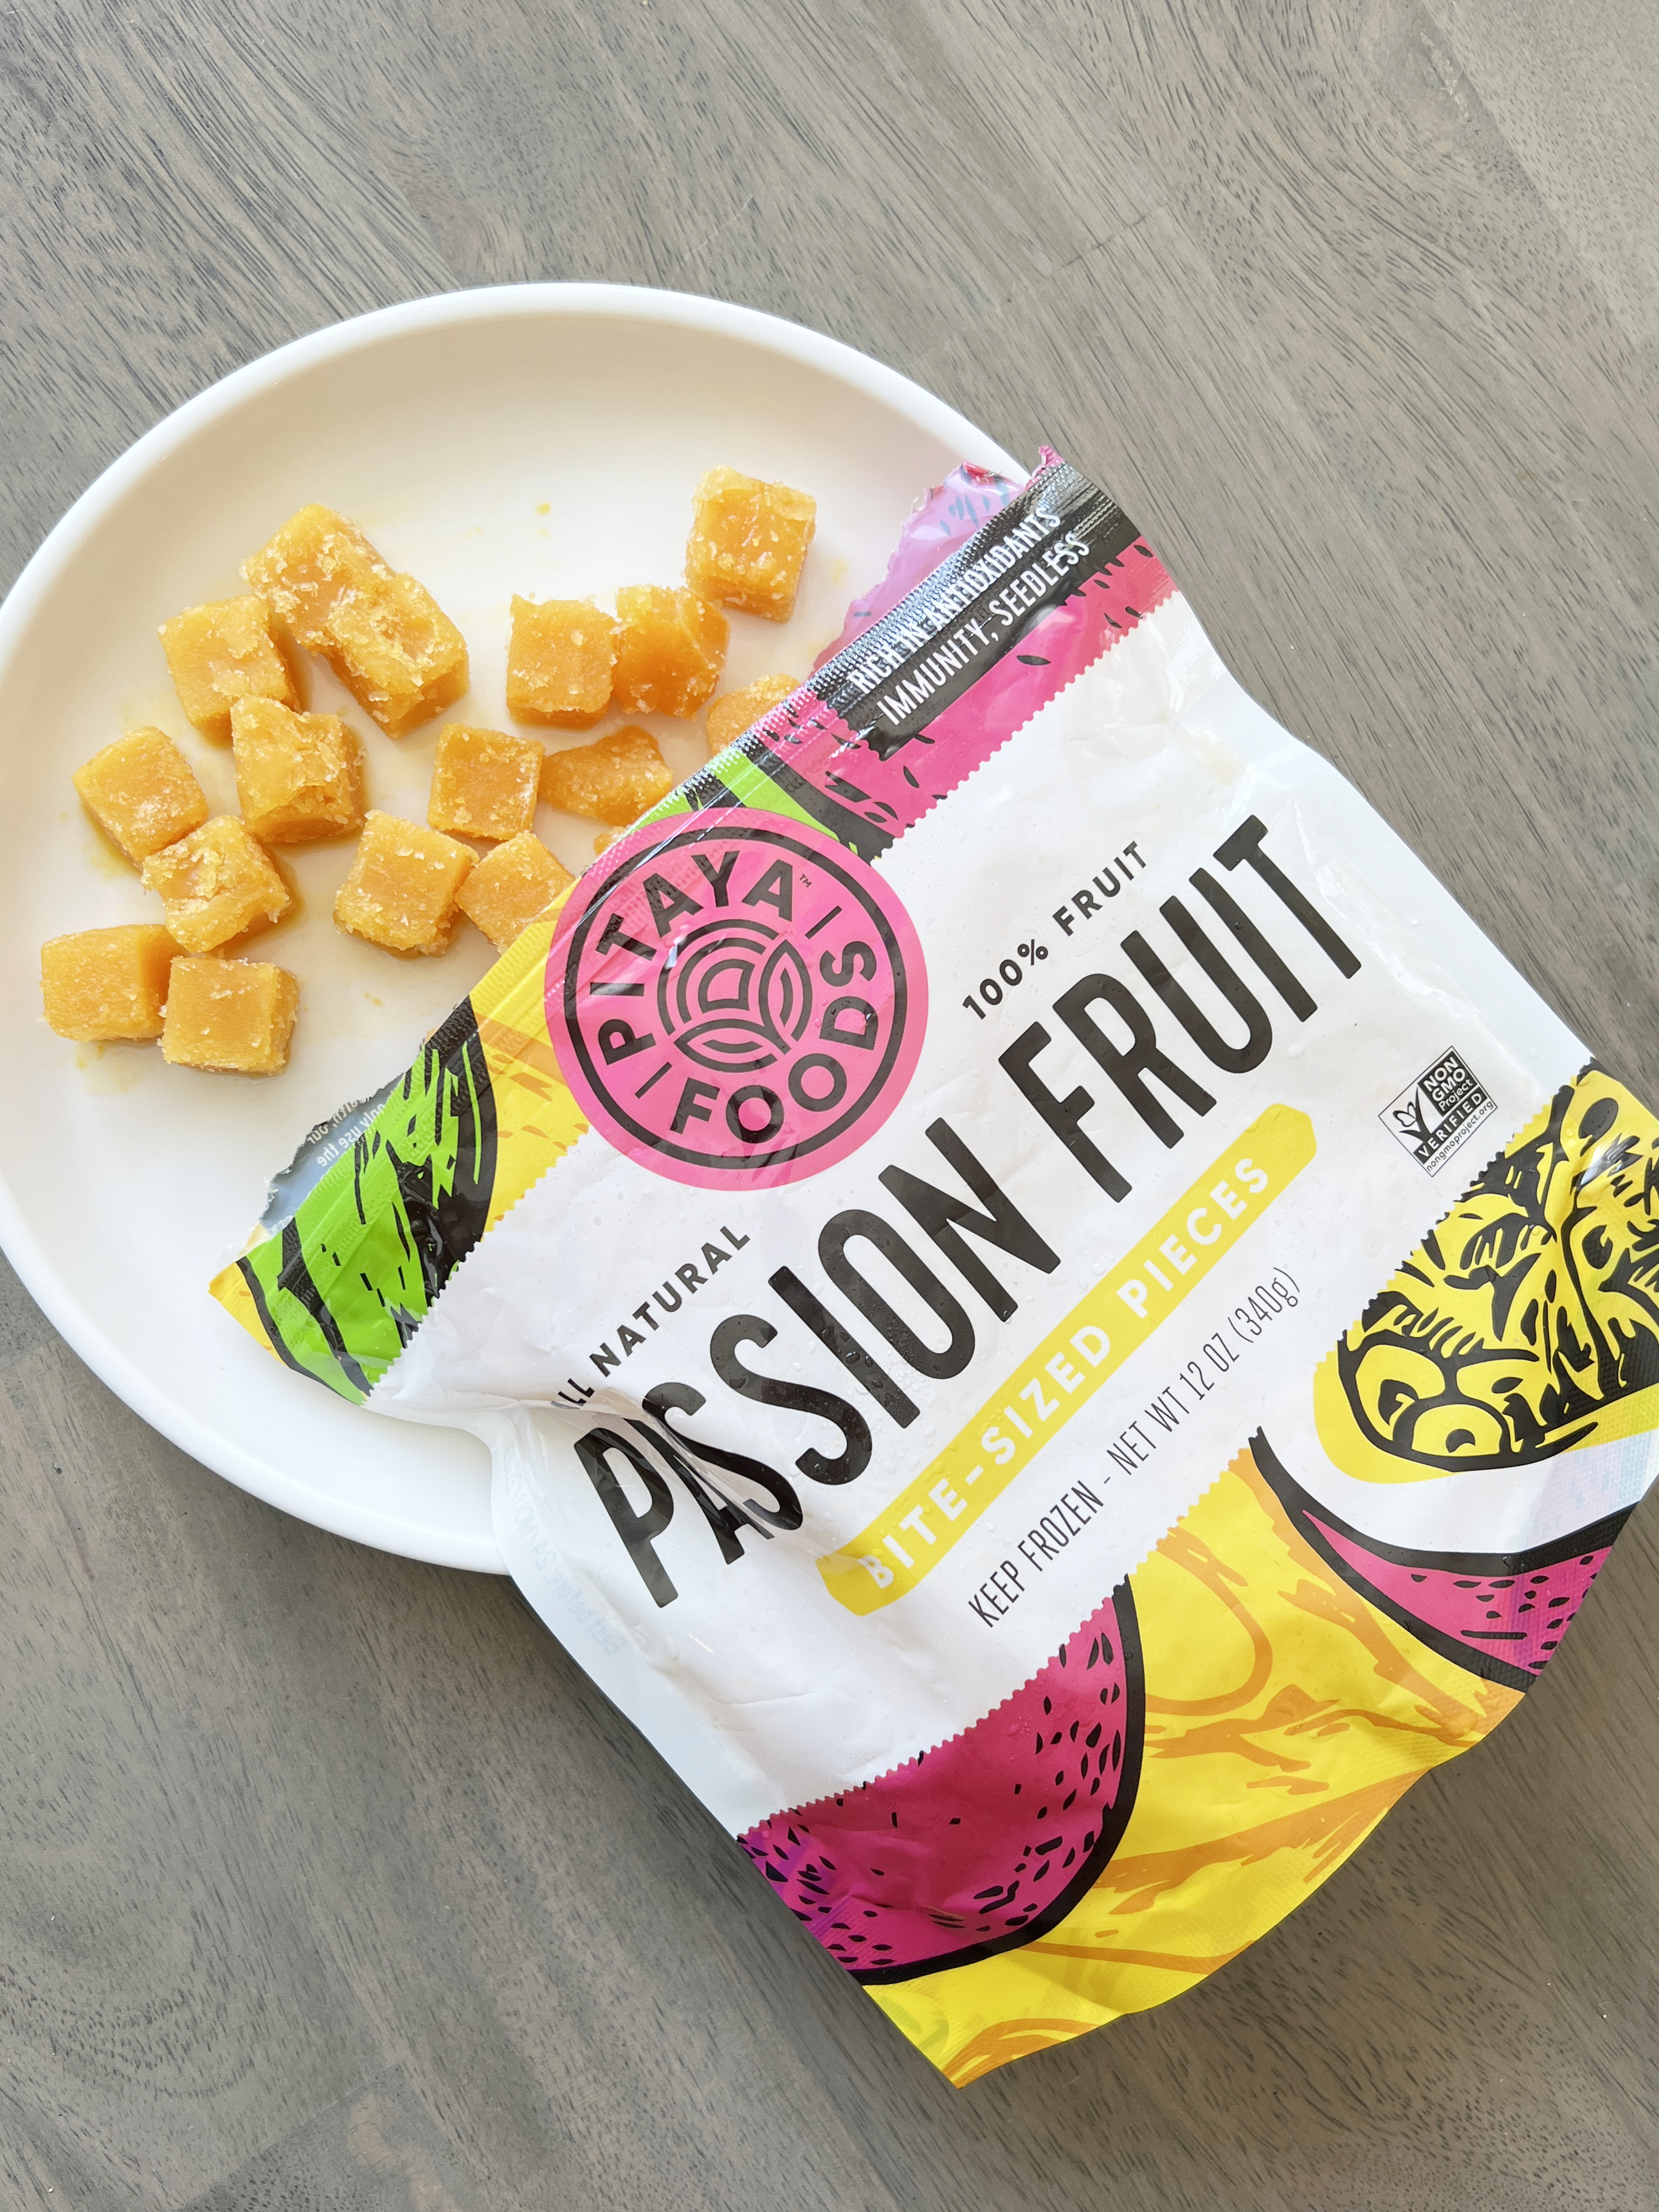
I already posted a recipe for this cupcake flavor combo a year or so ago, but then I noticed something in the freezer at Walmart recently. I was picking up frozen raspberries to have on my oatmeal in the mornings, and there it was: a bag of frozen passionfruit purée frozen into tiny cubes. I got some, used them on my oatmeal, and fell in love with this product! No seeds, so mess, just a sprinkle of cubes on my warm oatmeal and…. perfection! 

CM6

So… here’s a second go-around with these flavors except that this time it is WAY more real-fruity, and a totally different feel than the first time I combined these ingredients in a cupcake! The first time was more flavoring from a passion fruit syrup. This time it’s all fruit! My husband says they are like a fruit-filled doughnut and that the filling is “SO good!” I like the decorations on my first cupcakes better, but had no time to make meringues today. Check it out for inspiration though!

Want to know how to make these? Here you go (printable recipe): 

INGREDIENTS: 

Filling: 

  • 1 12oz bag of frozen passionfruit (available at Walmart). This is equal to about 1 1/2 cups or passionfruit purée, if you are unable to find the frozen. 
  • 1 cup granulated sugar (more or less to taste- you can decide how sweet you want these!)
  • 1 cup water
  • 1/2 cup cornstarch

Cupcake:

  • 1 boxed white cake mix
  • 1/2 cup unsalted butter (1 stick) – melted
  • 1 can (15-16oz) of coconut milk (not cream!)
  • 4 eggs (whites only!)
  • 1 cup shredded sweetened coconut

Frosting: 

  • 1 stick (1/2 cup) unsalted butter, softened to room temperature
  • 2 sticks (1 cup) salted butter, softened to room temperature
  • 2 1/2 cups of powdered sugar

DIRECTIONS:

Filling: make this first, so that it has time to chill before you need it.

  1. Mix water and cornstarch in a small bowl and set aside.
  2. Place entire package of frozen passion fruit cubes and sugar into a small saucepan.
  3. Heat and stir until all cubes are melted and edges are bubbling.
  4. Stir cornstarch slurry together again (it will settle) and gradually pour into fruit and sugar, stirring constantly. You may not need it all- so add it slowly, pause and stir. You want the sauce to be thick enough to not run out of the cupcake center (like the filling in a fruit pie). When it reaches this consistency, stop adding cornstarch, take off stove, pour into a bowl and pop into the refrigerator to cool.

Cupcakes: 

  1. Preheat oven to 350 F degrees.
  2. Place cake mix, eggs and melted butter in large mixing bowl and beat on low for about 1 minute until well-incorporated. 
  3. Add can of coconut milk and beat on low until incorporated, and then on high for about a minute more.
  4. Gently stir shredded coconut in using a spoon.
  5. Scoop batter into cupcake liners placed in a cupcake tin. 
  6. Bake at 350F degrees for 14-18 minutes. Check, and when an inserted toothpick comes out clean, they are done. 
  7. Cool completely. 

Frosting: 

  1. Place powdered sugar and softened butter into a large mixing bowl and beat on medium until well incorporated and starting to get fluffy (a couple minutes). 
  2. Add about half of the cooled passion fruit filling to the mixture and beat on high until light and fluffy. 
  3. Place in a zip-top bag fitted with a piping tip. 

Assembly: 

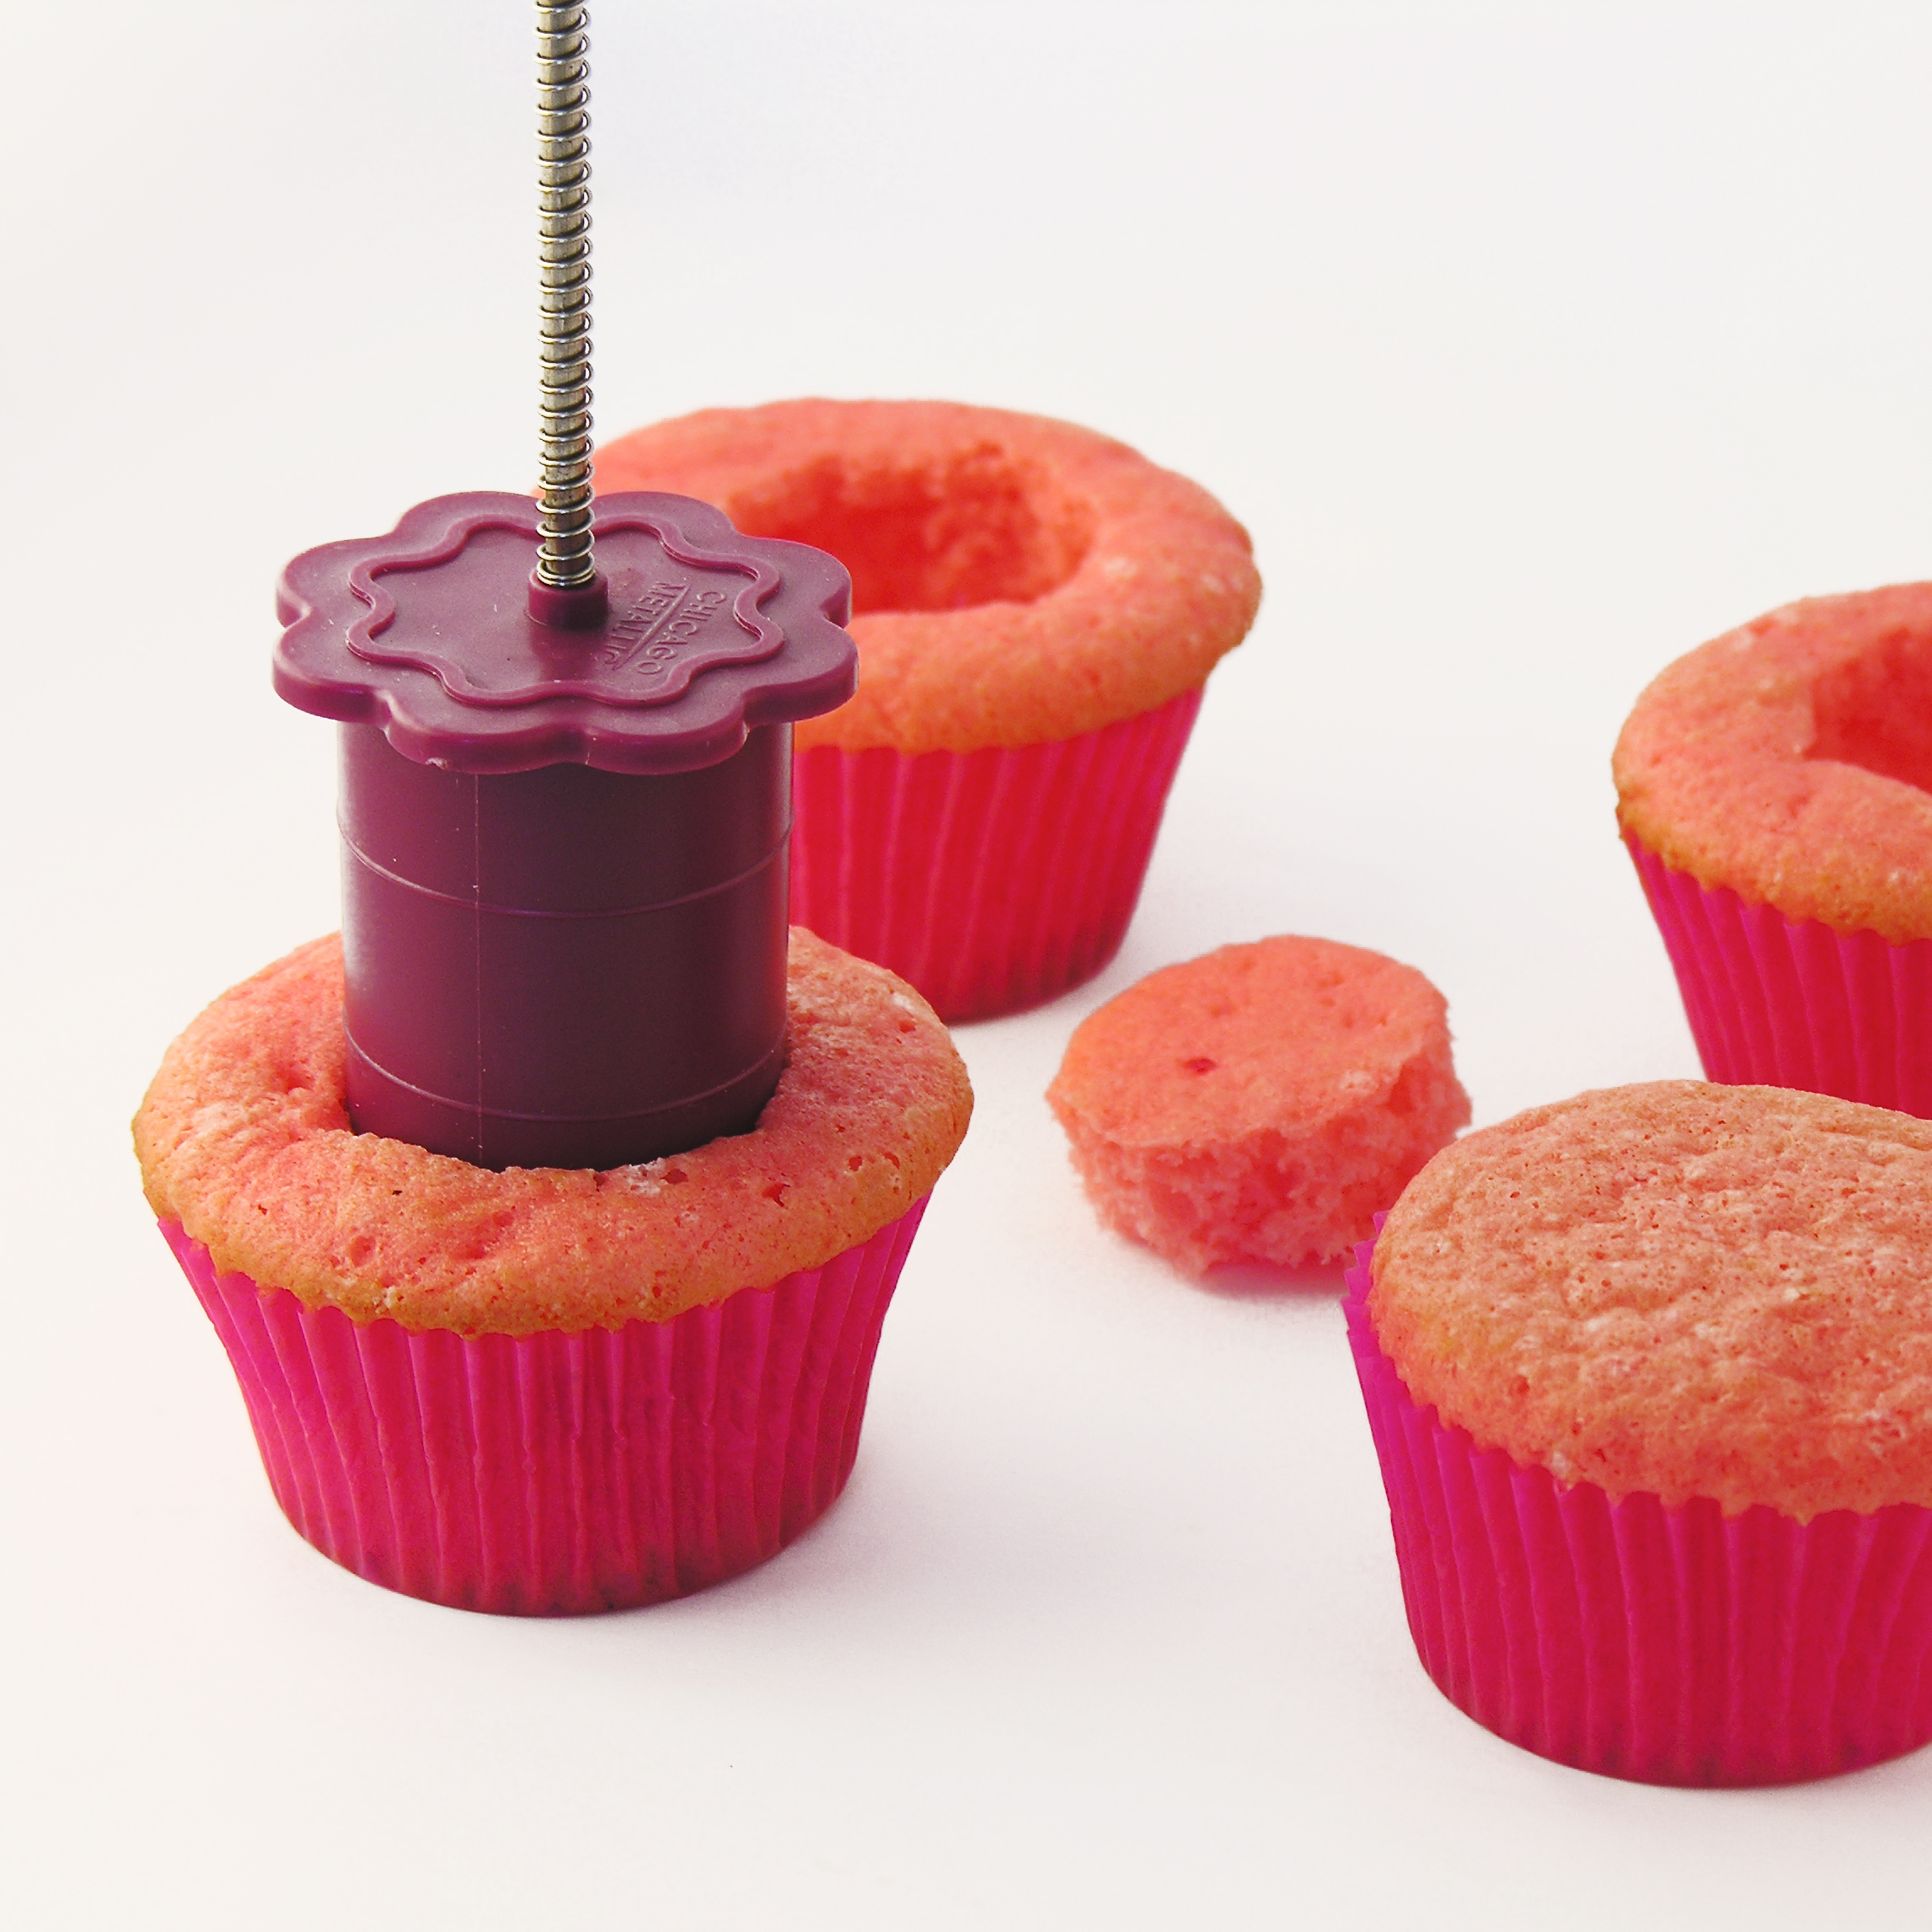
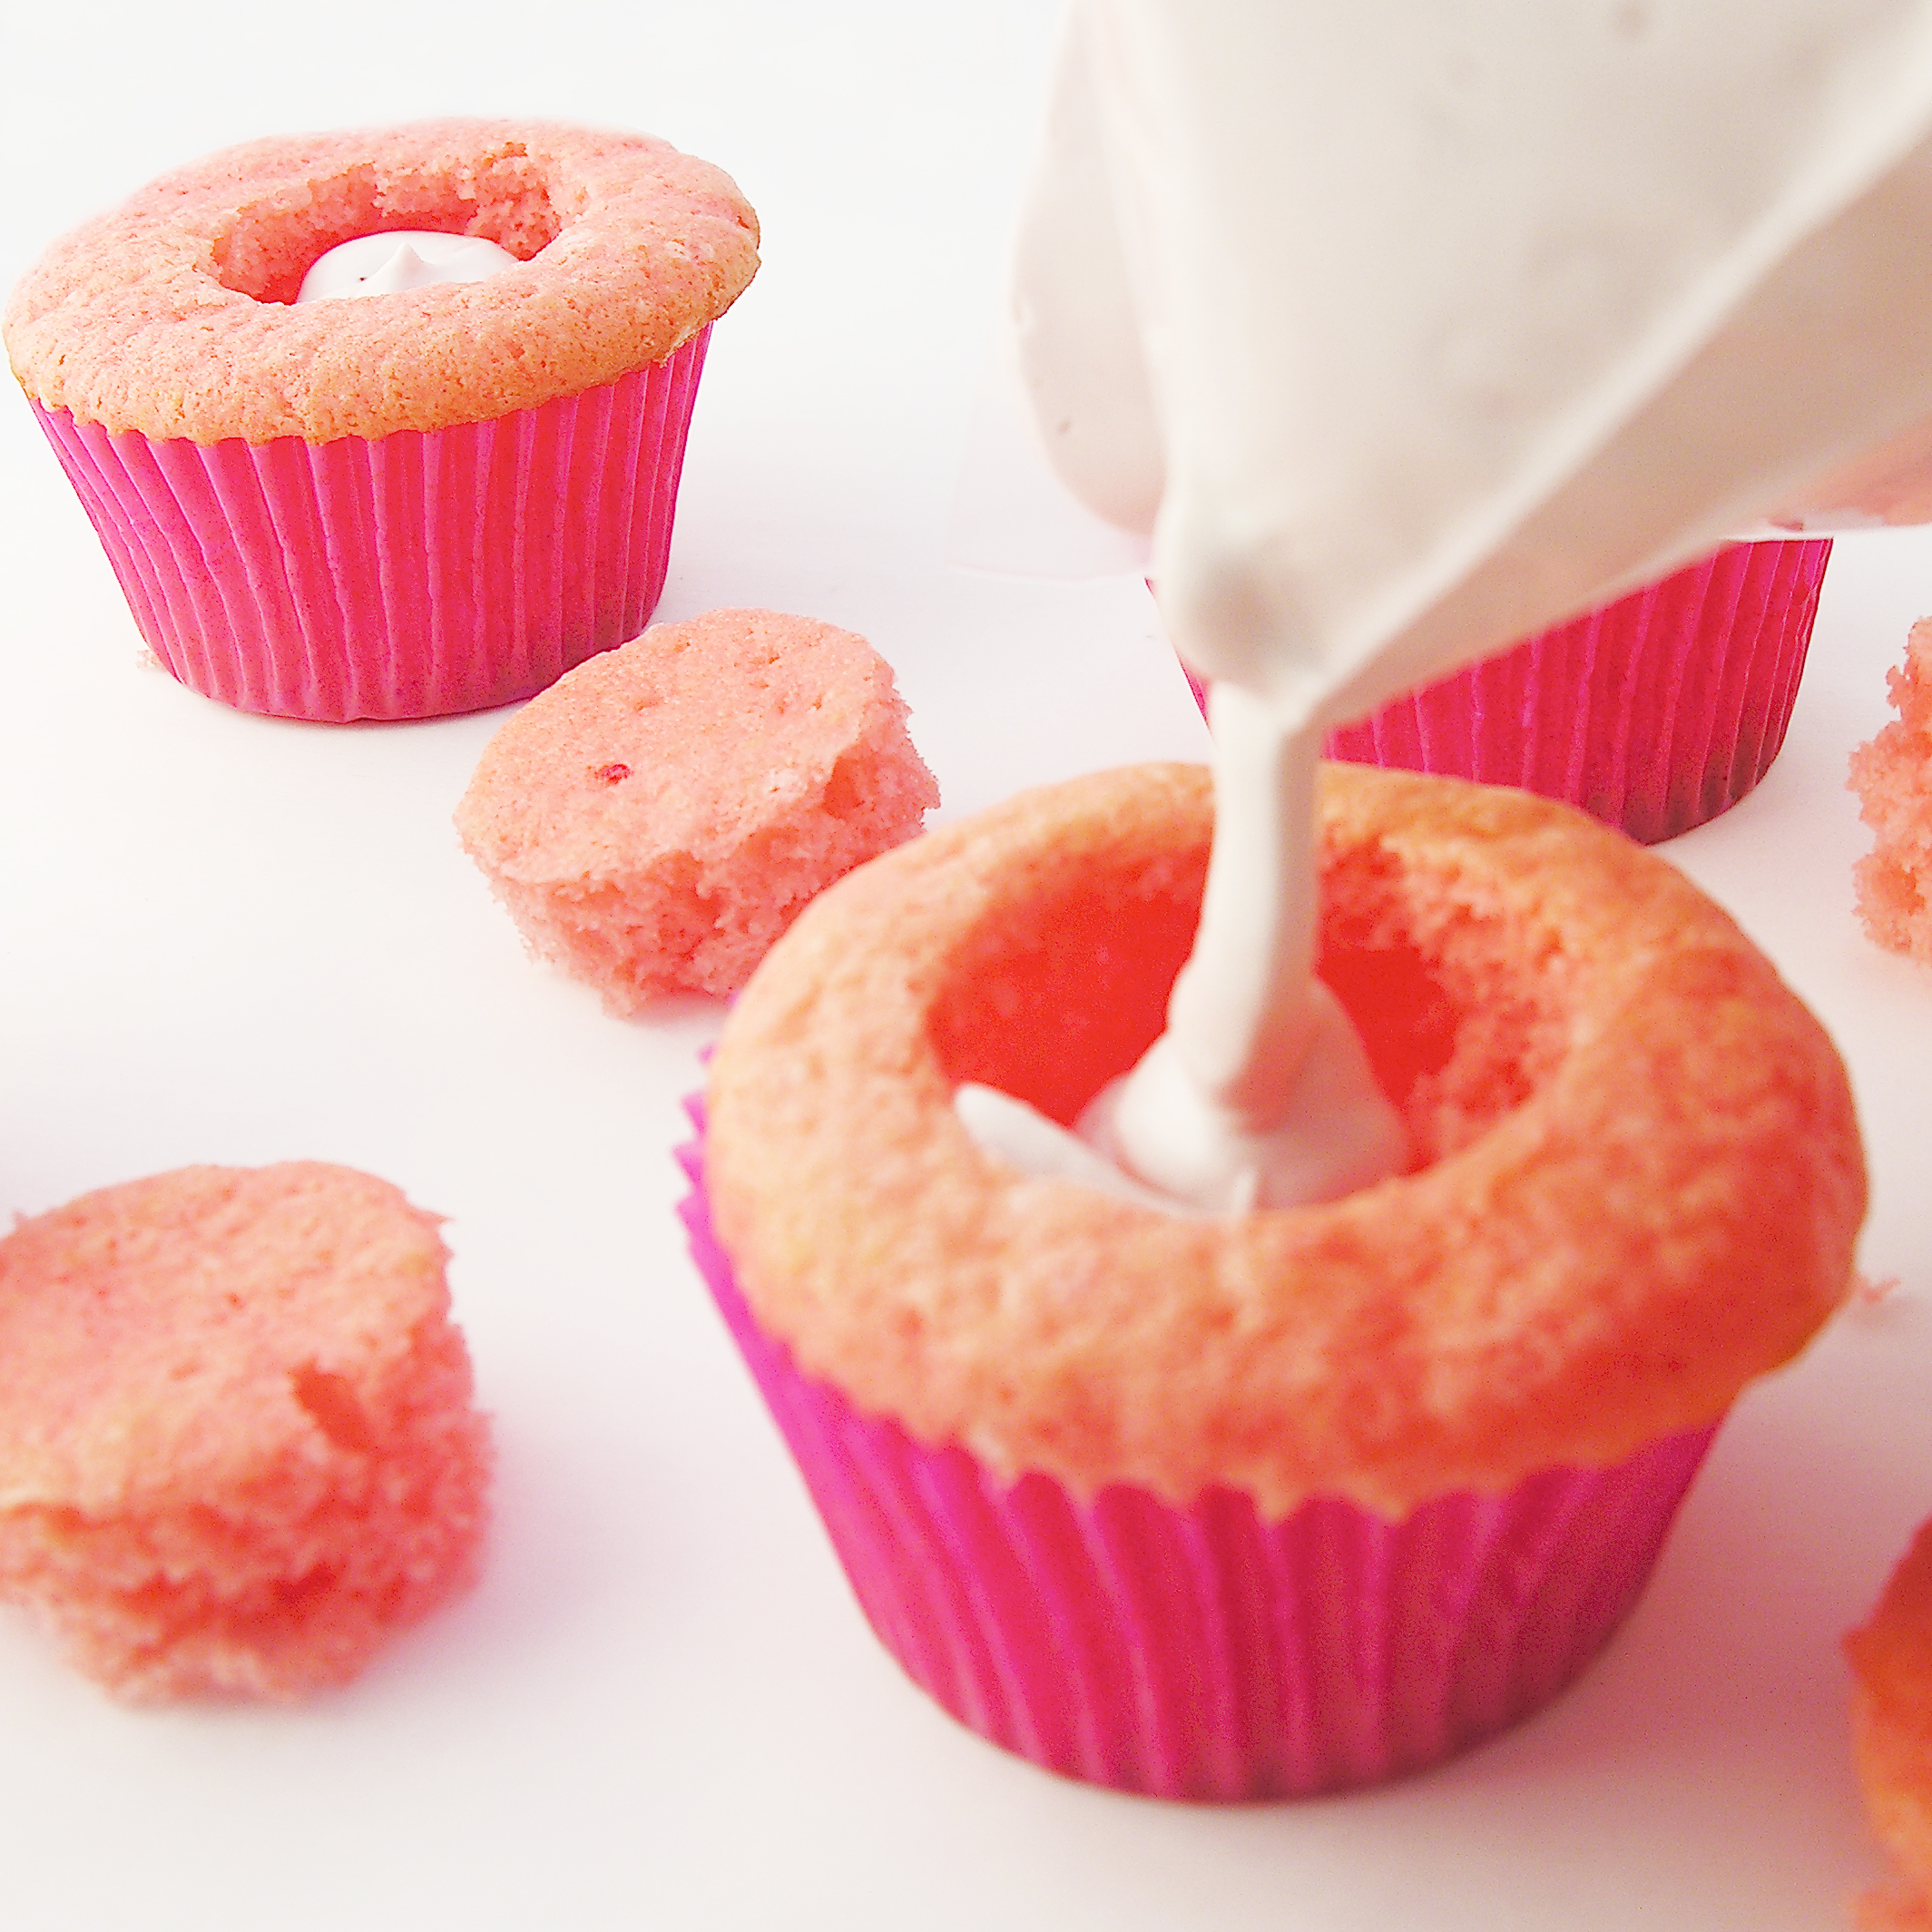
  1. Hollow out a little core in each cupcake using a knife or a cupcake corer, (affiliate link) and saving the top portion to use as a “lid”.
  2. Place remaining filling into a small zip-top bag and clip a corner off. 
  3. Pipe filling into each cupcake, and top with “lid”.
  4. Pipe icing on top of each cupcake, sprinkle with coconut, and top with a little drop of filling, if you have enough left.
  5. Enjoy!!!

My thoughts: I really enjoyed making these and sharing them with people. They are such cheery little cupcakes and that pop of flavor from the passionfruit in the middle is amazing! I really hope you get a chance to try these! ~r

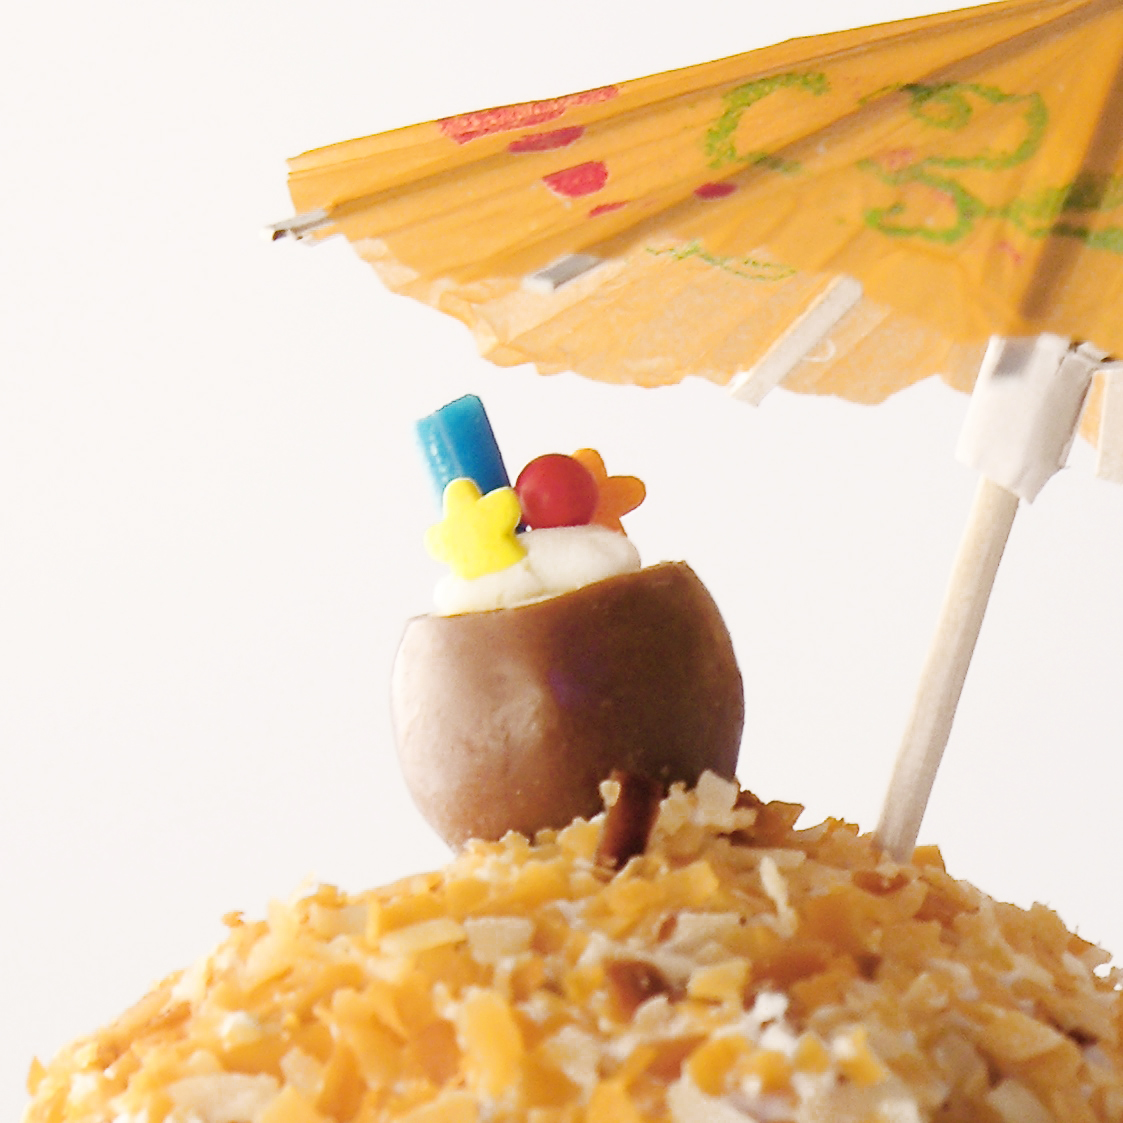
Other fun summer cupcakes to try- just click on a photo to see the recipe! 

banana-split-cupcakes5 root-beer-float-cupcakes1 strawberry-lemonade-cupcake-7 pina-colada-cupcakes4

Advertisement

No-Bake Easter Nest Cookies

Posted on

Easter nest 4-1
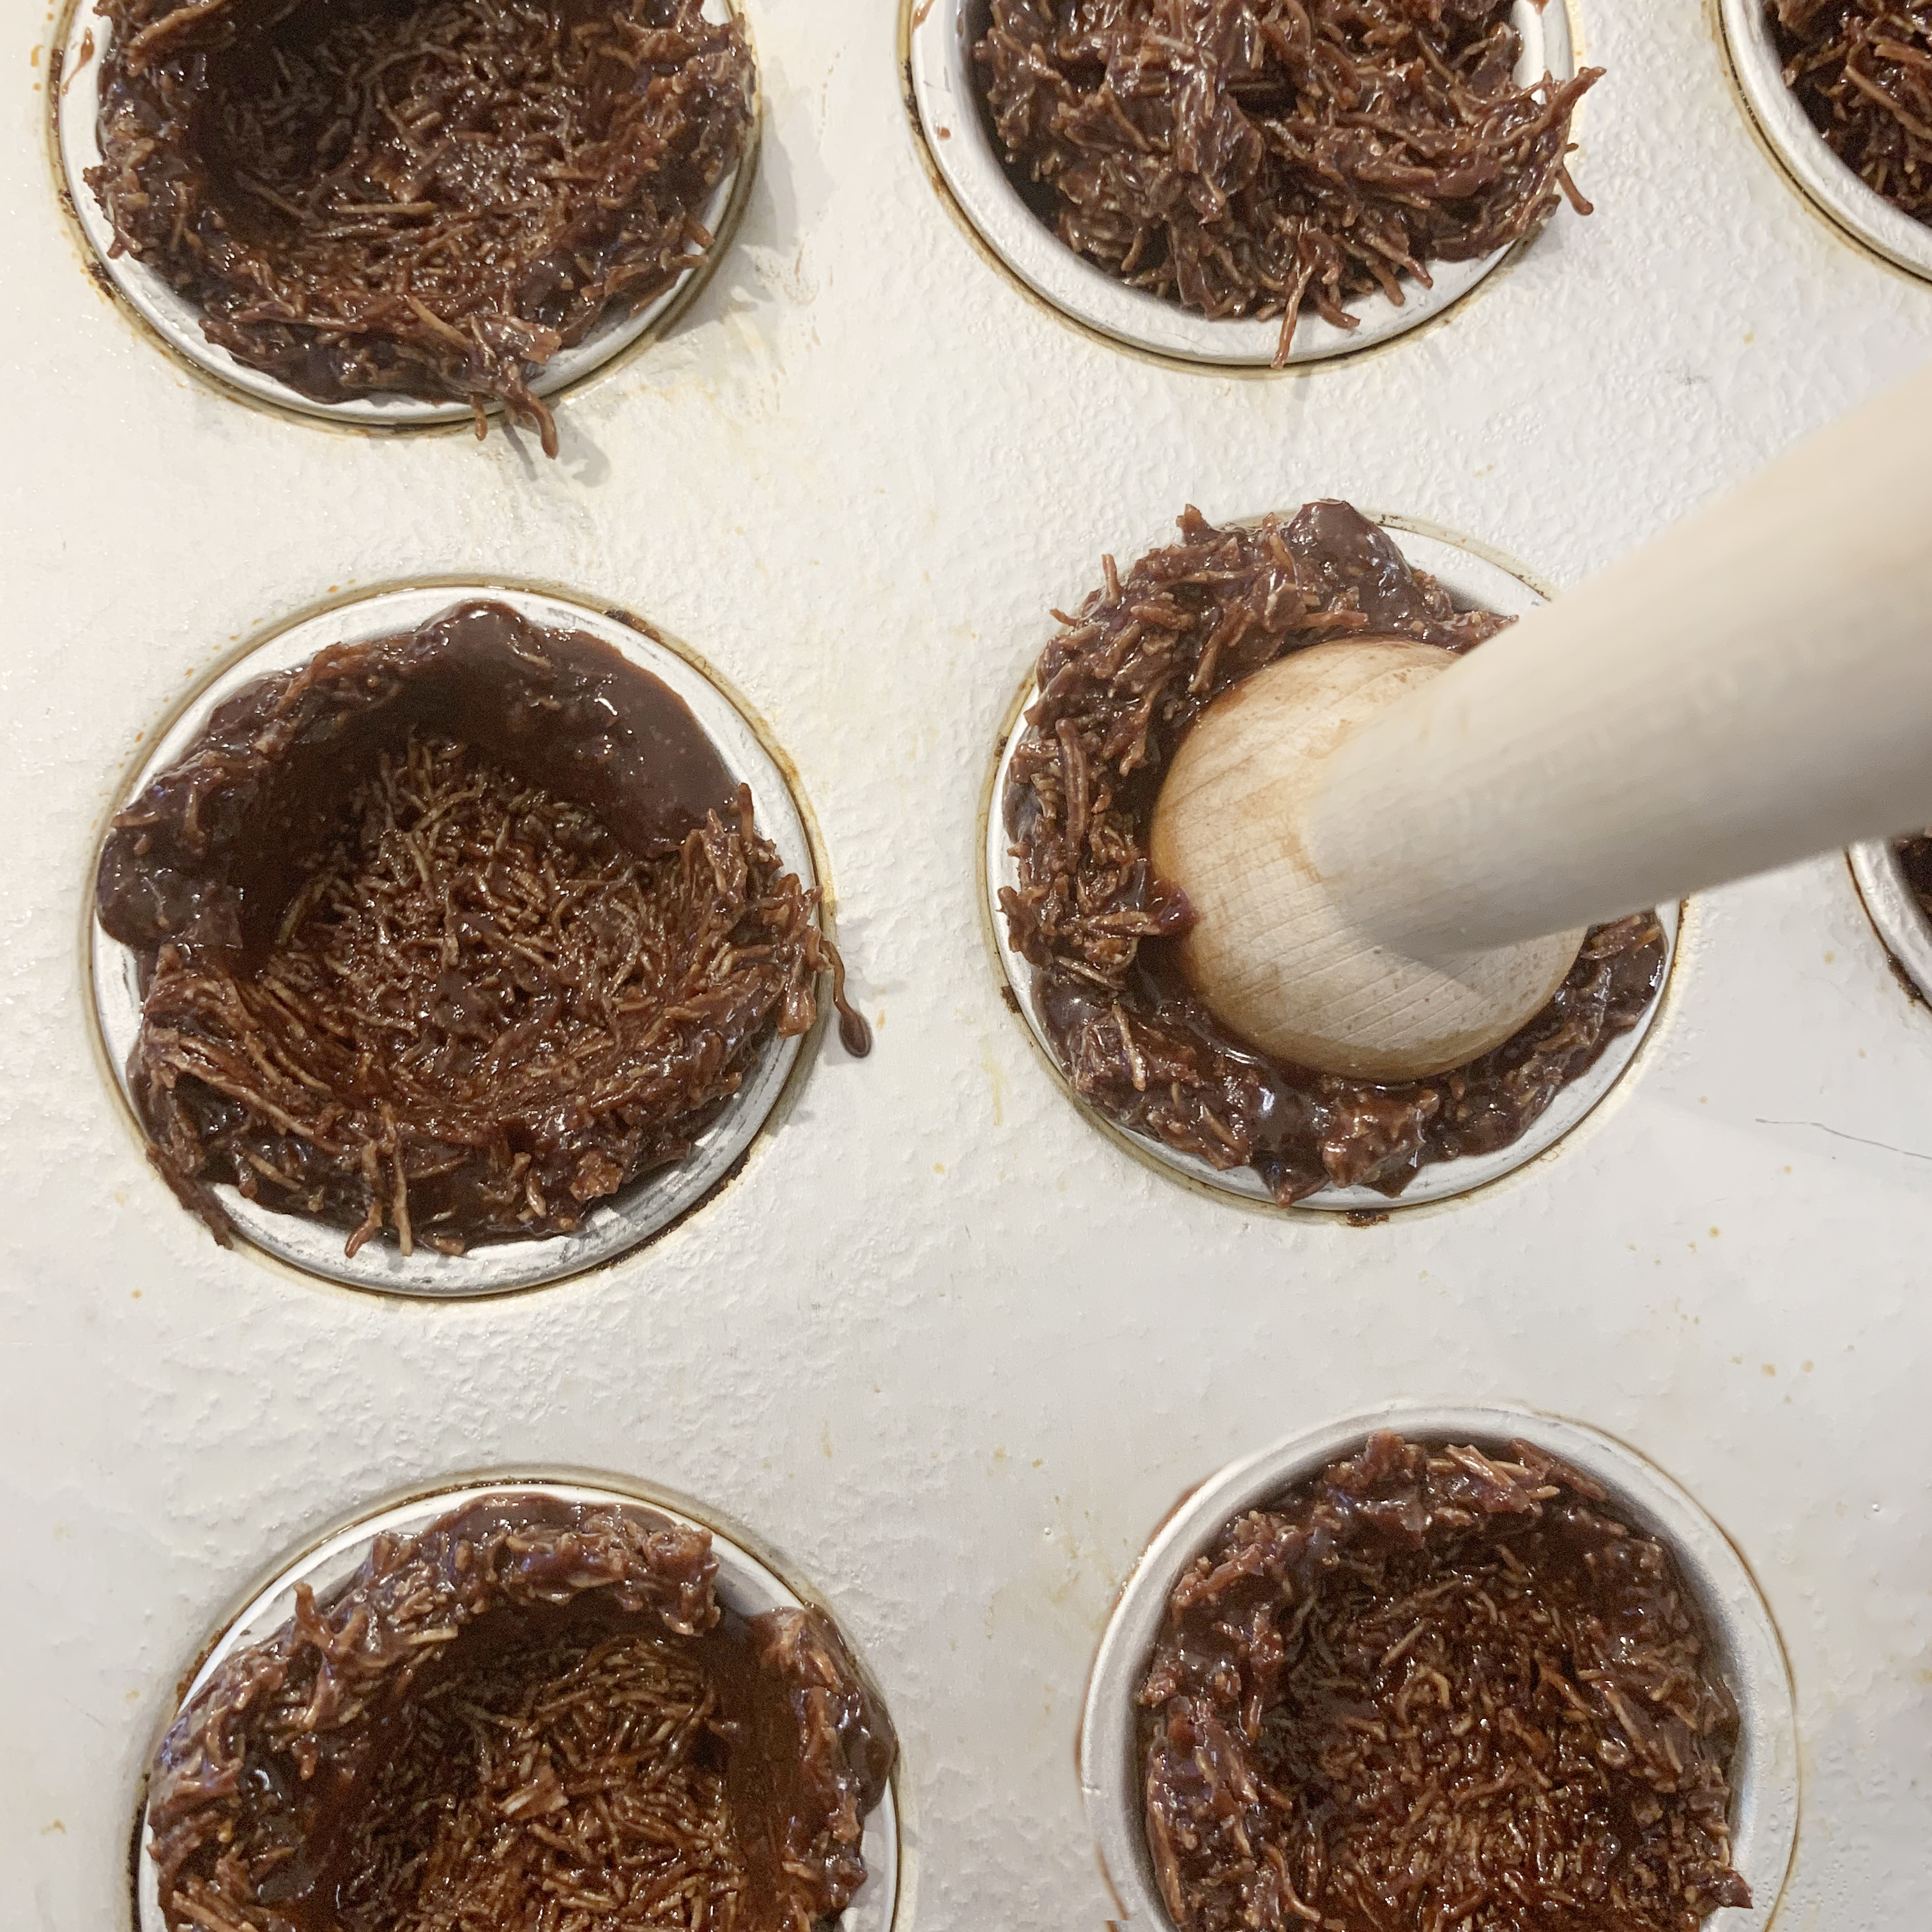
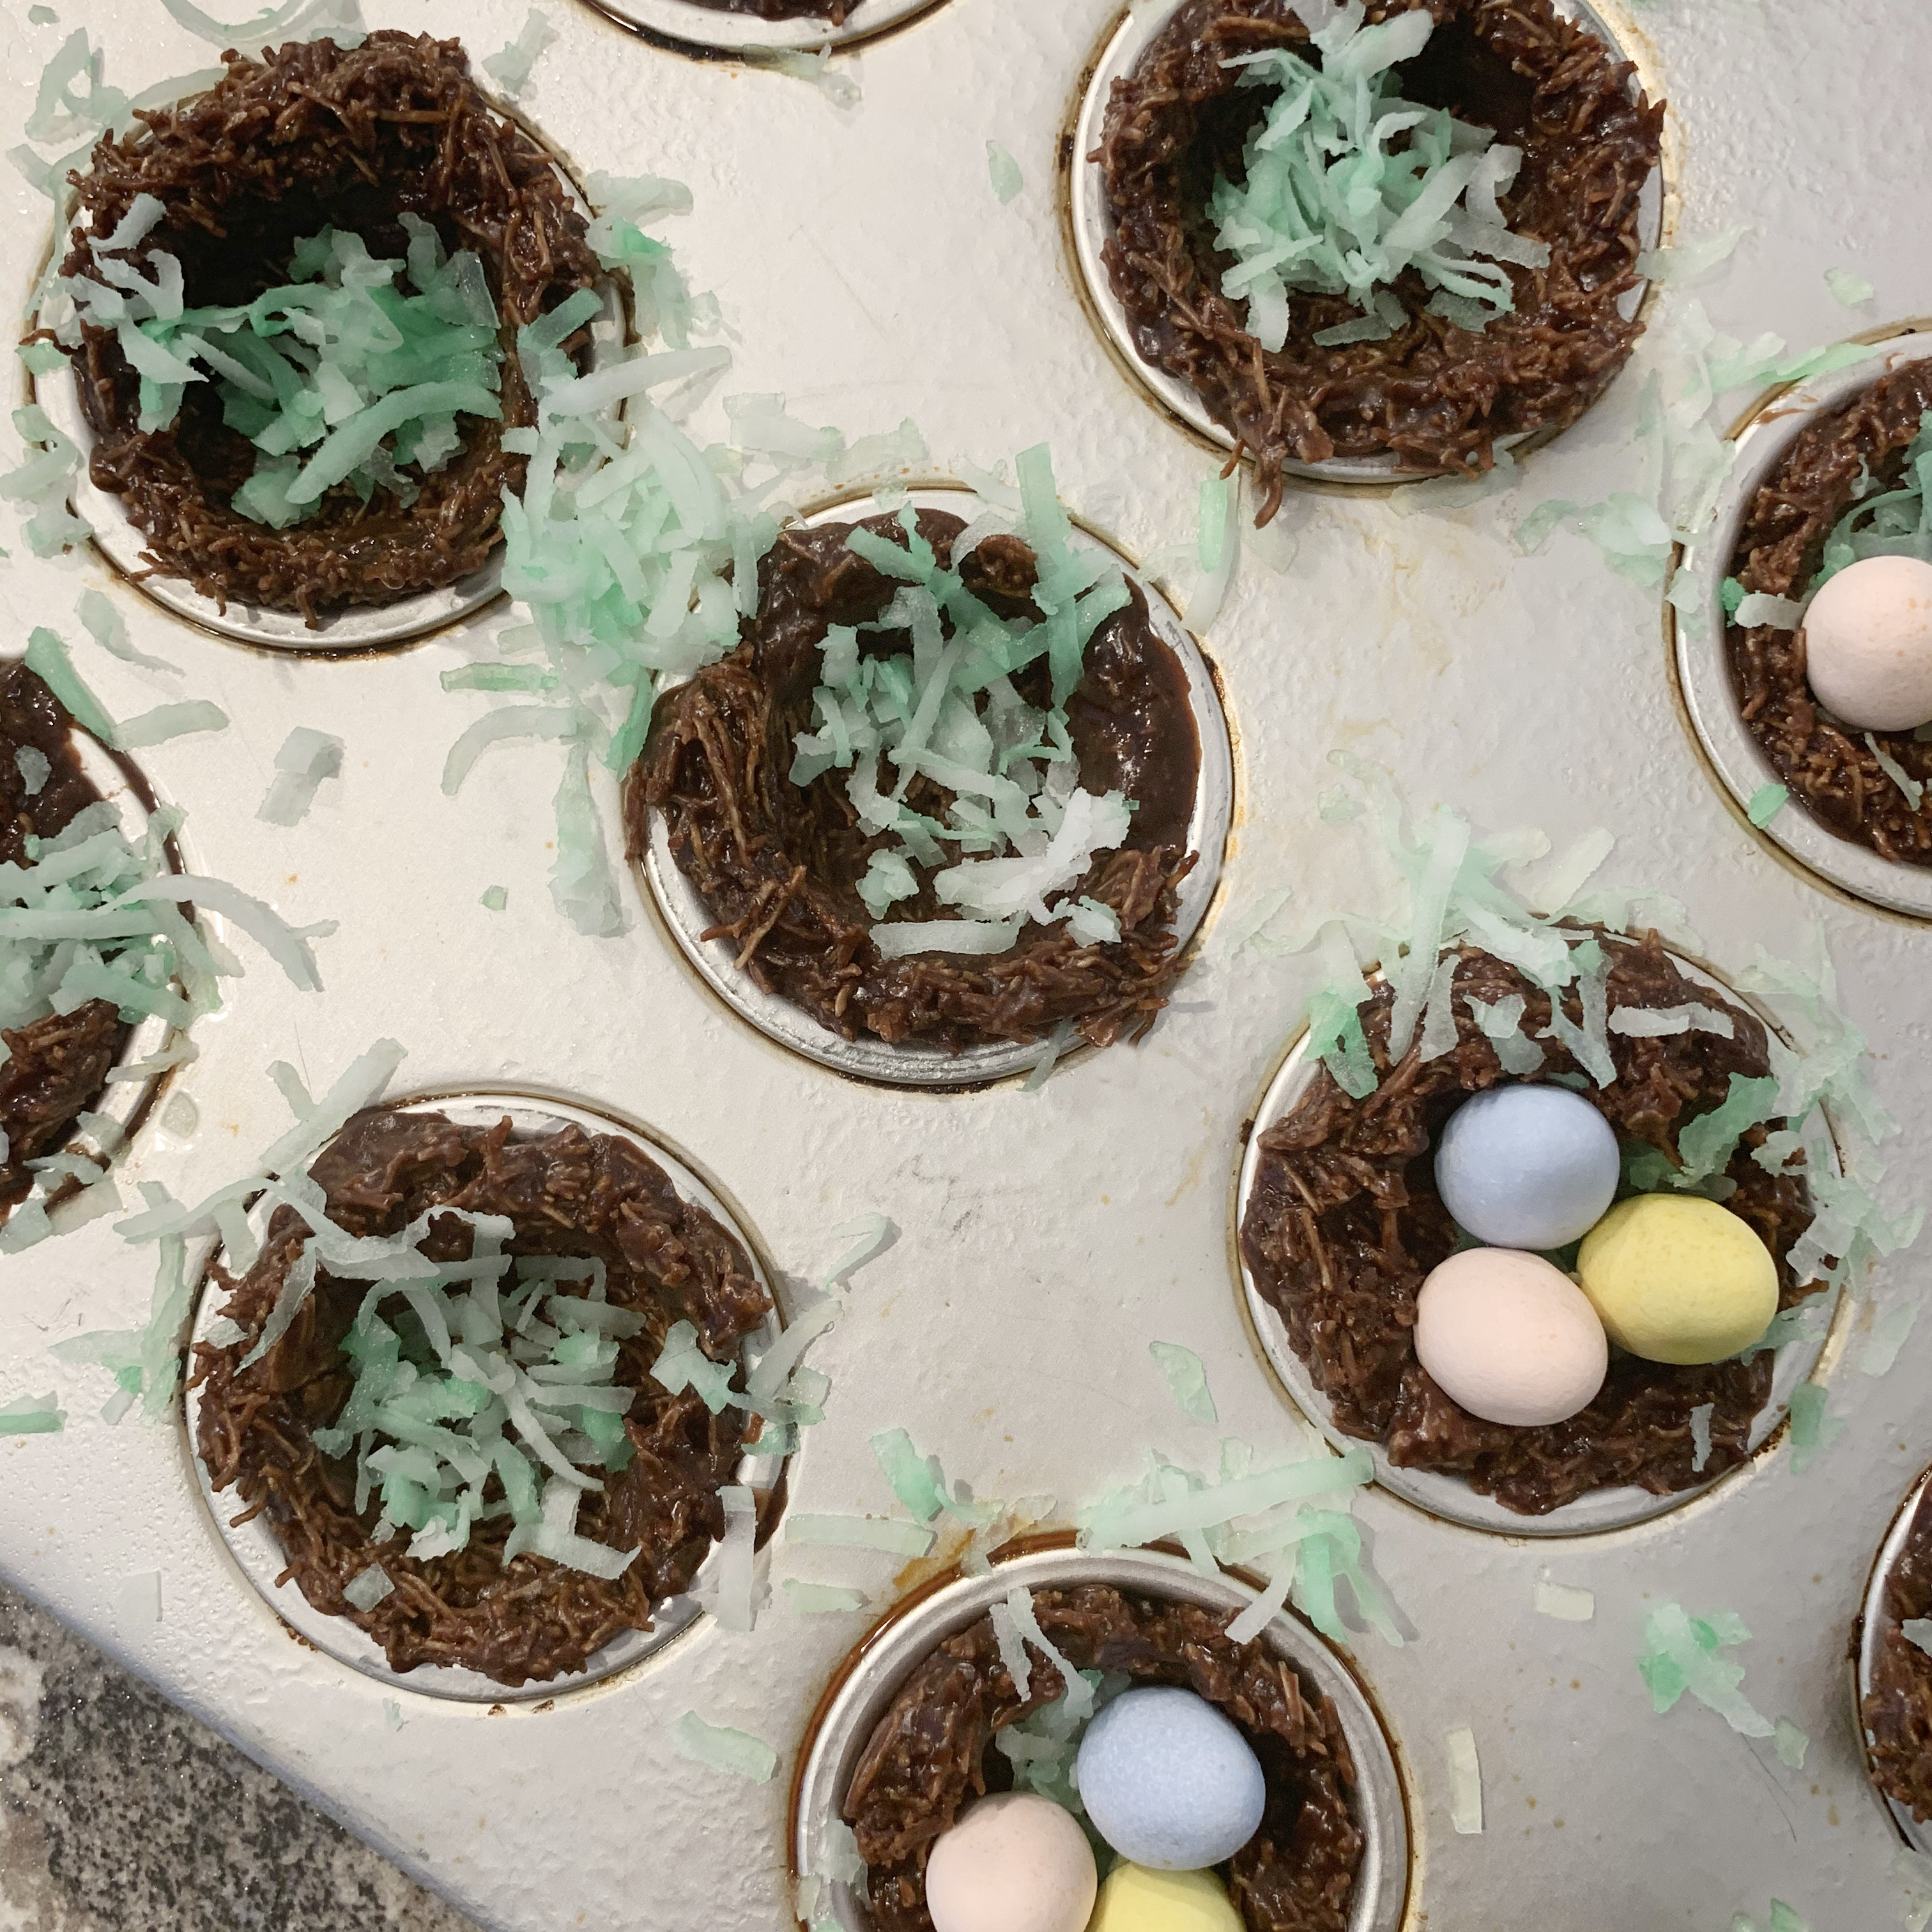
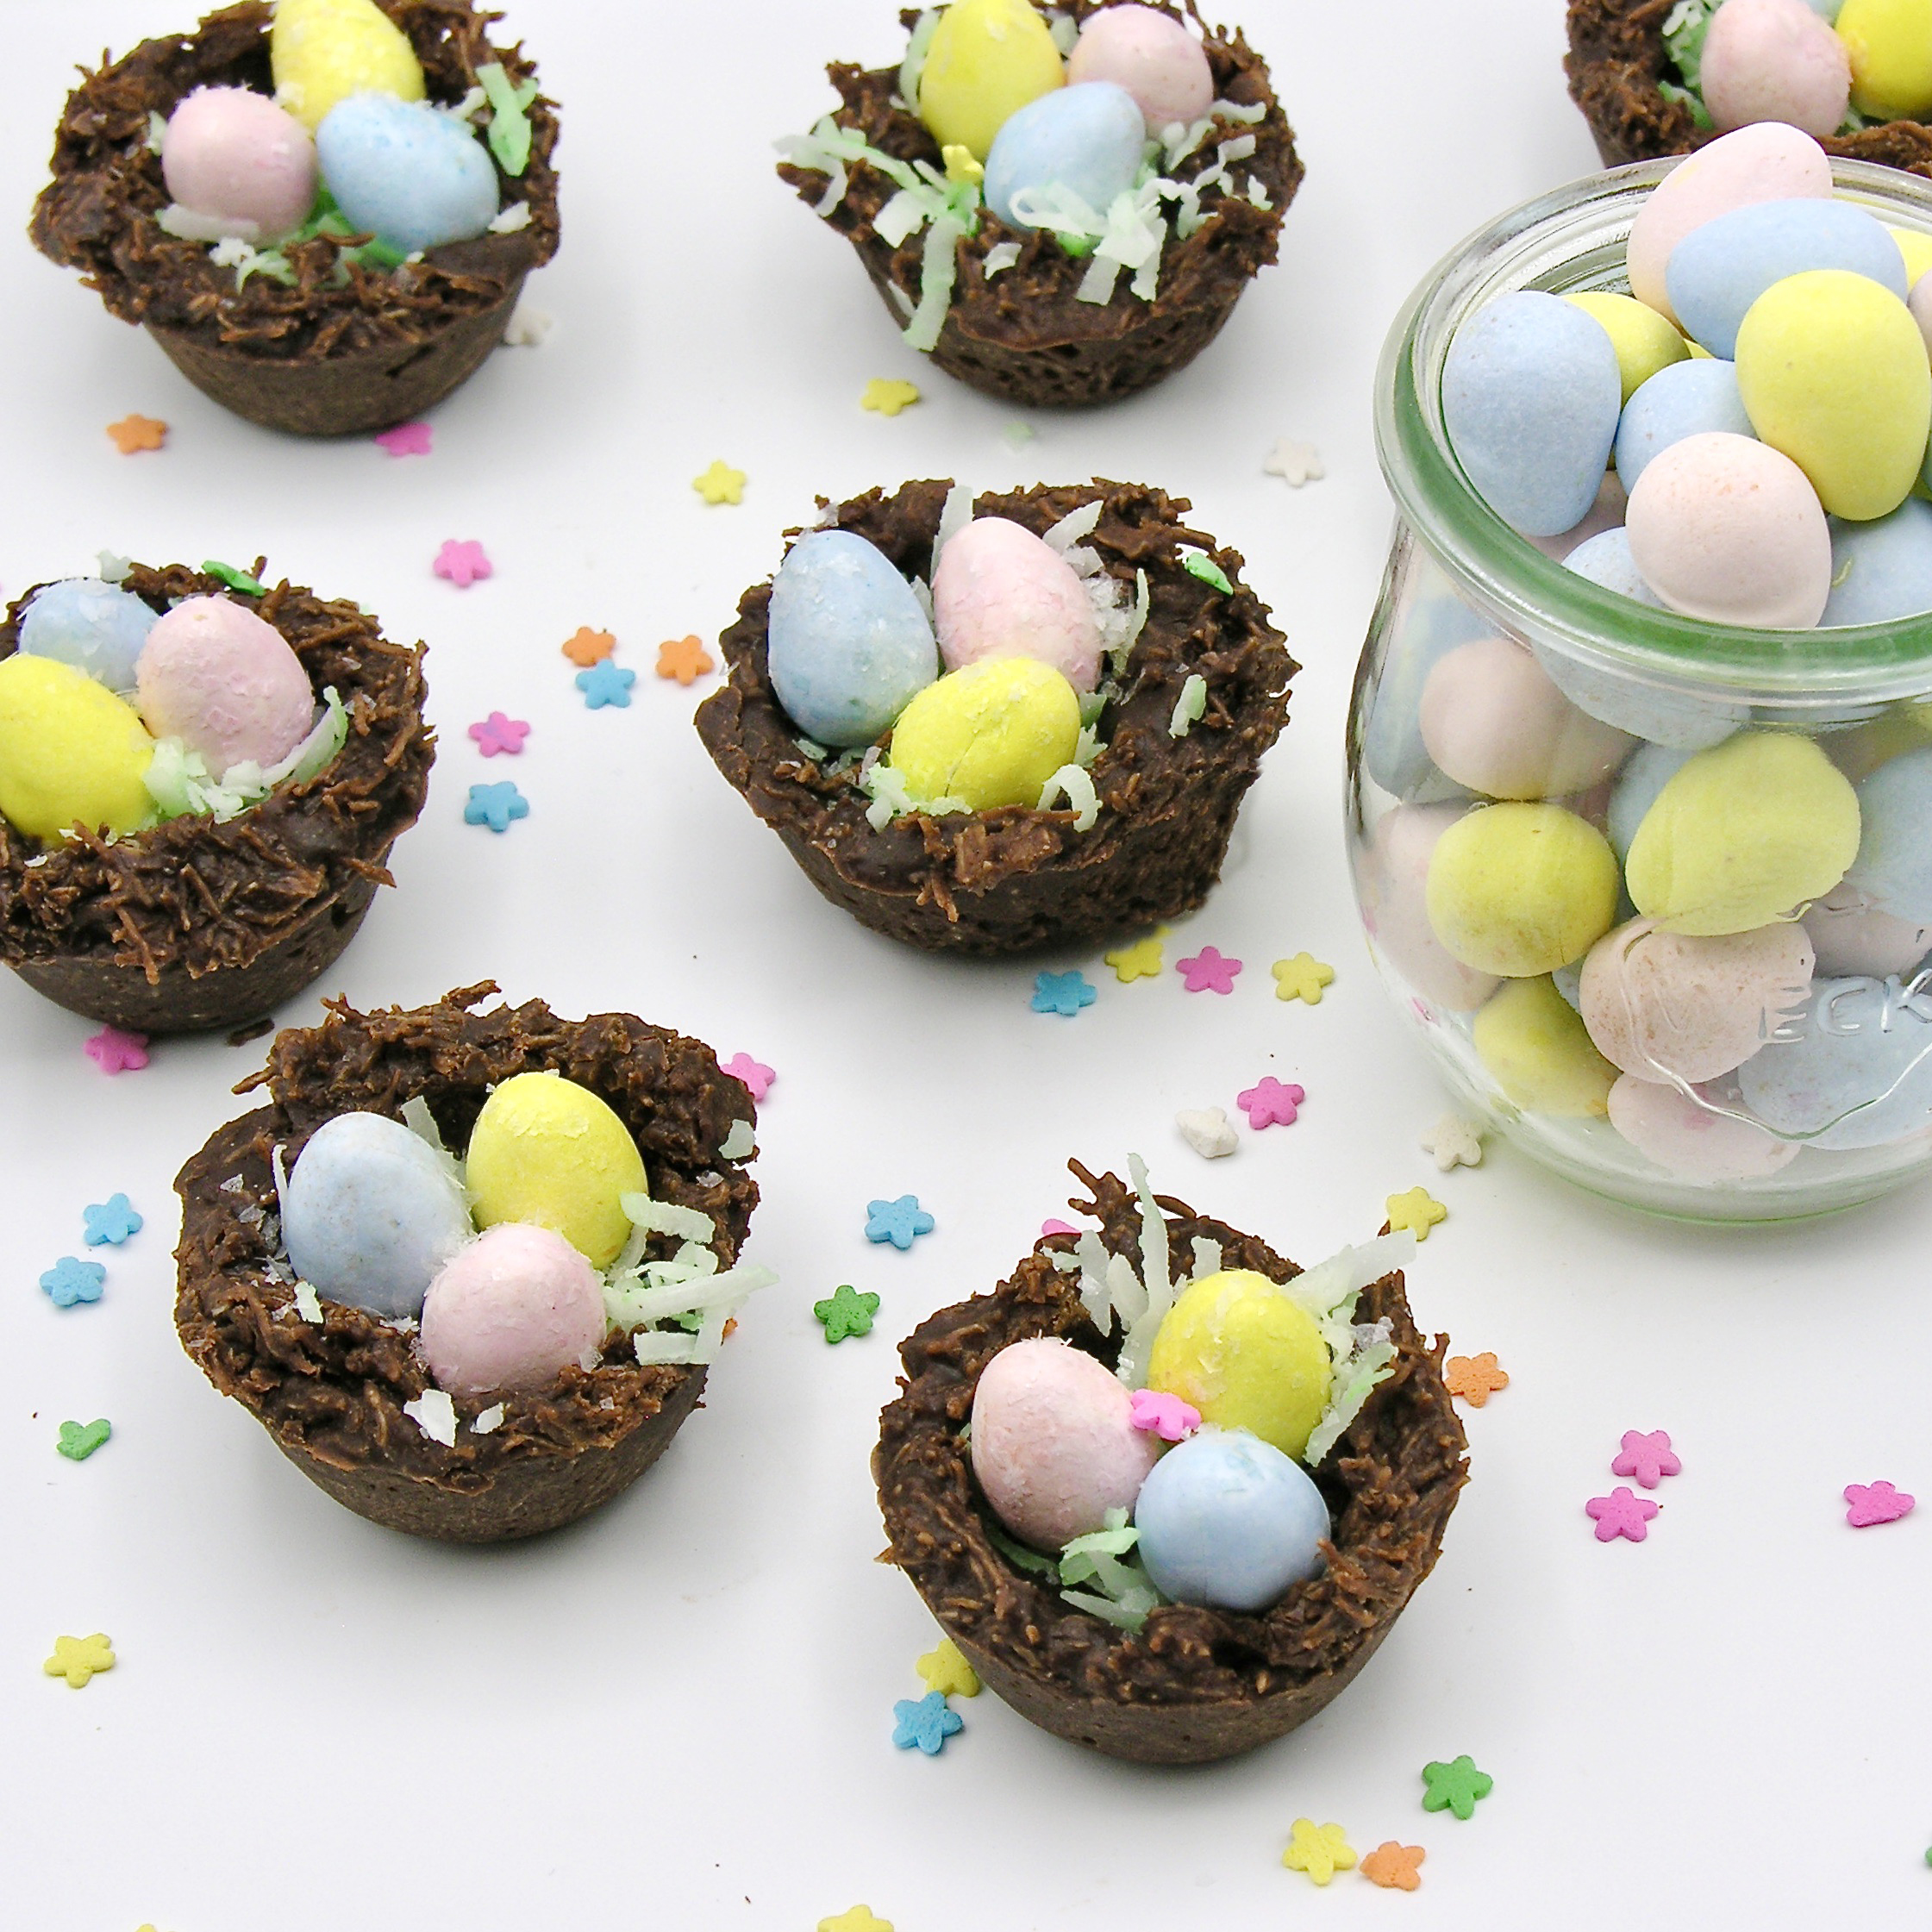
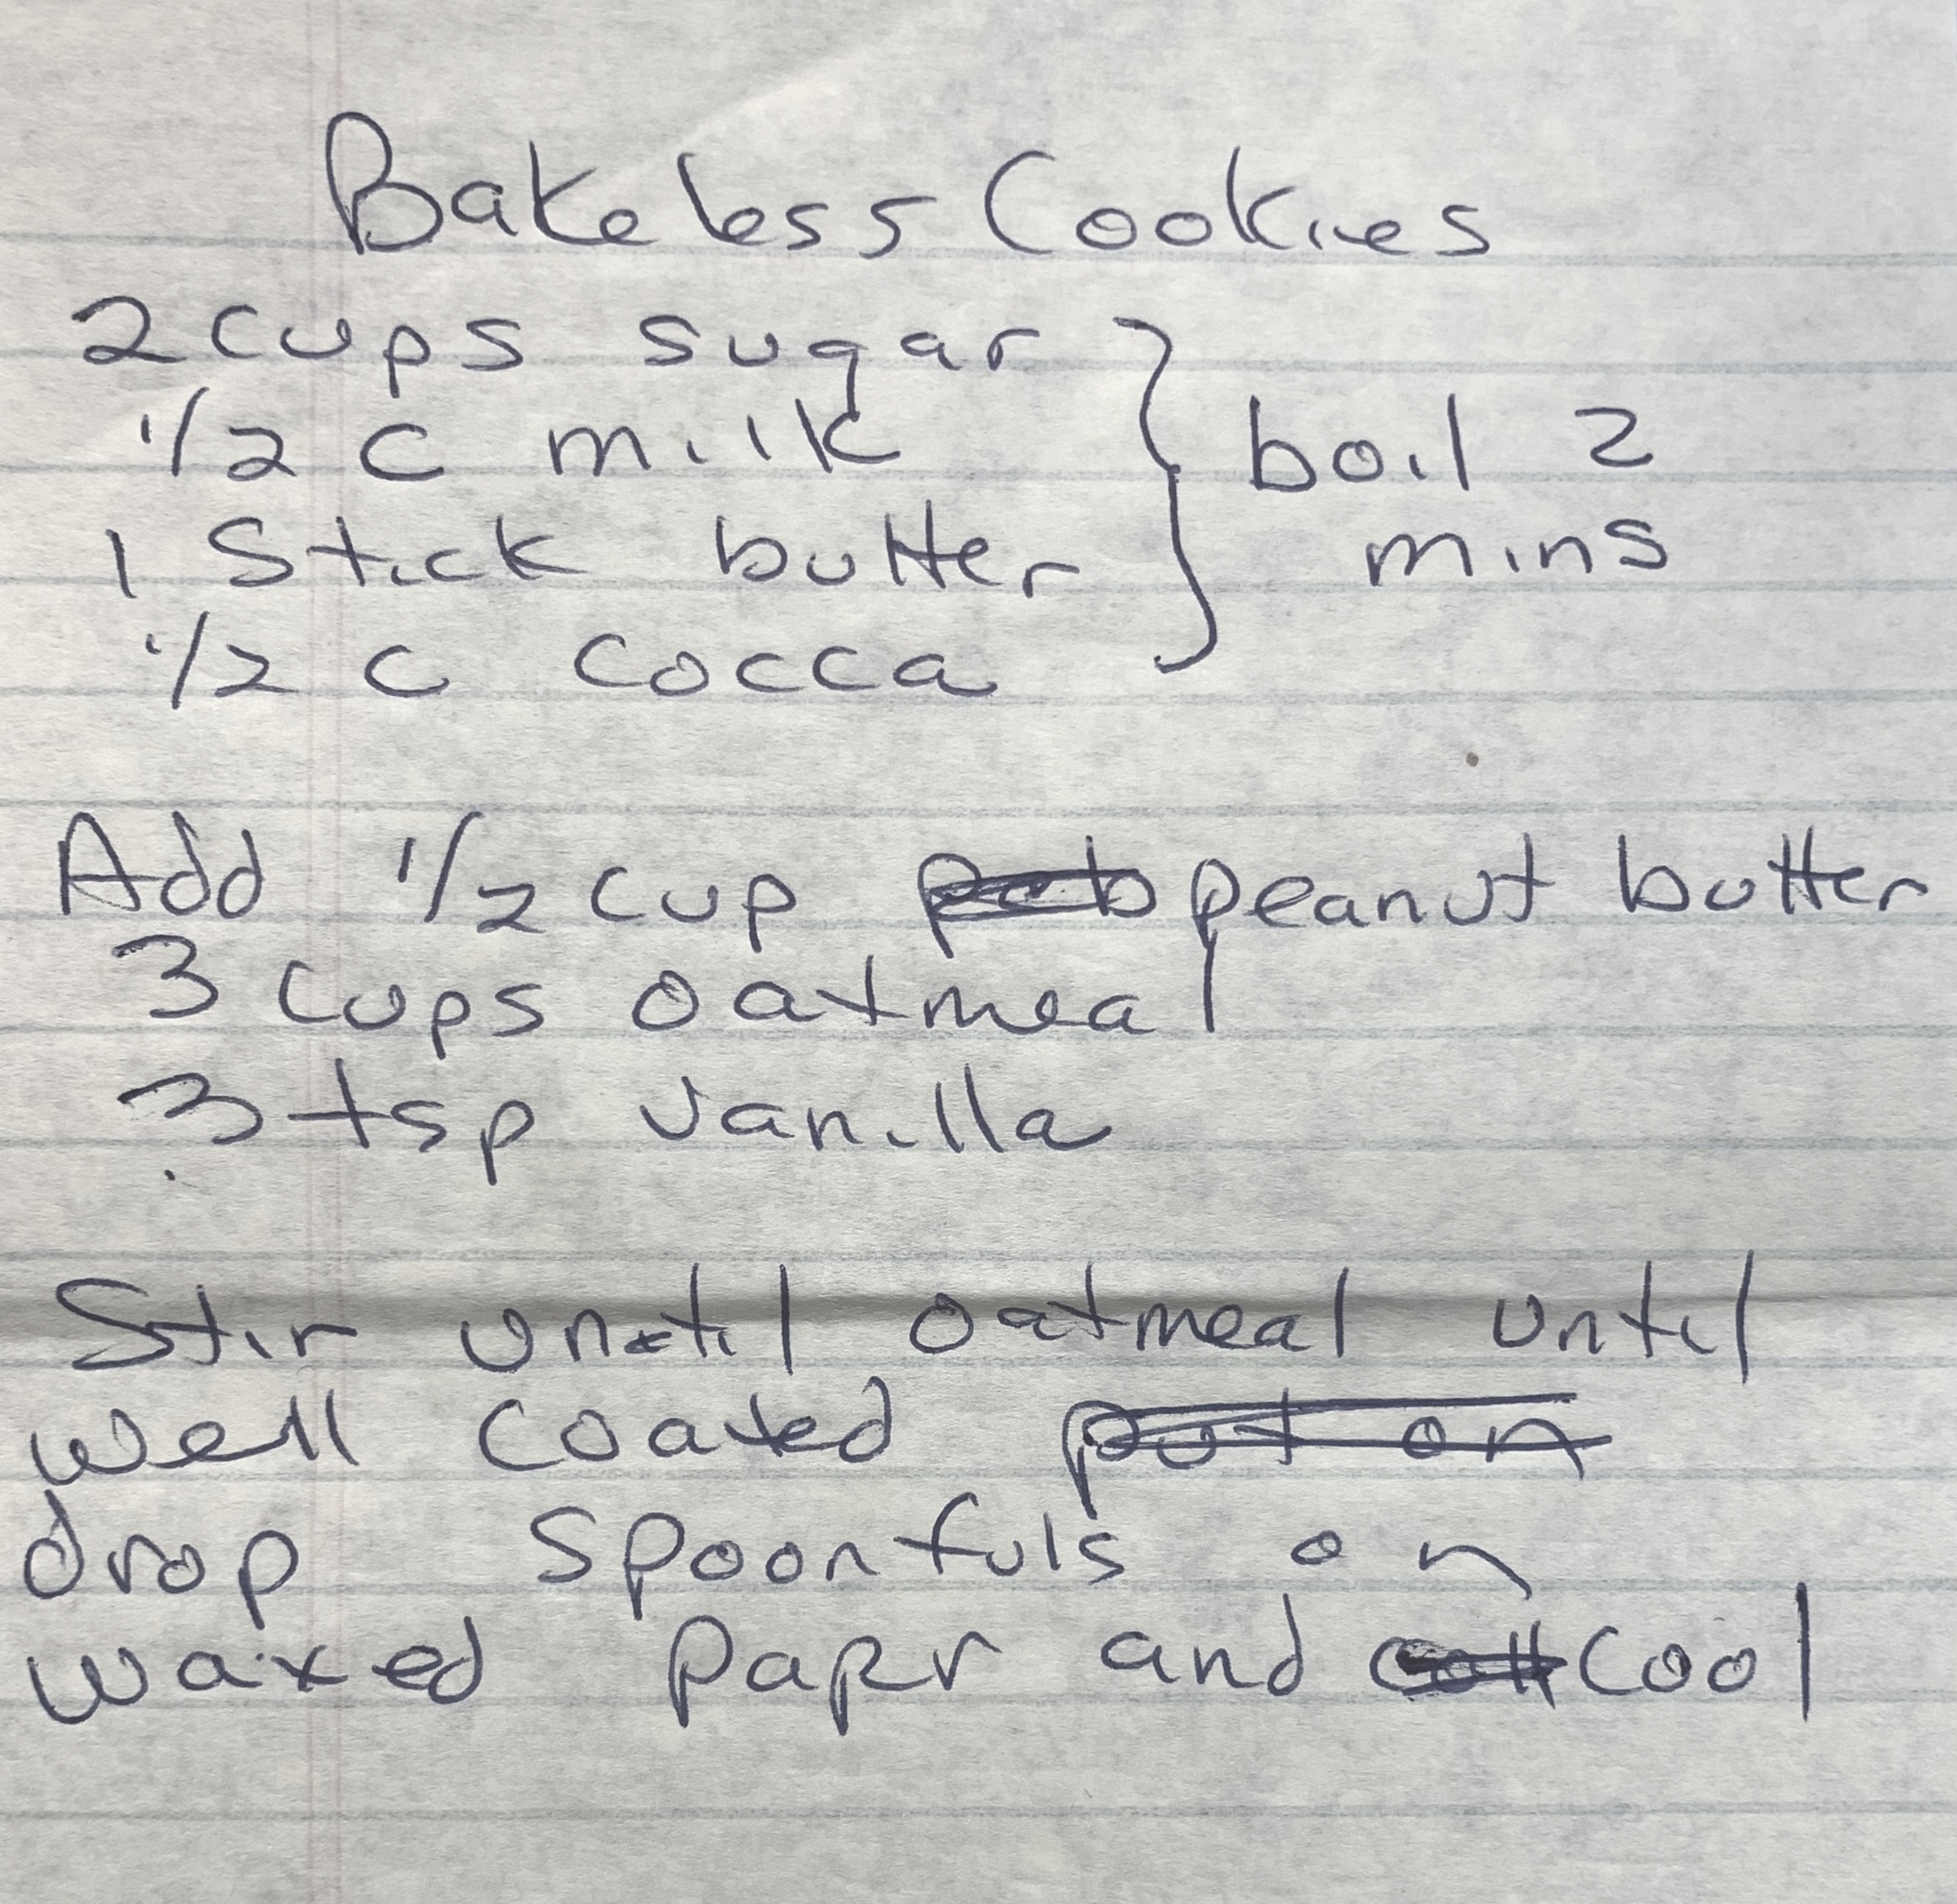
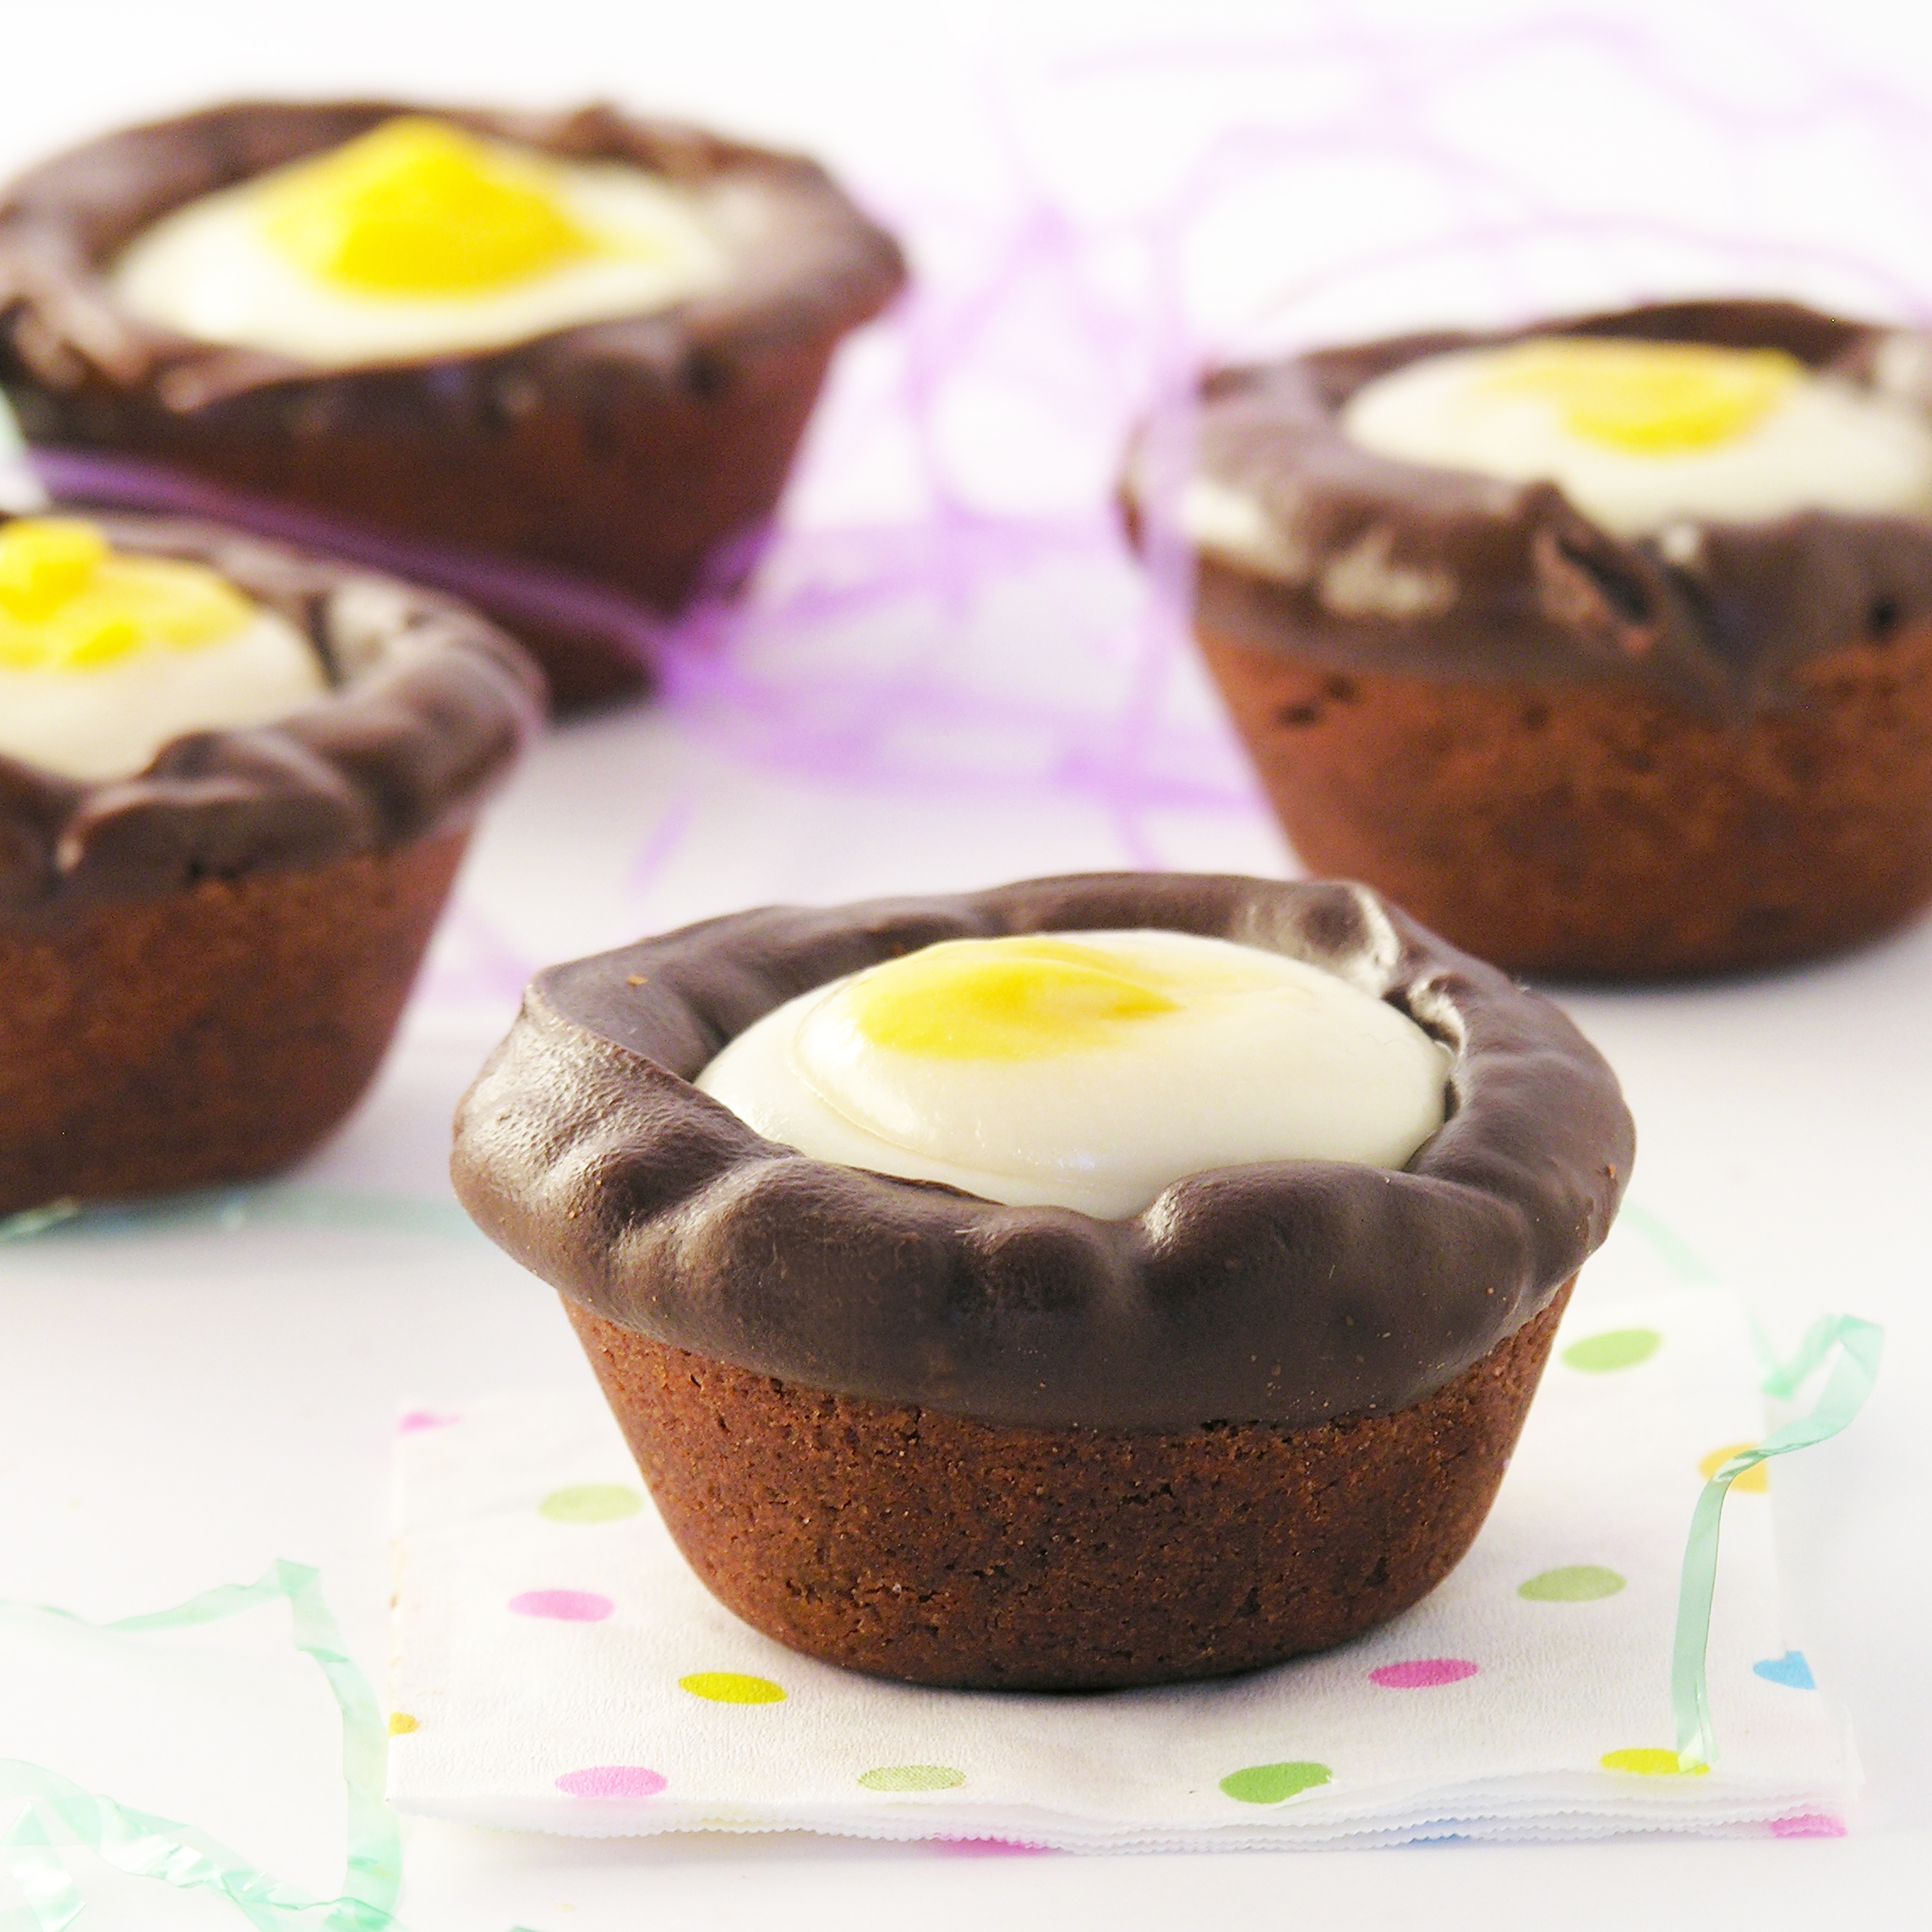
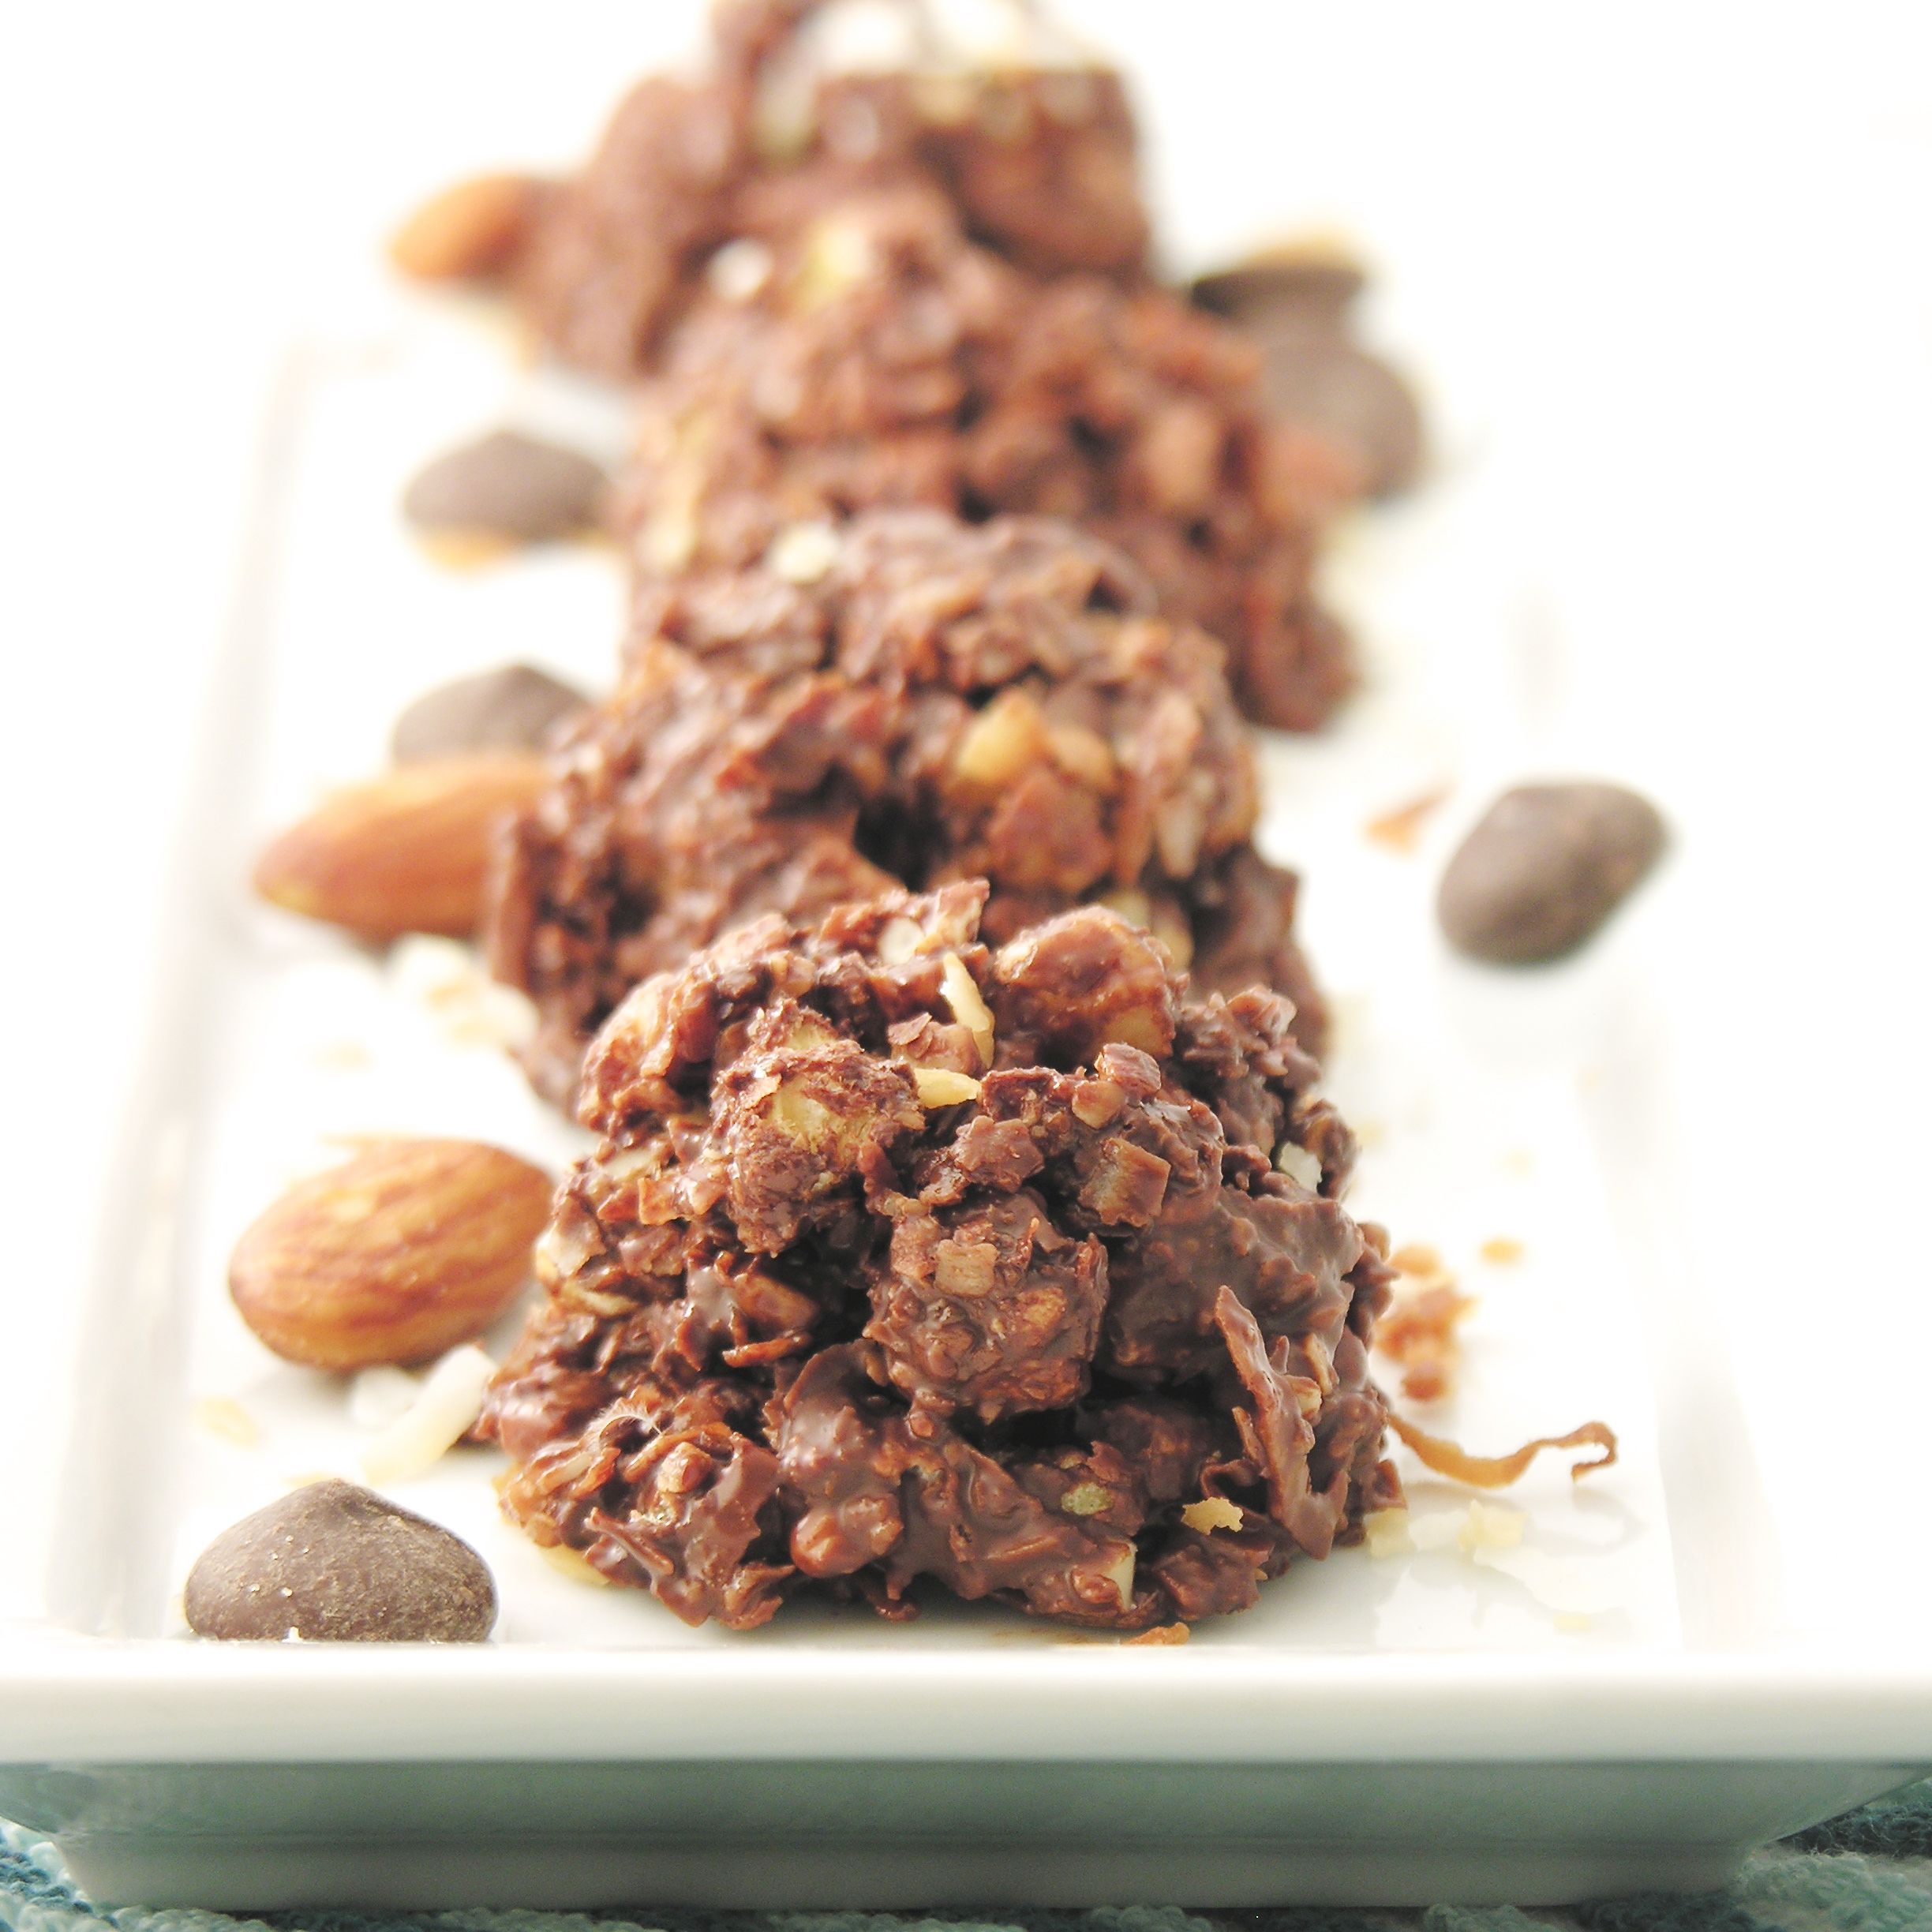
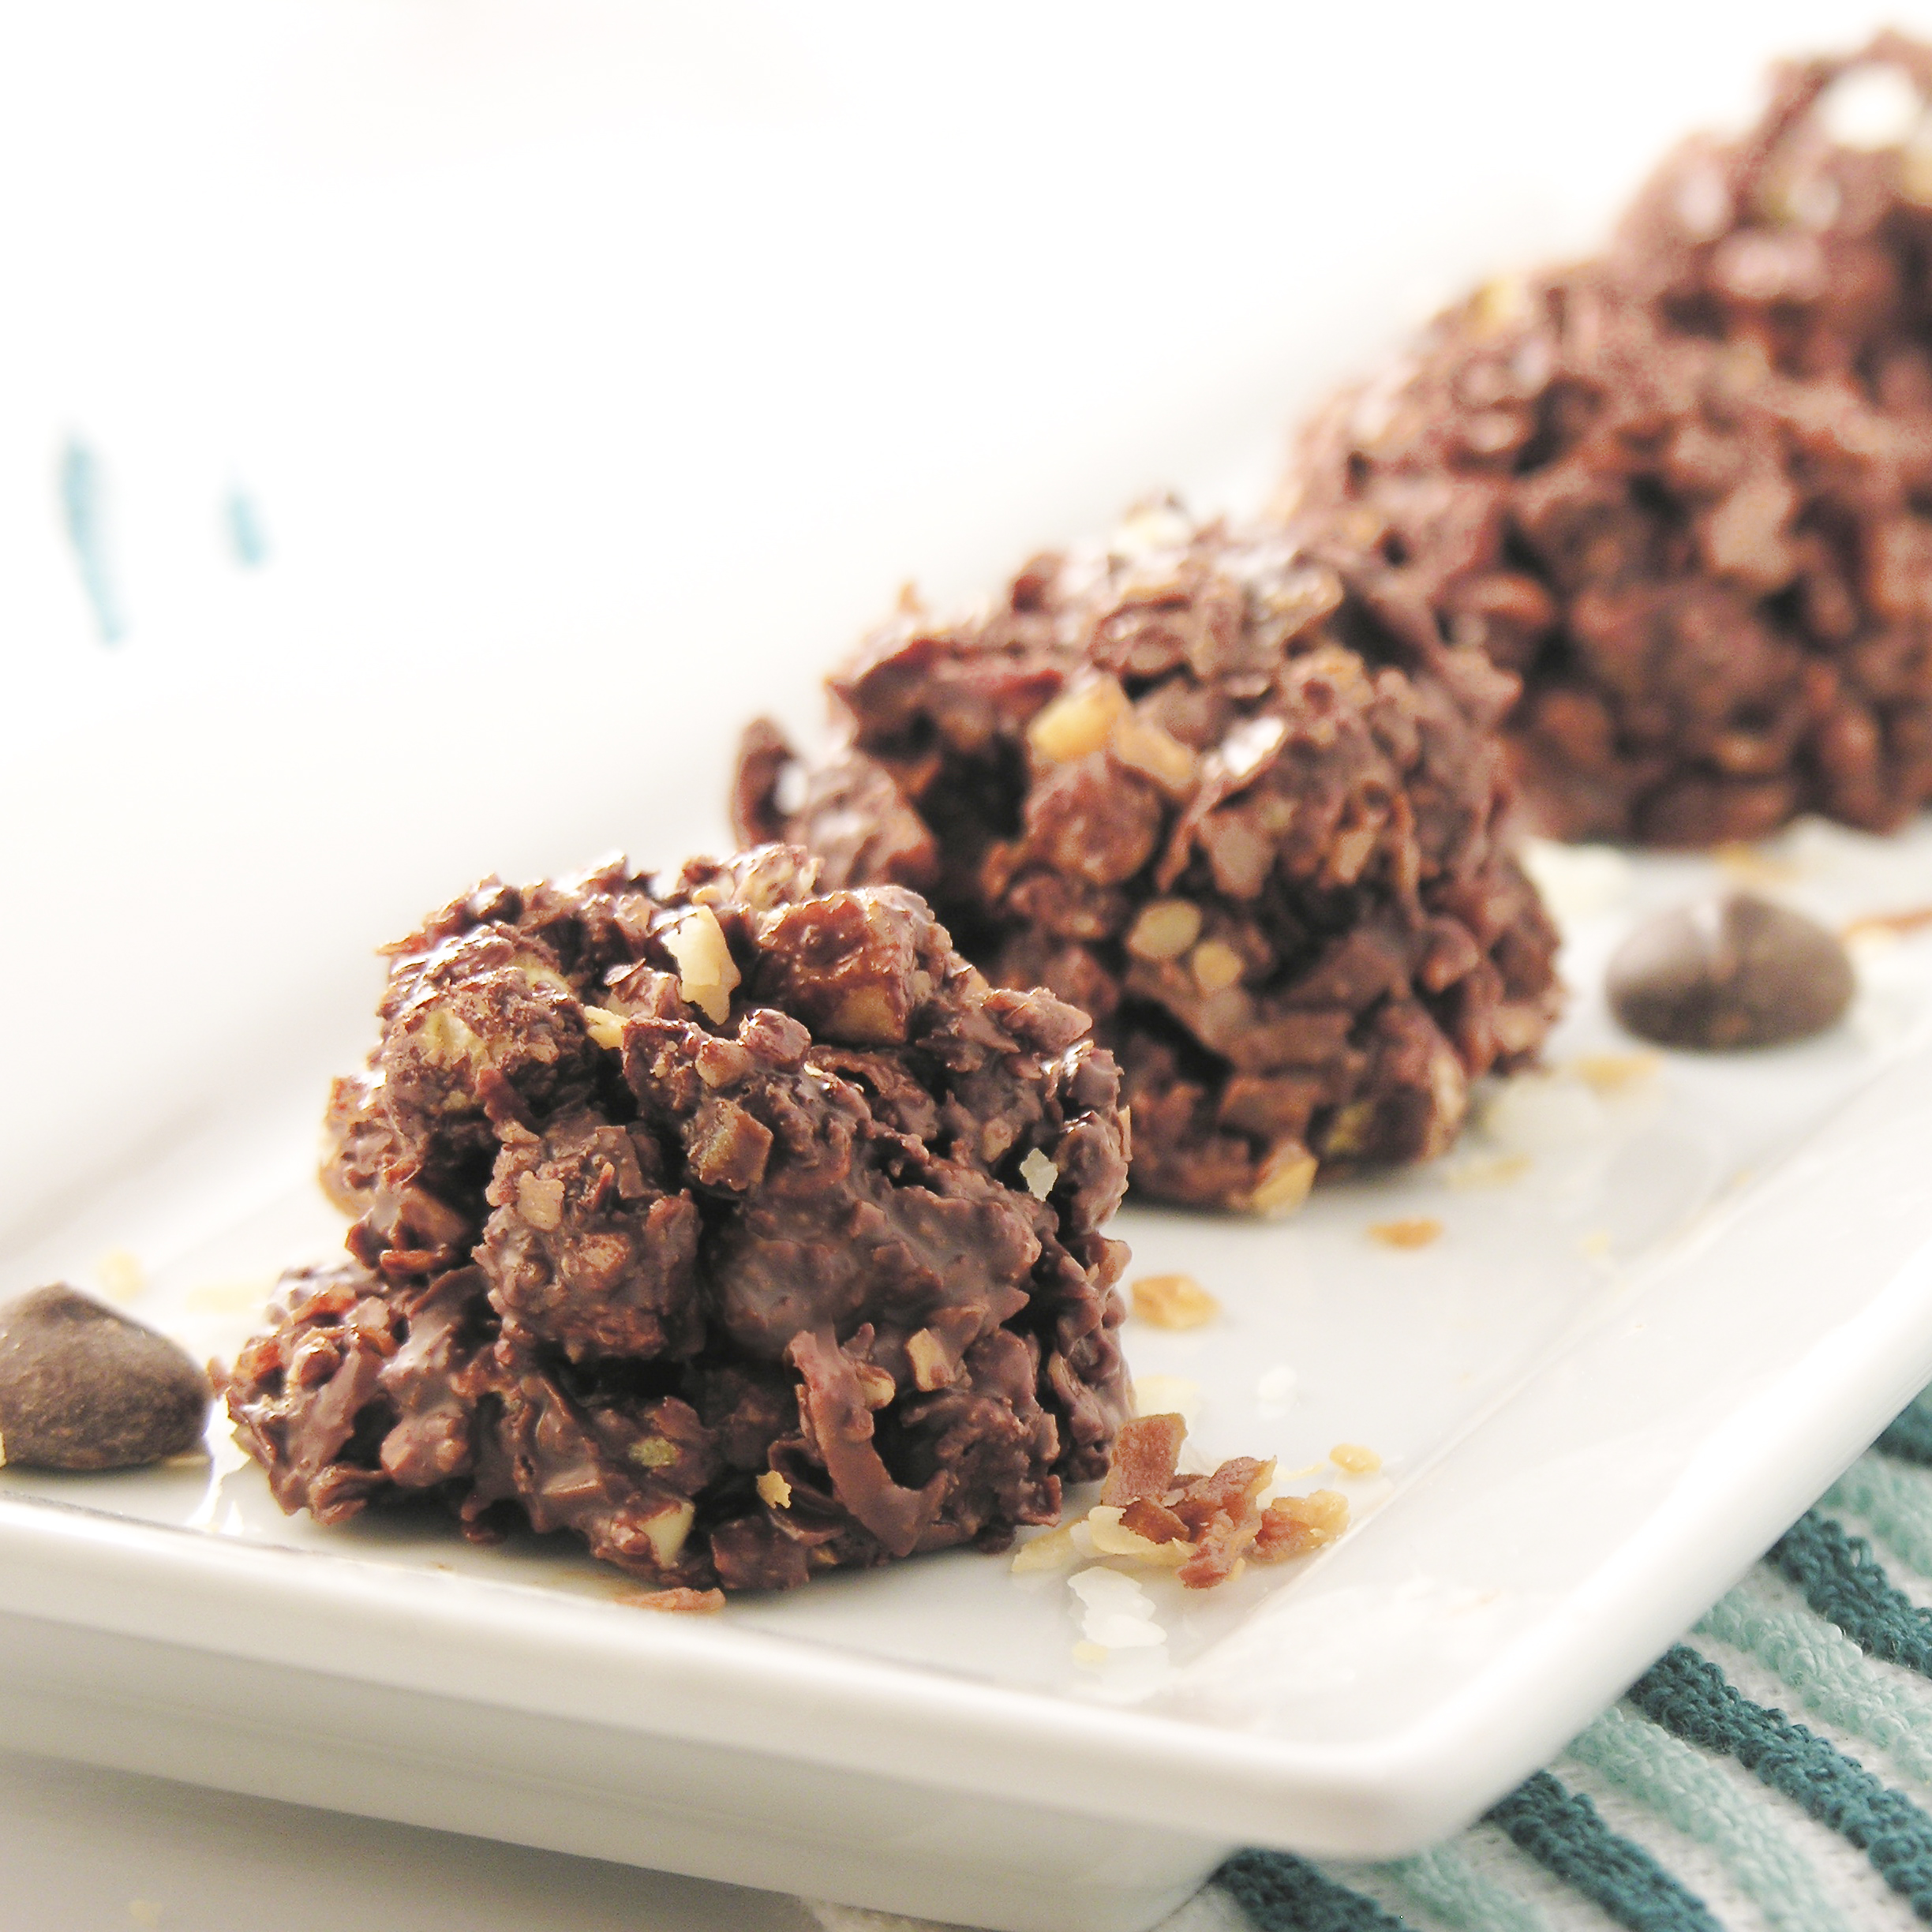
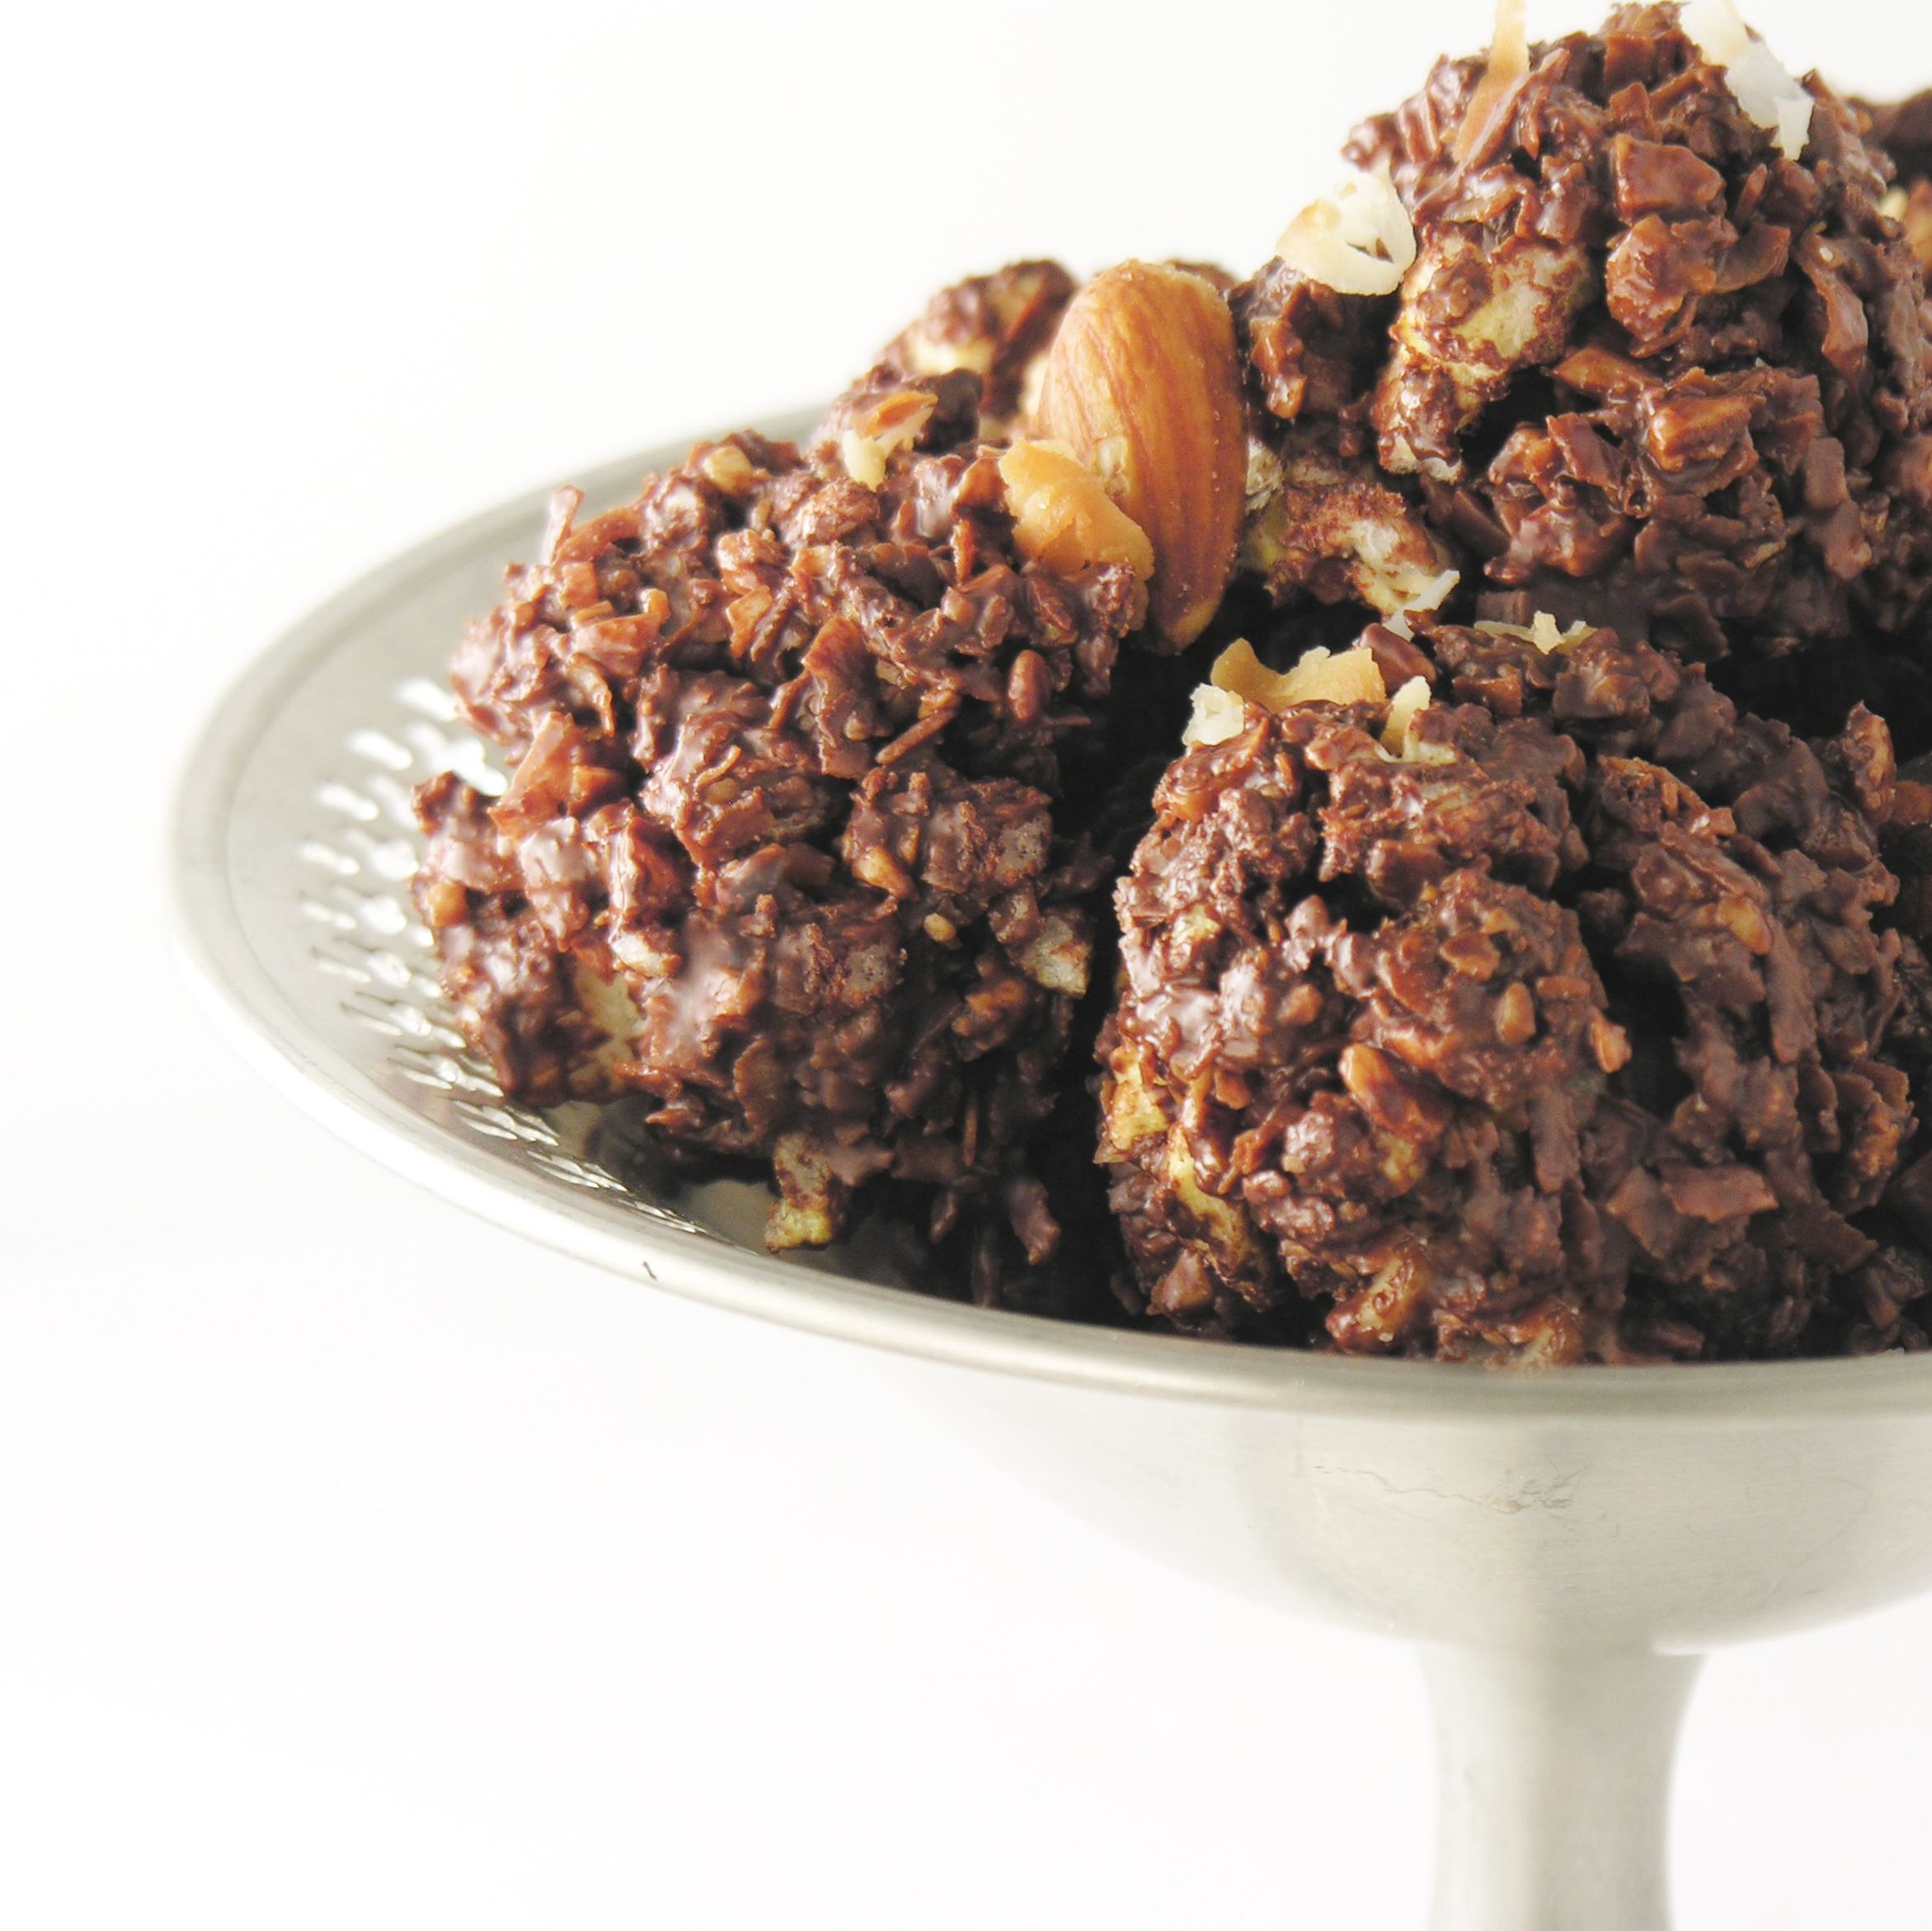
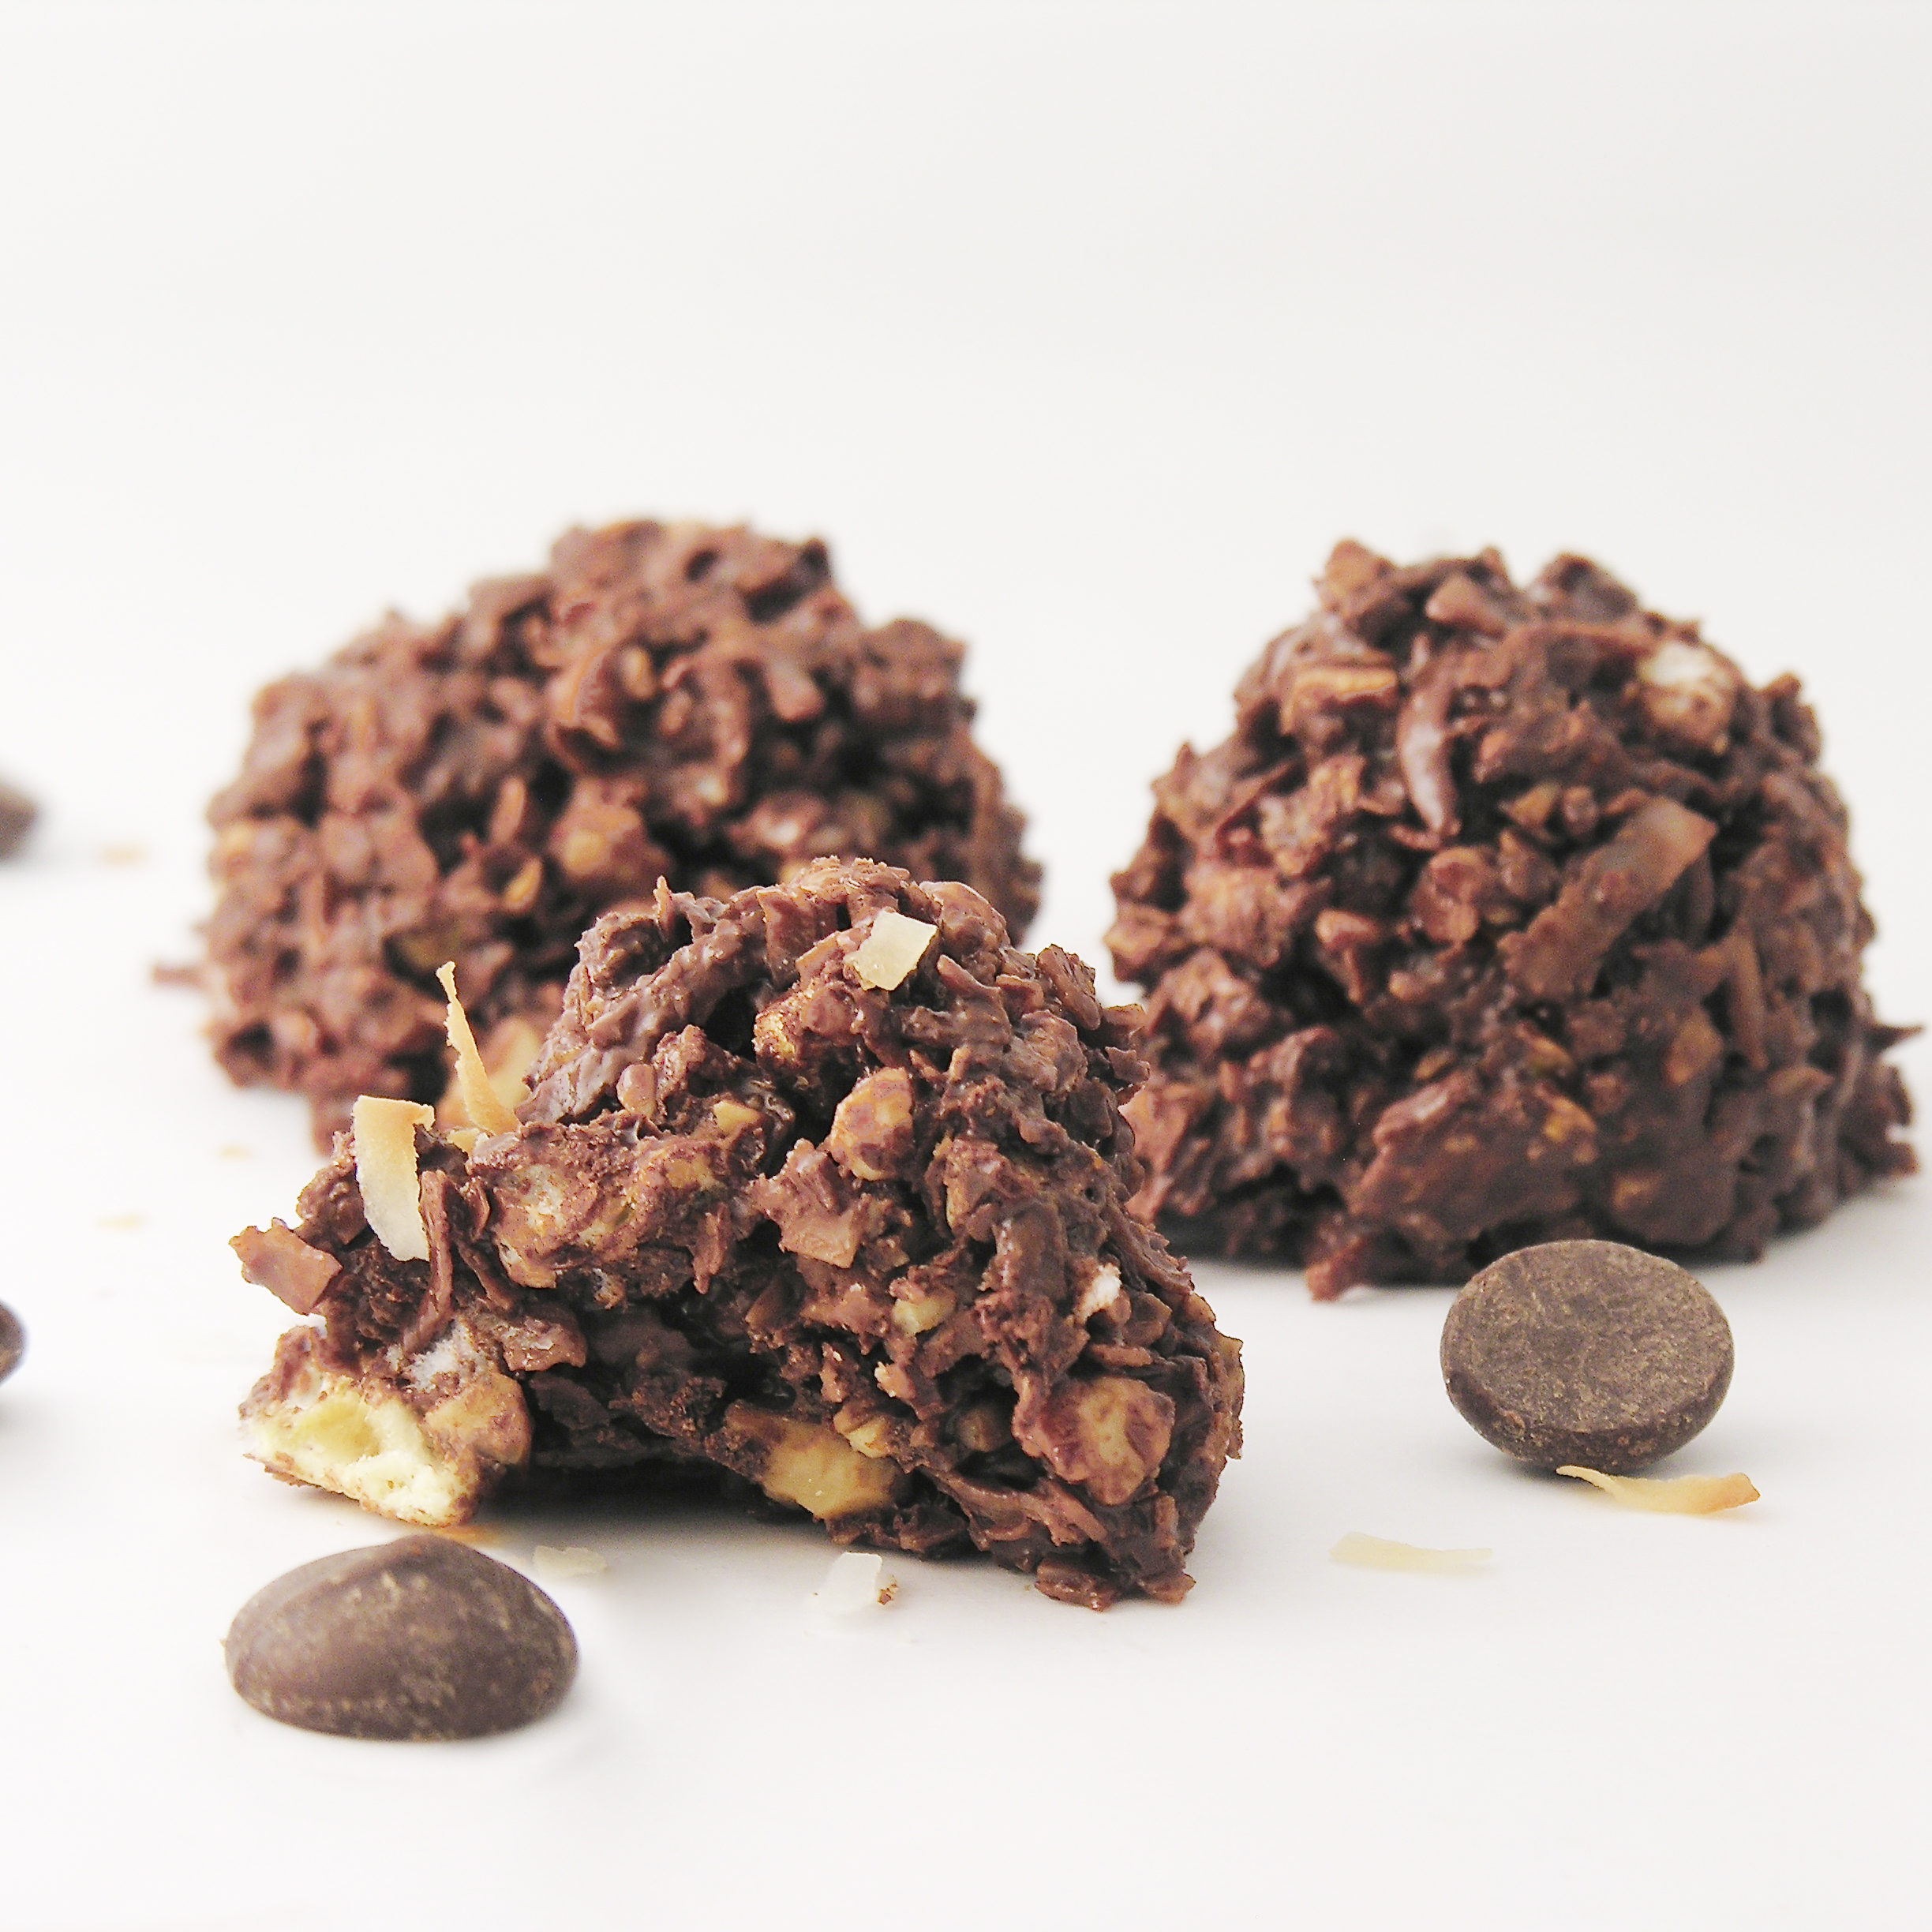
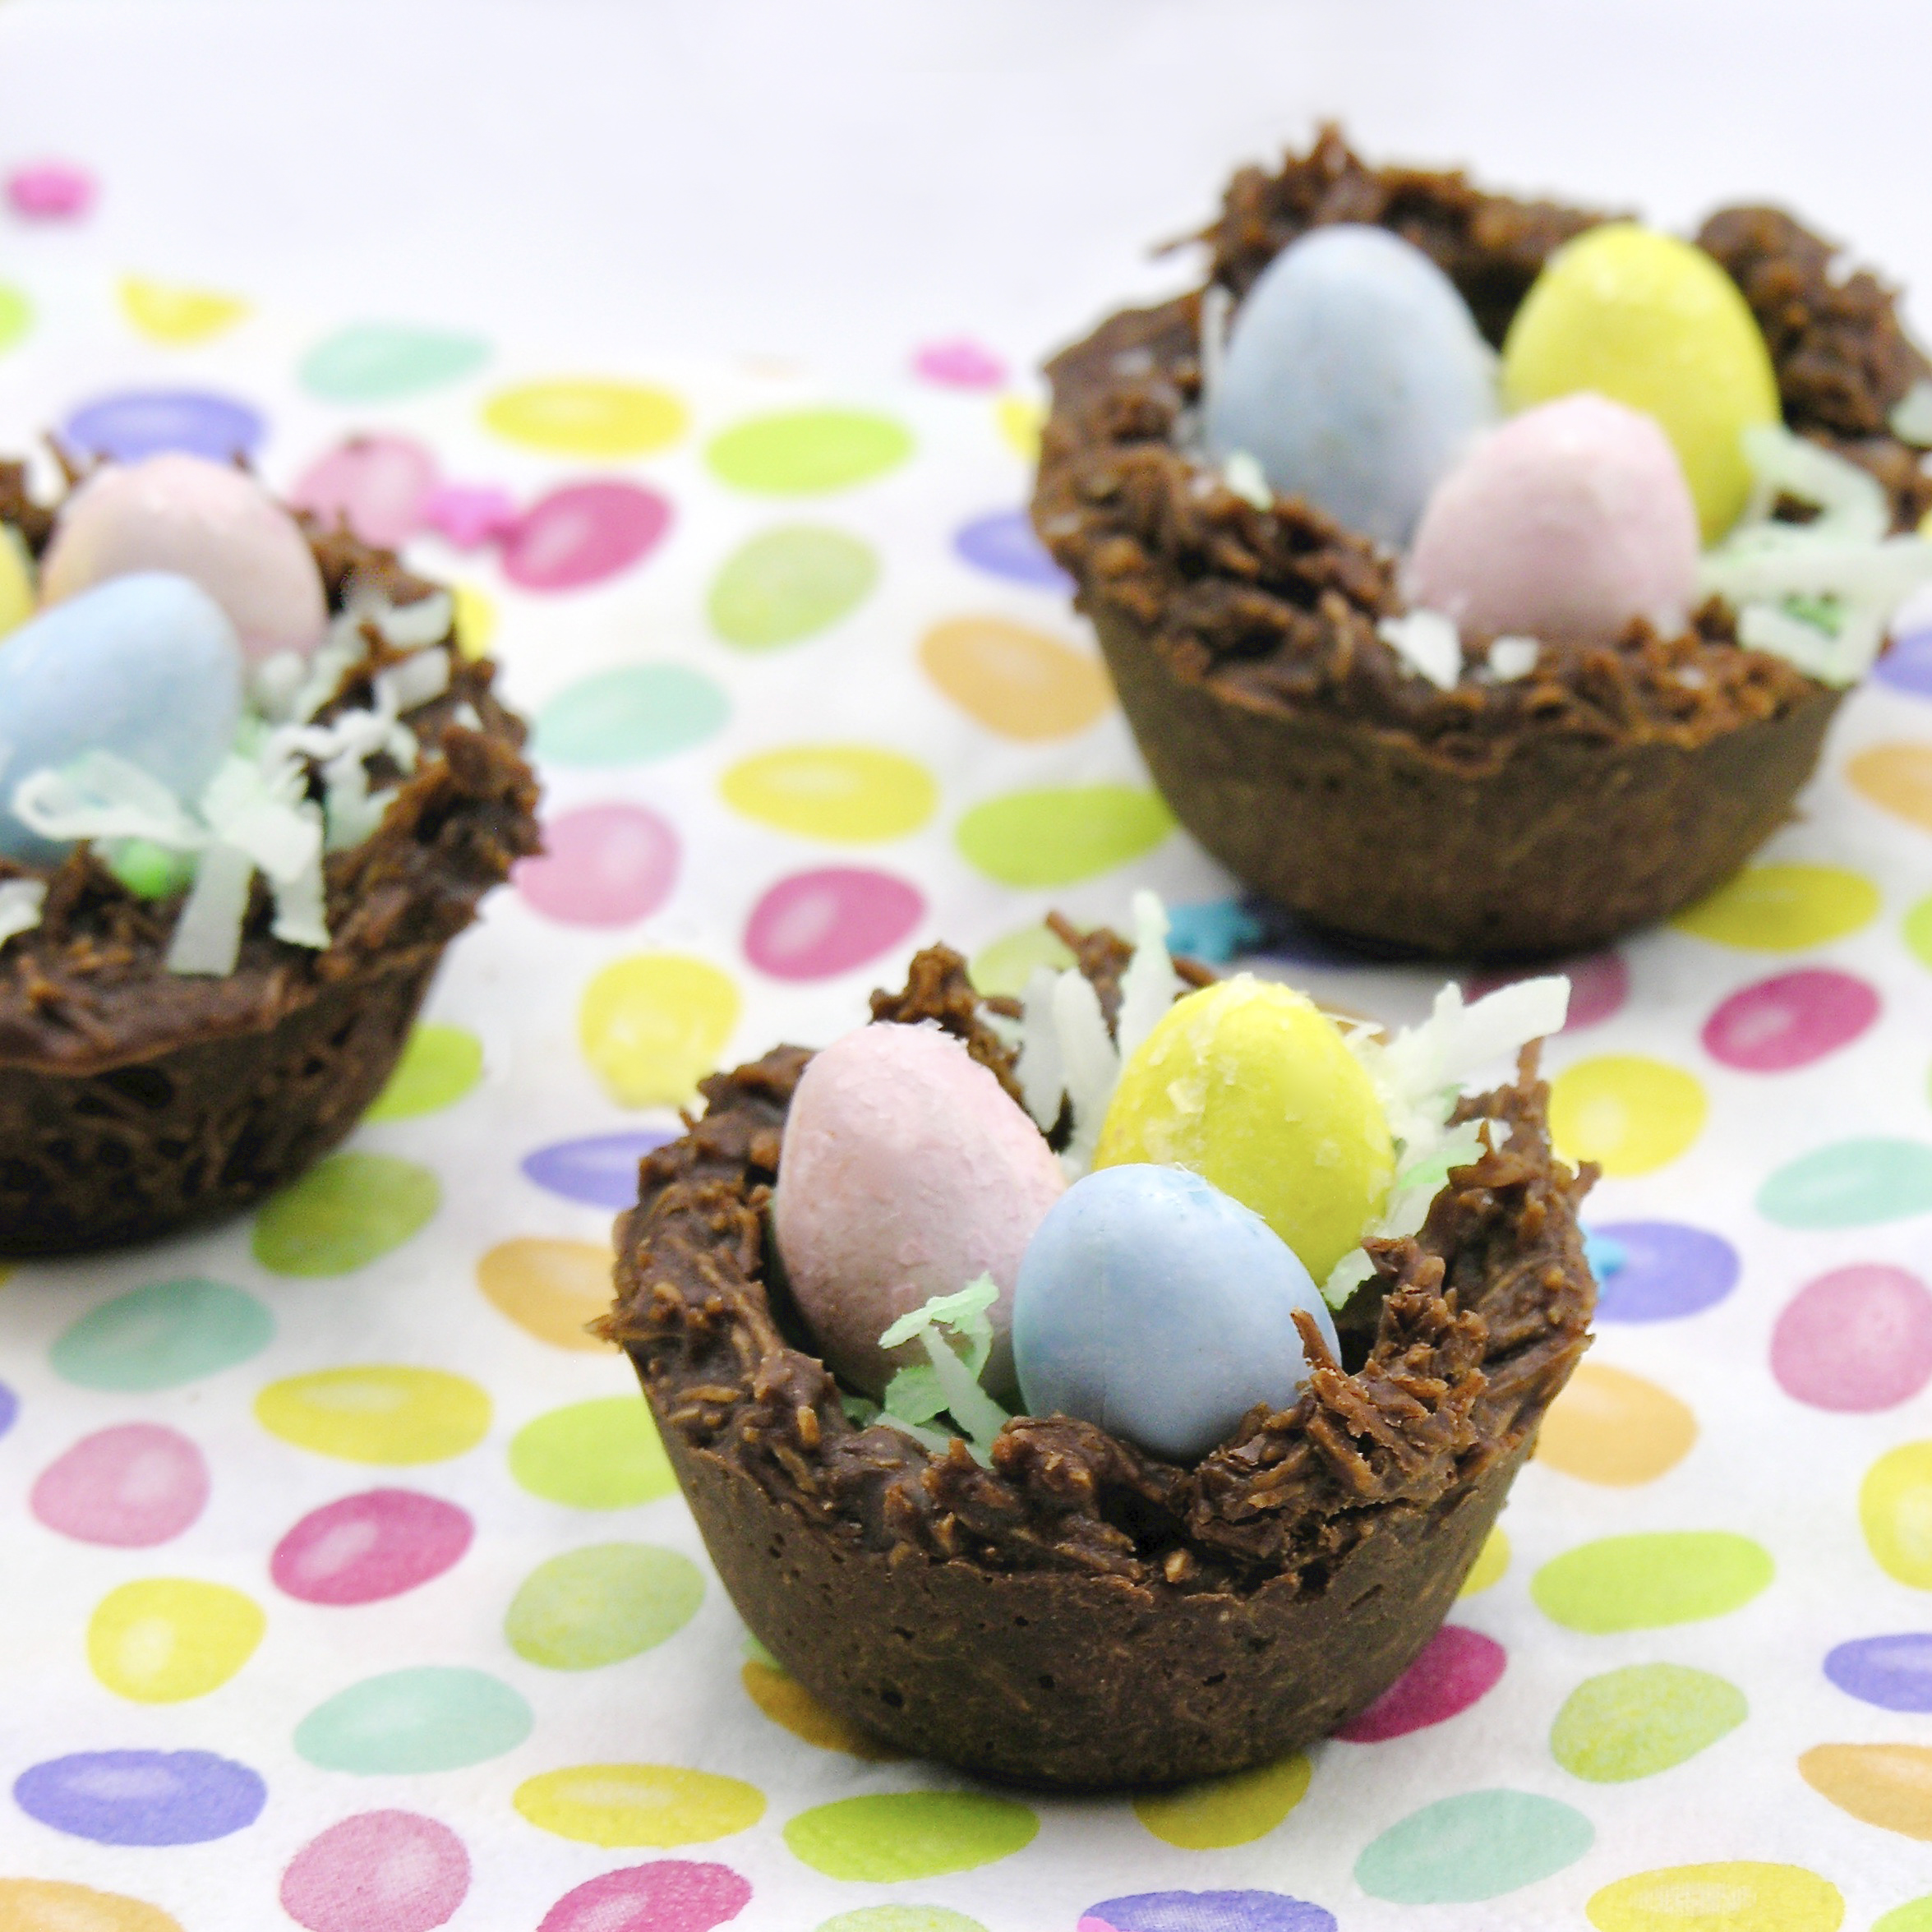
These crunchy little nest cookies are filled with the (seriously addictive!) Cadbury mini eggs and a pinch of coconut. A perfect Easter treat! 
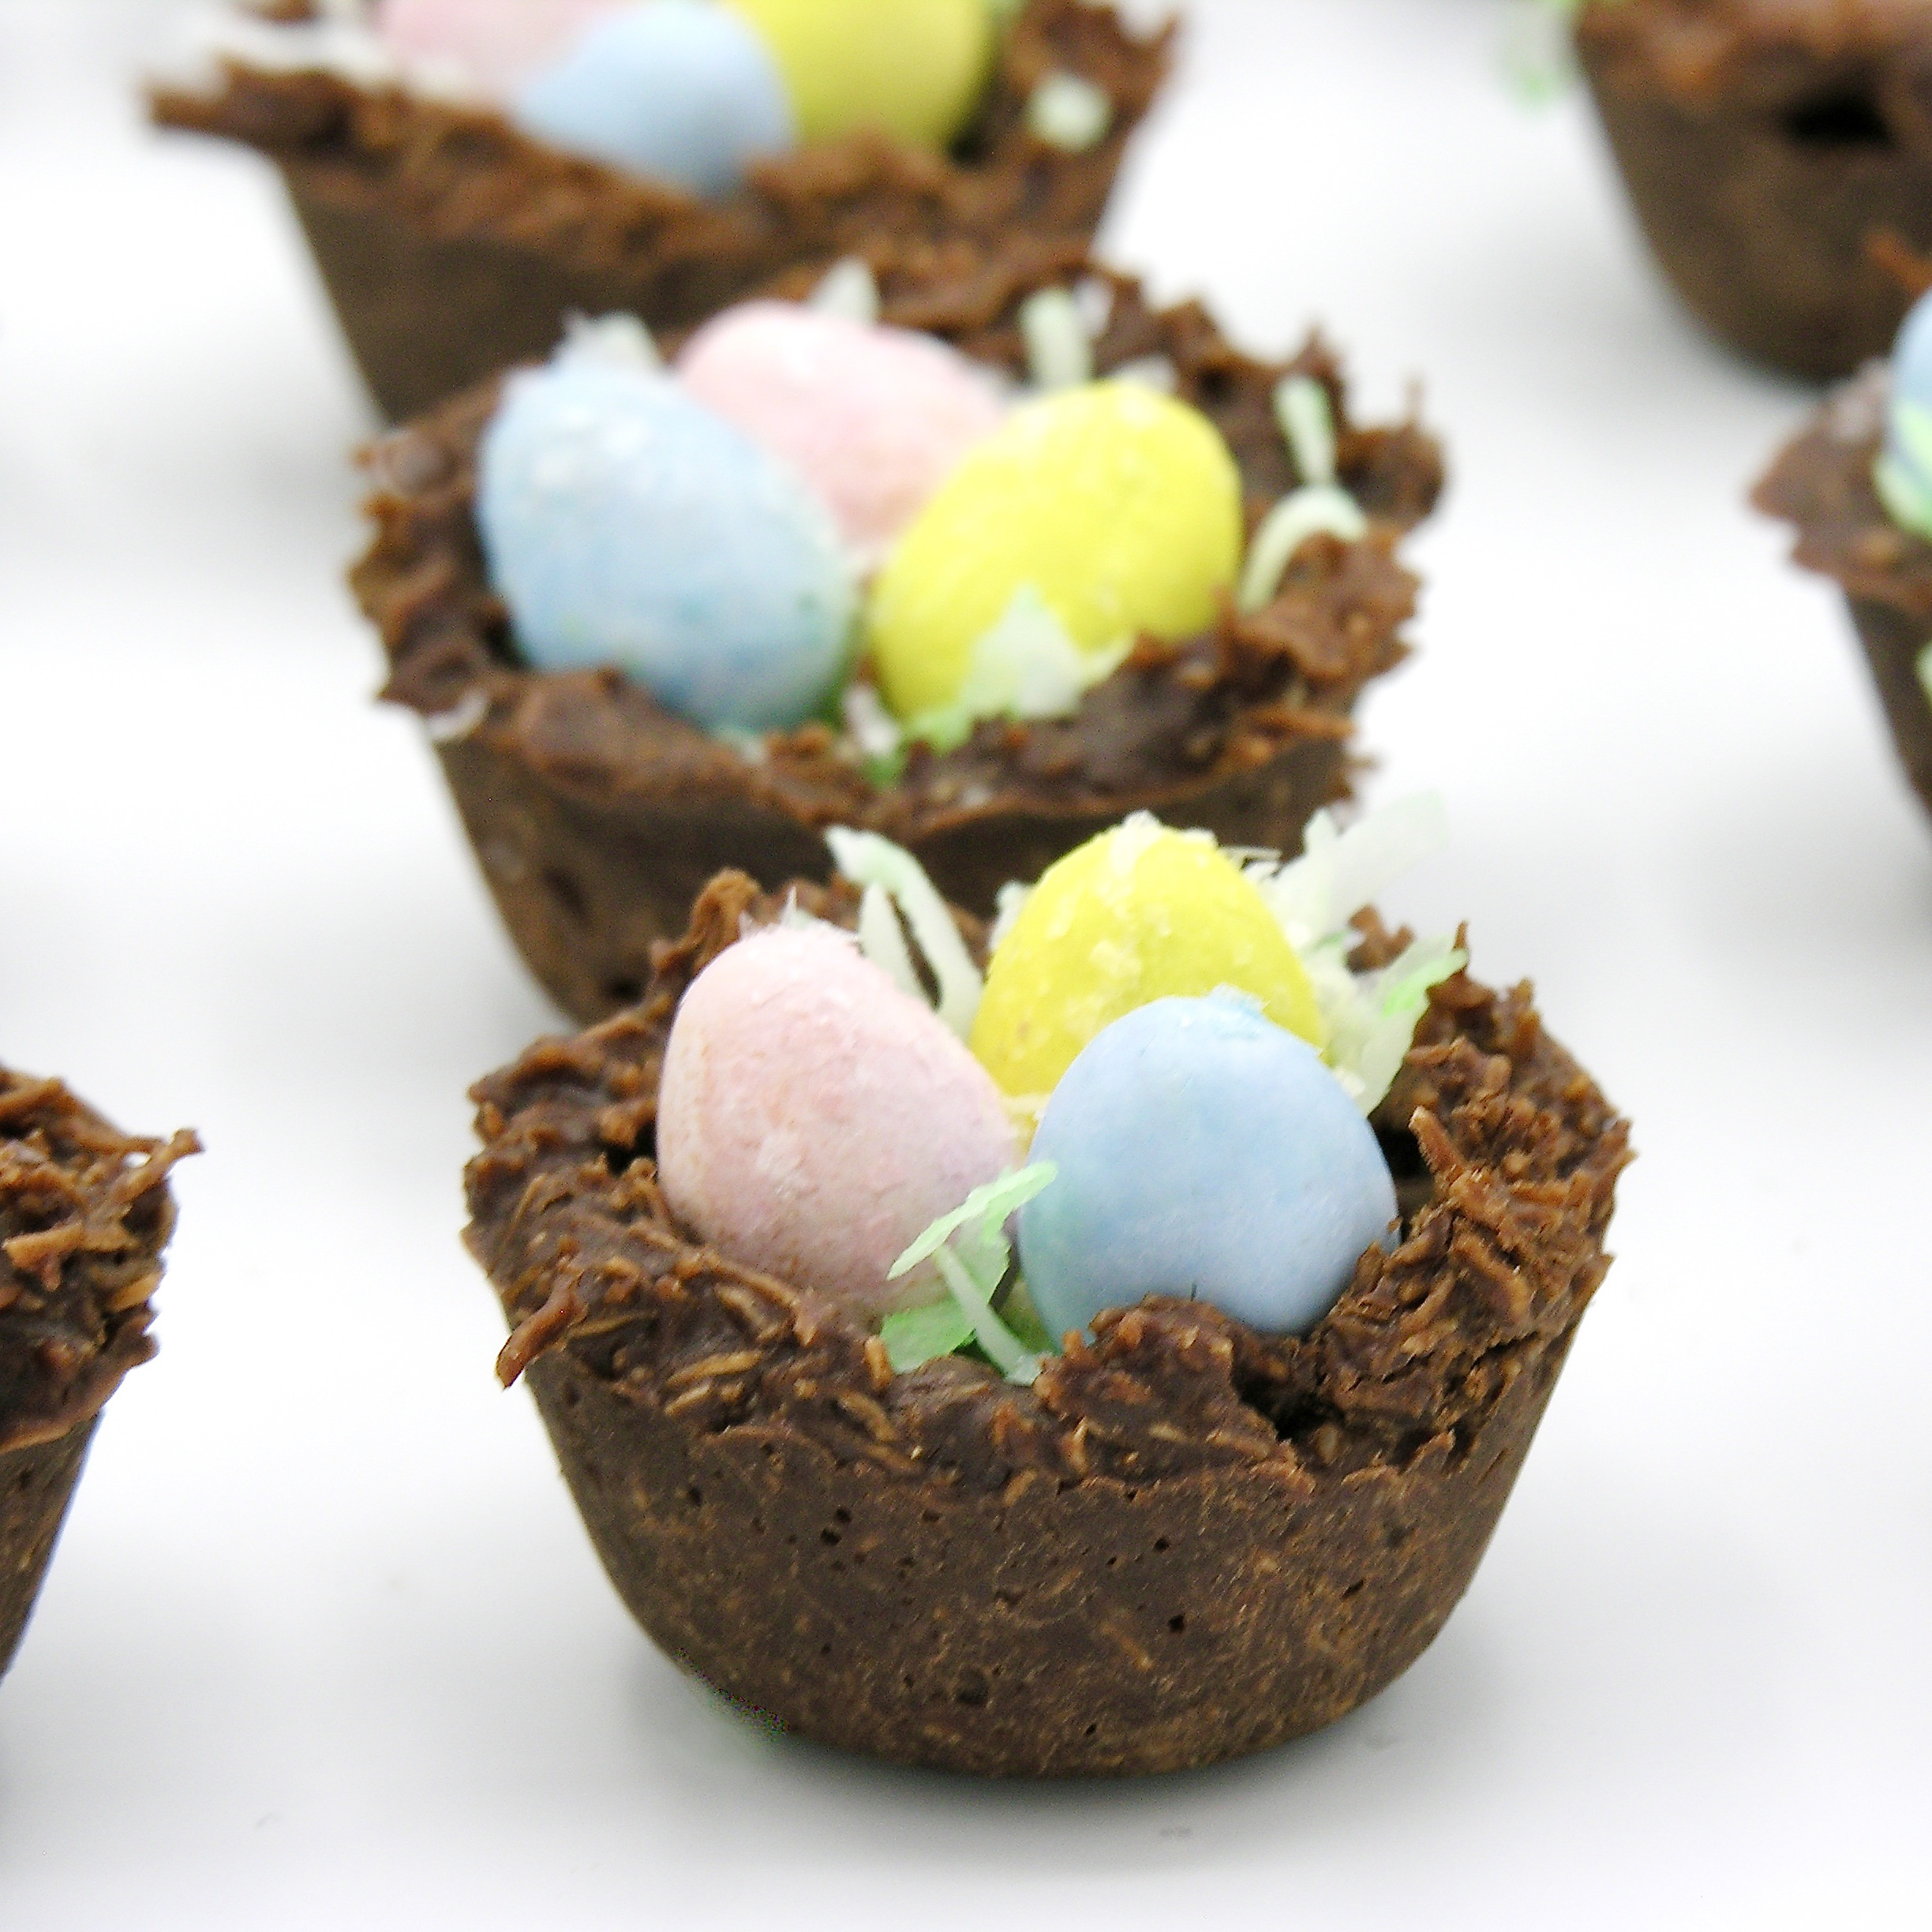
Easter nest 6-1

I just want you to know… I am the owner of the perfect no-bake cookie recipe. It’s my mom’s recipe, and it is perfect because it was the recipe we grew up enjoying. My mom passed away about 6 years ago, and I cherish every recipe I have of hers. When I was thinking about making Easter nest cookies, this recipe was the 1st to pop into my head. For sure I could have made it with the traditional oatmeal, but that’s not very nest-y, is it? So I used shredded wheat (the big ones!) I had to look a little bit to find the full-size shredded wheat (there are like a million flavors of mini!), but I found it- and it worked perfectly. I see you, chow-mien nest-makers- but I just could not bring myself to cover chow mien noodles in chocolate. Ewww. Sorry. Sticking with cereal here 🙂

Easter Nest 2-1

Want to know how to make these little nest cookies? Here is the recipe: (printable version)

Ingredients: (makes 24 mini nest cookies)

  • 2 cups sugar
  • 1/2 cup milk
  • 1/2 cup margarine (or one stick of butter)
  • 1/2 cup cocoa
  • 1/2 cup peanut butter (creamy)
  • 3 teaspoons vanilla extract
  • 4 cups of broken up shredded wheat (this was 9 big pieces, broken up)
  • 1/2 cup coconut (optional) with a tiny bit of green food coloring
  • 72 mini Cadbury eggs (just get a big bag- you’ll want the rest- I promise!)

Directions: 

  • Crunch up the shredded wheat until you have 4 cups.
  • If you use coconut, place it in a zip-top bag with the food coloring and shake until green.
  • Spray a mini-muffin tin with non-stick spray and set aside. 
  • Measure sugar, milk, margarine, and cocoa into a large saucepan. 
  • Heat until boiling (stirring constantly) and then boil for 2 minutes. 
  • Add peanut butter and vanilla. Stir until smooth. 
  • Take off heat, and add Shredded wheat, stirring until it is completely coated. I recommend adding it one cup at a time and using a little less if it gets too thick to stir well.
  • Working quickly, spoon or scoop into mini-muffin tin. 
  • Use a tart shaper or a rounded measuring spoon to press the center in (spray this item with cooking spray between each nest to keep it from sticking). 
  • Sprinkle a little coconut over each nest. 
  • Press three eggs into each nest. 

Nest process1Process3Process2

  • Allow nests to cool and harden.
  • Use a small knife to pop nests out of pan. 
  • Enjoy! 

Easter nest 5-1

My thoughts: I love how interesting these cookies taste with a different cereal added! For sure the shredded wheat gives these a more nest-like appearance. I really wanted to get the Cadbury eggs that are shimmery, but I couldn’t find them at my grocery, so I sprinkled a few edible sparkles over the top. 

If you want to try these with the oatmeal (and experience one of my favorite cookies from childhood), I will leave you with my mom’s original recipe (in her handwriting :)). I actually remember her writing this out for me (from memory). I’d just gotten my 1st apartment out of college and was craving these and she pulled out her notepad and jotted this down for me.

Just a note though- she NEVER used butter (even though the recipe says butter). Butter translated to her was always Country Crock. I use margarine as well- just to be true to her recipe- but I’m sure butter works fine too. Enjoy! ~r

Mom's recipe

Looking for other fun recipe ideas for Easter? We have lots of them! Just click a photo to see the recipe!

babychicks3cadbury-egg1dscn8243jelly-bean-cookies1

Dark Chocolate Almond Bites

Posted on

dark-chocolate-almond-bites1

These little clusters of almond, coconut and dark chocolate will satisfy your sweet tooth without wrecking your diet!

I’ve been trying to eat healthier this year, and so far I’m doing really well (even with a baking blog!). My friend Laura and I walk each day and when we do we talk a lot about things we crave that could be made healthier. She was telling me that she craves chocolate so much that she takes a few dark chocolate chips and adds some almonds for a snack each night. I was in the process of making some coconut cut-out cookies and I had extra toasted coconut. We started brainstorming ways to make a cookie with relatively low calories and carbs. This is the result 🙂 They are delicious (!!) and as far as I can tell, they are about 85 calories each and 6 carbs. Which is perfect. Just perfect.

dark-chocolate-almond-bites4

They aren’t very pretty- but who needs pretty when you can have yummy and relatively healthy? 🙂

Here’s how we made them: (printable recipe here)

INGREDIENTS:

  • 1 cup of toasted coconut (buy it toasted, or toast your own…)
  • 1 cup of lightly salted, roasted almonds
  • 2 plain rice cakes
  • 1 cup of dark chocolate chips

DIRECTIONS:

  • Place toasted coconut and almonds in a food chopper and chop to small pieces. Place in a mixing bowl.
  • Crumble up the 2 rice cakes into very small pieces and add to bowl.
  • Melt chocolate chips, and pour them over the top of mixture. 
  • Stir until well-blended and then use a medium cookie scoop to spoon out evenly-sized cookies onto a parchment paper- covered cookie sheet. (My batch made 22, and calories and carbs were calculated accordingly.)
  • Place cookie sheet in refrigerator until cookies harden up. Enjoy! 

dark-chocolate-almond-bites2

My thoughts: These are really, really good. I bagged mine up in individual cello bags and tied them shut with a twist tie. That way, I wasn’t tempted to eat more than one at a time! These are a perfect “gotta have some chocolate” treat. Lots of protein from the nuts, healthy oils from the coconut, and a little bit of crunch from the rice cakes. Enjoy! ~r

dark-chocolate-almond-bites3

Other yummy (slightly less healthy!) cookie recipes here at Easybaked (click on a photo to see the recipe):

Chocolate Covered Coconut Cut-out Cookies

Posted on

coconut-cookie-cut-outsCrunchy bits of toasted coconut make these cut-out cookies one of my favorite cookie recipes ever!

I love coconut! It reminds me of sunshine and beaches and (for some weird reason) Easter. Well, it isn’t Easter yet, but you can practice up so you are ready next month!

Story time!!!!! Last Christmas I made shortbread cookies with really cute little Christmas chocolates on top. The mold I used was made by Silikomart in Italy, and I got them on Amazon. I loved that they were a thin mold- so they added a cute bit of chocolate to a cookie without being too much chocolate. I looked for other varieties and found these ADORABLE winter animal ones. Cute little foxes, and hedgehogs?? I had to find them!

fox cookies  hedgehog cookies

I found them on Ebay and ordered them- but they sent me the wrong ones…from Italy… and then told me afterward that they were out of stock.

Sigh.

The only other place I found these was on a website out of Poland- that only ships to Poland. But I have friends in Poland, and long story short, I just got these in the mail with a fun note and a Polish chocolate bar.

I’m telling you this so that you won’t think it is easy to get this particular mold. Silikomart has a lot of other molds on Amazon (they call these chocolate tags)- so hopefully you can find one you like and make similar cookies to these. Of course, if you live in Poland…or Italy…. 🙂

moose cookies beaver cookies

Here is how we made these: (printable recipe for the cookies here)

INGREDIENTS: (makes about 48 small cookies)

  • 2 sticks (1 cup) unsalted butter (softened)
  • 1 1/2 cups of granulated sugar
  • 2 eggs
  • 1 teaspoon of vanilla
  • 2 teaspoons of coconut flavoring
  • 3 cups of flour
  • 1 teaspoon of baking powder
  • 1/2 teaspoon of salt
  • 2 cups of shredded sweetened coconut (or one cup of toasted, chopped coconut)
  • 2 bags of Wilton Candy Melts in dark chocolate
  • Edible shimmer dust (if desired)

DIRECTIONS:

Start by making your chocolate tags.

  • Set mold on a small cookie sheet so it is easy to move.
  • Melt candy melts in a bowl in the microwave. Stir every 30 seconds until smooth.
  • Spoon melts into a zip-top bag. Clip a corner and squeeze chocolate out and into mold. Tap on counter to flatten out into mold and remove bubbles Photo of this here.
  • Place in freezer for about 5-10 minutes and then pop out of mold onto clean and cool surface.
  • Repeat 2 more times (so you have 48 pieces)
  • Use a food-grade paint brush to add a little edible color and shimmer to these (if desired!)

Then toast your coconut.

  • While you are waiting for these to harden, preheat oven to 350F degrees and spread 2 cups of coconut out in a baking dish.
  • Bake for about 10 minutes, stirring every 2-3 minutes and watching closely. Coconut toasts fast- so be careful not to burn it!
  • Cool coconut to room temperature and then place in a food chopper and chop it up fine. Set aside.

Finally, make your cookies.

  • In a large mixing bowl, cream together butter and sugar until smooth.
  • Add eggs, vanilla and coconut flavoring and mix well.
  • Add all dry ingredients except coconut and mix until able to knead into a firm ball of dough.
  • Add coconut and knead it in.
  • Roll out on a floured counter with a flour coated rolling pin to desired thickness (I made them fairly thick)
  • Cut into rectangles just a little bigger than the size of the molds you use on top and place on a parchment-paper covered baking sheet.
  • Bake at 350F degrees for 8-10 minutes and slide off the cookie sheet (leaving on parchment paper) to cool.
  • While the cookies are still warm, set a chocolate on top and then let them cool completely. The entire chocolate will get soft. It won’t lose it’s shape, but if you touch it before it hardens back up you will make a mess 🙂 
  • Allow cookies and chocolate to cool completely (a couple of hours)
  • Enjoy!

Coconut cut-out cookies

My thoughts: I love coconut, I love coconut and chocolate together, and I think these are simply the cutest little chocolate molds ever! Please Silikomart— sell more things in the US!!! Your stuff is SO fun!!! 🙂 I hope you get a chance to try these yummy little cookies out- I think you will love them!!!!  ~r

coconut-cut-out cookies

Plus, if you don’t want to bother with the molds, you can cut these cookies into any shape and just drizzle them with the candy melts! Less fuss…same amazing cookies. I totally did a few- just so you can see 🙂

Coconut cut-out cookies

Other favorite coconut recipes here: (click on a photo to see the recipe)

Creamy Coconut CheesecakeCoconut Cupcakes!!Coconut Brownie CupsChocolate coconut cookies

Hairy Monster Oreo Pops

Posted on

hairy-monster-oreo-pops

These fuzzy Oreo monsters aren’t TOO scary- and they taste delicious!

Oh Oreo Pops… I love you! So many possibilities and so little time! Aren’t these so cute? They remind me of the little pom-poms with eyes that we used to put on the tops of pencils. Yes..pencils…back in the olden days when we used paper 😉

In any case- these are perfect for Halloween and even for just fun fuzzies at kids parties! The only requirement??? You need to like coconut!  I know that eliminates a few of you out there…but believe me- if you like coconut, you will LOVE these! Coconut plus Oreos?? Bam!

monster-oreo-pops

Here’s how we made these fun little guys: (printable recipe available here)

INGREDIENTS: (for about 24 cookies)

  • One package of Double Stuff Oreos
  • Wilton’s Candy Melts– you need about a bag and 1/2- so if you do all three colors you need 1/2 bag of each.
  • Candy eyes
  • About 3 cups of shredded, sweetened coconut
  • Food coloring in desired shades
  • About 24 lollipop sticks

DIRECTIONS: (if you’ve never made Oreo Pops, check out our tutorial here)

  • Place coconut in small zip-top bags and add food coloring in desired shades. Zip bag shut and shake and squeeze until coconut is completely colored. Set aside.
  • Twist apart all of your Oreos.
  • Melt your candy melts in the microwave in 30 second increments, stirring in between, until melted and smooth.
  • Dip the end of a lollipop stick into the melts, spread a little on the top of the white filling of the Oreo and then press the stick into the white filling.
  • Place the top of the Oreo back on so that the stick is in the middle with the filling.
  • Do this for all the Oreos, and set them on a large plate or cookie sheet to FREEZE for about 10 minutes.
  • Hold a chilled pop by the stick, and spoon candy melts (in desired color) over the top, bottom and sides of the Oreo.
  • Tap stick against the side of the bowl to get extra melts off, and gently pull the bottom of the Oreo along the edge of the bowl, scraping off excess melts.

hairy-monster-oreo-popshair-monster-oreo-pops

  • Set Oreo on parchment paper to harden- but before it hardens, sprinkle a generous amount of coconut on the top of the candy melts, and gently press it up against the sides.
  • When all Oreos of a given color are dipped and covered, take the remaining candy melts and use a dab on the back of each candy eye-ball to “glue” these on top of the coconut. I used a toothpick to add this dab of candy melt to the eyeball.
  • Continue until you have all colors finished. Allow Oreo pops to completely harden (a couple of hours). You can freeze them to speed up this process. 
  • The BEST way to serve these is to wrap them in cello bags and tie them with a ribbon. This keeps all that coconut in place (and not all over the other colors of coconut!)

hairy-monster-oreo-pops

hairy-monster-oreo-pops

My thoughts: These are quick, but a little messy to put together, They are adorable and delicious though– so well worth the effort in my opinion!!! I liked them even better after a couple of days- when the coconut gets a little firmer in texture from sitting out and it’s less oily. These will keep for at least a week (maybe longer?) when wrapped up in cello bags. I do hope you get a chance to try them!  Enjoy!!  ~r

hairy-monster-oreo-pops

We specialize in making kids smile here at Easybaked. Here are a few more ideas: (click on photo to see recipe)

Cookie Monster OreosFish Pond CupcakesTepee CupcakesPile of Cupcakes!

Key Lime Cookie Bars

Posted on

Key Lime Cookie Bars2

These delicious cookie bars have white chocolate and coconut on the bottom and key lime pie filling with whipped cream on top.  Such a refreshing treat for summer!

I love key lime pie. I love cookies. These smash those two worlds together into a sweet and tart summer dessert! Love it!

Key Lime Cookie Bars

Here’s how we made it: (printable recipe)

INGREDIENTS:

Cookie base:

  • 1 box of yellow cake mix
  • 1/3c. oil
  • 2 eggs
  • 1 cup of white chocolate chips
  • 1 cup of shredded coconut
  • 1/2 cup graham cracker crumbs

Key lime topping:

  • 1 cup of lime juice
  • 1 egg
  • 1 can (14oz) of sweetened condensed milk
  • One tub of cool whip, or 2 cups of whipping cream, whipped.

DIRECTIONS:

  • Preheat the oven to 350F degrees
  • In a mixing bowl, combine cake mix, oil and eggs well.
  • Add chips, coconut and graham crumbs, and mix together with clean hands until well- combined.
  • Press mixture into a greased cake pan and bake for 10 minutes at 350F degrees.
  • While this is baking, make key lime topping.
  • Mix together lime juice, condensed milk and one egg until well combined.
  • Pour over partially baked cookies and return to oven for another 20 minutes.
  • Cool completely and top with whipped topping, sprinkle with  graham crumbs, if desired.
  • Chill until serving, but allow dessert to return to room temperature before serving.
  • Enjoy!

Key Lime Cookie Bars4My thoughts: Sweet and fruity and white chocolatey….what is not to like here??? I love the sweet and tart balance of these little desserts and they just LOOK like summer! Enjoy! ~r
Key Lime Cookie Bars1

Other refreshing summer treats: (click on a photo to see the recipe)

Caramel Gelato!!!Kool Aid PieRaspberry Lemon Cream Cups!!!Root Beer Float Cupcakes!!!


Homemade Mallo Cups

Posted on

Mallow Cups

Dark chocolate and toasted coconut cups filled with creamy sweet marshmallow-  YUM!

Last week we featured one use for silicone baking cups, and even gave two sets of them away! This week is another idea for these cups. If you missed the story last week, I was sent a set of these silicone cups to try out as an apology for a designer that stole one of my photos and used it in the product packaging of these cups. The cups I am using are Baketown Girls Silicone Baking Cups, and can be found on Amazon.com.

I was a little doubtful about the practicality of these cups (especially when I thought of doing cupcakes in them), but I’m having fun experimenting with the possibilities! I’m sure this won’t be the last recipe on Easybaked using these silicone cups.

Have you ever had Mallo Cups?

Mallo-Cup-Wrapper-SmallDear me, they are amazing. They are considered the very 1st candy cup created, and they were one of my favorite childhood treats. They are a little hard to find these days, so I thought I’d re-create them. They are actually not very hard to make.

Mallo Cups

Here’s how we put them together. (printable recipe)

INGREDIENTS: (makes about 12 cups)

  • 2 bags of Wilton’s Candy Melts (if you want a little better chocolate, try Country Kitchen chocolate. It’s a touch more expensive, but truly better in flavor (click here). )
  • 1 cup of toasted coconut (to toast refer to instructions here)
  • One large jar (13 oz) of Jet-Puffed Marshmallow Creme

DIRECTIONS:

  • Set 12 silicone liners on a cookie sheet with edges.
  • Melt one bag of candy melts in a bowl in the microwave in 30 second increments, stirring between until smooth.
  • Spoon carefully into a large zip-top bag and seal well.
  • Clip a corner off the bag of chocolate and pipe a little chocolate (about 1 tablespoon) into each cup.
  • Tip and/or tap each cup until chocolate covers the entire bottom of the cup.
  • Refrigerate for about 5 minutes until hard.
  • Carefully spoon marshmallow into a second zip-top bag and seal well.
  • Clip a corner off this bag and pipe a dollop of marshmallow into the center of each cup- do not let it touch the sides.
  • Use bag of melted chocolate to carefully pipe chocolate all the way around each dollop of marshmallow- this seals it into the center and keeps it from leaking out. Melt more chocolate, as needed.
  • Refrigerate for about 5 minutes until chocolate is hardened.
  • Melt remaining chocolate and add finely crushed toasted coconut to it (save a bit out to sprinkle on top later if desired)
  • Spoon this mixture into a zip top bag and seal well.
  • Clip a corner and pipe chocolate/coconut evenly over each cup.
  • Sprinkle with toasted coconut, or any decorative topping you desire.
  • Chill until cup is hardened and then peel away silicone cup and enjoy!

Mallo CupsMallow Cups7Mallow Cups5

Not too difficult- and the end result is so much fun (and delicious!)

Mallow Cups2

My thoughts: These are just fun little treats to put together and they really are so yummy with the crunchy coconut and creamy marshmallow. I even made an Easter batch of them!!! I hope you get a chance to try them! Enjoy!! ~r

Easter Mallow Cups

We love to celebrate spring! Here are some other fun springtime recipes: (click on photo to see recipe)

Koolaid PieFlower Pot OreosRaspberry Lemon Cream Cups!!!Fun fondant cupcake toppers

Pumpkin Guts!

Posted on

Pumpkin Guts Dessert!

This delicious coconut cream pie dip is disguised as gooey pumpkin guts (with sliced almond “seeds”)~ a perfect Halloween treat!!

I love carving pumpkins. The smell is my favorite part, it reminds me of being very small and in a homemade costume anxiously awaiting trick-or-treat time. We always carved pumpkins several days earlier, but we lit them on Halloween and all evening the lids would quietly cook in the candle flame, filling the house with an indescribably wonderful scent that still reminds me of childhood whenever I smell it.

I carved a pumpkin for this recipe.

1. To serve this dip in.

2. To use as a reference in coloring this dessert!

Pumpkin Guts!!!!Isn’t it fun?  I savored the smell and enjoyed the squishy guts between my fingers…I even roasted a few seeds and ate them with salt as a reward for getting my pictures taken!

Want to know how to make this yummy fall treat?  It is SUPER easy!  (Printable recipe)

INGREDIENTS:

  • 3 cups of shredded sweet coconut (to desired consistency)
  • 1 cup of sliced almonds
  • 1 box (3.3 oz.) Jello Brand White Chocolate Pudding (instant)
  • Milk (to make pudding according to package)
  • Orange and yellow food coloring
  • Chocolate cookies for dipping!

DIRECTIONS:

  • Make pudding as directed on package and color to desired shade with food colors
  • Place coconut in a large zip-top bag and add the same food colors to the bag. Toss and mix coconut until colored as well.
  • Mix pudding with enough coconut to make a gooey pumpkin consistency.
  • Mix about half of the almonds in, and use the rest to sprinkle on top.
  • Serve with chocolate cookies or graham crackers for that “Almond Joy” taste!
  • Enjoy! 

Halloween dessert!My thoughts:  Well, I love coconut, almonds and chocolate- so this was a given “perfect” dessert for me!  I think it would be fun to serve this with a “murdered” pumpkin, I just didn’t have time to draw a dramatic face and stick a big knife in mine! Serve it up classy, or make it into a funny Halloween treat- either way, it is easy and soooooo yummy!  ~Enjoy!!!!! ~r

Pumpkin Guts!Other fun fall desserts here on Easybaked (click on a photo to see the recipe)

Halloween Swirl Cookies!!!Frosty Candy Corn Dessert!Ginger Maple CookiesSpider Cupcakes!

Piña Colada Cupcakes!

Posted on

Pina Colada Cupcakes!

 These pineapple cupcakes are full of coconut and rum flavored happiness.  A perfect pool party treat!

Aren’t these just the cutest little things?  I love the flavor combination of coconut and pineapple, it is such a refreshing taste!  The light whipped frosting on these, combined with the crunch of toasted coconut makes them such a delicious summer treat!  I even added a cute little edible coconut drink topper that I found on Party Pinchers.  So. much. fun!!!!

Pina Colada Cupcakes!!

INGREDIENTS: (printable recipe here)

  • 1 boxed pineapple cake mix (I used Duncan Hines), plus water, oil and eggs to make according to box directions.
  • 5 cups of shredded, sweetened coconut
  • 3 teaspoons of rum flavoring (divided)
  • 2 teaspoons of coconut flavoring
  • 2 sticks (1 cup) salted butter (softened to room temperature)
  • 2 sticks (1 cup) of unsalted butter (softened to room temperature)
  • 3 cups of powdered sugar
  • Decorations (as desired)

DIRECTIONS:

  • Preheat oven to 325F degrees
  • Spread 5 cups of coconut out on a large baking sheet that has edges.
  • Toast in 5 minute increments, stirring with a big spoon to evenly toast (It usually takes me about 20 minutes)
  • Allow coconut to cool, then place in a large zip-top bag, and crush into smaller pieces.
  • Make cake mix according to directions on box, and after it is made, add one cup of crushed, toasted coconut and mix completely into batter.
  • Add 2 teaspoons of rum flavoring and stir completely into batter.
  • Divide batter evenly into 24 cupcake liners placed into tins.
  • Bake according to package directions and cool completely.
  • To make frosting, place butters, coconut flavoring, remaining rum flavoring, and powdered sugar into a large mixing bowl and beat on high for 3 or 4 minutes until very light and fluffy.  Add one cup of crushed, toasted coconut and stir until well blended.
  • Use a spoon or a cookie scoop to place a rounded scoop of frosting on the top of each cupcake.  
  • Place the rest of the crushed coconut into a small bowl, and turn each cupcake upside down into it, pressing coconut into the top and sides of each scoop of frosting.
  • Decorate as desired. I found these cute little edible “coconut cups” on a site called Party Pinching, and I couldn’t resist making them for my pina colada cupcakes!  You just cut the tops off of a Whoppers malted milk ball, put a dab of melted white chocolate and add little flower sprinkles and a bit of string licorice.  FUN!

Pina Colada Cupcakes!Pina Colada Cupcakes!

My thoughts: I really thought these captured the flavors of coconut and pineapple in a perfect combination.  I loved the little crunchy bits of coconut in the cake and frosting.  These are such a festive cupcake and make a perfect refreshing summer or vacation dessert for all ages! 
Pina Colada Cupcakes!Other fun cupcake recipes:

Malted Milkshake CupcakesKey Lime Cupcakes!Brownie Oreo Cookie CupButter beer cupcakes


Flower Pot Cupcakes

Posted on


Flower Pot Cupcakes!!!


These cheery garden cupcakes have delicious raspberry cream filling

and fun flowers made of M& Ms!!!

HAPPY MOTHER’S DAY!!!!  This bit of cheer goes out especially to my mom this week.  I’m so far from home this year, that we will have to celebrate from a distance.

Aren’t these the cutest cupcakes ever?  I cannot take credit for the M&M flower idea, it was an idea I originally saw on a cute blog called Sara’s Shoebox.  She was copying the idea from a cookbook called “What’s New Cupcake“.  I do not own this cook book, but it is a sequel to one of my favorites, “Hello, Cupcake!”, by the same author.  In any case, Sara made hers with mini Oreos and I simply could not get mine to work with those..?  SO, I had seen marshmallows in pink lemonade flavor (who can walk by THAT without picking up a bag?) and I decided to use them instead.  They were a tiny bit too small, so I am going to recommend that you use full-size marshmallows for these.  I had to fiddle around with them awhile to get them to all stick.  I’m positive they will be easier on a full-size marshmallow!!

The cupcakes are an original though- I used a pink velvet cake mix, but you can use any flavor you like!  I filled them with a yummy raspberry cream and topped them with scoops of butter cream and either coconut or Oreos (um…I had a few of those left over from the flower attempt!)  Are you ready for a recipe for these???  Here you go: (printable version)

INGREDIENTS:

  • One boxed cake mix (in any flavor, with oil, water and eggs to make according to box)
  • One packet of Dream Whip
  • 1 cup of heavy whipping cream
  • 1/4 cup of berry jelly or jam
  • 2 sticks of salted butter (at room temp)
  • 2 sticks of unsalted butter (at room temp)
  • 3 cups of powdered sugar
  • 2 teaspoons of vanilla
  • 2 cups of shredded coconut (died green with food coloring) -OR- 2 cups of crushed Oreo Cookies
  • 24 pretzel sticks
  • Pastel M&Ms
  • 12 marshmallows
  • 1/2 cup of white Wilton’s candy melts

DIRECTIONS:

Flowers: I recommend making these ahead and storing them covered until you make your cupcakes.  They aren’t hard to make, but a little time consuming.

  • Take 12 marshmallows and cut them in half with clean kitchen scissors. Lay them on the counter with the cut side up to keep them from sticking to things.
  • Take a pretzel stick and wiggle it up into the side of each marshmallow.  
  • Melt candy melts in the microwave in 30 second increments, stirring between until completely melted and smooth.
  • The technique that worked best for me here was to lay my M&Ms out in a flower pattern (minus the center) on parchment paper, cover the sticky side of the marshmallow with candy melts and lay it (candy melt side down) on the flower until it dries.  Then I used a little of the candy melts to stick my center on.  Here’s some photos.

Flower Pot Cupcakes Flower Pot Cupcakes Flower Pot CupcakesFlower Pot Cupcakes

Just let those cute little flowers dry, and you are all set to make your cupcakes!

Cupcakes:

  • Make cake mix according to box and divide batter among 24 cupcake liners in muffin tins.
  • Bake according to box, remove from oven and cool completely.
  • Make filling by putting Dream whip powder and whipping cream in a bowl.  Mix on high until stiff peaks form.
  • Add jam or jelly and beat until well combined.  Place filling in a large zip top bag and keep refrigerated until use.
  • Core cooled cupcakes with a small knife or a cupcake corer.  I HIGHLY recommend the corer- it is super cheap and will save you time!
  • Cut a corner off the filling bag and squeeze filling into each cupcake.  
  • Place top of “core” that was removed back on top of cupcake.

Flower Pot Cupcakes Flower Pot Cupcakes Flower Pot Cupcakes

  • Make buttercream frosting by beating butters, powdered sugar and vanilla together in a large bowl on high until it is light and fluffy and smooth.
  • Use a scoop to place a mound of frosting on each cupcake.
  • Turn cupcake upside down in either coconut or crushed Oreo to coat the frosting.
  • Now pop a cute flower in, and you have an adorable treat for all sorts of occasions!!


Flower Pot Cupcakes!!!
My thoughts:  These brought smiles to so many faces!  I often share my blog creations with various families and organizations here on the Navajo Nation.  These went to the Easter party at the Senior Citizen Center here.  I got many hugs and thank yous (Ahéhee’)
 from the recipients.  I also got to watch almost 100 seniors literally running to a huge Easter egg hunt!  So fun!!!

Happy Easter!!On a recipe note:  These are little time consuming, but so worth the effort!  I made my flowers ahead and I was glad I did.  I really hope you enjoy these!

And to the best mom ever: a bouquet of M&M flowers!  I love you!!!!  ~r

M&M flower bouquet!!!
Other recipe ideas for Mother’s day:

Creamy cheesecake with sour cream toppingEspresso Cookies!!!Strawberry Lemonade Cupcakes!!!! Brownie Oreo Cookie Cup

%d bloggers like this: