RSS Feed

Tag Archives: white chocolate

Pumpkin-stuffed Oreos

pumpkin stuffed oreos

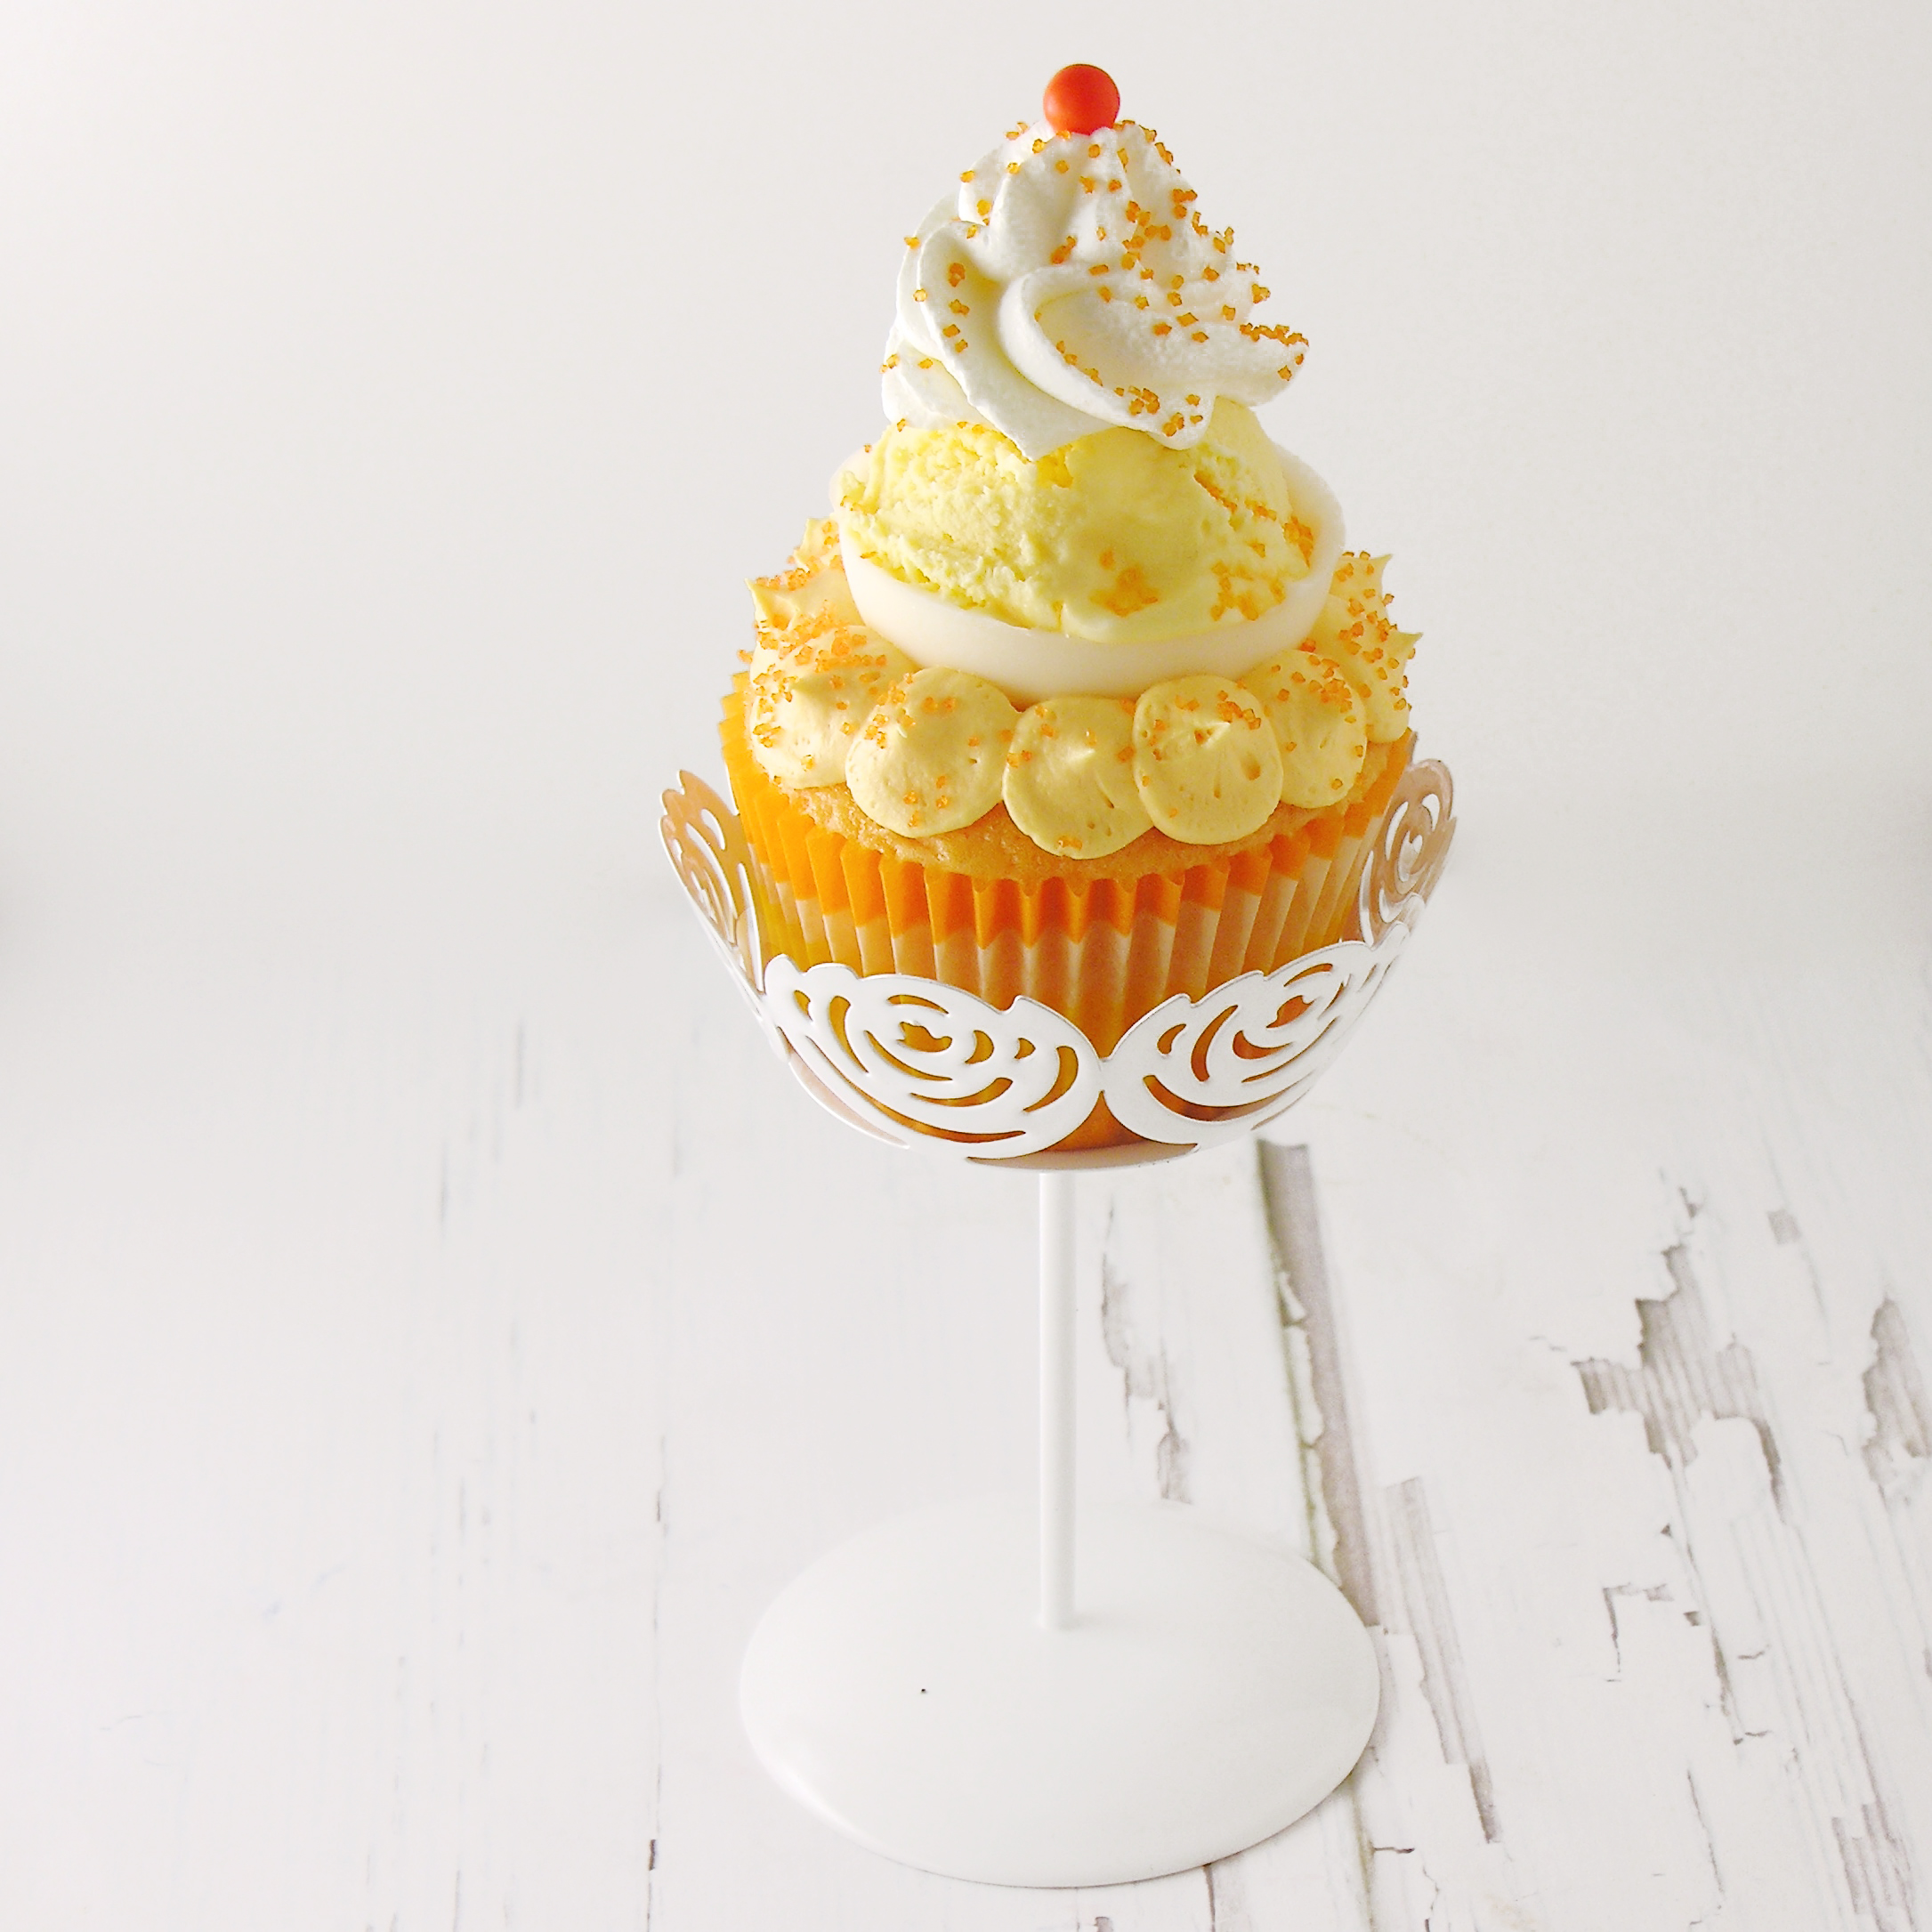
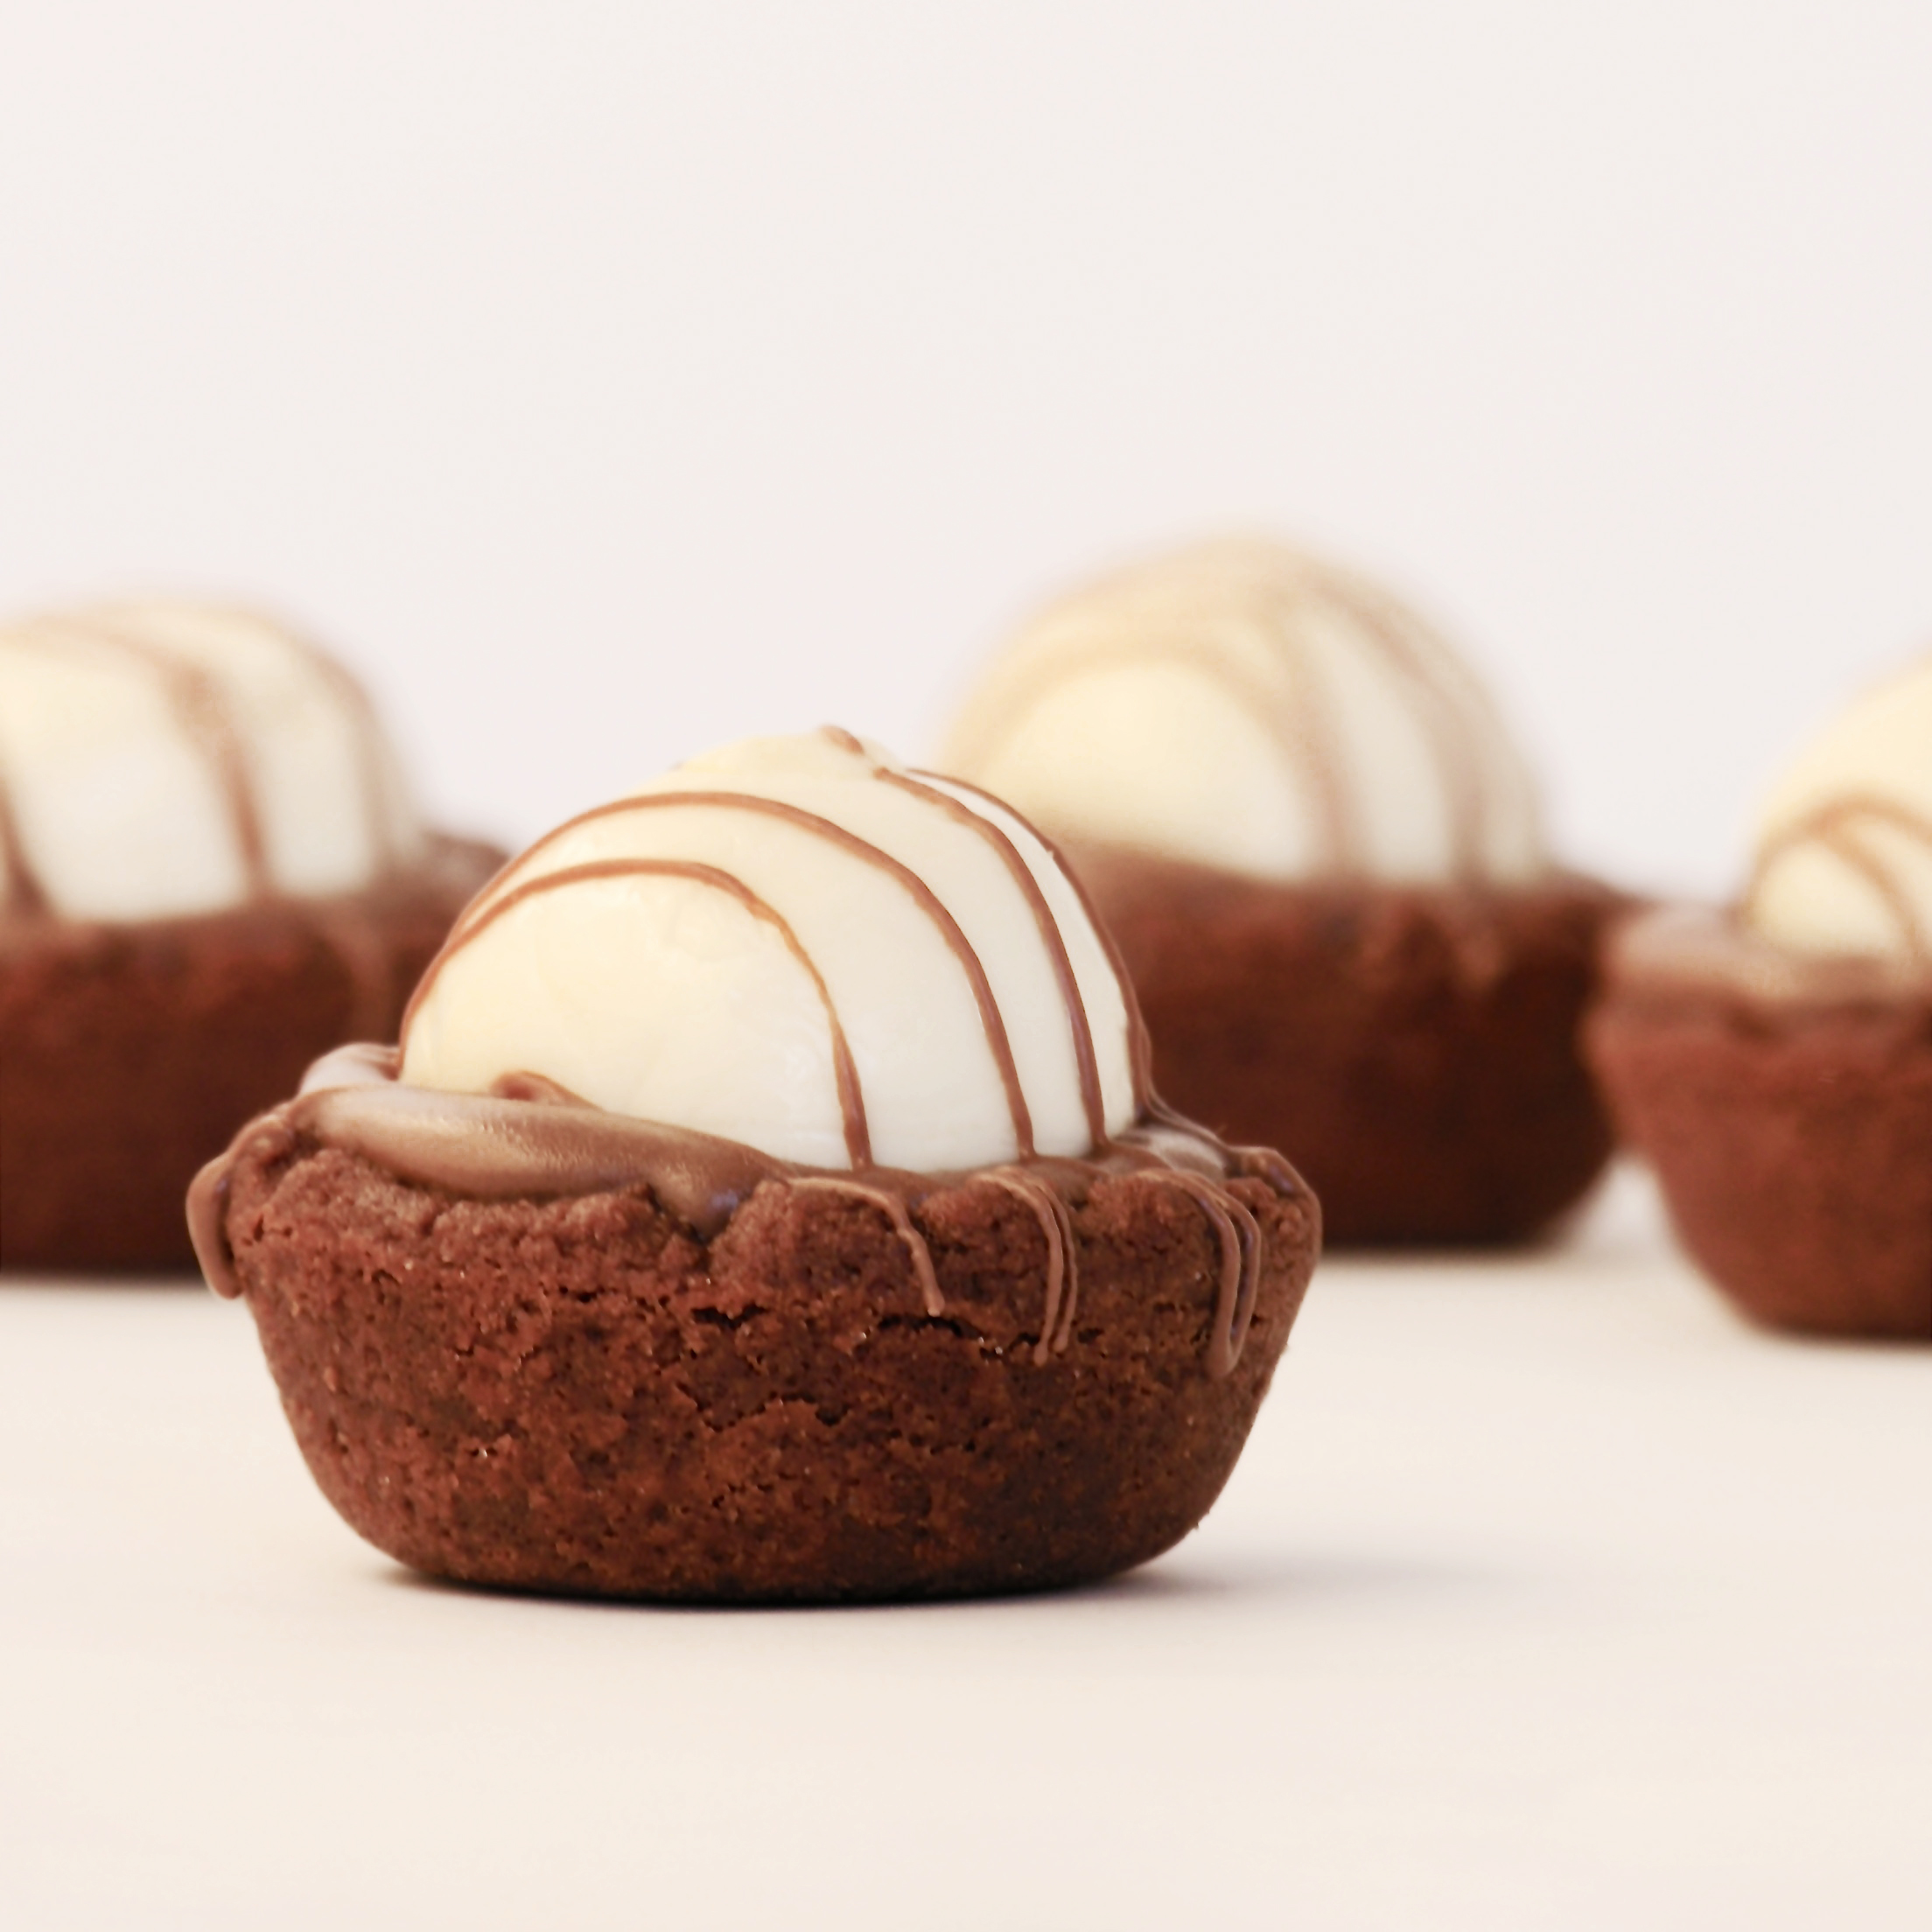
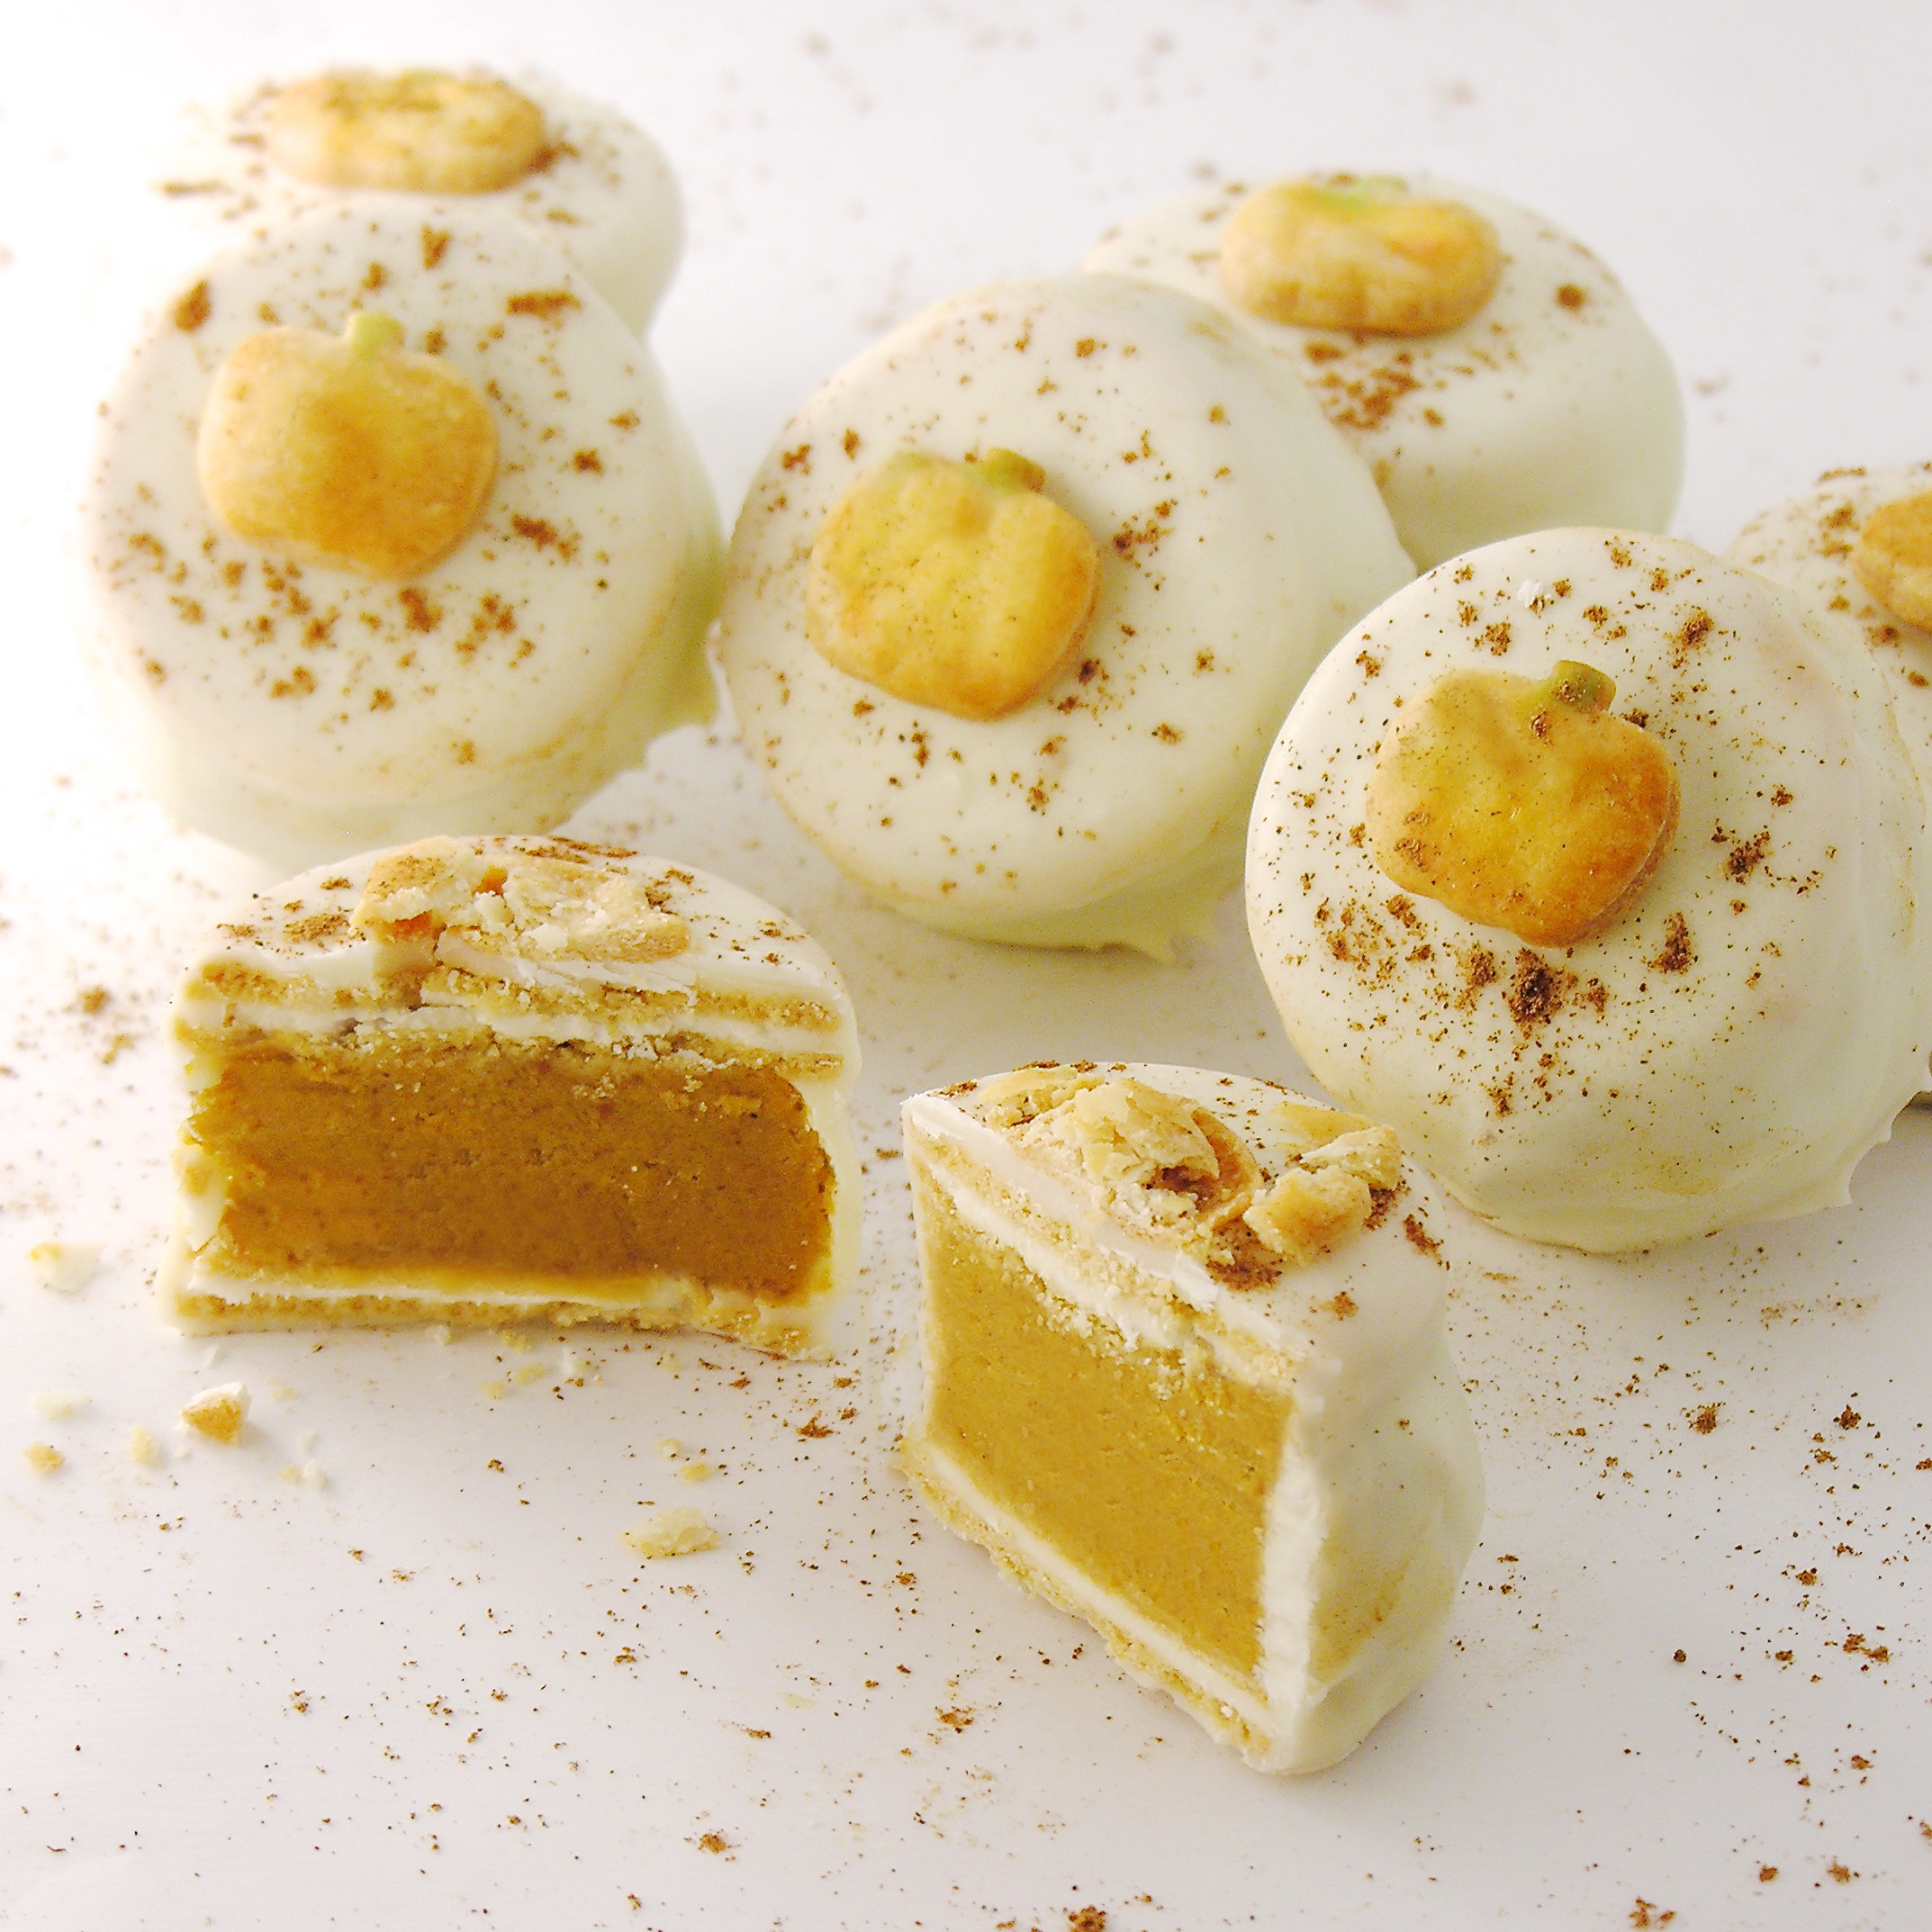
Why have plain old pumpkin pie, when you can have these Oreos- filled with pumpkin and dipped in white chocolate?!?

Admission: I don’t like pumpkin pie. I never have and probably never will. I don’t like pumpkin spice anything either. The best way to ruin a Starbucks drink is to add pumpkin spice. Ew.

So I made these for you. All of you lovers of pumpkin out there! I also distributed these to as many pumpkin-addicted friends as possible, to get their thoughts. They LOVED them. I like that they are cute. Cute is always good.

pumpkin filled oreo

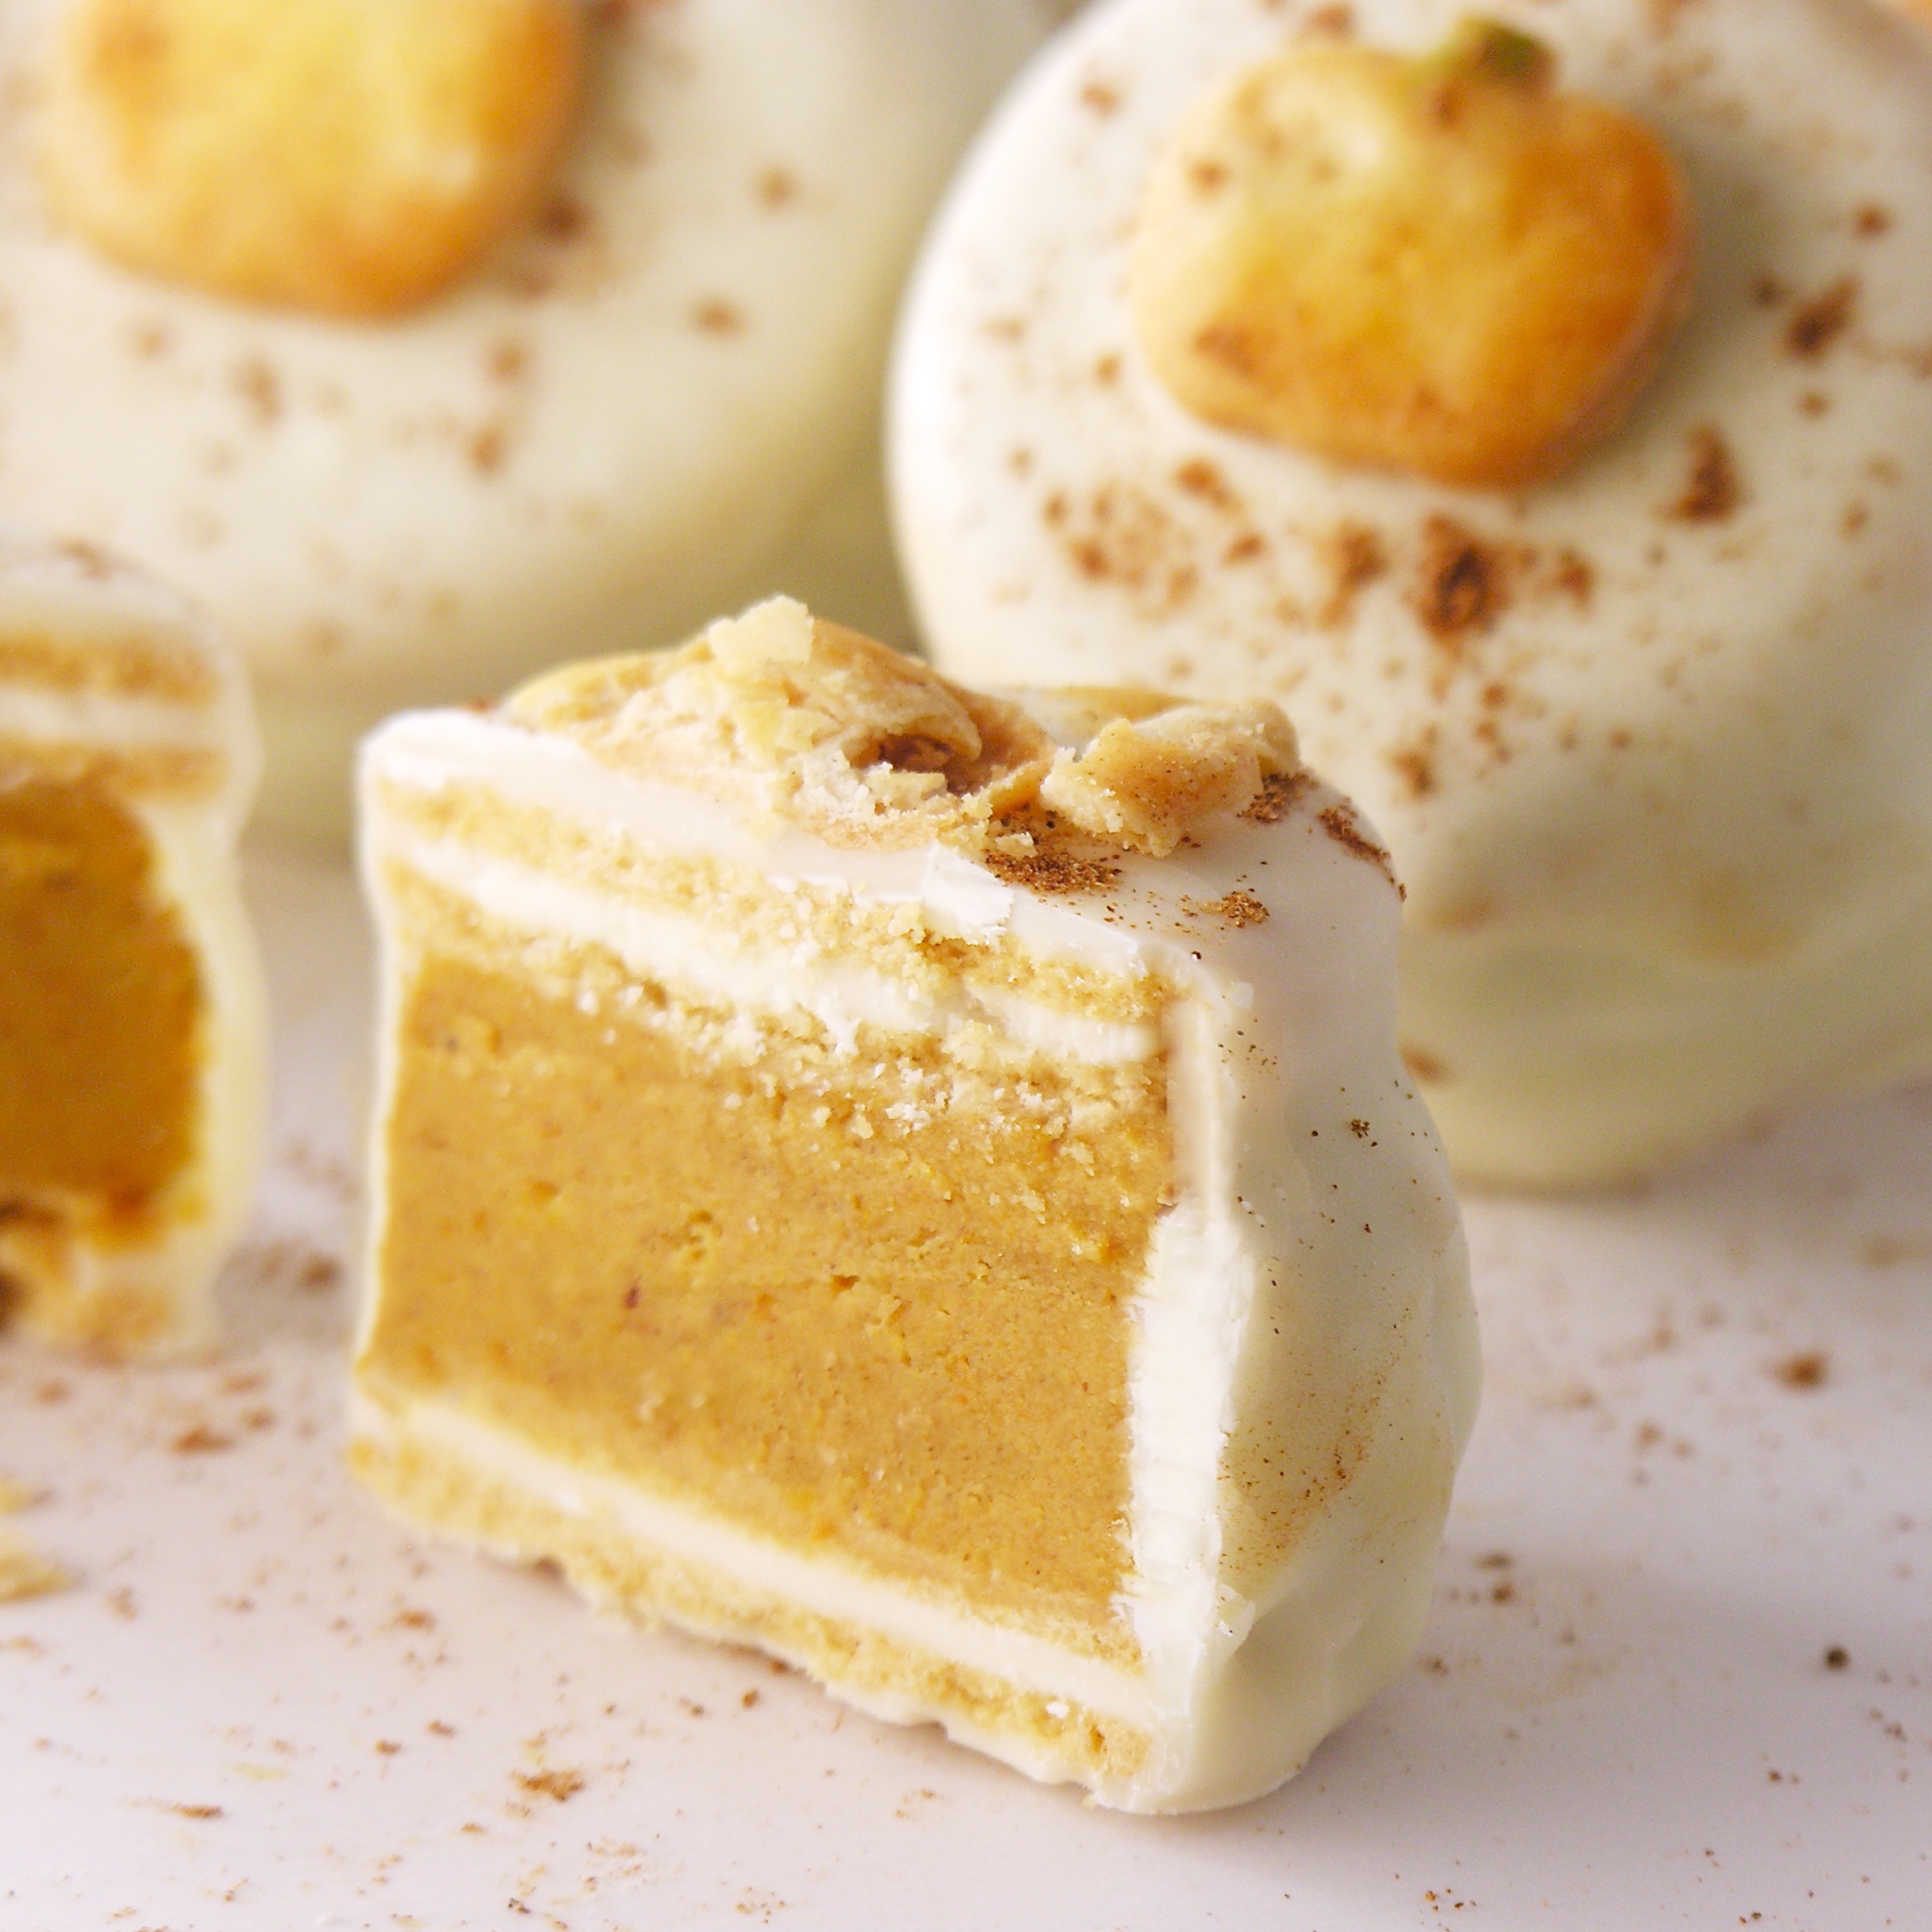
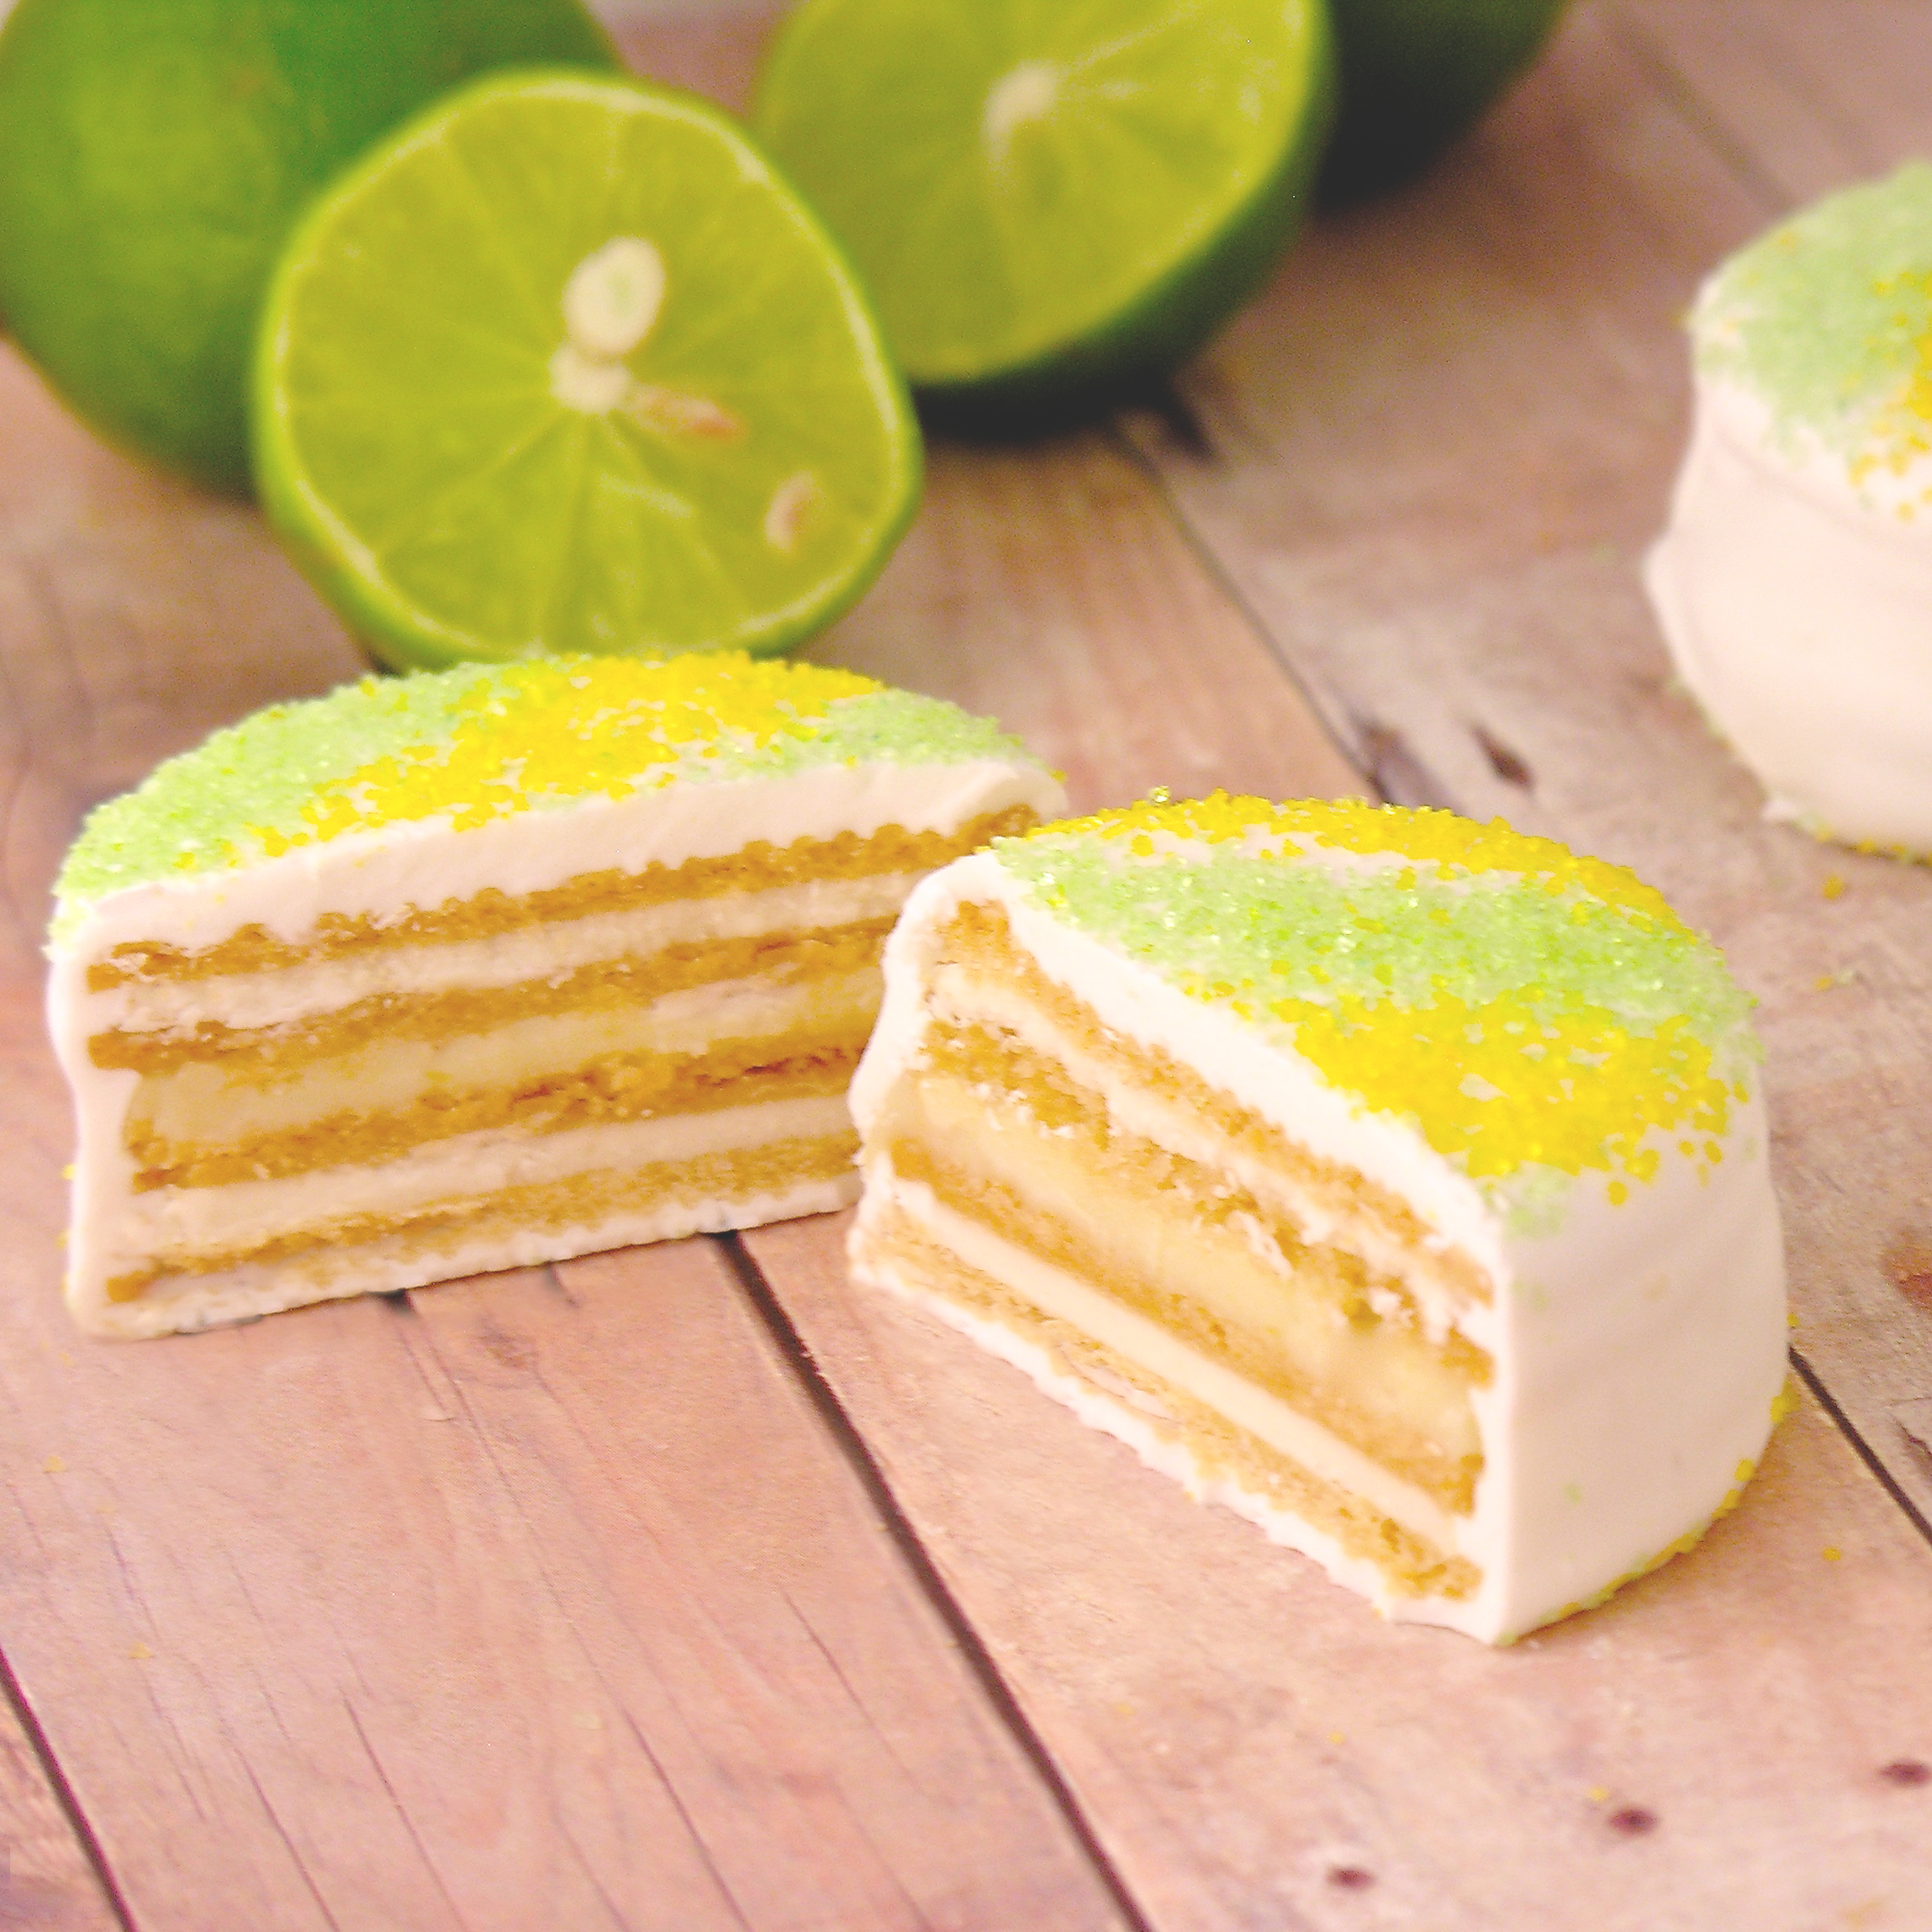
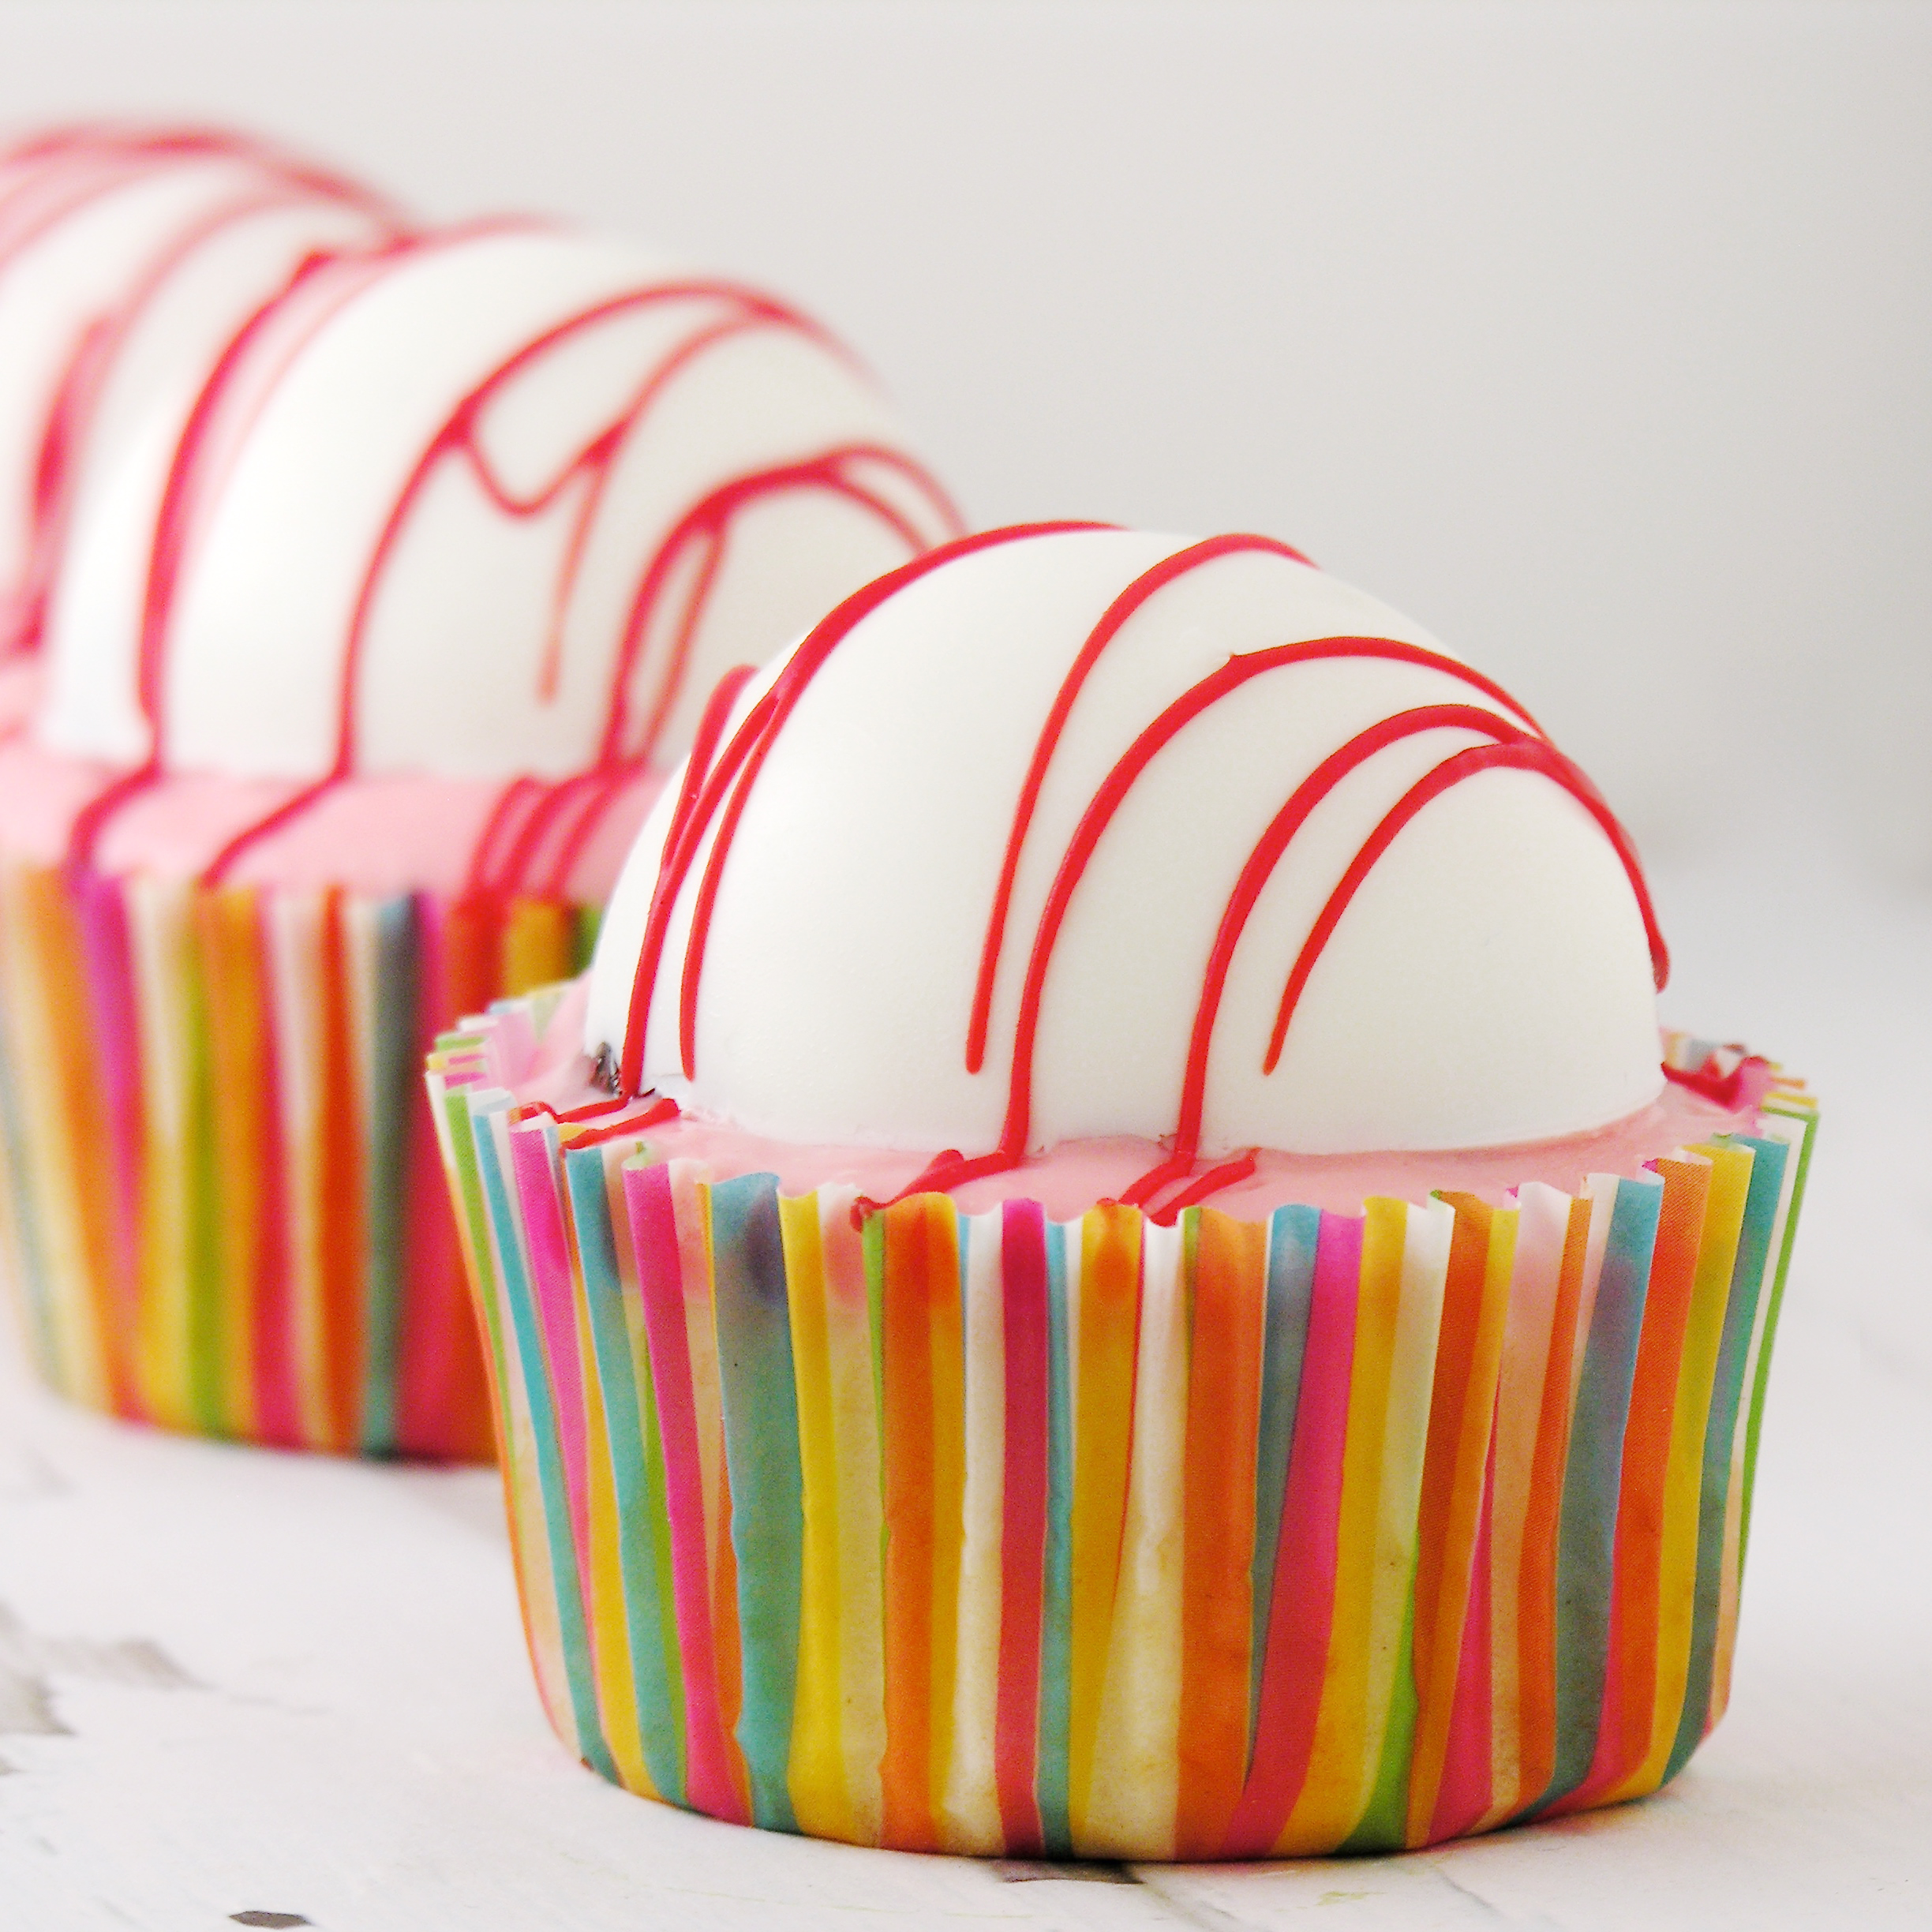
Like that photo, pumpkin people??? 🙂 I bet you do…. If you love pumpkin pie- you will go crazy over these fun little cookies!

Here is how we made them (printable recipe here)

INGREDIENTS: (makes about 20 cookies- but see notes at end of recipe)

  • 1 (15 oz) can of pumpkin
  • 1 (14 oz) can of sweetened condensed milk
  • 3 eggs 
  • 1 1/2 teaspoons of pumpkin spice seasoning
  • 1/2 teaspoon salt
  • 1 refrigerated pie crust
  • 1-2 boxes of Oreo Thins in vanilla (see notes)
  • 1-2 bags of Wilton’s Candy Melts in white (see notes)

DIRECTIONS:

  • Preheat oven to 375F degrees.
  • Place pumpkin, condensed milk, TWO eggs (save one), pumpkin spice, and salt into a medium mixing bowl and blend well using a whisk.
  • Pour into a baking dish (a pie plate works perfectly!)
  • Bake at 375 for 45-50 minutes- until a toothpick inserted into the center comes out clean. 
  • Remove from oven, spoon into a clean mixing bowl and blend until fairly smooth (it’s pumpkin, so it won’t be creamy smooth- but without big lumps).
  • Freeze for 30 minutes- until chilled through.
  • While baking /freezing pumpkin, make pie crust toppers.
  • Unroll pie crust and use a small cookie cutter to cut shapes out. Place these on a parchment paper-covered cookie sheet.
  • Separate remaining egg and keep just the white. Use a brush to coat top of each pie piece with egg-white. (I added a bit of orange and green food coloring in separate bowls to give them a hint of color- but this is optional!)
  • Bake at 375F for 7-8 minutes. Keep an eye on them! Mine got a little too brown.  I just popped these in while my pumpkin was still baking. Cool on counter.
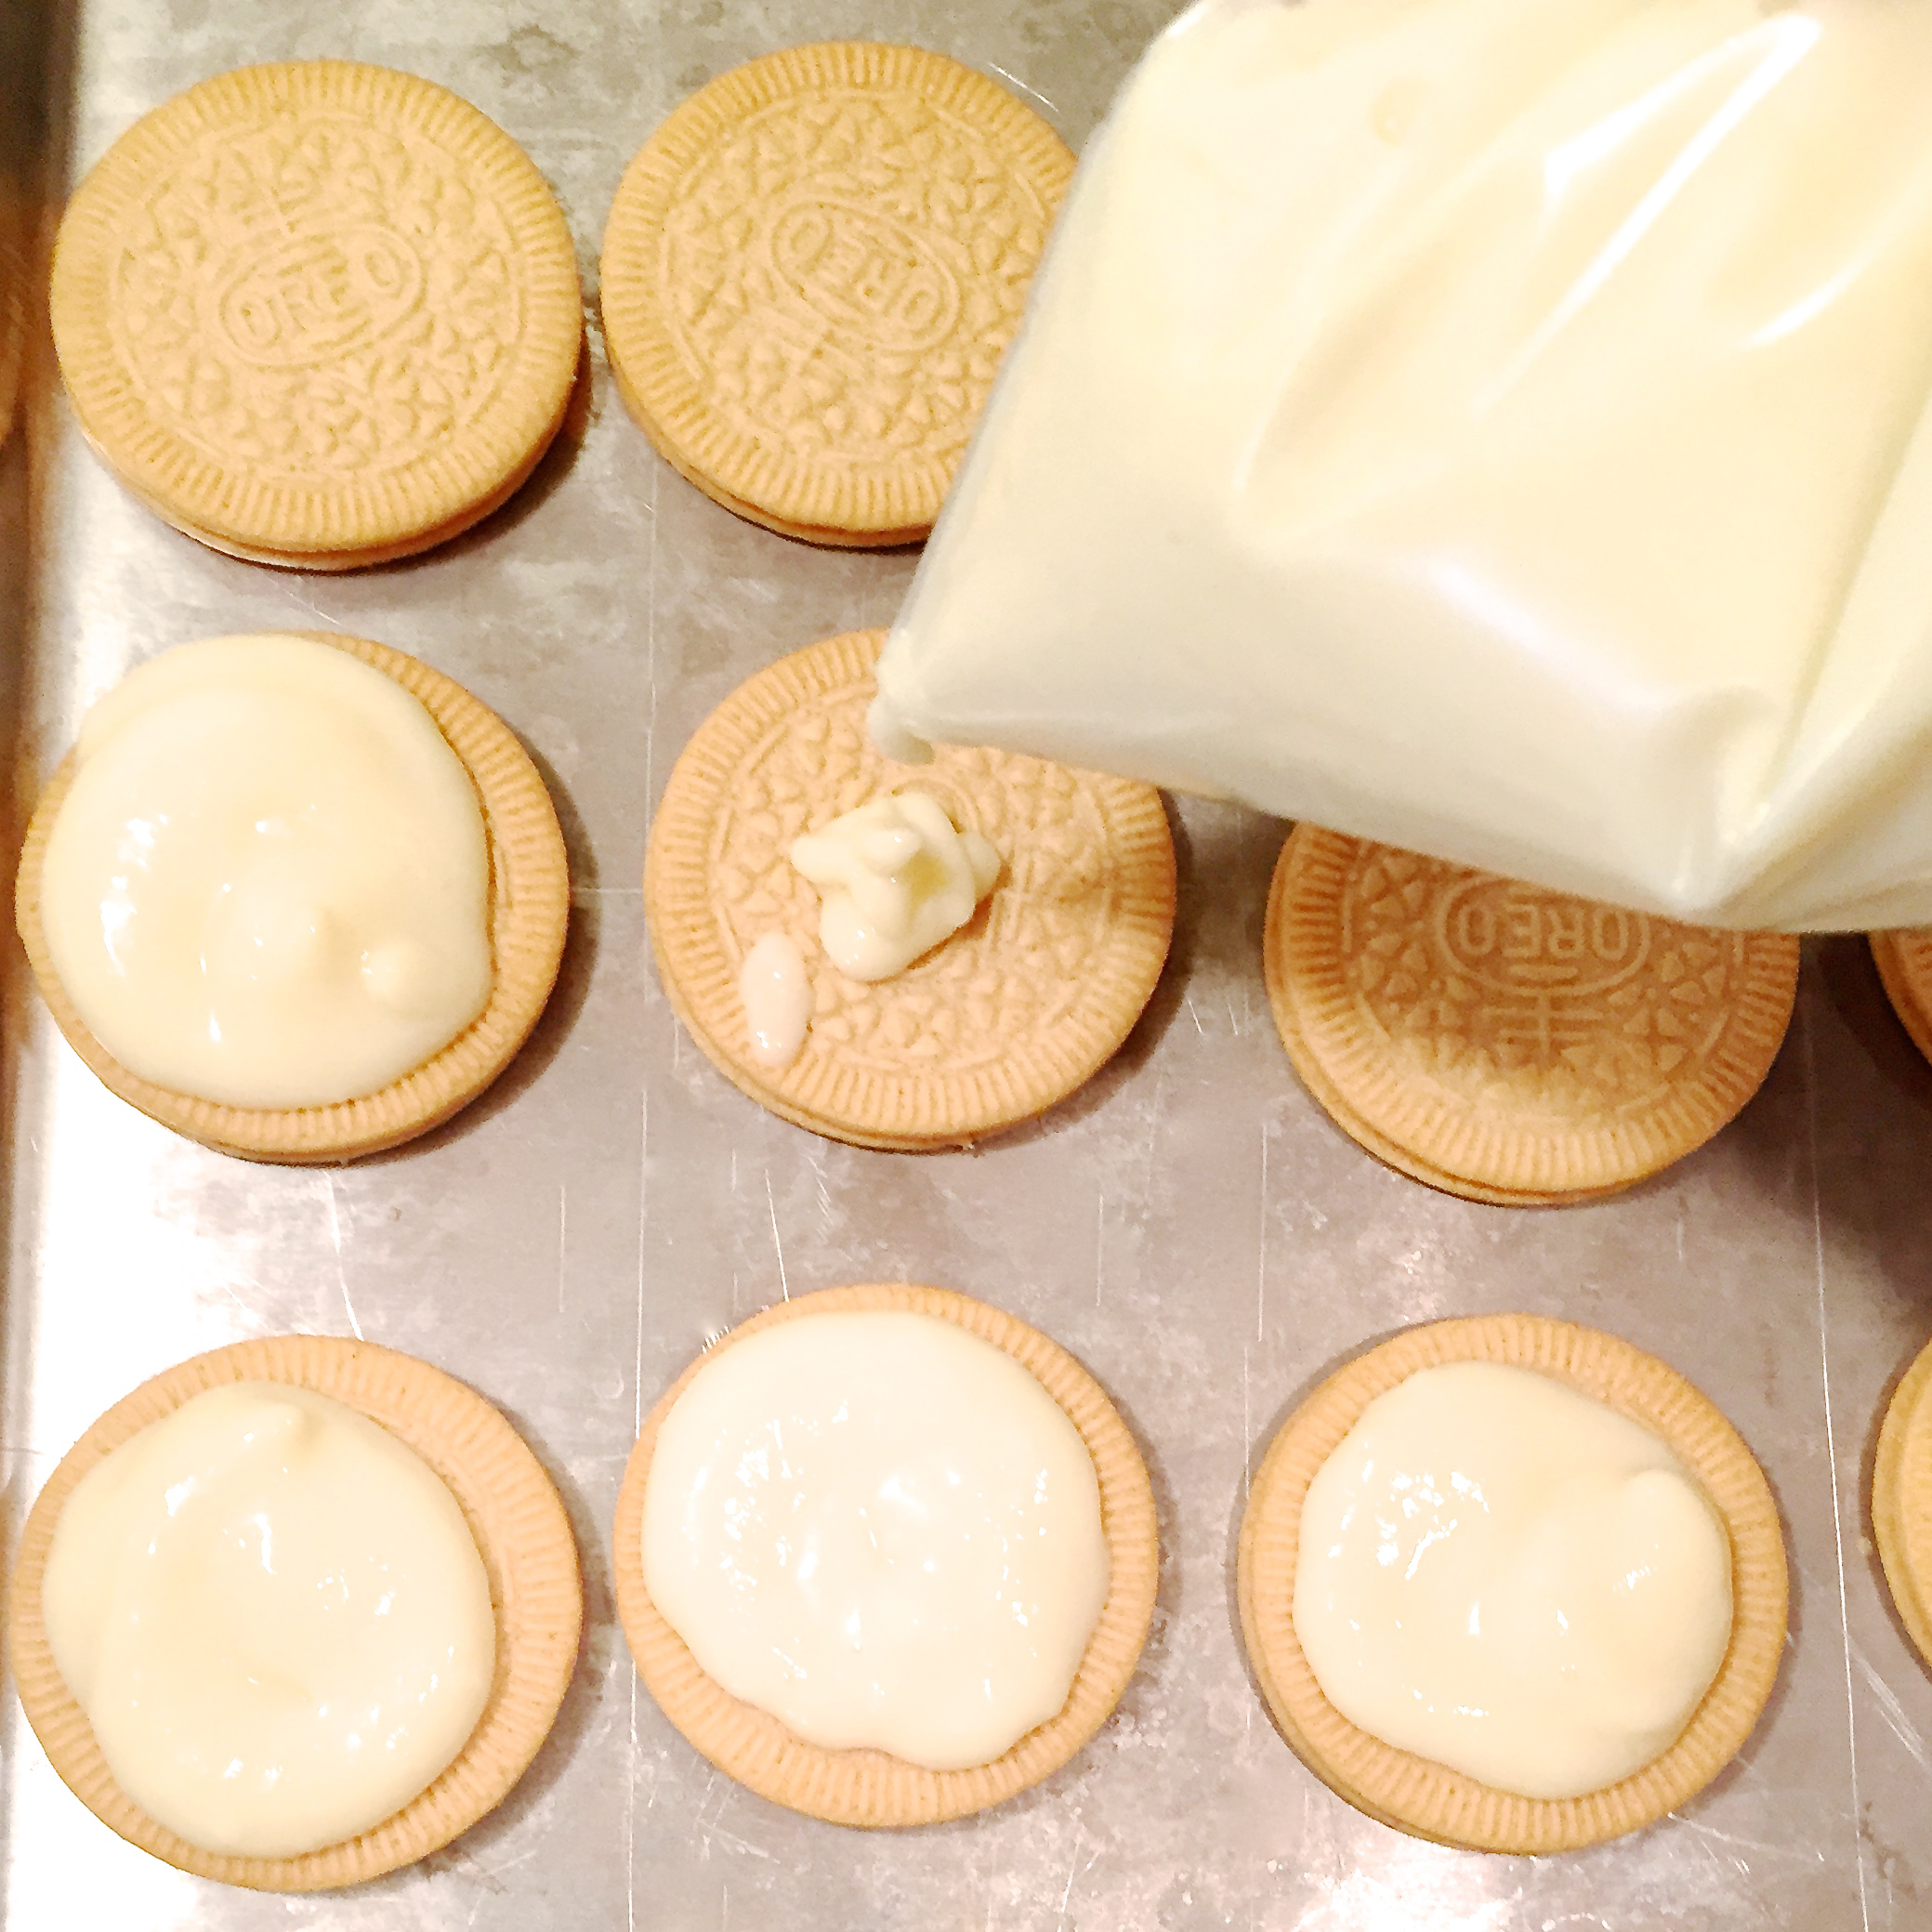
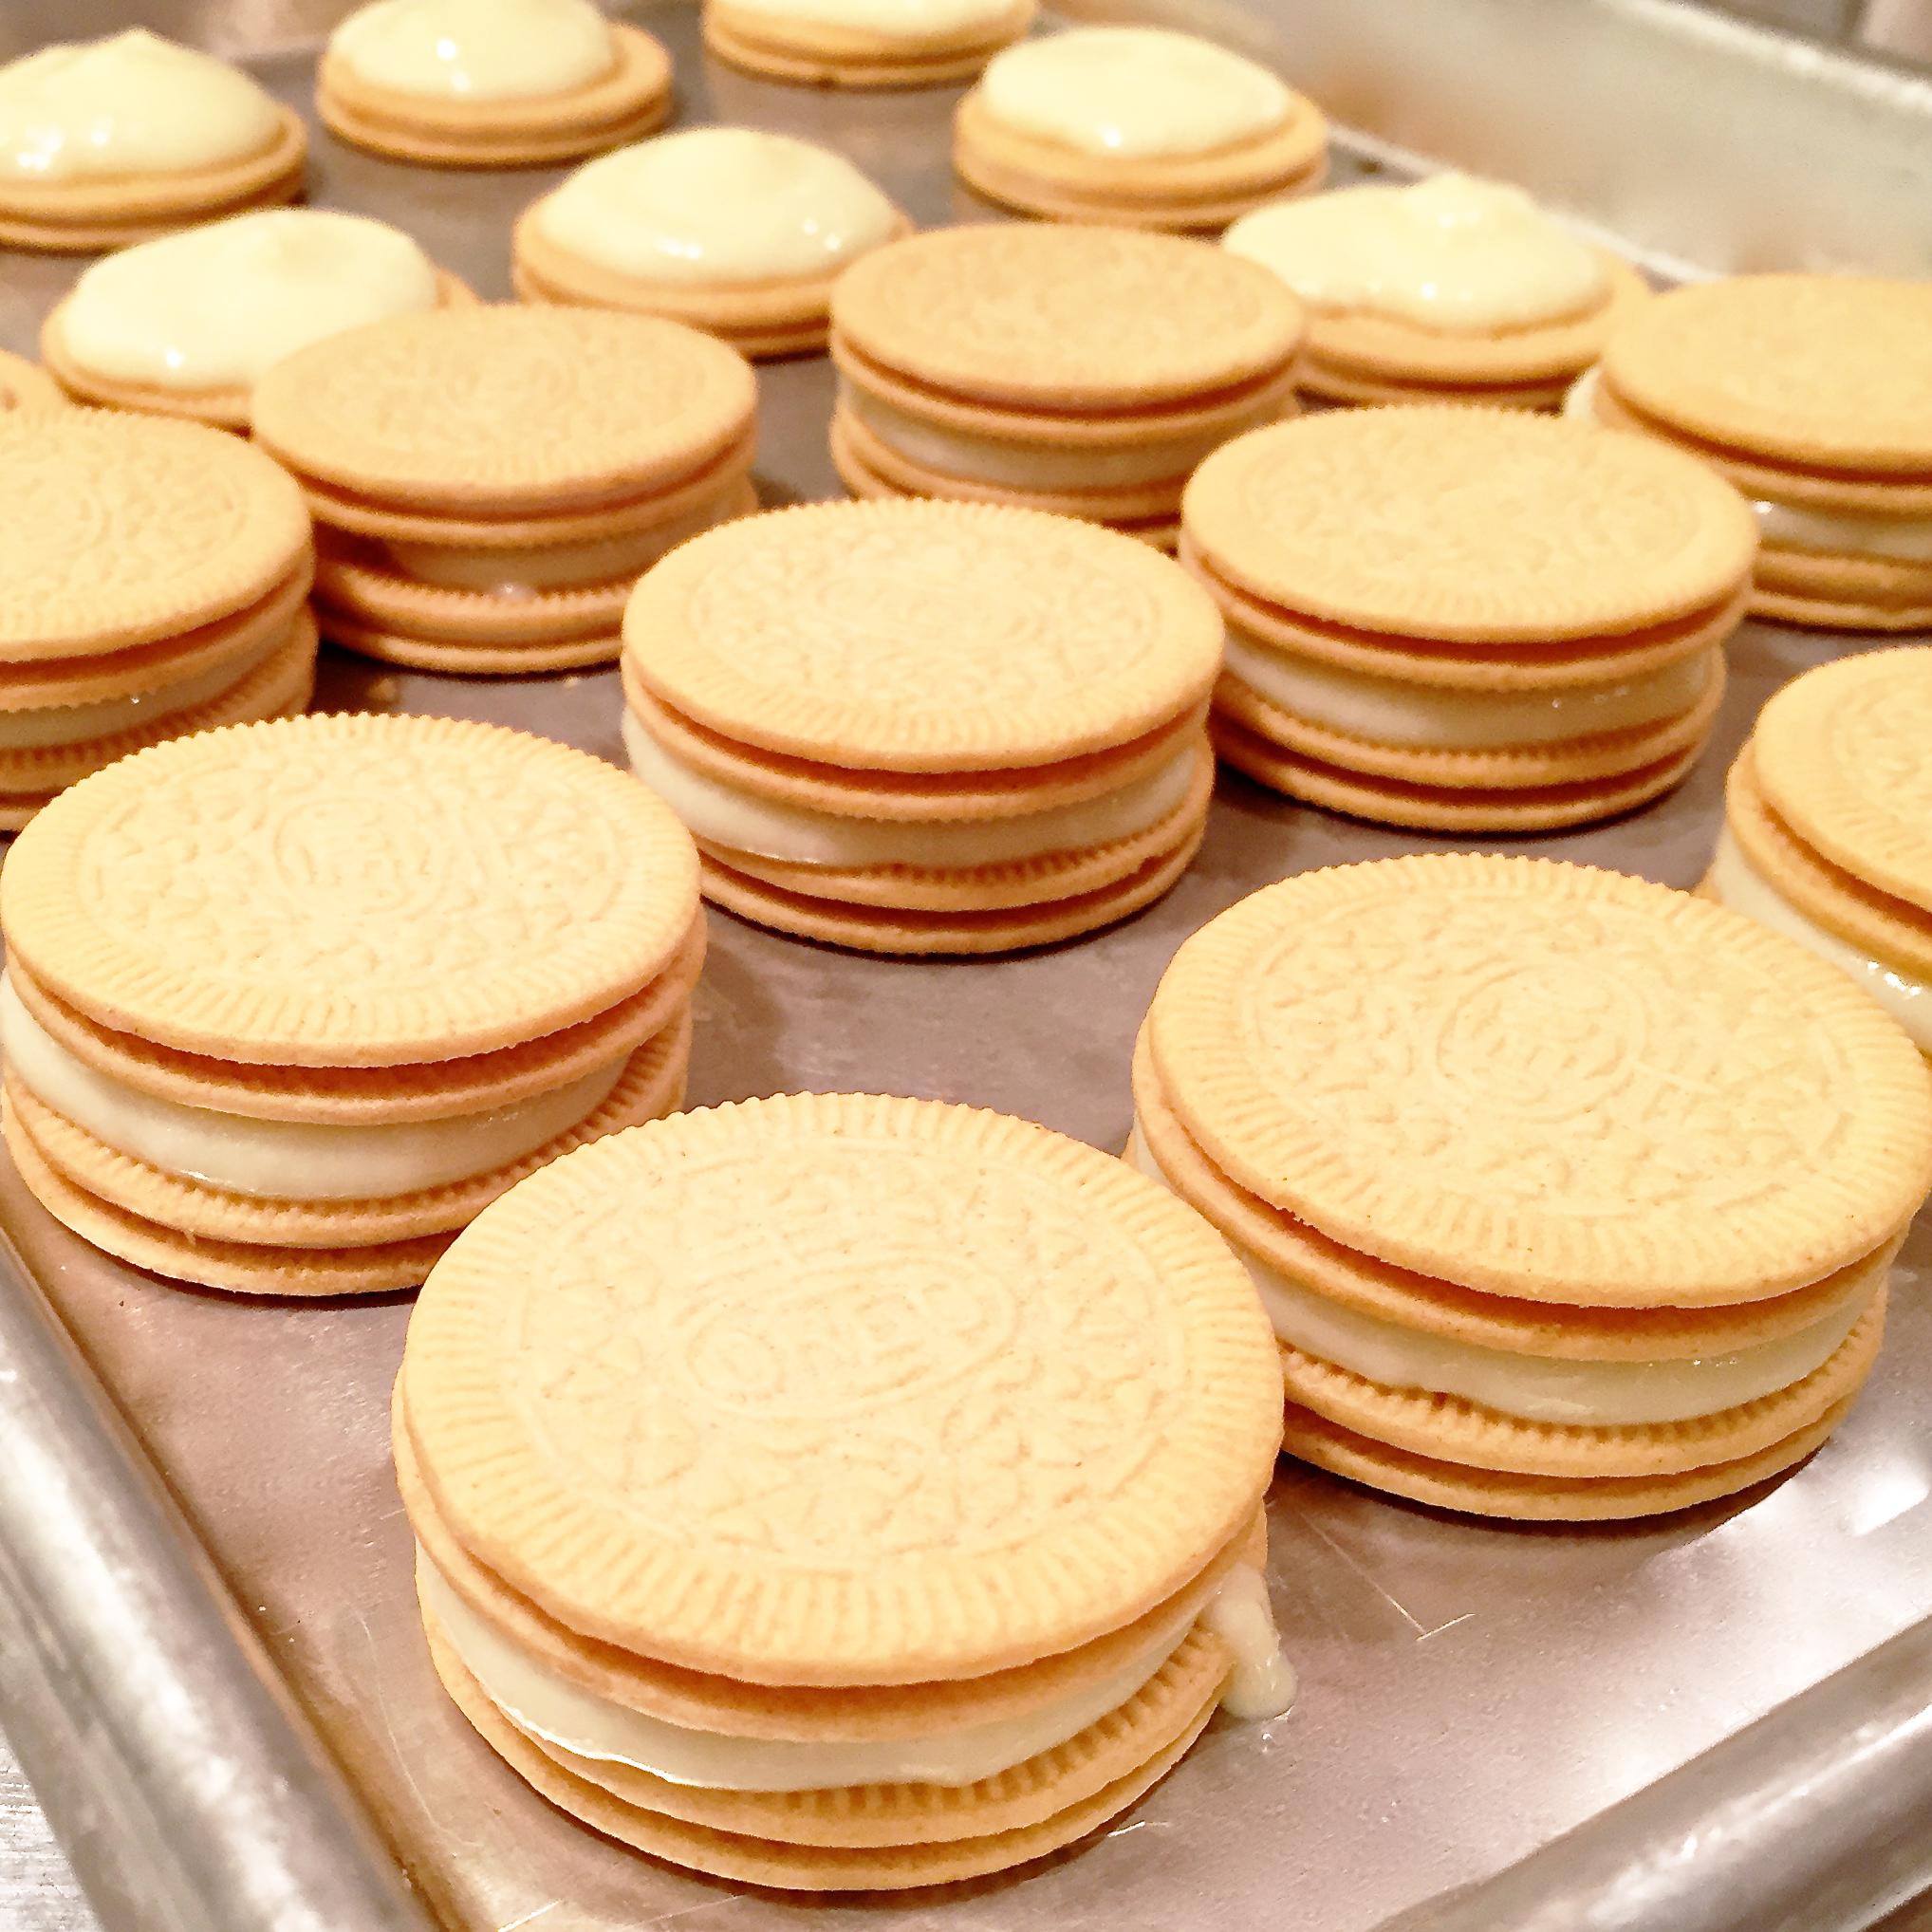
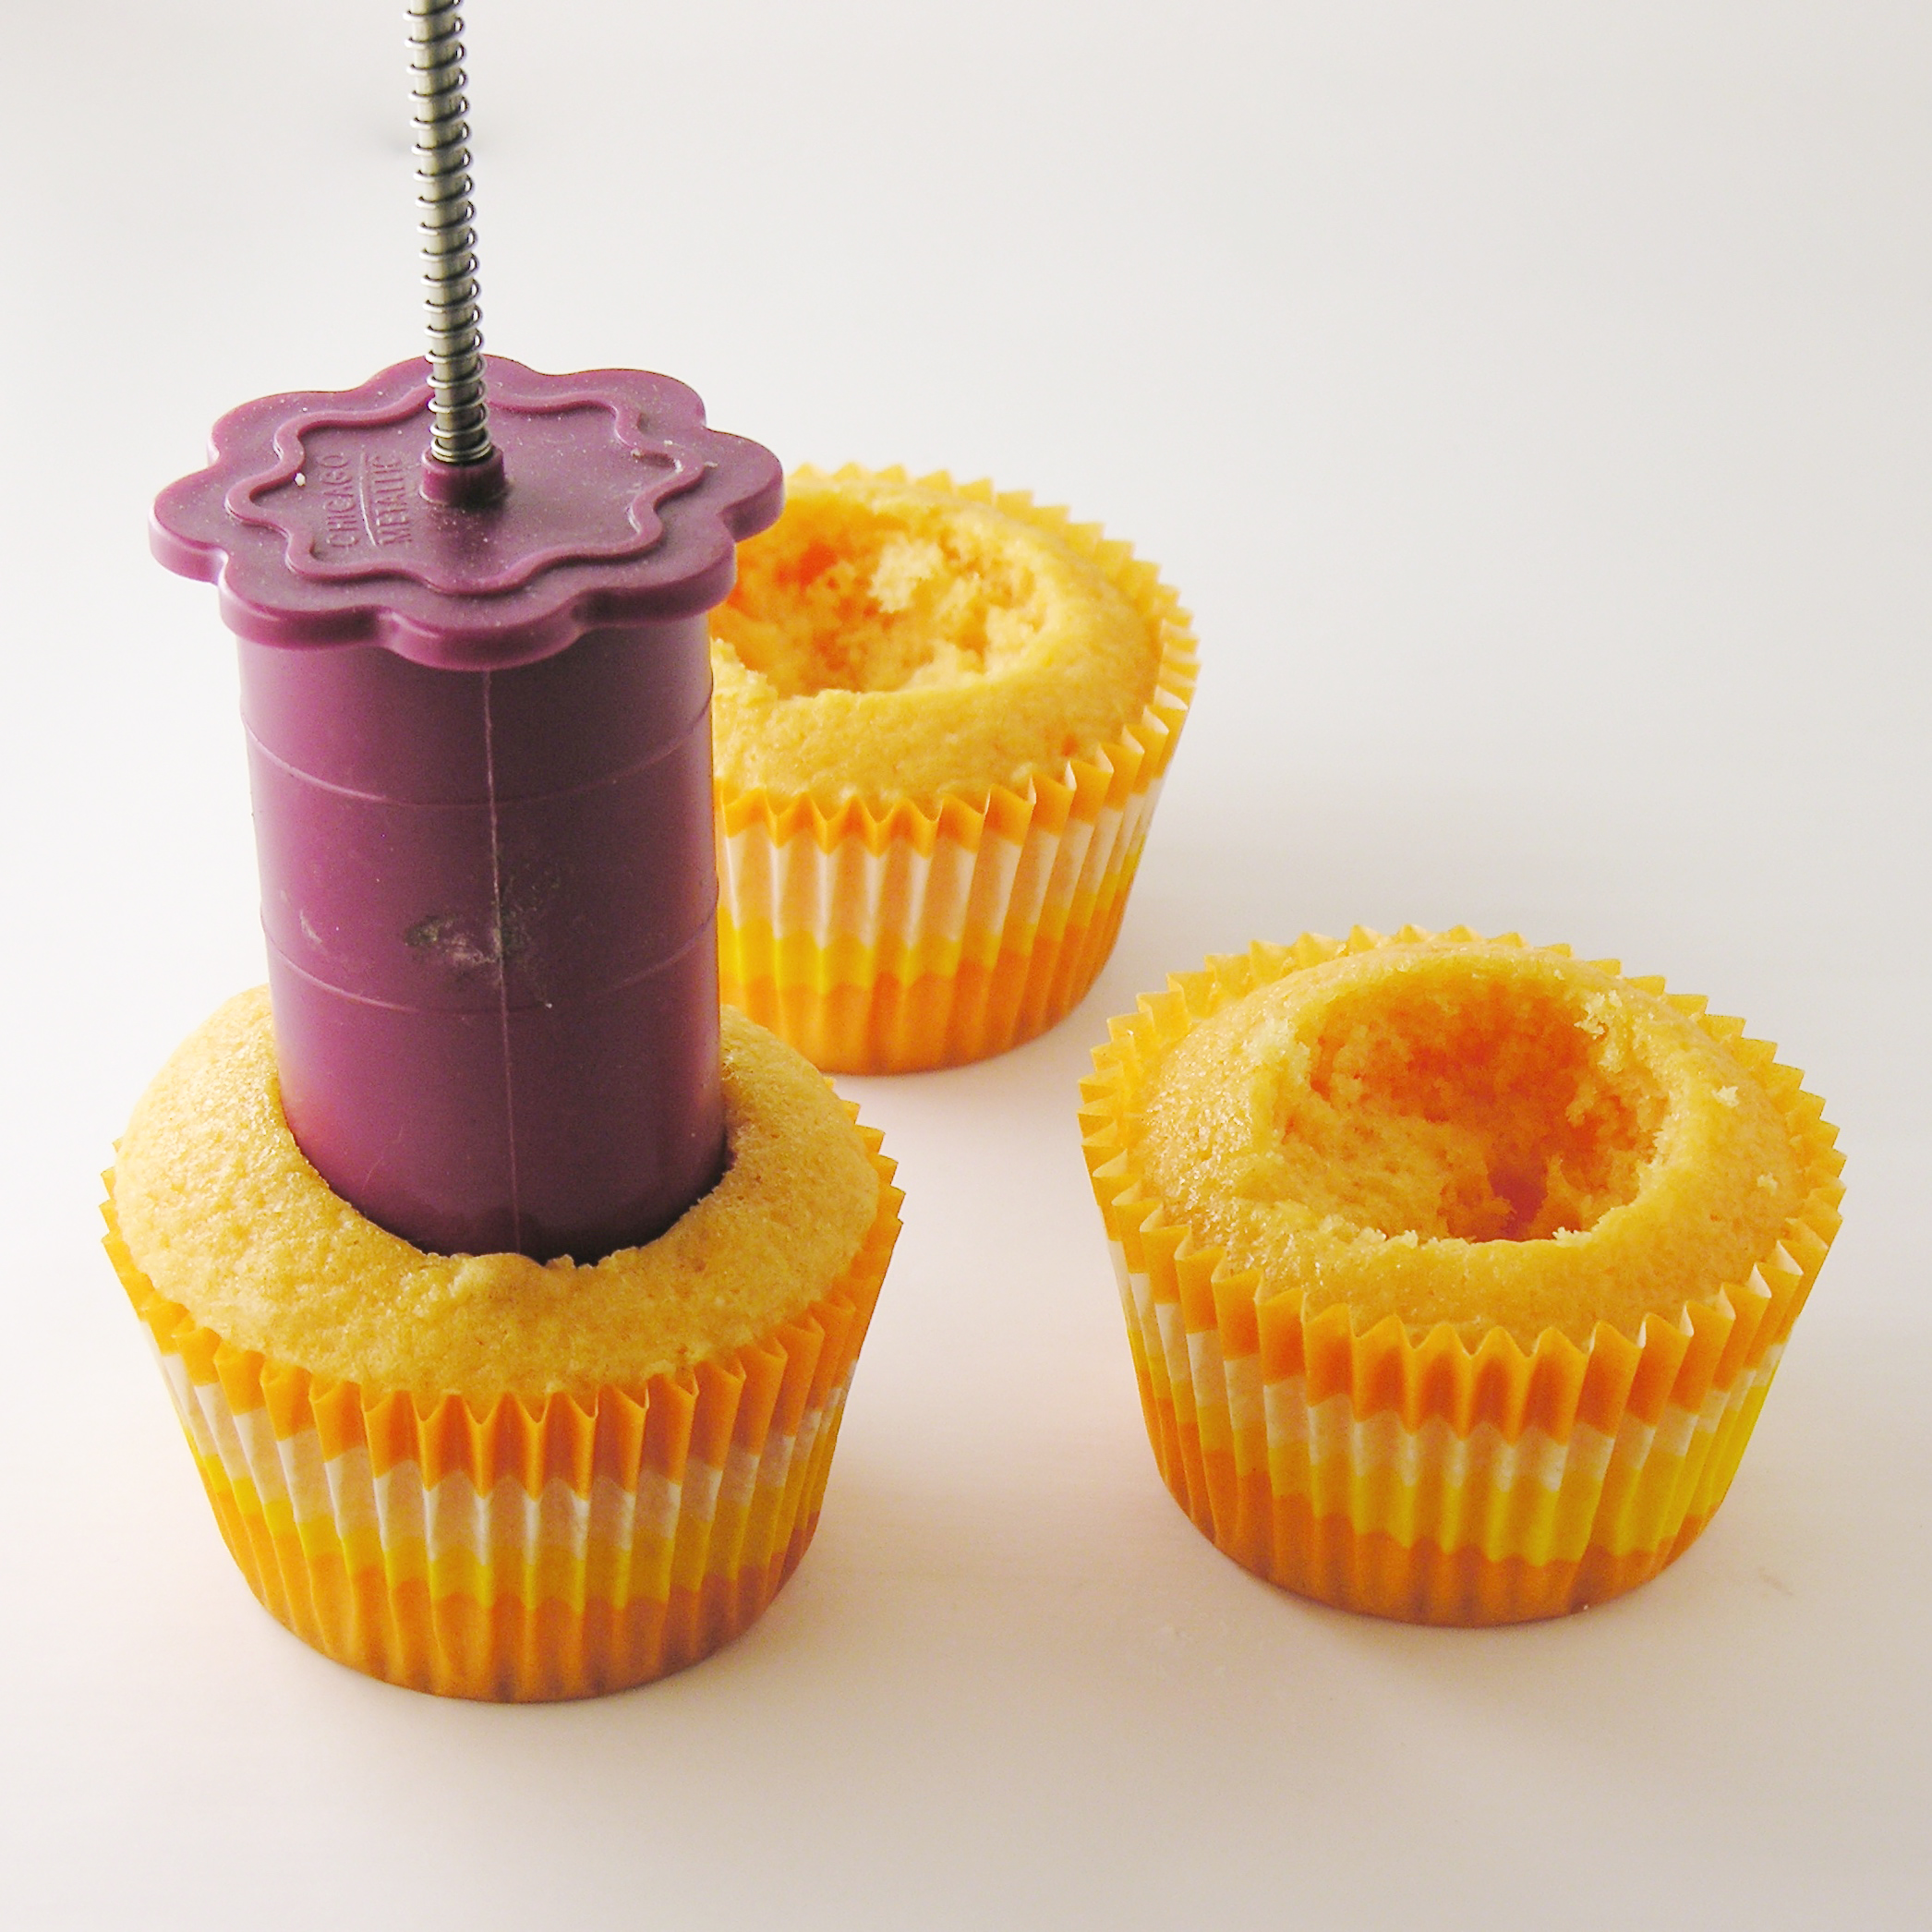
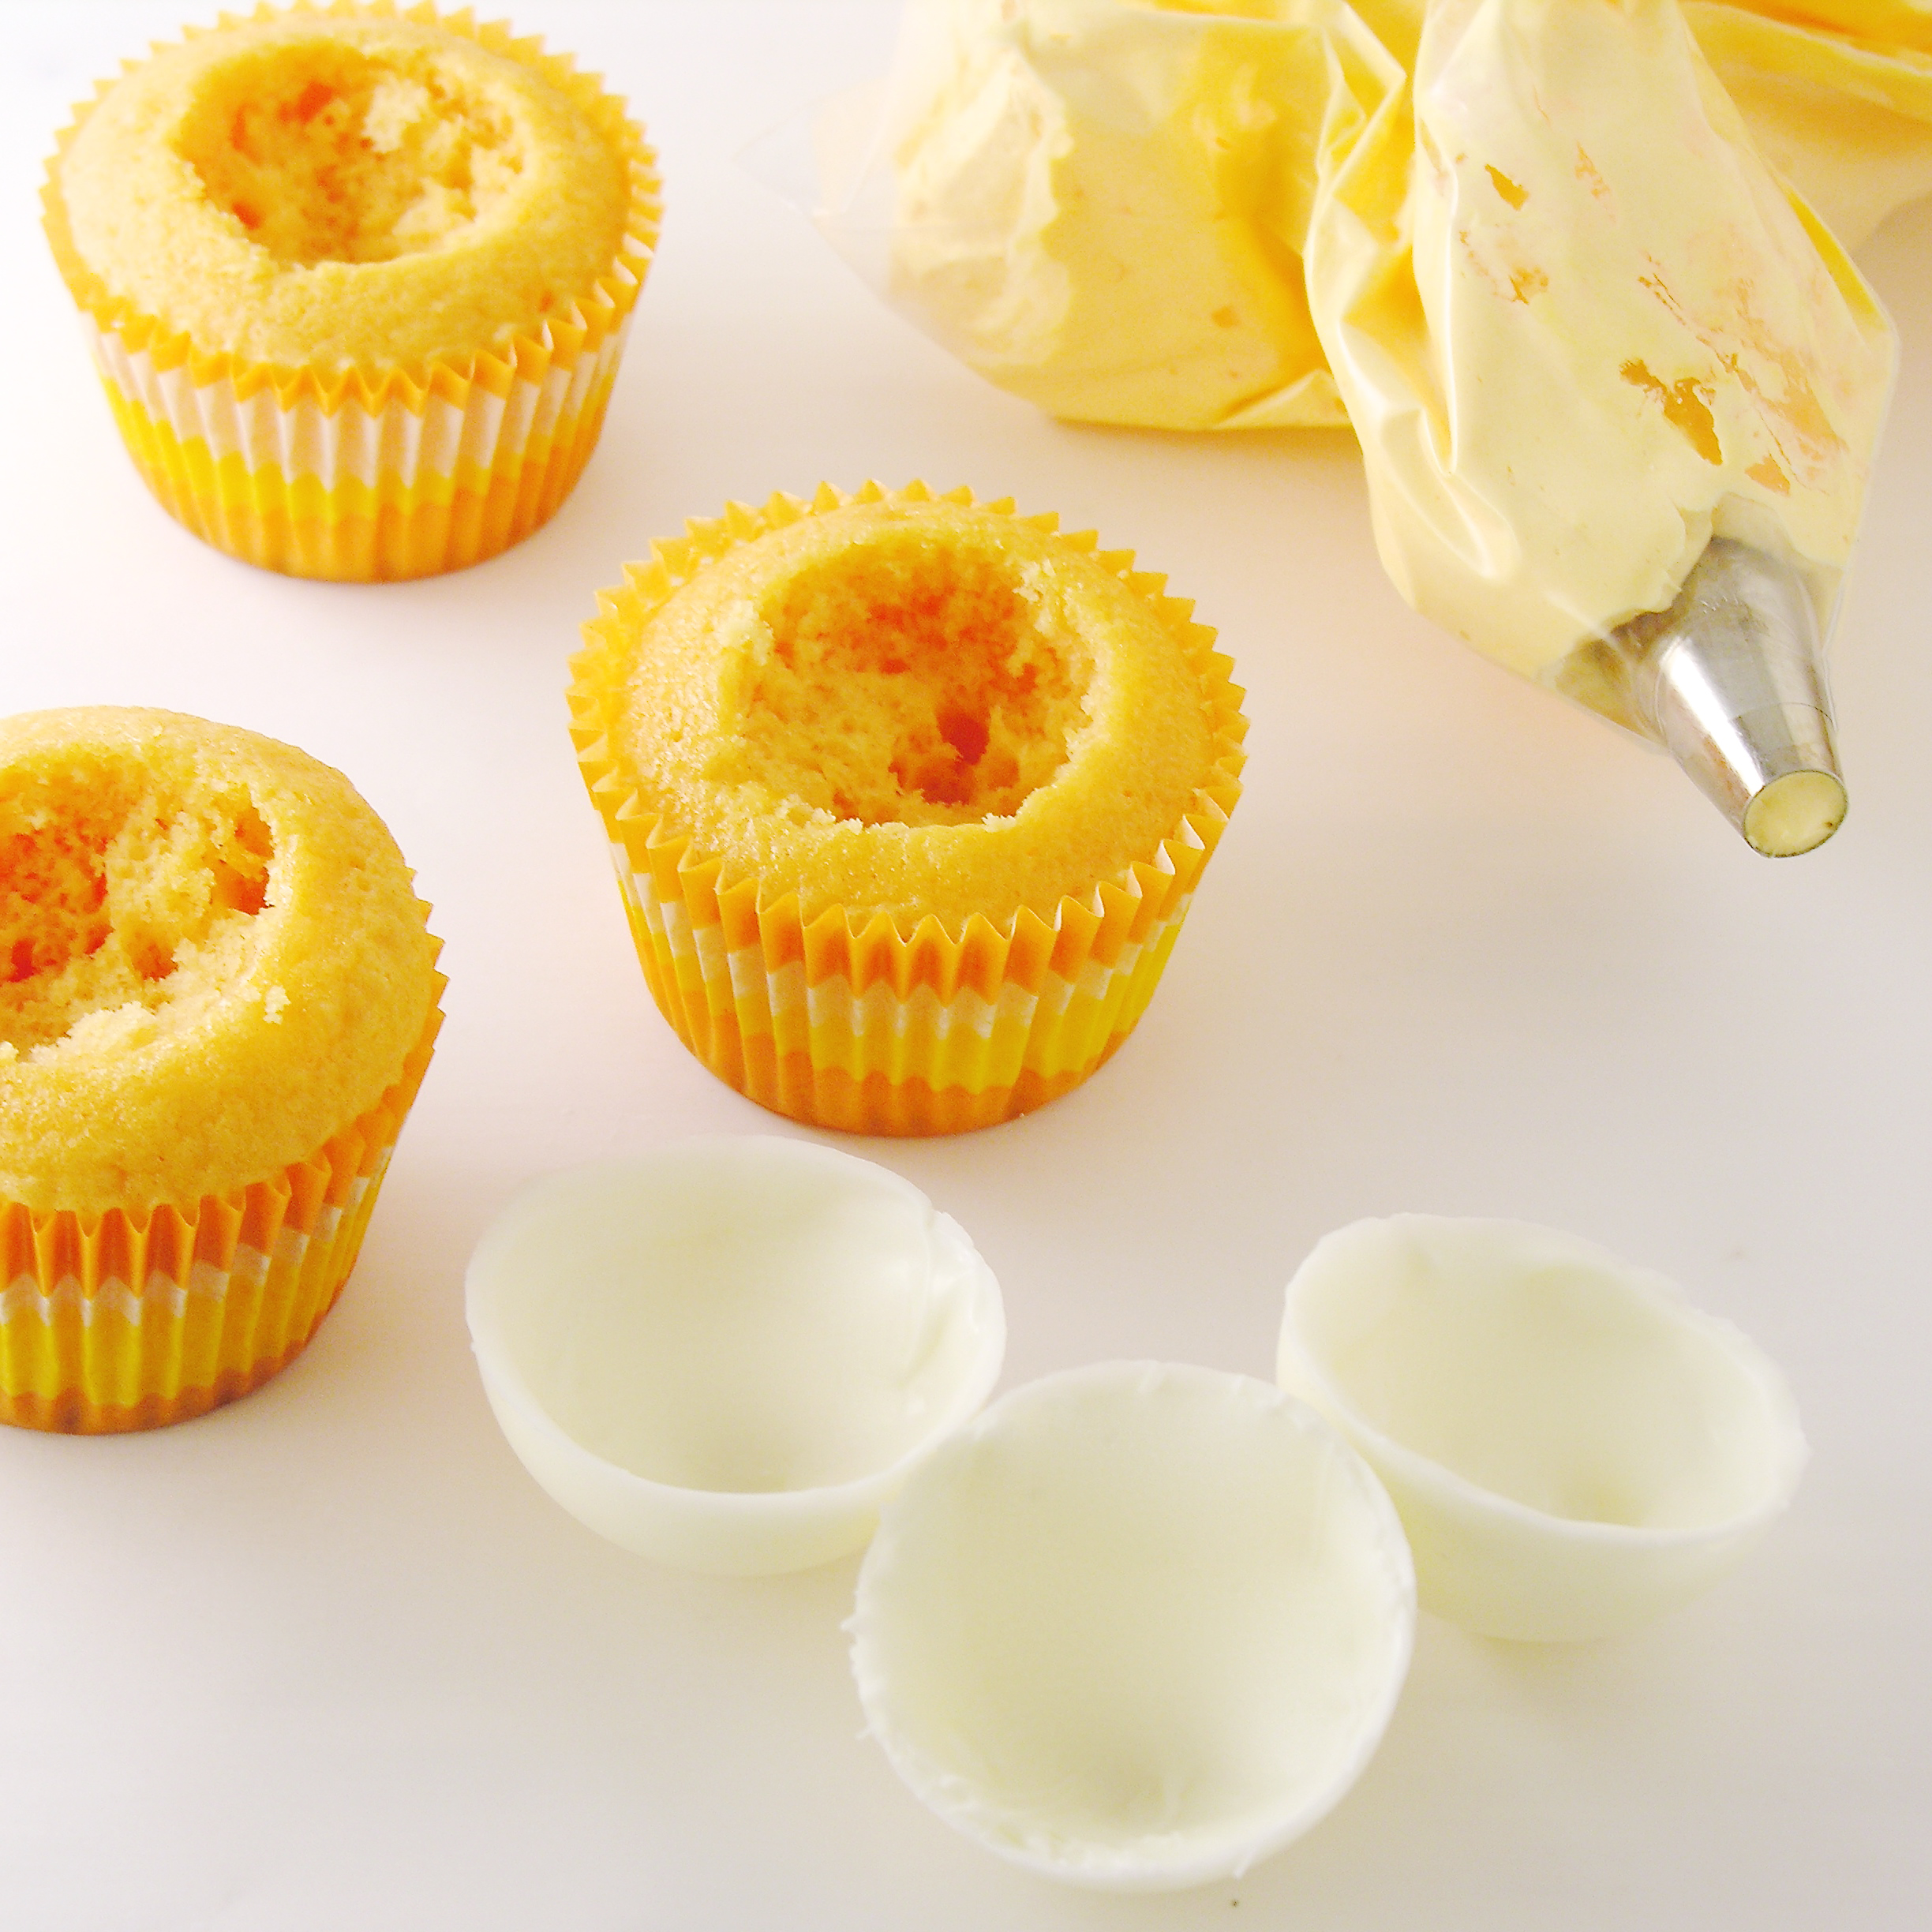
  • Place 1/2 of Oreo Thins on a small cookie sheet. 
  • Scoop cooled pumpkin on top of each and gently press second Oreo on top.

pumpkin pie cookiesimg_0116

  • Freeze for at least 30 minutes (until pumpkin in the center is fairly hard).
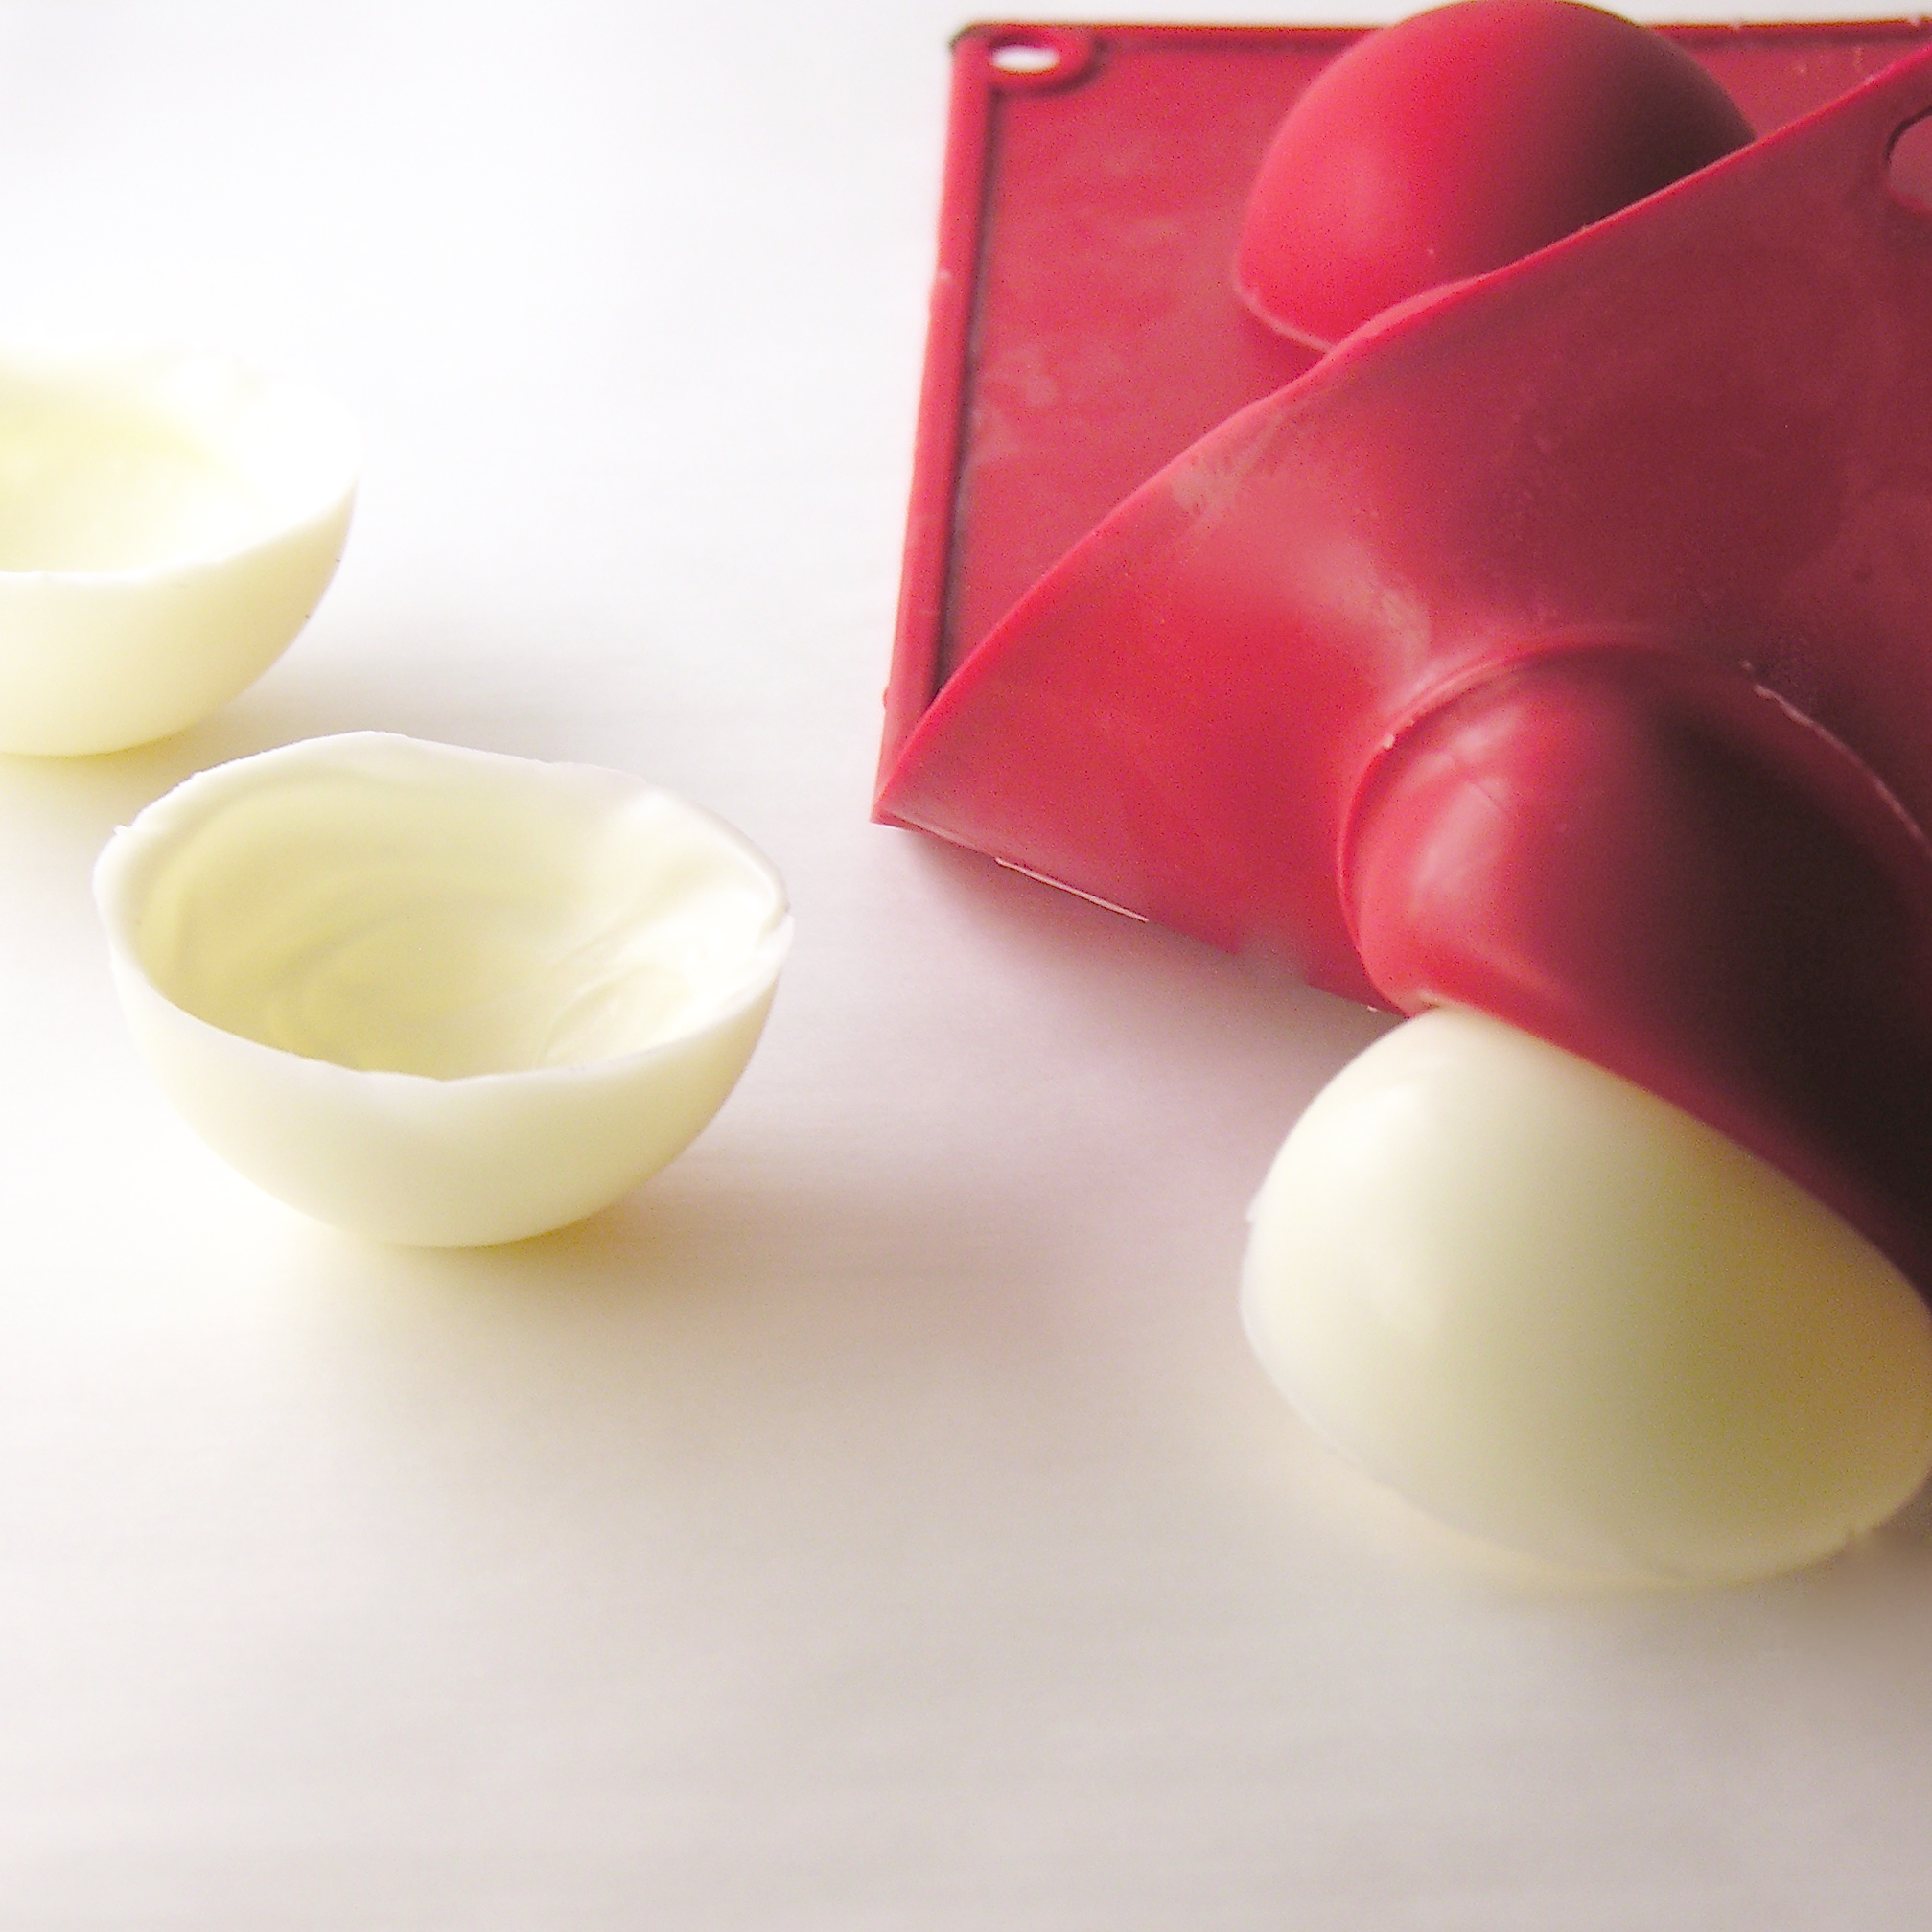
  • Melt Candy Melts in a bowl the microwave in 30 second increments, stirring until smooth.
  • Set a pumpkin-stuffed Oreo into candy melts and spoon over the top and sides. 
  • Remove using a fork. Tap against edge of bowl to drain excess away and gently slide onto parchment paper. 
  • Before candy hardens, place a pie piece on top and sprinkle with a little pumpkin spice seasoning. 
  • Allow candy to fully harden ( a couple of hours).
  • Serve in a pie plate- or bag them up in cute cello bags with ribbon. 
  • Enjoy!

Pumpkin pie oreos

My thoughts: Honestly, these take a little time. You bake a pie and then turn it into cookies. Everyone loved the HUGE amount of pie filling in each cookie- but if you haven’t done much dipping in chocolate before, I highly recommend you get a second box of Oreo Thins and put less in between each cookie. The hardest part of this process was coating such a tall cookie in white chocolate. If I made these again I would use less pumpkin filling to make that easier. If you do this, you will need a second bag of candy melts as well.

pumpkin-oreo3

See… half that amount would still be enough! Once these were hardened, I placed them in little cello bags and tied them with ribbon. They were still yummy (to my pumpkin loving friends) several days later. Because of the moist pumpkin filling, I recommend you serve these fairly soon after making them though. Within a few days. Enjoy!!!  ~r

Pumpkin filled oreos

Other fun recipes for Thanksgiving! (click on a photo to see the recipe)

Pecan Pie CupcakesTepee CupcakesHoney cut-out cookiesPeanut butter cup cheesecake

Advertisement

Key Lime Layer Cookies

Posted on

Key Lime Cookies

Layers of cookie, key lime pie filling, and white chocolate make these an irresistibly refreshing summer treat!

So. You know those new “healthier” Oreo Thins cookies? I found a way to make them unhealthy. Still a reasonable indulgence, but not the super-low calorie tiny sliver of a cookie they were created to be.

I present: Key Lime Layer Cookies!!!!

Key Lime Cookies

Creamy Key Lime filling sandwiched between two Oreo Thins and dipped in white chocolate. YUM!!! These are incredibly easy to put together and such a delicious, creative, and beautiful treat!

Key Lime Cookies4

Here’s how we made them: (printable recipe)

INGREDIENTS: (makes 20 cookies)

  • 3/4 cup of key lime juice (I squeezed ’em!)
  • 1 can of sweetened condensed milk
  • 1 egg
  • 1 package of Oreo Thins in vanilla
  • 1 bag of Wilton’s Candy Melts in white
  • Colored sugar (if desired for decorating)

DIRECTIONS:

  • Preheat oven to 350F degrees.
  • Combine lime juice, condensed milk and egg together in a small mixing bowl.
  • Pour into a small baking dish and bake for 20 minutes.
  • Spoon into a cool bowl and chill in freezer for 30 minutes to cool.
  • While cooling, set 1/2 box of vanilla Oreo Thins out on a baking sheet that will fit into your freezer.
  • After lime filling is chilled, stir and spoon into a large zip-top bag. Clip a corner off and pipe filling on top of each Oreo- not quite going to the edges.
  • Gently set an Oreo Thin on top of the filling. Don’t press too hard or the filling will come out on the edges. Use up all the cookies in the box.

Key Lime Cookies6Key LIme Cookies7

  • Gently slide this baking sheet into the freezer and freeze for 1 hour.
  • Melt Wilton’s Candy Melts in microwave in 30 second increments, stirring between until smooth.
  • Take chilled cookie and place it into melted chocolate. Quickly spoon over the top and sides.
  • Lift the cookie with a fork and tap on side of bowl until excess drips away. Slide bottom edge of cookie along side of bowl to get rid of excess on bottom and set on parchment paper to harden.
  • Repeat with remaining cookies. You may want to keep cookies in freezer before dipping, and only take maybe 4 or 5 out at a time to work on.
  • Decorate as desired. If you want sugar sprinkles, add these before the candy melts harden back up. 
  • Enjoy!

Key Lime Cookies2

My thoughts: These are easy and fun to make, and they keep for up to a week in the fridge! You will have a little pie filling left at the end, but you could get a little more white chocolate and a few more cookies to use it up -if you want. I’d guess you would have enough filling for another 8-10 cookies. Another helpful hint- make sure these are cold when you dip them, and don’t linger and let them sit for a long time in that melted chocolate. Sprinkle sugar on top while they are still melted. I hope you enjoy these as much as I did!!  ~r

Key Lime Cookies5

Other key lime desserts here on Easybaked: (click on a photo to see the recipe)

Key Lime PieKey Lime CakeKey Lime Cupcakes!Key Lime Tartlets

Sunshine Lemonade Cookies

Posted on

Lemonade Cookies2

These soft cut-out cookies have lemonade in the mix for a sweet lemon cookie you will love!

If you have been a fan of Easybaked for very long, you know that I love lemon-themed desserts! I’ve used lemonade in cupcakes and cakes– but these cut-out cookies are a new experiment- and I adore them! These cookies just melt in your mouth- and that tart lemon flavor is wonderful.

Lemonade Cut-out Cookies!

You can cut these into any shape you want, and decorate at whatever level of creativity and effort you choose. I wanted happy sunshine cookies for a summer party- so I used a Smiley Face Emoji Chocolate Mold and yellow, blue and orange Wilton’s Candy Melts to decorate my cookies. They make me smile!

Here is how I made them: (printable cookie recipe here)

INGREDIENTS: (makes about 24 cookies)

  • 2 sticks (1 cup) unsalted butter (softened)
  • 1 1/2 cups of granulated sugar
  • 2 eggs
  • 1 teaspoon of vanilla
  • 3 cups of flour
  • 1 teaspoon of baking powder
  • 1/2 teaspoon of salt
  • One packet (0.23 oz) of unsweetened lemonade powder (I used Kool Aid brand)
  • 2 bags of Wilton Candy Melts in blue (or in whatever colors you want to decorate in!)
  • 1 bag of Wilton Candy Melts in yellow
  • 1/4 bag of Wilton Candy Melts in orange

DIRECTIONS:

  • Preheat oven to 350F degrees.
  • In a large mixing bowl, cream together butter and sugar until smooth.
  • Add eggs, vanilla and lemonade powder and mix well.
  • Add all dry ingredients and mix until able to knead into a firm ball of dough (add additional flour if necessary).
  • Roll out on a floured counter with a flour coated rolling pin to desired thickness (I made them about 1/4 inch thick))
  • Cut into whatever shape you want- I used a 3.5-inch round cookie cutter.
  • Place on a parchment paper covered cookie sheet.
  • Bake at 350F degrees for 8-10 minutes and slide off the cookie sheet (leaving on parchment paper) to cool.
  • Melt 3/4 of yellow candy melts (in microwave, 30-second increments, stirring in between until smooth) and use a small zip-top bag to pipe this into each smiley face mold cavity. Freeze for 4-5 minutes and remove from mold. Set aside.
  • Melt blue candy melts and pipe around the edges of each circle.
  • Melt remaining yellow and orange candy melts and place in small zip-top bags to be ready to decorate. Keep them warm in a towel.
  • Flood cookie to edges with blue candy melts and immediately pipe circles of orange and yellow around the cookie’s center. 
  • Use a toothpick or skewer to pull lines through the melted chocolate and then tap on table to remove lines.
  • Place a smiley face in the center.

Lemonade cookies!

  • Repeat with remaining cookies, keeping candy melts warm in towels as you go.
  • Once they are hardened—Enjoy!

My thoughts: These are delicious. Decorating them this way takes a little time, but you could certainly make these cookies and decorate with a buttercream and some sprinkles if you want easy! The cookies are so worth trying- they got rave reviews 🙂 Happy summer to you!!!!  ~r


Lemonade CookiesOther lemon treats here on Easybaked (click on a photo to see the recipe):

Lemon Cream cupcakes!Raspberry Lemon Drop Cakes!!Raspberry Lemon Cream Cups!!!Lemon Drop Cookies with Coconut


Orange Creamsicle Cupcakes!

Posted on

Orange Creamsicle Cupcake

These delicious orange cupcakes have a white chocolate cup of vanilla ice cream in the center! Just like everyone’s favorite Orange Creamsicle frozen treats! Summer is coming…. you need these frozen cupcake treats!!!!

Confession: I hate all things orange flavored.

Confession: I was making cookie dough cupcakes for a party last week and I accidentally grabbed an orange cake mix instead of a chocolate cake mix at the store. I’m not sure how you do that… but I did. I had to rush to the store for a chocolate cake mix and then I was stuck with this orange one…. and I hate…hate…hate orange.

My dad suggested a Creamsicle cupcake and I went for it. Turns out, everyone else in the world LOVES orange Creamsicles- so it all worked out.

Orange Creamsicle Cupcake

I knew I wanted ice cream in the middle, but I didn’t want a soggy cupcake. Solution: the fun chocolate bomb mold that I’ve been raving about and using on cupcakes whenever I get a chance! Best kitchen gadget ever! I used the mold to make little white chocolate cups to hold the scoop of ice cream on top. Perfect!

Orange Creamsicle Cupcakes

Here’s how I put these fun little desserts together: (printable recipe)

INGREDIENTS:

  • One box of orange cake mix (plus oil, water and eggs to make according to package)
  • 1 bag of Wilton’s candy melts in white
  • 2 sticks of butter (room temp)
  • 1 1/2 cups of powdered sugar
  • 1 teaspoon of vanilla
  • Orange food coloring (if desired)
  • Vanilla ice cream
  • Cool Whip (if desired)
  • Sprinkles to decorate

DIRECTIONS

  • Make cake mix according to package and divide equally into 24 cupcake liners in cupcake tins.
  • Bake according to package and cool.
  • Make icing by combining butter, powdered sugar and vanilla in bowl and beating until light and fluffy. Color orange if desired.
  • Place icing in a large zip-top bag fitted with a round tip, and set aside.
  • Melt candy melts in microwave in 30 second increments, stirring between until completely melted.
  • Use a pastry brush to brush candy melts inside each cavity of the chocolate bomb mold and freeze for a few minutes.
  • Coat a second time (it needs to be nice and thick since we aren’t filling them before popping them out of the mold).
  • Pop these cups out of the mold by peeling the silicone away. Repeat.

Orange1


  • Assemble cupcakes by cutting a small core out of the center of each one, pipe a little frosting into this core, and set a chocolate cup on top.

Orange2Orange3

Orange9Orange8

  • Pipe frosting dots all the way around the edge of the cup.

Orange6

  • You can hold the cupcakes here until serving and do the next steps right beforehand- or do the following steps and keep the entire cupcake frozen until serving. Depends on how and where you will be serving them.
  • Place a small scoop of ice cream into the center
  • Top with Cool Whip, and sprinkles as desired

Orange5Orange4

Enjoy!!!!!

Orange Creamsicle Cupcakes

My thoughts: Well, I didn’t try these, but I did share them and according to others, they are a yummy success! These work best if you keep them at room temp and add the ice cream just before serving. If you add the ice cream ahead of time, let the cupcakes and ice cream warm up and soften a bit before serving- otherwise they are fairly difficult to eat! At room temperature though… cake and ice cream all at once!!!  YUM!  Enjoy!!!  ~r

Orange Creamsicle Cupcakes

Other fun ice cream desserts to try! (click on a photo to see the recipe)

Fried Ice creamBaked Alaska5Heath Bar Ice Cream Dessert3Butterscotch Ice cream towers!!!!

Berry Bomb Cupcakes

Posted on

Berry Bomb Cupcakes1

These delicious cupcakes are topped with a dome of raspberry cream and a touch of black raspberry jam- a perfectly pink Valentine’s Day treat!

I love berries over vanilla cake- it reminds me of summer and makes me smile. I got a little creative with the presentation, but I think that makes them just perfect as a Valentine– don’t you?

Berry Bomb Cupcakes3

These are incredibly delicious and fun to make. They use a fun (and inexpensive) silicone mold that I got here and have used before on my Peanut Butter Bomb Brownies. I just love how beautiful the dome of white chocolate looks atop these cupcakes! There are so many possibilities for fillings….!

Want to know how we made these cute little desserts? Here you go: (Printable recipe)

INGREDIENTS:

  • One boxed white cake mix (with water, oil and eggs to make according to package)
  • 1 large jar of black raspberry preserves
  • 1 can of strawberry frosting
  • 2 packets of Dream Whip
  • 3/4 cup milk
  • 1 tablespoon of raspberry extract
  • 6 tablespoons powdered sugar
  • Pink food color gel (to desired shade)
  • 2 bags of Wiltons candy melts in bright white.

DIRECTIONS:

  • Make cake mix according to package and divide into 24-28 cupcake liners placed in a muffin tin. Fill only about 1/2 full so that they bake up flat and not mounded up and over edges. Bake according to package.
  • Make Berry Bomb filling by combining Dream Whip, milk, extract, and powdered sugar in a mixing bowl and blending together with mixer until stiff peaks form. Add coloring to desired shade of pink.
  • Melt Wiltons candy melts and use a brush to “paint” the melts into the inside of the silicone mold. Do two layers and then freeze until hard (5 minutes).
  • Place filling into a large zip-top bag and clip a corner. Pipe filling into hardened cups- about 3/4 full- and then top with a little jam. 
  • Use a knife to spread jam flat and freeze another 5-10 minutes.
  • Carefully remove berry bombs from mold and place, round side down and sticky jam side up, on a wax-papered plate. Keep these cool until all bombs are made.

Berry Bomb Cupcakes5

  • Open strawberry frosting and warm in the microwave for about 15 seconds- just until it softens a bit when stirred,
  • Spoon frosting over tops of cupcakes, allowing it to spread to edges.
  • Gently set a bomb on top of cupcake, pressing it into the soft frosting (I used wax paper to touch chocolate to prevent fingerprints)
  • Allow frosting to firm up and hold the bomb in place.
  • Drizzle with a little red or pink melted candy melts if desired. Keep refrigerated until serving.
  • Enjoy!!!!!!!

Berry Bomb Cupcakes2

My thoughts: These are a fun and refreshing twist on a berry-topped cupcake. The bombs take a little time to make- since you have to to do them in batches of 6. I recommend you start making them when you start the cupcakes. You can be in and out of the freezer while you are baking and save a little time. My other thought- serve these with a fork!!! When you bite into them and that white candy shell breaks it is too much to hold onto. I promise. Use forks 🙂  I hope you enjoy making and eating these as much as I did!!  ~r

Berry Bomb Cupcakes4


Other Valentines Day treats to try (click on a photo to see the recipe)

Chocolate covered Strawberry cupcakes1Frog Oreos!!Strawberry layer cakeCake balls filled with cream cheese frosting


Key Lime Cookie Bars

Posted on

Key Lime Cookie Bars2

These delicious cookie bars have white chocolate and coconut on the bottom and key lime pie filling with whipped cream on top.  Such a refreshing treat for summer!

I love key lime pie. I love cookies. These smash those two worlds together into a sweet and tart summer dessert! Love it!

Key Lime Cookie Bars

Here’s how we made it: (printable recipe)

INGREDIENTS:

Cookie base:

  • 1 box of yellow cake mix
  • 1/3c. oil
  • 2 eggs
  • 1 cup of white chocolate chips
  • 1 cup of shredded coconut
  • 1/2 cup graham cracker crumbs

Key lime topping:

  • 1 cup of lime juice
  • 1 egg
  • 1 can (14oz) of sweetened condensed milk
  • One tub of cool whip, or 2 cups of whipping cream, whipped.

DIRECTIONS:

  • Preheat the oven to 350F degrees
  • In a mixing bowl, combine cake mix, oil and eggs well.
  • Add chips, coconut and graham crumbs, and mix together with clean hands until well- combined.
  • Press mixture into a greased cake pan and bake for 10 minutes at 350F degrees.
  • While this is baking, make key lime topping.
  • Mix together lime juice, condensed milk and one egg until well combined.
  • Pour over partially baked cookies and return to oven for another 20 minutes.
  • Cool completely and top with whipped topping, sprinkle with  graham crumbs, if desired.
  • Chill until serving, but allow dessert to return to room temperature before serving.
  • Enjoy!

Key Lime Cookie Bars4My thoughts: Sweet and fruity and white chocolatey….what is not to like here??? I love the sweet and tart balance of these little desserts and they just LOOK like summer! Enjoy! ~r
Key Lime Cookie Bars1

Other refreshing summer treats: (click on a photo to see the recipe)

Caramel Gelato!!!Kool Aid PieRaspberry Lemon Cream Cups!!!Root Beer Float Cupcakes!!!


Fishing Bobber Cupcakes!

Posted on

Bobber Cupcakes1

If your dad loves fishing, these fun bobbers on waves of blue buttercream frosting will make him smile!

A perfect Father’s Day treat!

The idea for this recipe began last year before Father’s Day. I was pondering the idea of cutting a hole in the top of a cupcake and finding (or making) an edible golf ball to set inside of it. One morning the lightbulb came on: Lindt White Chocolate Truffles! They were perfect, and as I unwrapped all that yummy chocolate I brainstormed for other ideas.

Golf Cupcakes!!

One of those ideas was another Father’s Day treat- fishing bobbers! I filed the idea away until this year came around and then gave it a go. I wasn’t sure if I would be able to dip the truffle in warm chocolate without it melting, and if it would actually look like a bobber– but I love them! My dad loved them too.

Bobber Cupcakes9

Here’s how we made these yummy treats for dad: (printable recipe)

INGREDIENTS:

  • One boxed cake mix (plus water, oil and eggs to make according to package)
  • Blue food coloring gel
  • 2 sticks (one cup) of salted butter
  • 2 sticks (one cup) of unsalted butter
  • 3 cups of powdered sugar
  • 2 teaspoons of clear vanilla flavoring
  • 24 Lindt white chocolate truffles
  • One bag of Wilton candy melts in red

DIRECTIONS:

  • Make cake mix according to package.
  • Divide out about 1/3 of batter and color it blue
  • Swirl the 2 colors together (don’t mix too much!) and scoop into 24 cupcake liners placed in a baking tin.
  • Bake according to package and cool cupcakes completely
  • Make frosting by placing butters, powdered sugar and vanilla into a large bowl and beating on high until light and fluffy. 
  • Divide frosting in half and color one half blue. Swirl together the blue and white frosting and place into a large zip-top bag, fitted with a decorating tip.
  • Pipe frosting on top of cupcakes.
  • To make toppers: Unwrap all Lindt truffles.
  • Melt red candy melts in a bowl in the microwave for 30 second increments, stirring in between, until melted and smooth.
  • Allow candy melts to cool a little before dipping.
  • Use a small skewer or fork to dip each truffle into red candy melts, covering the bottom half in red. Place these on clean parchment paper to cool and harden.

Bobber CupcakesBobber Cupcakes13


  • Place remaining melted red chocolate into a small zip-top bag. Clip a corner and carefully pipe a small circle of red on the top of each “bobber”, covering the hole made by the skewer used for dipping.
  • Once “bobbers” are completely cooled and hardened, place them on the top of each cupcake and enjoy!!!

Bobber Cupcakes

My thoughts: I really have the most incredible dad. He is funny (hilarious!) and smart and brave. He loves golf (last year’s cupcakes) and he loves fishing (this year’s cupcakes)~ he goes to Canada every summer to fish for GIANT Walleye and Pike and then he fries them up for us all when he gets back- and they are delicious! He does roll his eyes when I say that I like bobber fishing best….but in any case, these are for you dad! I love you!!!!!!!

484544_10150888332207513_696367834_n

Need more ideas for your Father’s Day celebration? Try some of these! (click on a photo to see the recipe)

Chocolate Pecan TartCookie Dough BrownieBBQ Grill Cupcakes!!Golf Cupcakes!!!!


Bobber Cupcakes4Bobber Cupcakes8Bobber Cupcakes10

Triple Chocolate Truffle Cups

Posted on


Triple Chocolate Truffle Cups

Delicious dark chocolate cookie cups filled with melted milk chocolate and a white chocolate truffle.  Yum.

I love little mini desserts.  I used to work for a hospital and they would have a big, fancy Christmas party every year.  My favorite part was all the adorable little desserts at the end.  You can try like 8 of them for the calorie price of one big dessert!

This is an adorable (easy to make!) mini dessert.  Perfect for showers, receptions, tea parties and any occasion that calls for a little bit of “fancy” dessert.

The cookie cups use my favorite chocolate cut-out cookie recipe (pressed into a cup!), melted chocolate and a Lindt White Chocolate Truffle. Quick, easy, and delicious!

Triple Chocolate Truffle Cookie Cups!

Here’s the recipe: (printable version)

INGREDIENTS: (makes about 48 mini desserts)

  • 1 stick (1/2 cup) butter, softened
  • 3/4 cup of granulated sugar
  • 1 egg
  • 1/2 teaspoon vanilla extract
  • 1/3 cup of unsweetened cocoa powder
  • 1 1/2 cups flour
  • 1/4 teaspoon salt
  • 1/4 teaspoon baking powder
  • 1 bag of Wilton’s milk chocolate Candy Melts (if you want to melt higher end chocolate for this, feel free!)
  • Approximately 48 Lindt White Chocolate Truffles (Walmart has them in large boxes of 60, for a reasonable price)

DIRECTIONS:

  • Preheat oven to 350F degrees.
  • Make cookies by combining butter, sugar, egg, vanilla and cocoa powder and beating until completely combined.
  • Add other dry ingredients gradually, mixing with beaters until too heavy to beat. Use clean hands to knead dough into a soft ball.
  • Use a small cookie scoop (I used a scoop that holds 1/2 Tablespoon of batter) to portion out your dough into mini muffin tins that have been sprayed with non-stick spray.
  • Use a tart shaper or a wooden spoon to press the dough into a cup shape (really, the tart shaper works best for this and you will use it again- I use mine all the time!)

Making cookie cups

  • Bake at 350F degrees for 7 to 8 minutes and remove from oven.
  • Press centers in a second time with the tart shaper and allow them to cool for just a couple of minutes.
  • Use a small paring knife to pop each cup out and allow them to cool completely on the counter.
  • Melt candy melts in a microwave safe bowl, in the microwave, in 30 second increments, stirring in between until melted and smooth.  
  • Pour melted chocolate into a sturdy zip-top bag.  Zip it closed and clip a corner off.
  • Unwrap all of your Lindt truffles.
  • Carefully pipe warm chocolate into each cookie cup, filling each one about half way.
  • Gently press a truffle into the center of each chocolate-filled cup, allowing the warm chocolate to squeeze up around the edges (yum!)
  • Drizzle any left-over chocolate over the tops of the mini-desserts and allow them to cool and harden completely.
  • Enjoy!!!

Triple Chocolate Truffle Cookie Cups!!!My thoughts: Well, you can see for yourself what happens when you bite into this little dessert. Pure deliciousness!!!! Those truffles are so good.  Mine got a little melted before I cut one in half– but all that soft white chocolate….!!! They make this dessert a touch pricey- but they are SO worth the cost!  If you want to make a smaller batch just cut the cookie recipe in half.  I hope you get a chance to try these- I am filing this recipe away for the next time I need something little for favors or a mini dessert table.  These are perfect for both!  Enjoy!!!!  ~r

Triple Chocolate Truffle Cups

Other mini desserts you might enjoy:

Melted Smores cupDark Chocolate Ganache CupcakesKoolaid truffles!!Mini Pineapple Upside Down Cakes

Hole in One Cupcakes!!

Posted on

Hole in One Cupcakes!!What do you get if you cut a hole in a cupcake and fill it with a Lindt white chocolate truffle?   A perfect Father’s Day treat!!!

These are guaranteed to make any golf-loving Father smile on his special day!  This one’s for you dad!  I can’t wait to see you in 2 weeks and go “golfing” (aka losing cute golf balls in ponds).

How is such incredible cuteness created, you ask?  EASY!  Make a chocolate cupcake, cut a hole in the top, and pop a Lindt white chocolate truffle inside!

Golf Cupcakes!!How fun and easy is that?  Here are the details (Printable recipe)

INGREDIENTS:

  • One boxed chocolate cake mix (plus oil, water and eggs to make according to package)
  • One tub of white frosting
  • One container (about 1 cup) of green sugar sprinkles
  • 24 Lindt White chocolate Truffles (I got 2 (5.1oz) bags that each had 12 truffles)

DIRECTIONS:

  • Make cake according to package and divide evenly into 24 cupcake liners placed in muffin tins.
  • Bake according to package.
  • Use a cupcake corer or a small knife (use a corer to get that perfectly round cut!) to cut a hole in the center of each cupcake.
  • Use a knife to carefully frost the top of each cupcake around the hole.
  • Press top of frosted cupcake into green sugar to coat it.
  • Place a truffle into “hole”.

Golf CupcakeGolf CupcakeGolf Cupcake


  • Place a flag in each cupcake- you can print these on heavy paper and use double-sided tape to secure them to toothpicks.  Here are 2 files- Happy Father’s Day, and Blank (write your own message) flags.

Click on a picture to be taken to the printable pdf:

Father's Day FlagsGolf Cupcake- DIY Flags

My thoughts: I’ve used a cupcake corer on so many cupcakes to add fillings, and the last time I did it, this idea popped into my head!  I wasn’t sure how it would turn out, but as soon as I coated my 1st cupcake in that green sugar I knew it would be perfect!  Happy Father’s Day to all the dads out there- especially mine!!!!

Golf Cupcakes!!!!

Want another reason to get a cupcake corer? Here’s four……..

Key Lime Cupcakes!Cinnamon Roll Filling in a yummy cupcake!Radioactive Cupcakes filled with SLIME!Peppermint Hot Chocolate Cupcakes!!!

Rocky Road Cupcakes!

Posted on

Rocky Road Cupcakes!!!!These chocolate cupcakes are filled with creamy marshmallow and topped with a rich ganache frosting, marshmallows and almonds! YUM!!!!!

These are fork-eating cupcakes!  You’ll love that combination of rocky road flavors in these rich and messy-to-eat cupcakes.

Rocky Road Cupcakes4I absolutely love this frosting.  I have used ganache for many recipes, but I’d never taken the time to whip it up into a frosting.  Now that I’ve tried it, I will be back for more- this frosting is so rich and chocolatey!!! Ready for a recipe?

Here you go: (printable version)

INGREDIENTS:

  • One box of chocolate cake mix (with oil, water and eggs to make according to package)
  • One large jar (13 oz) of Jet-Puffed Marshmallow Creme
  • One bag of semi-sweet chocolate chips *
  • 1/2 cup of whipping cream *

(*double these two ingredients if you want to pile your frosting high like mine is)

  • One bag of mini-marshmallows
  • 1 cup of slivered or sliced almonds
  • a little white chocolate to drizzle on top, if desired

DIRECTIONS:

  • Start your frosting first, as it needs to chill before you beat it, and double the recipe if you want piles of frosting like mine.  I went a little overboard for fun pictures!! 🙂
  • Place 1/2 cup of whipping cream into a medium saucepan and heat it on the stove until the cream starts to bubble just a bit on the edges, stirring as it heats.  Turn off the heat, add the chocolate chips and cover for 5 minutes.
  • Stir melted chocolate and warm cream together until completely smooth (a “ganache”).  Put it in a medium bowl and refrigerate until it is a cool, spoonable consistency (30 minutes to an hour).
  • Make cake mix according to box, and divide equally into 24 cupcake lines placed in a muffin tin.
  • Bake as directed on box, and cool completely.
  • Core cupcakes using a small knife, or a cupcake corer.  I used the Chicago Metallics one, and for $4 there is just no reason to not get one- it makes filling cupcakes SOOOO easy!  Isn’t your birthday coming up???

So easy to core cupcakes!

  • Spoon entire jar of marshmallow fluff into a gallon-size zip-top bag and clip a corner off with scissors.  Squeeze the marshmallow into the middle of each cupcake and then trim a little of the core you removed and place the “lid” back on top of the filling.
  • Remove cooled chocolate ganache from refrigerator and beat on high until light and fluffy.
  • Place icing in a gallon size zip-top bag that has been fitted with a decorating tip in one corner, and pipe icing onto the cupcakes.
  • Decorate with almonds, and mini marshmallows.  I also added some mini chocolate chips (because I had some leftovers from another recipe) and I melted some white chocolate to drizzle on top.  Be creative and make these little marshmallow-y cupcakes irresistible!!!!


Rocky Road Cupcakes!!!!!


My thoughts:  These are FABULOUS cupcakes.  I love the gooey marshmallow creme surprise in the middle!  And that frosting….. oh my.  A few tips:  the frosting does harden up, so get those almonds and marshmallows placed in it as soon as you are done piping the frosting on.  This is good, because it holds all those yummy toppings in place!  Also, store these all sealed up.  You know what happens when you leave the bag of marshmallows open?  Yucky, rubbery, dried up marshmallows!  The same will happen if you just let these set out. 

I hope you love these little yummy desserts!!!!  ~r

Rocky Road Cupcakes with marshmallow filling!!!!Want some other ideas for that new cupcake corer?  We love filled cupcakes here at Easybaked!  Here’s a few of our favorites:

Cinnamon Roll Filling in a yummy cupcake!Peppermint Hot Chocolate Cupcakes!!!Toxic Slime-filled Cupcakes!Mocha caramel filled cupcakes3

%d bloggers like this: