Tag Archives: chocolate chips

Cookie Butter Stuffed Oreos

cookie-butter-oreos3

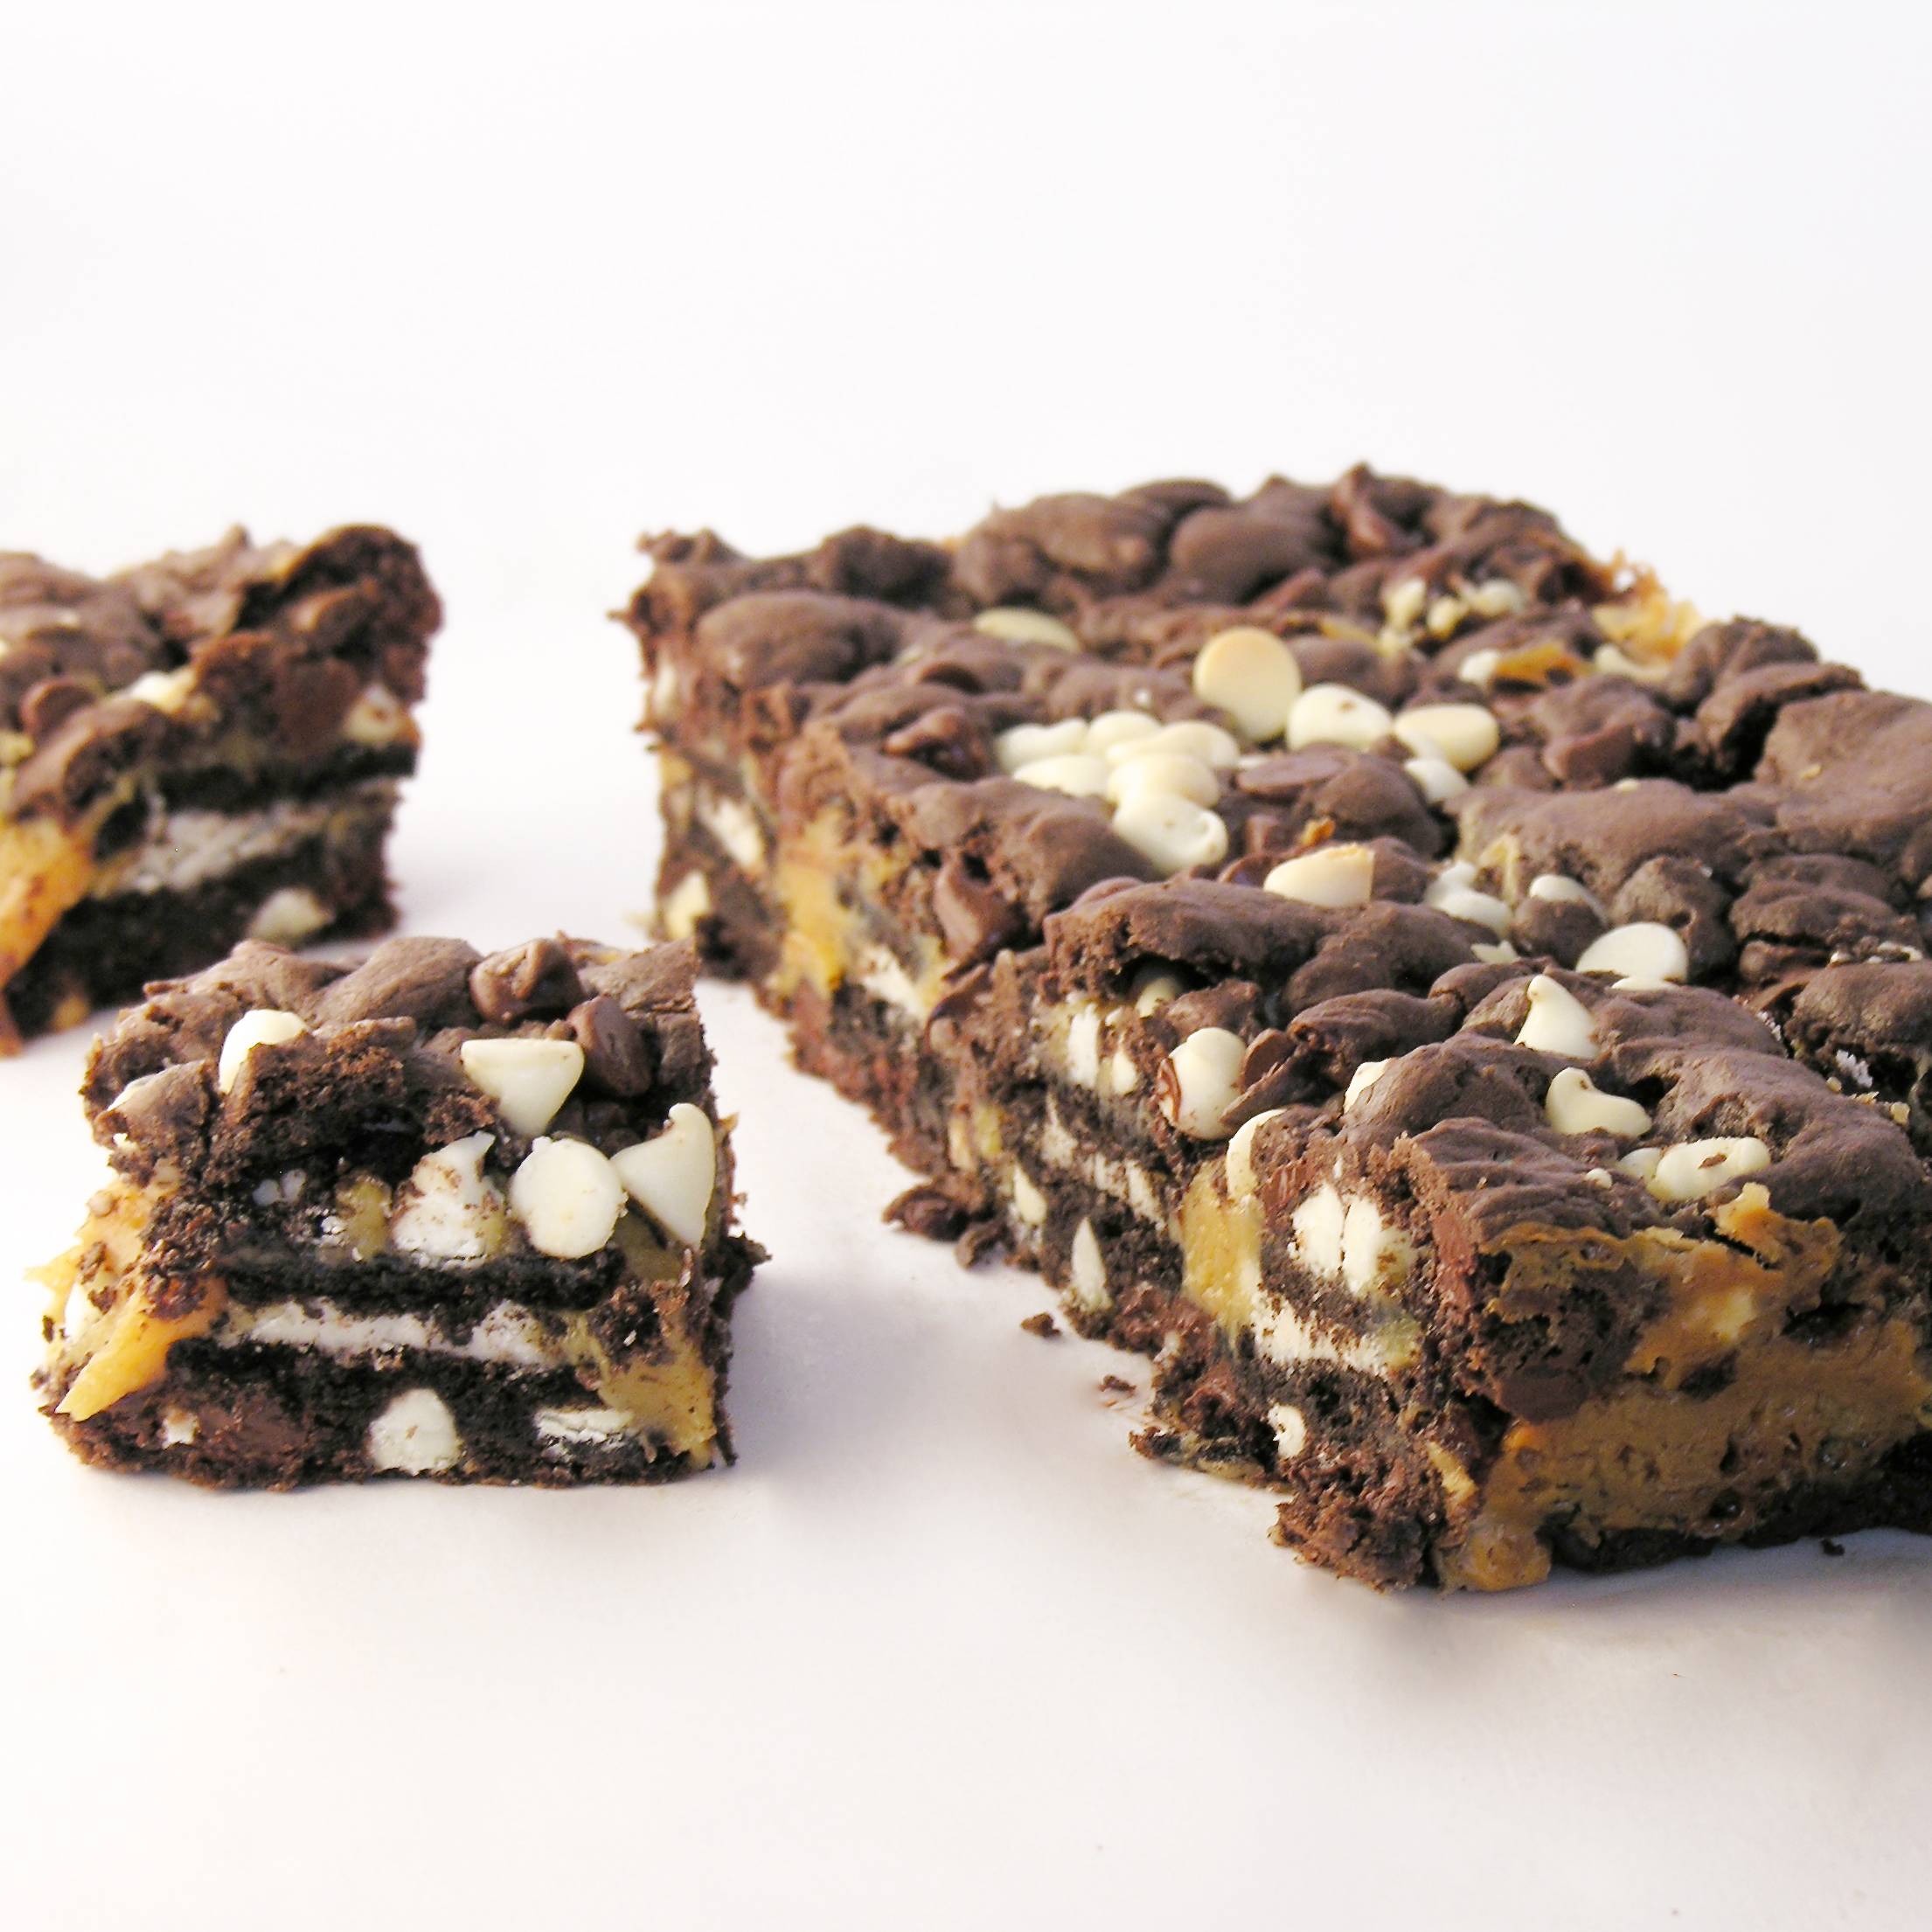
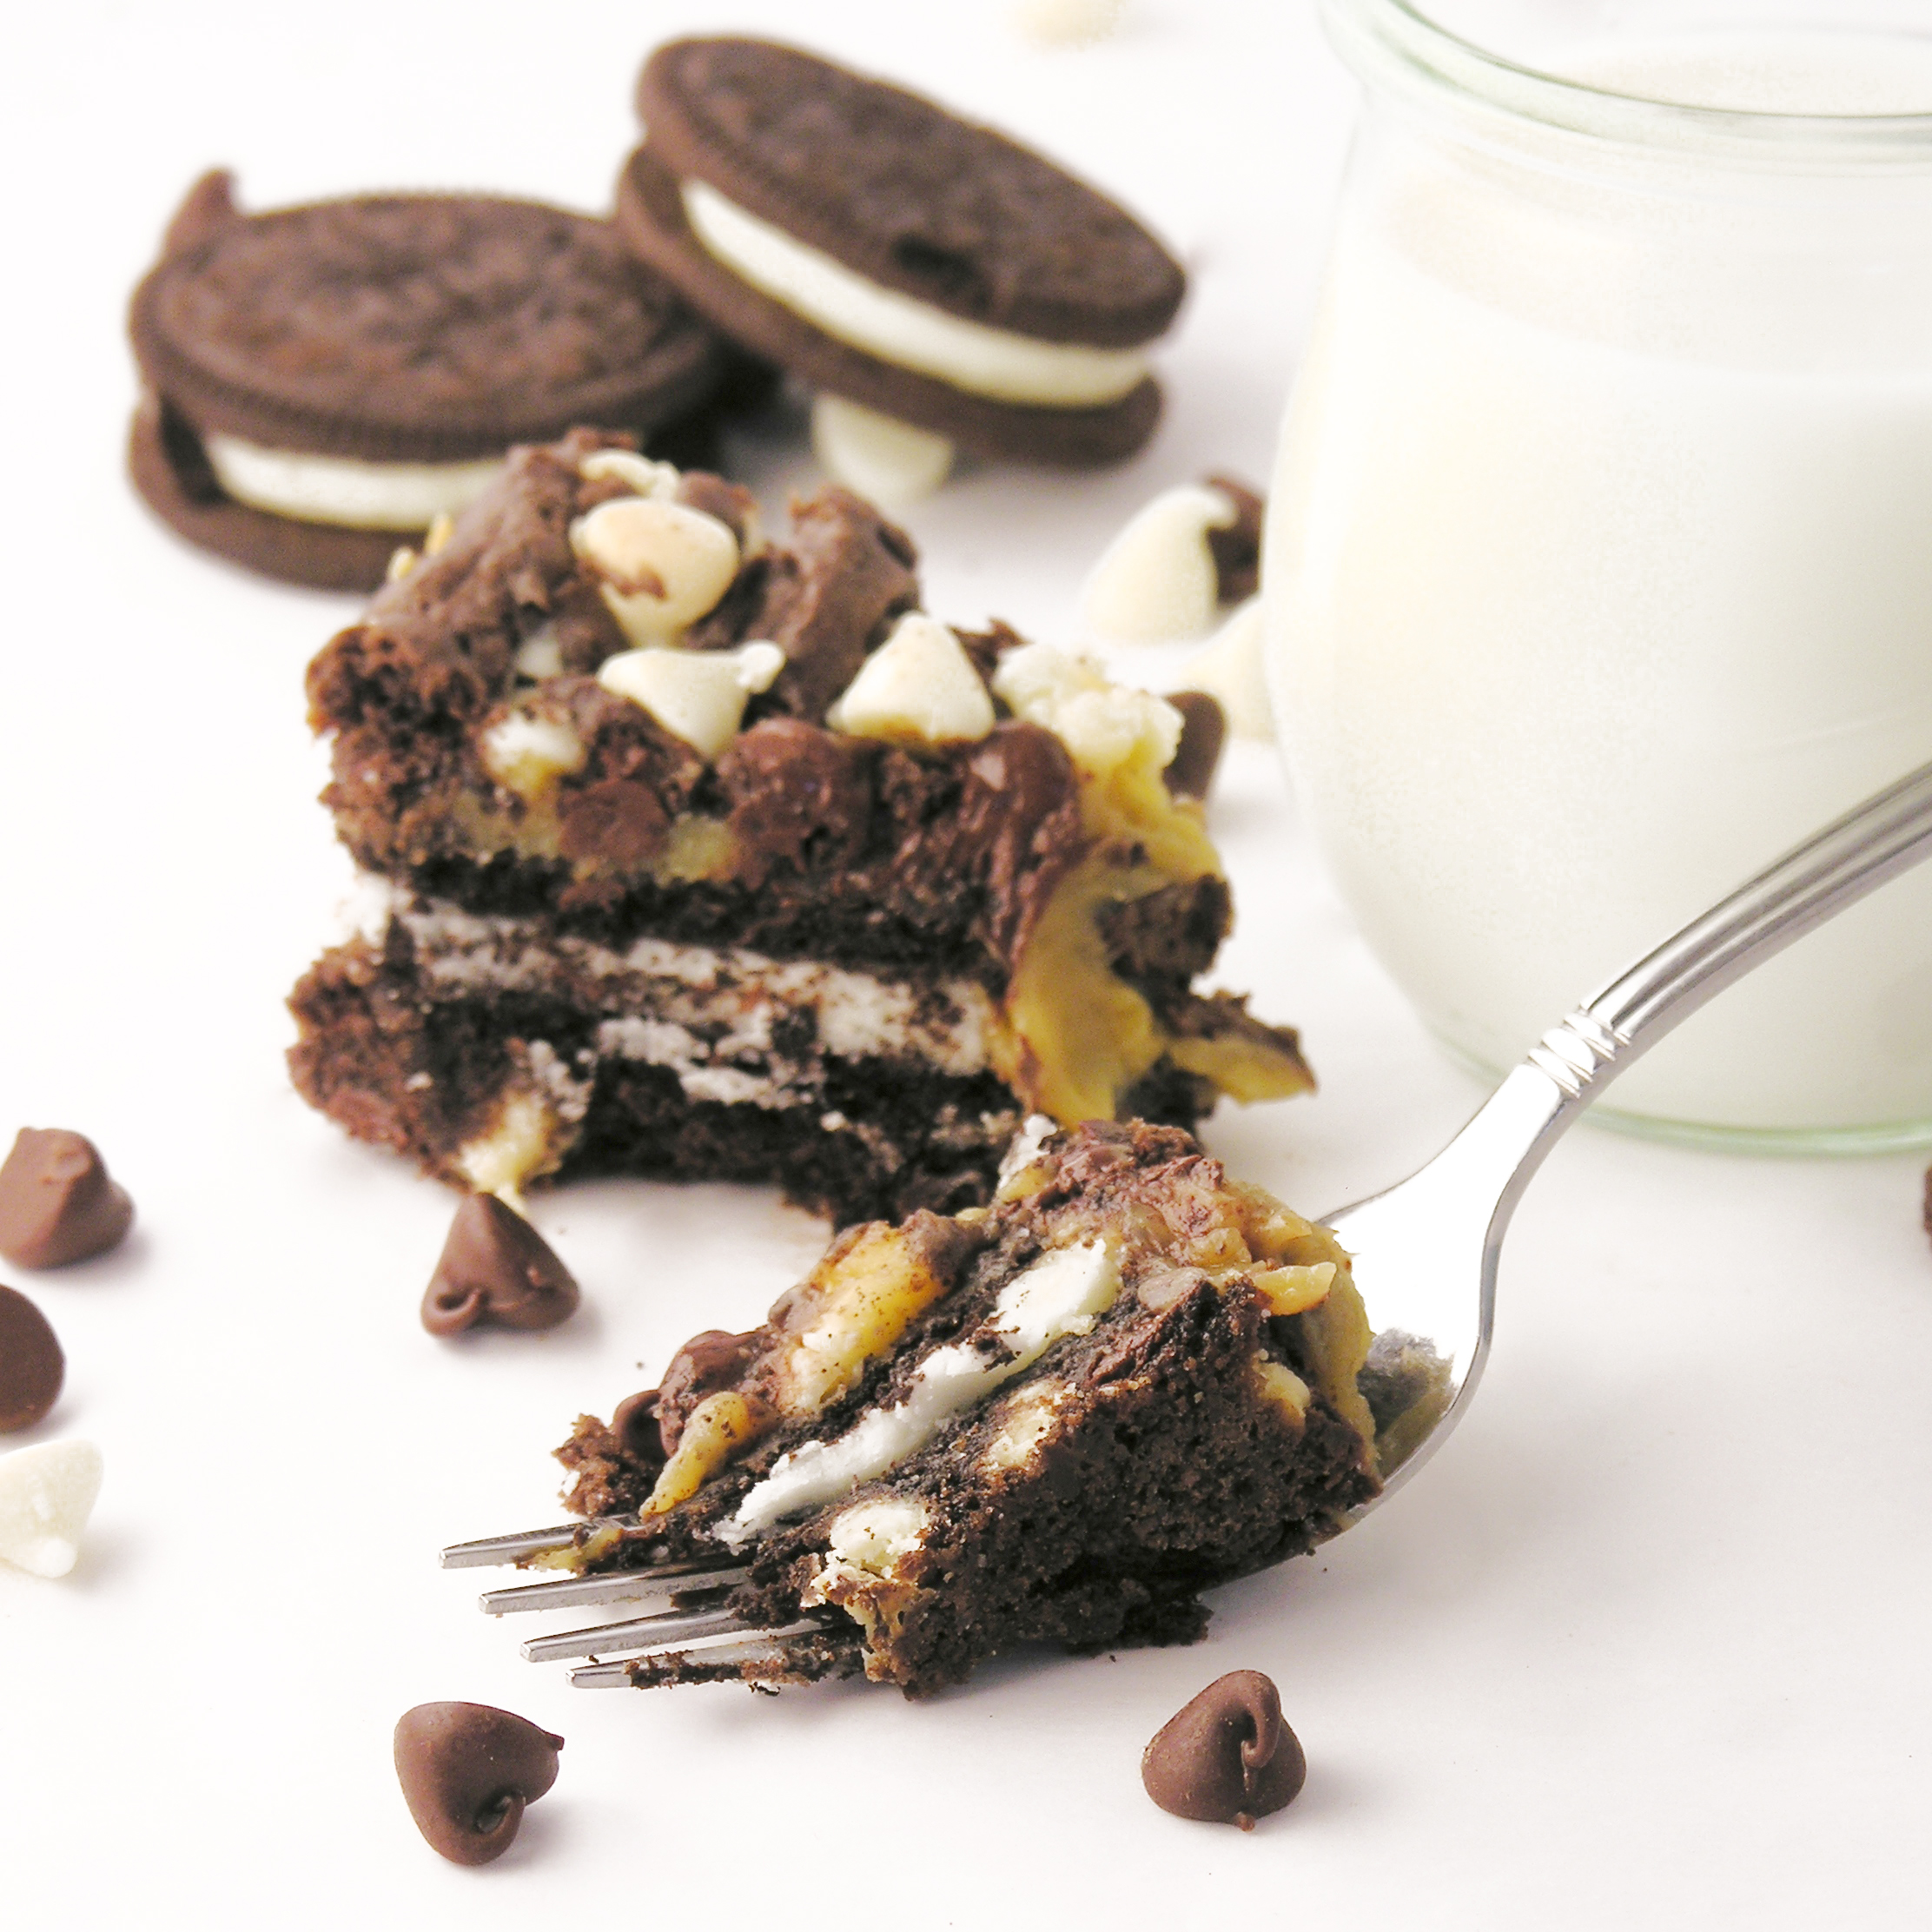
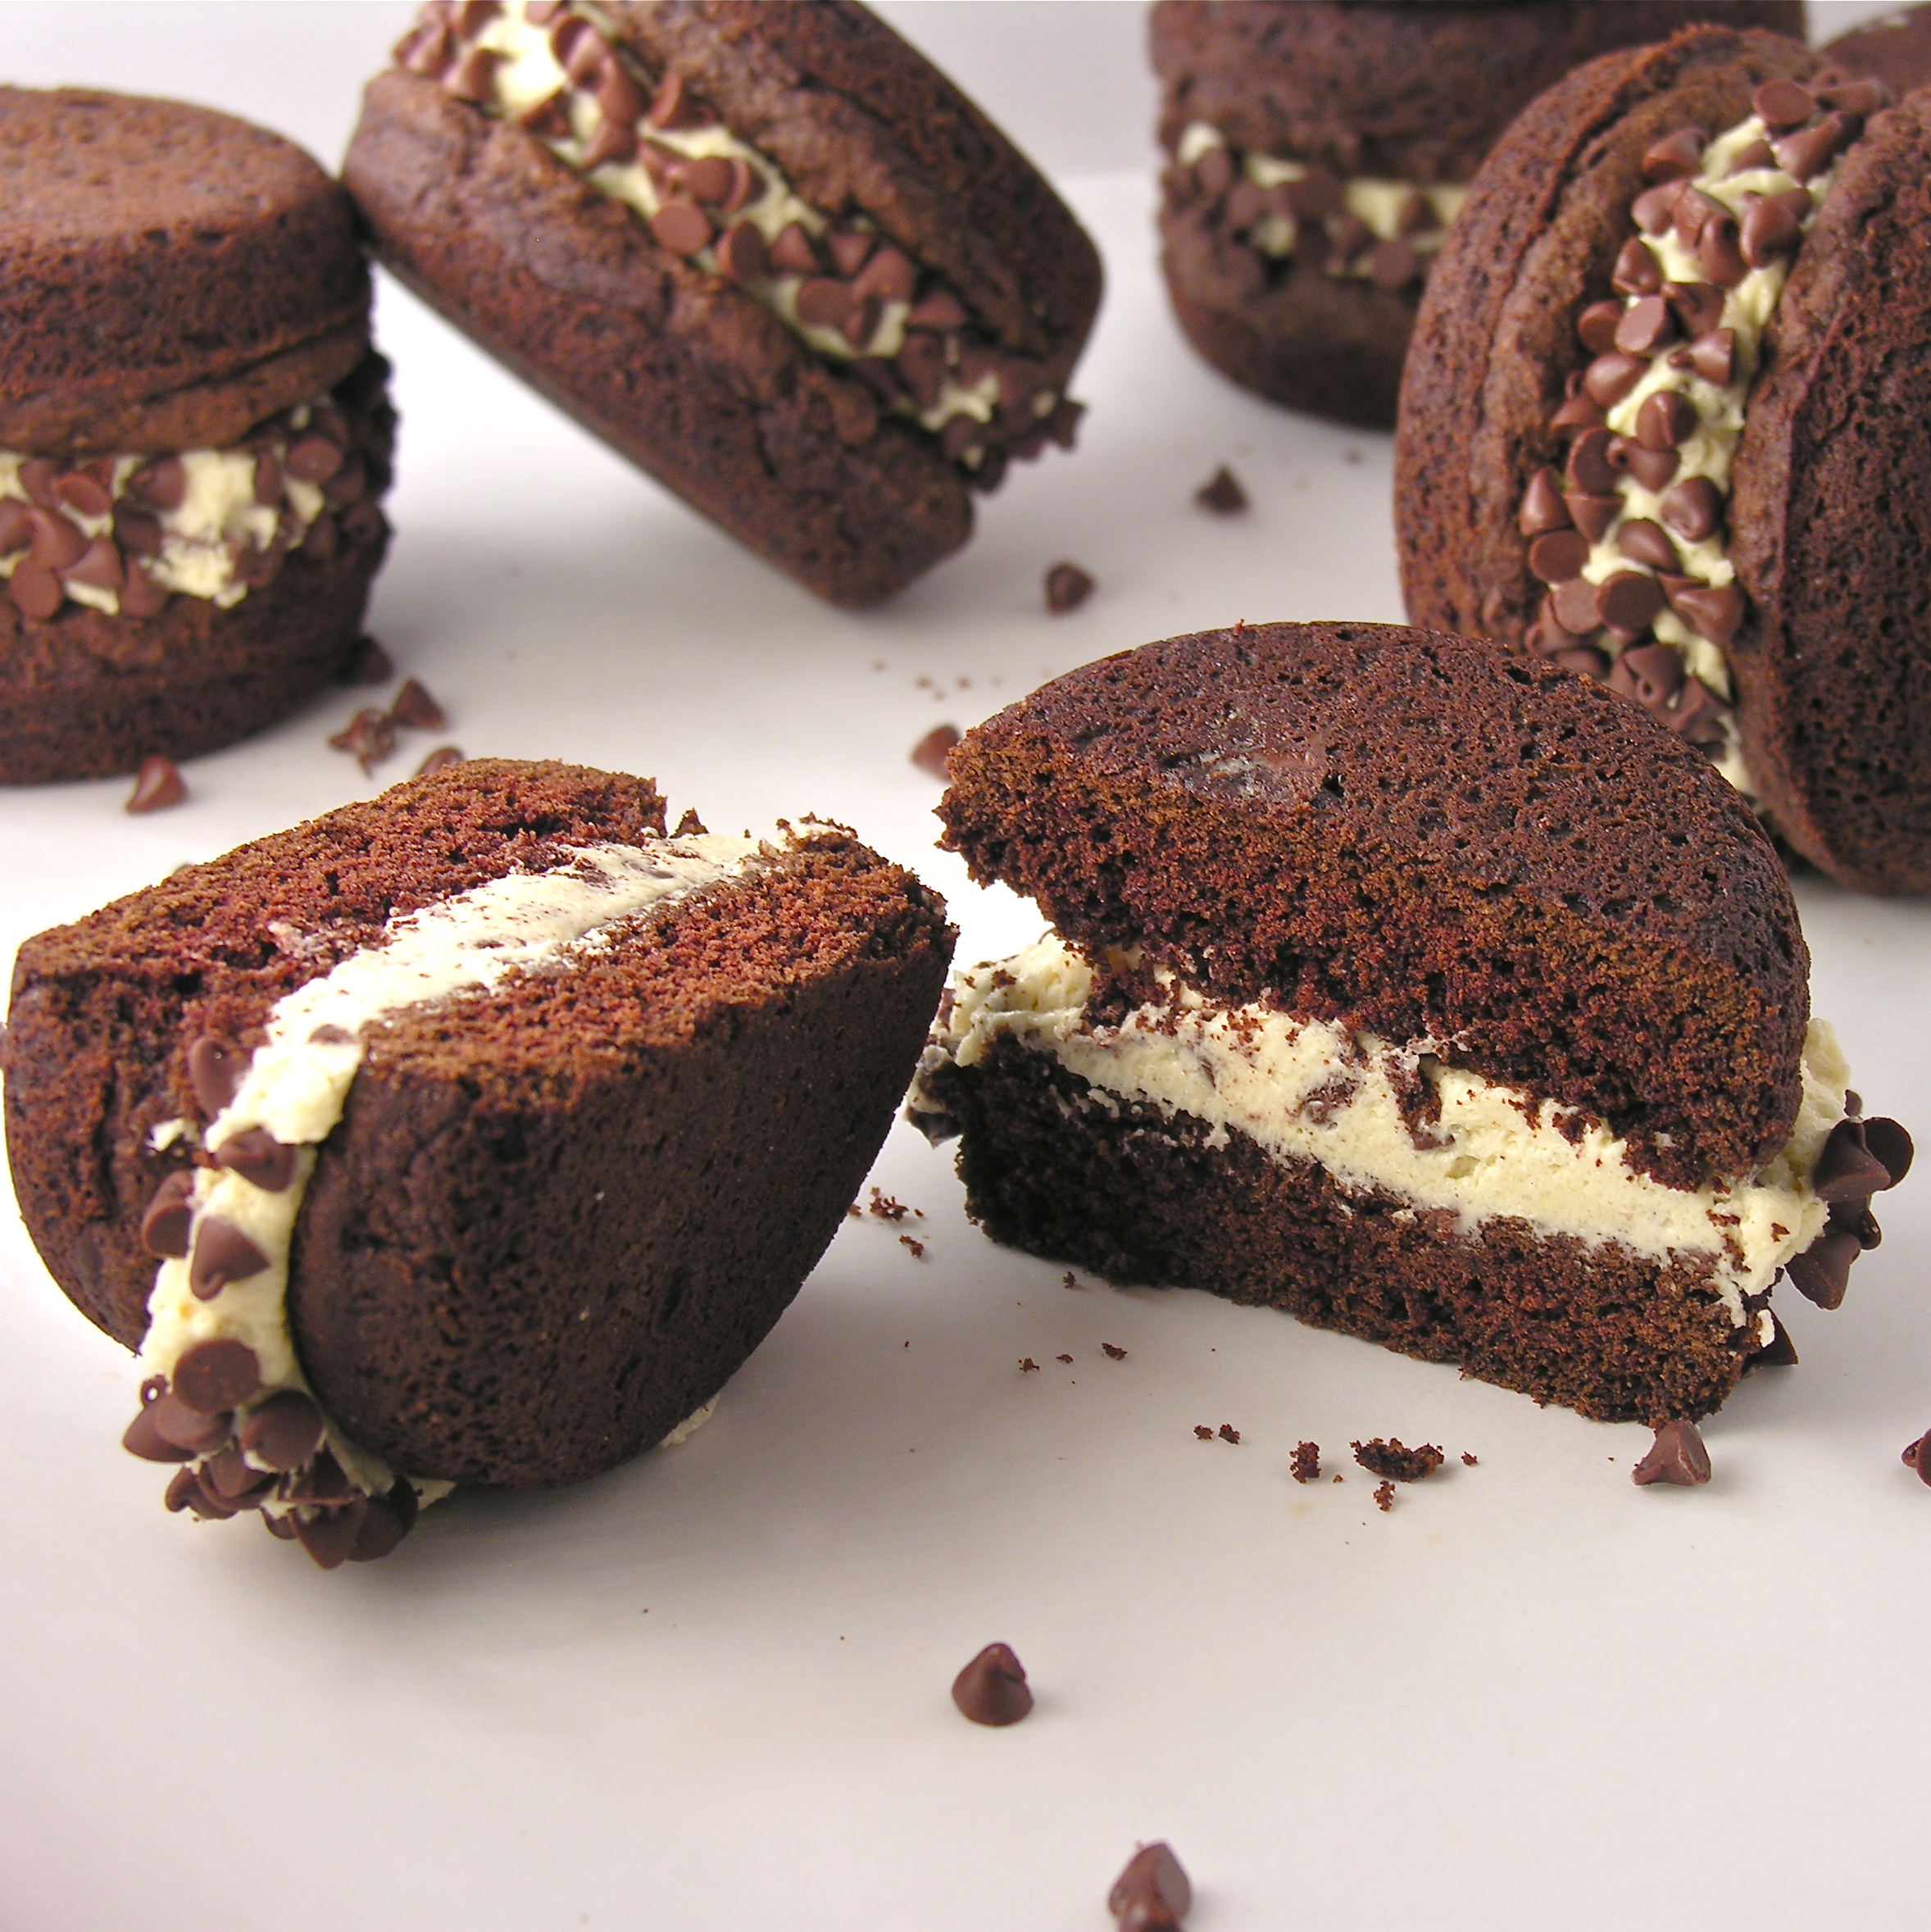
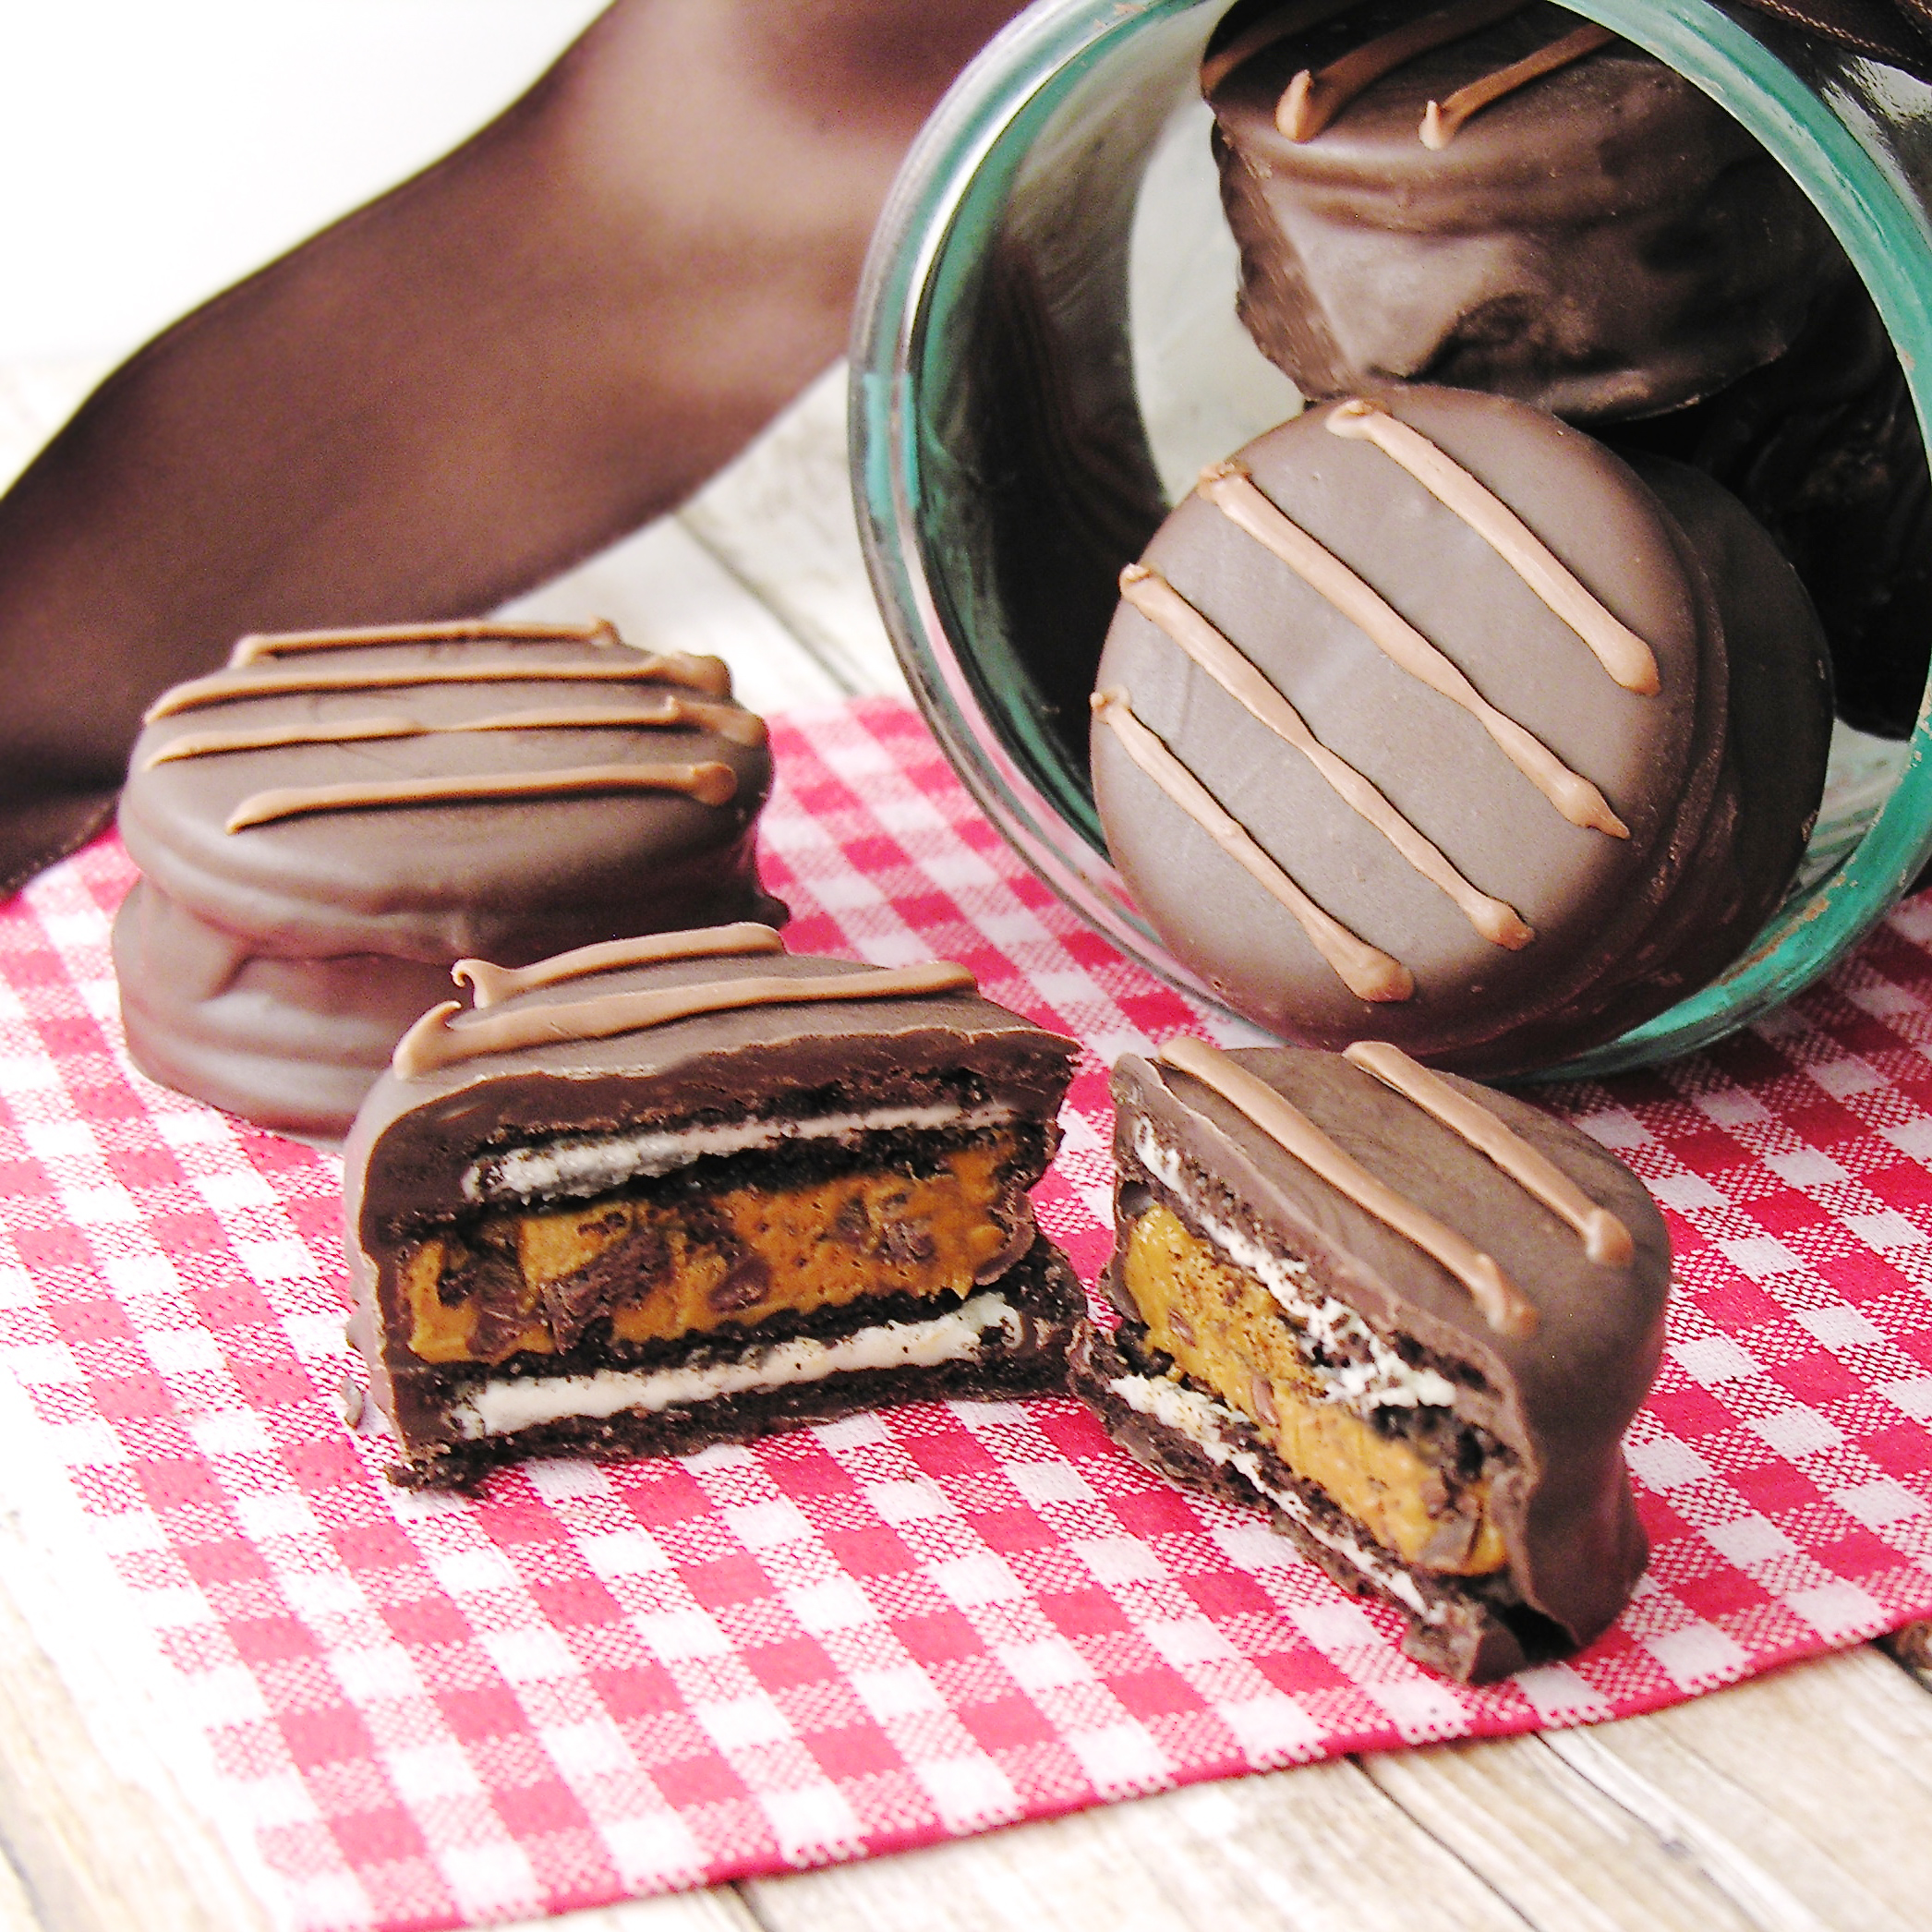
A creamy layer of chocolate chip cookie butter is a wonderful surprise inside these easy chocolate cookies!

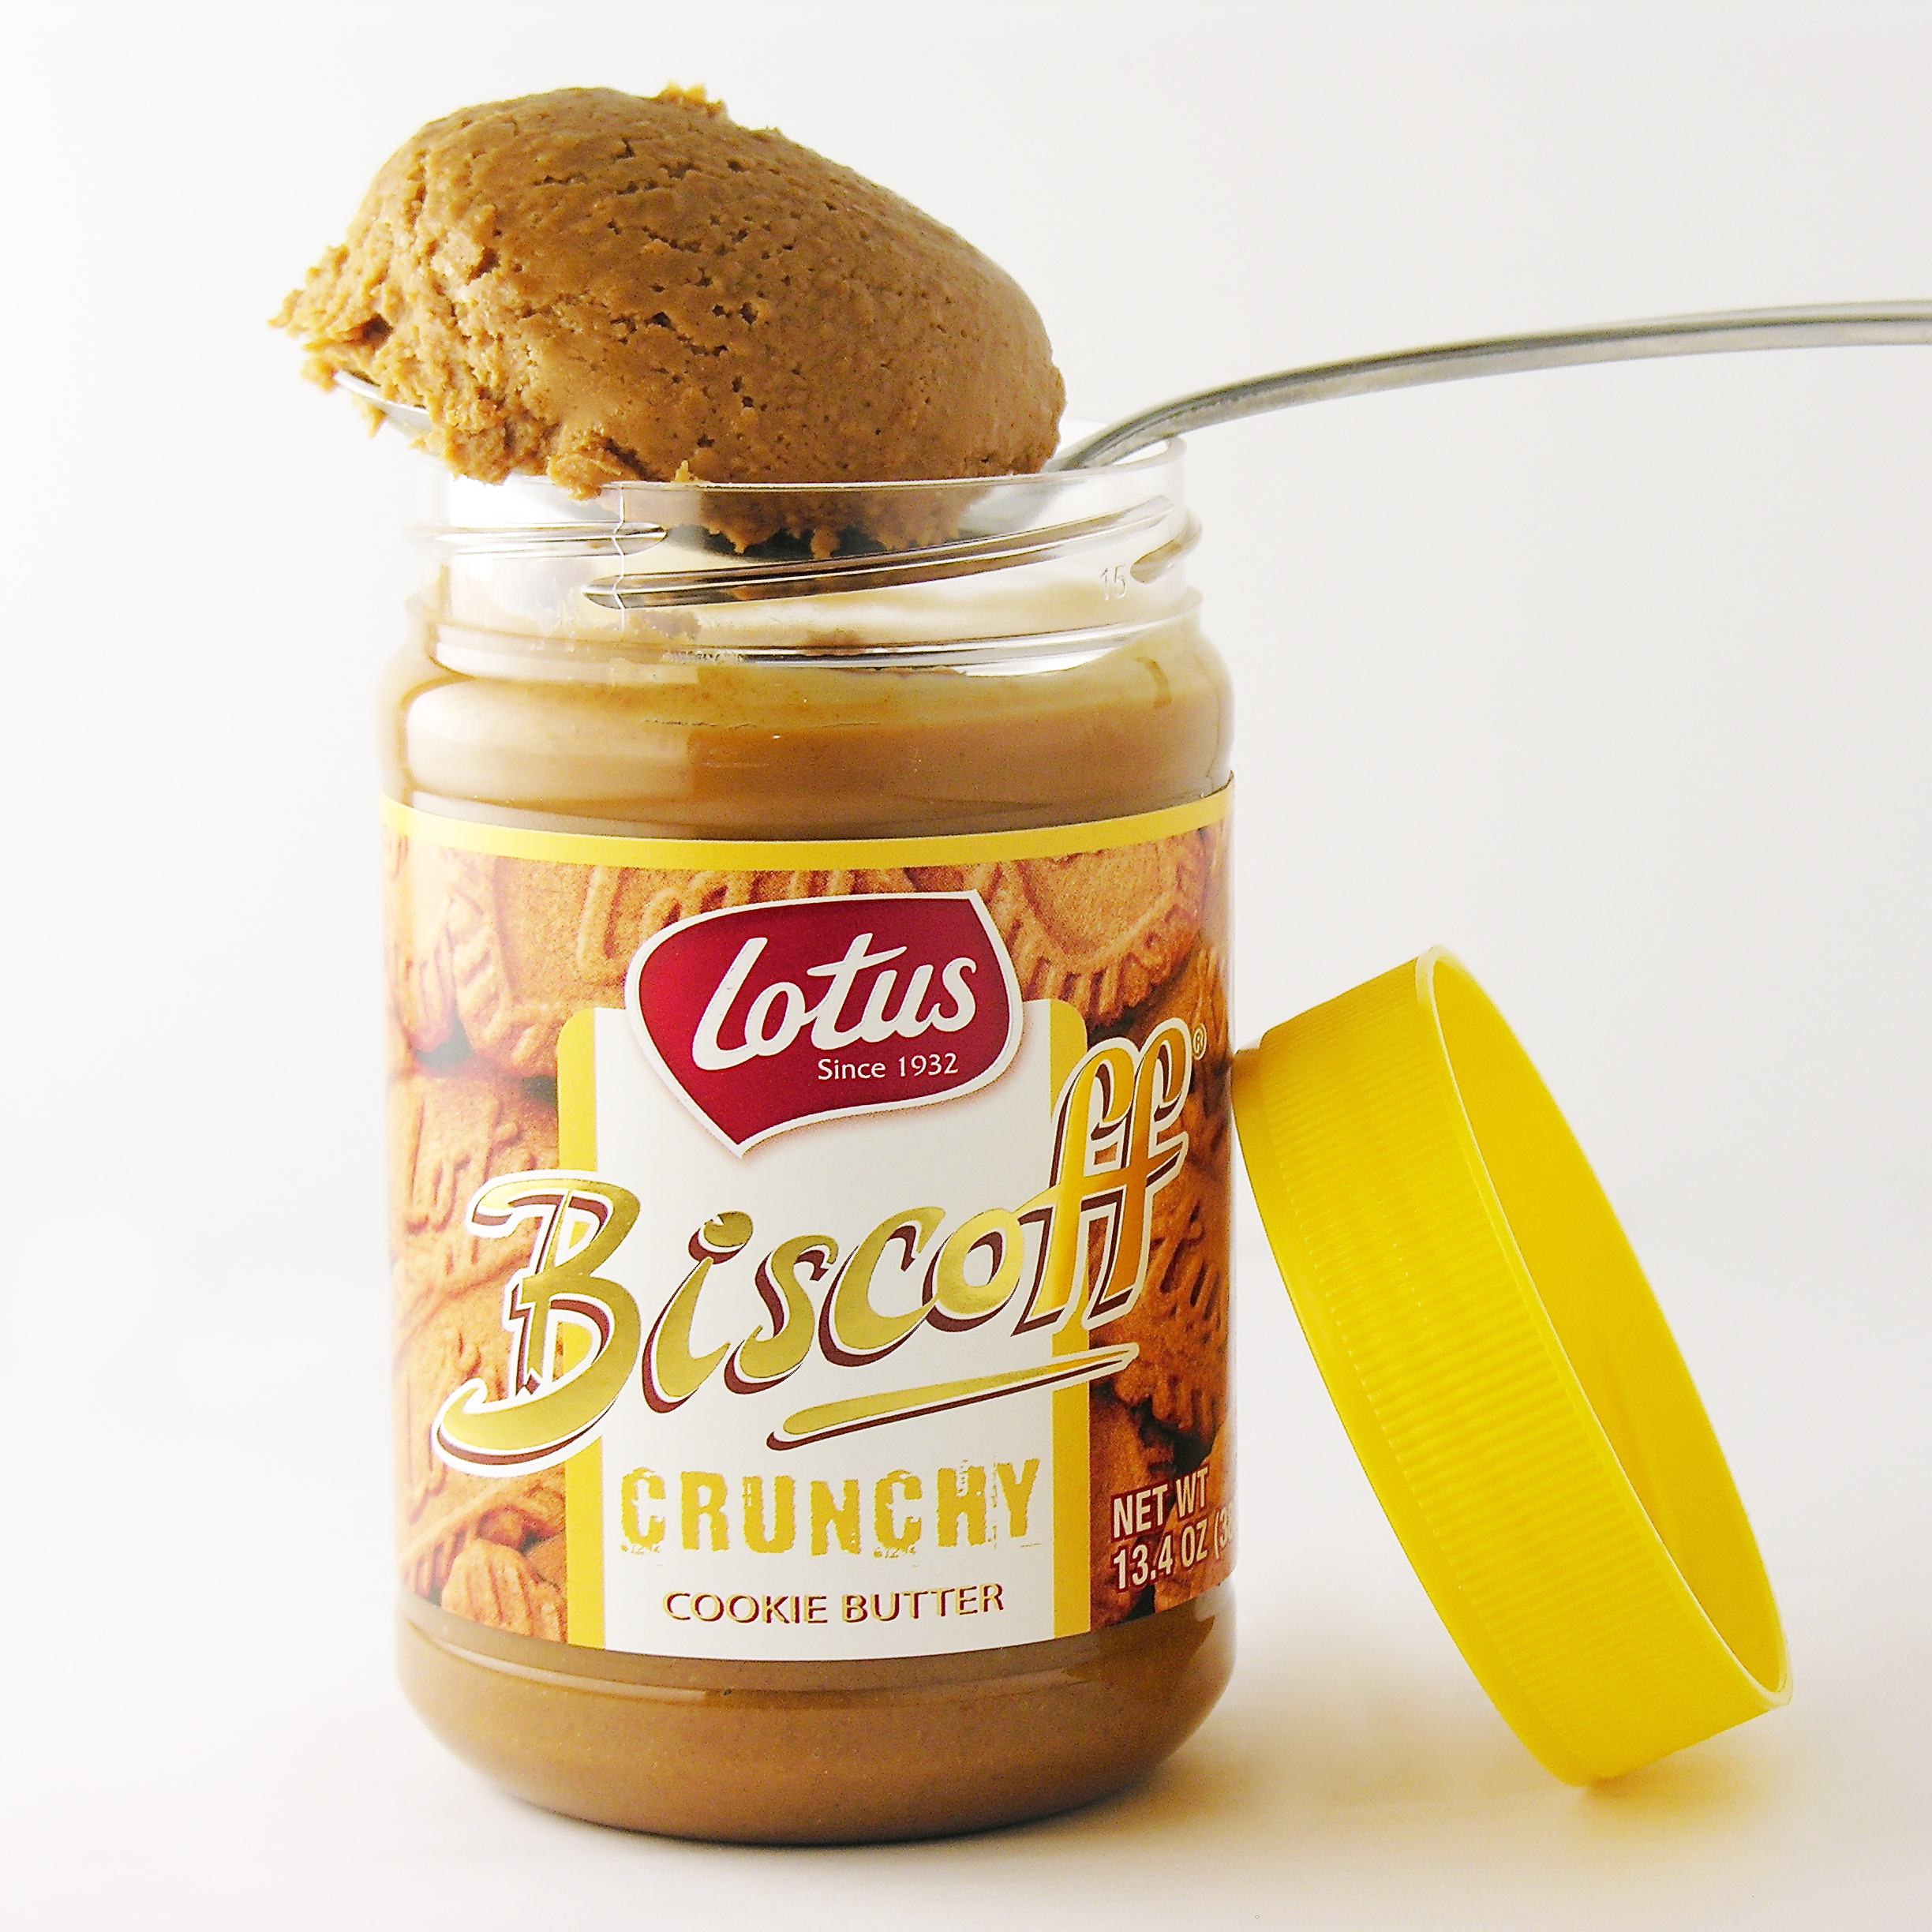
I may be out of the loop on things, but somehow I missed this whole craze over COOKIE BUTTER. When I was in the Czech Republic about a year ago, my friend Angie (the best gift-giver!) sent me home with a collection of European treats. Nestled in with the coffees and chocolates, there was this jar of “stuff” (all the labels were in Czech) and I wasn’t sure what to expect. I know that peanut butter is hard to find in Eastern and Central Europe- so I knew it wasn’t that- but it was close… it was butter- but not made out of peanuts..made out of COOKIES!!!!! Seriously. I fell in love.

Cookie Butter!

Then I found it at Wal Mart. Here. In Indiana. #smile!!!

So, I’ve been stuffing Oreo Thins with all sorts of things over the past few months. Marshmallows….Key Lime Pie…I can’t stop. I have A LOT more ideas. This is just one more. (Prepare yourself…)

Cookie butter stuffed Oreos

These are simply….delicious. I shouldn’t have been surprised that adding cookie butter to Oreos would create such a yummy combination- but I was. The combination is such a unique flavor- and I’m not kidding you- unbelievably good!

Plus they are SUPER easy to make.

Here’s how we did it: (printable recipe available here)

INGREDIENTS: (makes about 25 cookies)

  • One box of Oreo Thins Chocolate cookies
  • One jar of crunchy cookie butter (I’ve loved every brand I have tried, but I used Lotus for these)
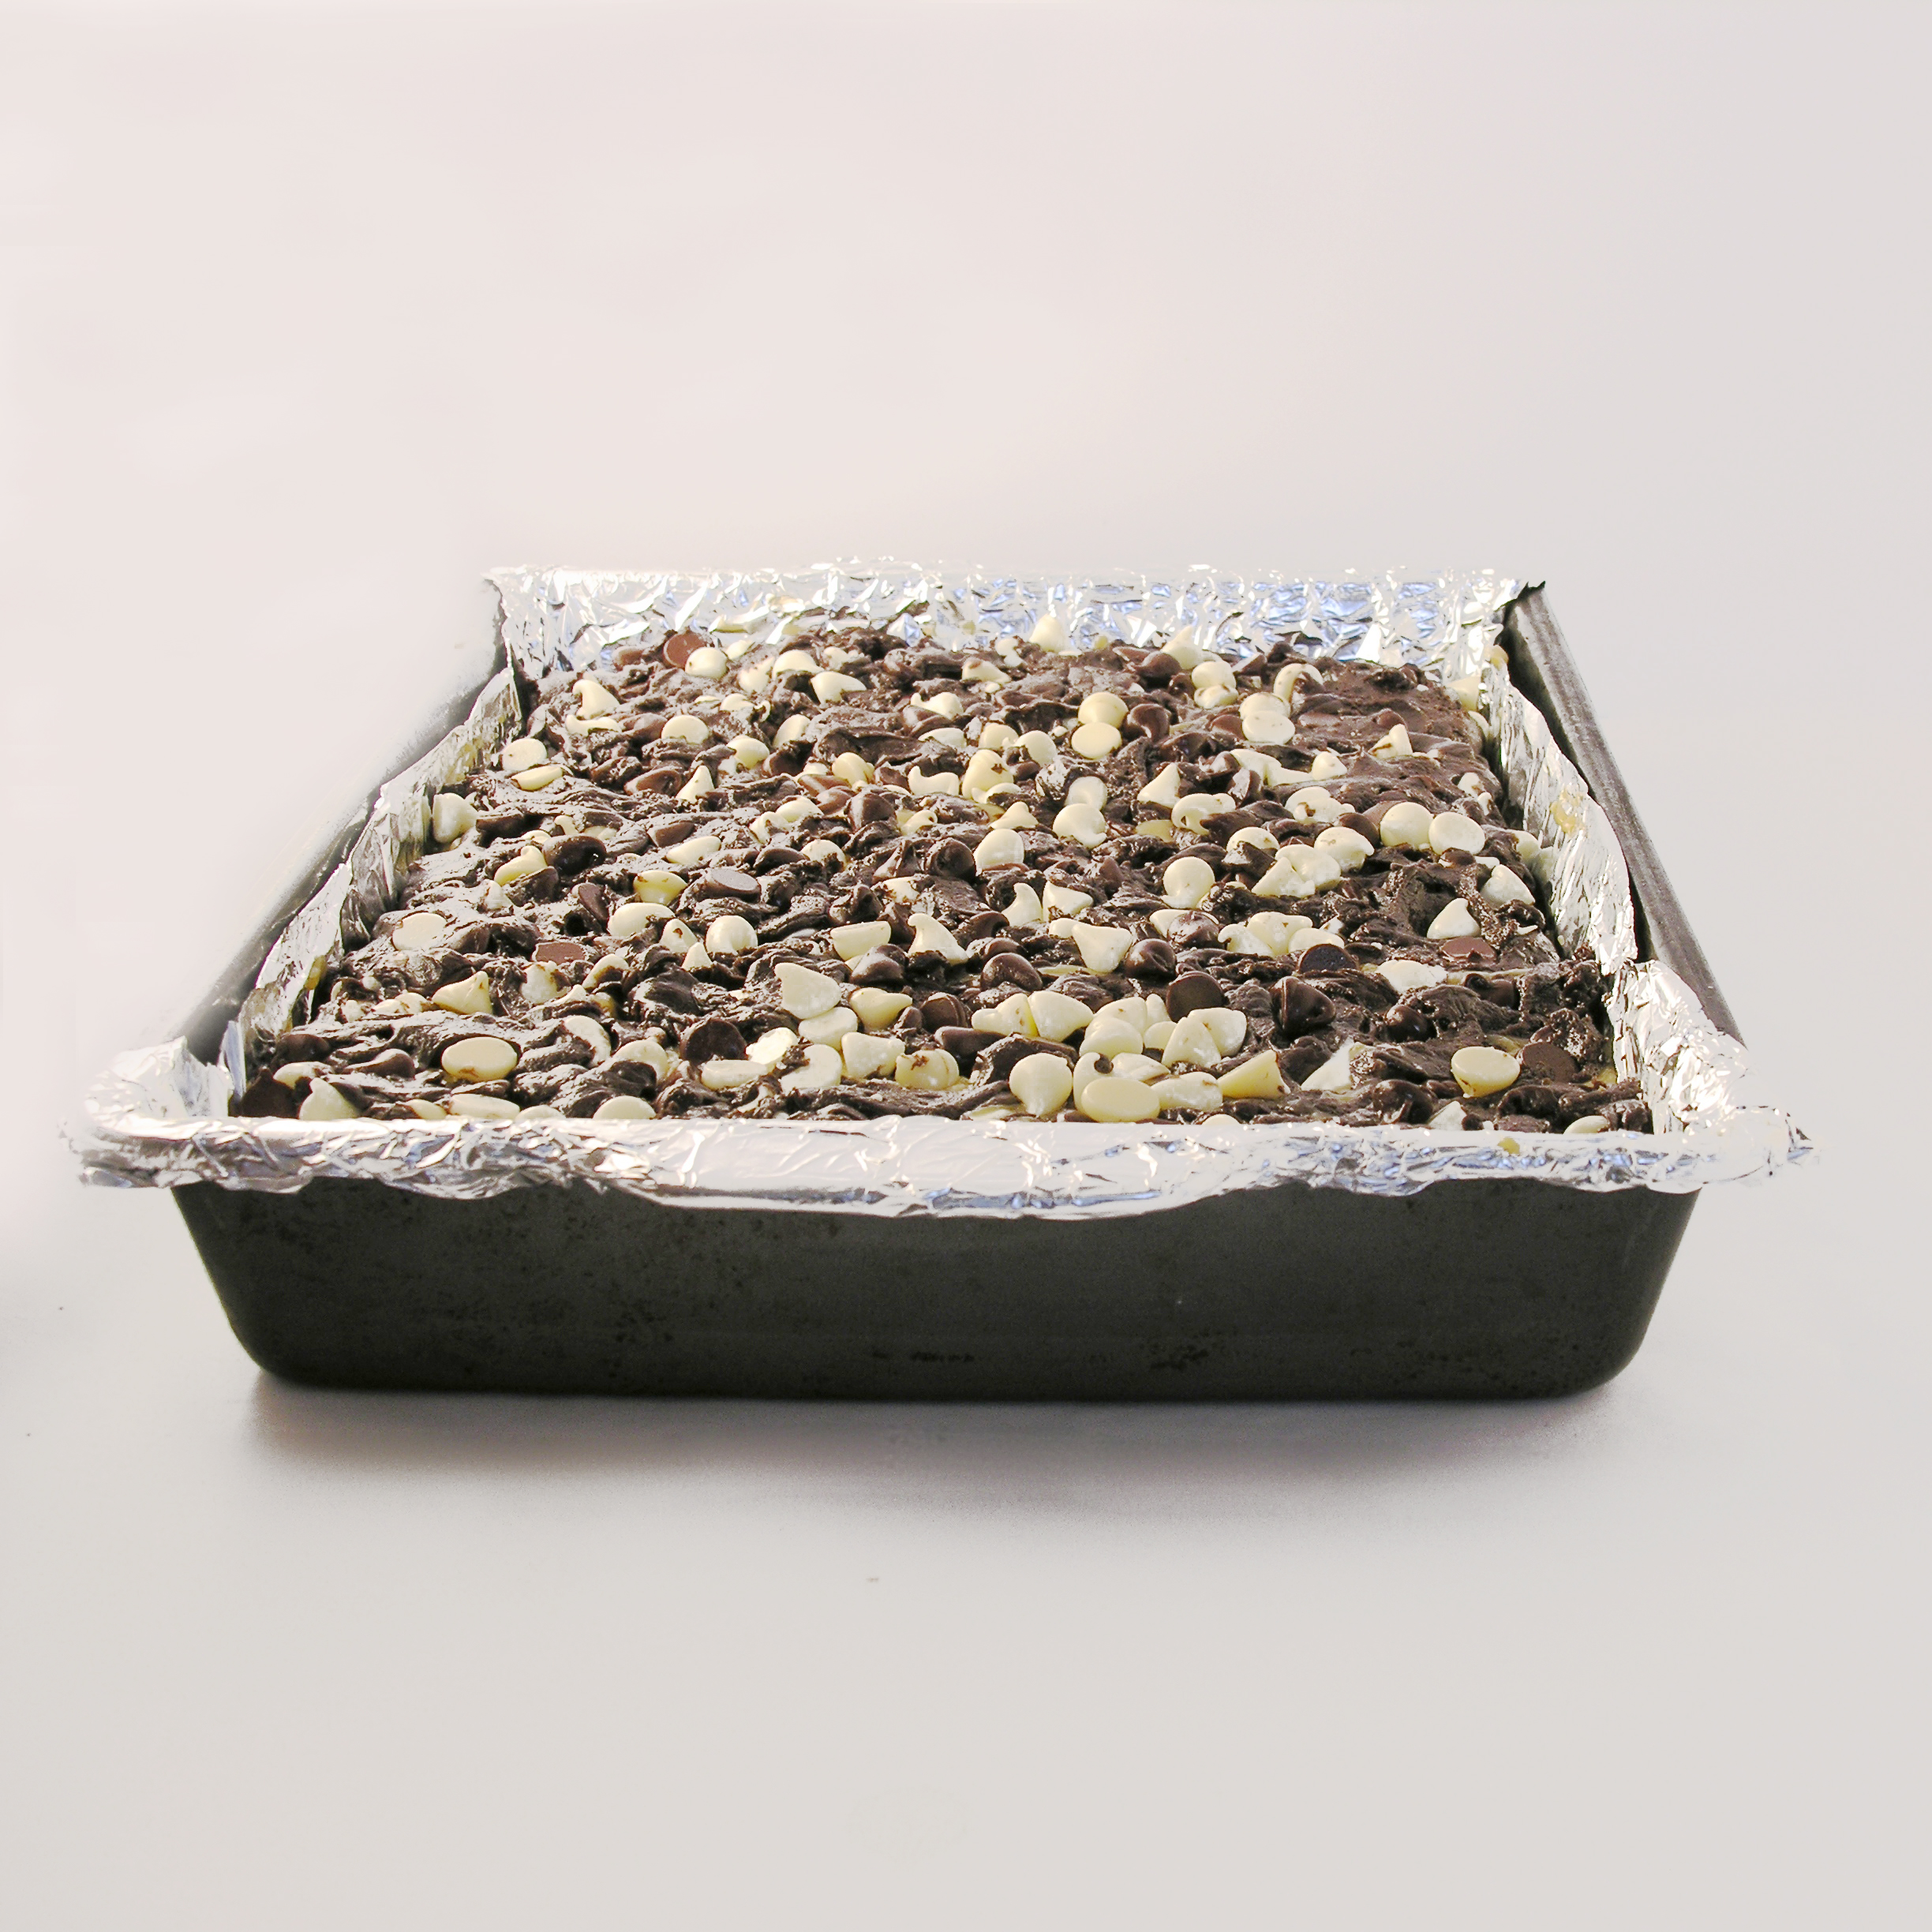
  • One cup of mini chocolate chips
  • One and 1/2 bags of Wilton’s Candy melts in dark chocolate
  • A little bit of milk chocolate candy melts to make stripes on top (or any sort of sprinkles you’d like to add to make these for any season!)

DIRECTIONS:

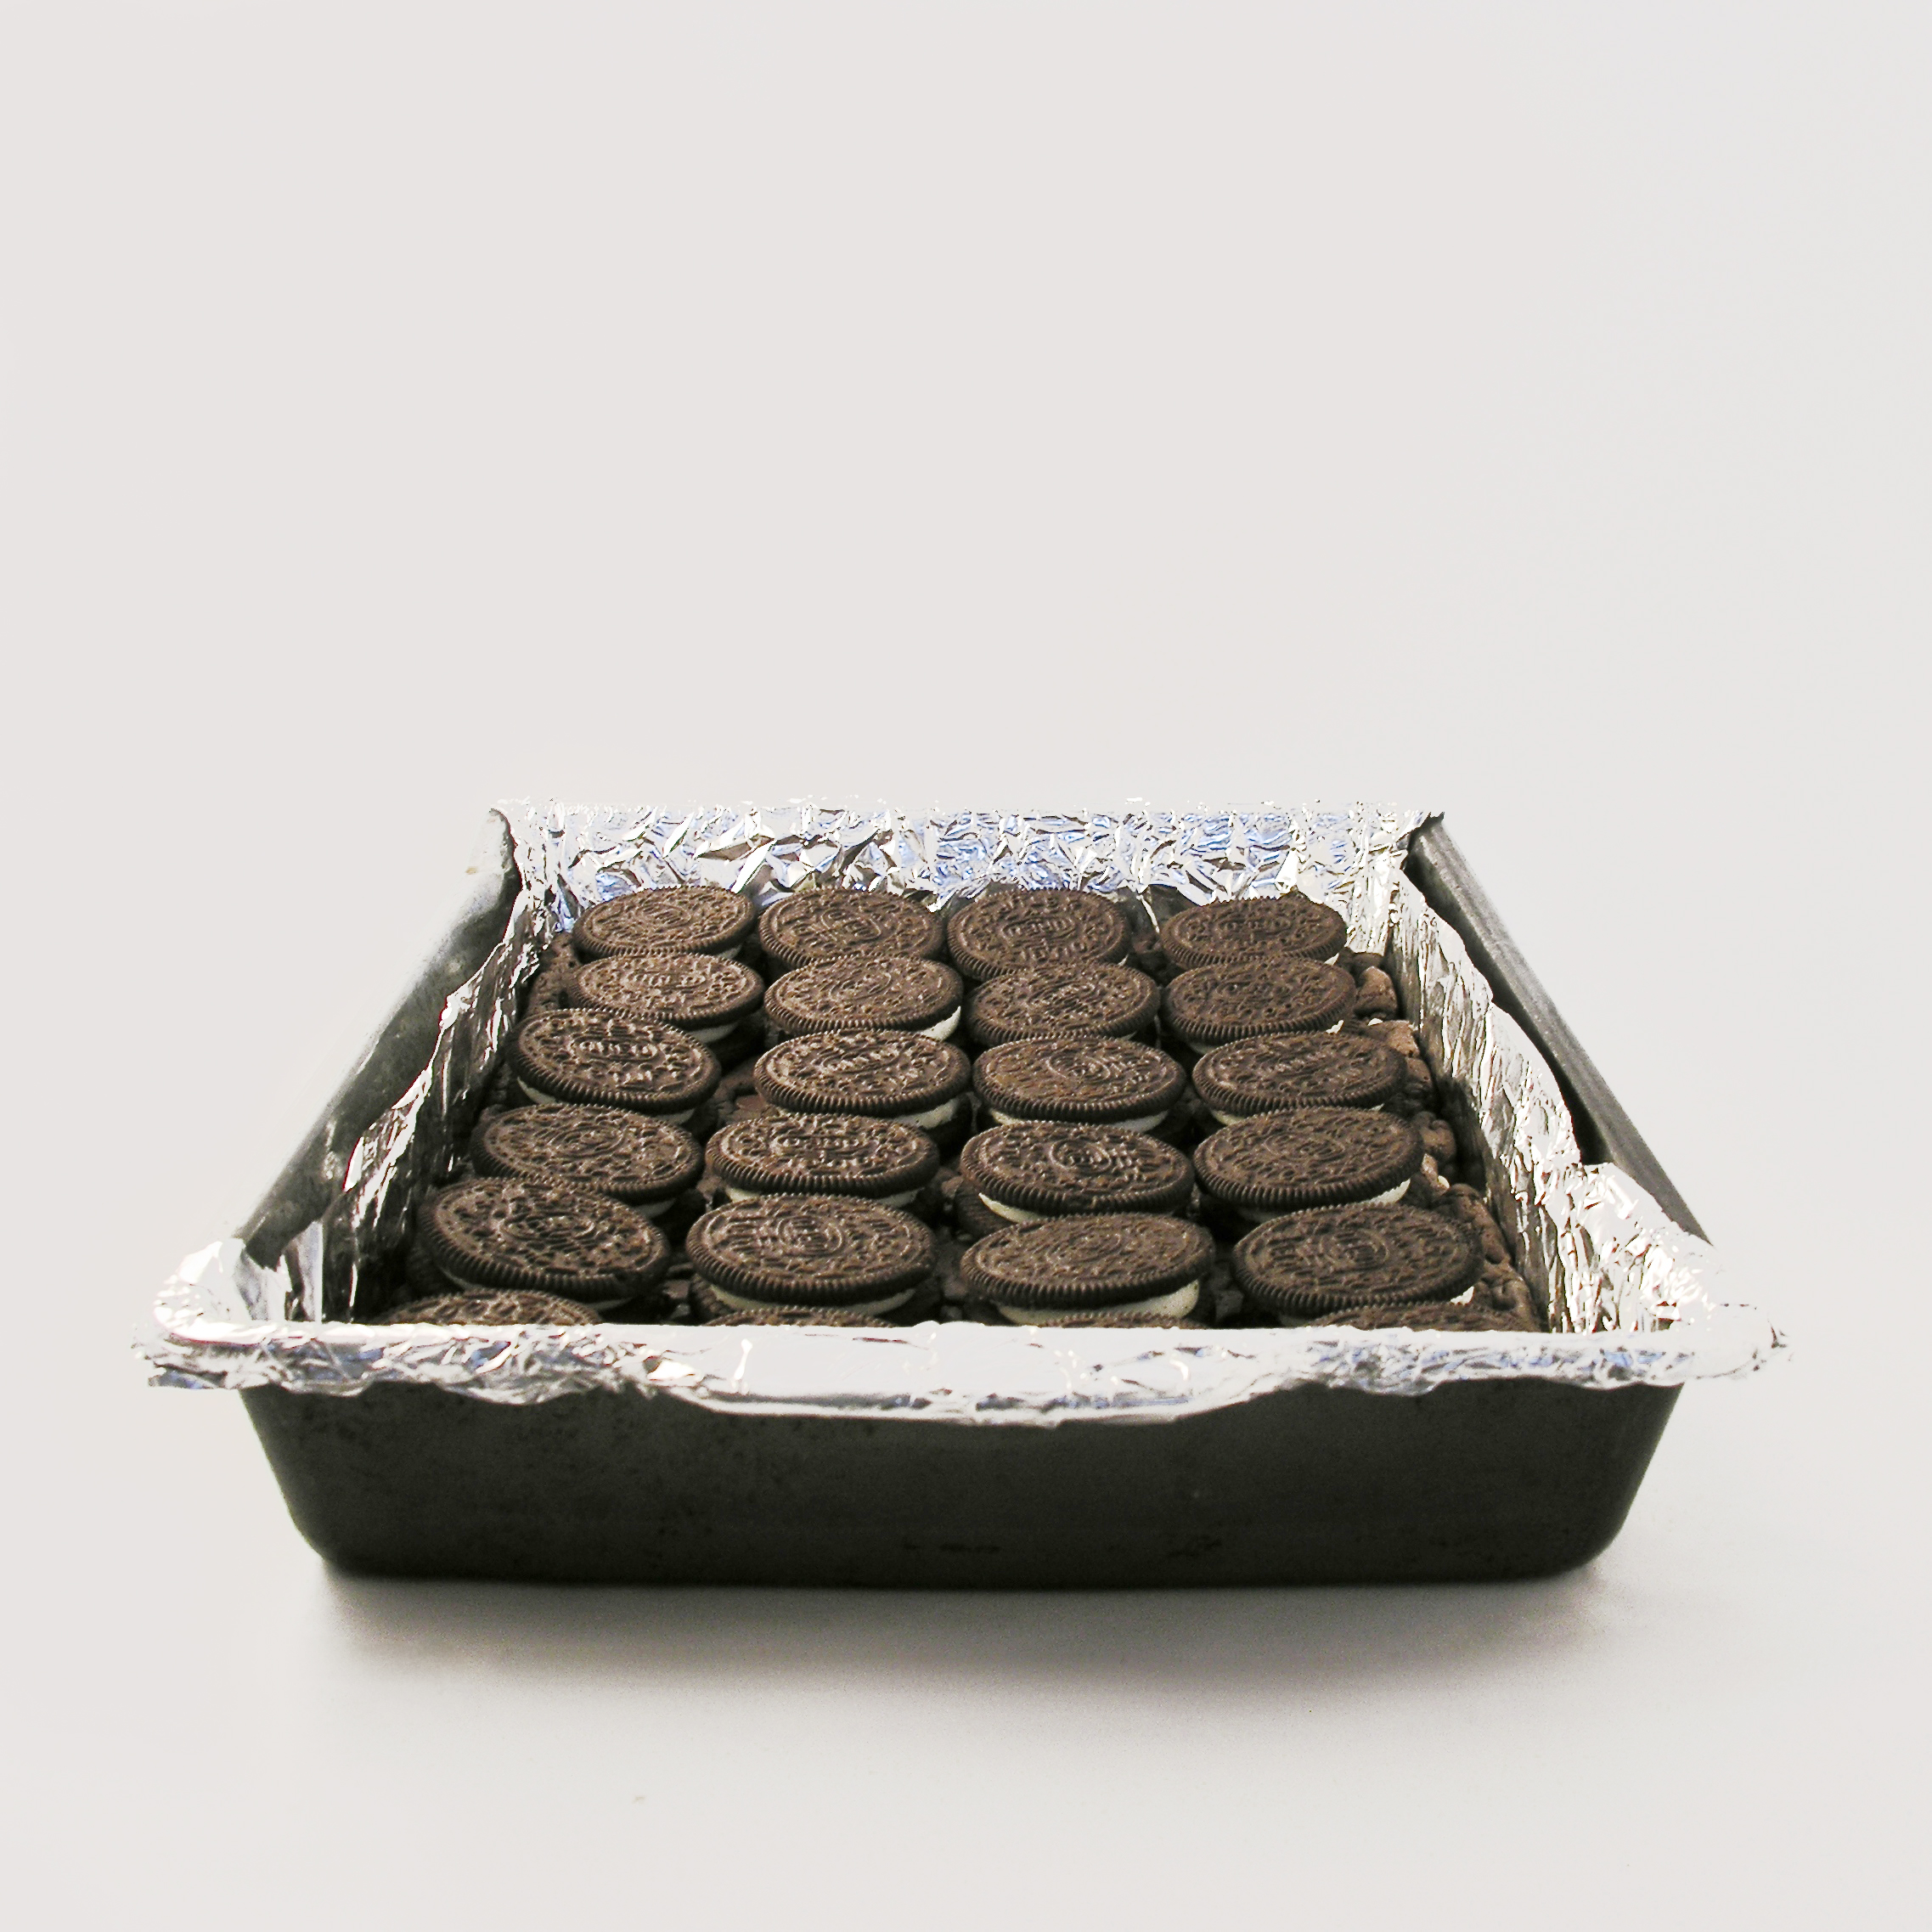
  • Set half of Oreo cookies on a small tray or sheet that will fit in your freezer.
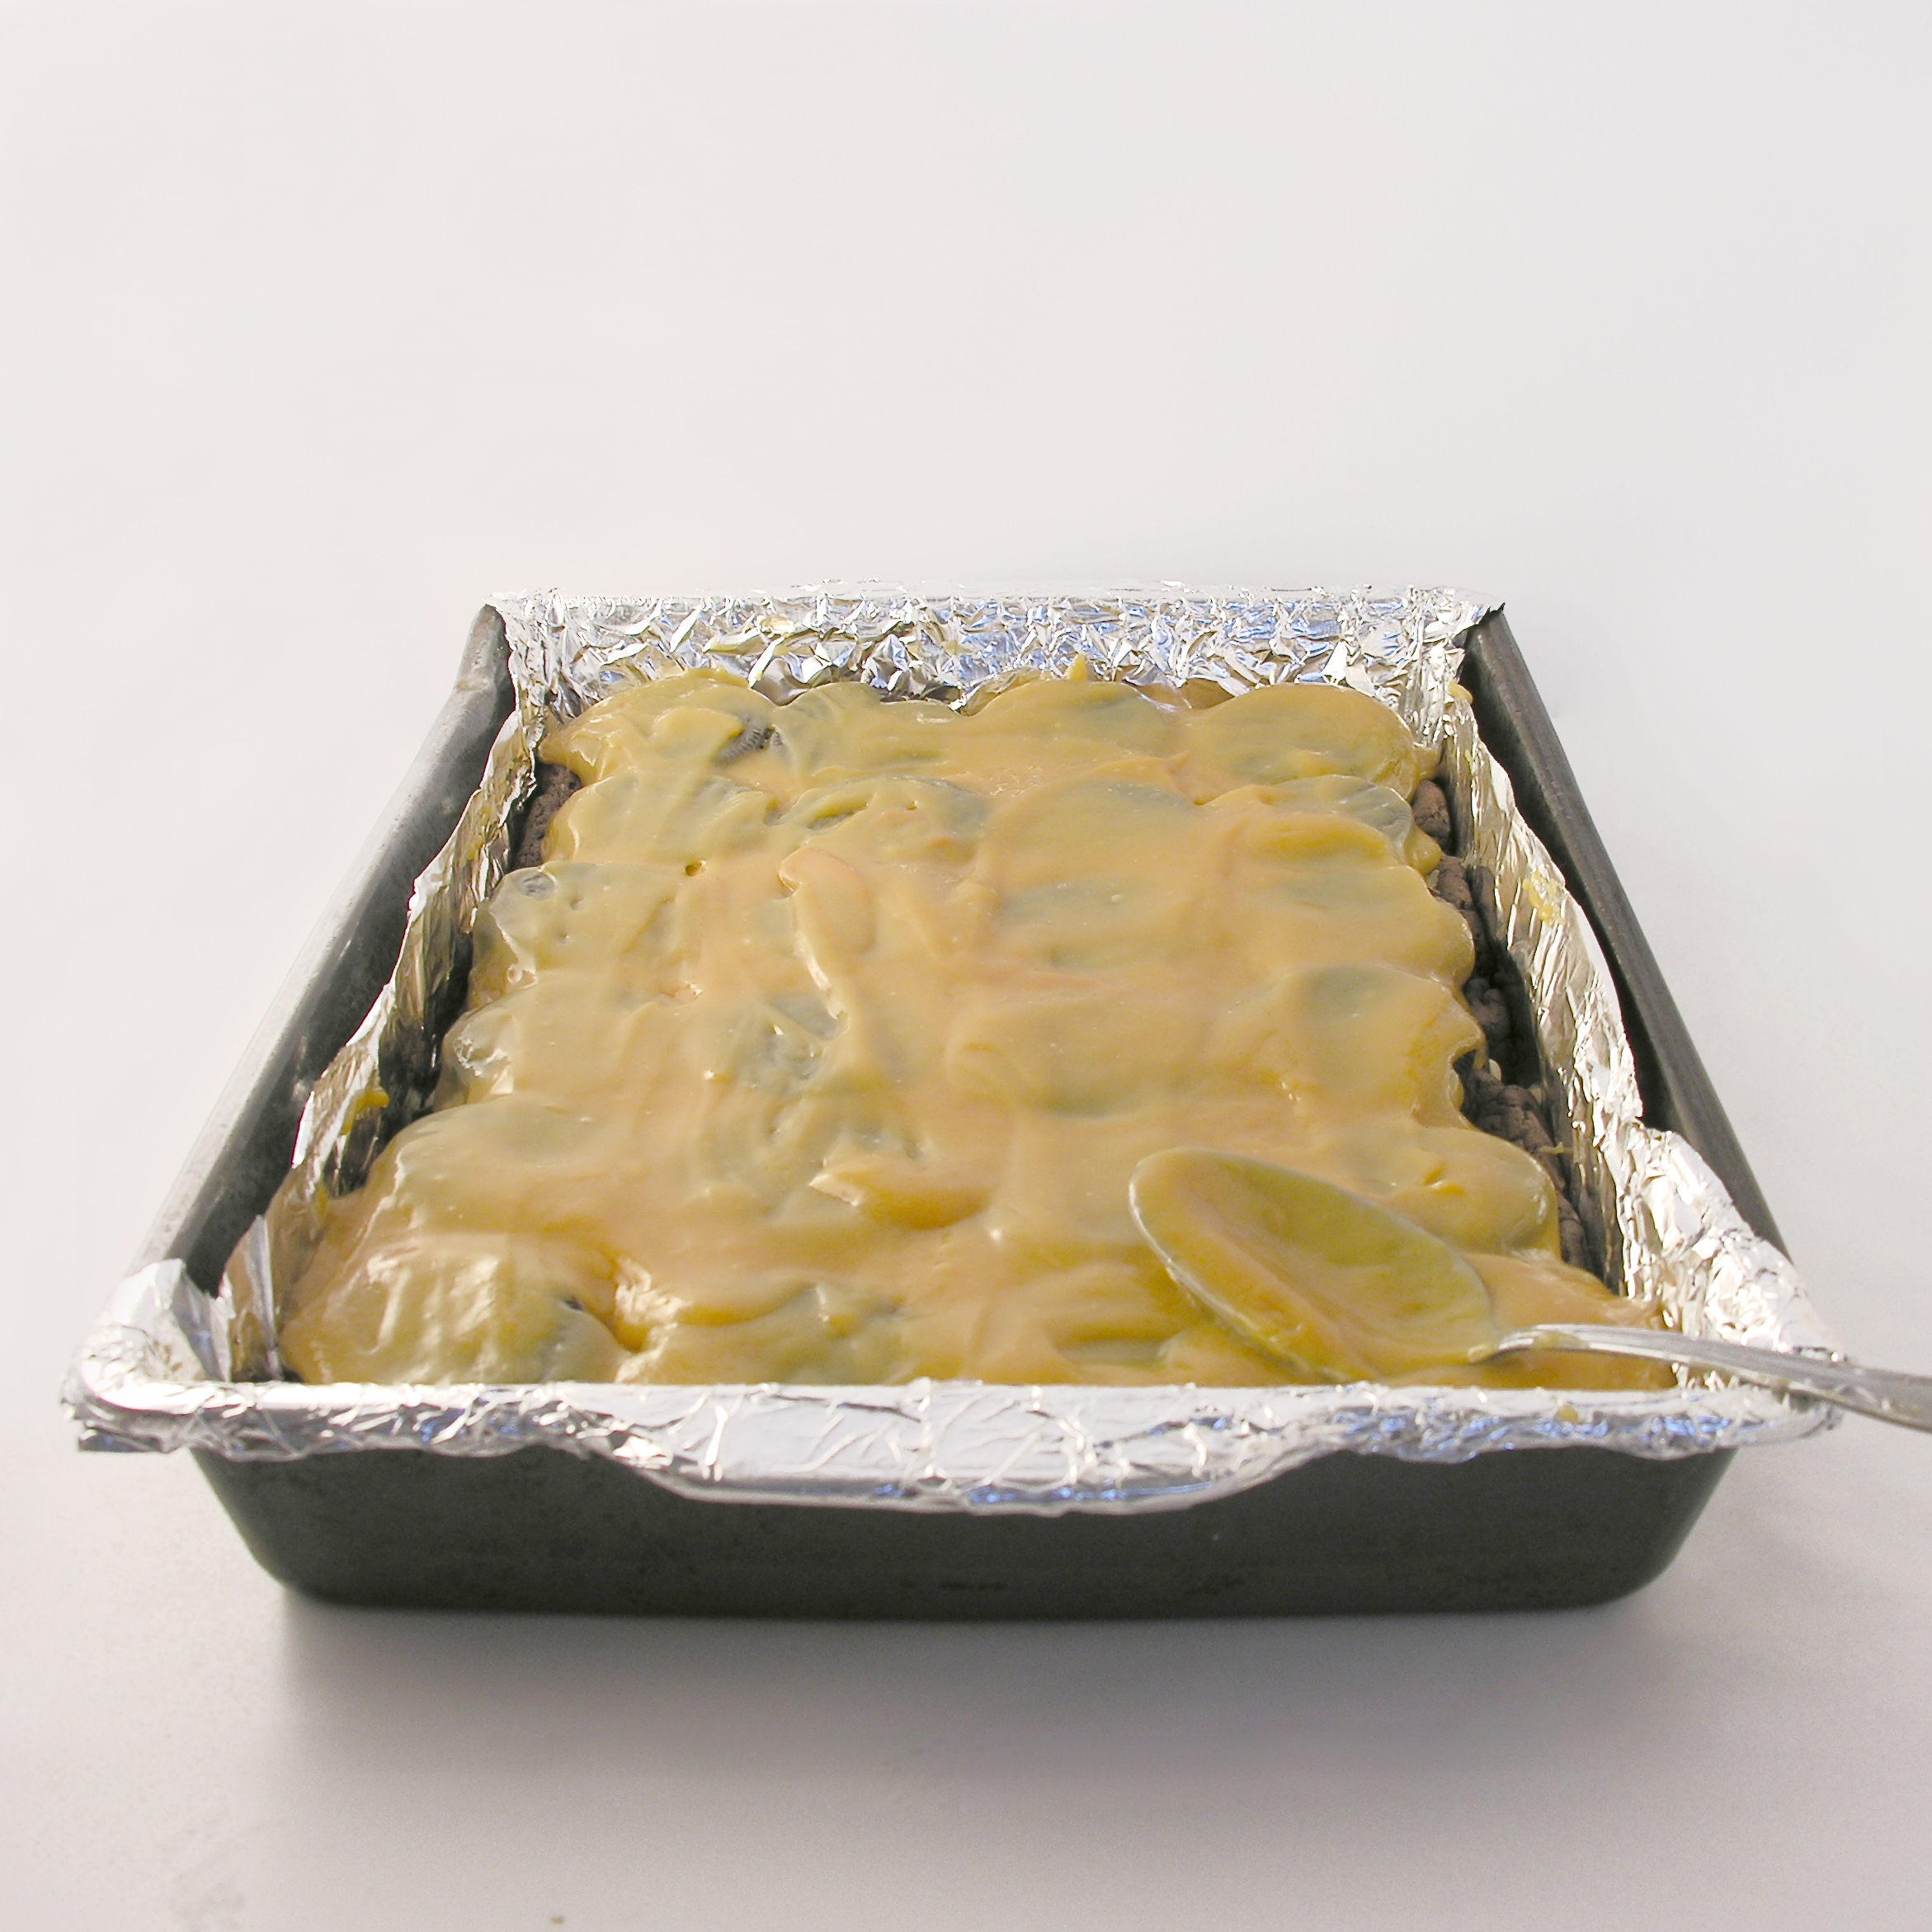
  • Mix jar of cookie butter and mini chips in a small bowl.
  • Scoop or spoon cookie butter on top of each Oreo and press a second Oreo on top to make a sandwich.

Cookie butter on Oreo Thins

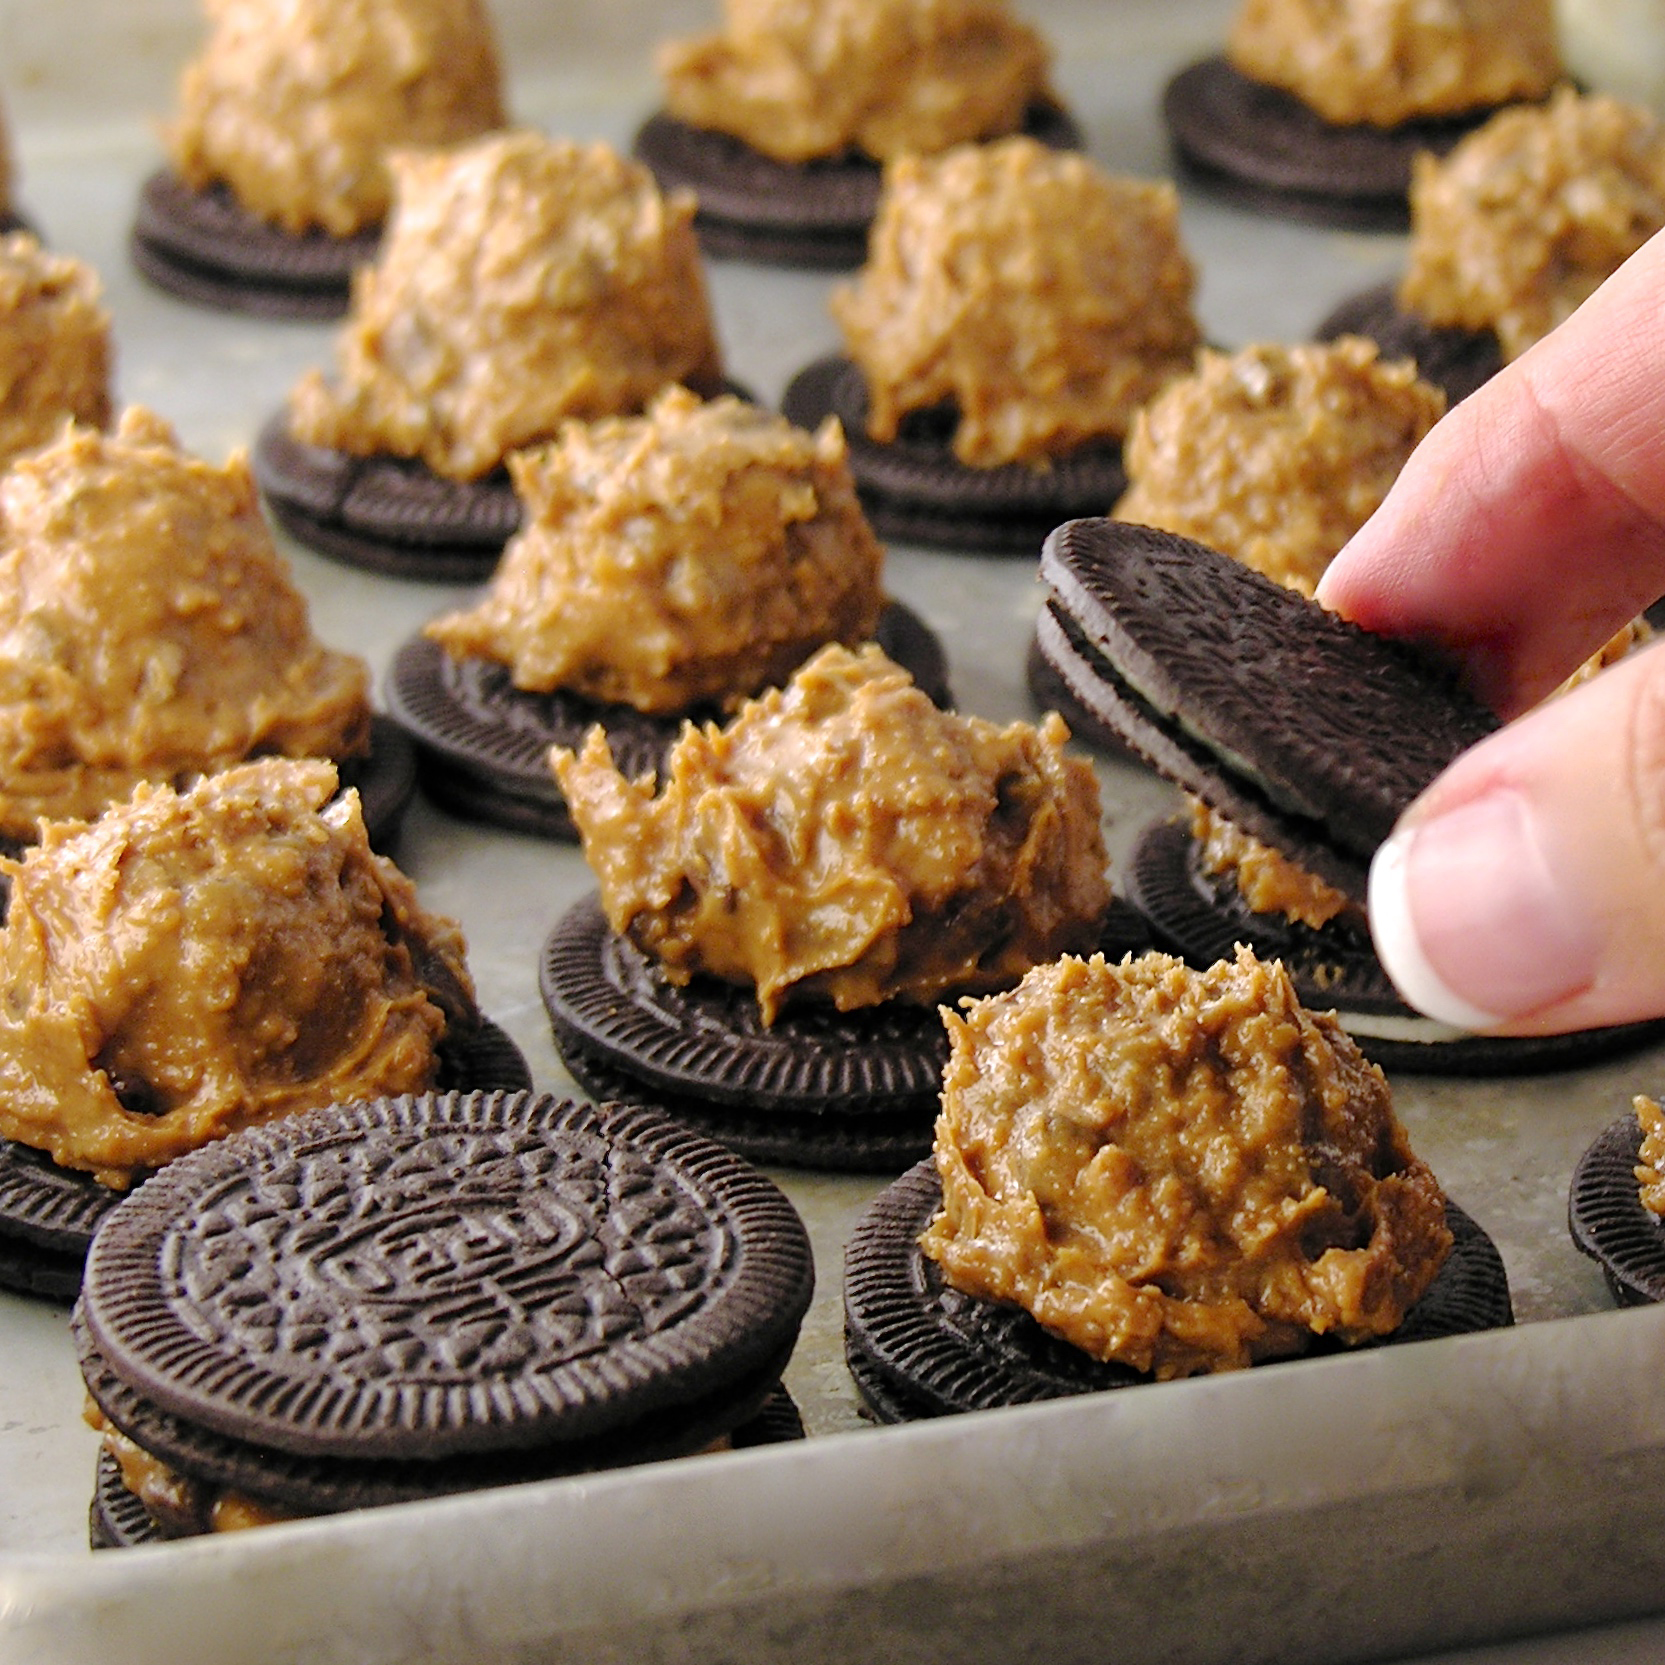
  • Freeze for about 30 minutes.
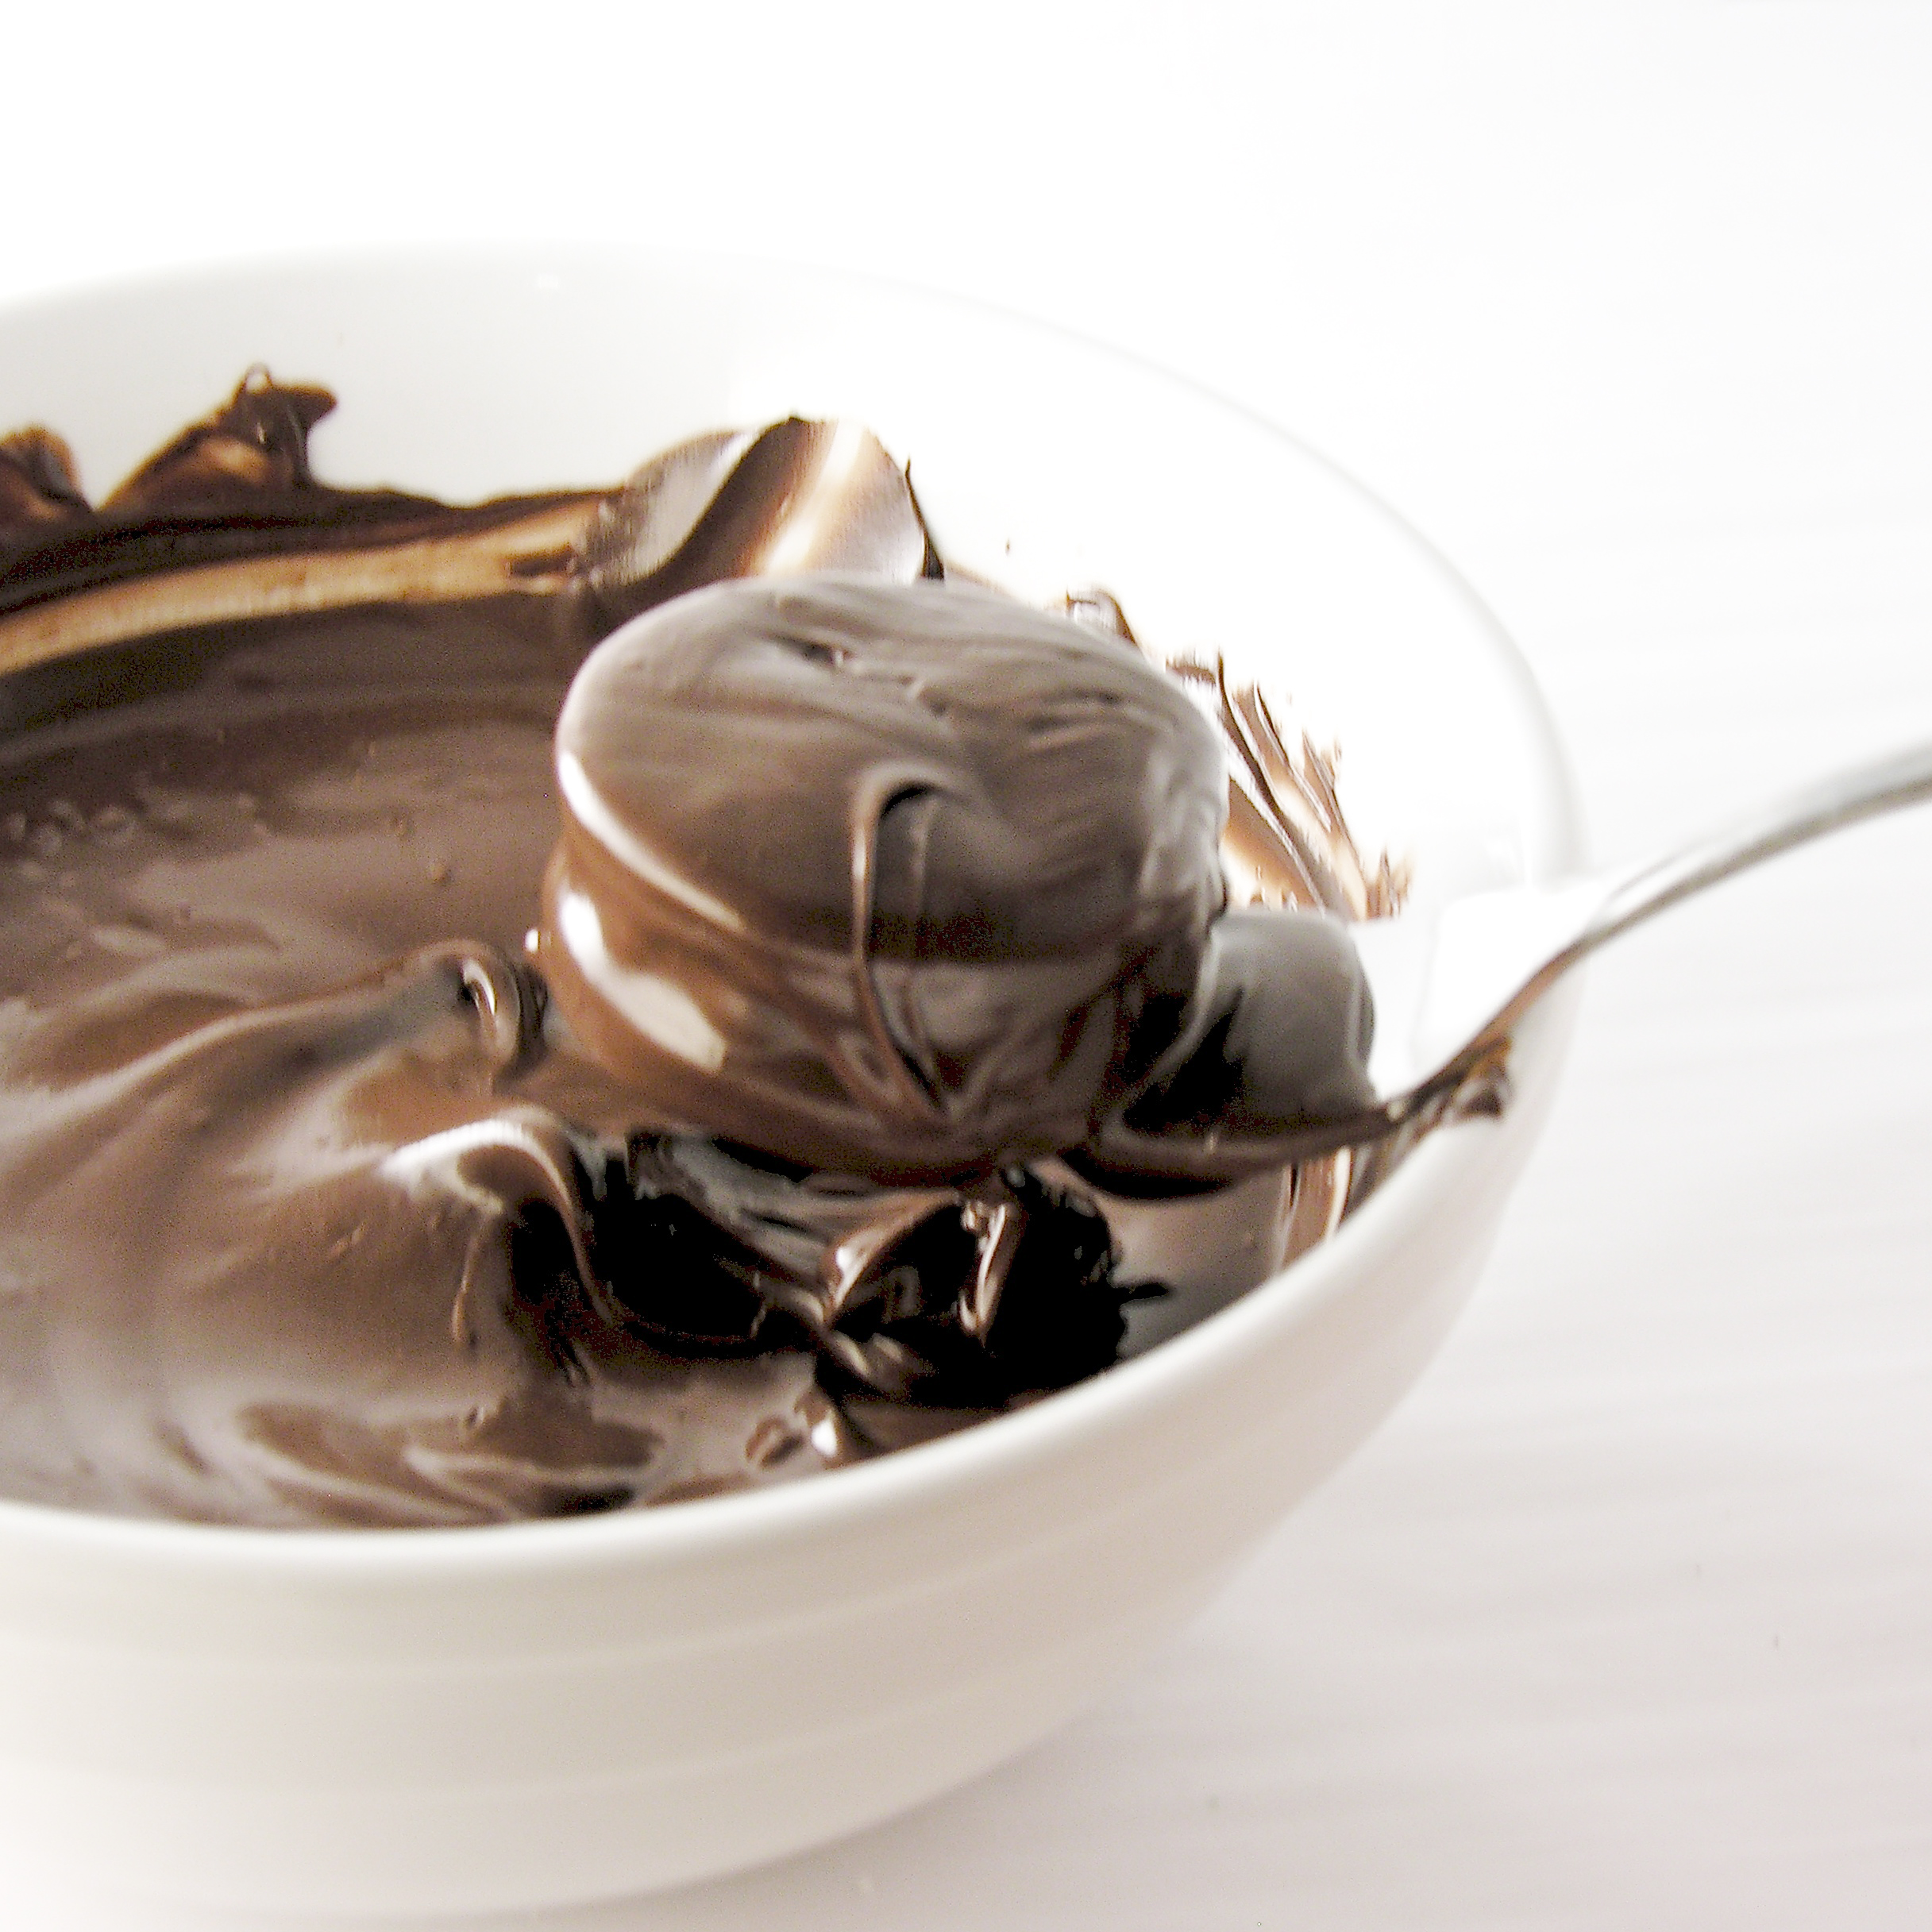
  • Melt Candy Melts in microwave, in 30 second increments, stirring in between, until melted and smooth.
  • Take 3 or 4 cookies at a time out of freezer and carefully dip in melted chocolate, using a fork to tap excess chocolate off and sliding the bottom of the cookie along the edge of the bowl to remove excess from the bottom. 

Oreo Thins dipped in chocolateOreo Thins dipped in chocolate

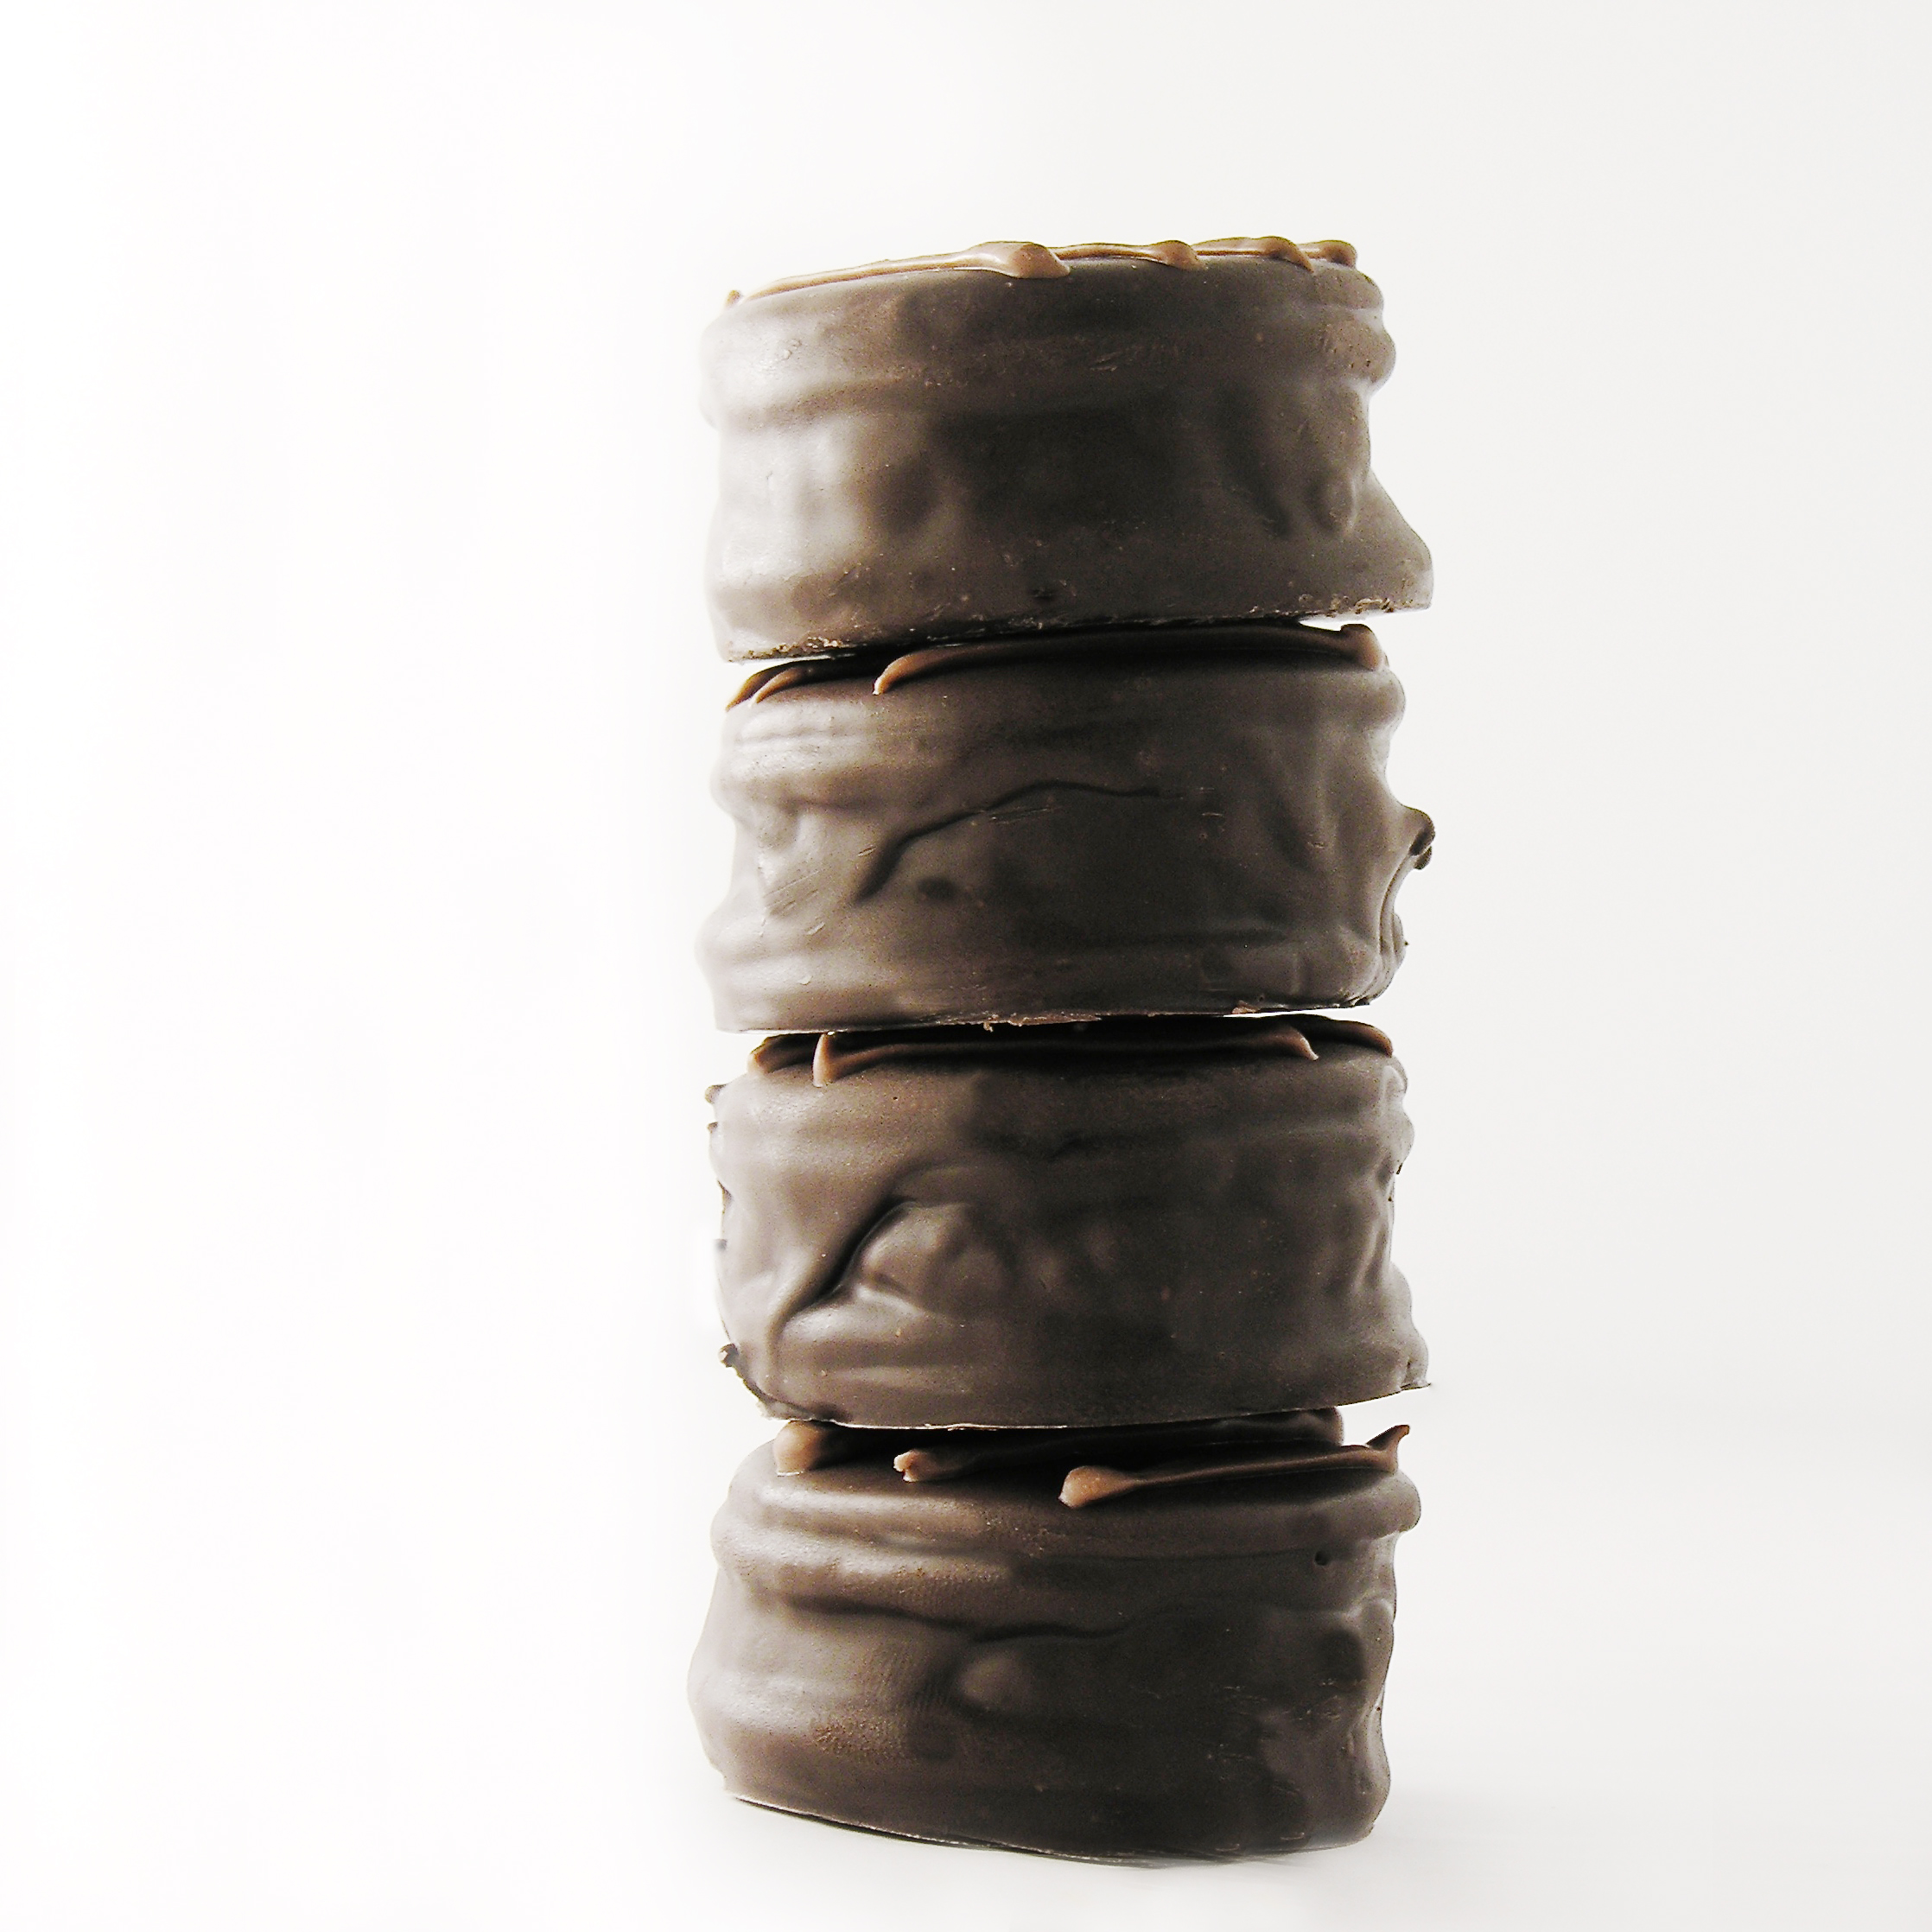
  • Set on parchment paper to harden.
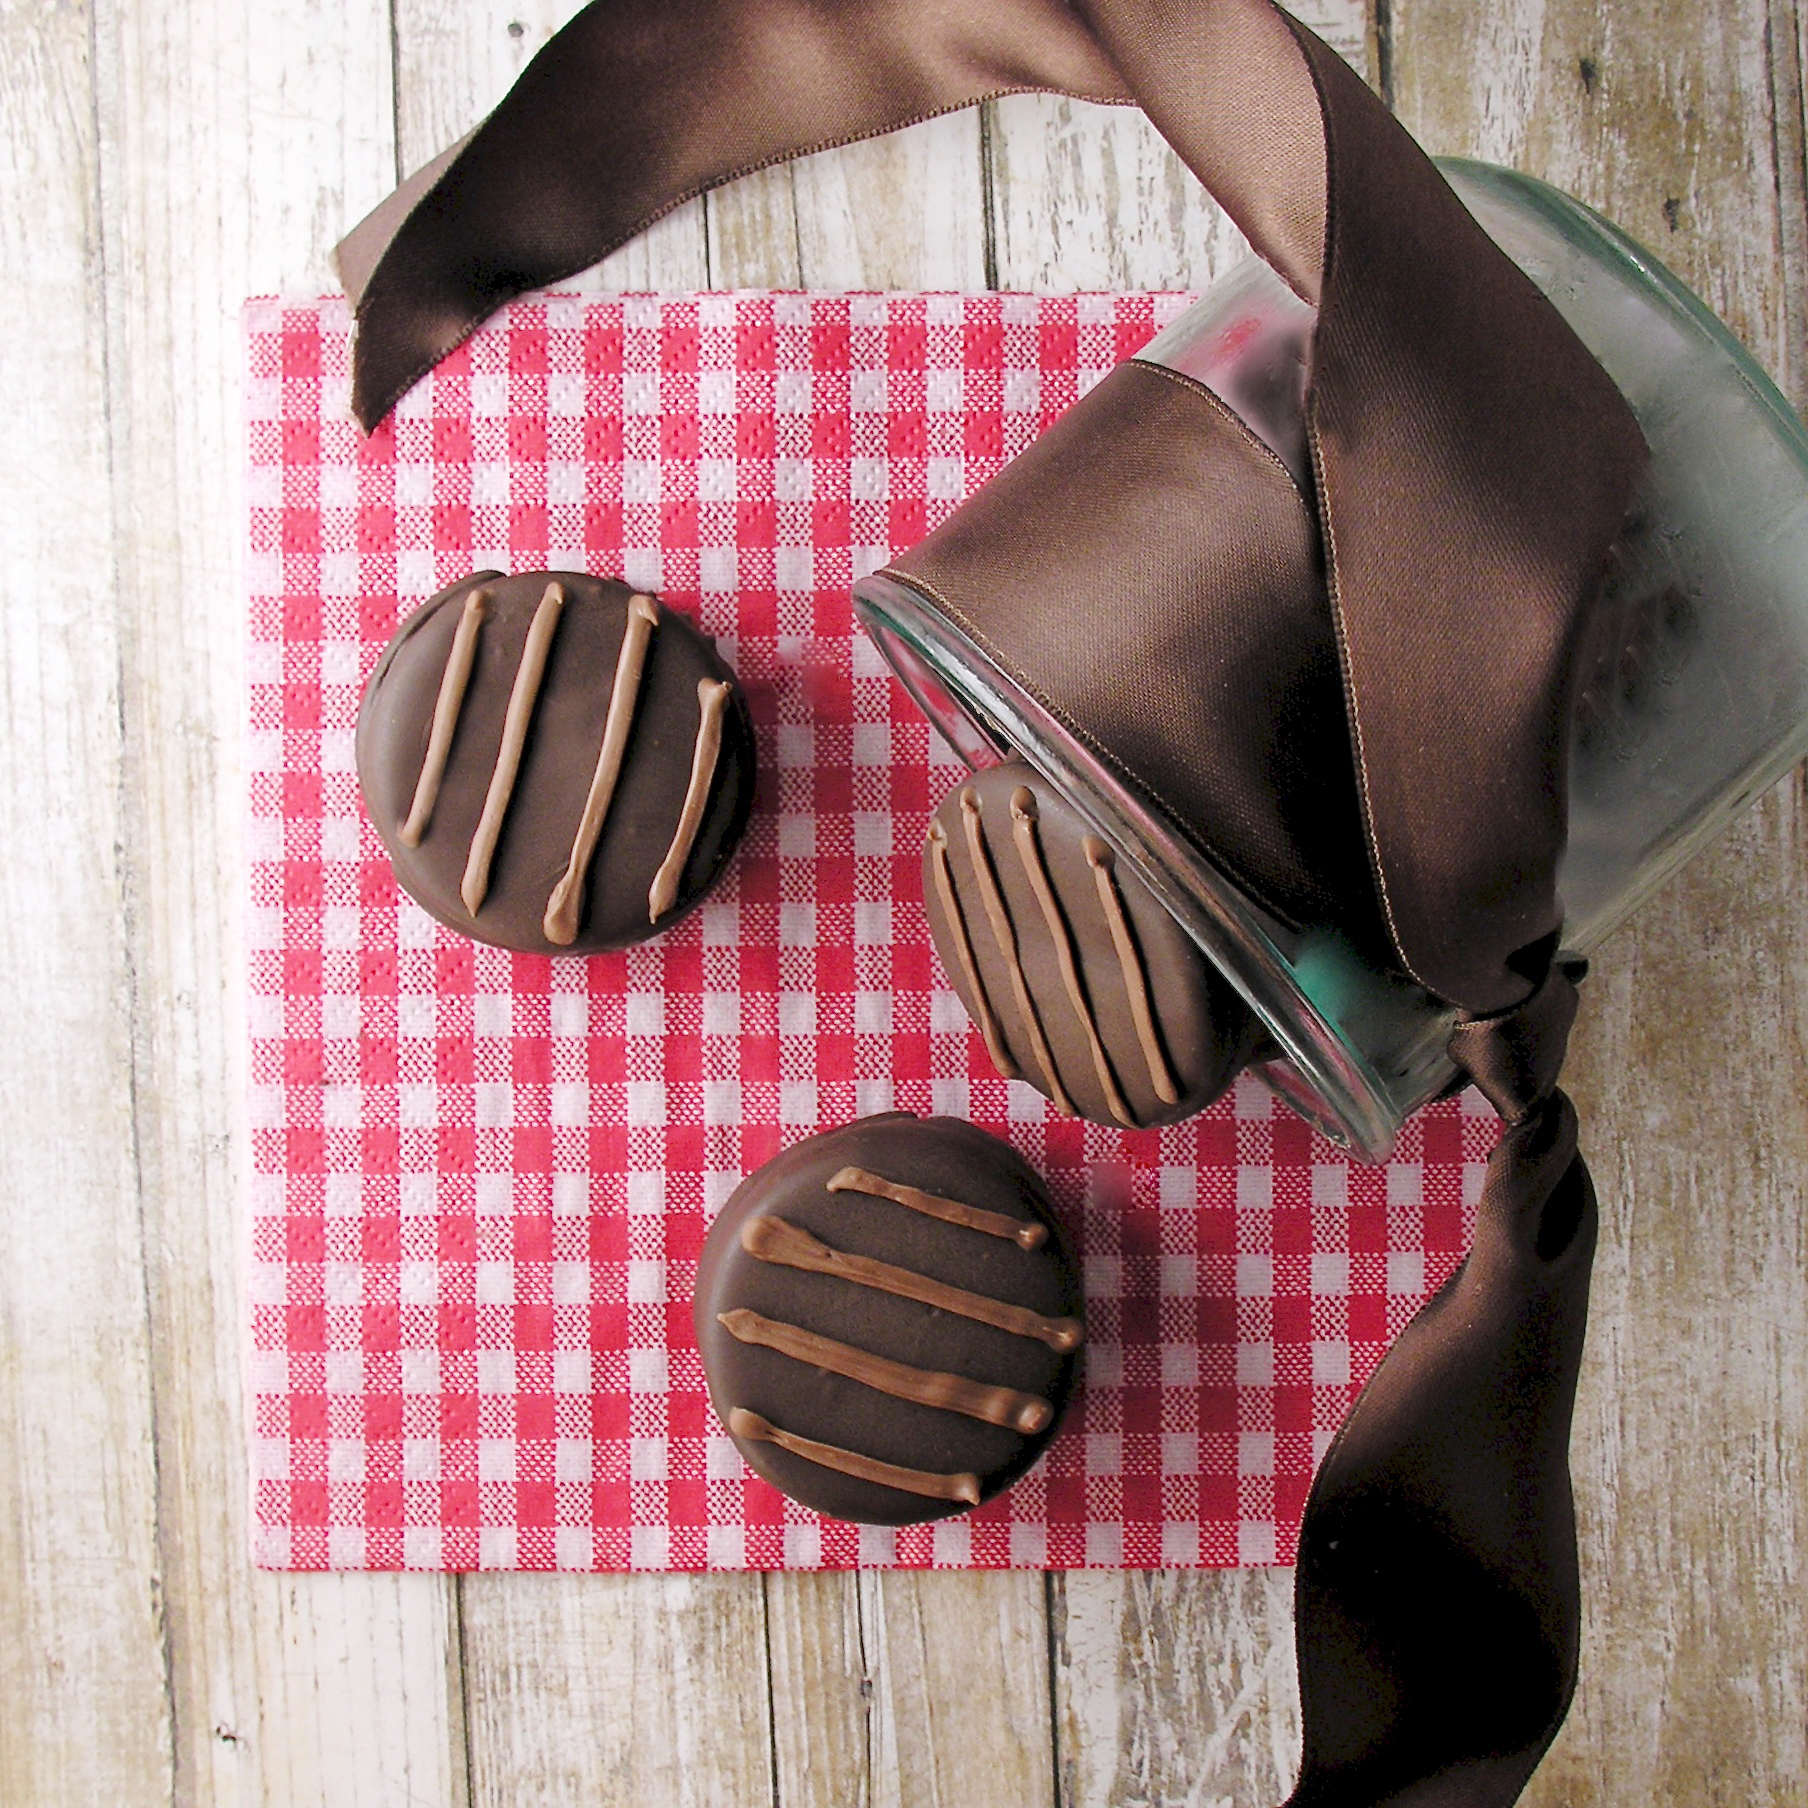
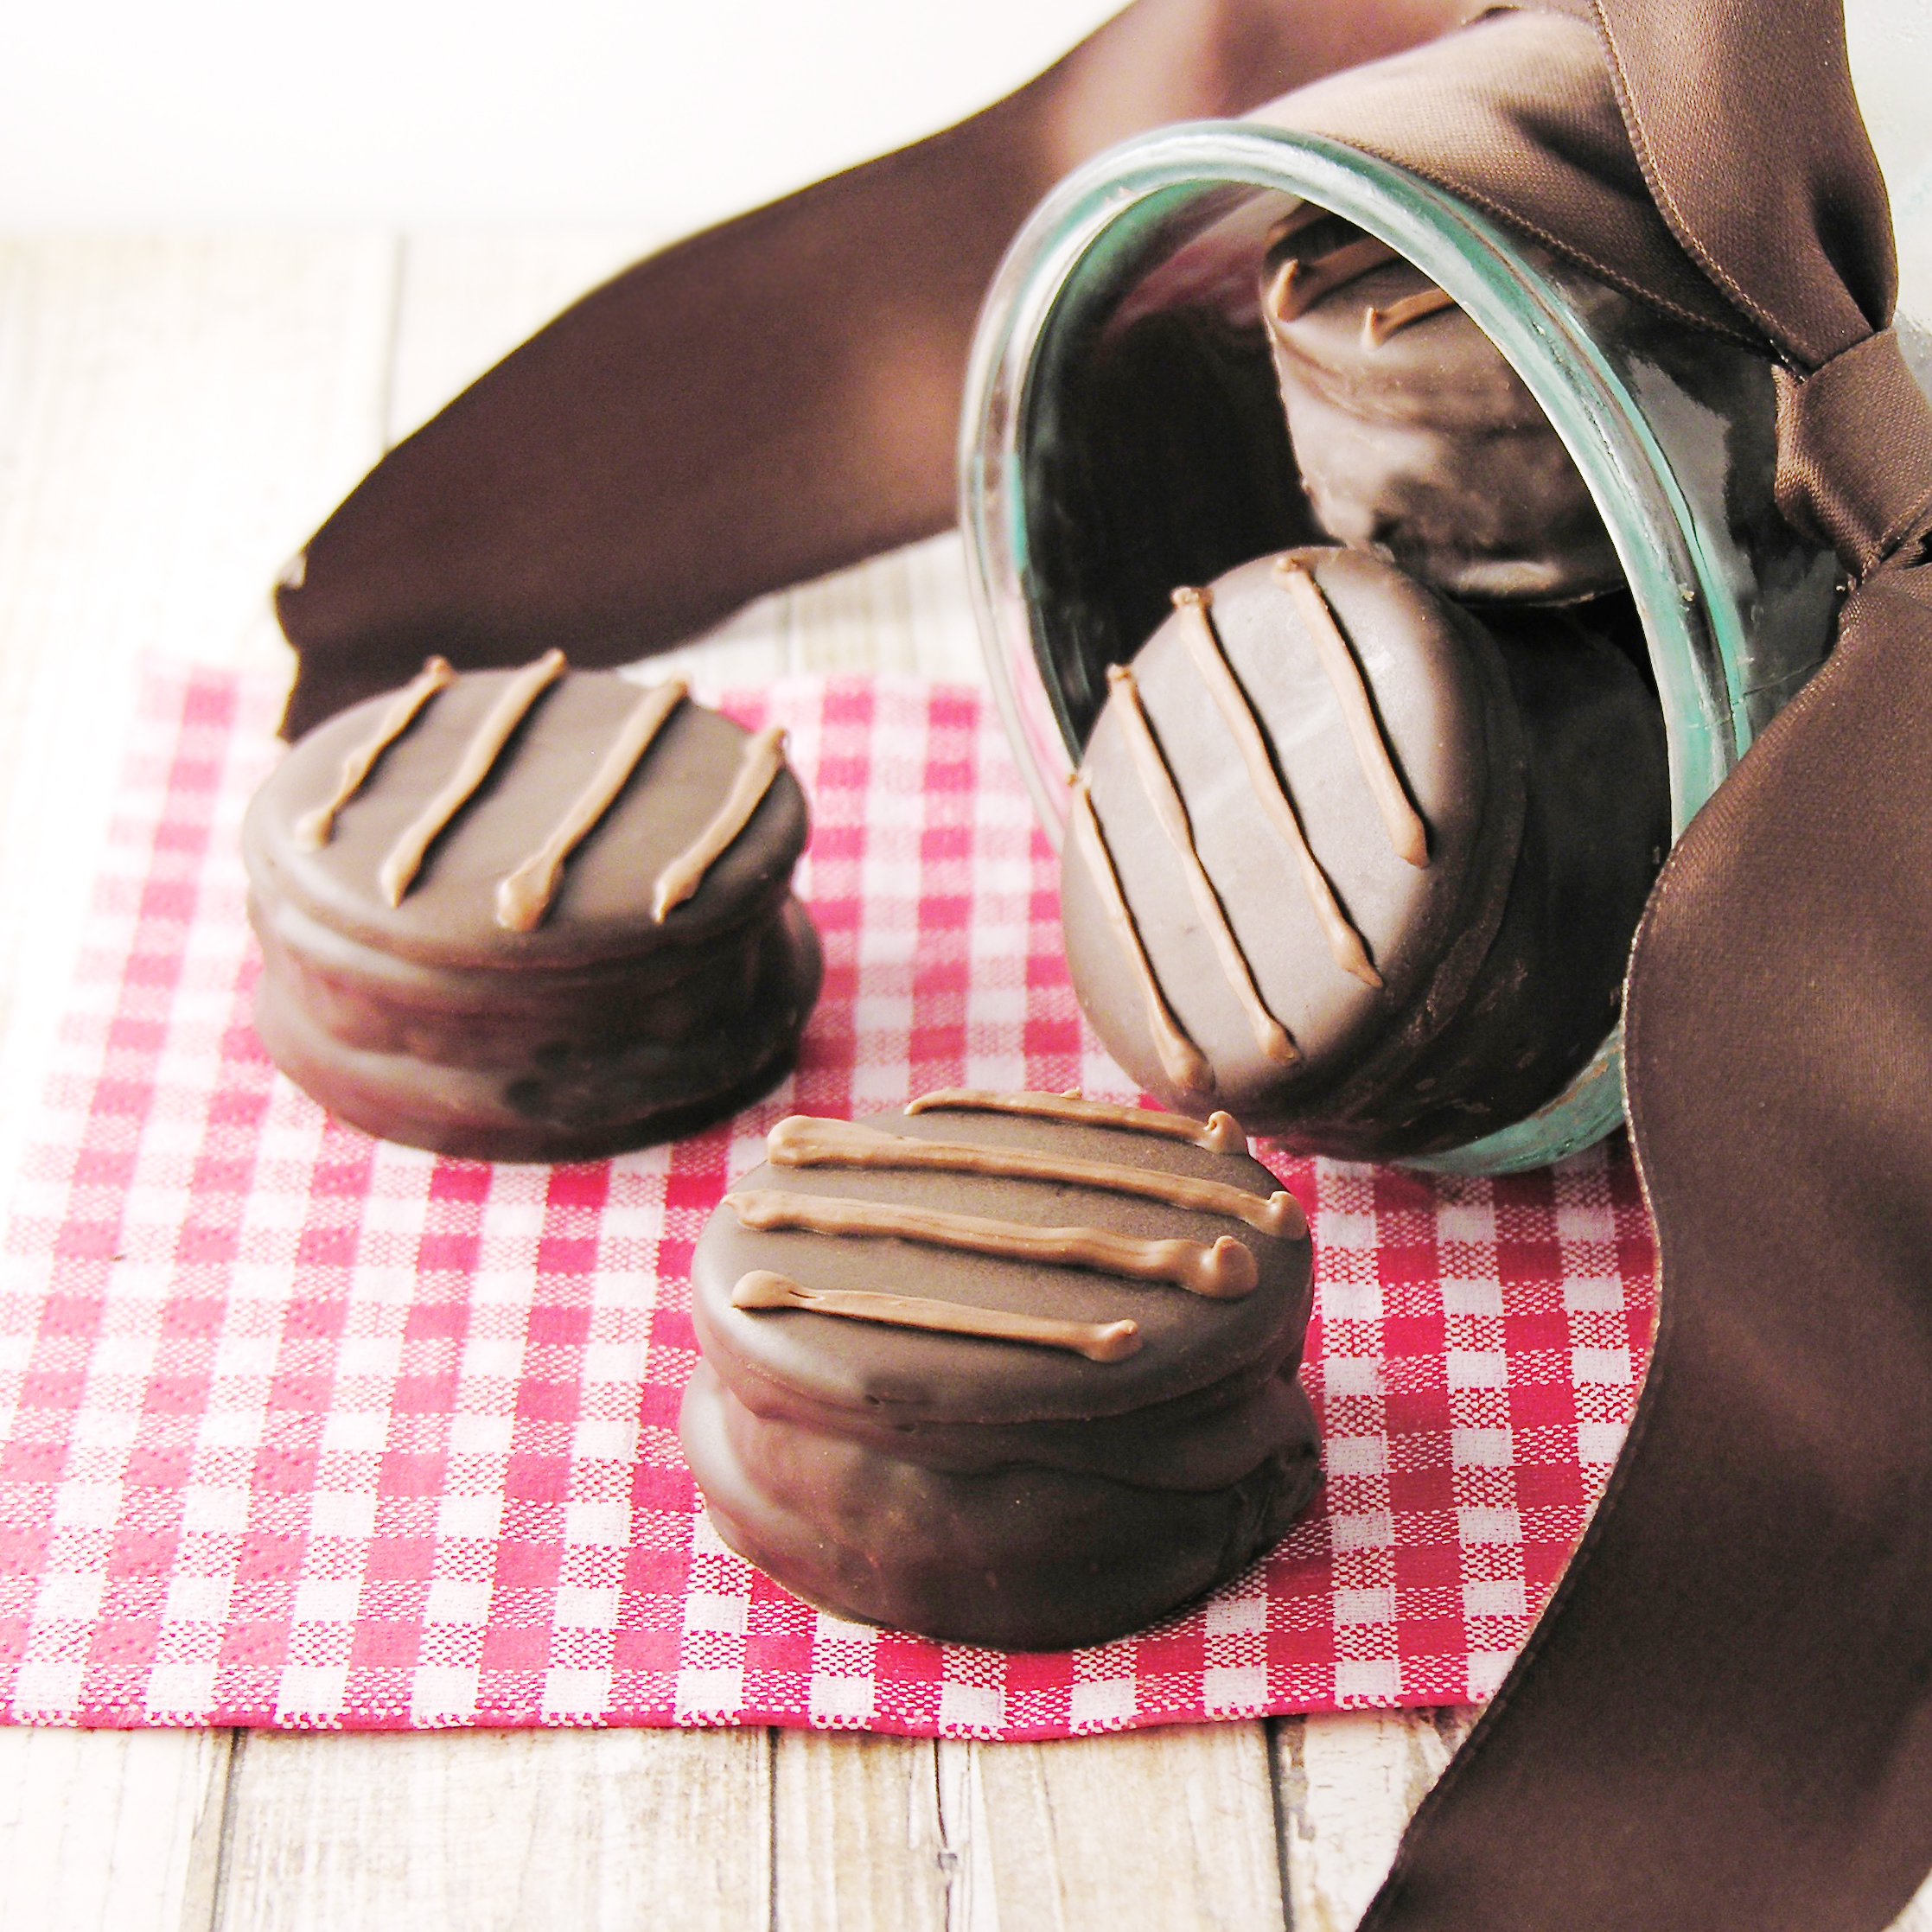
  • Add sprinkles (if desired) before chocolate hardens, or after it hardens, drizzle or pipe a little bit of contrasting chocolate across the top of each cookie.
  • Enjoy!

Oreo Thins dipped in Chocolate

My thoughts: Mmmmmmm! These cookies were eaten up so fast- and I got back so much positive feedback on them- everyone loved them! The only tricky part might be dipping them (if you haven’t dipped things in chocolate before). The trick is to tap off excess chocolate and to remove excess off the bottom. If you aren’t feeling confident in your dipping skills, try just dipping half of the cookie and leaving half of that yummy cookie butter visible! I hope you get a chance to try these!!!  Enjoy!!  ~R

Cookie Butter stuffed Oreo Thins

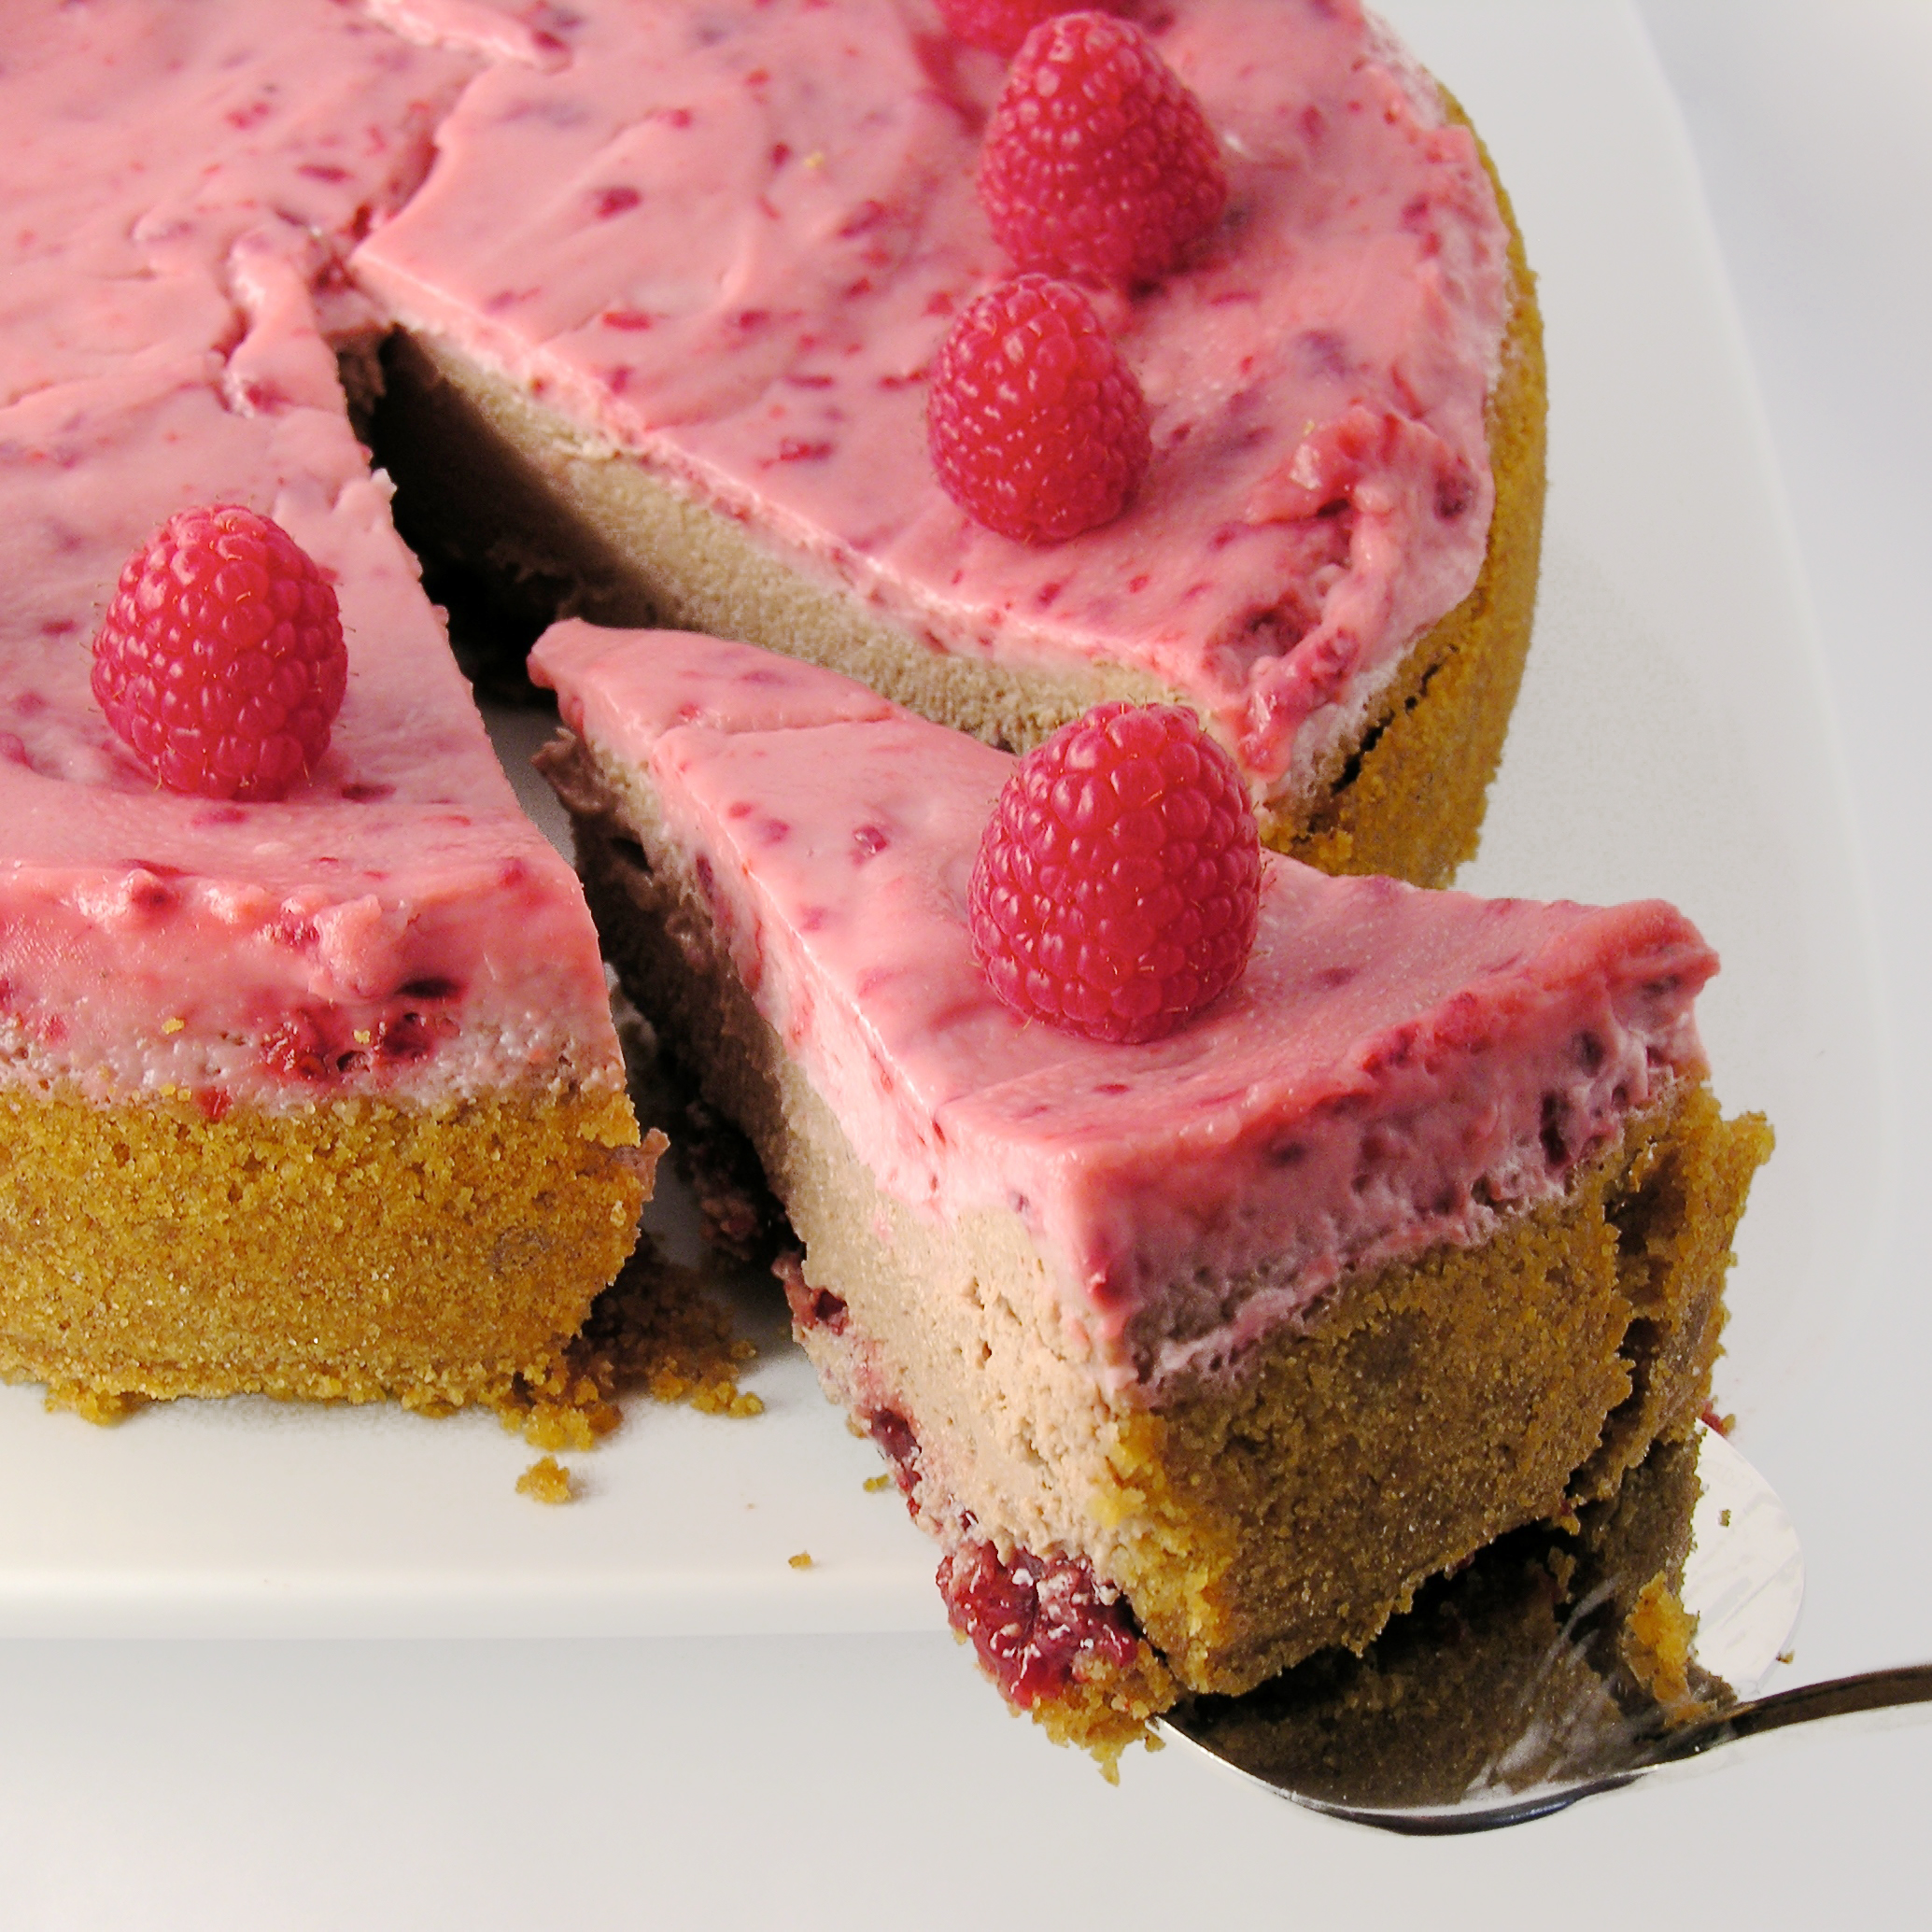
More delicious Oreo ideas! (Click on a photo to see the recipe)

Caramel Oreo Brownie BarBrownie Oreo Cookie CupMud Pie!Creamy Coconut Cheesecake

Watermelon Cupcakes

Posted on

Watermelon Cupcakes

What could be a better picnic treat than these sweet watermelon cupcakes~ covered in “ants” and filled with chocolate chip seeds???

Watermelon Cupcakes

These are so fun to make- and watching people’s surprise at that filling is fun too! My favorite comment? “Oh my, this tastes like WATERMELON!”  Um…yes. It does. *smile*

This recipe uses a cake pop maker. I hesitantly purchased one a few years back to make a polka dot cake, and I thought I’d end up selling it on a garage sale after that one use. NOT SO!!! I love it! So many possibilities! I just made fun little pancake balls the other day for breakfast- not to mention all the yummy recipes we have done here with it! Get a cake pop maker!! (or, if you must, make your pink centers in mini muffin tins. Just know that you are missing out on some serious fun!)

I also used fondant on the top of these cupcakes. I know that for many of you, this step is a tedious one and I say frost these cupcakes however you like! Green frosting, pink frosting with sprinkles of mini chips….whatever! Just don’t miss out on that fun center!

Watermelon Cupcakes

Here’s how we made them: (printable recipe)

INGREDIENTS:

  • One boxed white cake mix (with water, oil and eggs to make according to box)
  • One small packet of watermelon Kool-Aid drink mix
  • 1/2 cup mini chocolate chips
  • 1 stick of salted butter
  • 1 stick of unsalted butter
  • 1 1/2 cups of powdered sugar
  • 2 teaspoons of clear vanilla
  • Green, Pink, and Black  Food Color Gels
  • One box of Wilton fondant in white (or make your own, using my recipe)

DIRECTIONS:

  • Make cake mix according to package
  • Remove one cup of batter and place in a separate bowl.
  • Add 1/2 a packet of Watermelon Kool-Aid powder (use more or less to taste)
  • Add pink color gel to intensify the color to desired shade
  • Mix in mini chocolate chips.
  • Bake in cakepop maker (or use a small mini-muffin tin), making 24 cake pops (or mini-muffins)

Watermelon Cupcakes CentersWatermelon Cupcakes Centers

  • Add green color gel to remaining batter, mixing well.
  • Spoon a little green batter into a cupcake liner, placed in a cupcake tin.
  • Place pink cake pop on top.
  • Spoon green batter over the top, covering the cake pop. Use less, rather than more batter here- if you use too much it will bake over the edges.
  • Bake at 350F degrees for 15-18 minutes.
  • Cool completely.
  • Make frosting by placing butters, powdered sugar and vanilla in a large mixing bowl and beating on high for 3-4 minutes until very light and fluffy.
  • Color frosting green, if desired, and set aside.
  • IF you use fondant, color a batch with green color gel (leave out a little bit to make ants if desired), cut into circles that fit the top of your cupcakes using a round cookie cutter. Keep circles covered to prevent drying.
  • Working one cupcake at a time, spread frosting and then gently lay fondant on top of frosting and press edges down inside of cupcake liner.
  • Use dark green color gel with a little water (think watercolor paints) to paint on watermelon stripes.
  • Color remaining fondant black and roll into 3 small balls to stick together as an ant on each cupcake. use a toothpick or small brush to paint little ant legs under each ant.

Watermelon CupcakesWatermelon Cupcakes

***If you have used fondant before, this should all be easy, but if this is your 1st time and you are wondering what I mean by things like “color fondant”, see my tutorial on making and using fondant here. You’ll make your ants like the caterpillars shown in the tutorial.***

Watermelon Cupcakes7My thoughts… These are really fun little cupcakes. I’m not a huge fan of watermelon flavor, but only the center is flavored and for me it was the perfect little surprise “pop” of flavor. You could certainly add Kool-Aid to your frosting too- it will just end up being a little pink, rather than green.

Watermelon Cupcakes

Nothing says SUMMER like watermelon~ enjoy these little cupcakes at YOUR next summer celebration!! ~r

Other ways to use that cake pop machine you just got 😉 (click on a photo to see the recipe)

Polka Dot Cake!!!Gender reveal cupcakes5Patriotic Polka Dot Cake!!!!Green Bay Packer Cupcakes!

Caramel Turtle Bundt Cake

Turtle Bundt Cake

Swirls of caramel and chocolate cake, topped with caramel sauce and pecans, make this a beautiful and decadent dessert!

I love bundt cakes. They are just so pretty and fun to serve. This one is a combination of caramel and chocolate in a memorably beautiful and tasty display of yumminess!

Turtle Bundt3

This uses cake mixes and Kraft caramels, so it is a quick and easy dessert to put together, and it serves a ton of people, 14-16 at least.

Here’s how we made it: (printable recipe)

INGREDIENTS:

  • One box of chocolate cake mix (plus water, oil and eggs to make according to box)
  • One box of caramel cake mix- I use Duncan Hines- (plus water, oil and eggs to make according to box)
  • 32 Kraft Caramels (unwrapped)
  • 1 can (14 oz.) of sweetened condensed milk
  • 1 stick (1/2 cup) of butter
  • Whole Pecans (as many as you want to sprinkle on top)
  • Mini chocolate chips (as many as you want to sprinkle on top)
  • I also added some Kraft caramel bits as sprinkles because I had them and they sounded fun- those are the little round caramel bits you see in my photos.

DIRECTIONS:

  • Preheat oven to 350F degrees.
  • Make up both cake mixes according to package.
  • Alternate pouring them into a well-greased bundt pan. Fill the pan only 3/4 full. You will have a little cake mix left at the end, since both mixes don’t fully fit in the pan.
  • Place on a cookie sheet (just in case of overflow) and bake for 40-50 minutes. A cake tester or skewer should come out clean when cake is fully baked.
  • Allow cake to cool for 5-10 minutes in pan, and then tip onto a wire cake rack to finish cooling.
  • While cake cools, make caramel.
  • Place unwrapped caramels into a medium saucepan with sweetened condensed milk and butter.
  • Heat on medium/high, stirring constantly, until caramels are completely melted and smooth.
  • Place cake on serving plate.
  • Pour caramel sauce over the bundt cake, allowing it to run down the sides.
  • Immediately sprinkle with nuts and chocolate chips. If you wait these will not stick to the caramel as it hardens.
  • Allow topping to cool and firm up before cutting.
  • Enjoy!

Turtle Bundt5

My thoughts: This is such a moist cake, and if you aren’t a big fan of frosting this is perfect- no frosting at all- just a soft caramel. It’s a perfect fancy dessert that is so quick to make, and fun to serve!

Turtle Bundt2

One more…

Turtle BundtOther yummy caramel desserts you’ll love (just click on photo to be taken to recipe):

Caramel Fudge Brownies!!Salted Caramel Cookie Cup!!!Dulce de Leche caramel sauce form a canAlfajores- Peruvian Caramel Cookie!

Learning to make Scones

Chocolate Chip Scone4These dense, rich scones can be made with a variety of flavors, and they are SO good!

One month ago I could say that I had never even tasted a scone before, much less made one. Today I made nearly 80 of them and they are one of my new favorite treats!

About a month ago, I offered to help with a baby shower for my friend Heather. I asked if they needed help with food, thinking cake or cupcakes or fancy cookies- typical shower requests. Heather’s mom Sharla explained that they were having an English tea for Heather and could I please make scones?

Scones…? I agreed and started to read up on scones. They sounded difficult. They sounded dry and crumbly and b-o-o-o-ring…. yawn.

Apricot Scones1

I started with a basic recipe for chocolate chip scones. I won’t tell you where I got it, because it wasn’t very good. At the time, I thought it must just be how scones are supposed to be (since I’d never tasted one before). Yuck.

I was explaining my dislike for scones in a group of friends one night, and one family started protesting that they make the best scones ever. The mom (my friend Beth), got the recipe from her mother-in-law, who sold them in a tea shop she ran years ago.

It sounded promising, and Beth sent me home armed with the recipe, tips and two scone pans (I didn’t even know those existed, but I LOVE them!).

I started with Apricot White Chocolate Scones, and the rest is history. I love them. They are easier than cookies and so much yummier!

Apricot Scone

Here is how to make them: (printable recipe)

You really need to have a pastry cutter (you can cut cold butter in with a knife, but it is SO much harder). You might also want to consider a scone pan. Those links will take you to products on Amazon, and if you get them I will get like 6% of what you spend. And then I will buy a scone pan for myself. *smile* If you want, you can cut the scones and bake them on a cookie sheet too- but they aren’t quite as moist and amazing that way.

 INGREDIENTS:

  • 2 1/2 cups of all-purpose flour
  • 2 tablespoons of sugar
  • 4 teaspoons of baking powder (fresh!)
  • 1/4 teaspoon salt
  • 1 cup of dried fruit, chocolate chips, nuts, or any combination of those three
  • 1 stick (1/2 cup) of cold butter
  • 2 eggs (beaten)
  • 3/4 cup of whipping cream
  • Milk (as needed)
  • Sugar/ Cinnamon to sprinkle on top.

DIRECTIONS:

  • Preheat oven to 400 degrees F, and spray pan (or sheet) liberally with cooking spray.
  • In a large mixing bowl combine flour, sugar, baking powder, and salt.
  • Add stick of butter and cut into crumb-like pieces using the pastry cutter.
  • Add nuts or chips (if using) and toss together with dry mixture until coated.
  • In a medium mixing bowl, mix together whipping cream and eggs until well combined.
  • Add dried fruit (if using) and toss together with wet mixture until coated.
  • Make a “well” in the center of the dry ingredients and pour the wet ingredients into it.
  • Combine and then gently knead with hands until it holds together in a ball. Add milk if mixture is too dry (this is most often the case when no fruit is added). Don’t over-knead this dough (you’ll melt all those little pieces of butter with the heat of your hands!)

IMG_0122IMG_0127IMG_0128

  • If using a scone pan, set aside about 1/4 of the dough to bake in a second batch. I overfilled my pan and they rose too high (as you can see in my pictures). When I made them for the shower, I used less dough and it was perfect!
  • Press remaining dough into a square on a floured counter and cut into triangles as shown (I used a pizza cutter and a knife- both worked fine).
  • Set into pan (or on cookie sheet) and brush tops with milk. Sprinkle with sugar (I used cinnamon and sugar).
  • Bake at 400 degrees F for 12-15 minutes.

IMG_0135IMG_0137IMG_0142

  • Allow them to cool in pan for about 5 minutes and pop out with forks.
  • Enjoy!!!

Apricot Scones3

My thoughts: Goodness…this sounds complicated, doesn’t it? I thought so too, but now that I’ve made a bunch of them I really do think they are easier than cookies! Today for the shower I made 4 kinds. I added white chocolate chips and apricots to the first (I cut the dried apricots into smaller pieces using kitchen scissors).  I added dried berried (cherries, blueberries and cranberries) to the second. I added mini chocolate chips to the third, and I added Hershey’s cinnamon chips to the fourth.

DSC_0894Here’s Heather, the beautiful mom-to-be at her English tea baby shower- SO much fun!  Enjoy!!~r

Other fun shower desserts here at Easybaked (click on a photo to see the recipe):

Gender reveal cookiesOriginal Oreo pops!!!!!Cotton Candy Fizz Gender reveal cupcakes

Chocolate Chip Cake

Chocolate Chip CakeThis delicious chocolate chip cake recipe is a tried-and-true family favorite and a go-to for a winning bake-off recipe!

This recipe is my grandma’s, but my mom made it a lot when I was growing up. She didn’t tell me her secret ingredients until I loved it too much to care that there were dates in it. Man, do I hate dates. I’m not sure what happens to them in this recipe though- they are magically transformed into chocolatey goodness that doesn’t resemble dates in the slightest!

Chocolate Chip CakeIt’s an ugly cake. I mean, it’s just a plain old chocolate cake, and it’s sweet enough without frosting. I was hoping my photos could adequately convey how delicious it is. My mom used to lay paper lace doilies on top, just before serving, and sprinkle it with powdered sugar. When she removed the paper lace it really was pretty. Plus it routinely won our church bake-offs each year… I love beautiful desserts, but for this one it truly is the inside that counts! Plus it is ridiculously easy to make.  Here’s how: (printable recipe)

INGREDIENTS:

  • 1 cup of pitted and chopped dates
  • 1 cup of hot water
  • 1 teaspoon of baking soda
  • 1 cup of margarine
  • 1 cup of sugar
  • 2 eggs
  • 1 3/4 cups of flour
  • 2 teaspoons of cocoa powder
  • 1 teaspoon of salt
  • 1 bag of semi-sweet chocolate chips (I used mini- chips because it was all I had- and they worked great!)

DIRECTIONS:

  • Preheat oven to 350F degrees and spray a cake pan with non-stick spray.
  • In a medium bowl, combine the dates, water and baking soda, and allow the dates to soak while you put the rest of the ingredients together.
  • Cream together margarine and sugar. Add eggs and blend together.
  • Add dry ingredients (except for chocolate chips) and blend well.
  • At the end, add date and water mixture. Blend well and add chocolate chips.
  • Pour into cake pan and bake 40-50 minutes, until a tooth pick inserted in the center comes out clean.
  • Enjoy!

Chocolate Chip CakeOur family recipe made me smile. Oleo (??) is margarine… and bake “til done” is nice too. Gotta love the way grandmas bake! This is my mom’s recipe card and she graciously added  “40 minutes” at some point in the history of making this cake for us.

Chocolate Chip Cake My thoughts: Well, I love this cake. It is so moist and sweet (probably from those dreaded dates!) and it genuinely doesn’t need frosting. (As a frosting addict, that is saying something!) This is SO easy to put together and it is great served warm with a little ice cream! Yum… I hope you get a chance to try it and make it one of your family favorites!  Enjoy! ~r

Chocolate Chip CakeOther family tried-and-true recipes~ just click on a picture to see the recipe:

Creamy cheesecake with sour cream toppingHeath Bar Ice Cream Dessert3Peanut Brittle!!Grandma's Chocolate Cream Cake

Need a fun and unique gift idea? Easybaked has adorable boxed sets of notecards. They have an Easybaked dessert photo on the front and a recipe on the back! The come in a cute box and the best part? They are ON SALE for Christmas, include free shipping and the site that is hosting them offers $10 off a $50 purchase! Enjoy!!! (Click on photo for more information)

Easybaked Card sale

Rocky Road Cupcakes!

Posted on

Rocky Road Cupcakes!!!!These chocolate cupcakes are filled with creamy marshmallow and topped with a rich ganache frosting, marshmallows and almonds! YUM!!!!!

These are fork-eating cupcakes!  You’ll love that combination of rocky road flavors in these rich and messy-to-eat cupcakes.

Rocky Road Cupcakes4I absolutely love this frosting.  I have used ganache for many recipes, but I’d never taken the time to whip it up into a frosting.  Now that I’ve tried it, I will be back for more- this frosting is so rich and chocolatey!!! Ready for a recipe?

Here you go: (printable version)

INGREDIENTS:

  • One box of chocolate cake mix (with oil, water and eggs to make according to package)
  • One large jar (13 oz) of Jet-Puffed Marshmallow Creme
  • One bag of semi-sweet chocolate chips *
  • 1/2 cup of whipping cream *

(*double these two ingredients if you want to pile your frosting high like mine is)

  • One bag of mini-marshmallows
  • 1 cup of slivered or sliced almonds
  • a little white chocolate to drizzle on top, if desired

DIRECTIONS:

  • Start your frosting first, as it needs to chill before you beat it, and double the recipe if you want piles of frosting like mine.  I went a little overboard for fun pictures!! 🙂
  • Place 1/2 cup of whipping cream into a medium saucepan and heat it on the stove until the cream starts to bubble just a bit on the edges, stirring as it heats.  Turn off the heat, add the chocolate chips and cover for 5 minutes.
  • Stir melted chocolate and warm cream together until completely smooth (a “ganache”).  Put it in a medium bowl and refrigerate until it is a cool, spoonable consistency (30 minutes to an hour).
  • Make cake mix according to box, and divide equally into 24 cupcake lines placed in a muffin tin.
  • Bake as directed on box, and cool completely.
  • Core cupcakes using a small knife, or a cupcake corer.  I used the Chicago Metallics one, and for $4 there is just no reason to not get one- it makes filling cupcakes SOOOO easy!  Isn’t your birthday coming up???

So easy to core cupcakes!

  • Spoon entire jar of marshmallow fluff into a gallon-size zip-top bag and clip a corner off with scissors.  Squeeze the marshmallow into the middle of each cupcake and then trim a little of the core you removed and place the “lid” back on top of the filling.
  • Remove cooled chocolate ganache from refrigerator and beat on high until light and fluffy.
  • Place icing in a gallon size zip-top bag that has been fitted with a decorating tip in one corner, and pipe icing onto the cupcakes.
  • Decorate with almonds, and mini marshmallows.  I also added some mini chocolate chips (because I had some leftovers from another recipe) and I melted some white chocolate to drizzle on top.  Be creative and make these little marshmallow-y cupcakes irresistible!!!!


Rocky Road Cupcakes!!!!!


My thoughts:  These are FABULOUS cupcakes.  I love the gooey marshmallow creme surprise in the middle!  And that frosting….. oh my.  A few tips:  the frosting does harden up, so get those almonds and marshmallows placed in it as soon as you are done piping the frosting on.  This is good, because it holds all those yummy toppings in place!  Also, store these all sealed up.  You know what happens when you leave the bag of marshmallows open?  Yucky, rubbery, dried up marshmallows!  The same will happen if you just let these set out. 

I hope you love these little yummy desserts!!!!  ~r

Rocky Road Cupcakes with marshmallow filling!!!!Want some other ideas for that new cupcake corer?  We love filled cupcakes here at Easybaked!  Here’s a few of our favorites:

Cinnamon Roll Filling in a yummy cupcake!Peppermint Hot Chocolate Cupcakes!!!Toxic Slime-filled Cupcakes!Mocha caramel filled cupcakes3

Caramel Oreo Brownie Bars

Posted on

Caramel Oreo Brownie BarRich and gooey, these brownies are filled with soft caramel and Oreo cookies.  Does dessert get any better than this?!?

Wow…this was an experiment, and I’m almost speechless about how good these are.  It is hard to describe the yumminess…You need to try these.  I need to make these again, because they are already gone.

Caramel Oreo Brownie Bars!I’ve shared this recipe before on Easybaked, a very long time ago.  It is a wonderful recipe I called caramel chip bars.  This was one of my very first recipes on this blog, and if you click on the link you can see the recipe AND my awful beginning photography!!!  Lol.

These are very versatile brownie bars.  I make them all the time with a variety of cake mix flavors and chips.  It is a perfect way to use up half-empty bags of chips.

Caramel Oreo Brownie Bars!!!This time….I added Oreos, and the result was too incredibly yummy to not share with you all.  So here you go: (printable recipe)

INGREDIENTS:

  • 1 box of chocolate cake mix
  • 1/3c. oil
  • 2 eggs
  • 1 bag of semi sweet chocolate chips
  • 1 bag of white chocolate chips
  • 1 box of Double Stuf Oreos
  • 1/2 cup of butter
  • 32 unwrapped Kraft caramels
  • 1 (14oz.) can of sweetened condensed milk

DIRECTIONS:

  • Preheat oven to 350 degrees.  
  • Line a 9×13″ cake pan with foil.  
  • Combine cake mix, oil and eggs.  
  • Blend well and stir in all of the chips (mixture will be very thick).  
  • Press a little less than half of the mixture into bottom of pan (it will press into a very thin layer and you might be able to see the bottom of the pan, but when it bakes it will fill in).  
  • Bake for 10 minutes.
  • While this is baking, in a medium saucepan, combine butter, caramels and condensed milk.  
  • Cook over low/medium heat until melted and smooth (stir constantly!)
  • When cake has baked for 10 minutes, remove from oven and place 24 Oreo cookies over the top of the partially baked cake.

Oreo Caramel BrowniesOreo Caramel Brownies

  • Spread caramel over Oreos.  
  • Top with remaining cake/chip mixture.
  • There is a technique to this- you cant just spoon the batter on top or it will just mix in with the melted caramel.  Instead, take a small ball of dough/chips and press it very flat between your hands. Lay this on top of the caramel and repeat the process, like a patchwork quilt, until the entire top is covered.  It is ok to have a few gaps.

Oreo Caramel BrowniesOreo Caramel Brownies

  • Bake an additional 25 to 30 minutes.  
  • Remove from oven and cool 20 minutes.  
  • Gently lift from pan and peel foil from edges.  
  • Cool completely before cutting. Makes about 24 bars.

Caramel Oreo Brownie Bars!!!

My thoughts:  You have to make these!!!!!!! YUM!!!!!

Caramel Oreo Brownie BarsLove caramel?  We do too!!!  Here’s a few more caramel- filled recipes from Easybaked:

Caramel Cheesecake!!Dulce de Leche caramel sauce form a canSalted Caramel Cookie Cups (2)Caramel Fudge Brownies!!

Chocolate Raspberry Cheesecake

Chocolate Raspberry Cheesecake!!Creamy chocolate cheesecake topped with a layer of raspberry and sour cream. Unbelievably yummy!!!

If you follow my blog on a regular basis, you will remember this cheesecake from last fall.  It is my Aunt’s recipe and it is literally the best cheesecake I’ve ever eaten.  It is so creamy and smooth…oh my.

I decided to add a few twists to the recipe by making it chocolate and adding raspberries to the topping.  It worked beautifully and added so much flavor!  It is really quite easy to make.  I hope you enjoy it as much as I did!!!!

Here’s the recipe (printable version):

INGREDIENTS:

Crust:
  • 1 1/4 cups Honeymaid graham cracker crumbs
  • 5 tablespoons butter, melted
  • 3 tablespoons sugar 
Filling: 
  • 3/4 cup sugar
  • 3 (8 oz.) Philadelphia cream cheese bars (must be the Philadelphia brand)~ softened to room temperature.
  • 2 eggs
  • 1 teaspoon vanilla
  • 1 teaspoon lemon juice
  • pinch of salt
  • 1 cup of semi-sweet chocolate chips
Topping: 
  • 1 pint (2 cups) sour cream
  • 1/2 cup sugar
  • 1 tsp. vanilla
  • pinch of salt
  • 1/3 cup of canned raspberry pie filling

DIRECTIONS:

  • Preheat oven to 350F degrees.
  • In a medium bowl, combine crust ingredients together until well combined.
  • Press into a 9″ spring form pan, pressing crumbs into bottom and about 1 1/2″ up sides of pan.    
  • For the filling, combine the sugar and softened cream cheese in a large mixing bowl and beat together until smooth.
  • Add the eggs, one at a time, beating between each addition.
  • Add the vanilla, lemon juice and salt and beat until smooth and creamy.
  • Melt the one cup of chocolate until smooth, and add to cheesecake mixture, beating until completely incorporated.
  • Pour into crust.
  • Bake at 350F degrees for 35-45 minutes.
  • While cheesecake is baking, make topping by simply mixing together all of the topping ingredients.
  • After 35-45 minutes of baking, remove cheesecake from oven and turn oven down to 325F degrees.
  • Pour topping over hot cheesecake, gently spreading to edges.
  • Return cheesecake to oven and bake for an additional 12-15 minutes.
  • Remove cheesecake from oven and leave sides on pan while allowing cheesecake to cool to room temperature.  
  • Refrigerate several hours (or overnight)
  • Run a small knife around the edges of the pan and remove them before serving.
  • Serve with extra raspberry pie filling– YUM!
  • Enjoy!!!!


Chocolate Raspberry Cheesecake!!
My thoughts:  You can see in my pictures that I added a cup of raspberry pie filling over the crust before I poured the cheesecake batter in.  It was really yummy, but made it hard to remove the bottom of the springform pan (which I always do before pictures).  If you don’t mind leaving the bottom on, this is a yummy addition to the recipe!  Just gently spread it out over your graham crust and pour the cheesecake over the top.
Chocolate Raspberry Cheesecake!!

We love raspberries here at Easybaked!  Check out our other yummy raspberry recipes!

Raspberry Lemon Cream Cups!!!Raspberry Confetti KissesRaspberry Truffle TartRaspberry Lemon drop Cakes!!!

Cookie Dough Whoopie Pies

Posted on

Cookie Dough Whoopie Pies!

Rich cocoa whoopie pies filled with a creamy cookie dough frosting.  Yum.

One of the benefits of being a food blogger is that all of your friends see cool kitchen stuff and get it for you!  My sweet friend Danielle gave me a Whoopie Pie Pan for my birthday and I had to google what a whoopie pie was because I’d never had one.  Now, I am obsessed with this incredible dessert.  Oh. My. Word.

A few months ago I made a cupcake that is my FAVORITE recipe on this blog (yes, I have a favorite!)  It’s a cookie dough cupcake and I so wanted an excuse to make that frosting again, so I made it for these!  Perfect!  Everyone loves them….and I am eating the leftover frosting out of a bowl while I write this post…really– right out of the bowl {sigh of pure joy}

Whoopie Pies!!!

You know you want to try these….here’s how: (printer friendly recipe)

INGREDIENTS: (makes 16-18 whoopie pies)  

Whoopie Pie:

  • 2 sticks (8 oz) salted butter (softened)
  • 2 cups sugar
  • 2 eggs
  • 1 1/2 cups milk
  • 2 Tablespoons vanilla
  • 3 1/2 cups flour
  • 1 1/2 cups cocoa powder
  • 1 teaspoon salt
  • 1 Tablespoon baking soda
  • 1 teaspoon baking powder

Cookie Dough Filling:

  • 2 sticks (8 oz.) unsalted butter(softened)
  • 2 sticks (8 oz.) salted butter(softened)
  • 2 cups powered sugar
  • 1 cup brown sugar (packed)
  • 3 Tablespoons vanilla
  • 1/3 cup flour
  • 1 12 oz bag of mini chocolate chips.

Directions:

Whoopie Pie:

This recipe can be made on a cookie sheet, but to get that perfectly shaped, every-one-is-the-same-size look you really should invest in a Whoopie Pie Pan.  They aren’t terribly expensive and these turn out SO much better if you use one!

  • Preheat oven to 400F degrees
  • Spray a whoopie pie pan with non-stick cooking spray.
  • Use a mixer to cream together butter and sugar.
  • Add milk, eggs and vanilla and beat until combined.
  • Add dry ingredients (add flour last and gradually) and beat until smooth. (My mixer had a hard time with this, as it is a thick cookie-like mixture.  My mixer is 15 years old though and died the next day….so …?  I finished mixing by hand…)
  • Use a large Cookie Scoop (2-3 Tablespoons) to drop dough into each whoopie pie cavity.  Gently press dough into cavity.

Making whoopie pies

  • Bake for 8-10 minutes- don’t overbake- cake should be springy to the touch, not hard like a cookie.
  • Cool on a wire rack.

Filling:

  • Place all filling ingredients except mini chips into a large mixing bowl and beat with mixer on low until combined and then high until light and fluffy.
  • Add half of mini chips and blend in well.
  • Scoop about 2 Tablespoons of filling onto one half of a whoopie pie.  
  • Press the other half on top very gently until filling spreads to edges.
  • Pour remaining mini chips into a bowl and roll edges of filling in them to coat the sides.

Whoopie Pies!!

My thoughts:  These are just exactly right, in my book.  I love the deep cocoa flavor in the cake and that FROSTING….!

If you want to reduce the amount of filling you can certainly cut the recipe for it in half.  I was very generous with the filling and had just a little left at the end.  I hope you get a chance to try these– and if you want  a similar flavor in smaller bites hop over to the cookie dough cupcake recipe and give them a try.  Happy baking, friends!!!

Cookie Dough Whoopie Pie!

You might also like:

Cake balls filled with cream cheese frostingMango Smoothie PopsBubble Gum Cupcakes!Koolaid truffles!!

Turtle Brownie Bars

Posted on
Caramel Turtle Bars!!


Everyone loves a good bar dessert.  These are absolutely stuffed full of yummy goodness.  Caramel and three kinds of chocolate mixed with chocolate cake….these will certainly satisfy your sweet tooth!!!!

INGREDIENTS:

  • 1 box of chocolate cake mix
  • 1/3c. oil
  • 2 eggs
  • 1c. each of white chips, semi-sweet chips, milk chocolate chips and dark chocolate chips
  • 1/2 c. margarine or butter
  • 32 unwrapped Kraft caramels
  • 1 (14oz.) can of sweetened condensed milk

DIRECTIONS:

  • Preheat oven to 350 degrees.  Grease a 9x13pan.  
  • Combine cake mix, oil and eggs.  Blend well and stir in all of the chips (mixture will be very thick).  
  • Press half of the mixture into bottom of pan (it will press into a very thin layer).  Bake for 10 minutes and then remove from oven.
  • While this is baking, in a medium saucepan, combine butter, caramels and condensed milk.
  •  Cook over low/medium heat until melted and smooth (stir constantly!)  
  • Spread caramel over partially baked cake mixture.  
  • Top with remaining cake/chip mixture (it will not completely cover, but you can press the mixture flat with your fingers and lay it in small sections over the caramel.)
  • Bake an additional 25 to 30 minutes.  Remove from oven and cool 20 minutes.  
  • Run knife around edges.  Cool completely before cutting. Makes about 20 bars.

Caramel Turtle Bars!!!

My thoughts:  I make this recipe with a variety of cake mix flavors every time I start accumulating odds and ends of chips in my pantry.  When you bake a lot, you end up with lots of almost-empty bags of baking chips in all sort of flavors.  I just use them all up in this recipe!  I’ve made this with yellow, chocolate and caramel cake mix.  I’ve used dark, milk, white, swirled, peanut butter, cinnamon and butterscotch chips.  Each time I make it there’s a whole new flavor and look.  I *love* recipes like that!  It’s like having so many recipes all in one.  I hope you have fun – both following this recipe  AND experimenting with it!  Enjoy!!  ~r

Caramel Turtle Bars!!We love chocolate and caramel here at Easybaked!!  Check out some of our other recipes that use this favorite combination.  Just click on an image to be taken to the recipe.

Turtle CheesecakeSalted Caramel Cookie Cup!!!Caramel Fudge Brownies!!Inside-out Caramel Apple!!

*****SPECIAL NOTE******  Ruthanne will be wandering the Amazon Jungle when this recipe posts.  If you don’t get replies to your comments or questions it is because I have no internet….I’ll be back soon though!!!!