RSS Feed

Tag Archives: unique dessert

Blooming Marshmallows for Cocoa! Make your own!

Posted on

blooming marshmallows! DIY
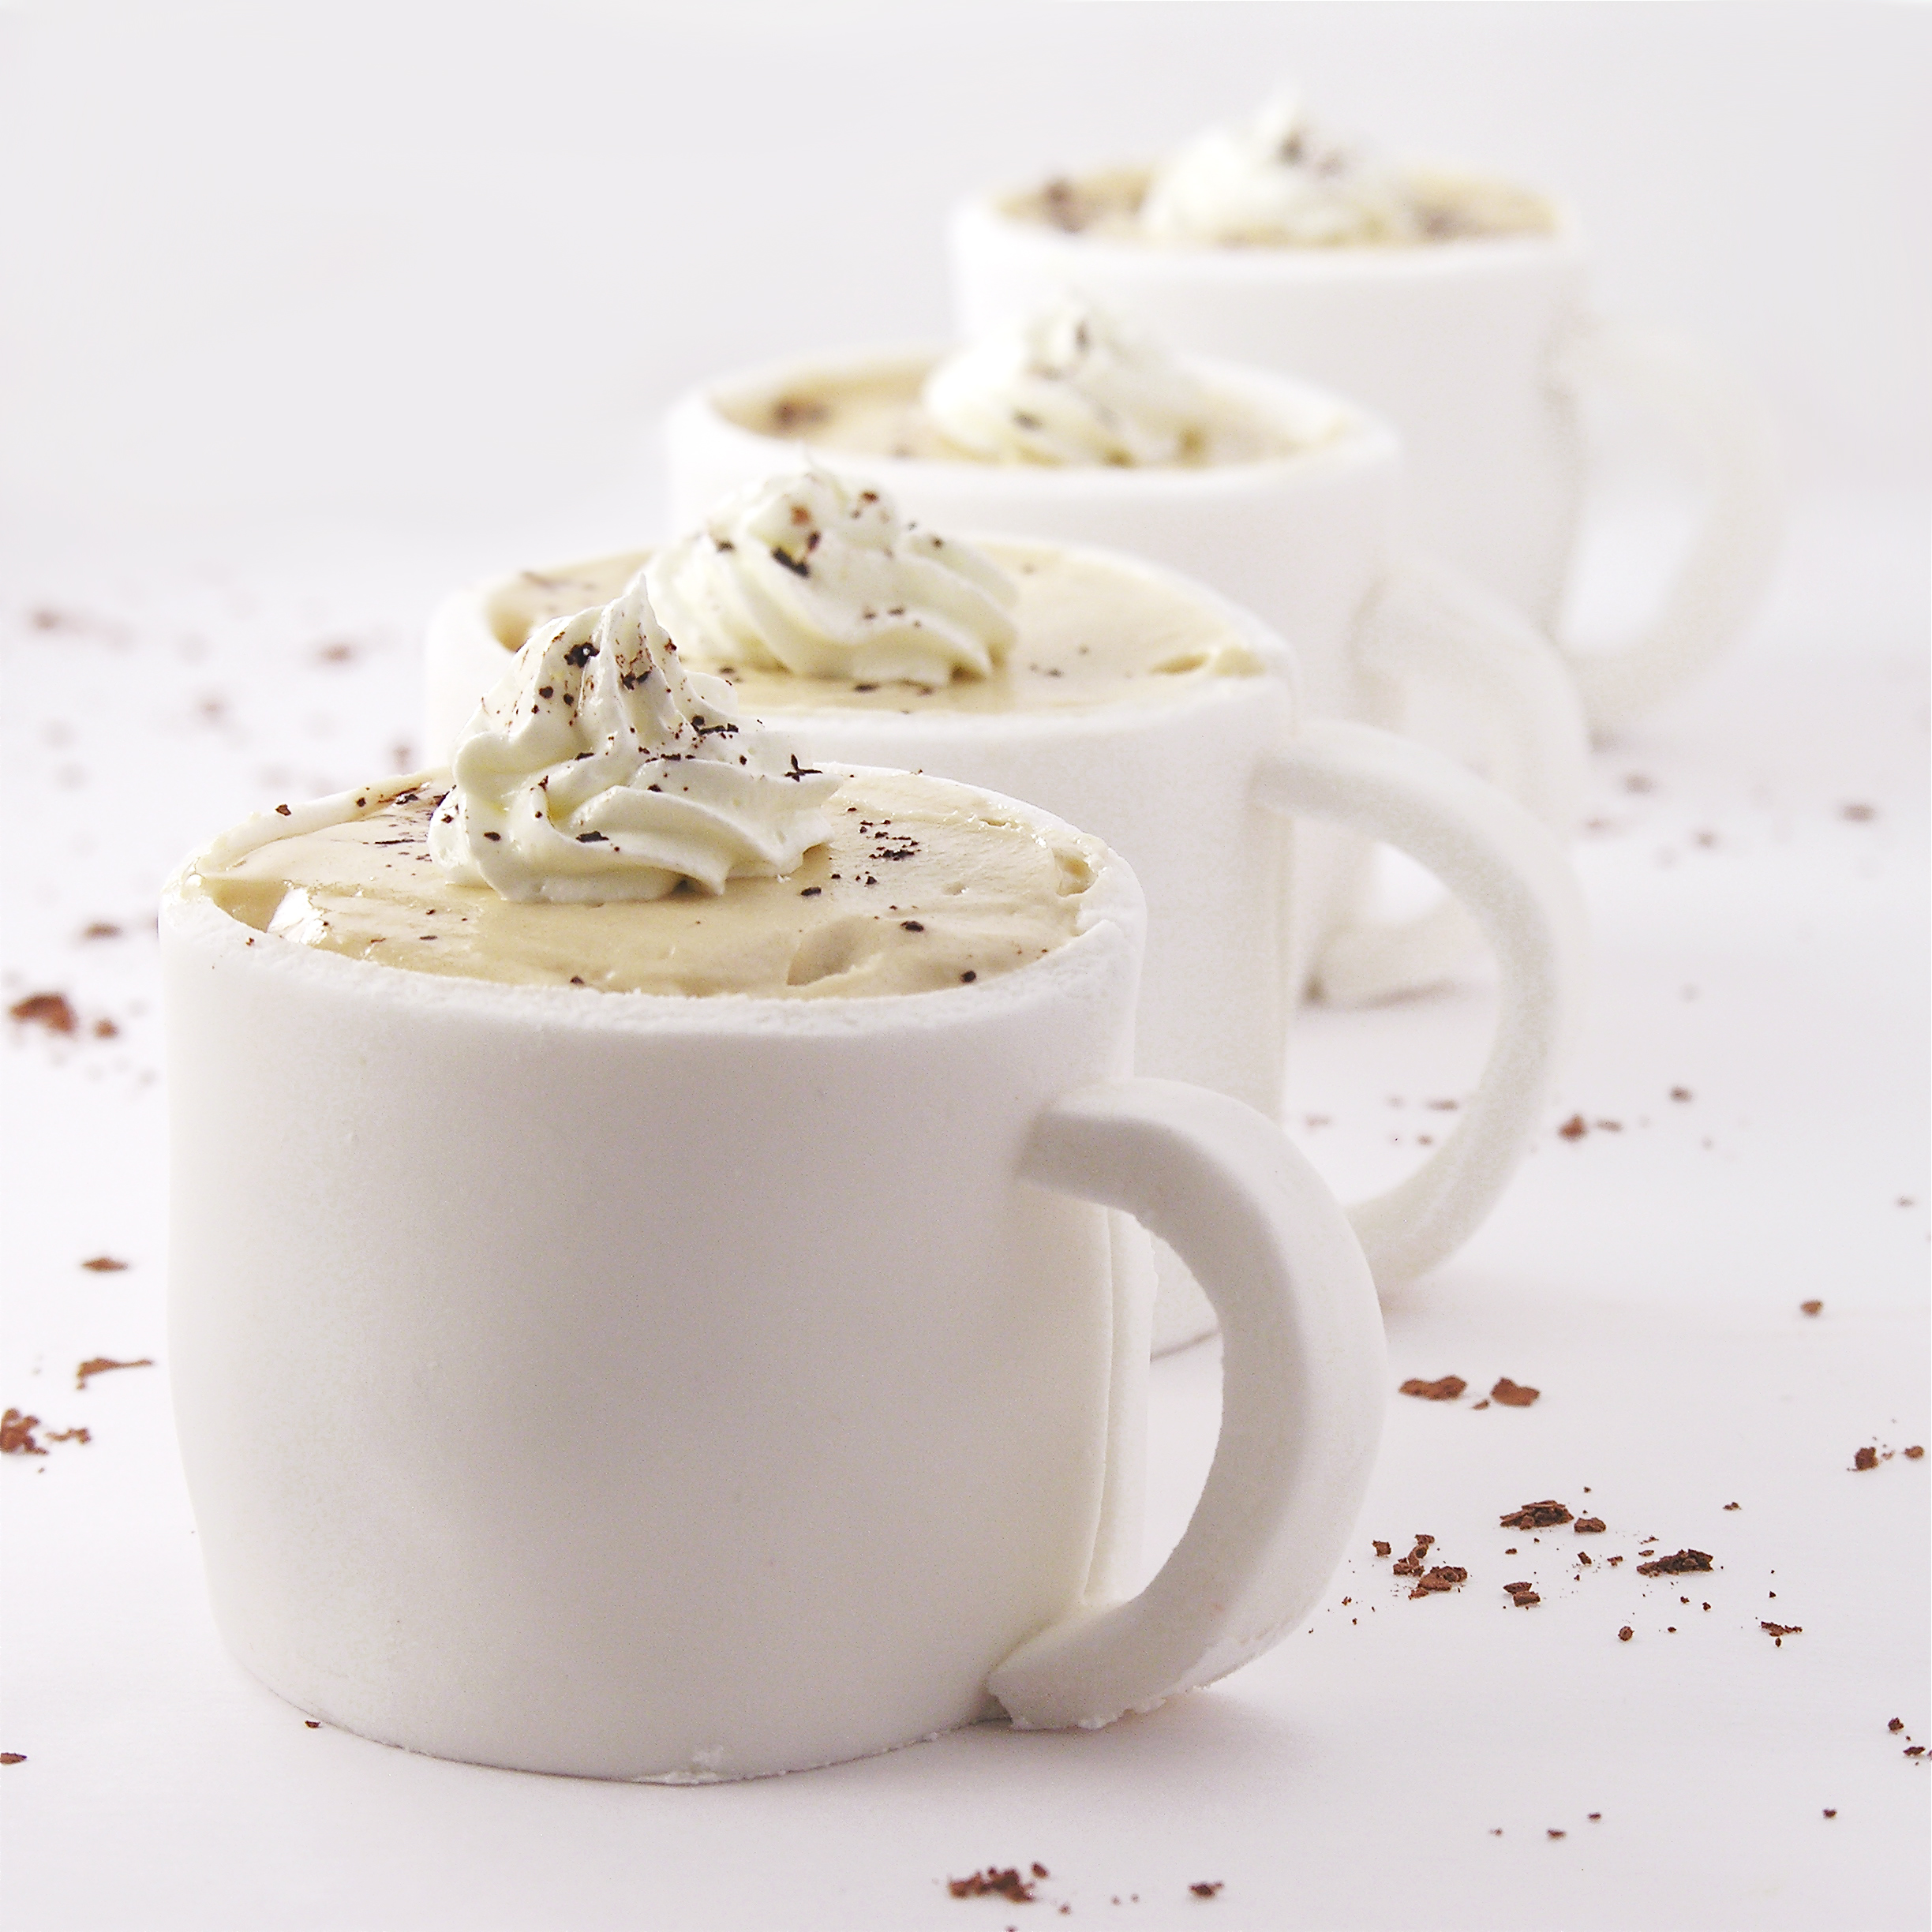
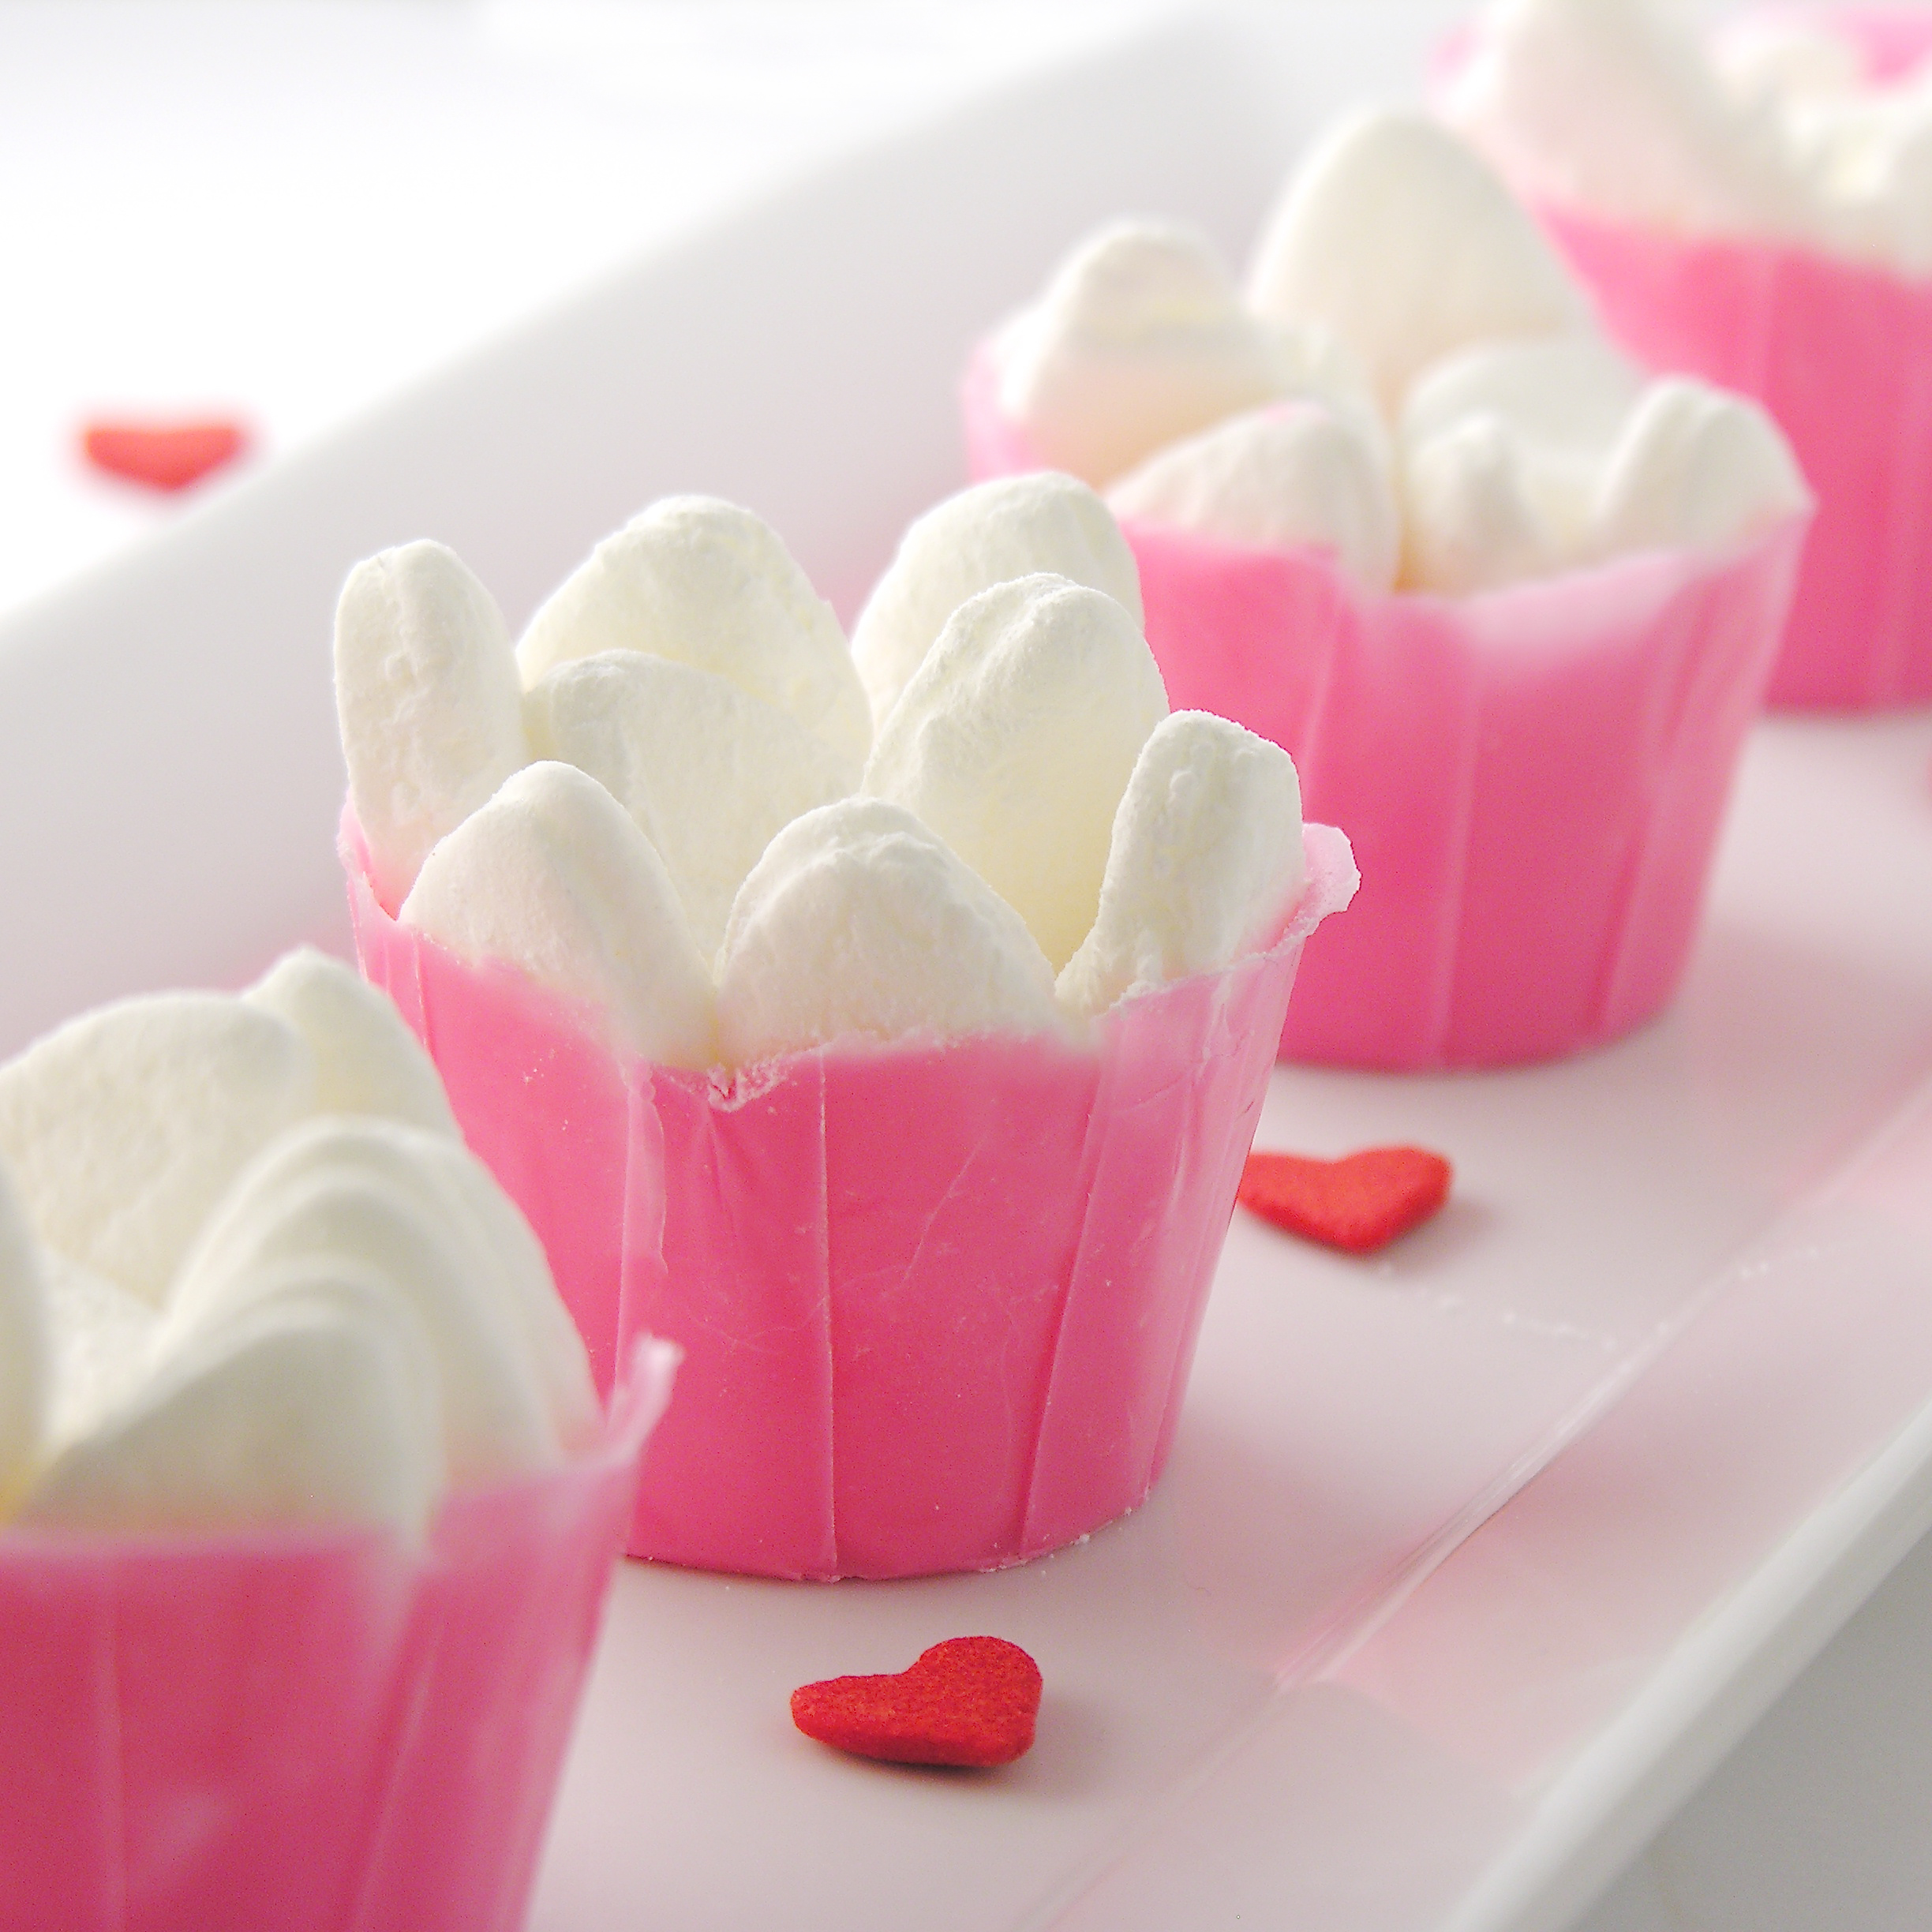
Have you seen the latest food fad? A friend sent me this video and I couldn’t stop smiling! Genius!!! These fun little marshmallows, when set into hot chocolate, bloom and reveal fun sprinkles at the center. These are the creation of chef Dominique Ansel (creator of the Cronut, for all you foodies out there) and he serves them up in Tokyo and New York.

So what’s a girl from Indiana to do? Obviously figure out a way to make them herself! And just in time for Valentine’s Day!

It seemed like rule-breaking to use from-scratch marshmallows for this (we are called Easybaked for a reason, you know!). So I melted marshmallows and spread them out to cut. I got REALLY good at this because I made about a billion batches of these before I got them to work well.

DIY Blooming Marshmallows

I learned a few things.

  1. Get the off-brand of marshmallows, they all melt the same.
  2. That marshmallow has to be spread pretty thin (I will tell you how to accomplish this..)
  3. That cocoa has to be as hot as lava to melt away the chocolate cup these sit in.
  4. Use tongs to place the bloom into the hot chocolate so you don’t splash yourself with the lava.

I’m not kidding you- this recipe was a labor of love. But now I can tell you how to do these in SUCH an easy way- and you can surprise your family with these fun treats!

Blooming Marshmallows DIY

Here is how we made these: (printable recipe here)

INGREDIENTS/SUPPLIES: (makes about 10 blooms)

  • 1 bag of regular sized marshmallows
  • 1/4 stick butter
  • 1 cup powdered sugar
  • 1 cup cornstarch
  • 1/2 bag of white Wilton’s candy melts (I used pink on some of these so you could see them better).
  • Jimmies or candies to fill the center of the flower
  • Hot (HOT!) chocolate
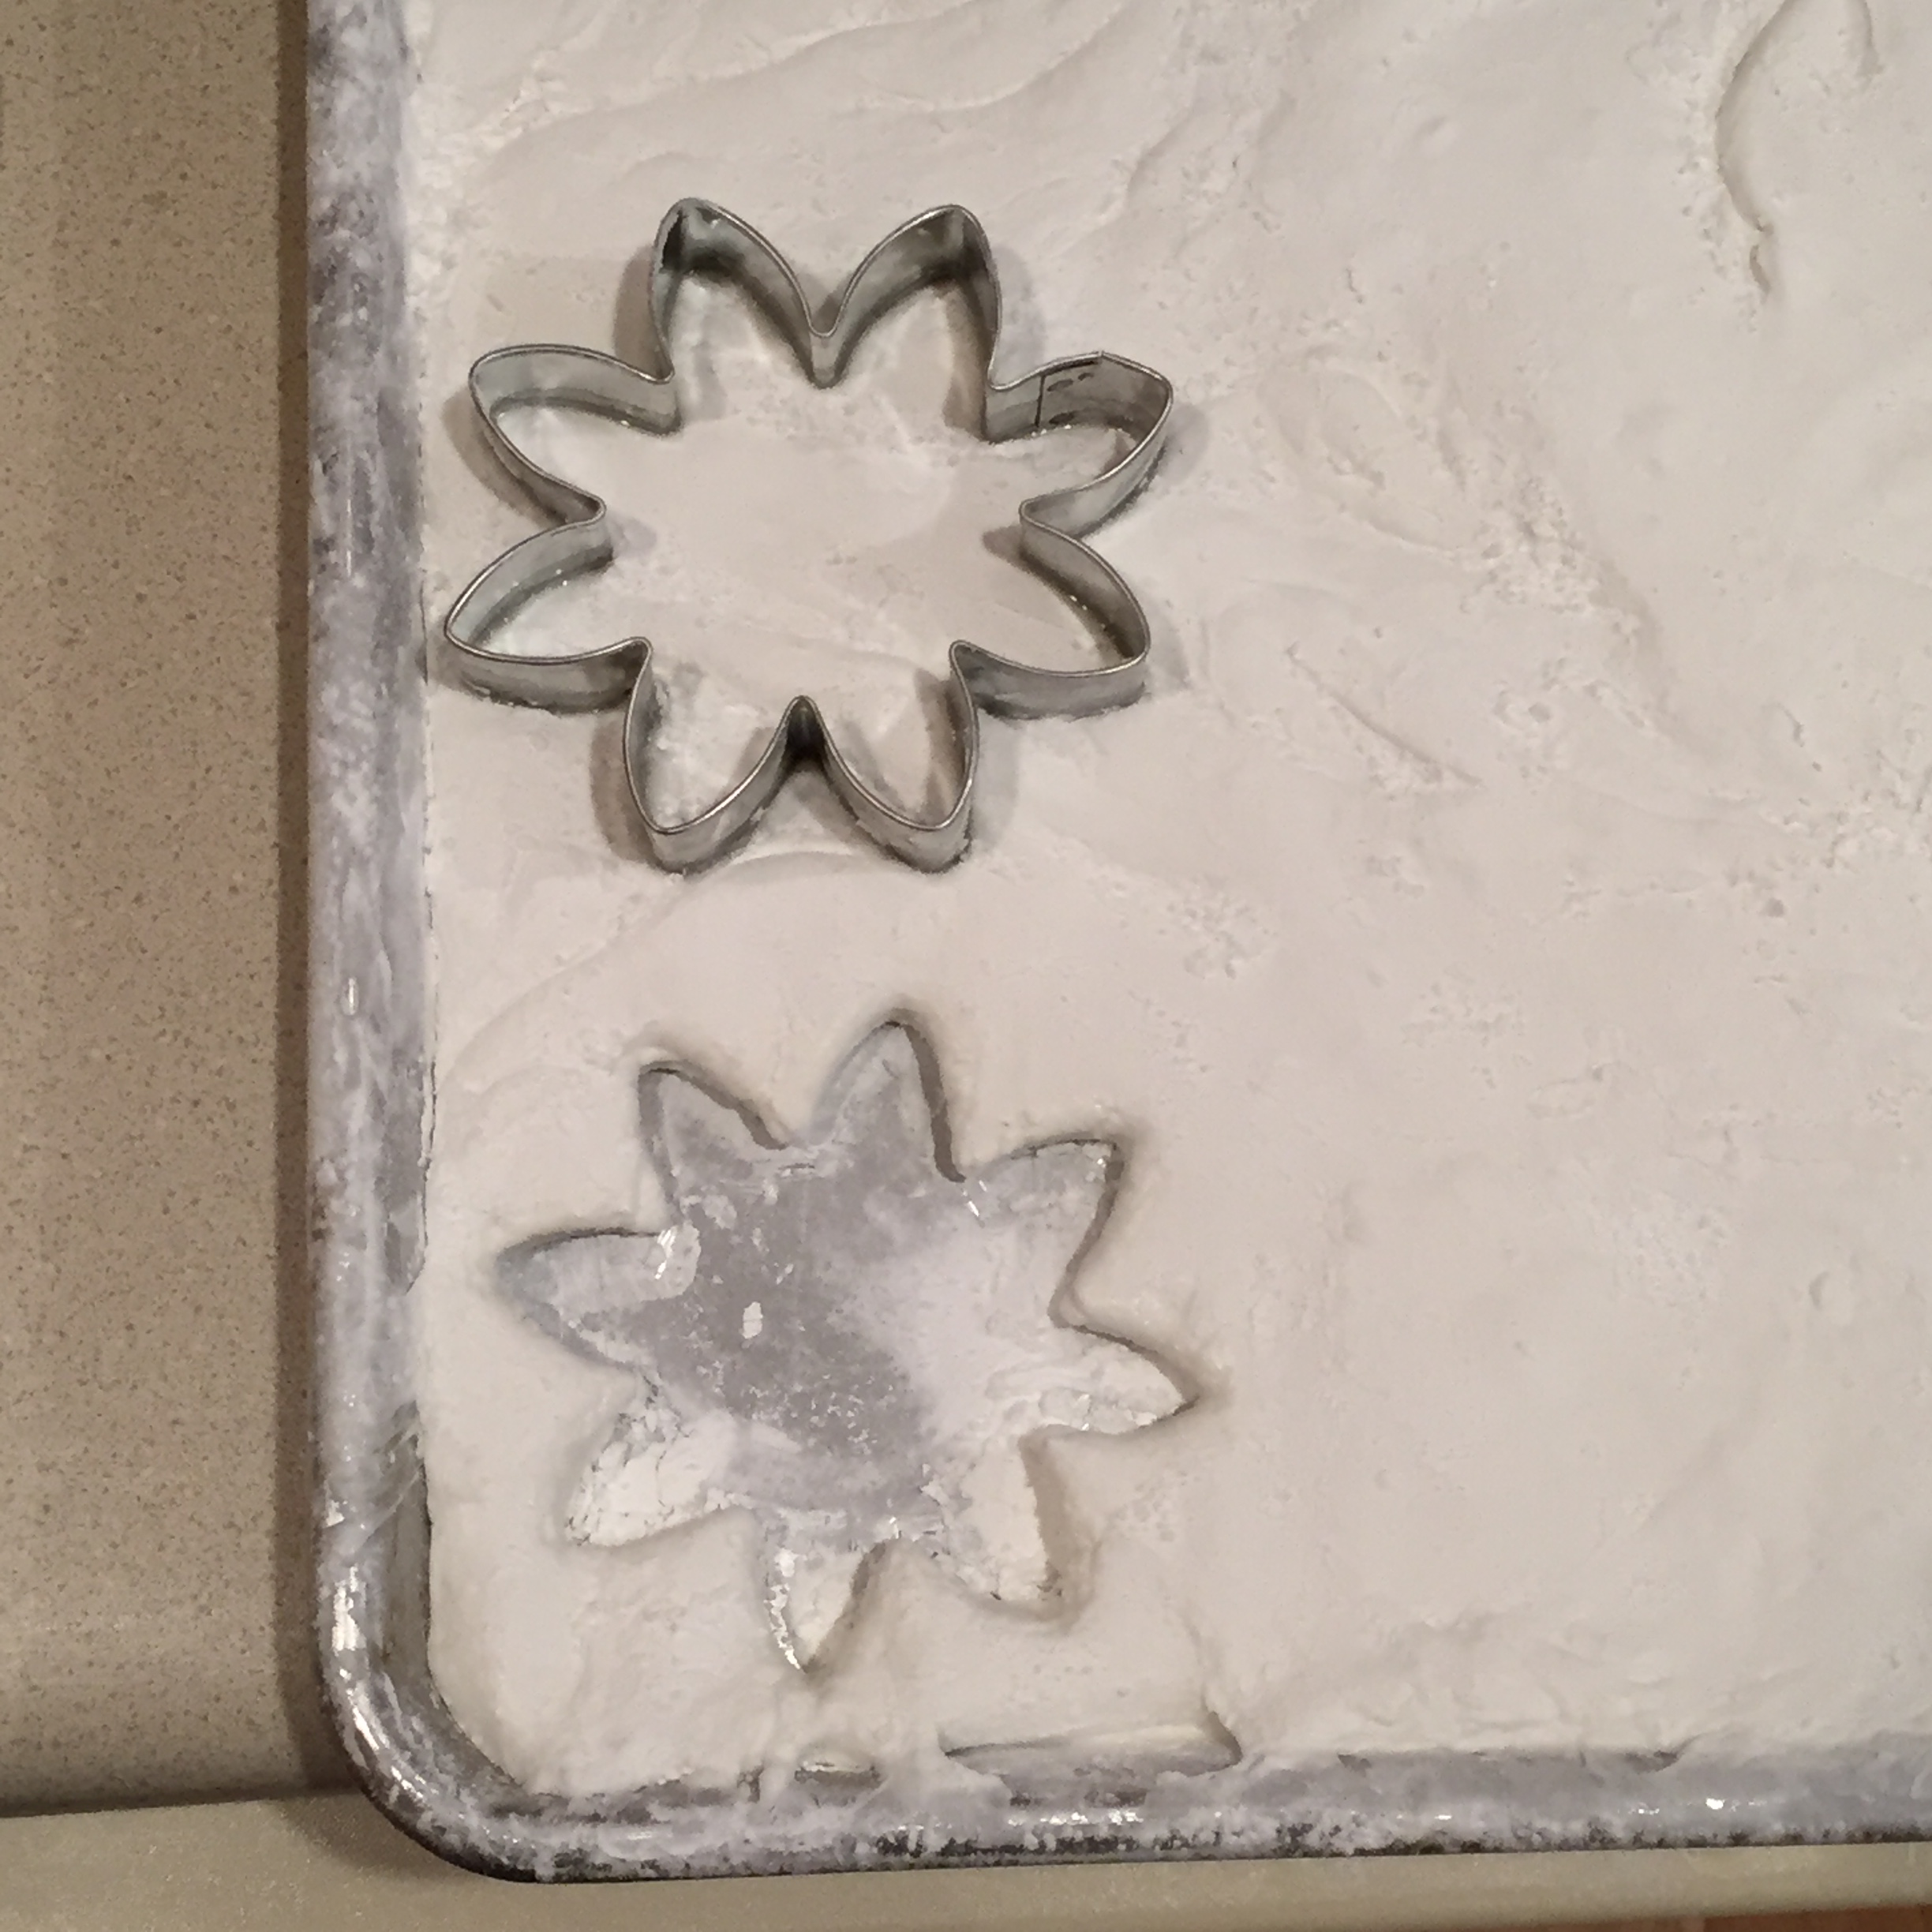
  • A flower shaped cookie cutter
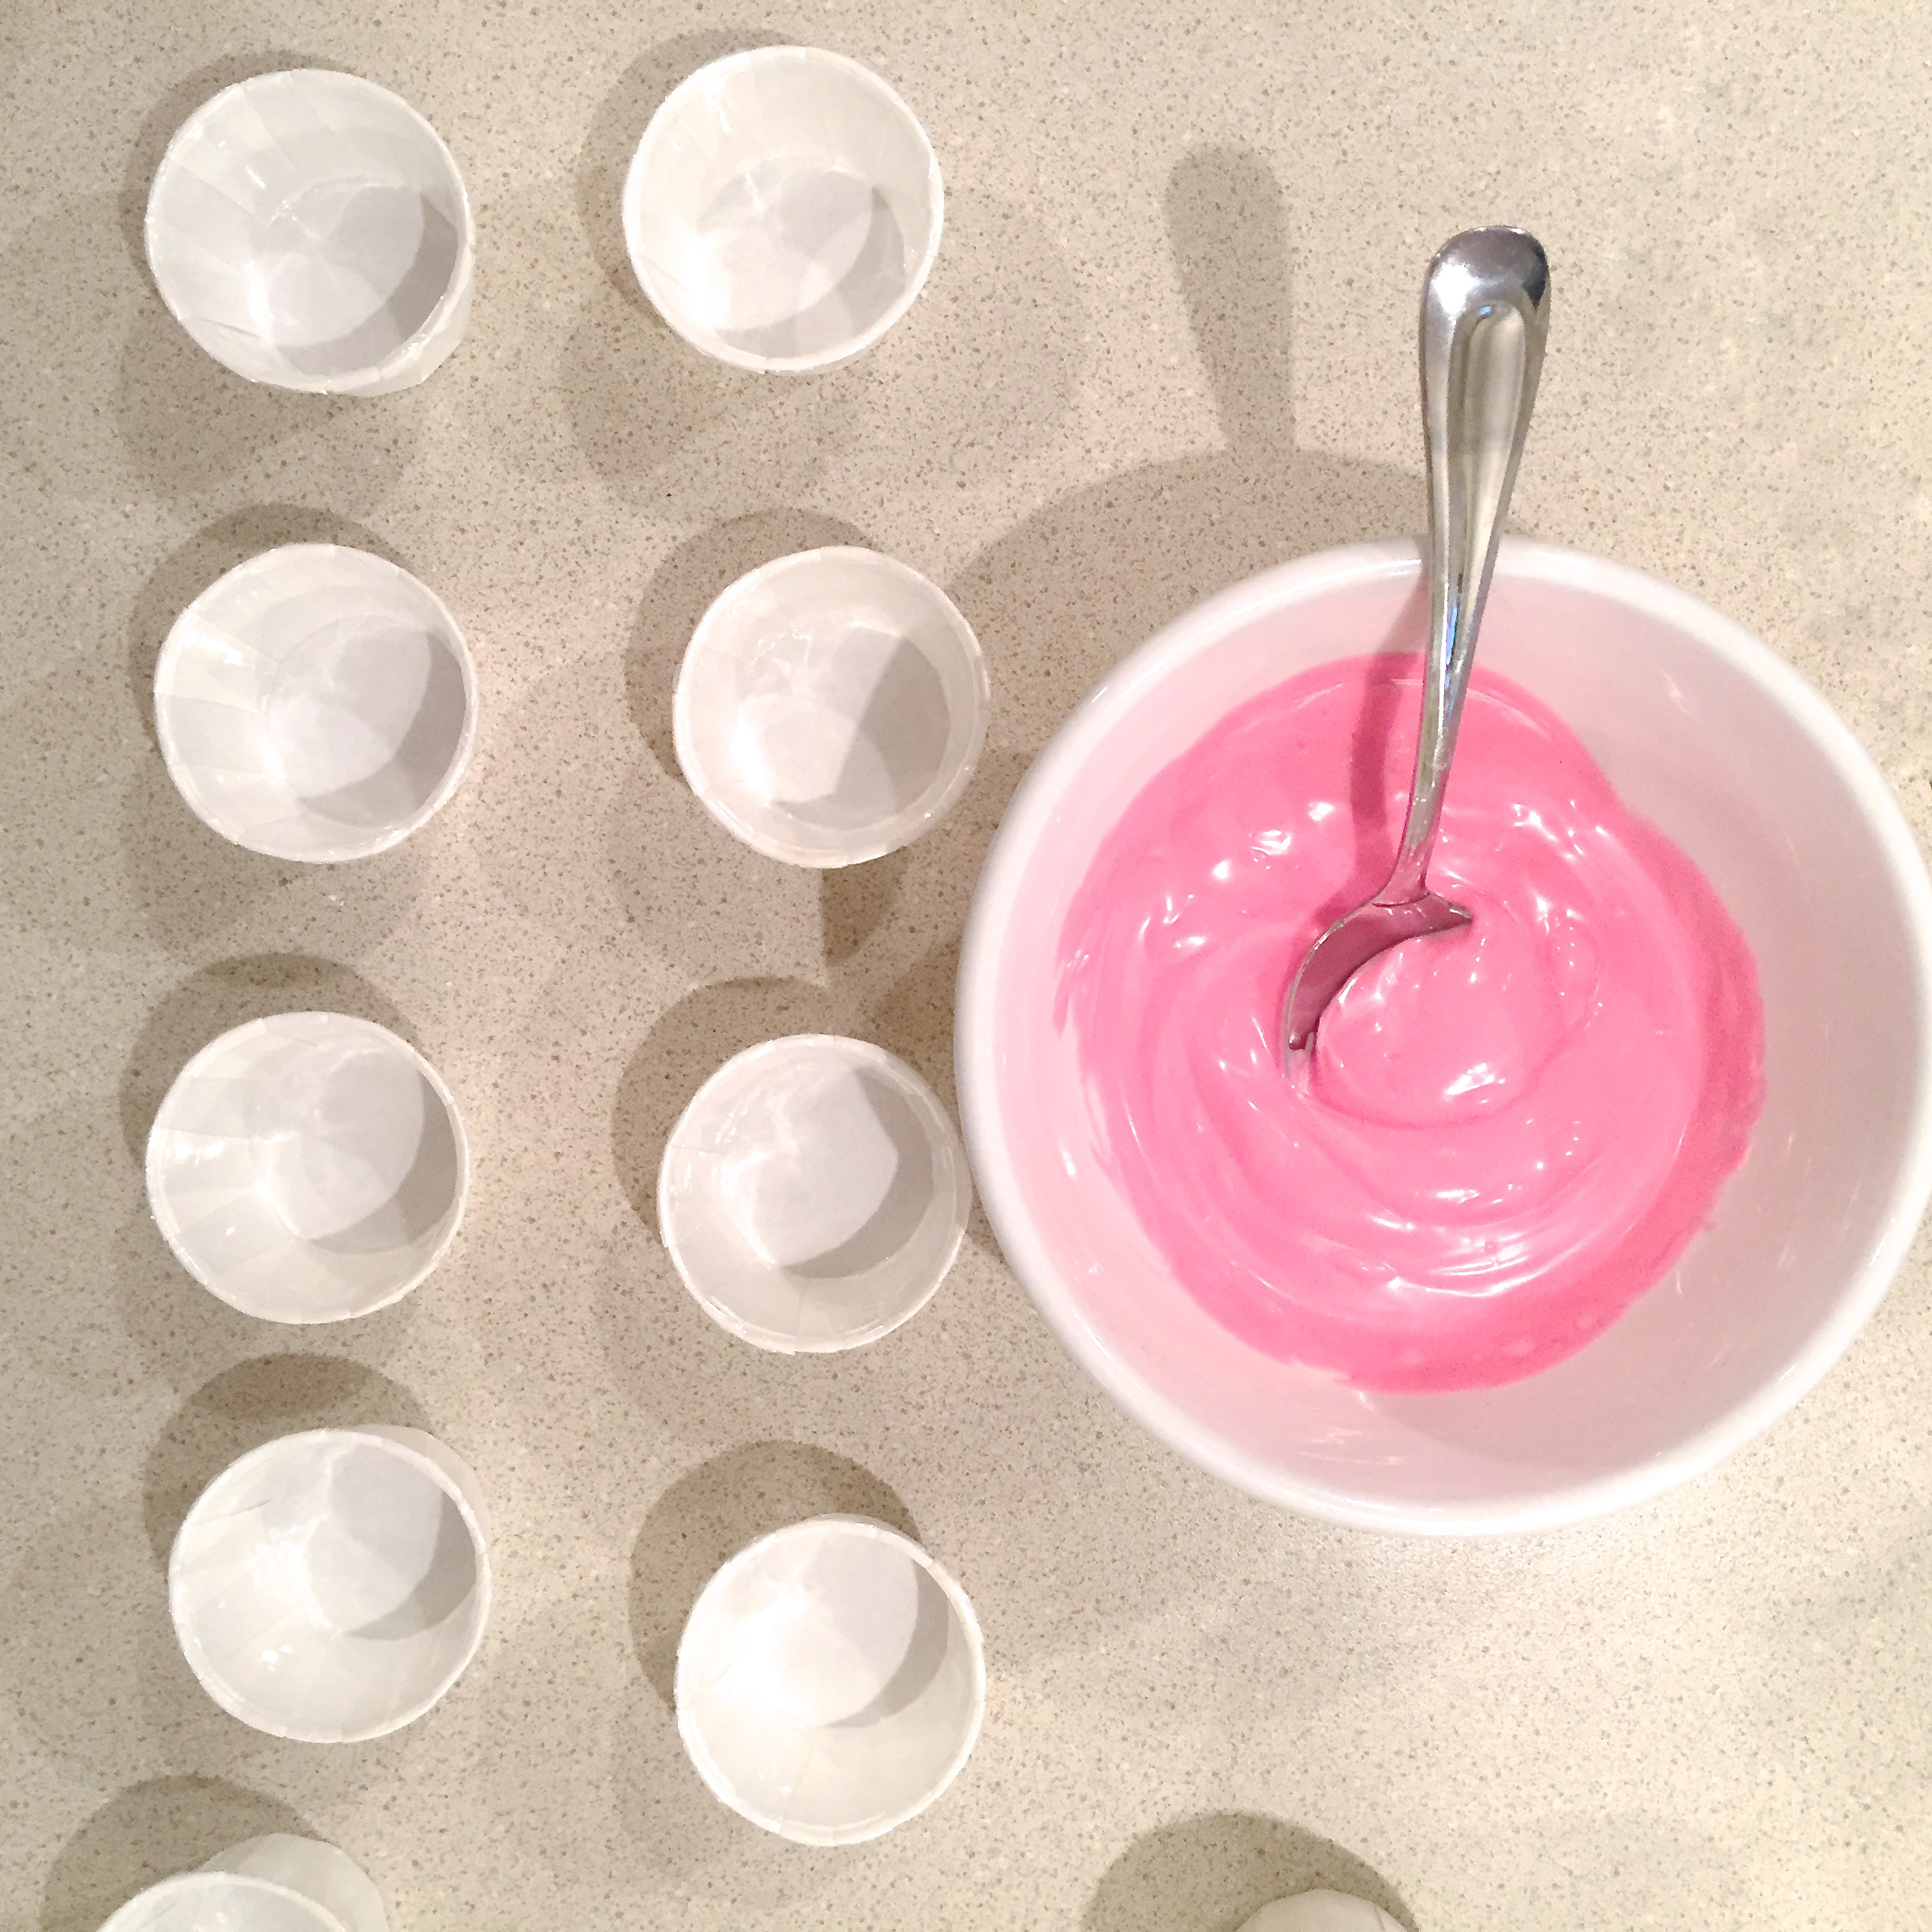
  • Mini paper nut cups

DIRECTIONS:

  • Liberally butter the bottom and sides of a sheet cake pan
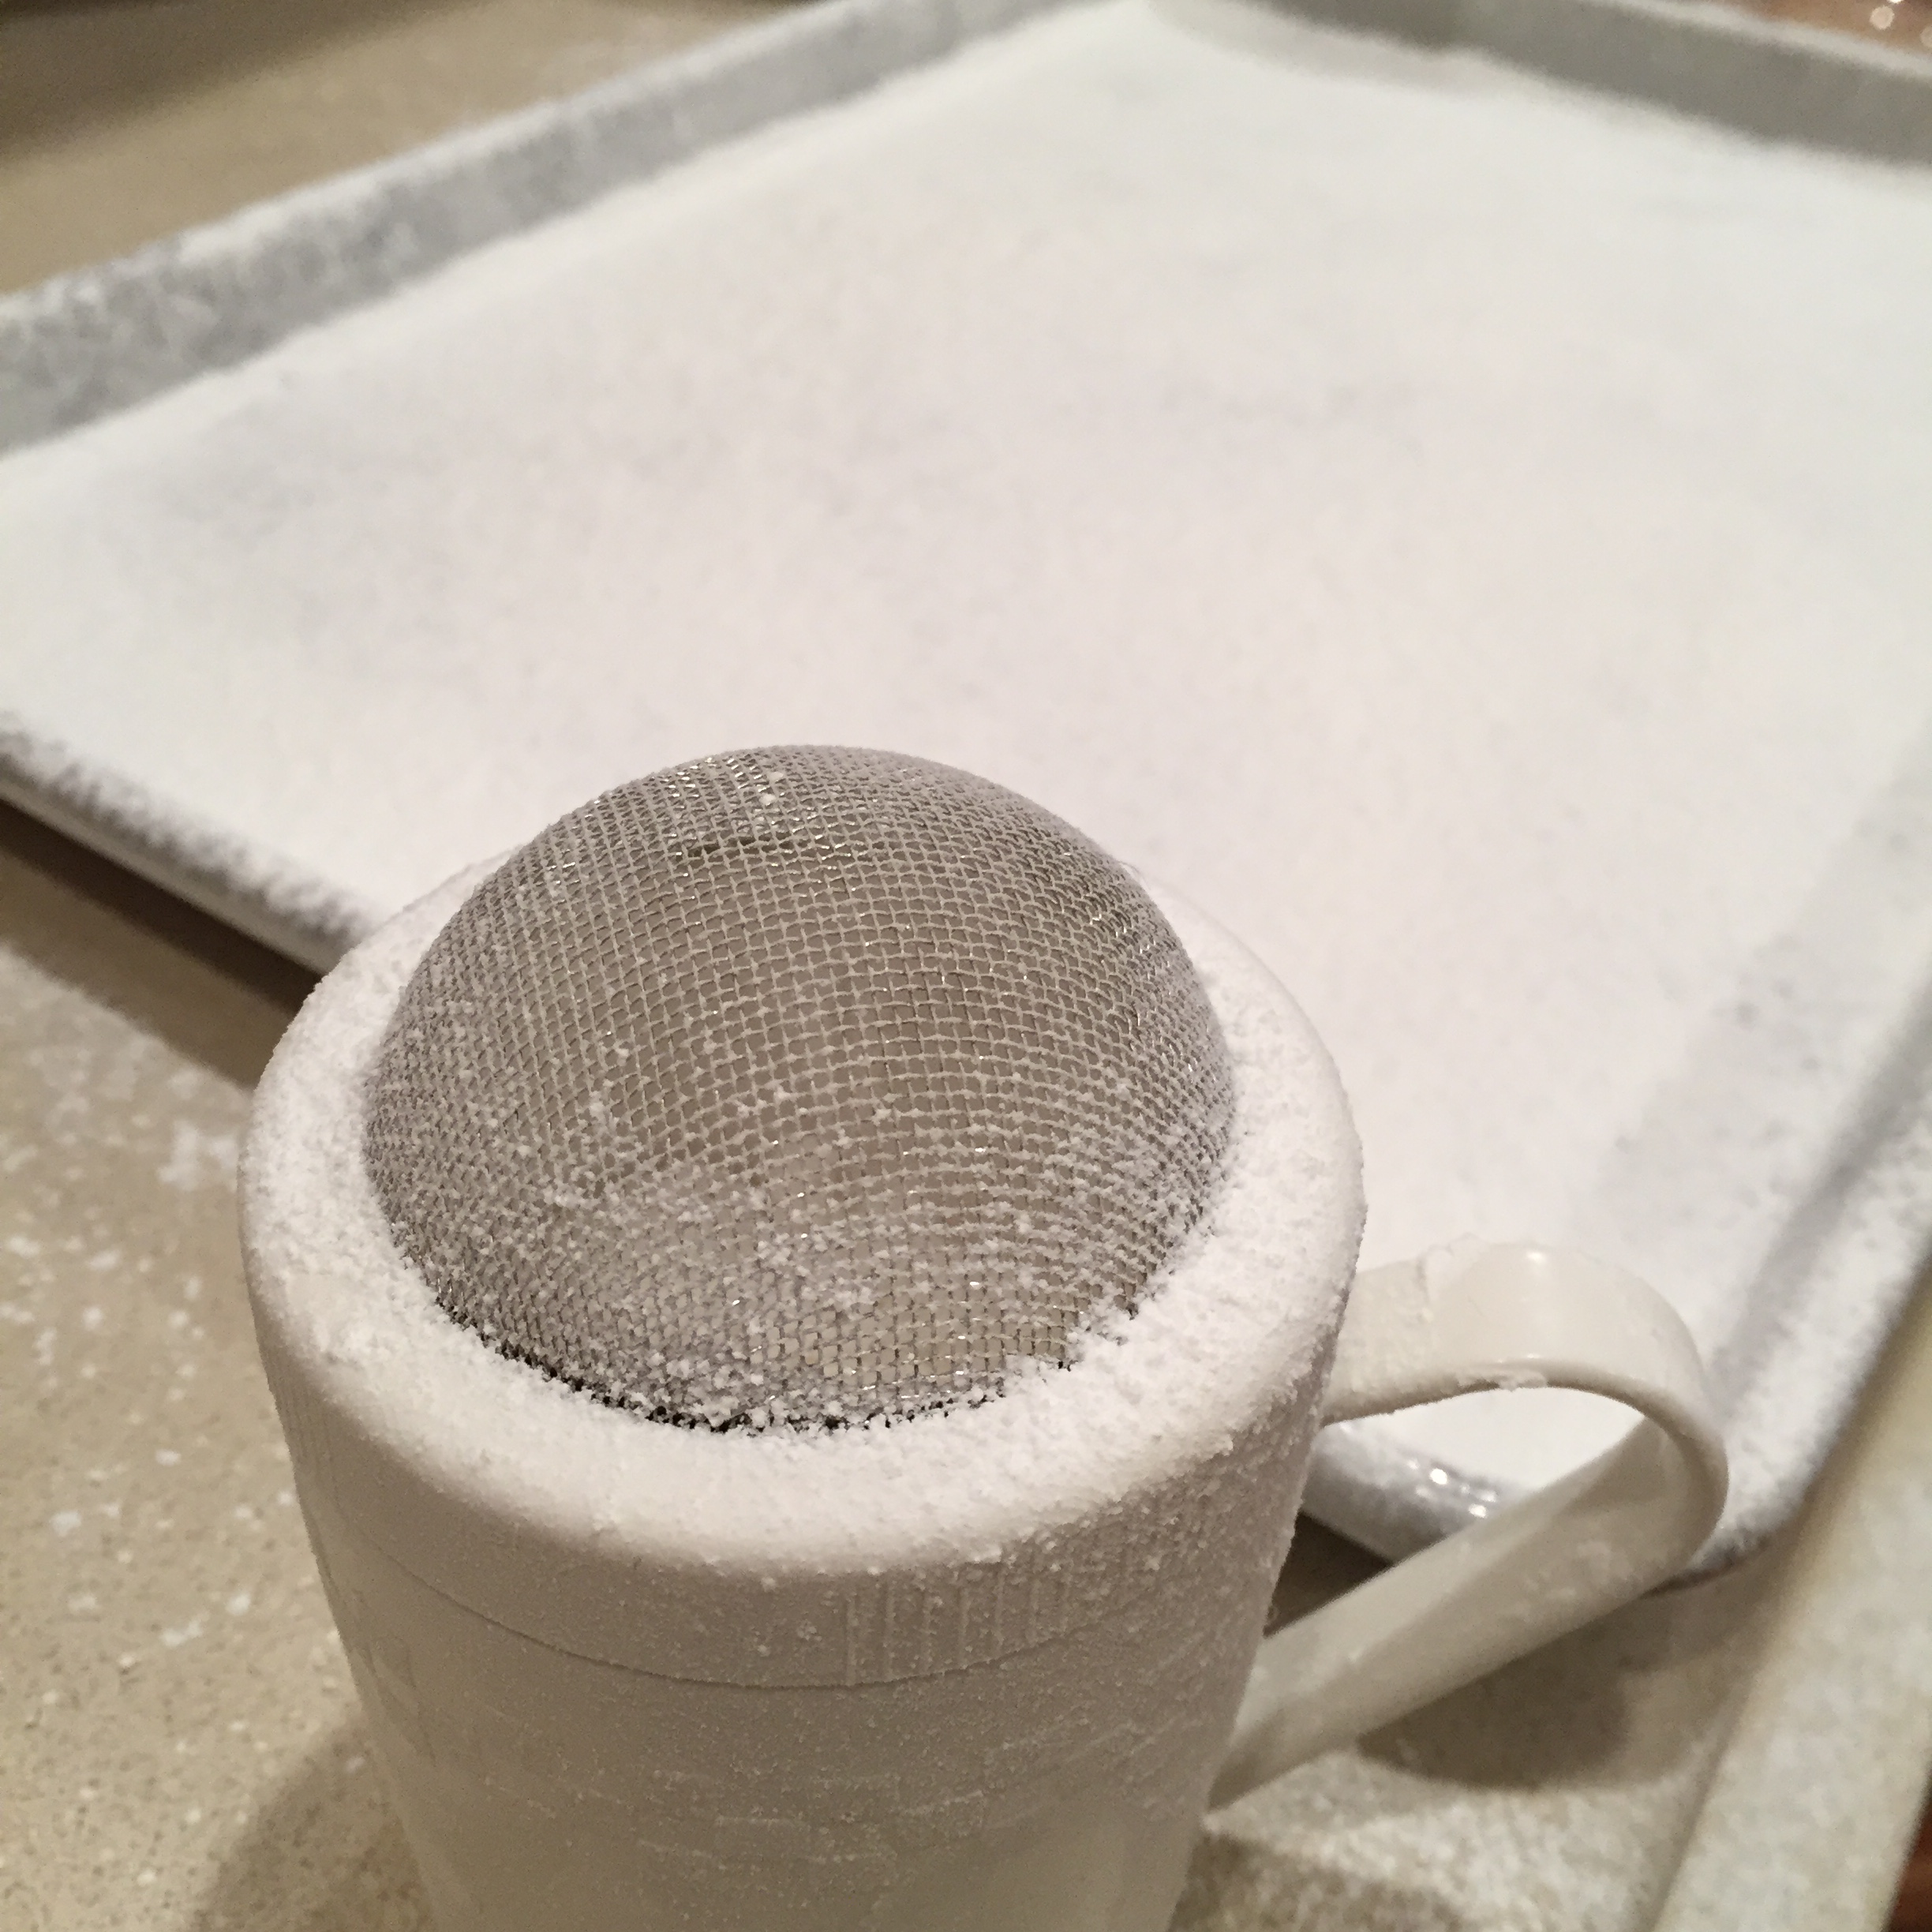
  • In a small bowl, mix together the powdered sugar and cornstarch.
  • Place about 1/2 of this mixture into a sugar shaker or sifter (I love my Pampered Chef one!) and coat entire pan with mixture.
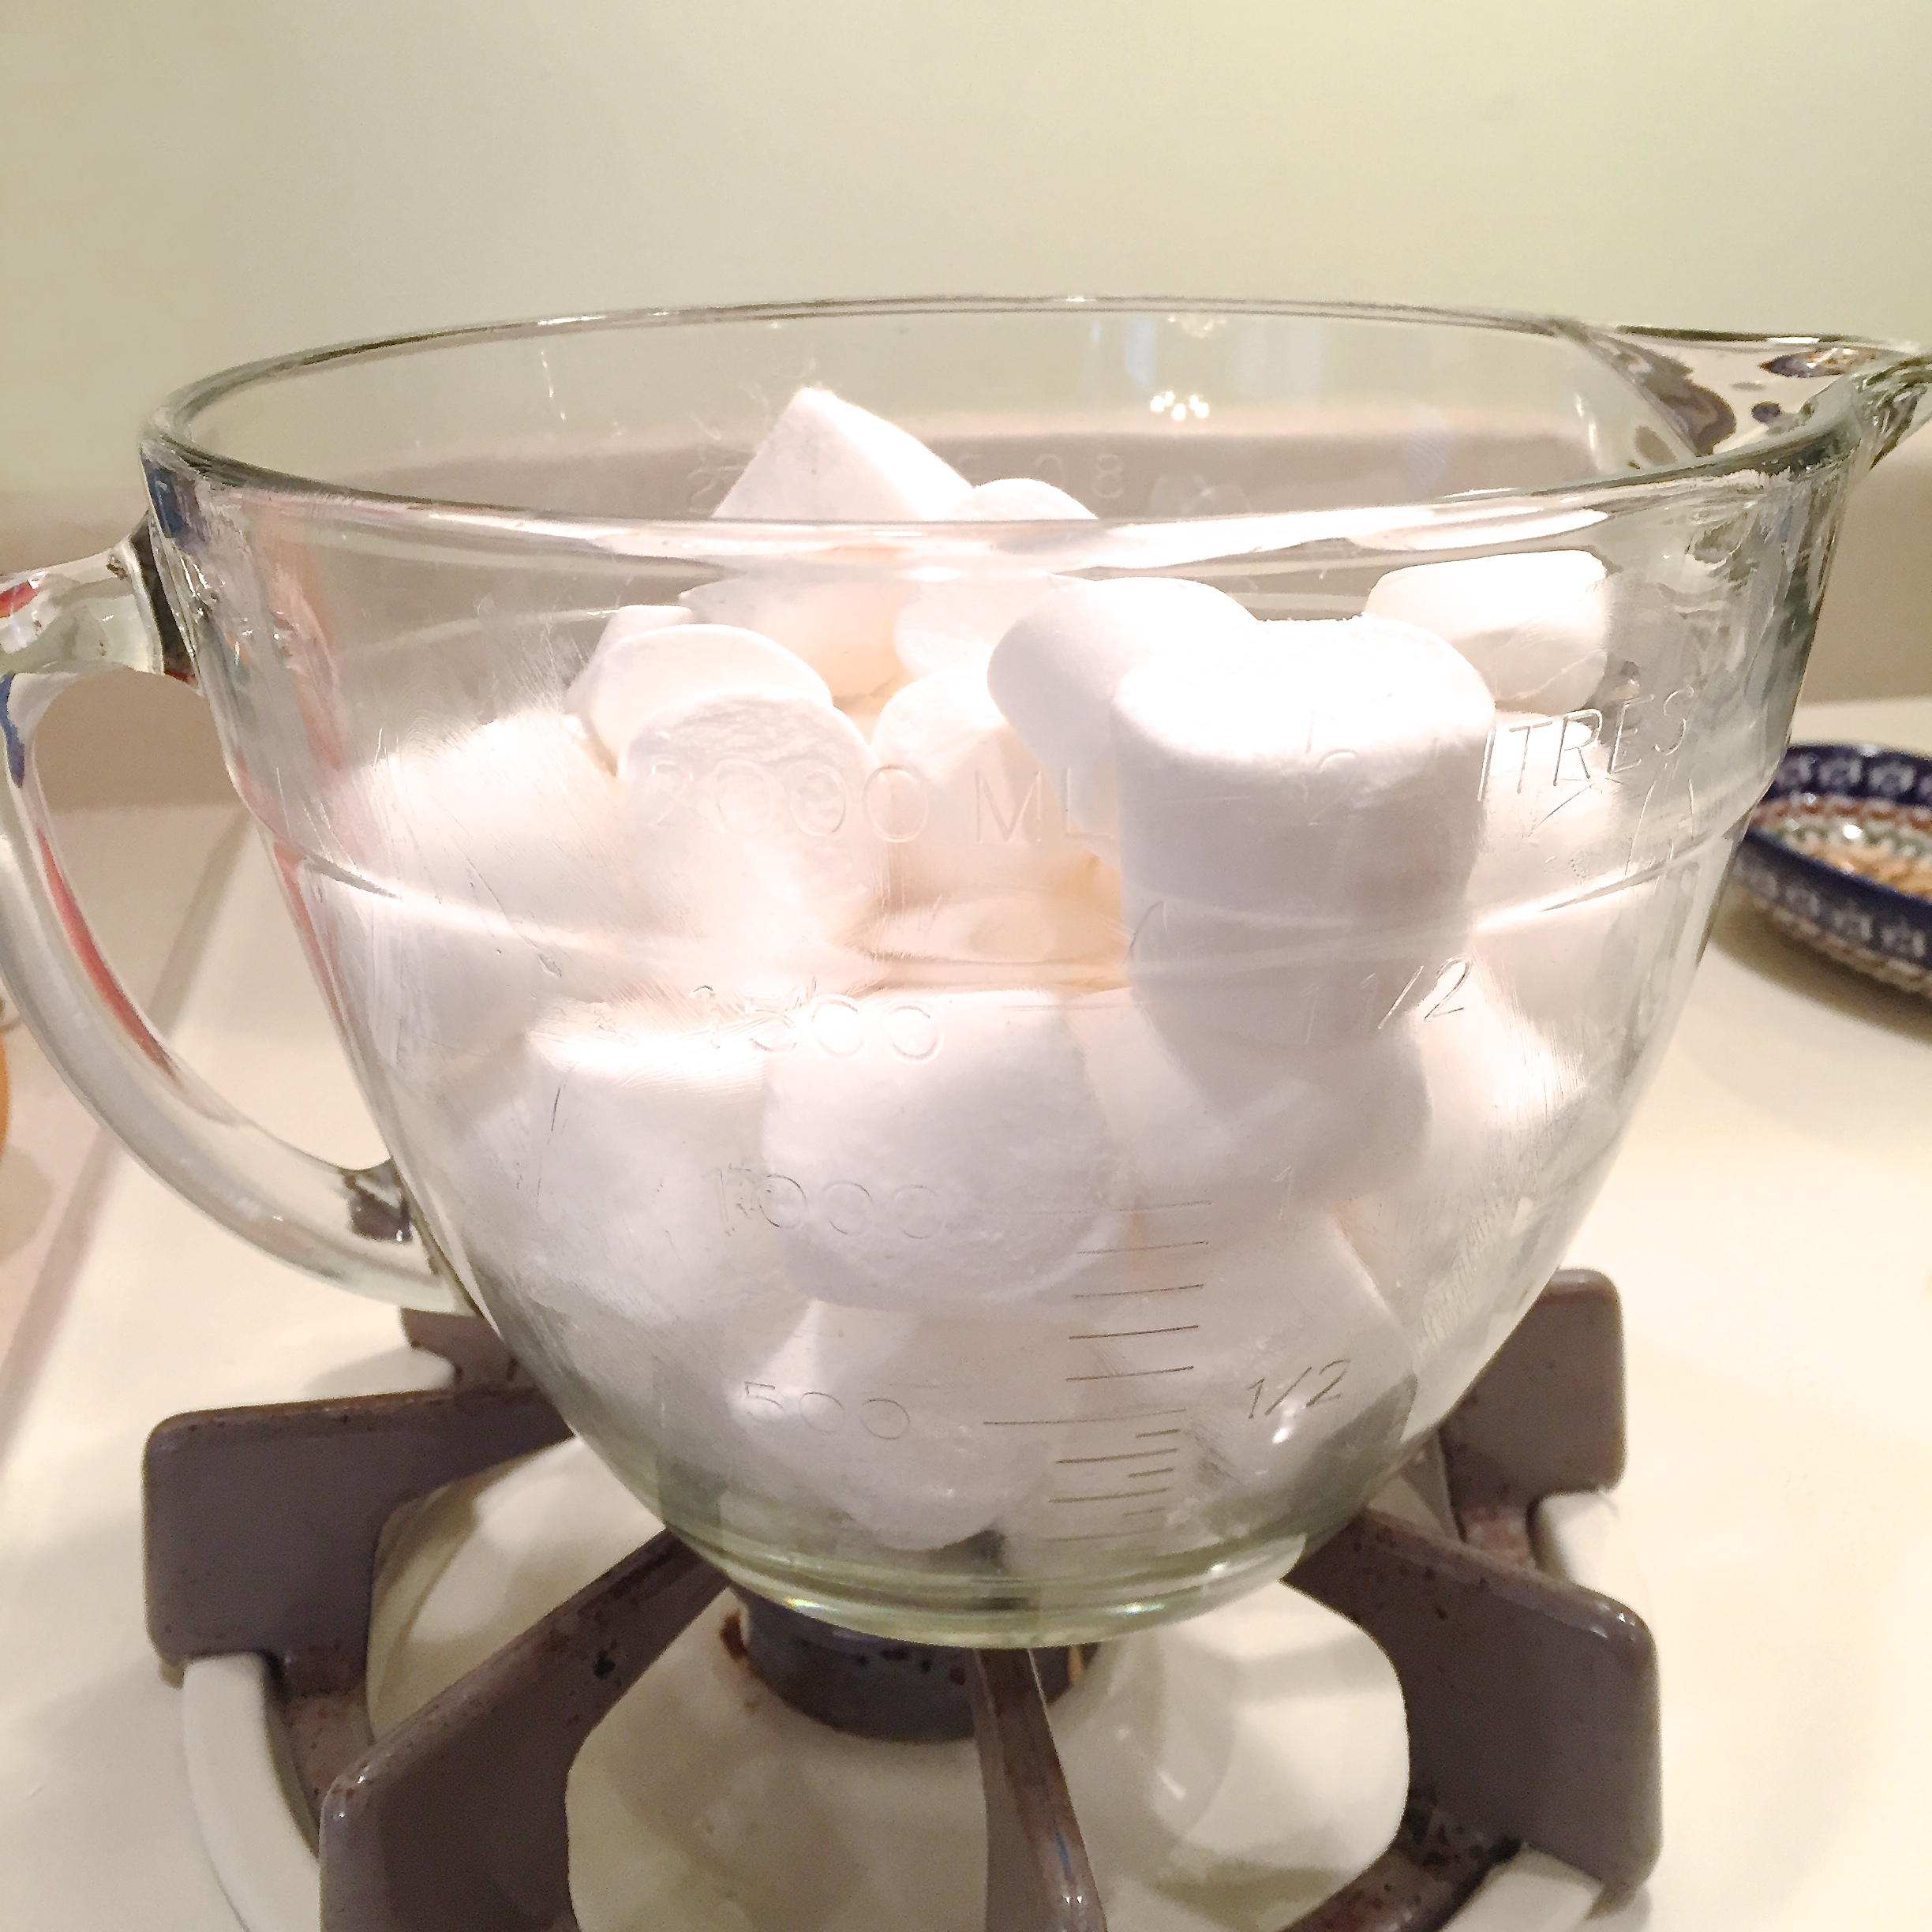
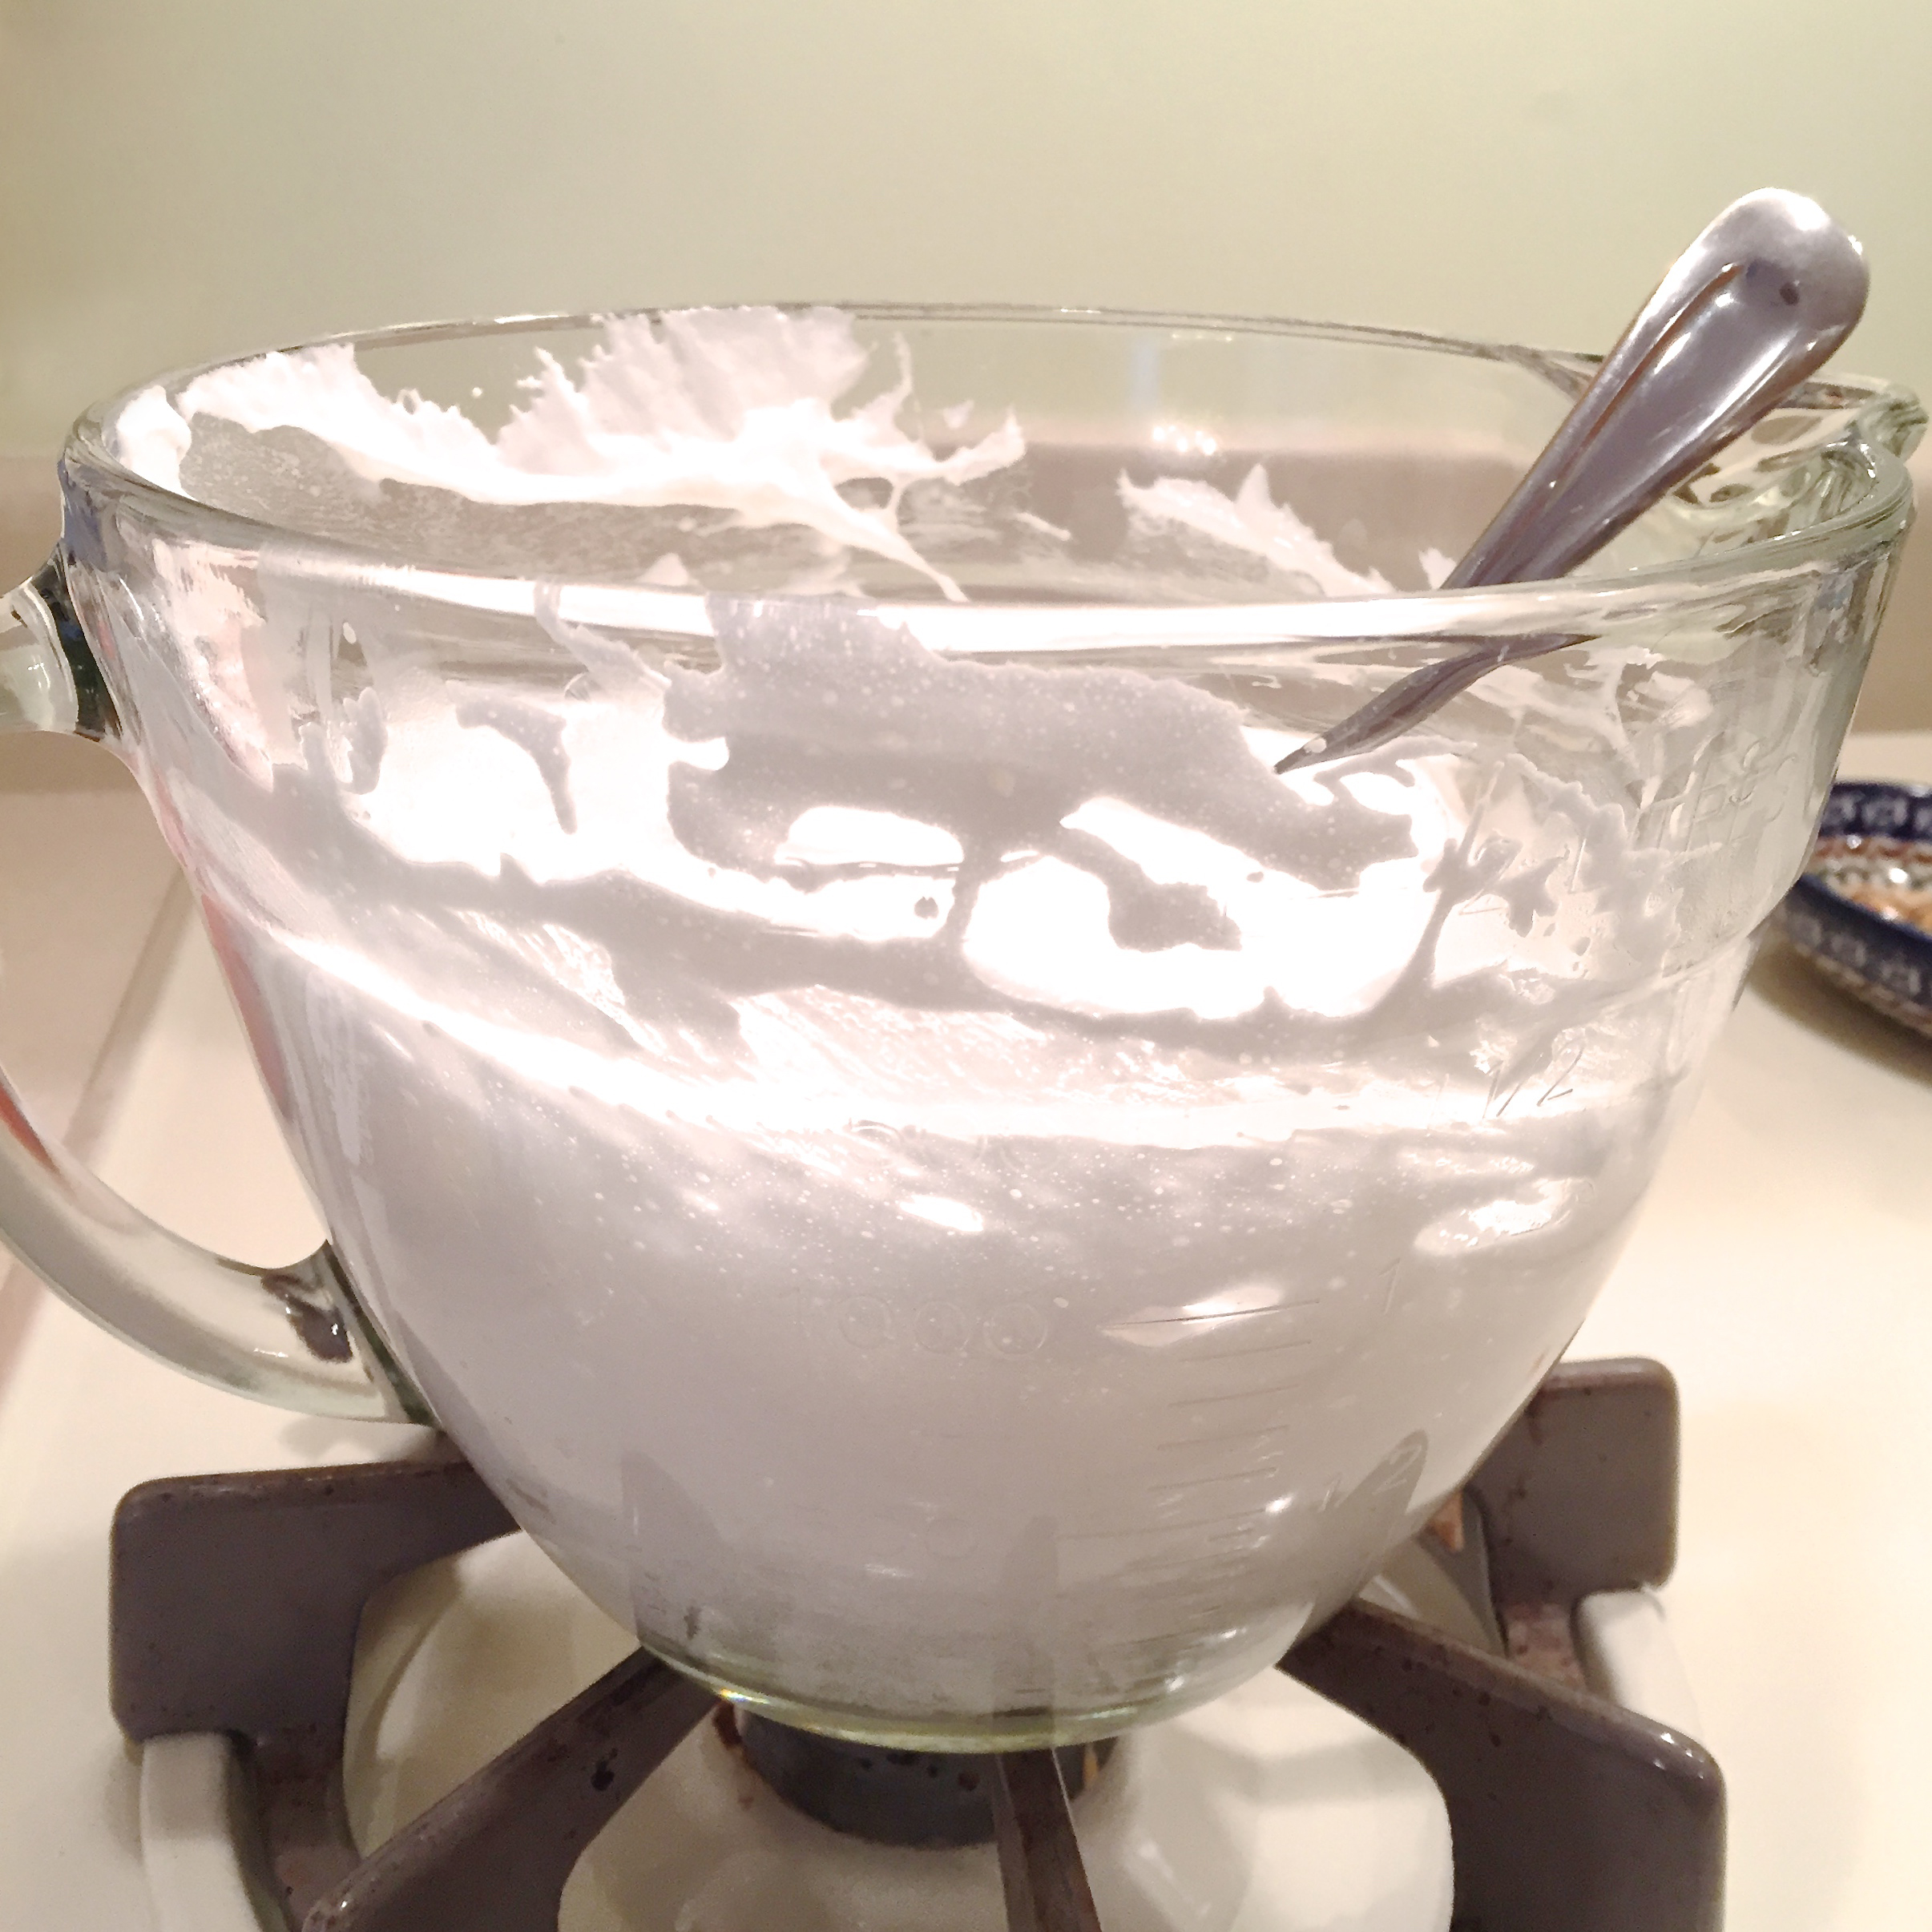
  • Liberally butter the inside of a large mixing bowl
  • Place marshmallows in bowl and melt in microwave for 30 seconds, stir and melt again for 30 seconds- until completely smooth.

melting MarshmallowsMelting marshmallows

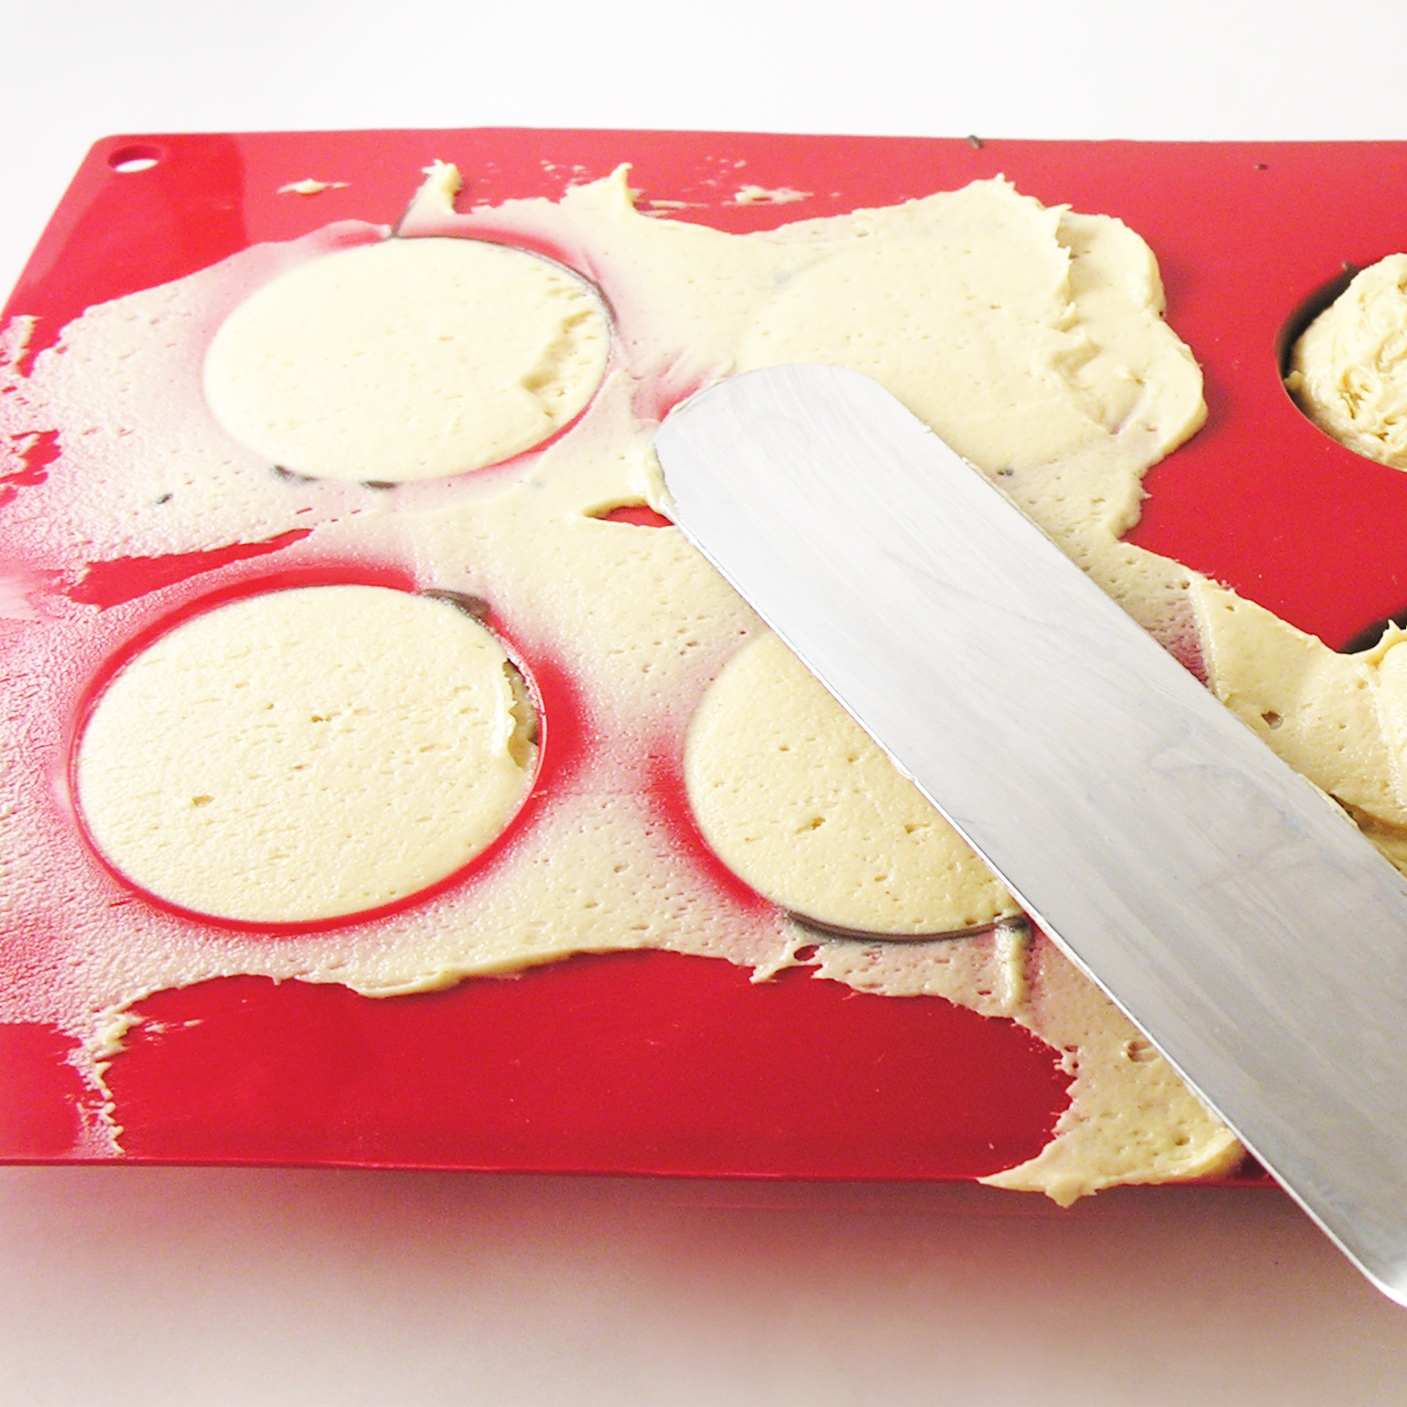
  • Pour marshmallow mixture down the center of the pan and sprinkle top with sugar/starch mixture.
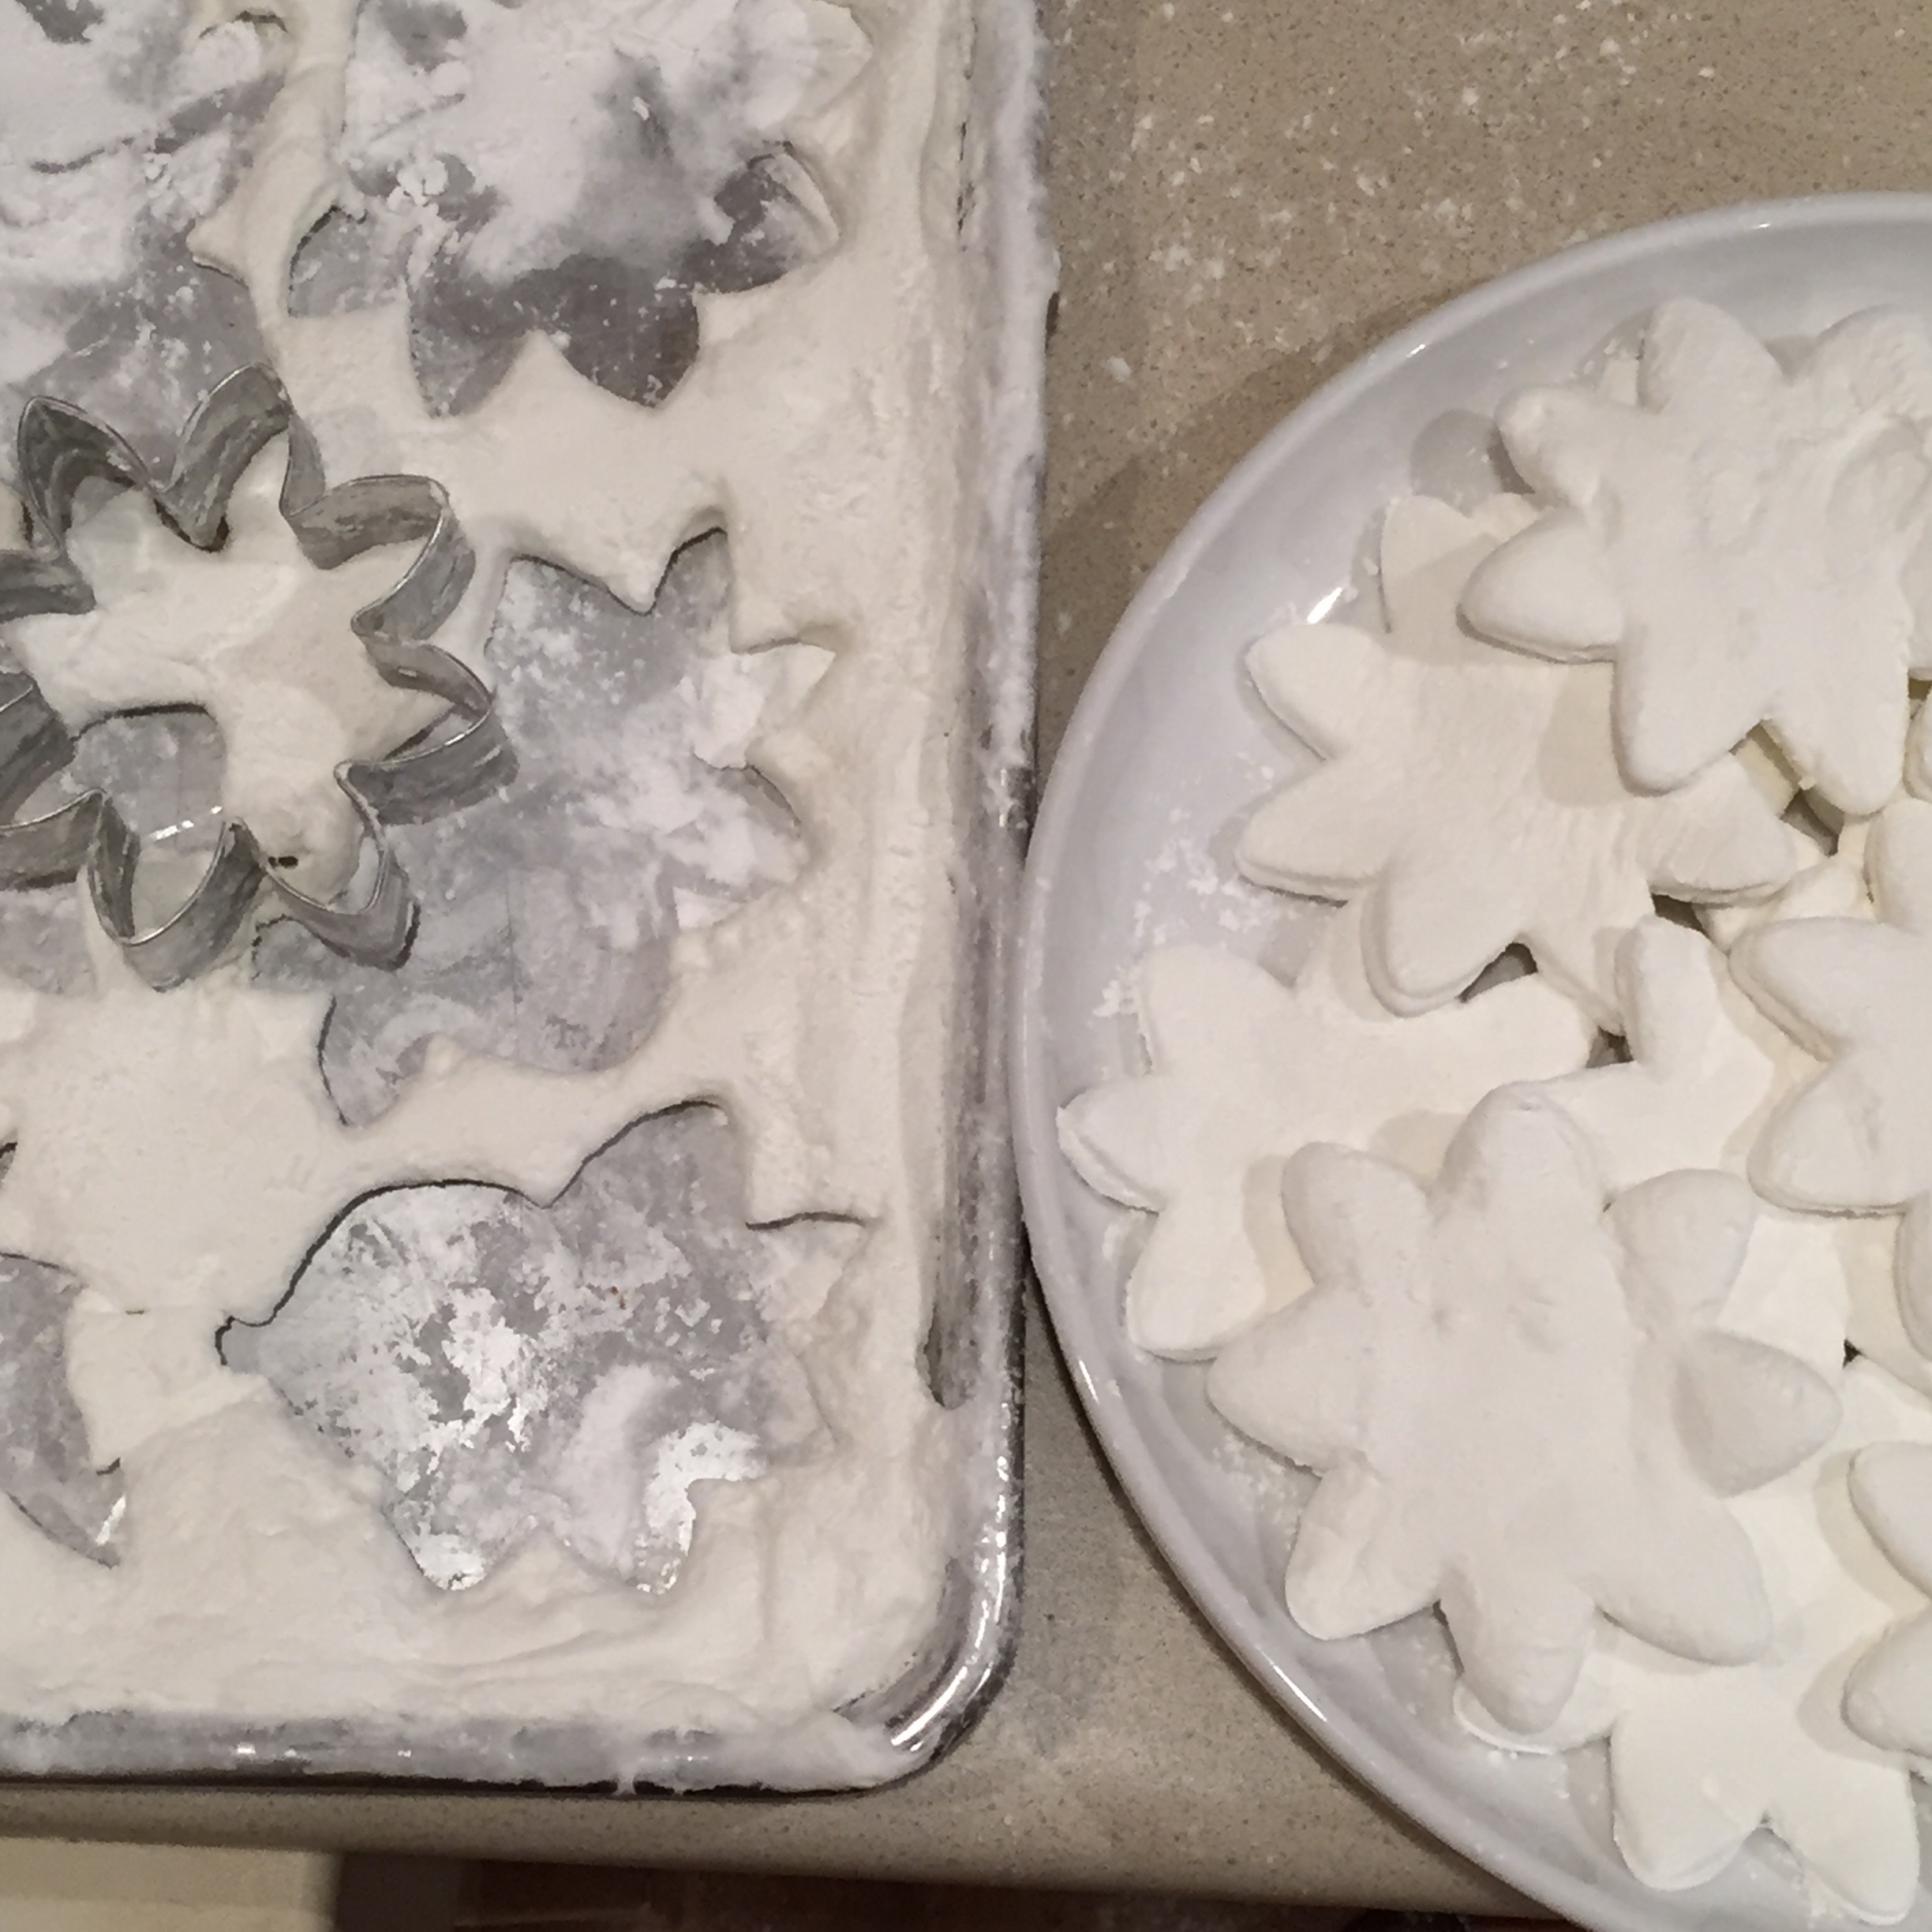
  • Coat your hands liberally in the powdered sugar/corn starch mixture and gently press the melted marshmallows flat across the pan. If you hit a sticky spot, sprinkle it with the sugar/starch.
  • Try to get the marshmallow layer as even as possible across the pan. You will have a few holes and maybe not get it all to the edge, but remember that you will be cutting flowers out of this- so you can work around bad spots.

img_0738img_0746

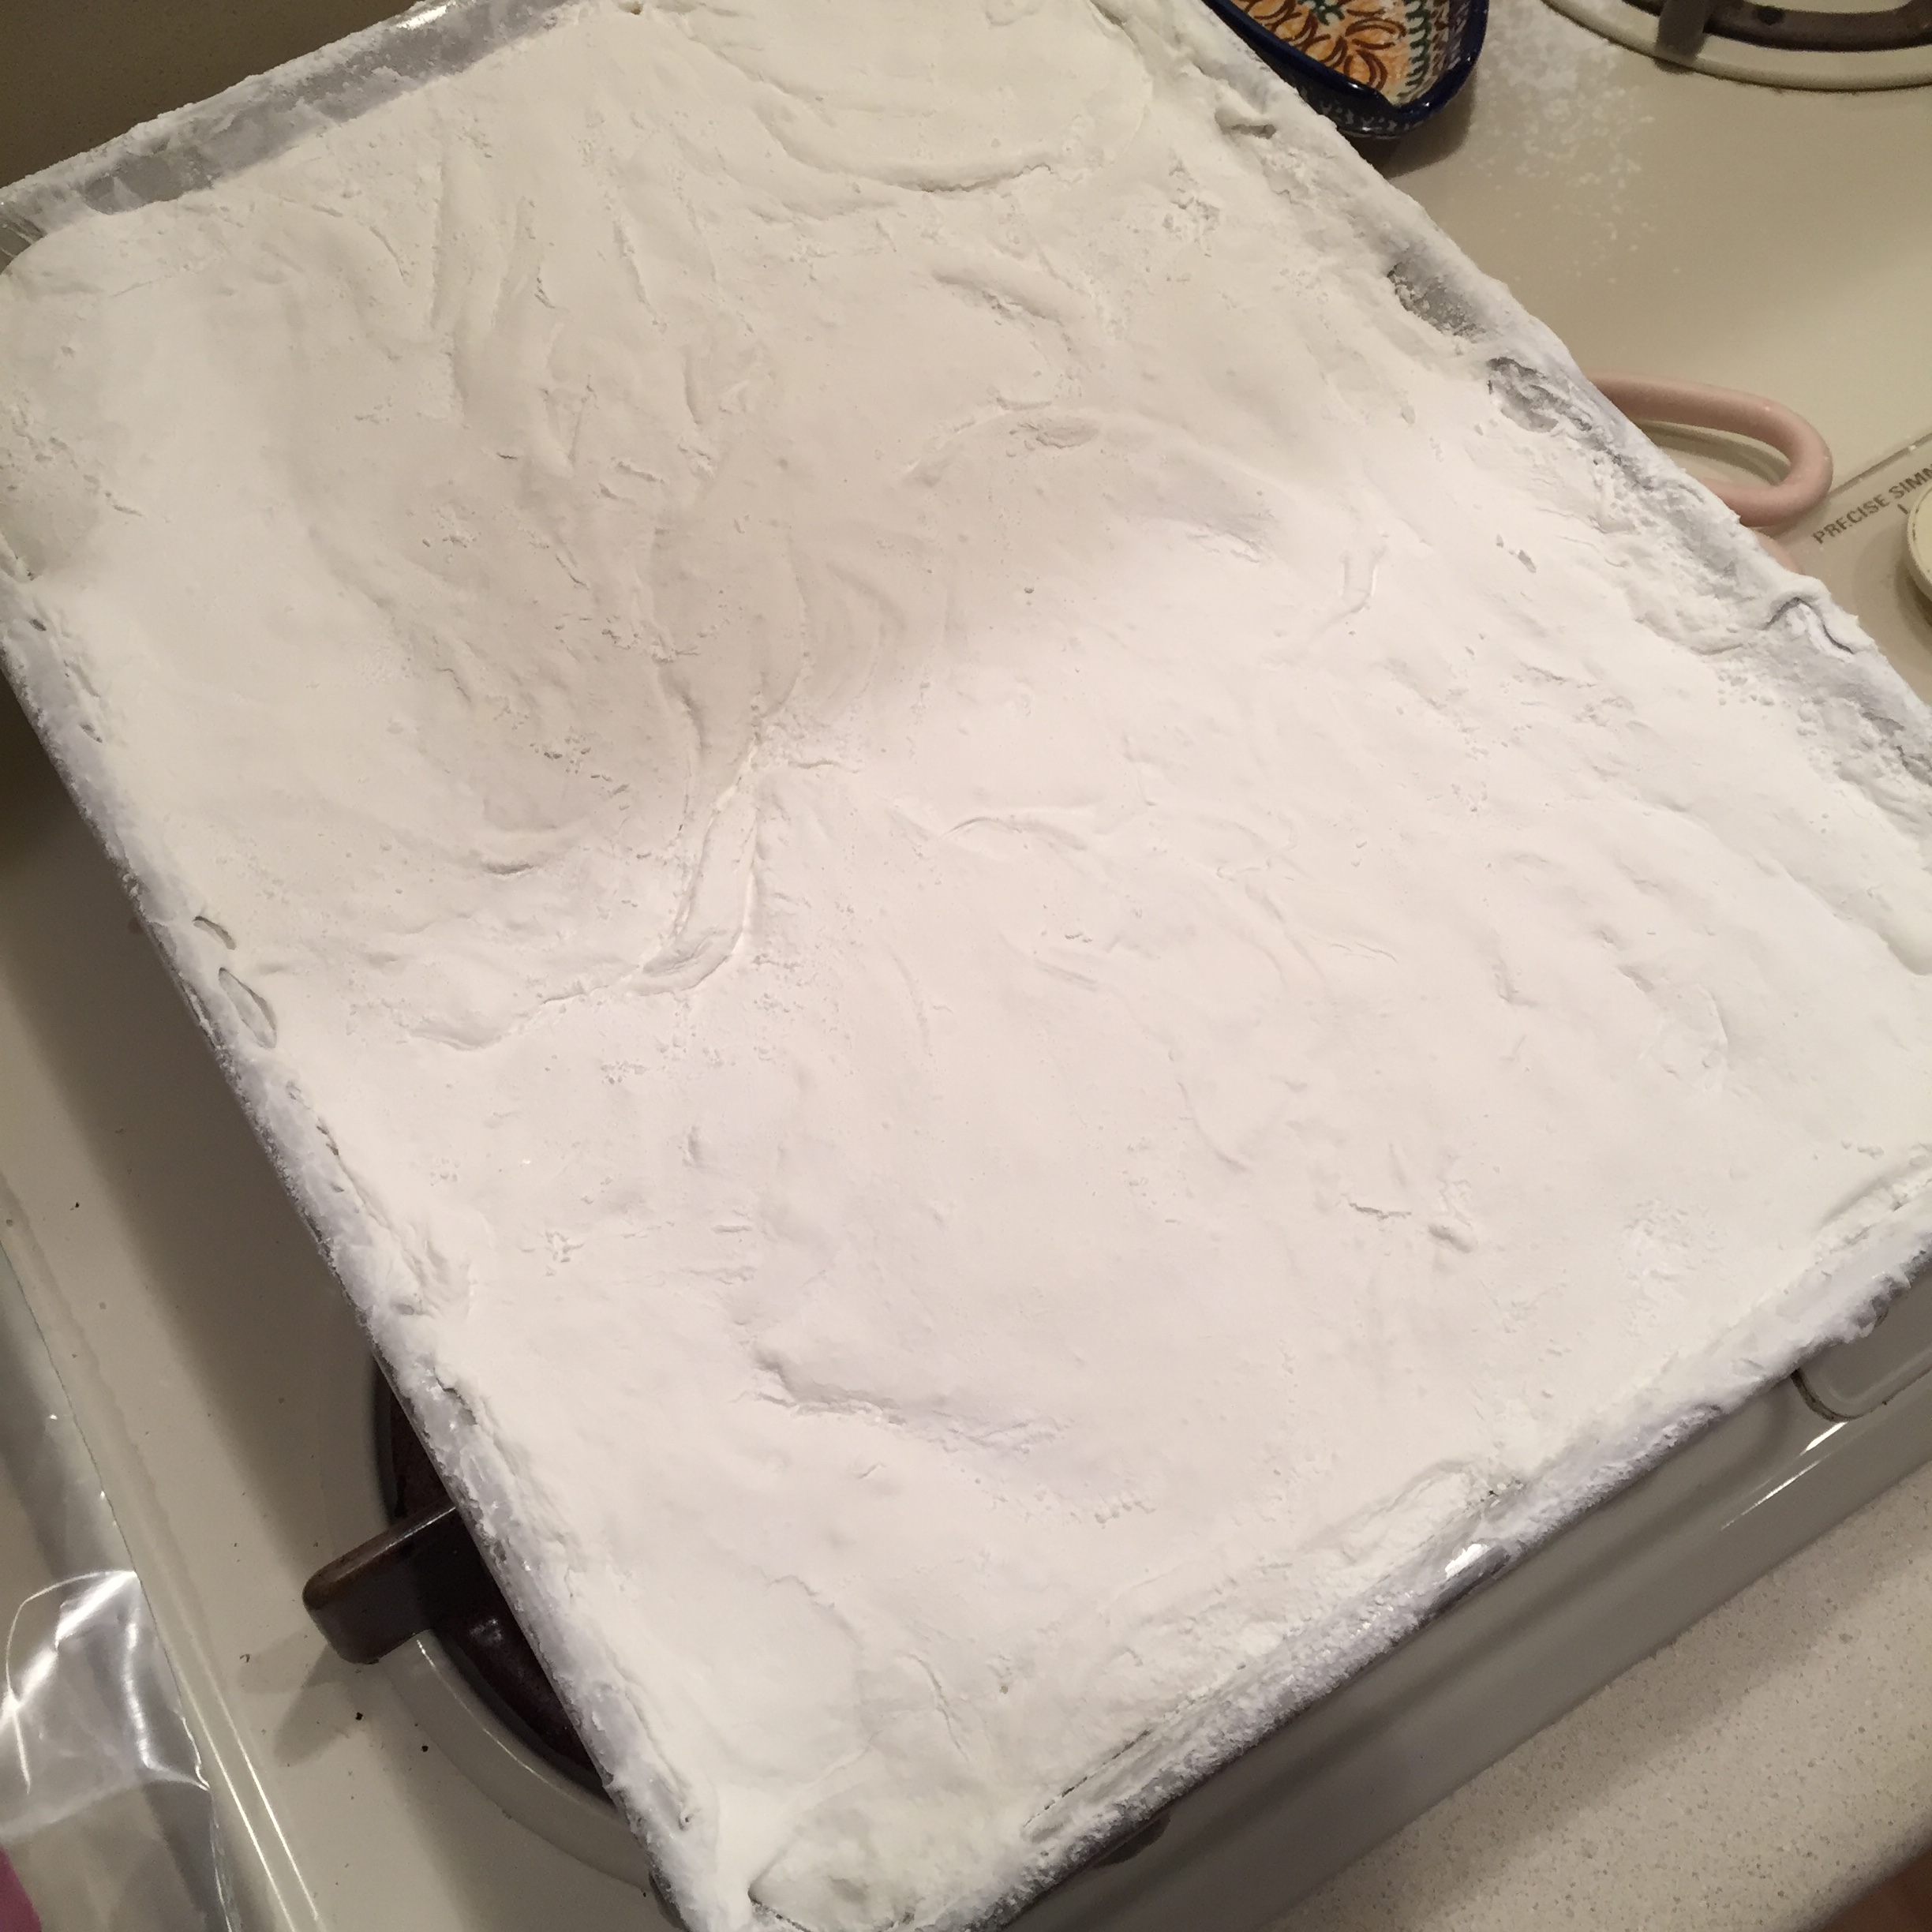
  • Allow this to harden for 30 minutes.
  • Coat cookie cutter in sugar/starch mixture and carefully cut out a flower. Coat cut edges in powder and set aside while the rest are cut.

Cookie cutter marshmallow Cookie cutter marshmallow

  • Have some sprinkles or Sixlets candy ready to place into the center of the flowers- but don’t place them yet.
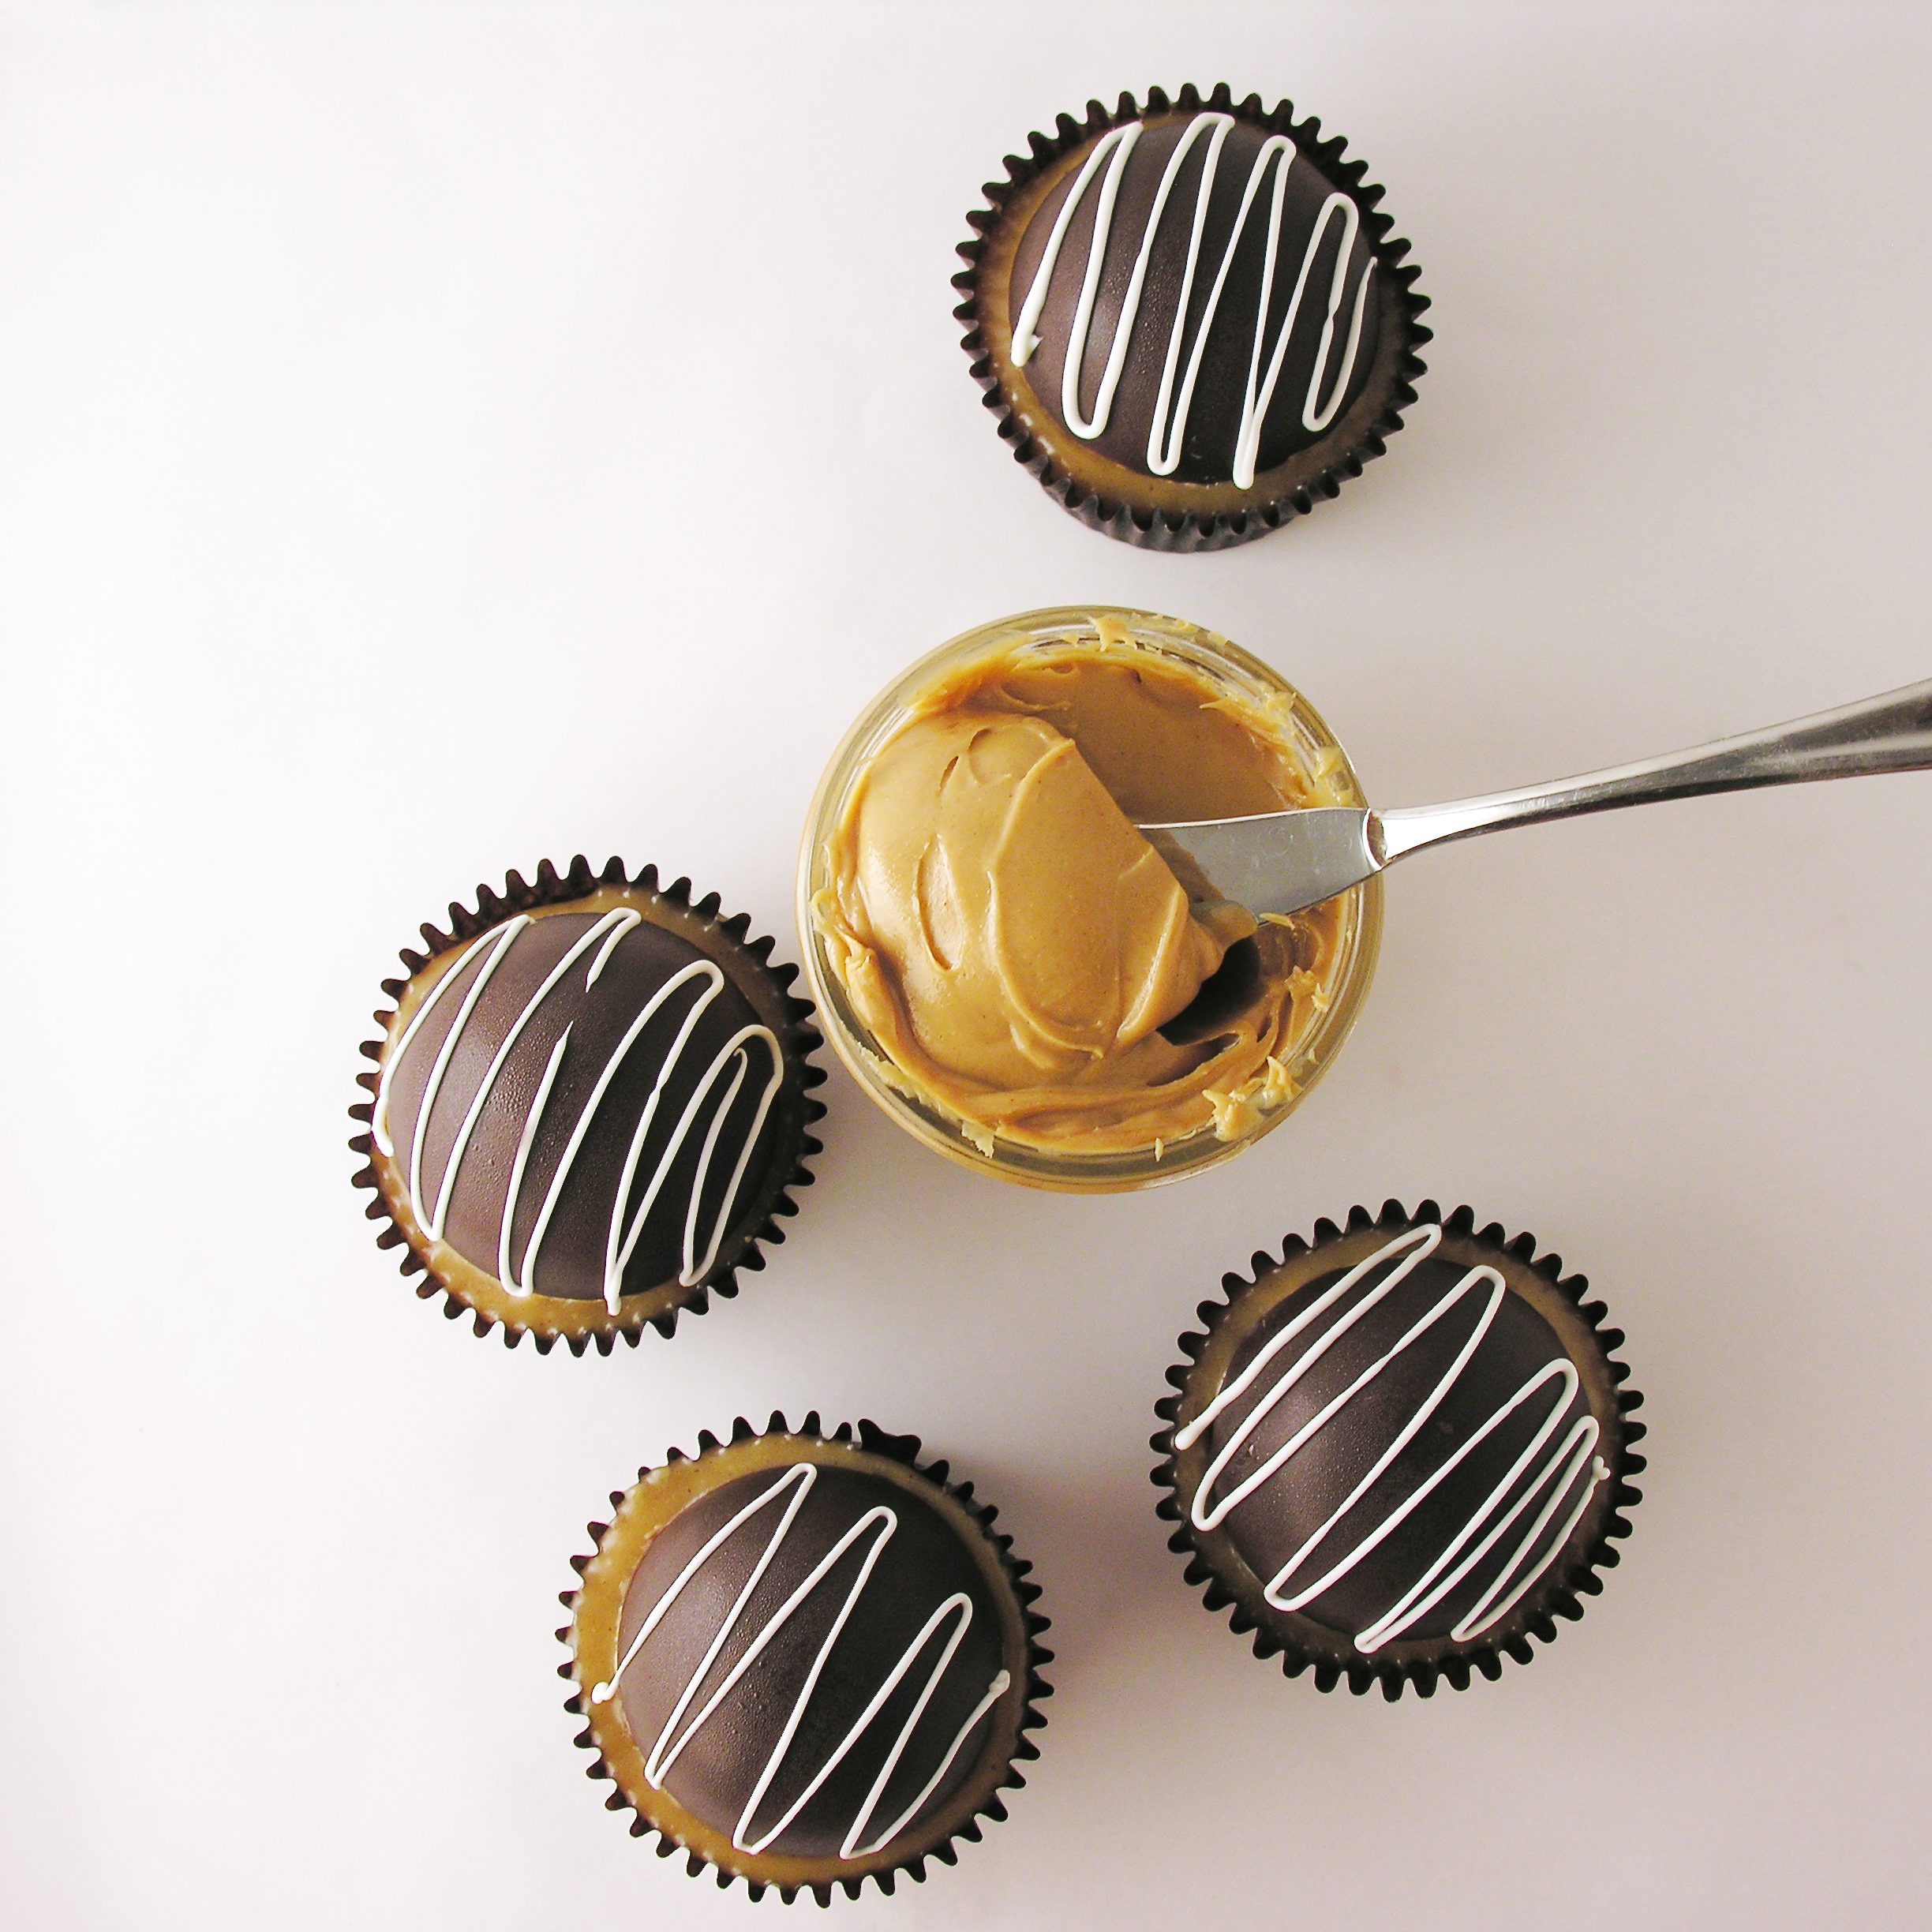
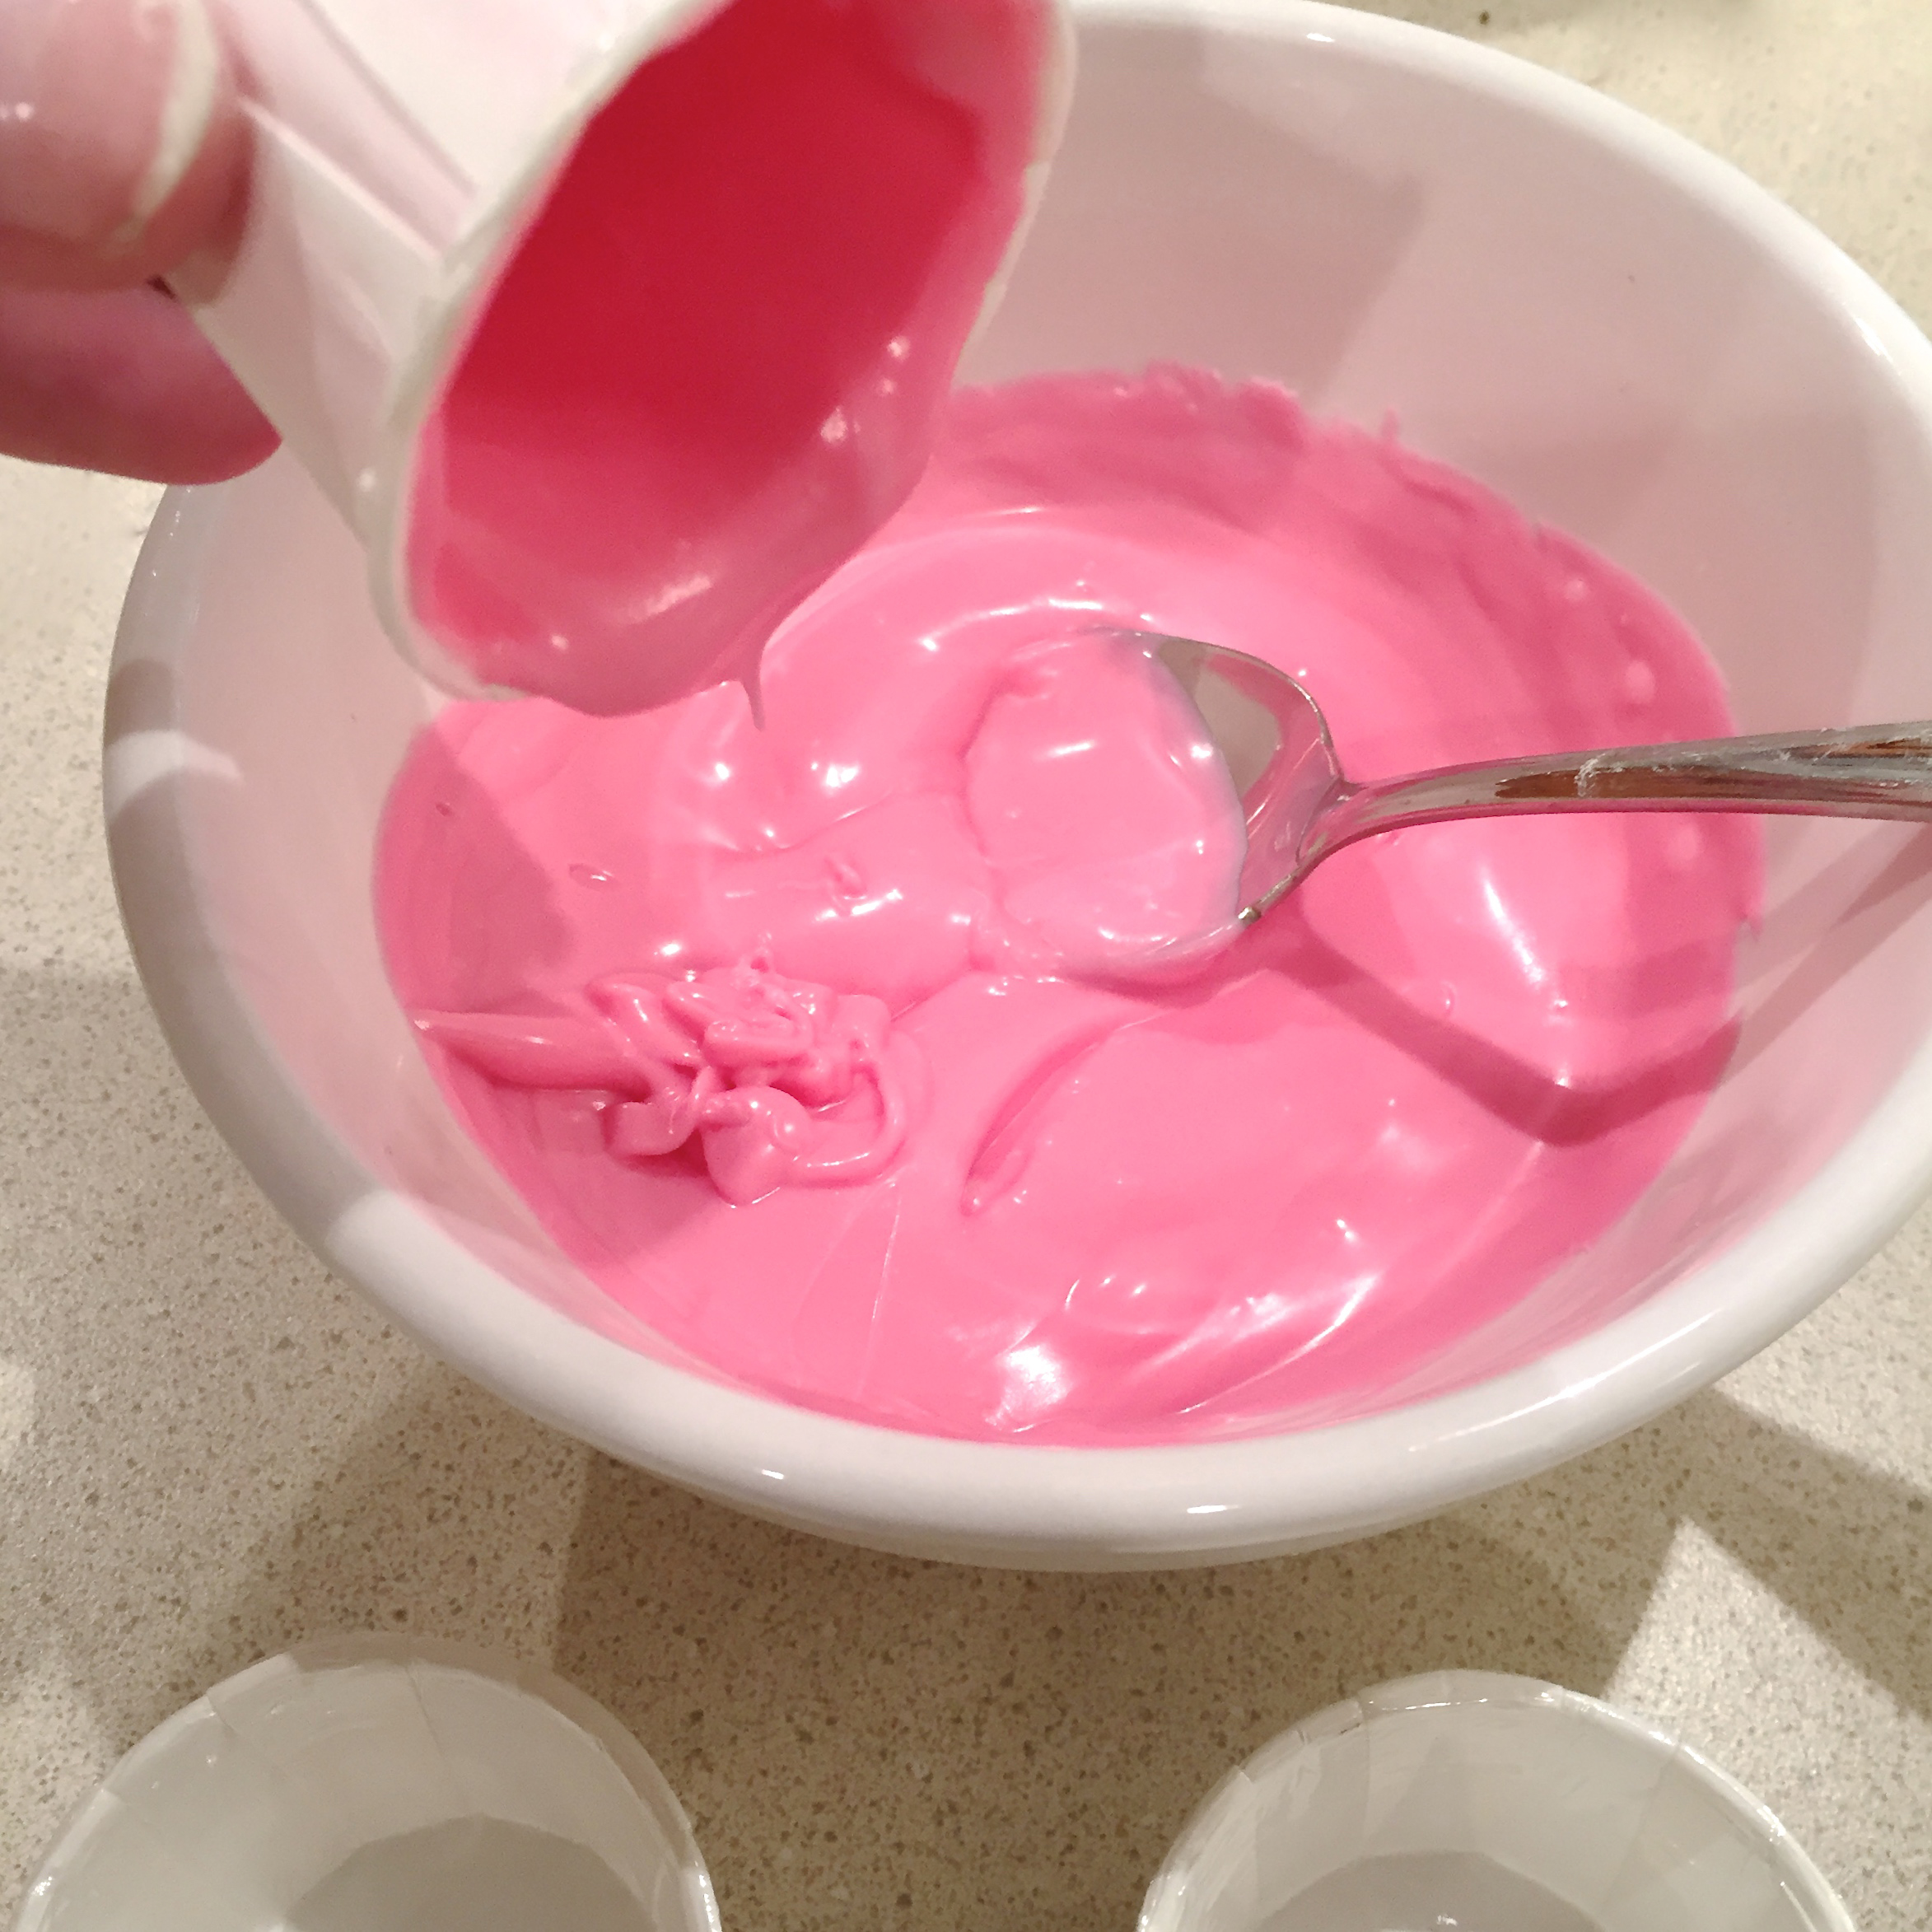
  • Melt Candy Melts in the microwave in 30 second increments, stirring in between until melted and smooth.
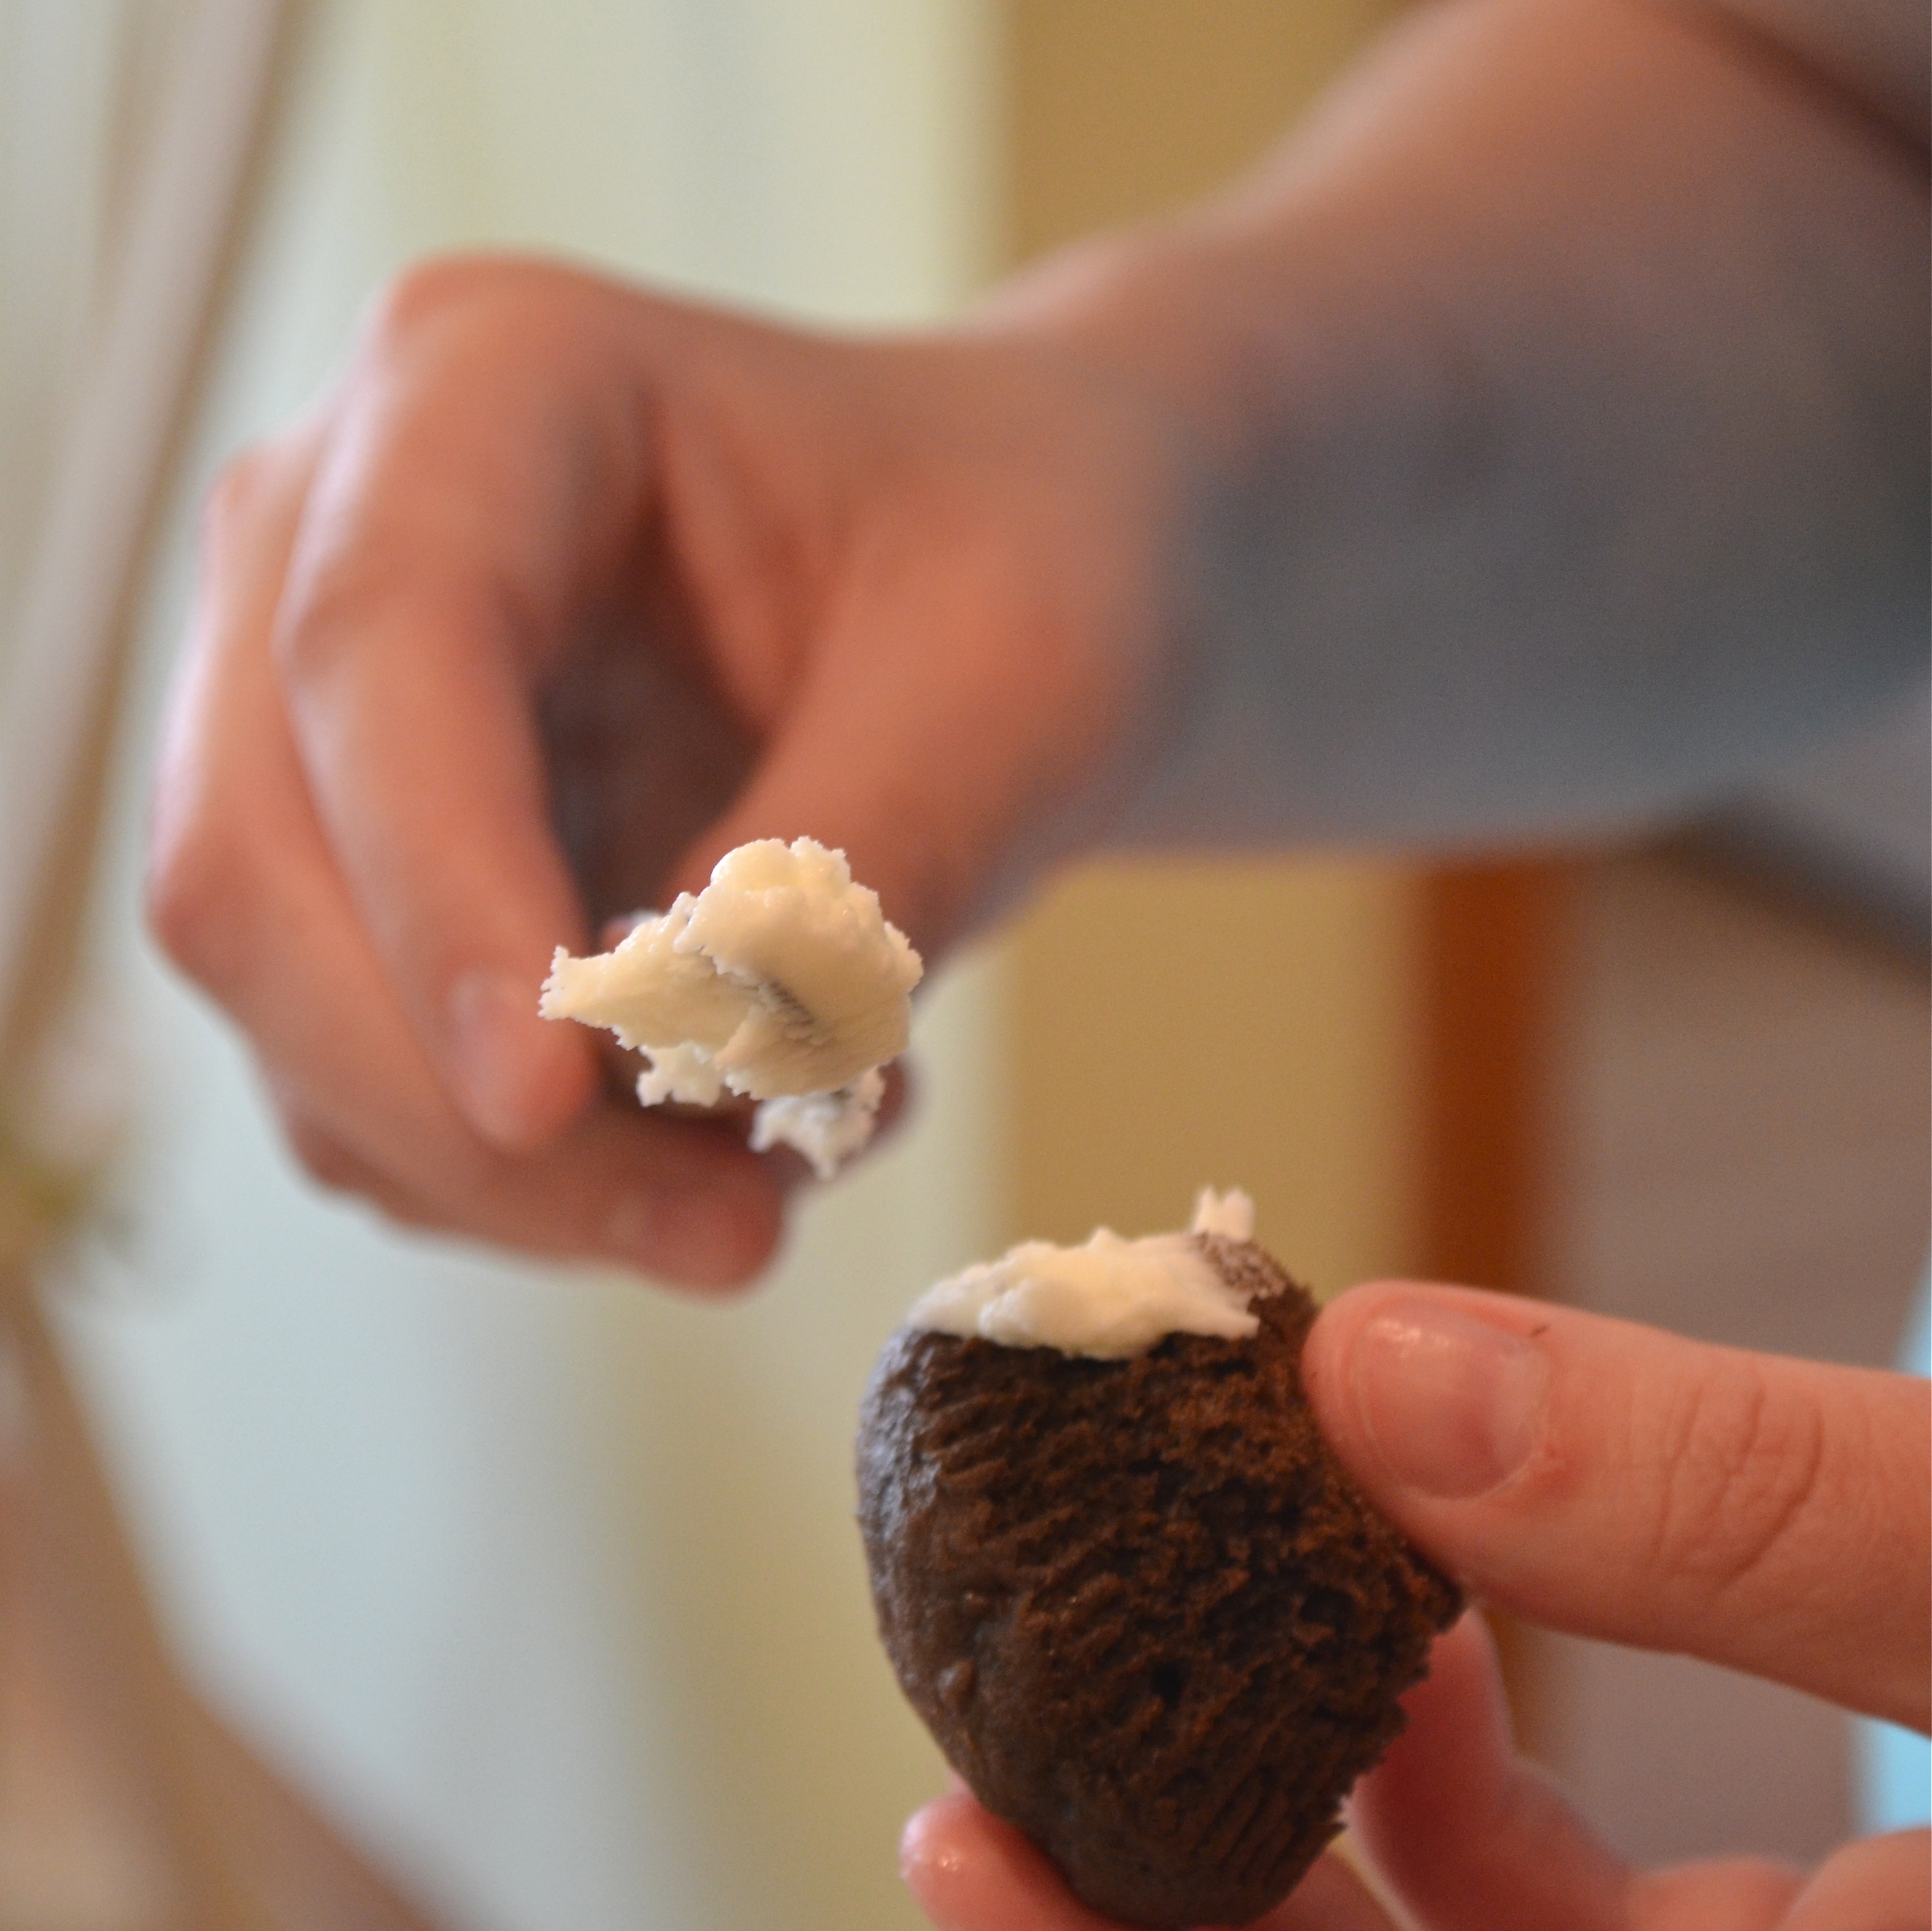
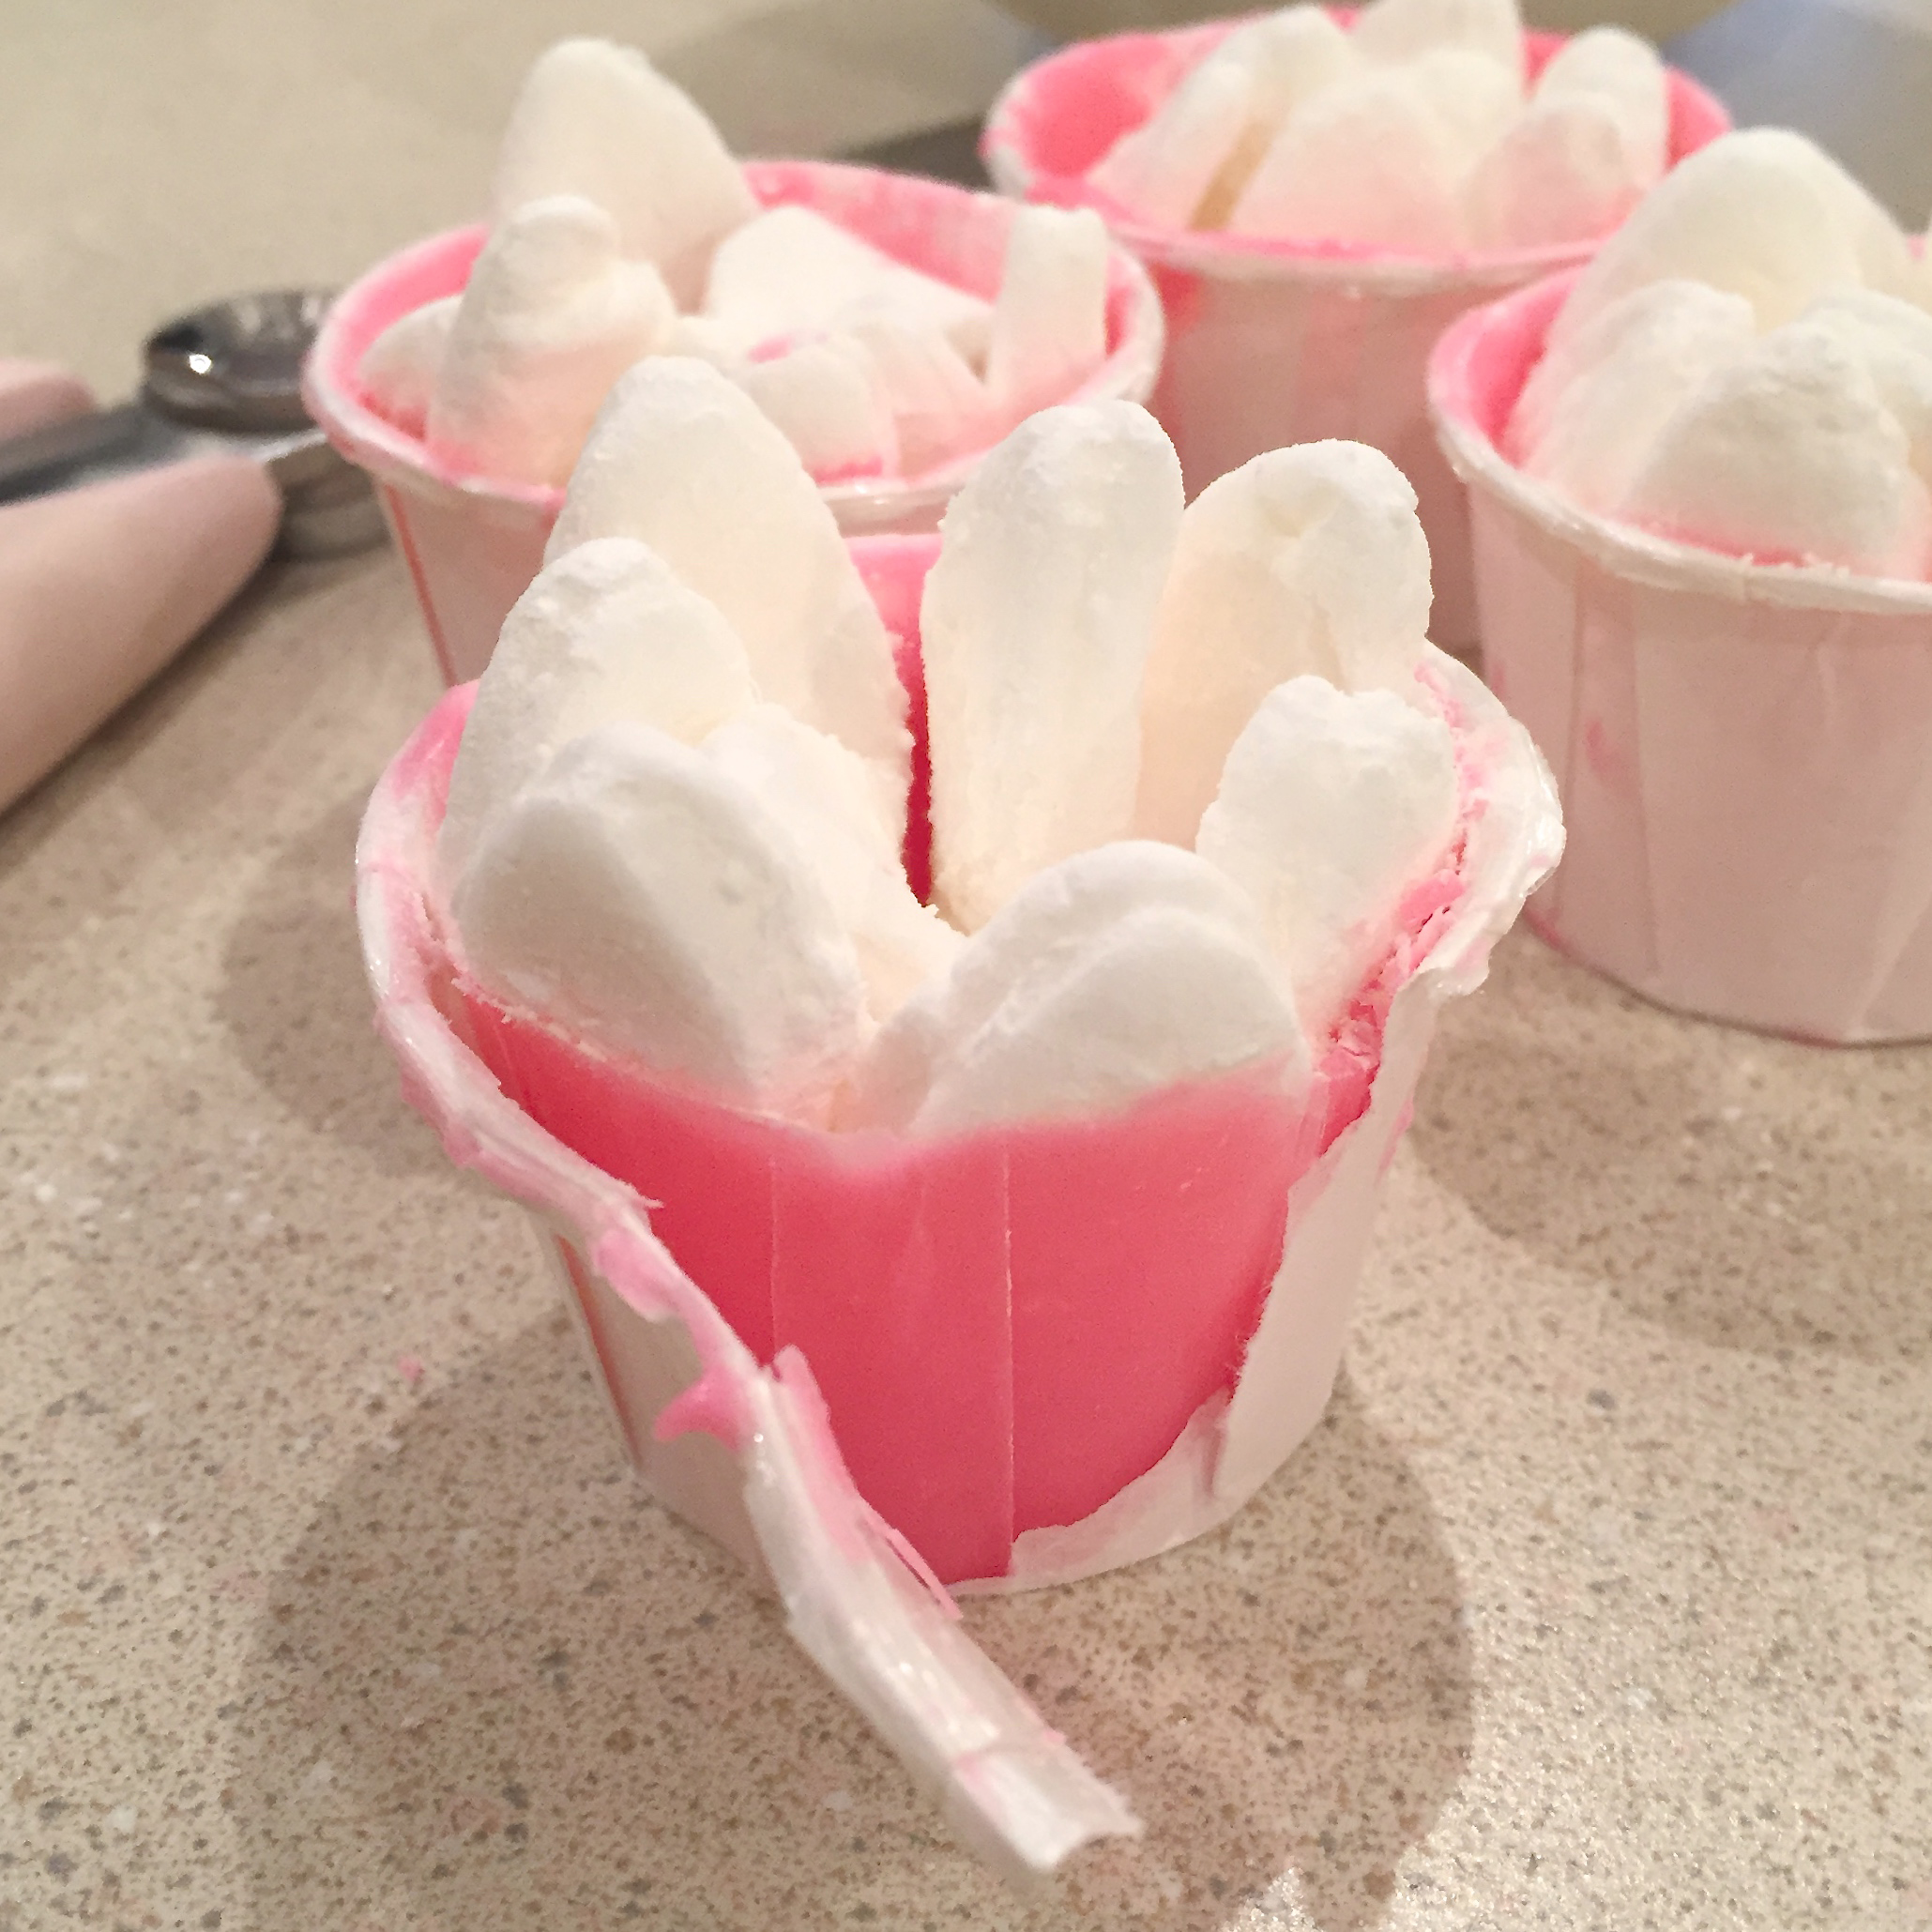
  • Spoon melts into paper cup and spread up sides. Tip cup to drain out excess.
  • Brush excess powder off a flower, add sprinkles/candy to center and pull all petals up to the center, leaving the bottom center open.
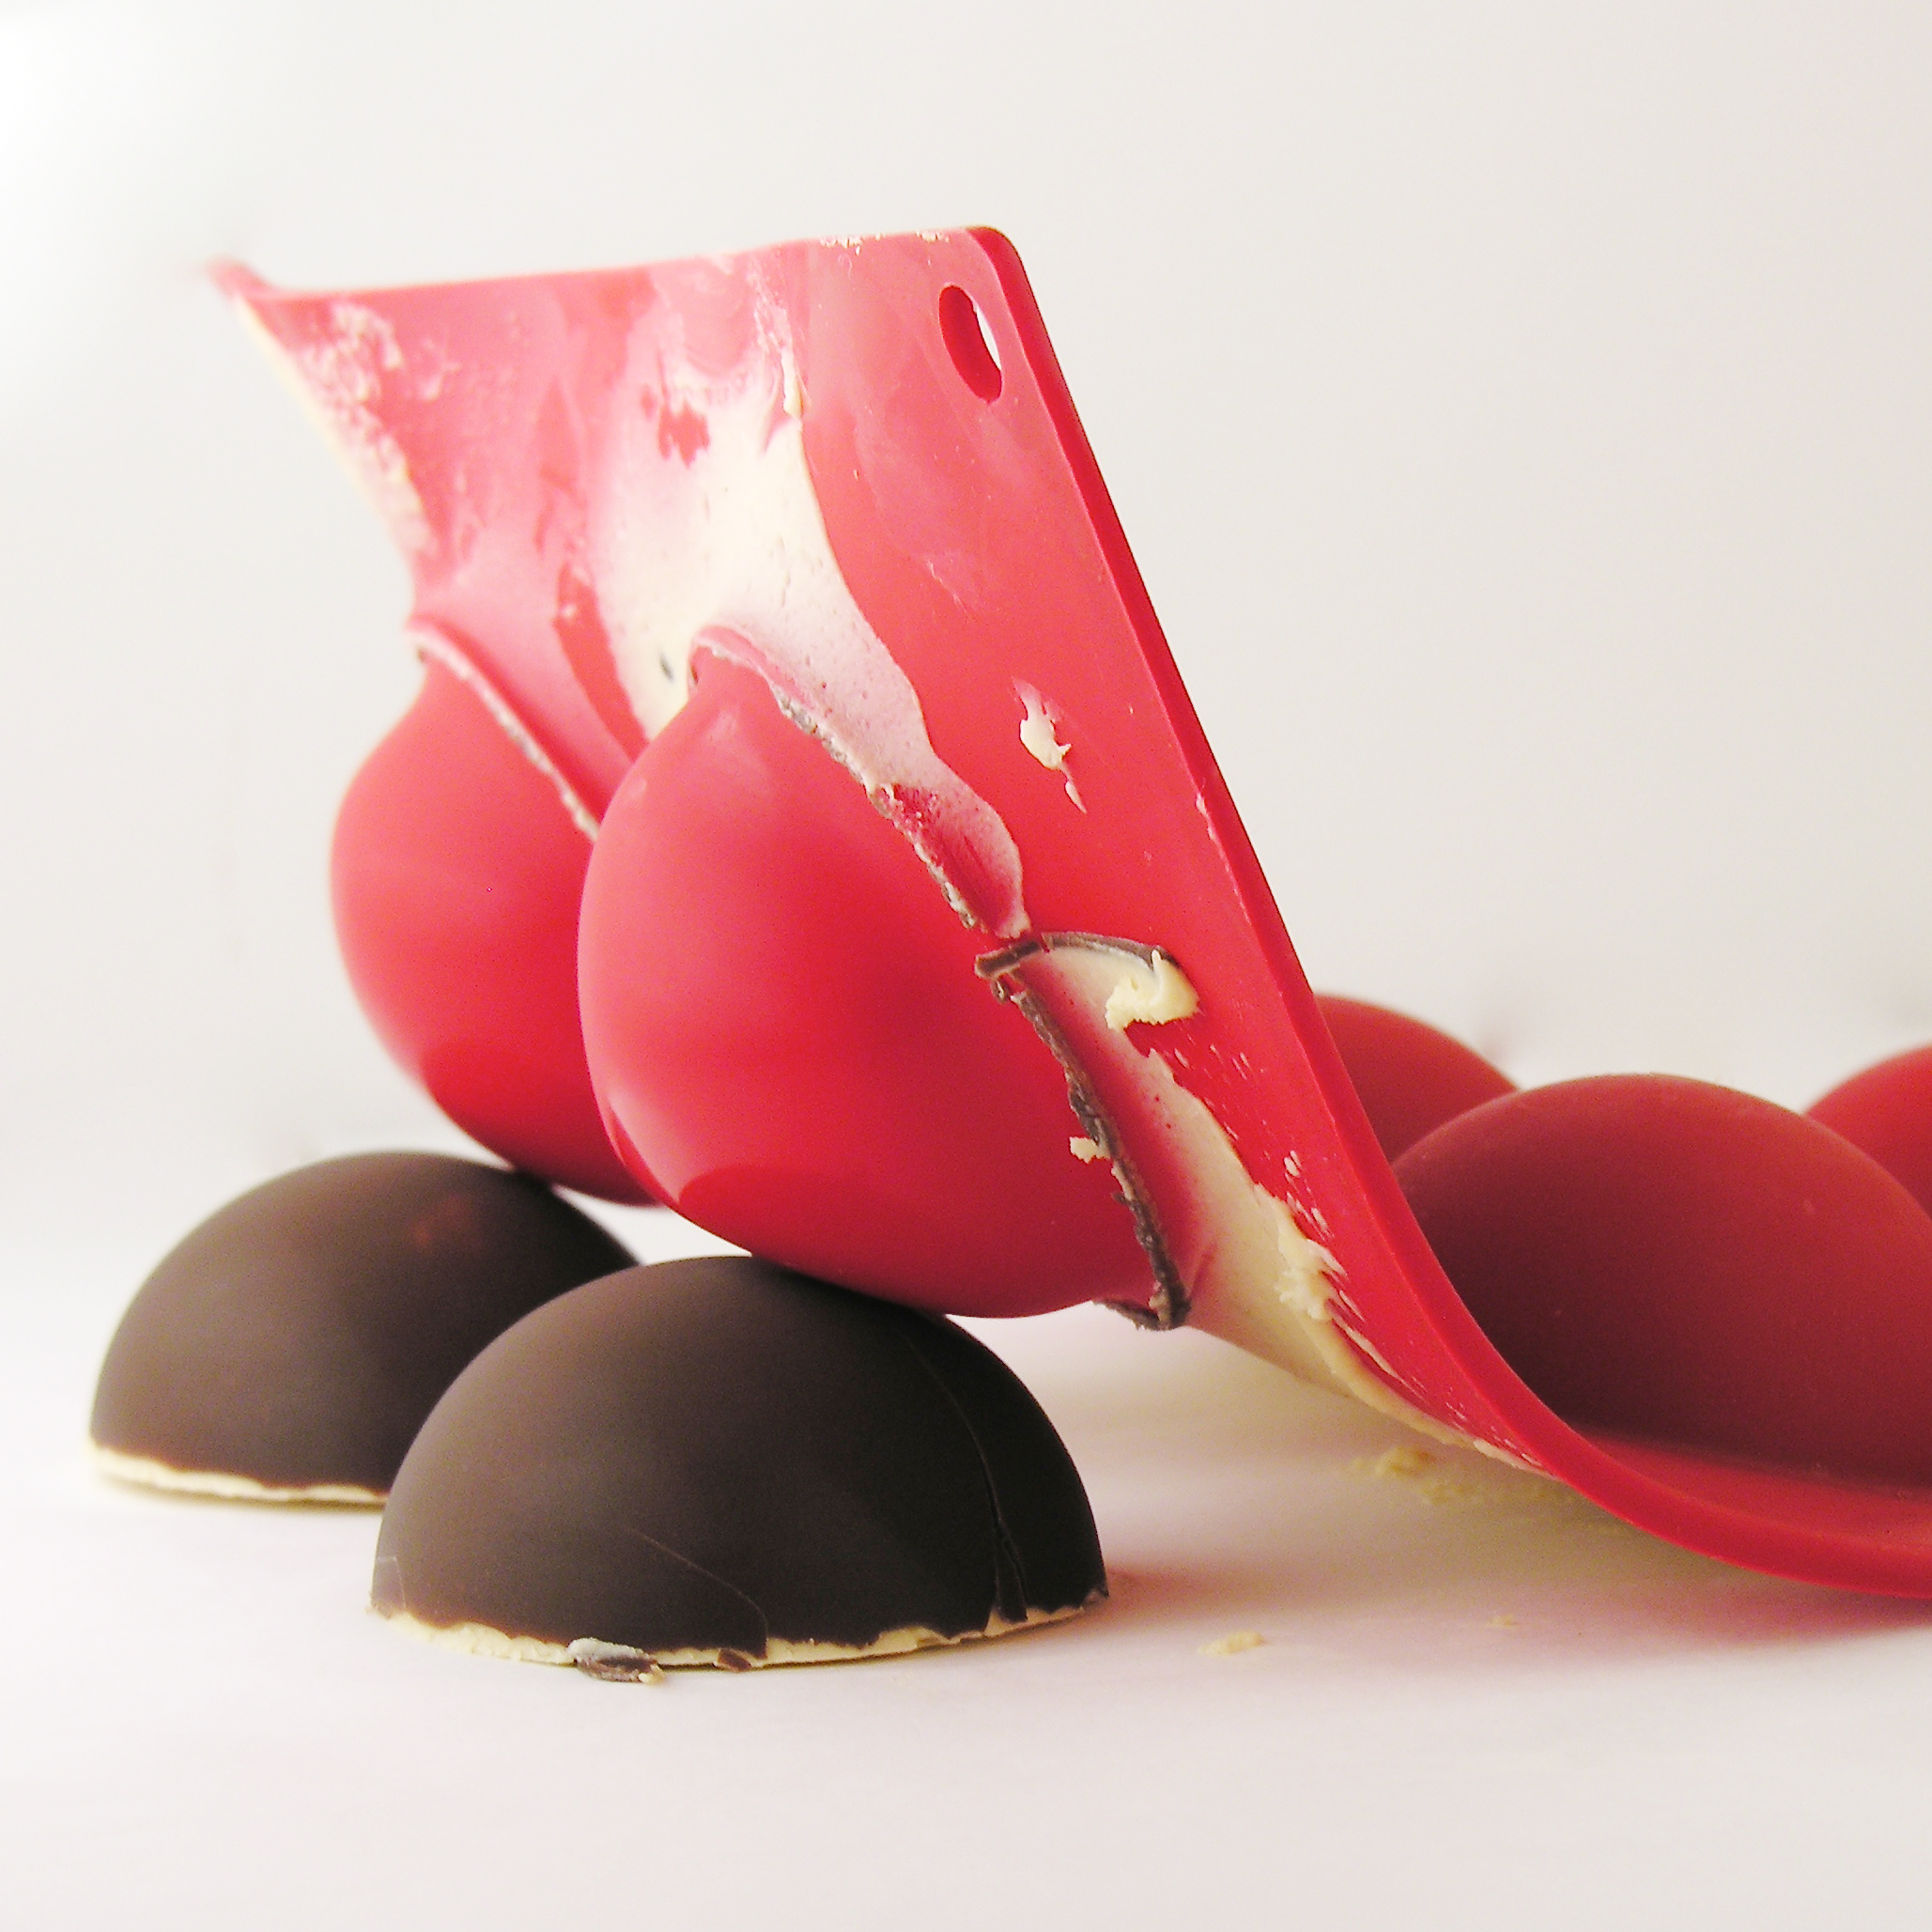
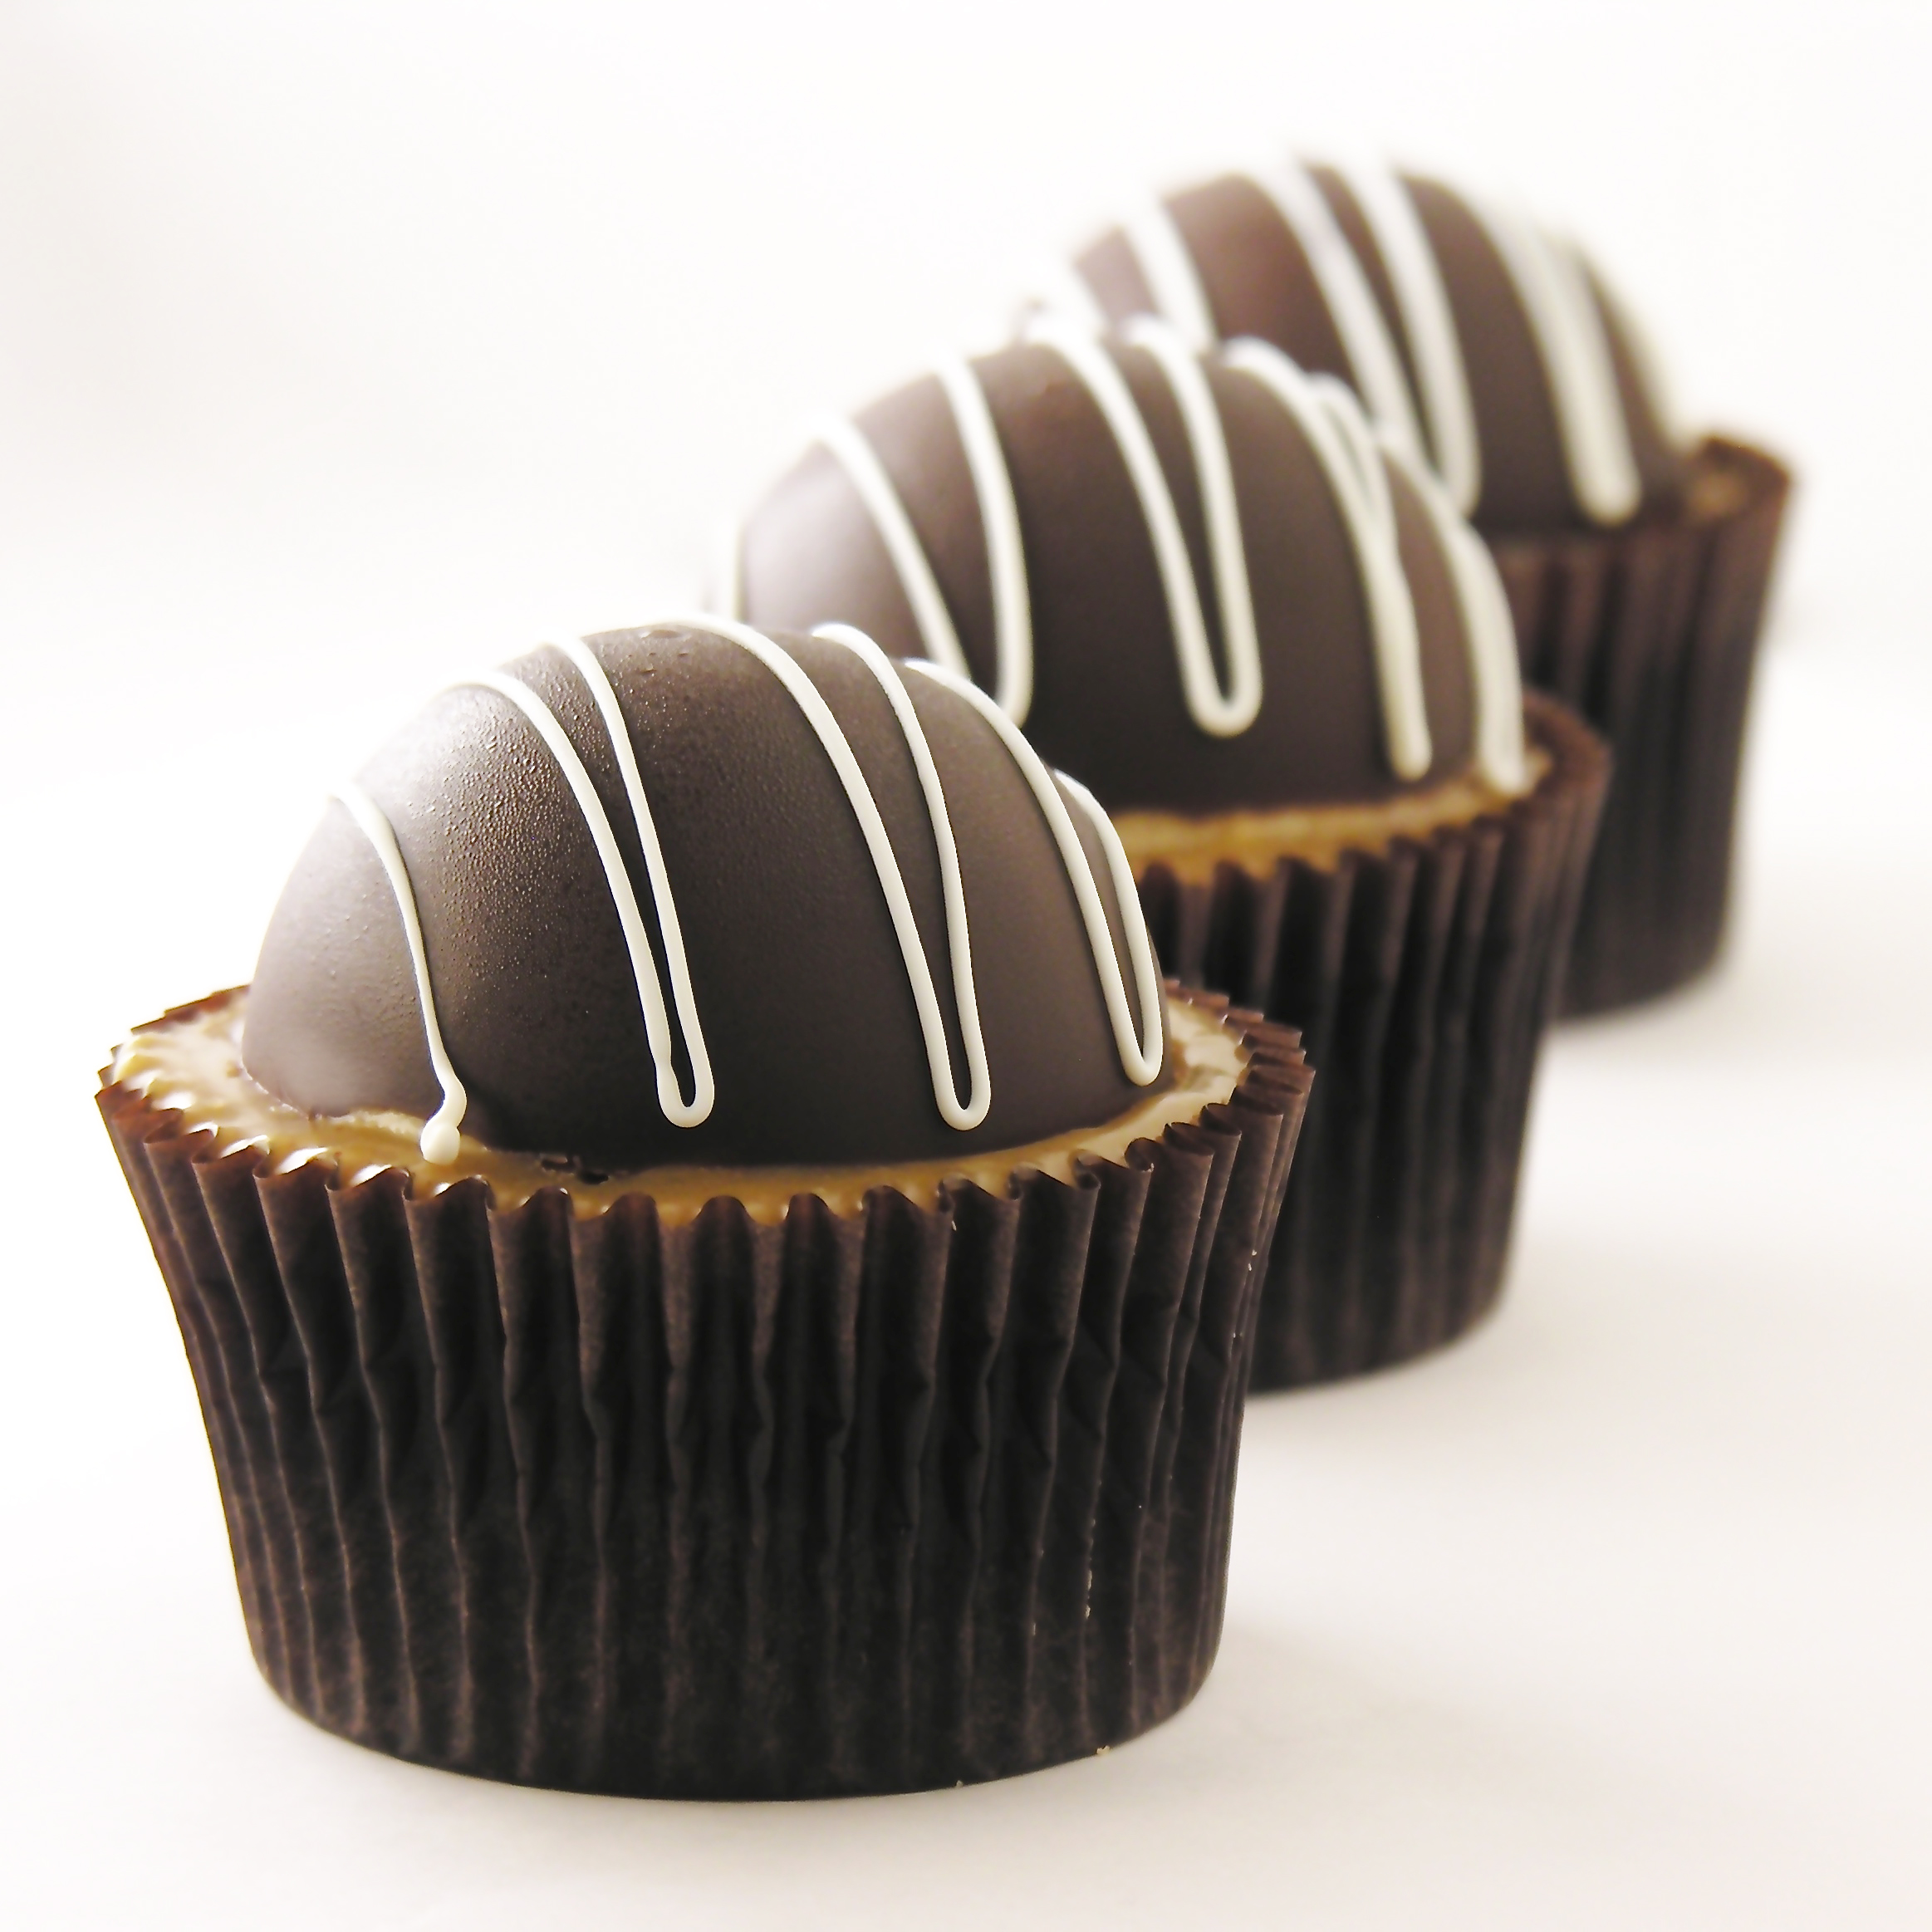
  • Place bottom center of flower into candy-coated cup (before it hardens). Allow this to harden with the flower inside.

blooming-mm6blooming-mm5

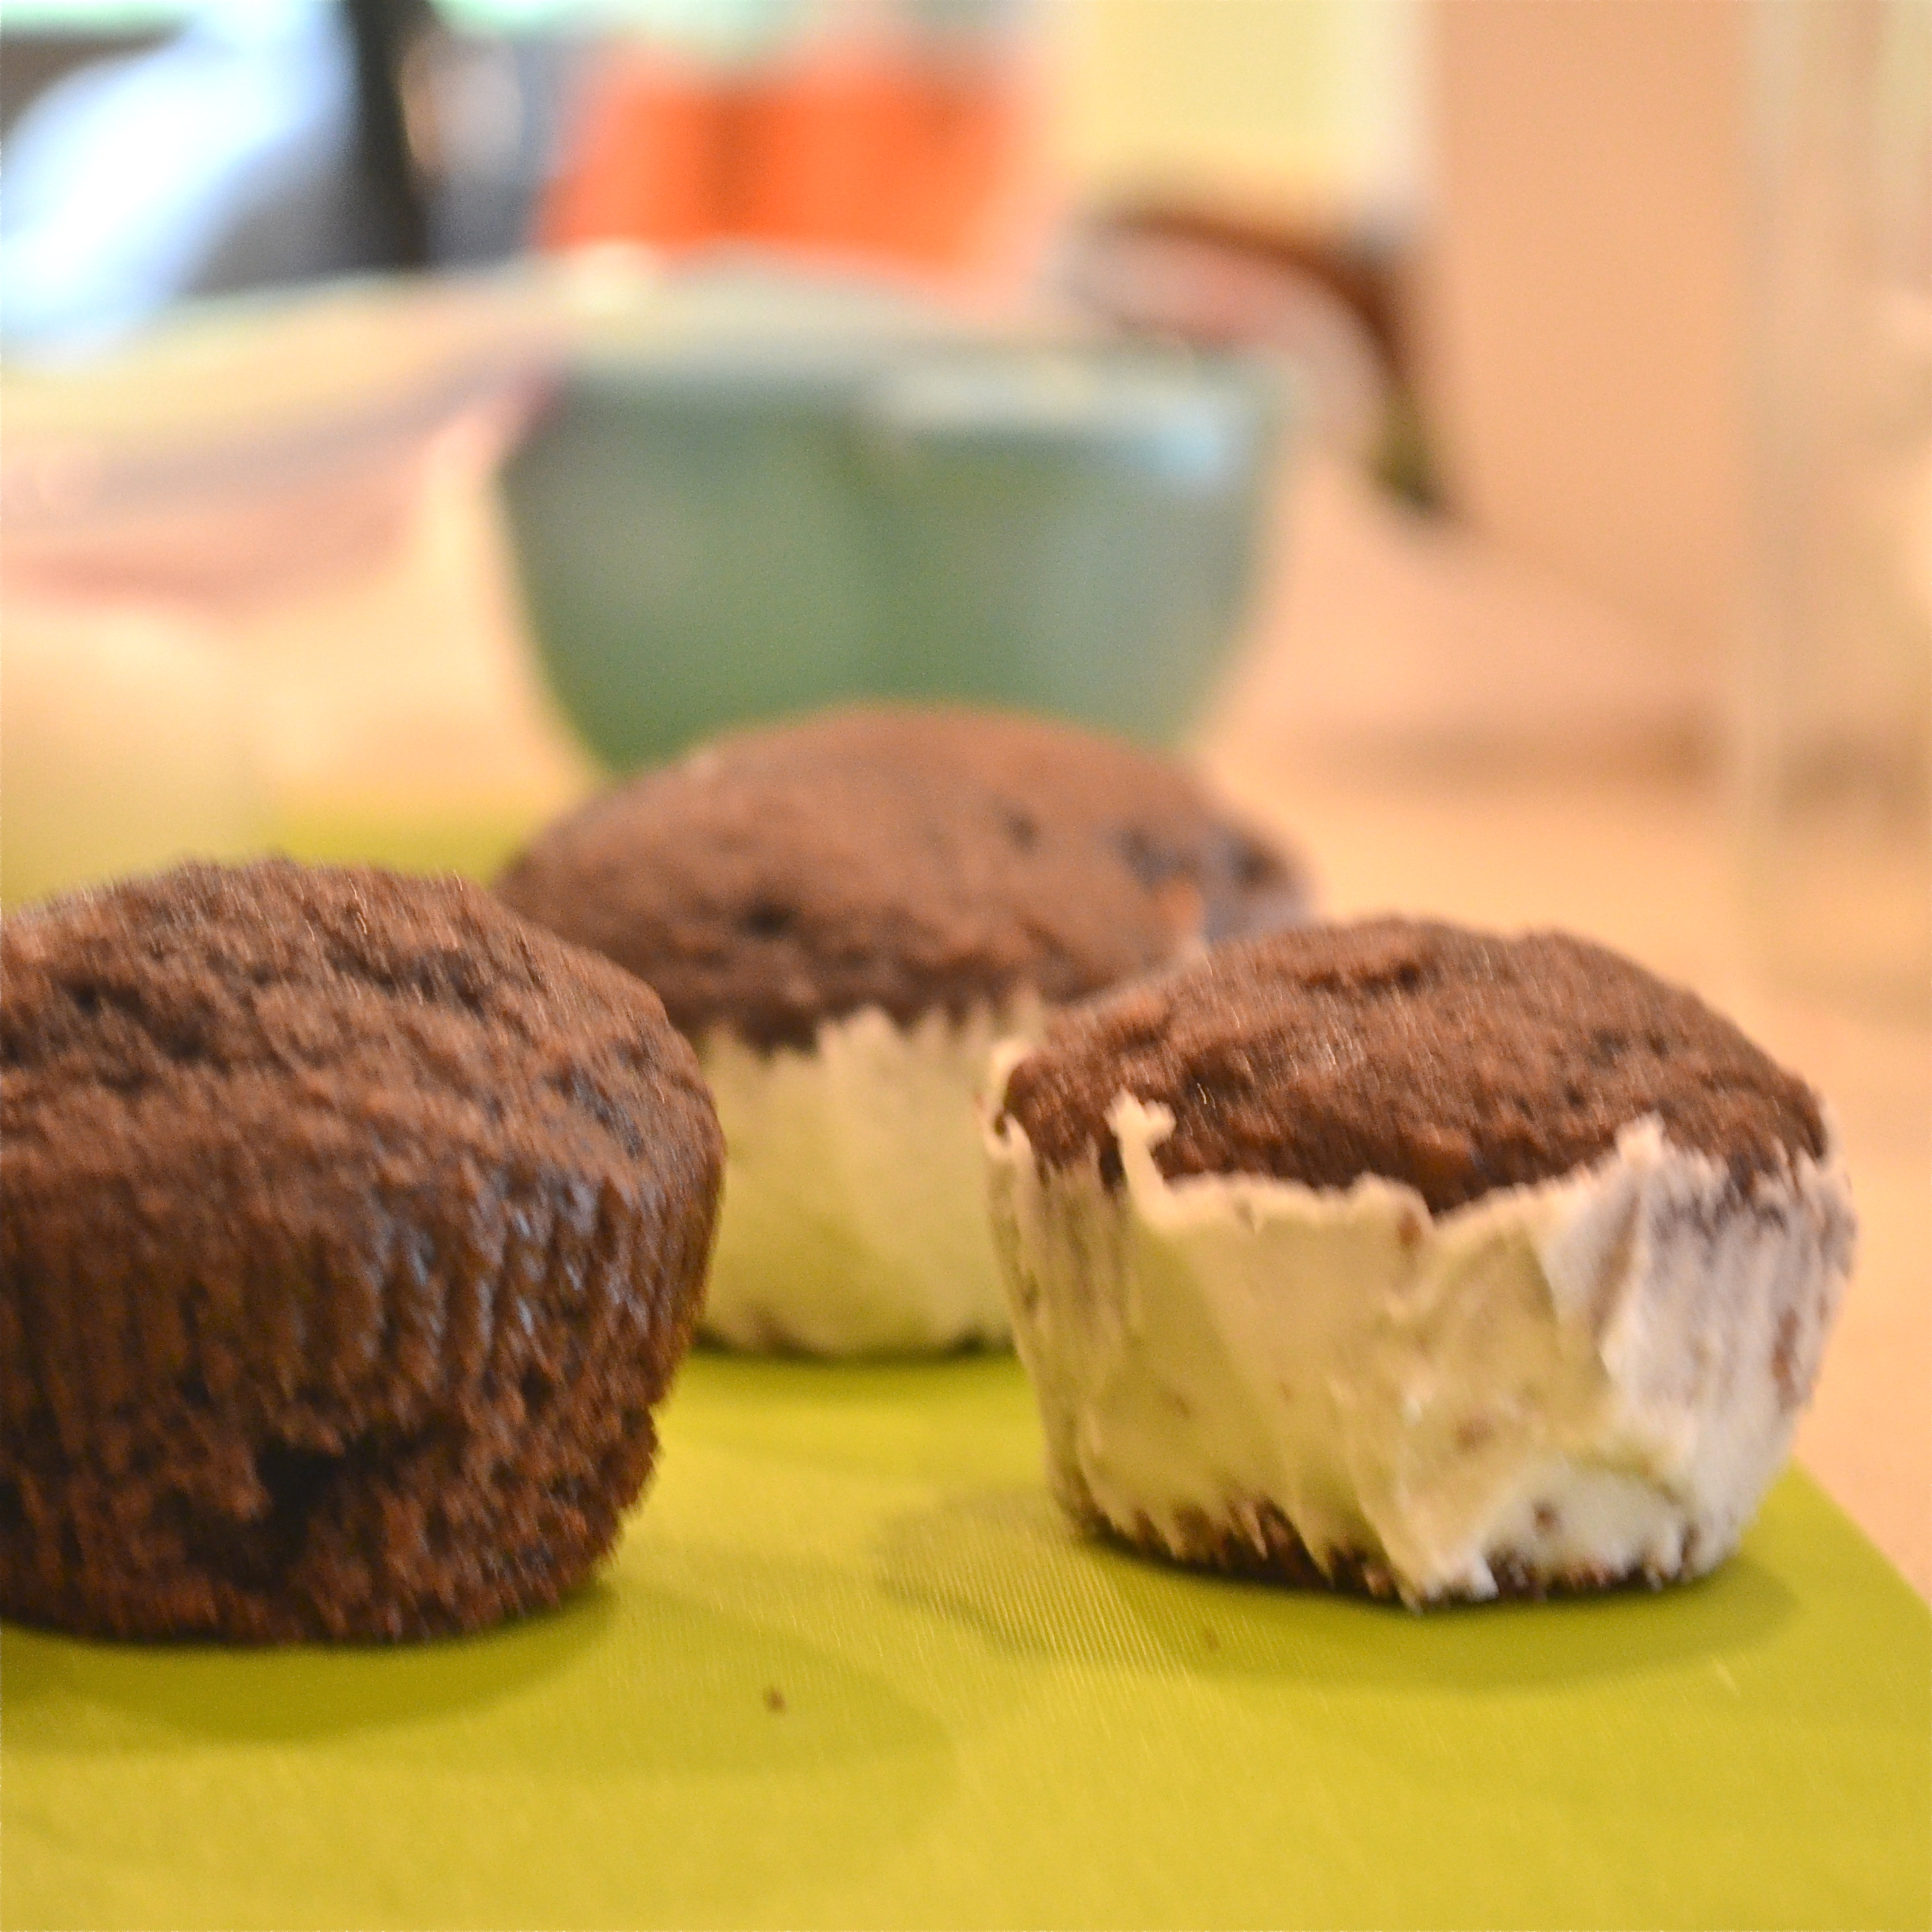
  • Once this has hardened completely , use a scissors to clip the top edge of the cup, and peel the paper away.

blooming-mm3blooming-mm2

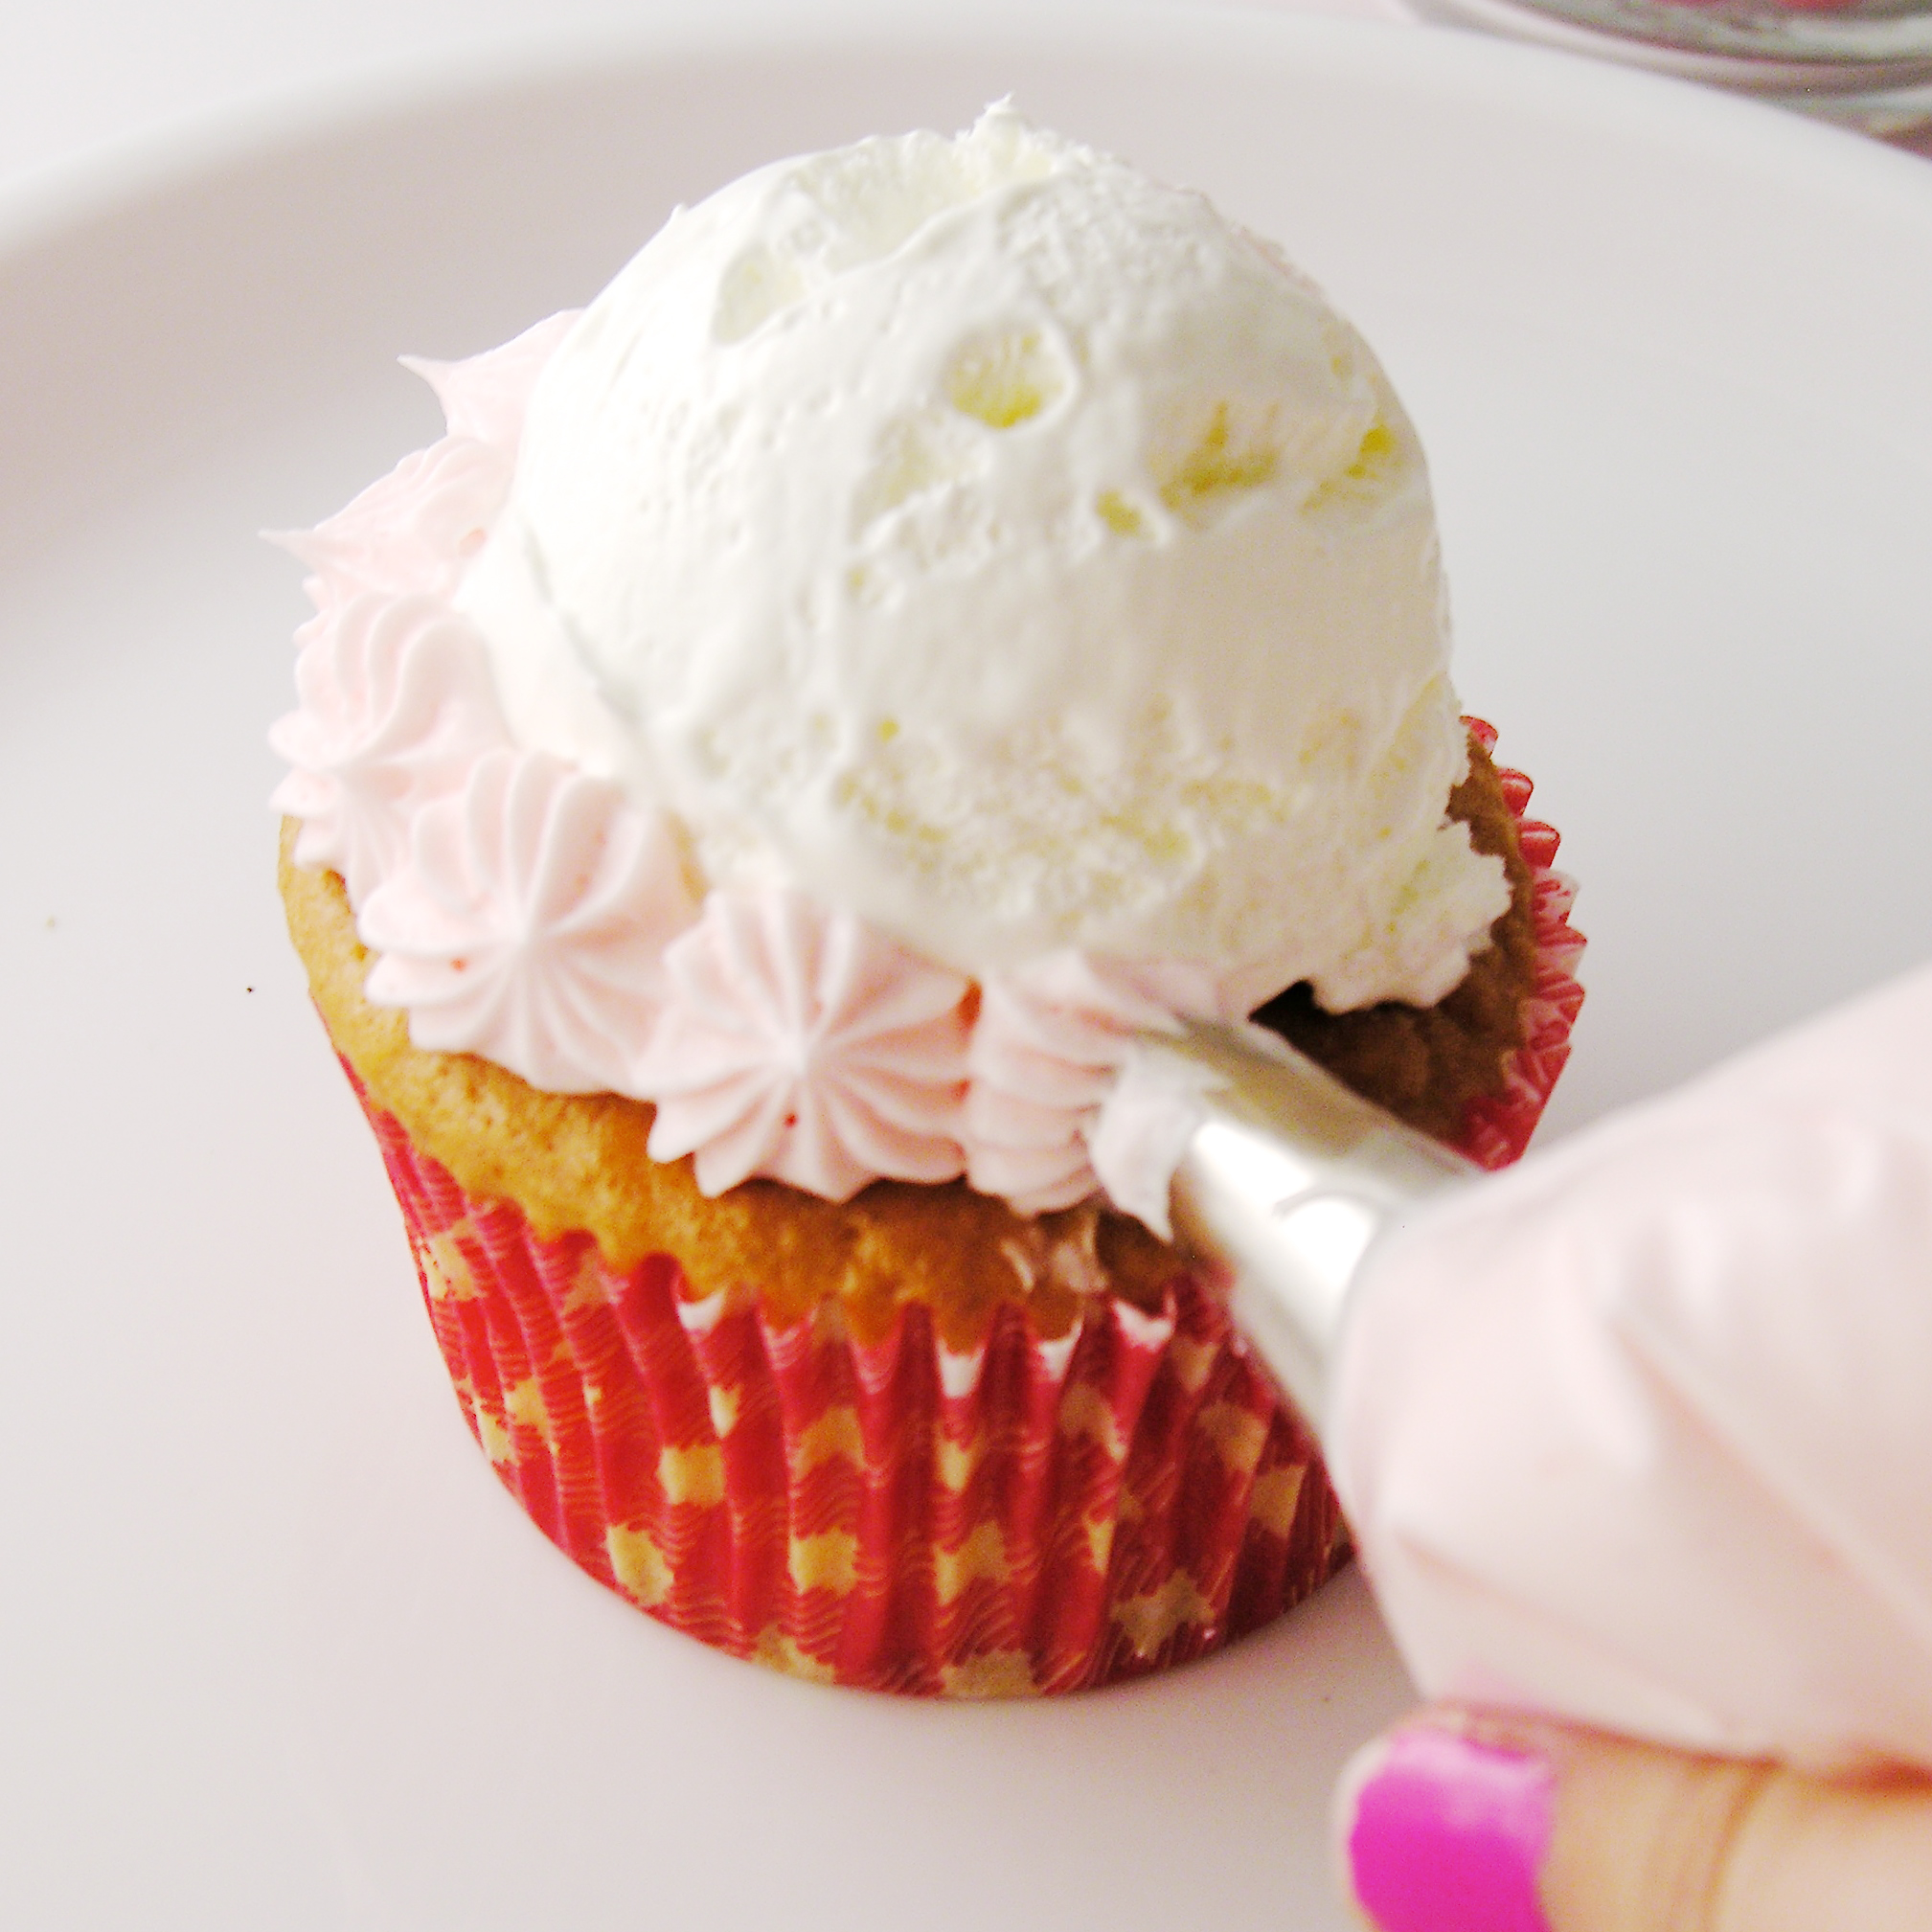
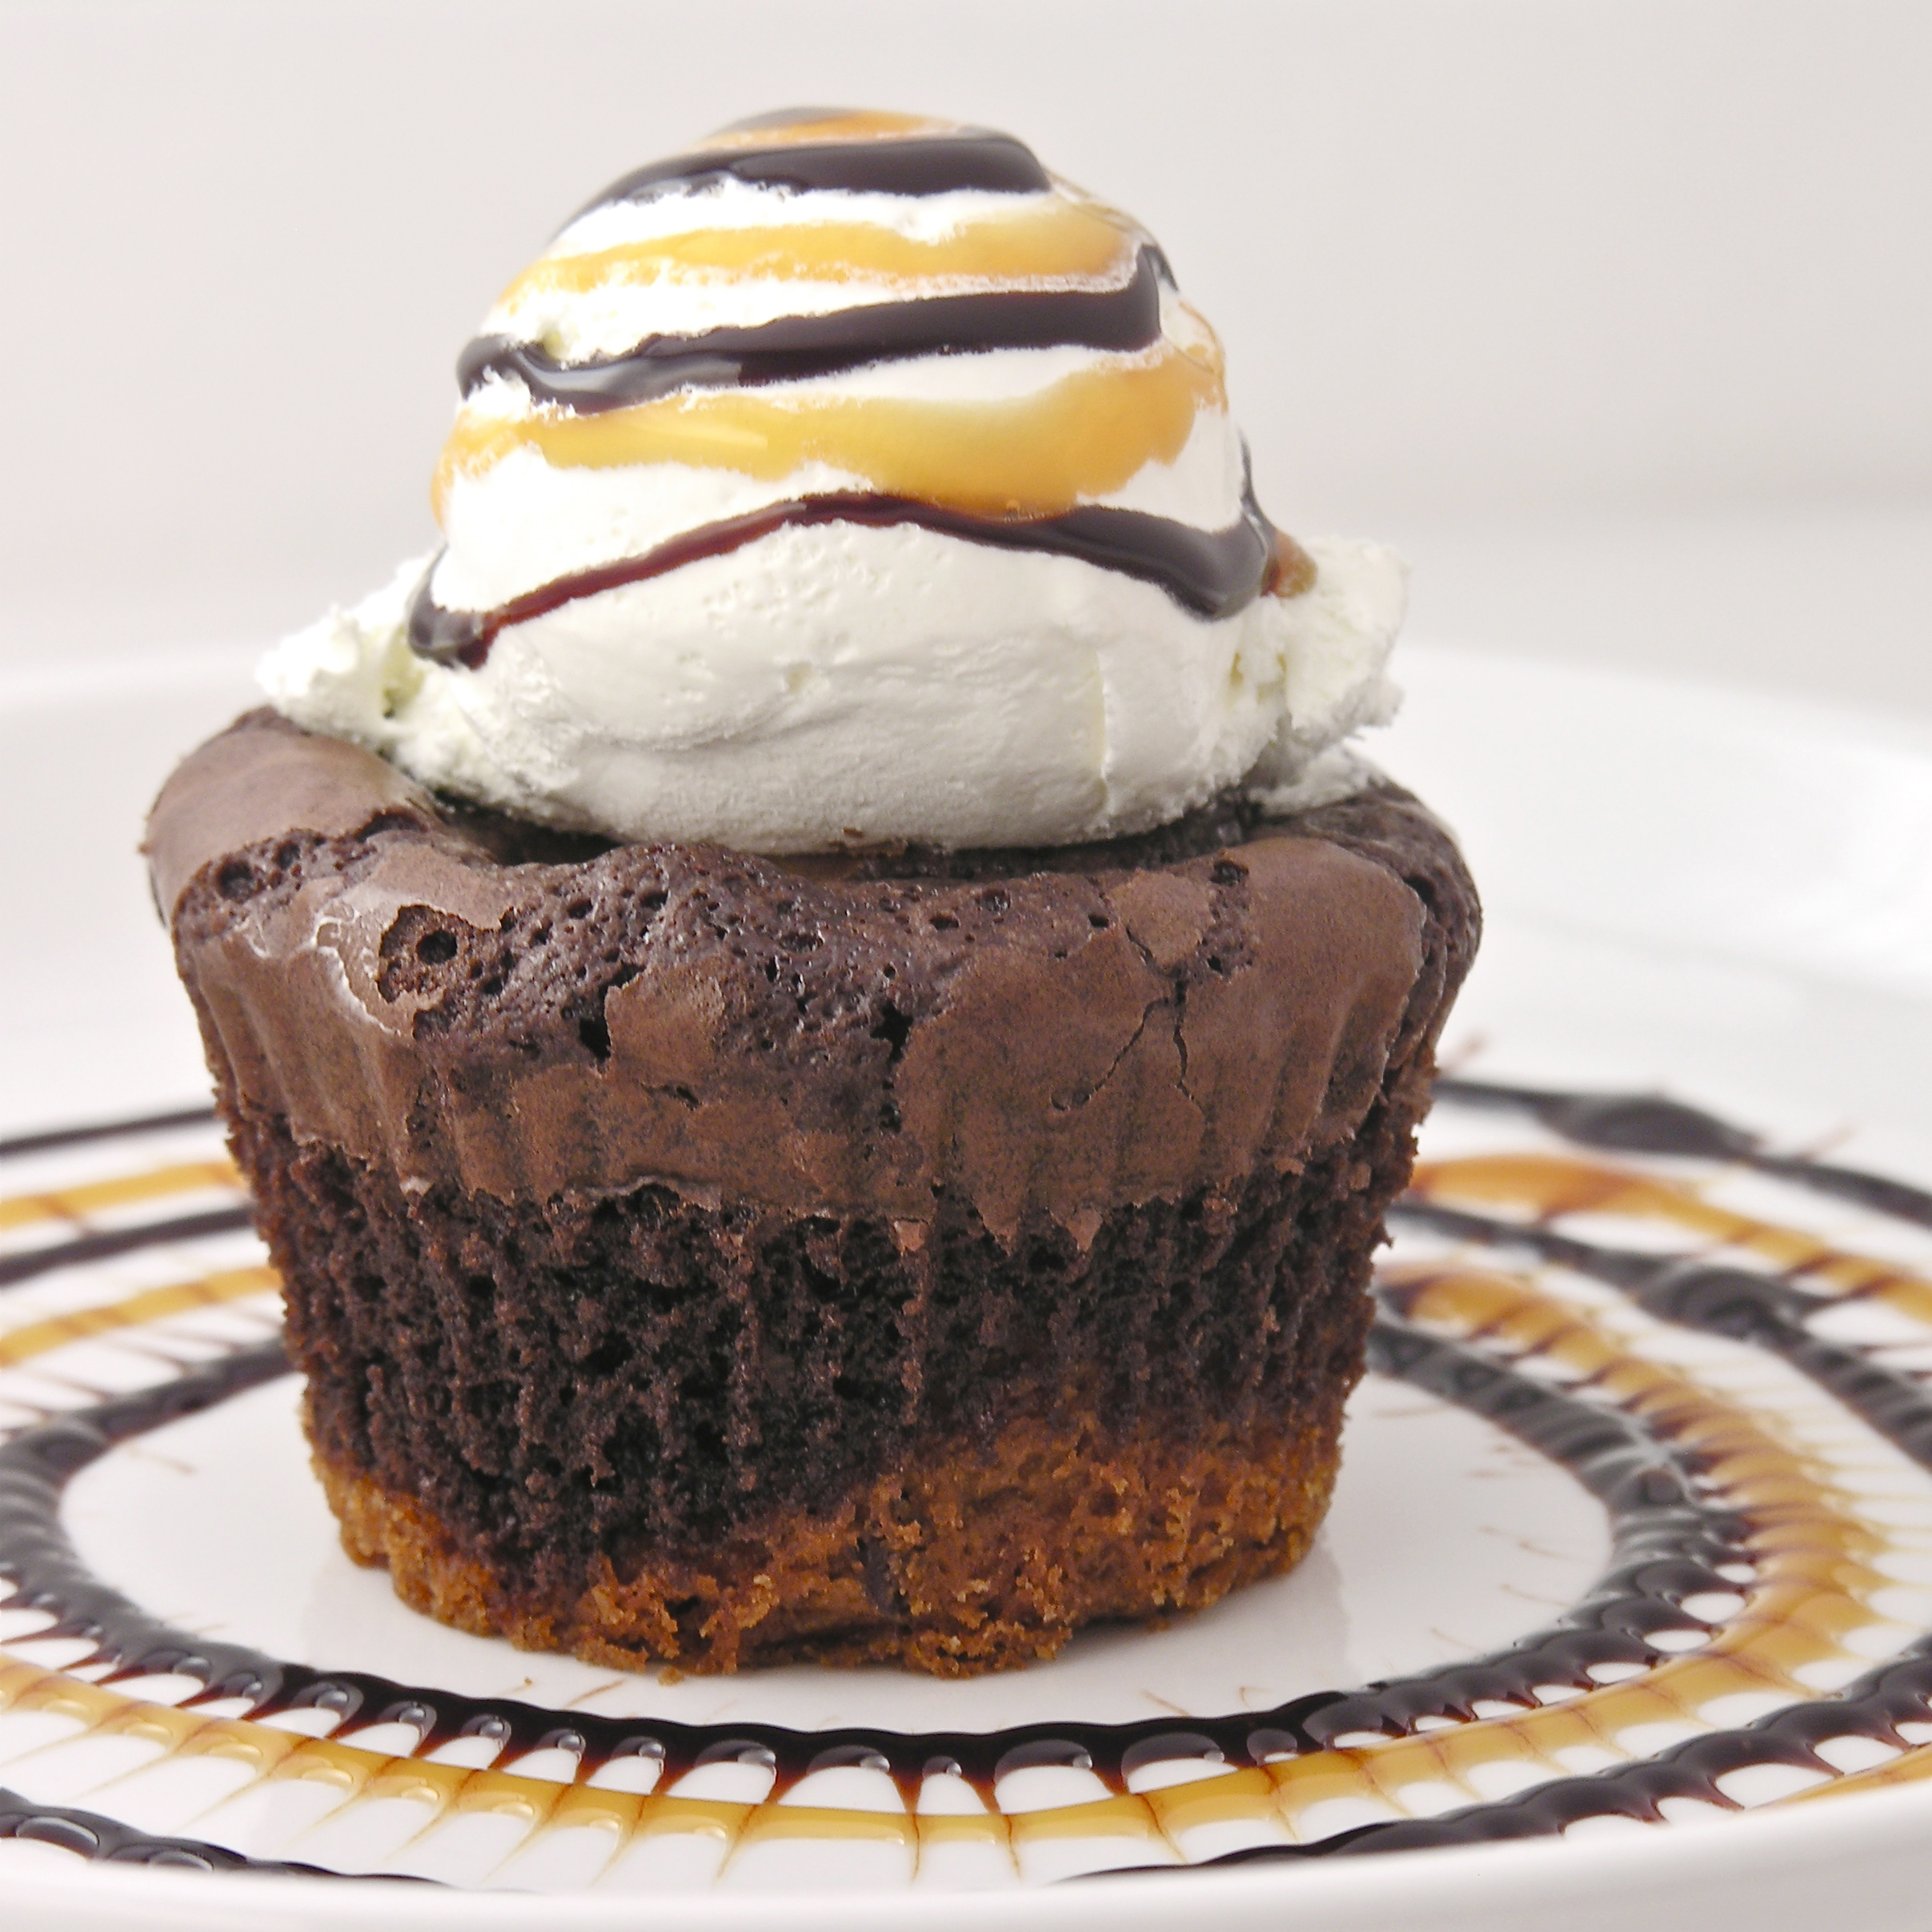
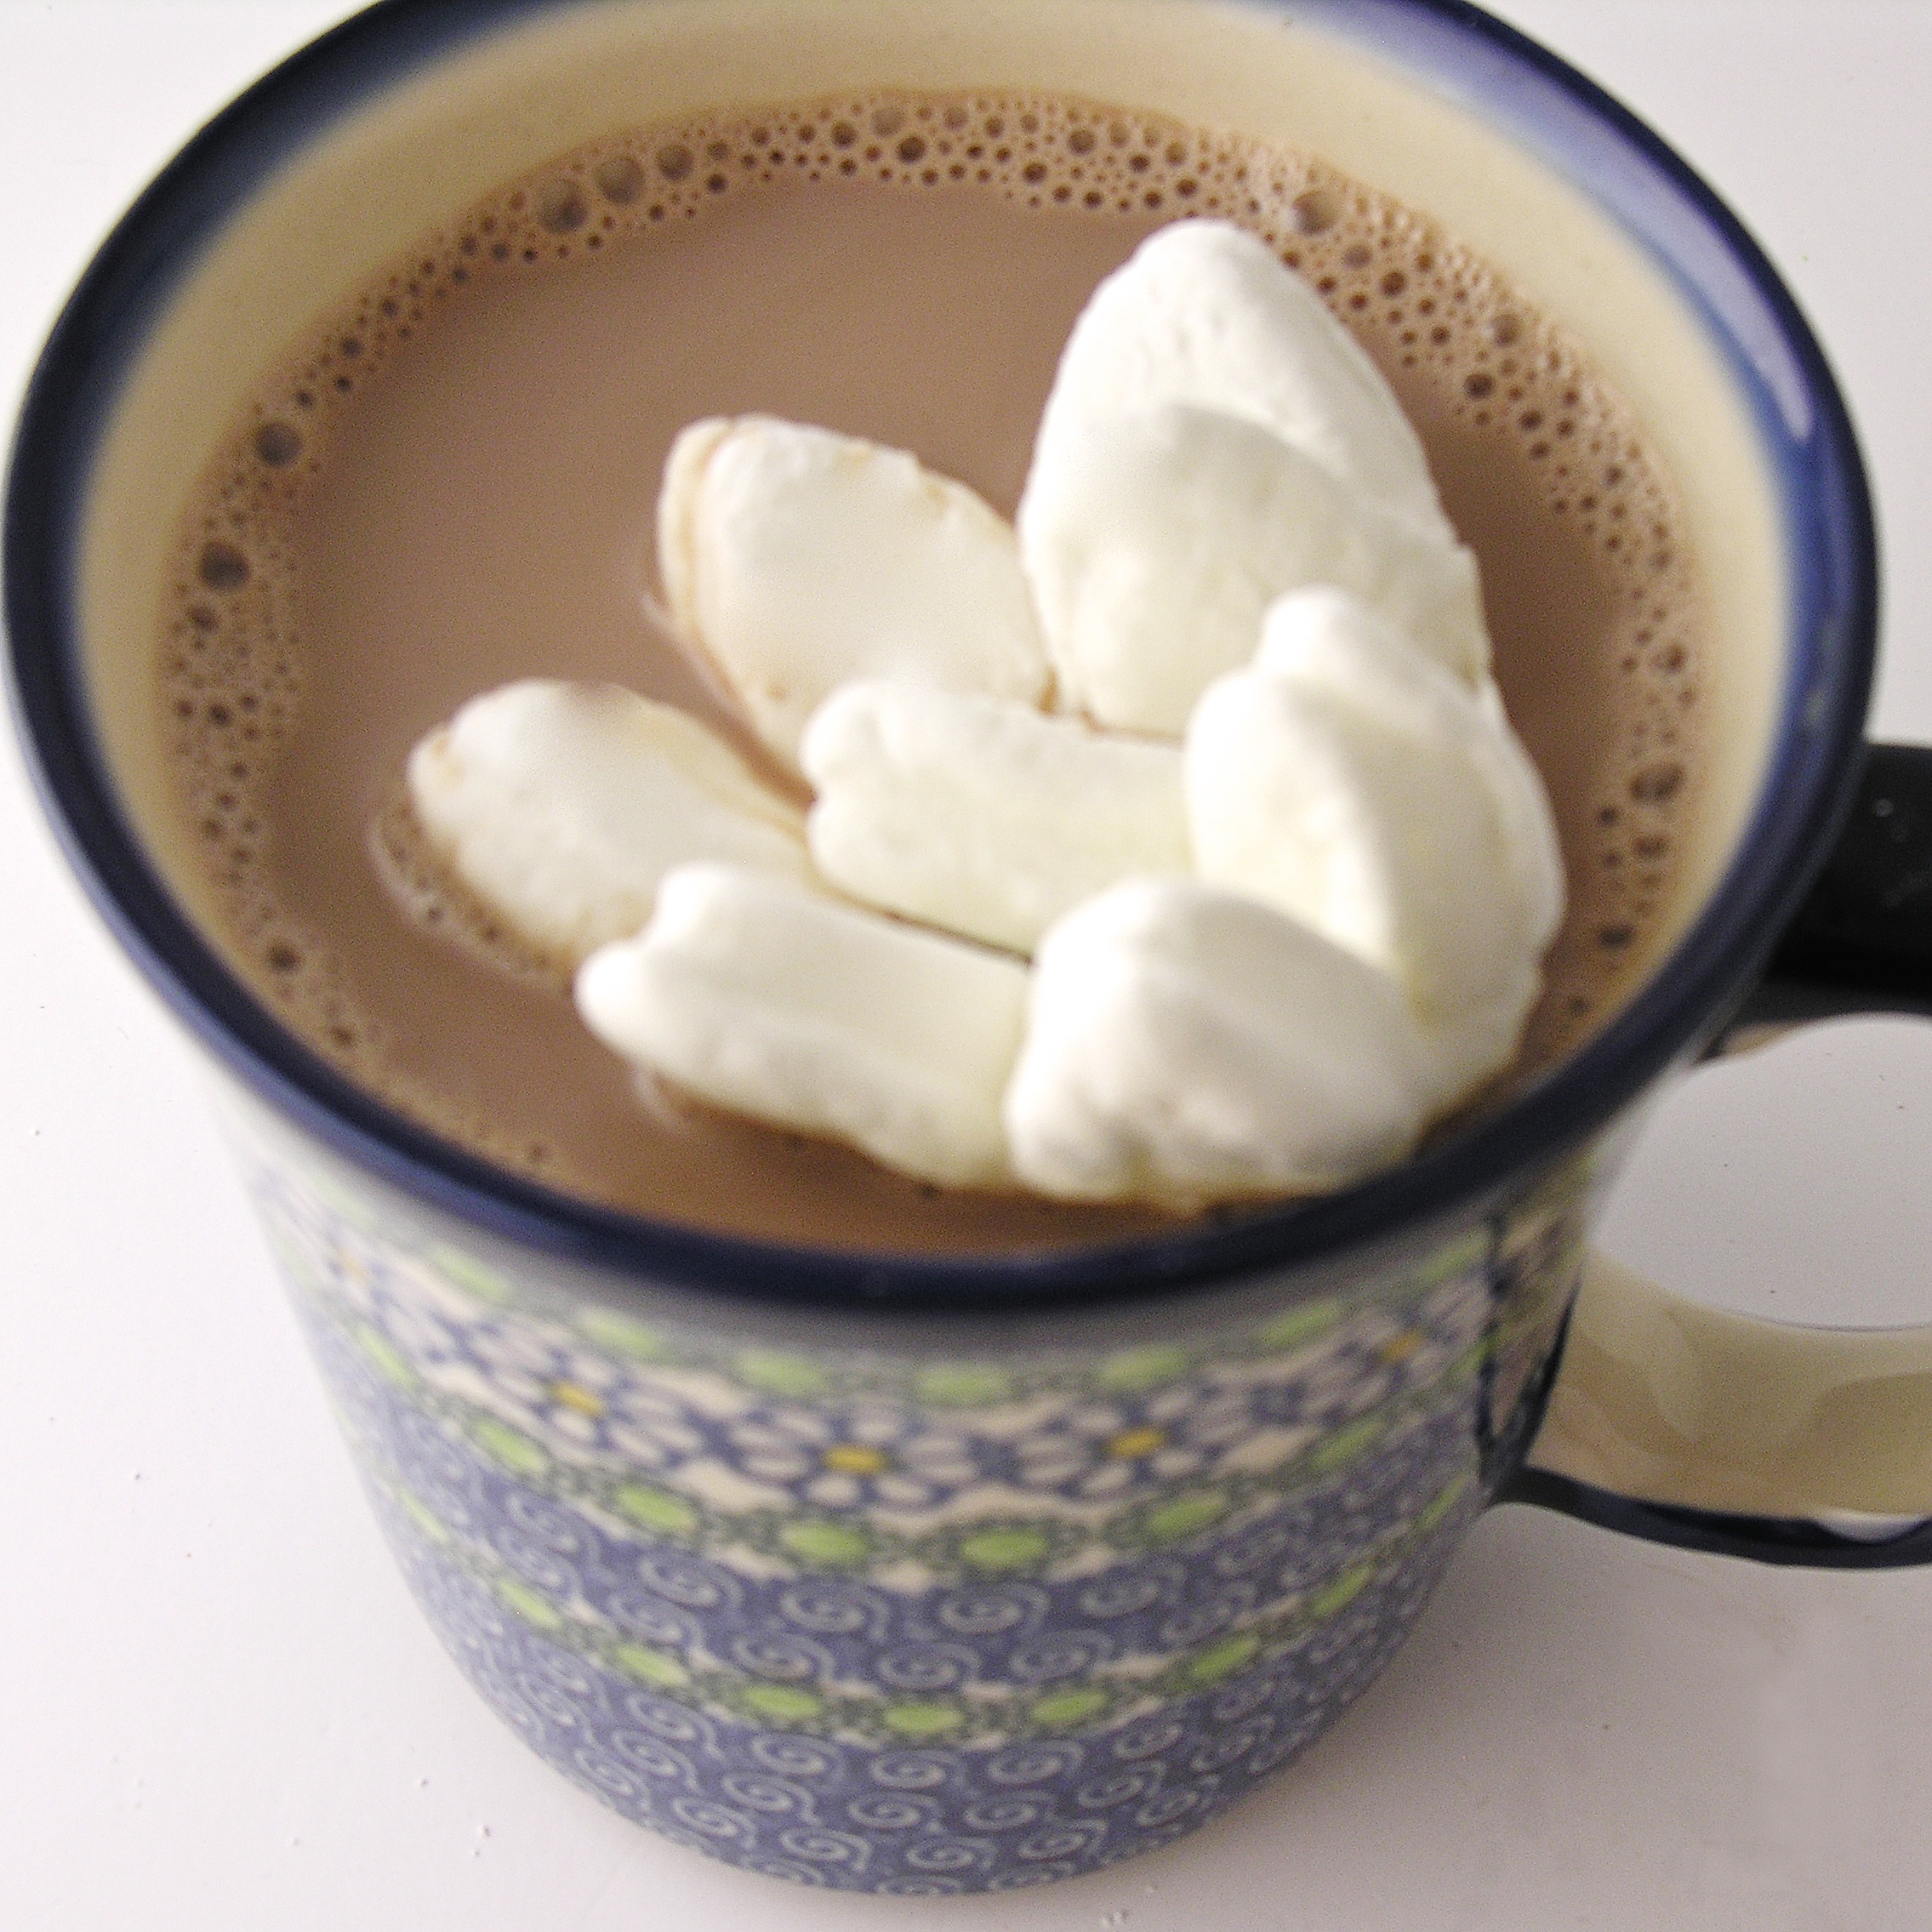
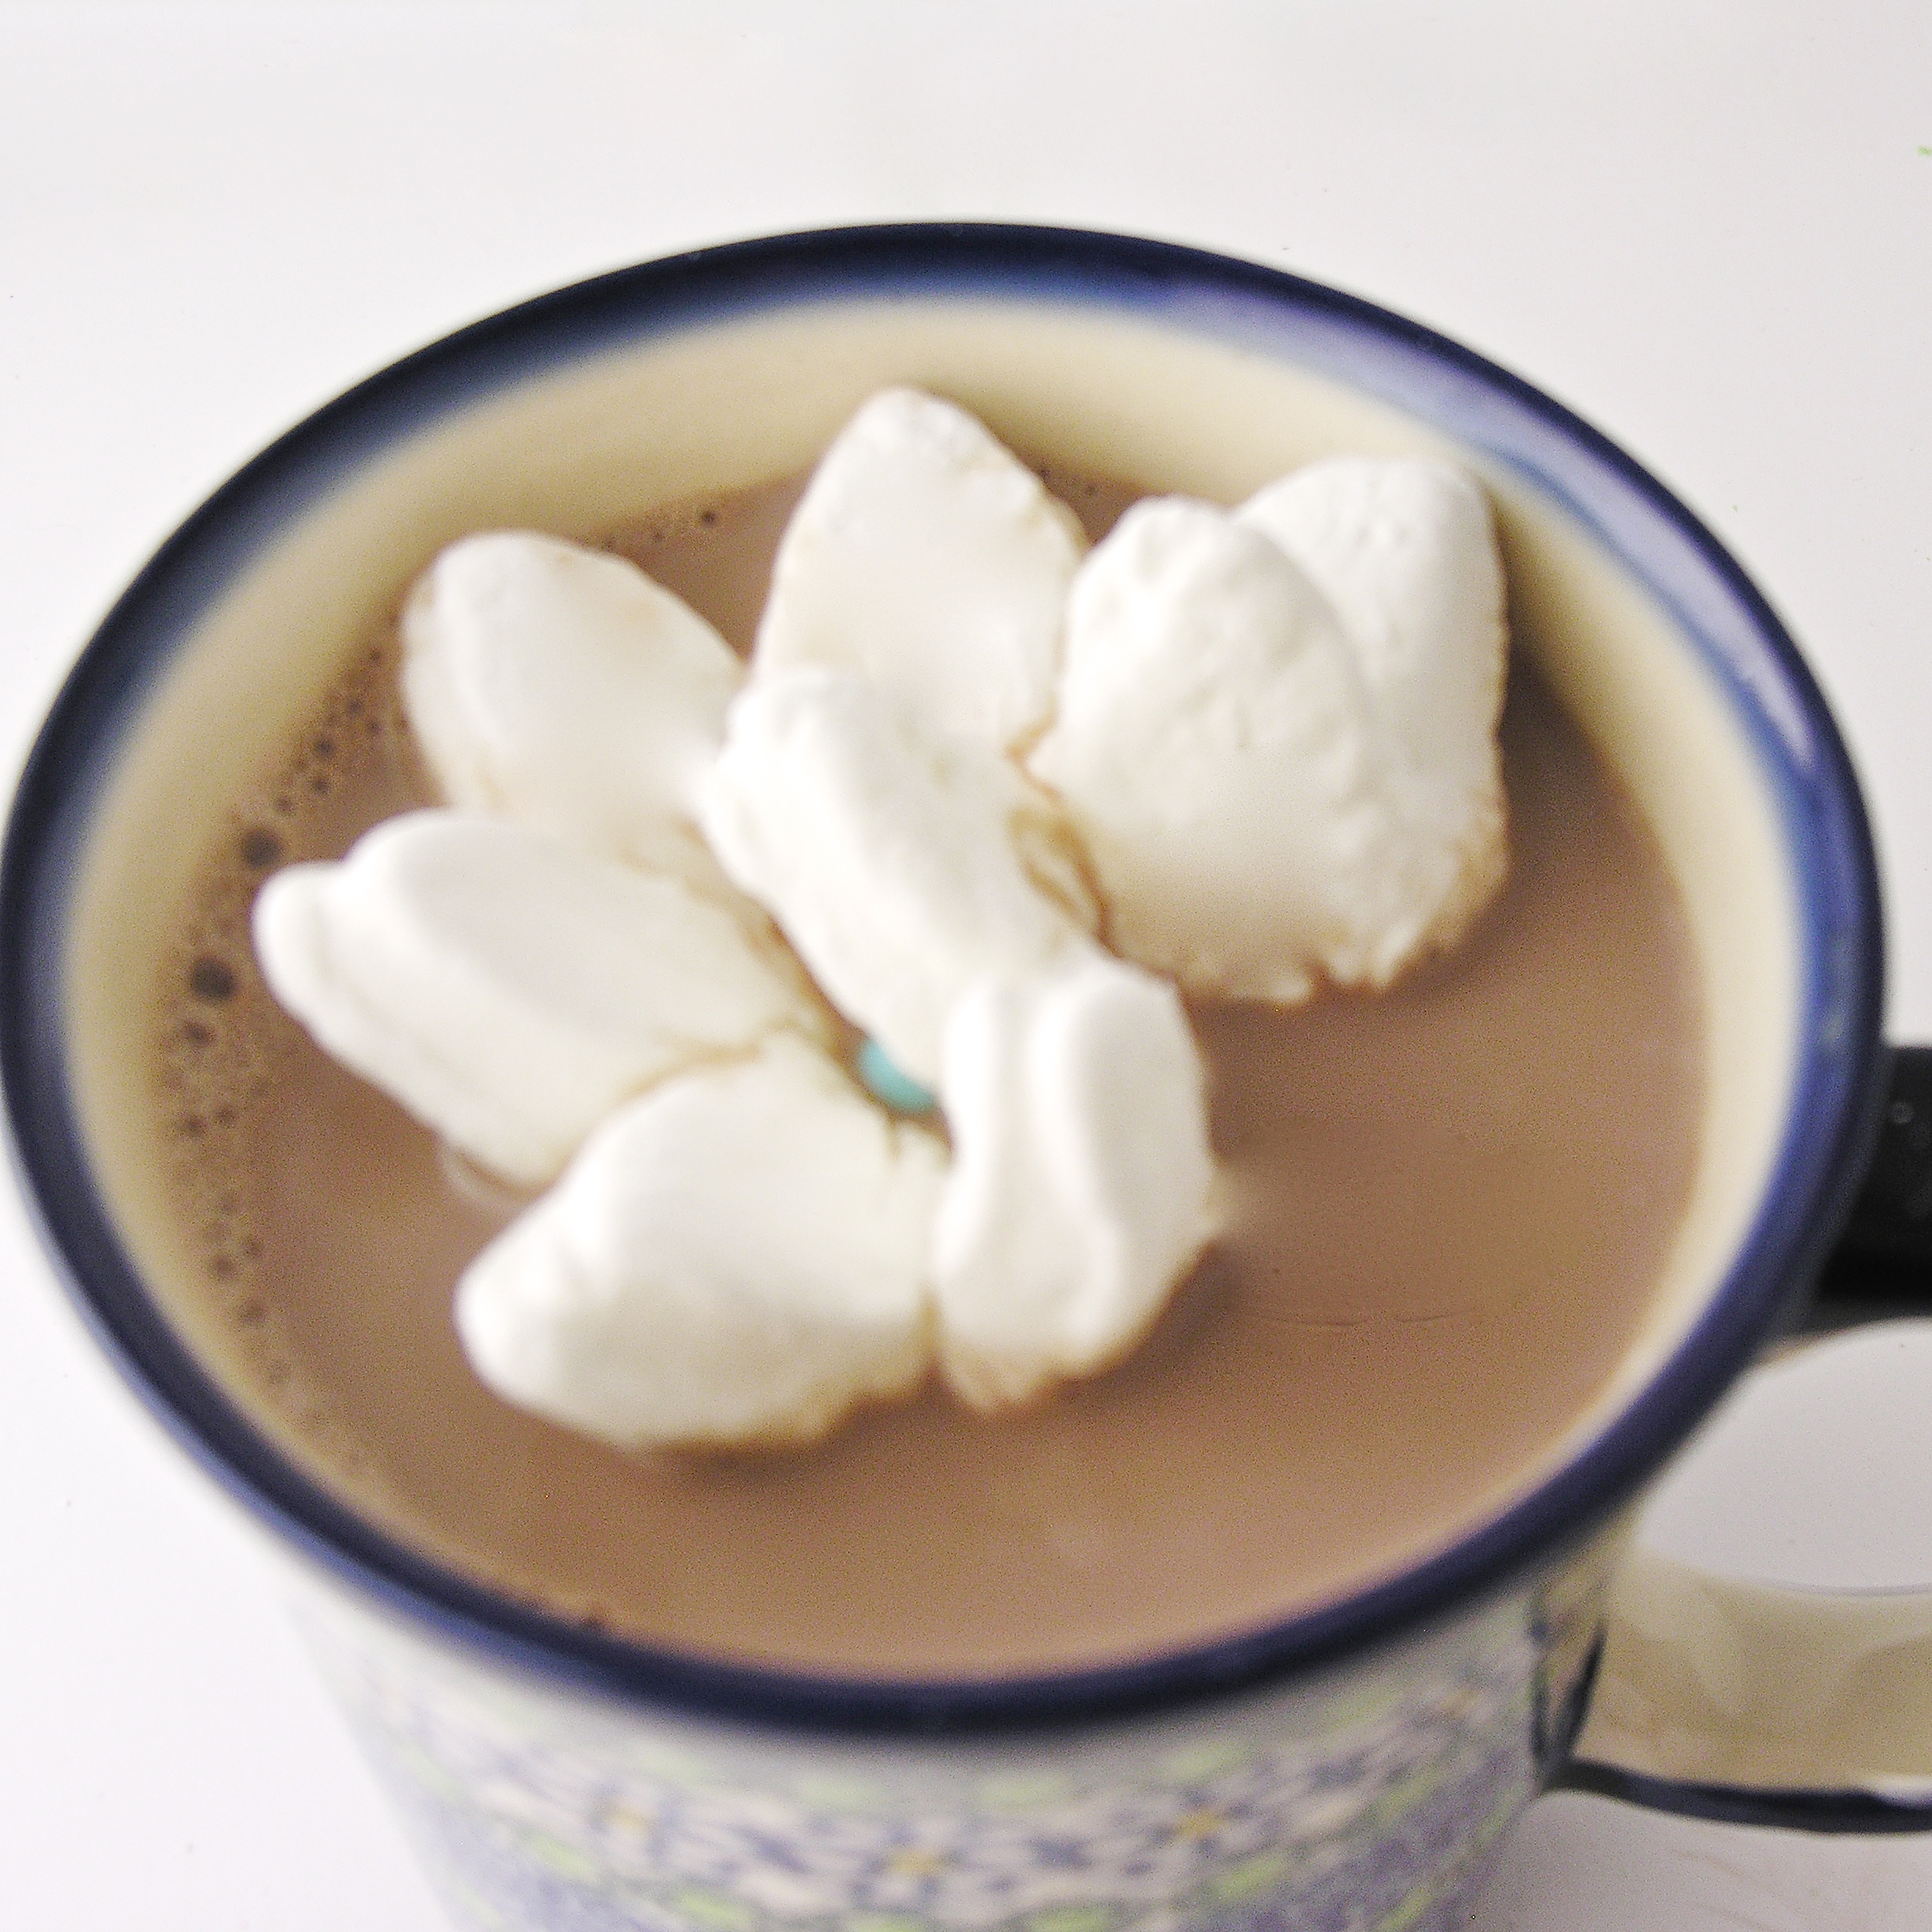
  • Make a cup of HOT hot chocolate. I found that using milk rather than water resulted in the best “openings” of the flowers.
  • Use tongs to carefully set the unopened flower into the cocoa and let it bloom!

blooming-marshmallow3blooming-marshmallow4

blooming-marshmallow

  • I stored my extra marshmallow flowers in an air-tight container and they still bloomed a few days later- but slowly. I think that the more fresh they are, the better they bloom.

Click on the photo below to see my (terribly shot!) video of a not-so perfect bloom. It illustrates the biggest problem I had with this project- getting the flower to bloom without allowing hot chocolate to seep into the center. I’d say about 50% of my flowers had some leakage of chocolate- and, if you watch the “professional” ones, you see this happens to them too.

I think that the key things to reduce this are:

  1. Use HOT chocolate made from milk instead of water.
  2. Marshmallows that aren’t too thick, and that aren’t still sticky on the edges (remember to cover those cut edges with powder early on!)
  3. Placing them into those chocolate cups as evenly as possible. If one side weighs more than the other, the cup will tip when placed in the cocoa, allowing some cocoa into the center.

I have to say though- that even when the centers filled a little with cocoa, people LOVED these! They wanted to drink more than one cup of cocoa to see it bloom again. So-not perfect, but really, really fun.

blooming-mm9

My thoughts: I feel like I’ve made progress toward figuring out a good DIY method for these. AND I’m pretty excited about how easy it is to take store-bought marshmallows and turn them into ANY shape! There are always unexpected things I learn when I experiment. I hope you get a chance to try these- and even improve on them! If any of you come up with a way to keep the cocoa out of the center on MOST of them, let me know! I feel like we could improve on 50%… 🙂 Enjoy! ~r

We love marshmallows here- because money can’t buy you happiness, but it can buy you marshmallows, and that’s nearly the same thing!!  Try a few more marshmallow-y recipes: (click on photo to see recipe)

Mallow Cupsfrozen s'more cupsMarshmallow Turtle Pops!Chocolate Marshmallow Cookies!!!


Advertisement

Cookie Dough Layer Cake


Cookie Dough Layer Cake4Creamy cookie dough filling surrounded by rich chocolate cake and topped with a delicious chocolate glaze. An easy, beautiful and oh-soo-yummy dessert!

I’m in love with cookie dough. When I go to those fancy yogurt shops where you make your own sundae I am always tempted to skip the yogurt and just fill my dish with those little cookie dough bites. This easy (super, super easy) layer cake is filled with my favorite creamy cookie dough. I’ve used it to top cupcakes and to fill brownies— and now to fill cake. I love it. I think you will too!

As in most of my recipes, this dessert is made simple with the use of a cake mix (I used a Duncan Hines Dark Chocolate Fudge here), but you can substitute your favorite cake recipe instead. More work… but that’s up to you!

Cookie Dough Layer Cake2

Here is how we put this cake together: (printable recipe)

INGREDIENTS:

Cake/Filling:

  • One boxed chocolate cake mix (plus water, oil and eggs to make according to package)
  • 2 sticks (8 oz.) unsalted butter(softened)
  • 2 sticks (8 oz.) salted butter(softened)
  • 2 c. powered sugar
  • 1 c. brown sugar (packed)
  • 3 T. vanilla
  • 1/3c. flour
  • 1 (12 oz) bag of mini chocolate chips.

Glaze:

  • 1 1/2 sticks of salted butter
  • 1 12 oz. package of semi-sweet chocolate chips

DIRECTIONS:

  • Make cake mix (or your favorite cake recipe) and bake according to box/recipe in 2- 8 or 9 inch round pans.
  • Cool cakes completely.
  • While cakes are baking and cooling, make your filling.
  • Place all filling ingredients except mini chips into a large mixing bowl and beat with mixer on low until combined and then high until light and fluffy.
  • Add mini chips (keep about 1/3 of a cup aside to sprinkle on sides and top of cake) and beat on low until fully combined.
  • Make glaze by melting butter and chips together and set aside.
  • Once cakes are cool, trim the tops so they are flat.
  • Place 1 cake on serving plate, cut side up, and spread a little of the glaze on top. 
  • Spoon all of filling on top and spread all the way to the edge of the cake.
  • Place second cake on top, cut side down, and use a knife to smooth edges of filling flat between the two cake layers.
  • Sprinkle edges of filling with extra chocolate chips, and then pour glaze over the top and add the rest of the chips.
  • Refrigerate until firm.

Cookie Dough Layer Cake3

My thoughts: I wondered if the filling layer was too thick (it’s a lot of filling!) I knew that I would love all that cookie dough, but would others? They did. It got rave reviews and even a 2 thumbs up from a frosting-hater 🙂 You could make half of the filling recipe if you want- but it is honestly soooo yummy to have a big bite of cookie dough with every bite of cake. Wish I had some left…!  Enjoy!  ~r

Cookie Dough Layer Cake1


Other fun layered caked here at Easybaked (click on a photo to see the recipe):

Grandma's Chocolate Cream CakeKey Lime Cake!Strawberry Lemonade Birthday CakePolka Dot Cake!!!!!!

Peanut Butter Bomb Brownies

Posted on

Peanut Butter Bomb

What could be more yummy than a chocolate brownie covered in creamy peanut butter ganache and topped with a chocolate covered peanut butter mousse bomb?  If you are addicted to chocolate and peanut butter, this dessert is for you!

Peanut Butter Bomb Brownies

Chocolate and peanut butter are a timeless combination, and these brownies combine those flavors in such a fun way!

The homemade brownies are dense, but not too rich. They compliment that sweet creamy peanut butter mousse perfectly and are such a pretty dessert!

You will need a silicone bomb mold for this, and a brush for coating it in chocolate. I found both of these at a local cake-decorating shop and they were really inexpensive.

Want to see how we did these? Here’s the recipe: (printable version)

INGREDIENTS: (makes 18-24 brownie cups)

Brownie:

  • Two sticks (1 cup) butter
  • 2 cup sugar
  • 3 eggs
  • 2 teaspoons vanilla
  • 1/2 cup cocoa
  • 1/2 teaspoon salt
  • 2 cups flour
  • 1 cup milk

Ganache: 

  • 1 cup of peanut butter baking chips
  • 1/2 cup of heavy cream

Bombs:

  • 1 to 2 cups of dark chocolate candy melts
  • 1 c. creamy peanut butter
  • 8 oz. Philadelphia Cream Cheese (softened to room temperature)
  • 1/2 c. sugar
  • 8 oz. Cool Whip topping

DIRECTIONS:

Bomb: 

  • Make these first, so they are ready to use once you need them.
  • Melt chocolate candy melts in 30 second increments in the microwave, stirring between until melted and smooth.
  • Use a brush (clean, food brush) to brush the inside of each cavity of the bomb mold with melted chocolate.
  • Freeze for about 3 minutes and repeat, to give a nice thick layer of chocolate. Re-freeze for another 4-5 minutes.


PBbomb1

  • Make filling by beating together peanut butter, cream cheese and sugar.
  • Gently fold in the container of whipped topping.
  • Place filling in a large zip-top bag and keep in the fridge until use.
  • Cut a corner off the bag, and squeeze filling into each chocolate coated bomb mold. Smooth tops with a spatula.

PB Bomb4    PB Bomb3

  • Refreeze for about 15 minutes- until filling is hardened.
  • Gently peel mold away from bomb. Place each one on a plate covered in parchment paper and freeze until use.

PB Bomb2

Brownie:

  • Preheat oven to 350.
  • Cream butter and sugar together. 
  • Beat in eggs, cocoa, vanilla and salt.
  • Add flour and milk (alternating them and mixing well in between)
  • Spoon into 18-24 cupcake liners placed in a muffin tin (only fill 1/3 to 1/2 full)
  • Bake at 350 degrees for 12-14 minutes or until a tooth pick inserted in the center comes out clean.

Ganache:

  • While brownies bake, heat peanut butter chips and heavy cream in a microwave safe bowl in 30 second increments. Stir and repeat until smooth and creamy.
  • When brownies are out of oven, carefully remove them from muffin tins and spoon warm ganache over warm brownies. Allow both to cool until ganache is firm but still a bit sticky.
  • Gently place a chocolate bomb on top of each brownie, and press gently into ganache.
  • Drizzle a bit of white chocolate on top if you desire.
  • Keep refrigerated. Leave at room temperature for a few minutes to warm before serving. Yum.

Peanut Butter Bomb Brownies3

My thoughts: Yum!!! These were a huge hit among my friends and family. They do take a little extra time to make that bomb on top– but the wow factor is worth it!  I will definitely be using these little silicone molds again- they are easy to use and I love that fun dome of chocolate! I hope you get a chance to try these!! Enjoy!!! ~r

Peanut Butter Bomb Brownies2

Other yummy peanut butter treats on Easybaked:

Peanut butter cup cheesecakePeanut Butter Cupcakes!!Peanut Butter Fudge Brownies!!!!Peanut butter Acorn Cookies!

Banana Split Cupcakes!

Posted on

Banana Split Cupcakes

Do you like banana split sundaes? If so, you will love these little cupcake treats- tasty and oh, so cute!!

I love going out for ice cream- not the soft-serve window kind, but the sit-down in a cute parlor with a million combinations of ice creams and toppings to decide from kind. I usually skip the banana split, because I’m not a huge fan of bananas unless they are in bread (or, in this case a cupcake!). Banana splits are the gold-standard of ice cream though- they have that sundae “look” to them. They are pretty.

I wanted to capture the look, and flavor of a sundae in these cupcakes and I love how they turned out! YUM!!!!

A few months ago I made Root Beer Float Cupcakes using scoops of Cool Whip as ice cream. They were so easy and cute and DELICIOUS, that I used the same idea here~ with banana cupcakes and a yummy strawberry ice-cream-topping filling!

Banana Split Cupcakes2 Want to try them? Here’s how we made them: (printable recipe)

INGREDIENTS:

  • One boxed banana cake mix (I used Duncan Hines), plus water, oil and eggs to make according to box.
  • 1 stick (1/2 cup) of salted butter (softened)
  • 1 stick (1/2 cup) of unsalted butter (softened)
  • 1 1/2 cups of powdered sugar
  • 2 teaspoons of strawberry flavoring
  • 2 tubs of Cool Whip (frozen)
  • One jar of strawberry ice cream topping
  • One bottle of chocolate “shell” ice cream topping
  • 1/2 cup of chopped pecans
  • Sprinkles and spoons (optional)

DIRECTIONS:

  • Make cake mix according to package and bake in 24 cupcake liners in muffin tins.
  • Make frosting by combining butters, powdered sugar and strawberry flavoring in a large bowl and beating on high until light and fluffy. Place in a zip-top bag, fitted with a decorating tip.
  • When cupcakes are cool, remove a core from the center using a knife or a cupcake corer. Spoon about 1 tablespoon of strawberry ice cream topping into the middle (you could use pineapple here too, if you wanted) Place “top” of core back on cupcake.
  • Use a cookie scoop or a small ice cream scoop to scoop frozen Cool Whip onto the top of one cupcake. Immediately pipe frosting around the edges of the scoop to hold it in place. Keep cupcakes chilled as soon as they are frosted, and keep your second tub of Cool Whip in the freezer until ready to use.
  • Once all cupcakes are frosted, drizzle them with chocolate shell- this makes a little bit of a mess, but I just dropped them into a second cupcake liner to catch the drips 🙂

Banana Split CupcakesBanana Split Sundae

  • Immediately sprinkle with nuts and decorations.
  • Keep cupcakes refrigerated until serving.
  • Enjoy!!!

Banana Split Cupcakes

My thoughts: These are a little more time consuming that your average cupcake– but look at how fun they are!! The flavors and textures are just perfect too- that cold Cool Whip and those crunchy nuts with the banana cupcakes… YUM! I really hope you get a chance to try these little treats! ~r

Banana Split Cupcakes

Other ice cream- inspired treats here at Easybaked: (click on a photo to see the recipe)

Butterscotch Ice cream towers!!!!Heath Bar Ice Cream Dessert3Raspberry Lemon Cream Cups!!!Ice Cream Cake

Rocky Road Cupcakes!

Posted on

Rocky Road Cupcakes!!!!These chocolate cupcakes are filled with creamy marshmallow and topped with a rich ganache frosting, marshmallows and almonds! YUM!!!!!

These are fork-eating cupcakes!  You’ll love that combination of rocky road flavors in these rich and messy-to-eat cupcakes.

Rocky Road Cupcakes4I absolutely love this frosting.  I have used ganache for many recipes, but I’d never taken the time to whip it up into a frosting.  Now that I’ve tried it, I will be back for more- this frosting is so rich and chocolatey!!! Ready for a recipe?

Here you go: (printable version)

INGREDIENTS:

  • One box of chocolate cake mix (with oil, water and eggs to make according to package)
  • One large jar (13 oz) of Jet-Puffed Marshmallow Creme
  • One bag of semi-sweet chocolate chips *
  • 1/2 cup of whipping cream *

(*double these two ingredients if you want to pile your frosting high like mine is)

  • One bag of mini-marshmallows
  • 1 cup of slivered or sliced almonds
  • a little white chocolate to drizzle on top, if desired

DIRECTIONS:

  • Start your frosting first, as it needs to chill before you beat it, and double the recipe if you want piles of frosting like mine.  I went a little overboard for fun pictures!! 🙂
  • Place 1/2 cup of whipping cream into a medium saucepan and heat it on the stove until the cream starts to bubble just a bit on the edges, stirring as it heats.  Turn off the heat, add the chocolate chips and cover for 5 minutes.
  • Stir melted chocolate and warm cream together until completely smooth (a “ganache”).  Put it in a medium bowl and refrigerate until it is a cool, spoonable consistency (30 minutes to an hour).
  • Make cake mix according to box, and divide equally into 24 cupcake lines placed in a muffin tin.
  • Bake as directed on box, and cool completely.
  • Core cupcakes using a small knife, or a cupcake corer.  I used the Chicago Metallics one, and for $4 there is just no reason to not get one- it makes filling cupcakes SOOOO easy!  Isn’t your birthday coming up???

So easy to core cupcakes!

  • Spoon entire jar of marshmallow fluff into a gallon-size zip-top bag and clip a corner off with scissors.  Squeeze the marshmallow into the middle of each cupcake and then trim a little of the core you removed and place the “lid” back on top of the filling.
  • Remove cooled chocolate ganache from refrigerator and beat on high until light and fluffy.
  • Place icing in a gallon size zip-top bag that has been fitted with a decorating tip in one corner, and pipe icing onto the cupcakes.
  • Decorate with almonds, and mini marshmallows.  I also added some mini chocolate chips (because I had some leftovers from another recipe) and I melted some white chocolate to drizzle on top.  Be creative and make these little marshmallow-y cupcakes irresistible!!!!


Rocky Road Cupcakes!!!!!


My thoughts:  These are FABULOUS cupcakes.  I love the gooey marshmallow creme surprise in the middle!  And that frosting….. oh my.  A few tips:  the frosting does harden up, so get those almonds and marshmallows placed in it as soon as you are done piping the frosting on.  This is good, because it holds all those yummy toppings in place!  Also, store these all sealed up.  You know what happens when you leave the bag of marshmallows open?  Yucky, rubbery, dried up marshmallows!  The same will happen if you just let these set out. 

I hope you love these little yummy desserts!!!!  ~r

Rocky Road Cupcakes with marshmallow filling!!!!Want some other ideas for that new cupcake corer?  We love filled cupcakes here at Easybaked!  Here’s a few of our favorites:

Cinnamon Roll Filling in a yummy cupcake!Peppermint Hot Chocolate Cupcakes!!!Toxic Slime-filled Cupcakes!Mocha caramel filled cupcakes3

Mocha Cupcakes (in edible coffee cups!)

Posted on

Mocha cupcakes in edible fondant mug

Rich chocolate cupcakes and mocha buttercream nestled in an edible marshmallow mug…how much fun is that??

The past two posts have been full of my adventures with my friend Megan from Happily Ever After Cakes.  We made chocolate cut-out cookie pops decorated with royal icing and fondant-covered cupcakes decorated with fun ladybugs and caterpillars.  This is the third and final project from that weekend and I just love how it turned out!

This project starts with easy mini mocha cupcakes with mocha buttercream frosting.  You can stop there and they are just wonderfully yummy –even without the mug!

The mug uses my new-found love of marshmallow fondant to add a little “wow” factor to the cupcakes.

Let’s start with the cupcakes: (printer friendly recipe)

Mocha Cupcakes with ButtercreamINGREDIENTS: (makes and frosts 48 mini cupcakes)

  • One box of chocolate cake mix (plus eggs, oil and water to make according to box)
  • 3 Tablespoons of instant coffee granules (divided)
  • 2 sticks (1 cup) of salted butter- softened to room temperature
  • 2 sticks (1 cup) of unsalted butter- softened to room temperature
  • 3 cups of powdered sugar
  • 2 Tablespoons of vanilla

DIRECTIONS:

  • Preheat oven to 350F degrees
  • Make cake according to box, but add 2 Tablespoons of coffee granules to the water required by cake mix first.
  • Allow granules to dissolve and then add to cake mix with eggs and oil according to box.
  • Place mini cupcake liners into mini cupcake pan and spoon batter into liners.
  • Bake for about 12 minutes until centers are firm.
  • Cool completely
  • Make buttercream by placing vanilla and remaining 1 Tablespoon of instant coffee into a small bowl to dissolve.
  • Add butters and powdered sugar to a large bowl and beat on high until light and fluffy.
  • Remove a small bit of this vanilla-free icing to garnish the tops of cupcakes and set aside.
  • Add vanilla/coffee mixture and beat again until well- combined.
  • To make plain cupcakes, just pipe coffee frosting on top of cooled mini cupcakes and then pipe a tiny bit of the white frosting at the tip of the cupcake.
  • Sprinkle with cocoa powder if desired.

Yum.

To make the cupcakes into little edible mugs, you will need to make fondant and a thick buttercream ahead of time. My previous post goes into great detail on making fondant and buttercream icing.  Click here to see the entire process.

If you’d like to print the recipes for these two things:

Printer friendly recipe for thick buttercream icing

Printer friendly recipe for marshmallow fondant

Once you’ve made both of these items, assembling the little mugs is fairly easy:

  • Unwrap the mini cupcakes you wish to use in mugs.
  • Spread thick buttercream icing around the sides of each cupcake.
  • Roll fondant out  fairly thick and trim into rectangles that wrap around mini cupcake and touch without overlapping. (You’ll need to grab a cupcake and experiment until you know how long and high to make these)
  • Also cut small strips of fondant to use as mug handles.
  • Wrap sides of mug around the frosted edge of each mini cupcake and seal the edges by brushing with a bit of water and holding together.
  • Attach the handle over the sealed edge with a bit of water.

Spread buttercream over sides of mini cupcakeCupcakes ready to be covered in fondantWrap fondant around mini cupcakeAdd handle over seam, using water to attach it.

  • Set mugs on a plate or dish with a lipped edge to hold the handle in place until it sets.
  • Once handle is dried in place, pipe mocha frosting on top of cupcake to fill mug in.
  • Spread frosting flat and pipe a tiny bit of the white frosting on top.
  • Sprinkle with cocoa powder if desired.

Allow handle to harden in place.Pipe frosting into top of mug

Megan (more artistic than I!) decorated some mugs to personalize them for us.  She used decorating brushes with gel food coloring to paint the cups….aren’t they cute????

Edible mug cupcakes!!!My thoughts:  These are really yummy cupcakes- even without the mugs.  The mugs are a little time consuming, but if you want something REALLY unique and fun they are both!  The marshmallow fondant got rave reviews from our friends– they loved it and ate the entire mug with the cupcake.  

When you bite in, it is quite the surprise….so fun!!!!  Enjoy!!!

Edible mug cupcakes
You might also enjoy:

Nutter Butter Flip FlopsBlack Bottom Peanut Butter CookiesRaspberry Lemonade TrufflesFudgy bonbon cookies

Chocolate Chip Oreo Brownie Cups

Posted on

Brownie Oreo Cookie CupChocolate chip cookie dough topped with an Oreo cookie topped with a chewy brownie… does dessert get better than this?  Plus they are just so cute- and fun to eat!

These little dessert cups are incredibly easy to make.  All you need is refrigerated cookie dough, Oreos and brownie mix (plus the oil water and eggs to make the brownies!)

Dessert Ingredients!They are so easy to put together:

DIRECTIONS:

  • Preheat the oven to 350F degrees.
  • Put 24 cupcake liners into cupcake tins.
  • Break apart refrigerated cookie dough (the Nestle brand comes already divided into 24 pieces)
  • Press cookie dough into the bottom of each cupcake liner so it covers the bottom of each cup (I thought that as the dough warmed a little bit to room temperature that this was easier).
  • Press an Oreo cookie on top of each bit of cookie dough.

Break apart cookie dough bits....Press Oreo on top of cookie dough..

  • Prepare the brownie mix as directed on box and scoop batter evenly into all 24 cups, covering the Oreo completely.


Scoop brownie batter over Oreo.

  • Bake at 350F degrees for 20-30 minutes.  Check often and be sure you don’t over bake the brownie.  They are much better a little chewy!
  • Remove from oven and serve warm or at room temperature.
  • I served with a little whipped topping and chocolate/ caramel drizzle.


Brownie Oreo Cookie Cup3

My thoughts: These are a really easy and yummy treat.  They are fun right out of the cupcake wrapper (eaten like a cupcake), or they are fun to dress up as a fancy dessert with pretty drizzles and toppings.  The three layers of different flavor and consistency make this a truly unique dessert!  Enjoy!! ~r

Brownie Oreo Cookie Cup2

Other dessert cup recipes you might enjoy: (click on the image to be taken to the recipe)

Fruit Loop Confetti Cups!!Salted Caramel Cookie Cups (2)Pecan Pie cookie cups with dark chocolateSeven Layer Cups

Chocolate Covered Strawberry Cake Roll!

Posted on

Chocolate covered strawberry Cake roll!!This strawberry cake rolled with vanilla buttercream and dark chocolate ganache is not only a pretty Valentines Day treat, but such a yummy one!  Plus, it looks A LOT harder to make than it really is!

February 1st.  How can the first month of this year be gone already?  I had already written a post for for this week when I looked at the calendar and thought, oh my- it’s time for a Valentine’s dessert!  I had an unexpected day off of work this week and decided to experiment with turning an ordinary cake mix into a cake roll.  I absolutely loved the results!  Cake rolls will always be a little fussier than plain old cakes, but look at how cute it is…!  If you’ve never made a cake roll, I will try to explain it as we go.  I have a few pictures, but if you want a few more click here for my pumpkin roll recipe.

INGREDIENTS:

  • One boxed strawberry cake mix (I used Pillsbury this time)
  • Water, oil and eggs (we will adjust the amounts from the box just a bit!)
  • 1/2c. heavy whipping cream
  • 1 c. dark chocolate chips
  • 2 sticks (8 oz) butter
  • 1 1/2 c. powdered sugar
  • 1 T. clear vanilla flavoring.

DIRECTIONS:

  • Preheat oven to 350F degrees
  • Make boxed cake mix, but add just a little less oil and water.  The Pillsbury mix called for 1 cup of water and 1/3 cup of oil.  I used 3/4 c. water and 1/4 c. oil instead.  I used the same # of eggs (3)
  • Cover the bottom of a standard jellyroll pan (mine is about 12″ by 17″, and about 1″ deep) with waxed paper- allowing the paper to extend just a bit over each end.
  • Lightly spray with non-stick cooking spray.
  • Pour cake batter into pan and gently spread it out to cover the entire bottom in a thin, but even layer of cake.
  • Bake at 350F degrees for 15-20 minutes- checking often to make sure it isn’t browning too much.
  • Remove pan from oven, sprinkle a clean kitchen towel with powdered sugar, lay it powder side down on the top of the cake and holding the towel in place, flip the pan over onto a flat surface.  You will have your powdered towel, the cake on top and wax paper on top of the cake.
  • Peel the wax paper off and gently roll the cake up in the towel, rolling from one short end to the other- keep the towel on the bottom and wrap it up with the cake.
  • Refrigerate for one hour.
  • While this is in the fridge, make your ganache and butter cream.
  • For the ganache: heat 1/2 c. of whipping cream in a medium saucepan until it starts to bubble around the edges.  Turn off the heat. Add the dark chocolate chips and cover for 5-10 minutes.  Stir until smooth and creamy.
  • For the buttercream: Place (softened) butter, powdered sugar and vanilla in a large mixing bowl and beat on high until very fluffy and creamy.
  • After chilling for one hour, remove cake roll from fridge and gently unroll on a flat surface.
  • Gently and evenly spread ganache over entire surface of the cake roll.
  • Gently and evenly spread the buttercream over the ganache.  This part was a little tricky- I wanted to make sure I didn’t mix the two layers, so I scooped the buttercream in little bits all over the top and then spread it a little at a time.

Spread chocolate over the cake roll...Add buttercream over chocolate!!  YUM!

  • Gently roll the cake back up, leaving the towel behind.  Carefully lift it on to a large plate and refrigerate it until the buttercream and ganache harden up.

The 1st time I made this it rolled beautifully and I just sprinkled it with powdered sugar….then when I made it for taking photos it cracked as I rolled.  This sometimes happens with cake rolls and there’s an easy fix: make another batch of ganache and pour it right over the top!  I think I actually liked it better this way!  You can’t even tell it cracked, see:

Cake roll cracked!!!!Chocolate covered Strawberry cake roll-- all fixed!!!

When it is chilled, slice it and serve it with whipped cream and maybe even some chocolate covered strawberries?  So yummy!!!!

Chocolate Covered Strawberry Cake Roll!!!My thoughts: I really had fun making this dessert.  There’s just something about the pink cake and all that gooey chocolate that makes me smile!  I hope this cake brings a smile to the faces of all the ones you love this Valentine’s Day!  Enjoy!!!   ~r

Want some other fun Valentines Day ideas?  Click on the picture to be taken to the recipe.

Dark Chocolate Ganache CupcakesPeppermint marshmallow crunch barsSweetheart browniesOld Fashioned Red Velvet Cake

A big pile of cupcakes!

Pile of Cupcakes!Make everyone smile with a stack of three colorful cupcakes!  Made with peanut butter cups, these mini-cupcake decorations are SO yummy with the chocolate cupcake they top.  The occasions you could serve these at are endless.  What a fun New Year’s Eve party treat, or birthdays?  What about a Dr. Seuss themed party?  SO much fun!!!!  Here’s how to put them together:

INGREDIENTS:

  • One boxed dark chocolate cake mix (with oil, water and eggs to make according to box)
  • 2 sticks (8 oz) salted butter (softened)
  • 2 sticks (8 oz) unsalted butter (softened)
  • 3 cups of powdered sugar
  • 2 tsp clear vanilla
  • 24 Reese’s miniature peanut butter cups (unwrapped)
  • 24 Reese’s minis peanut butter cups
  • Wilton Icing Colors
  • sprinkles, jimmies to decorate cupcakes

DIRECTIONS:

  • Make cupcakes according to the box.  I used brown cupcake liners to match the chocolate on the peanut butter cup toppers.
  • Cool cupcakes completely.
  • Make butter cream frosting by combining butters, powdered sugar and vanilla in a large mixing bowl.
  • Beat on high until frosting is light and fluffy.
  • Divide frostings into bowls and color using icing gels.  I made 5 colors, but you can do however many you want.
  • Pipe frostings on top of cupcakes and (using a smaller tip) pipe frosting on top of the two sizes of peanut butter cups.  (I clipped both corners of a zip top bag and put the large tip in one and the small in the other.  I piped the large cupcakes 1st and then squeezed the remaining frosting into the other corner and piped the frosting on the Reese’s cups.)
  • Gently stack the tiny cupcake on the medium and the medium on the full-size. (this buttercream recipe worked GREAT for these- it is nice and firm and hardens just a bit as it sets.  I didn’t lose even ONE topping!)
  • Decorate with sugars and jimmies as desired I used Red Sixlets Candy  for the large cupcakes and they looked so cute- like cherries!


Dr. Seuss Cupcakes!Aren’t they fun?  I just couldn’t stop taking pictures!

Fun Birthday Cupcakes!My thoughts: Goodness these cupcakes made me happy.  My friend Danielle and I made them together and we both kept saying, “Ah! They are so CUTE!”  My neighbors and coworkers were the recipients of these treats and the smiles when they saw them made my day!  I love easy ideas that are high on the “WOW” factor.  To give credit where it is due, my friend Megan from Happily Ever After Cakes pointed this idea out to me on Edible Crafts.  They had only used one cupcake topper, but I love it so much with two!!  Enjoy!!!!!!  ~r

Cupcake toppers

Need some ideas for your upcoming New Years Eve Party?  Try these fun treats!  Click on the image to be taken to the recipe:

Raspberry Confetti KissesConfetti CupsStrawberry Lemonade Birthday Cake!Cotton Candy Fizz

Gingerbread Cake Roll with Maple Cream Filling

Gingerbread Cake Roll A moist gingerbread cake rolled around sweet maple cream filling– a perfect Christmas treat!

Over a year ago I made gingerbread cookies with a maple cream filling for Halloween.  I’ve had so many requests for those cookies that I decided to use those flavors again in a cake form.  If you’re turning your nose up at the ginger/ maple flavor combination you simply MUST try one of these two recipes.  The flavors together are wonderful!  Cake rolls are really very easy to make. If you’ve never made one click here to get some photos of my technique with a pumpkin cake roll.

INGREDIENTS:

Roll:

  • 1 1/4c. flour
  • 1 1/4 t. baking soda
  • 1 T. ground ginger
  • 1 T. ground cinnamon
  • 1 t. ground cloves
  • 1 egg
  • 1/2 c. warm water
  • 1/3 c. sugar
  • 1/3 c. molasses

Filling:

  • 2 c. powdered sugar
  • 1/3 c. butter (melted)
  • 1 t. maple flavoring
  • 1/2c. white chocolate chips (melted)
  • 1-2 T. water to get spreadable consistency.

DIRECTIONS:

  • Preheat oven to 350F degrees. Line a 10×15 inch jellyroll pan with waxed paper and spray lightly with non-stick spray.
  •  Blend together flour, baking soda, ginger, cinnamon and cloves.
  • Beat together egg and warm water in a large bowl, then whisk in white sugar, and molasses.
  • Fold in the blended dry ingredients until smooth, then pour batter into prepared pan.
  • Bake for 15 minutes (until the cake springs back to the touch).
  • Remove from oven and immediately -with wax paper on- roll gingerbread cake up from short end of pan to short end of pan (you will probably burn your fingers a little- I usually do!) Roll this up in a clean towel to hold it tightly together.
  • Refrigerate for 1 hour.
  • While roll is chilling, make filling:
  • Add powdered sugar, melted butter, melted chips and maple flavoring together and blend.
  • Add a little bit of water to make filling into a spreadable consistency.
  • After one hour, remove roll and unroll it carefully.
  • Spread filling over top of opened roll and then re-roll this up *removing the wax paper as you roll*
  • Place this back in the refrigerator for about 4-6 hours minimum.
  • Drizzle with a little powdered sugar glaze or sprinkle with powdered sugar and cut into slices to serve.

Gingerbread Cake RollMy thoughts:  YUM!!!  I can’t wait to make this again- its really fun to put together and to serve.  It’s such a unique and memorable dessert.  If you want something that will stand out on the dessert table this Christmas, this is it!  ENJOY!!!  ~r

Want to try this in cookie form?  I made these with Halloween Linzer cookie cutters, but they would be really fun with Christmas ones!  Click on the photo and you’ll be taken to the recipe….enjoy!

Ginger Maple Cookies

%d bloggers like this: