RSS Feed

Tag Archives: unique cupcakes

Spaghetti and Meatball Cupcakes

Posted on

spagetti-and-meatballs-cucpakes1

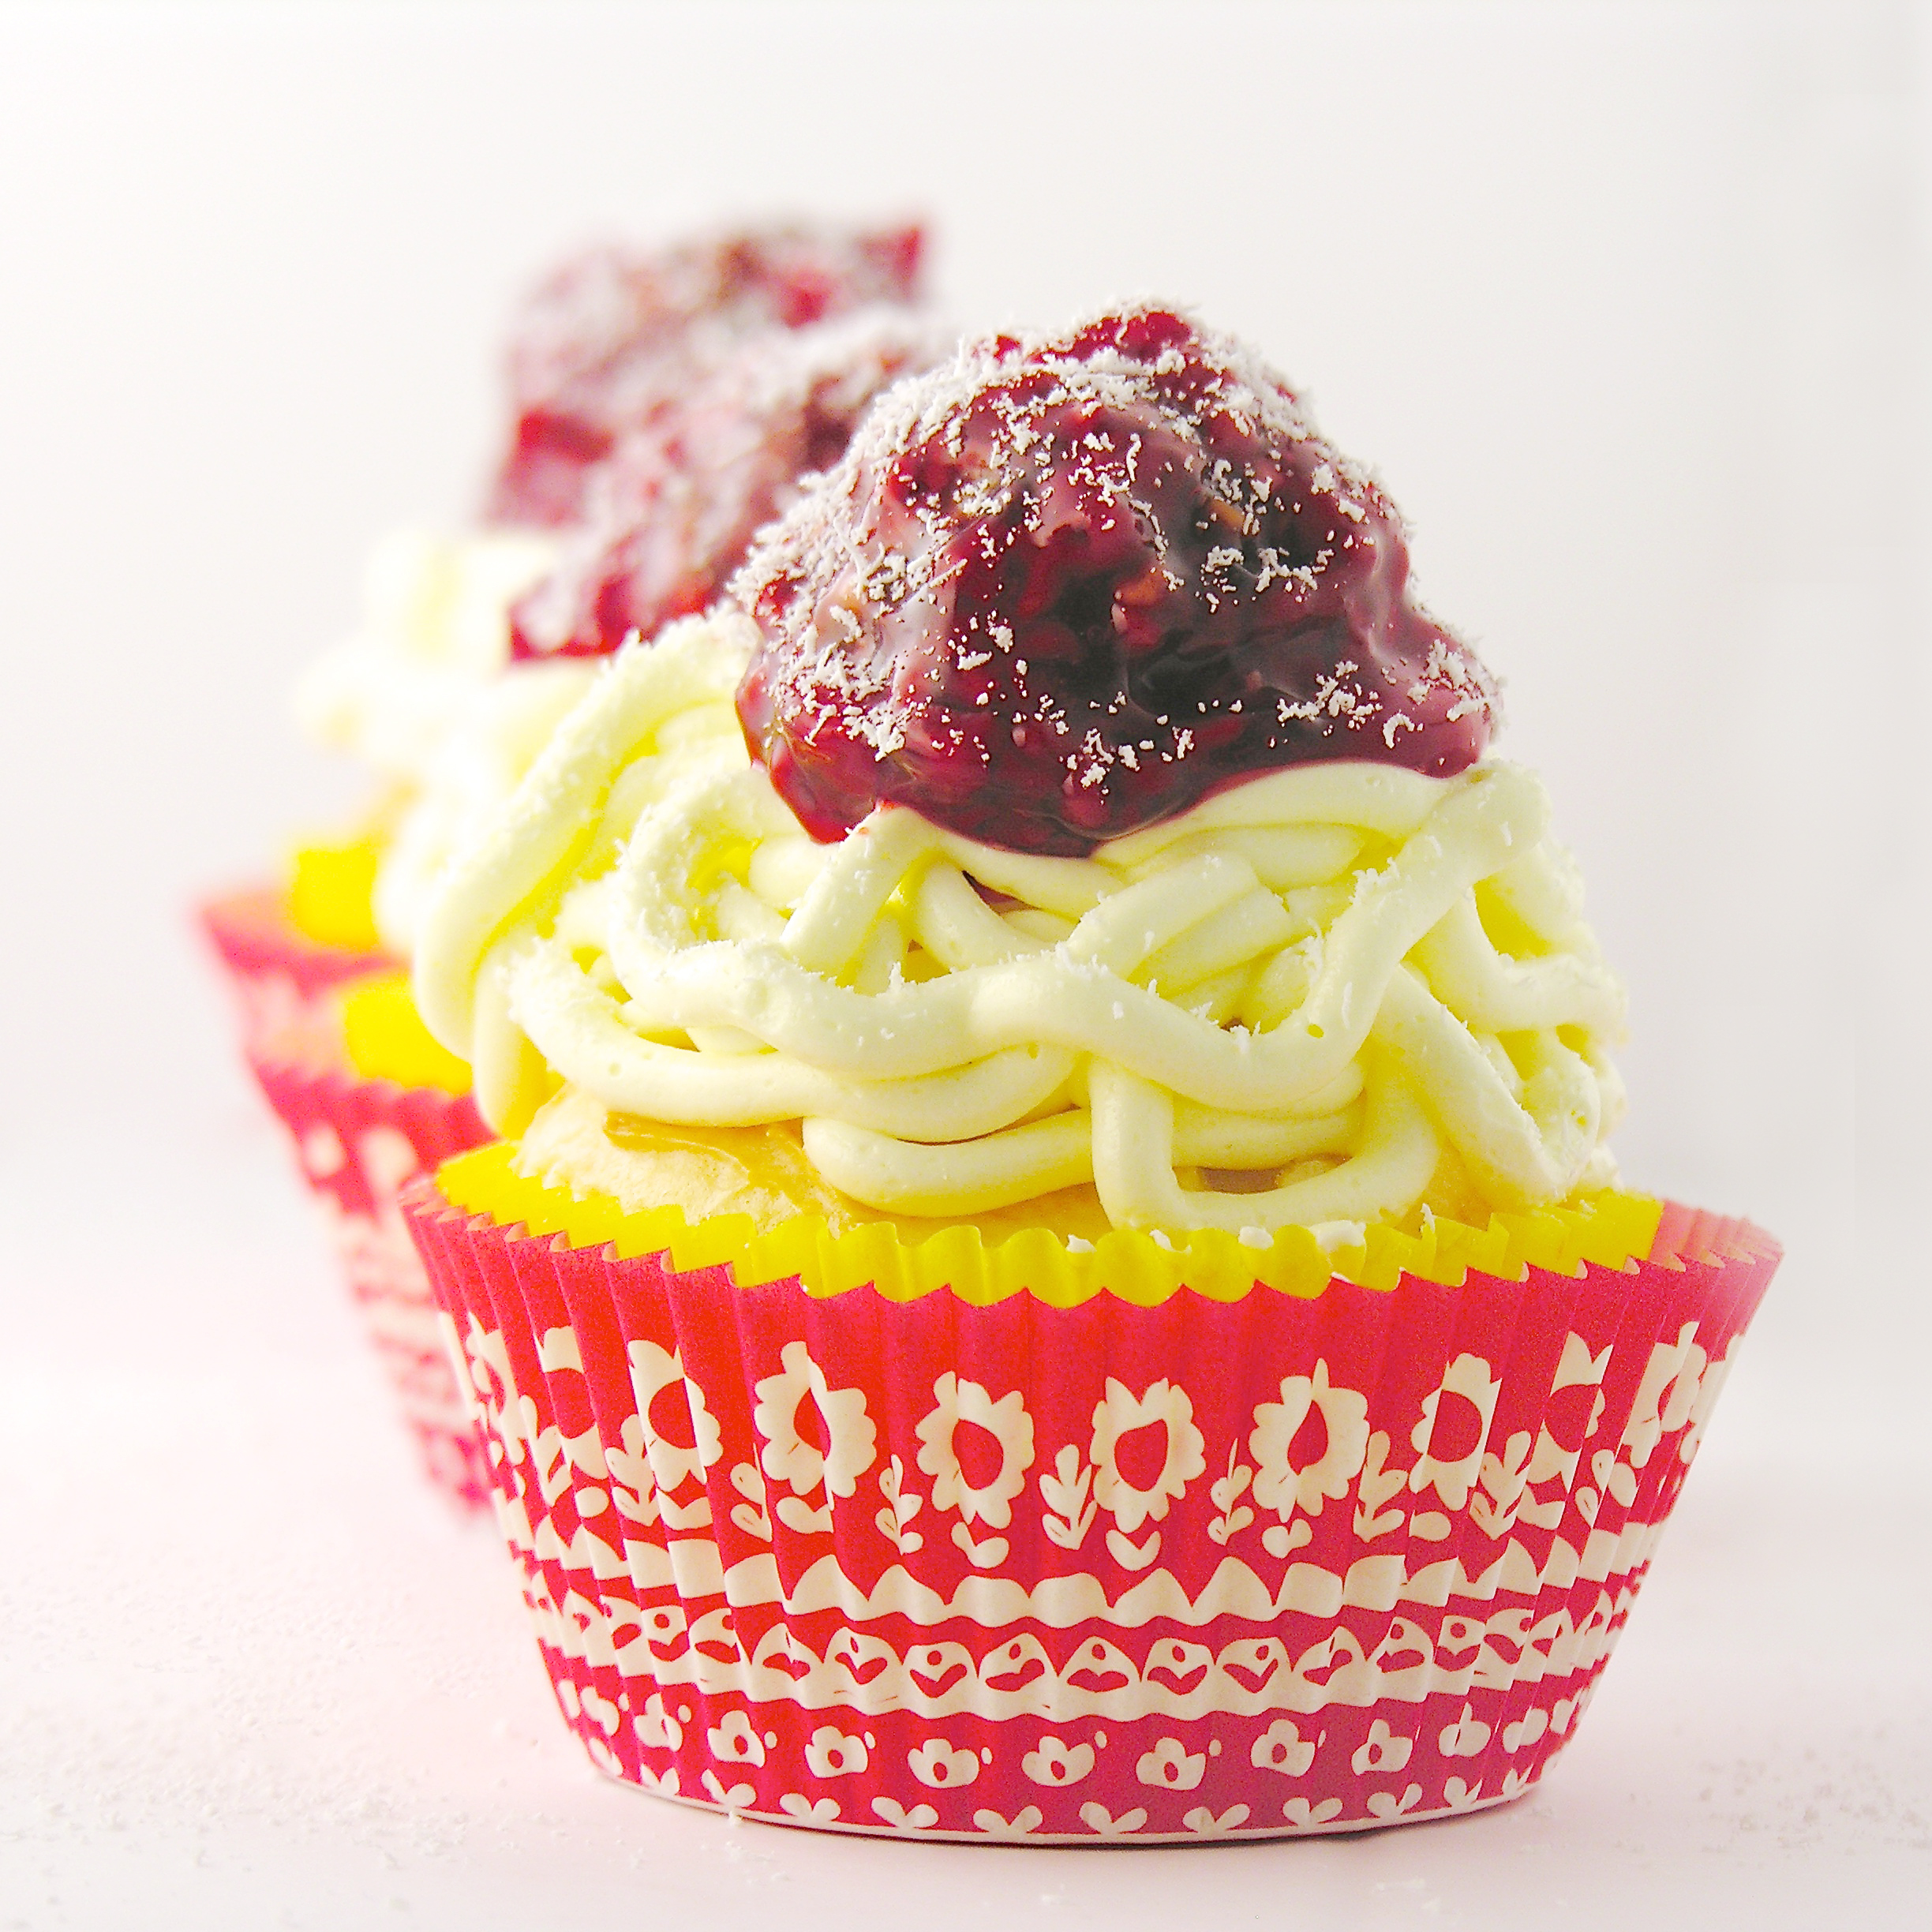
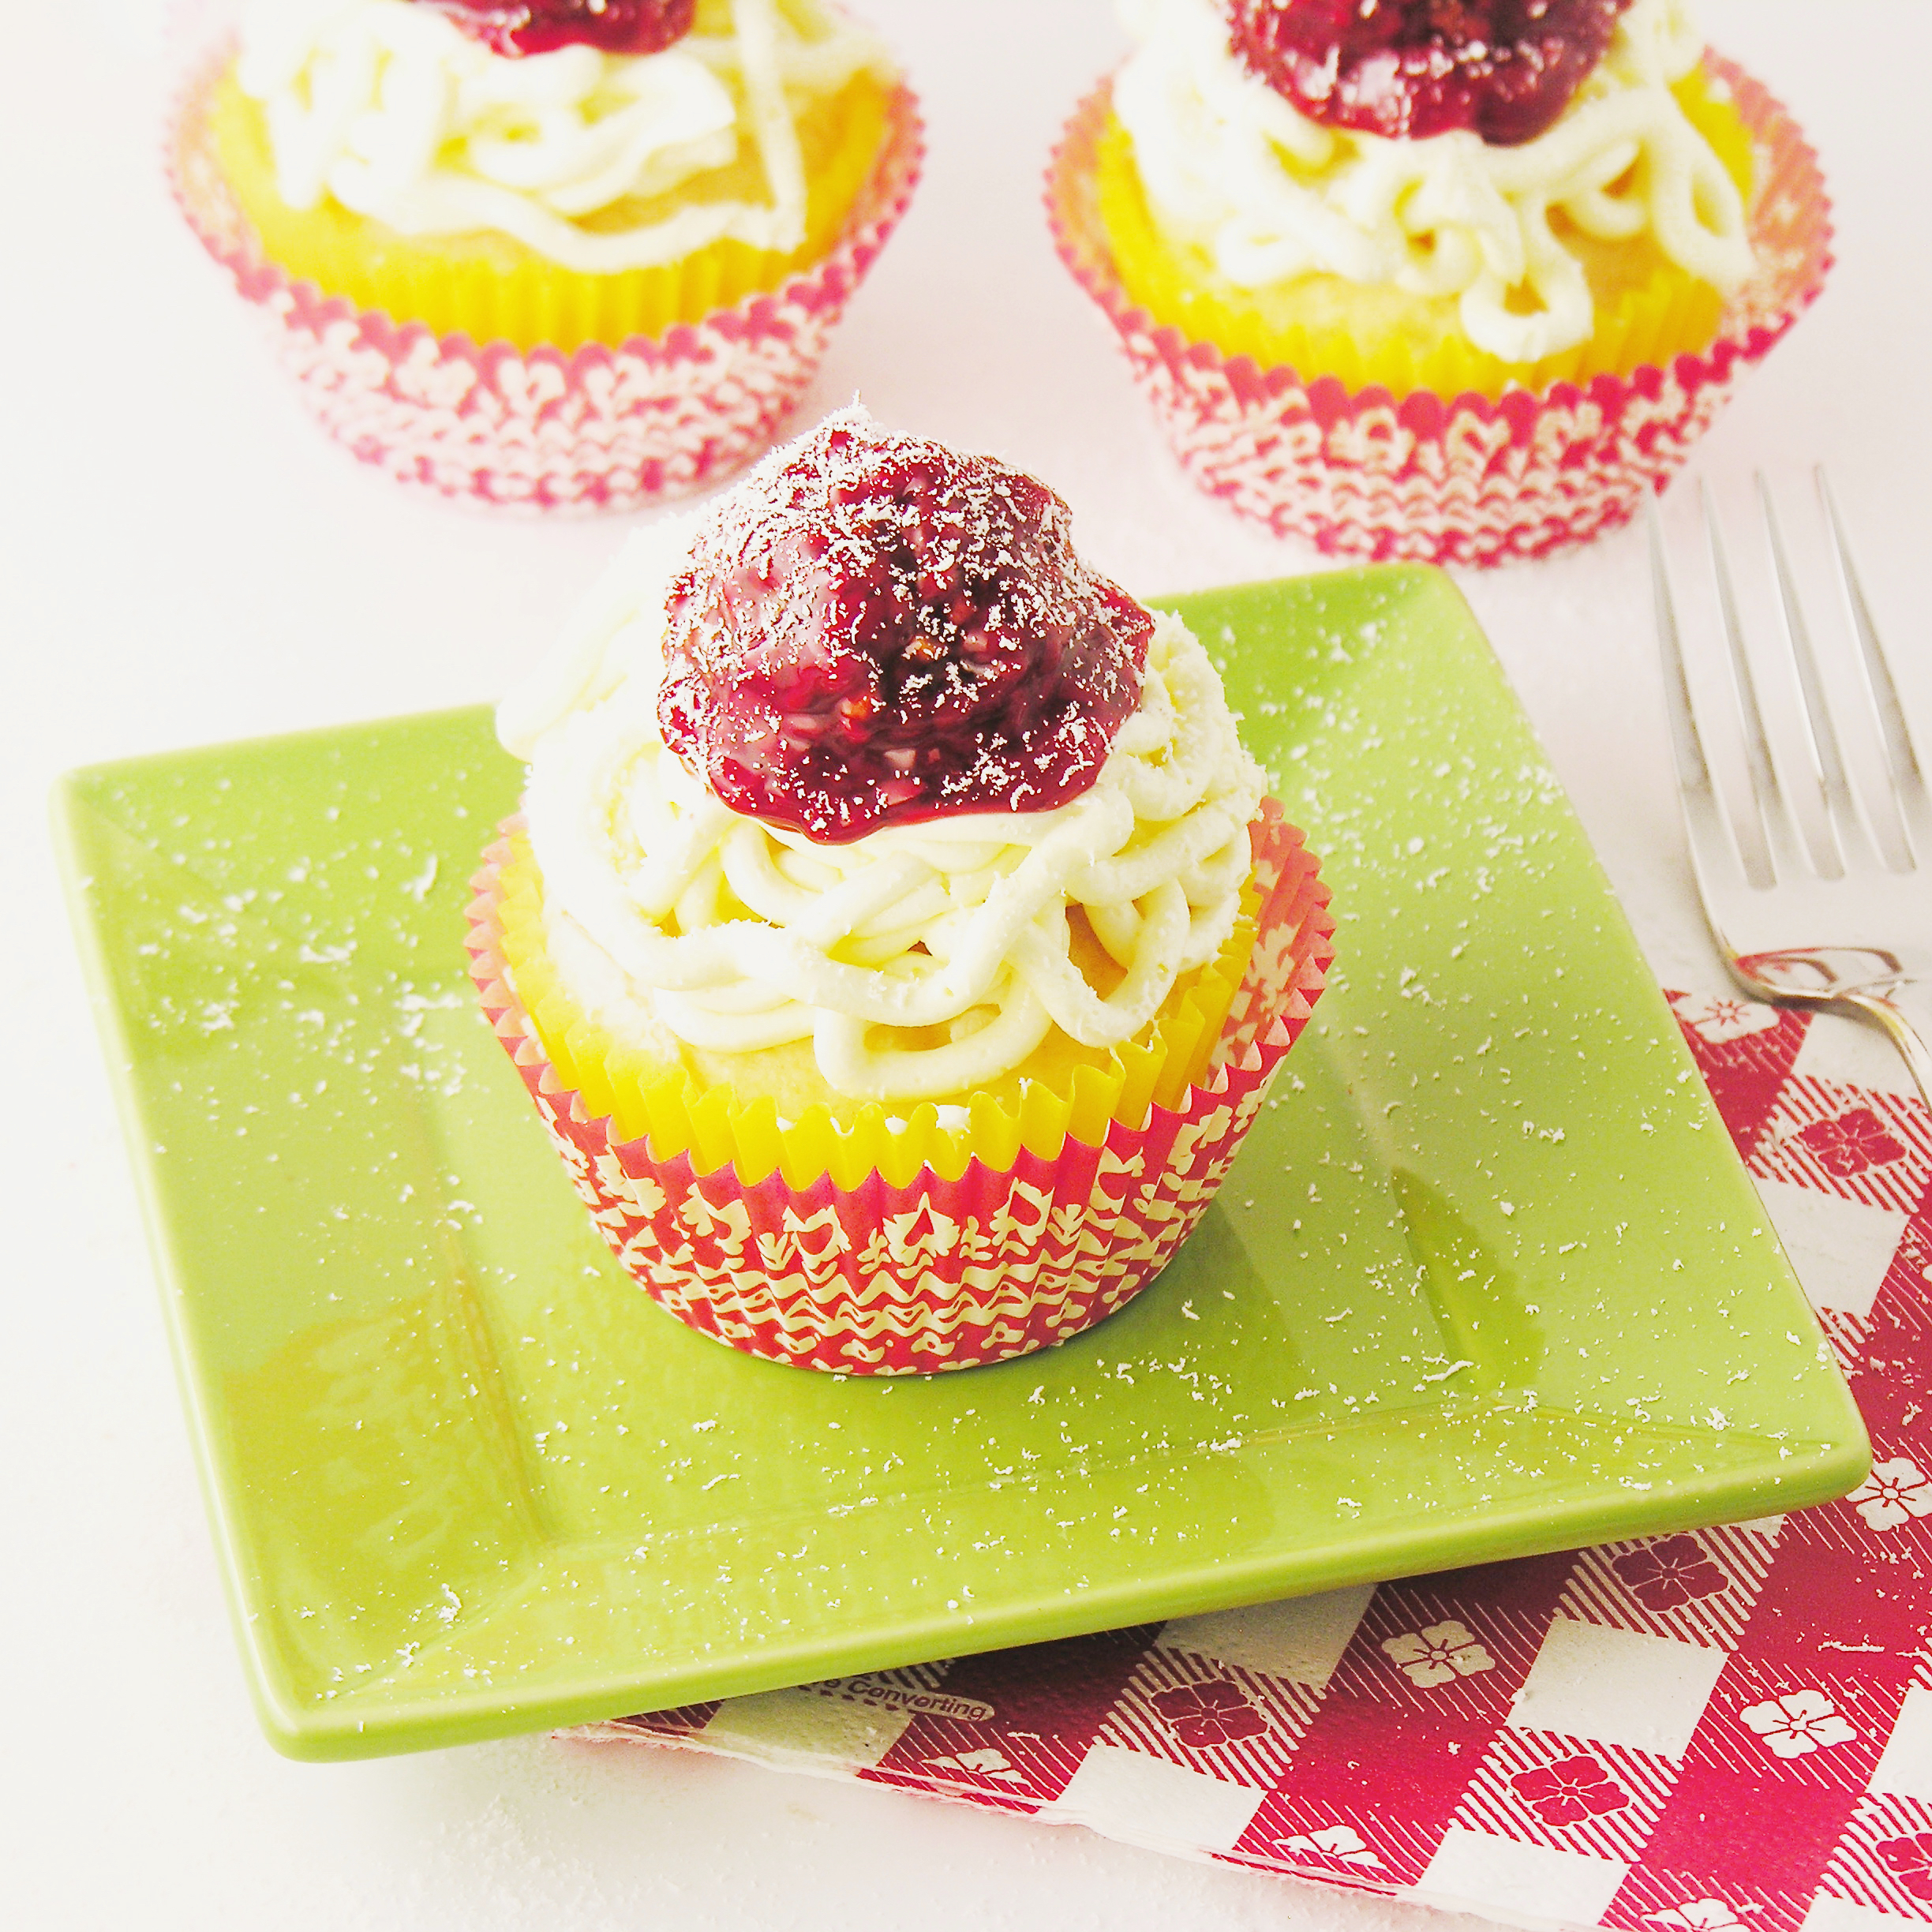
Nothing says “April Fools’ Day!” like these fun spaghetti cupcakes with a yummy chocolate “meatball” on top!

“You put spaghetti on a cupcake?”

Direct quote from one of the kids I offered this cupcake to.

#win

I love April Fools’ Day! When I was little, my mom was always trying to fool us with food. I remember opening up my lunch at school one year and seeing green milk and a sandwich with no meat and an apple with little candy worms coming out of it. I’m sure she was laughing every year when she packed lunch on April 1.

So, I try to be original here on Easybaked. My favorite moments are when I have an idea, I google it, and NOTHING comes up. Believe it or not, that happened to me with Oreo Pops. Nobody had done them when I created my 1st batch!

THIS recipe is not an Easybaked original. It is one I saw all over the internet, and simply had to make for myself!

SO much fun- these just make me smile 🙂

spaghetti-cupcakes3

Here is how we made these little April Fools’ Day treats! (printable recipe here)

INGREDIENTS:

  • One boxed yellow cake mix, plus water, oil and eggs to make according to package
  • 2 sticks (one cup) of salted butter, at room temperature
  • 2 sticks (one cup) of unsalted butter, at room temperature
  • 3 cups of powdered sugar
  • 2 teaspoons of vanilla
  • Yellow food coloring
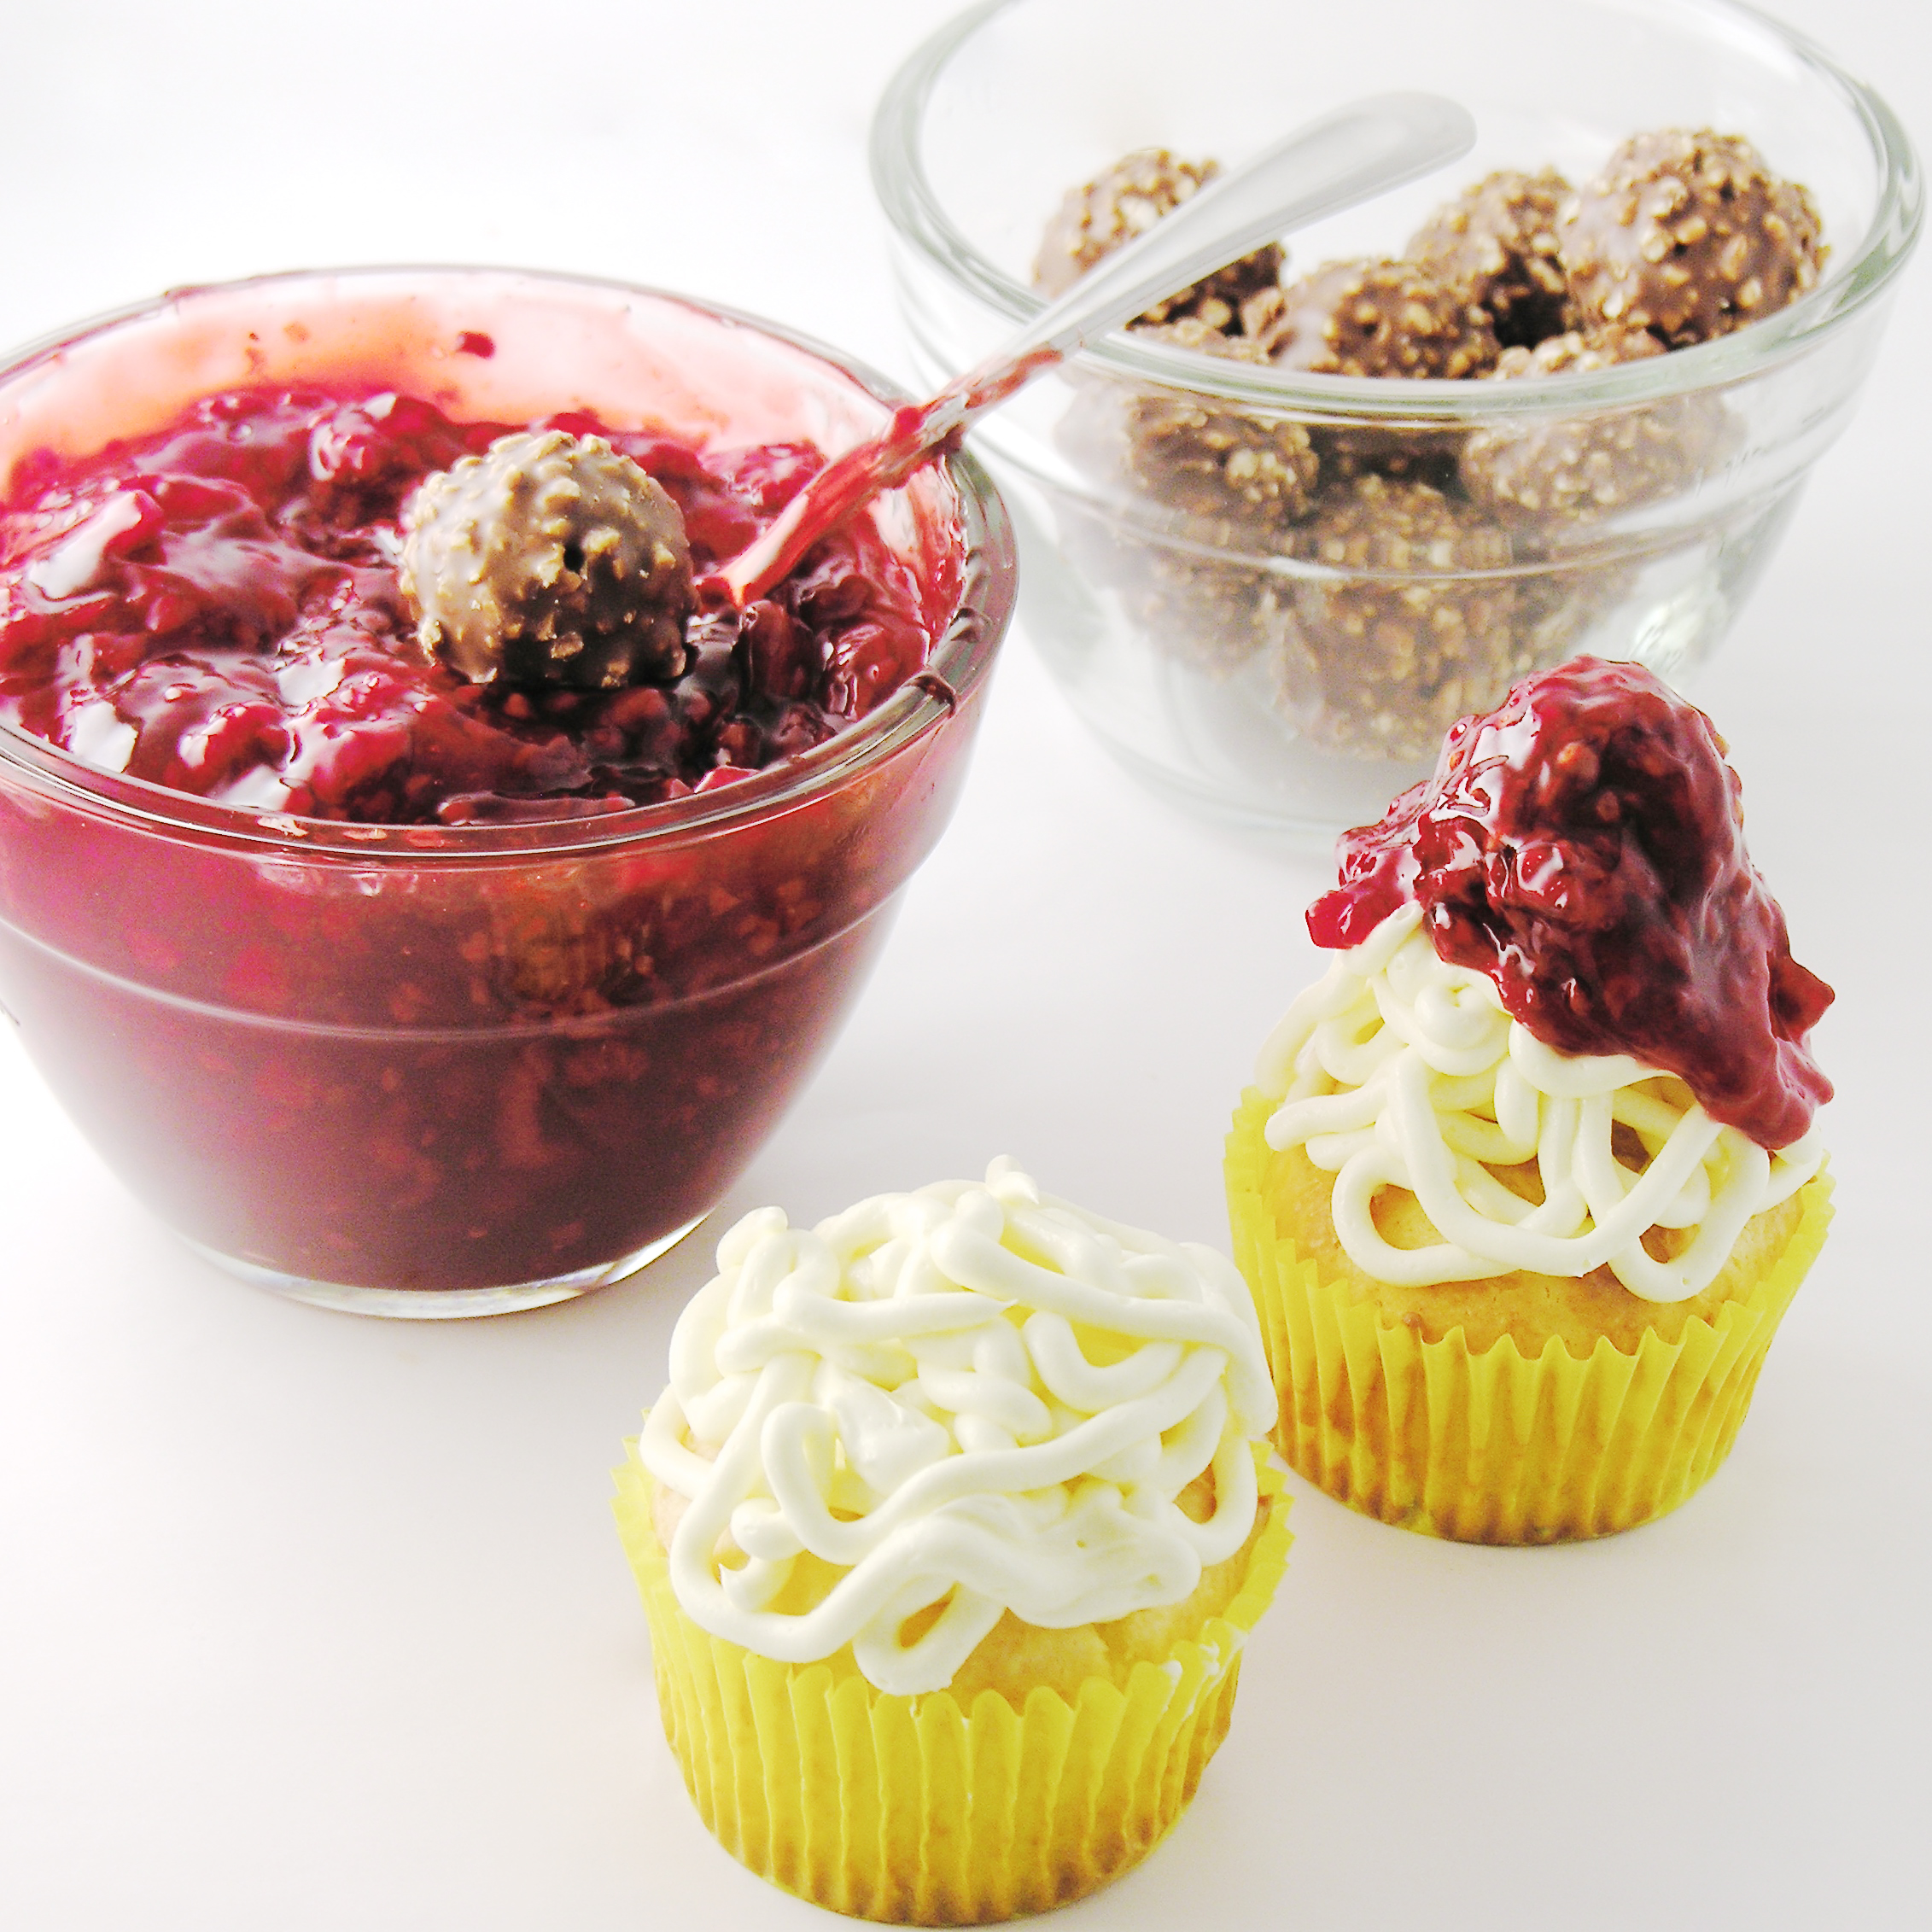
  • One can of raspberry pie filling
  • 24 Ferrero Rocher chocolates
  • 1/4 cup of white chocolate chips

DIRECTIONS:

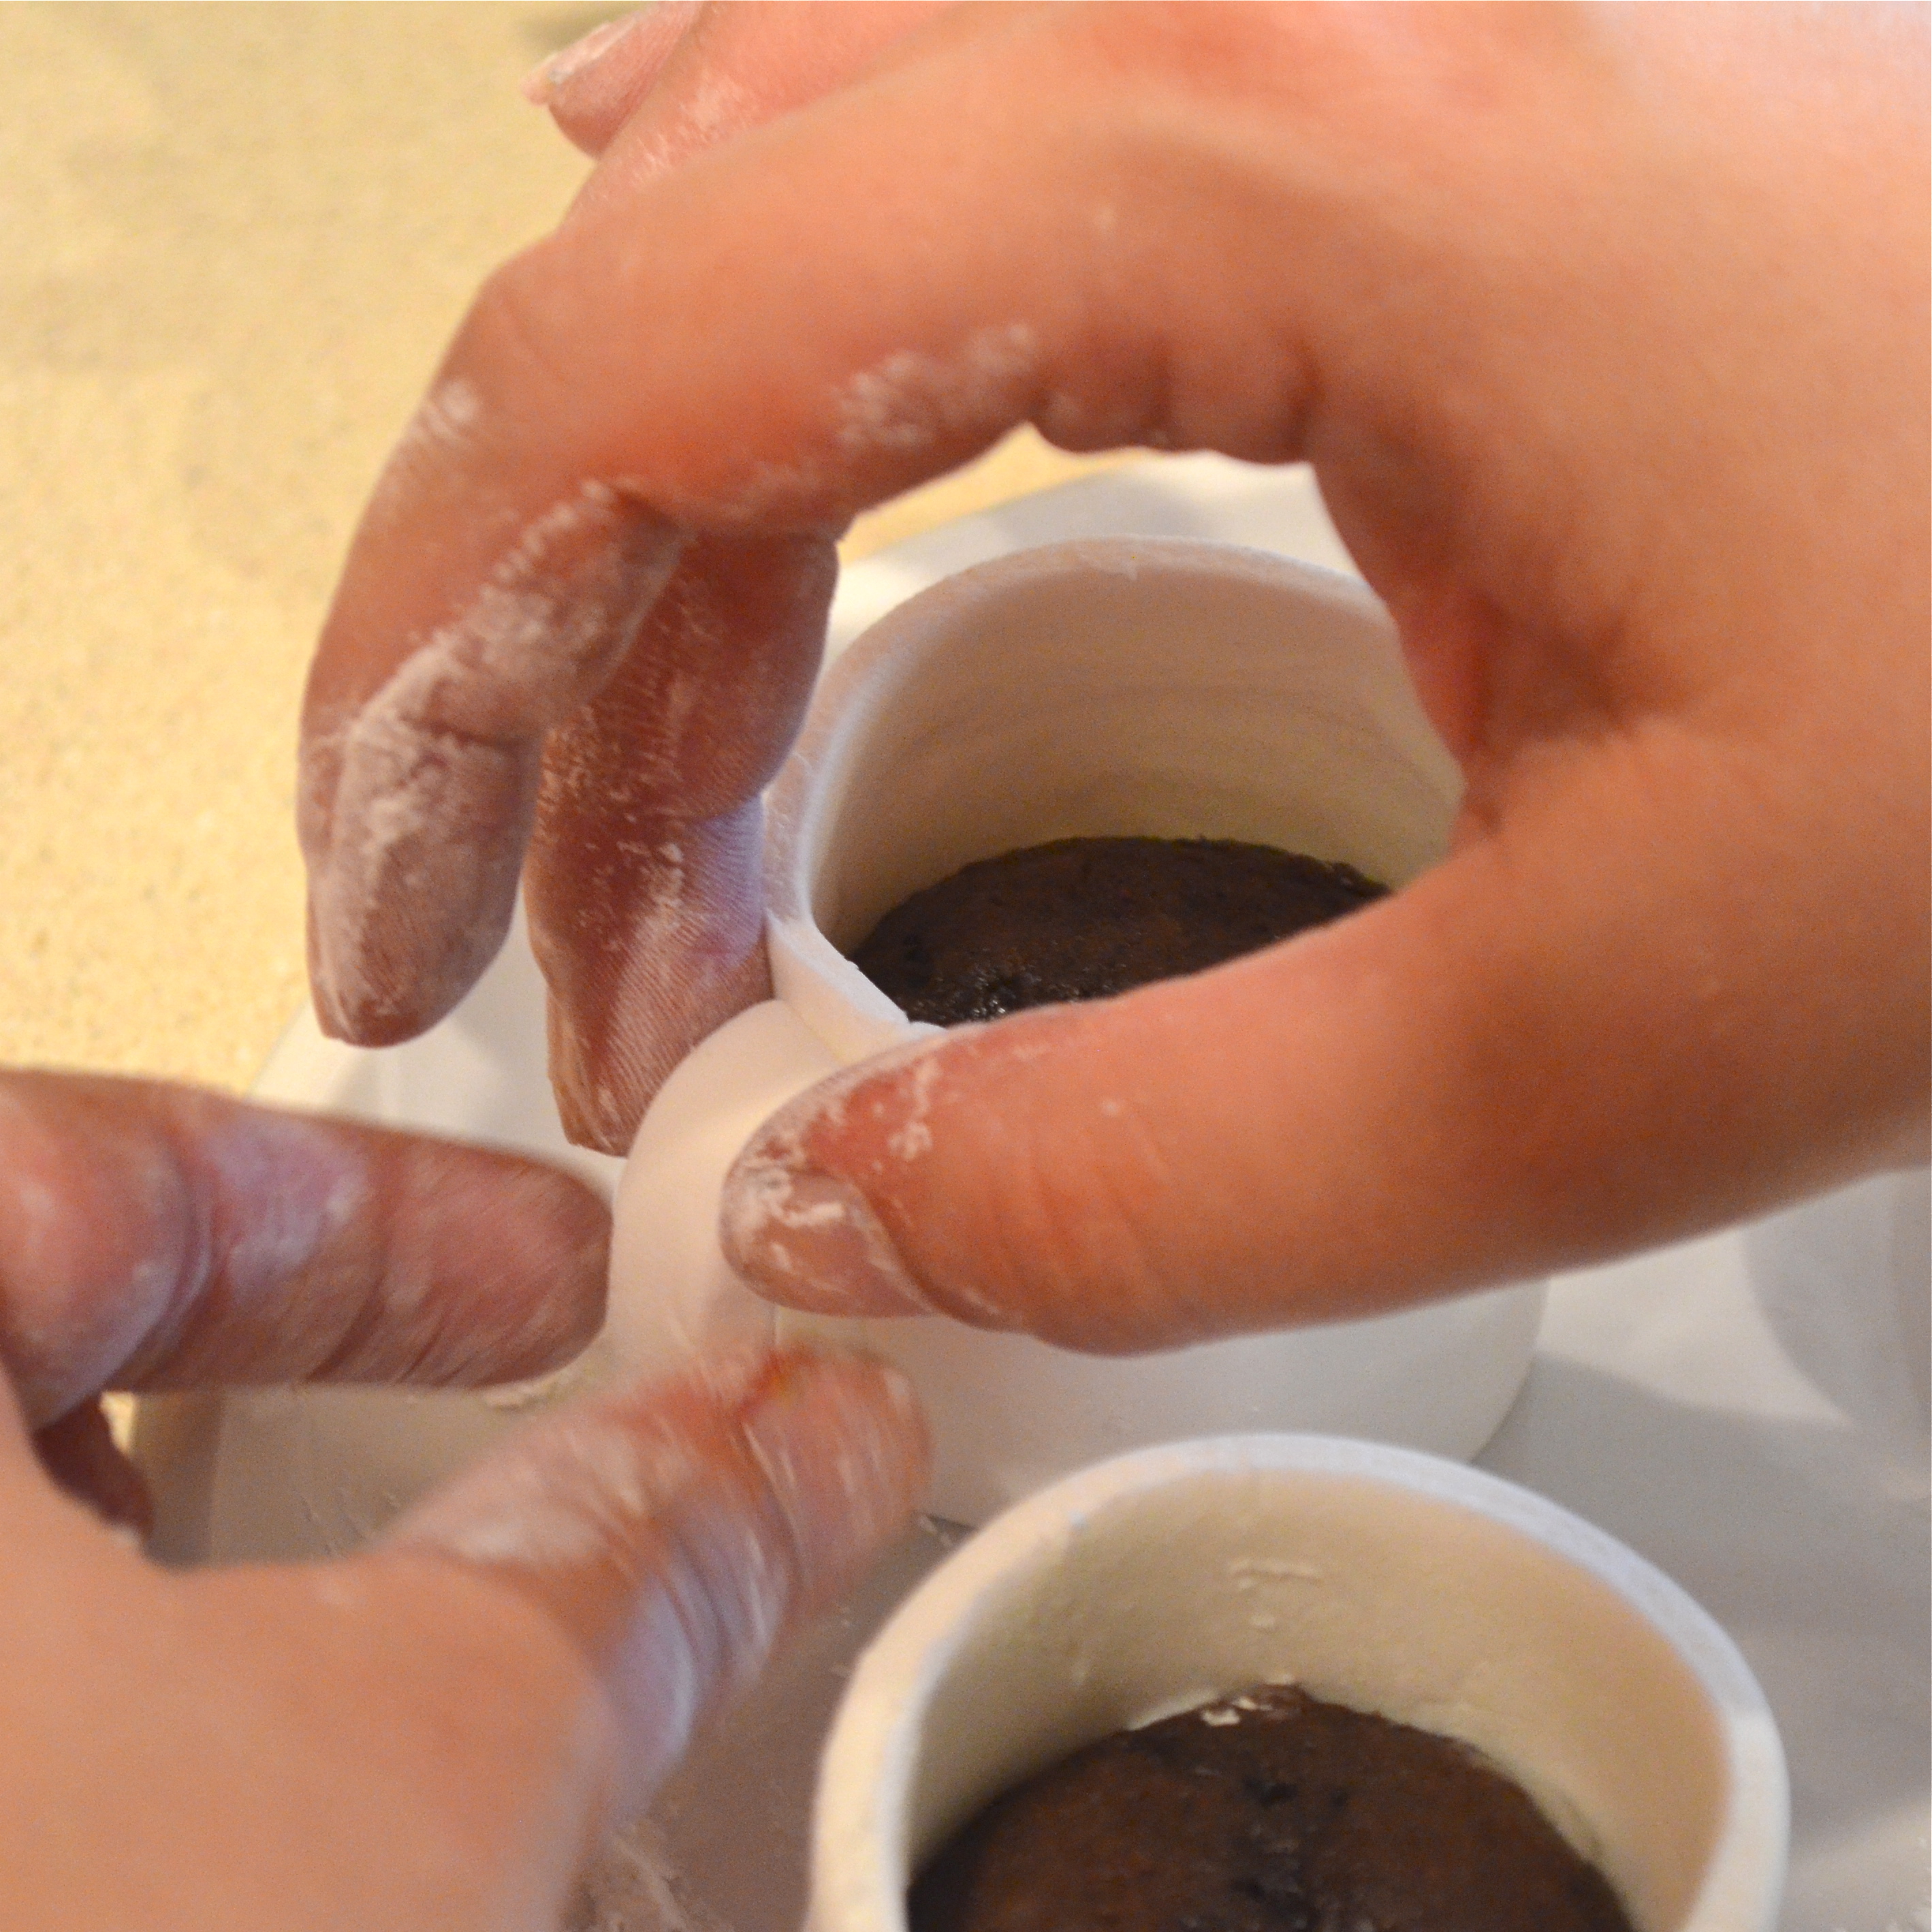
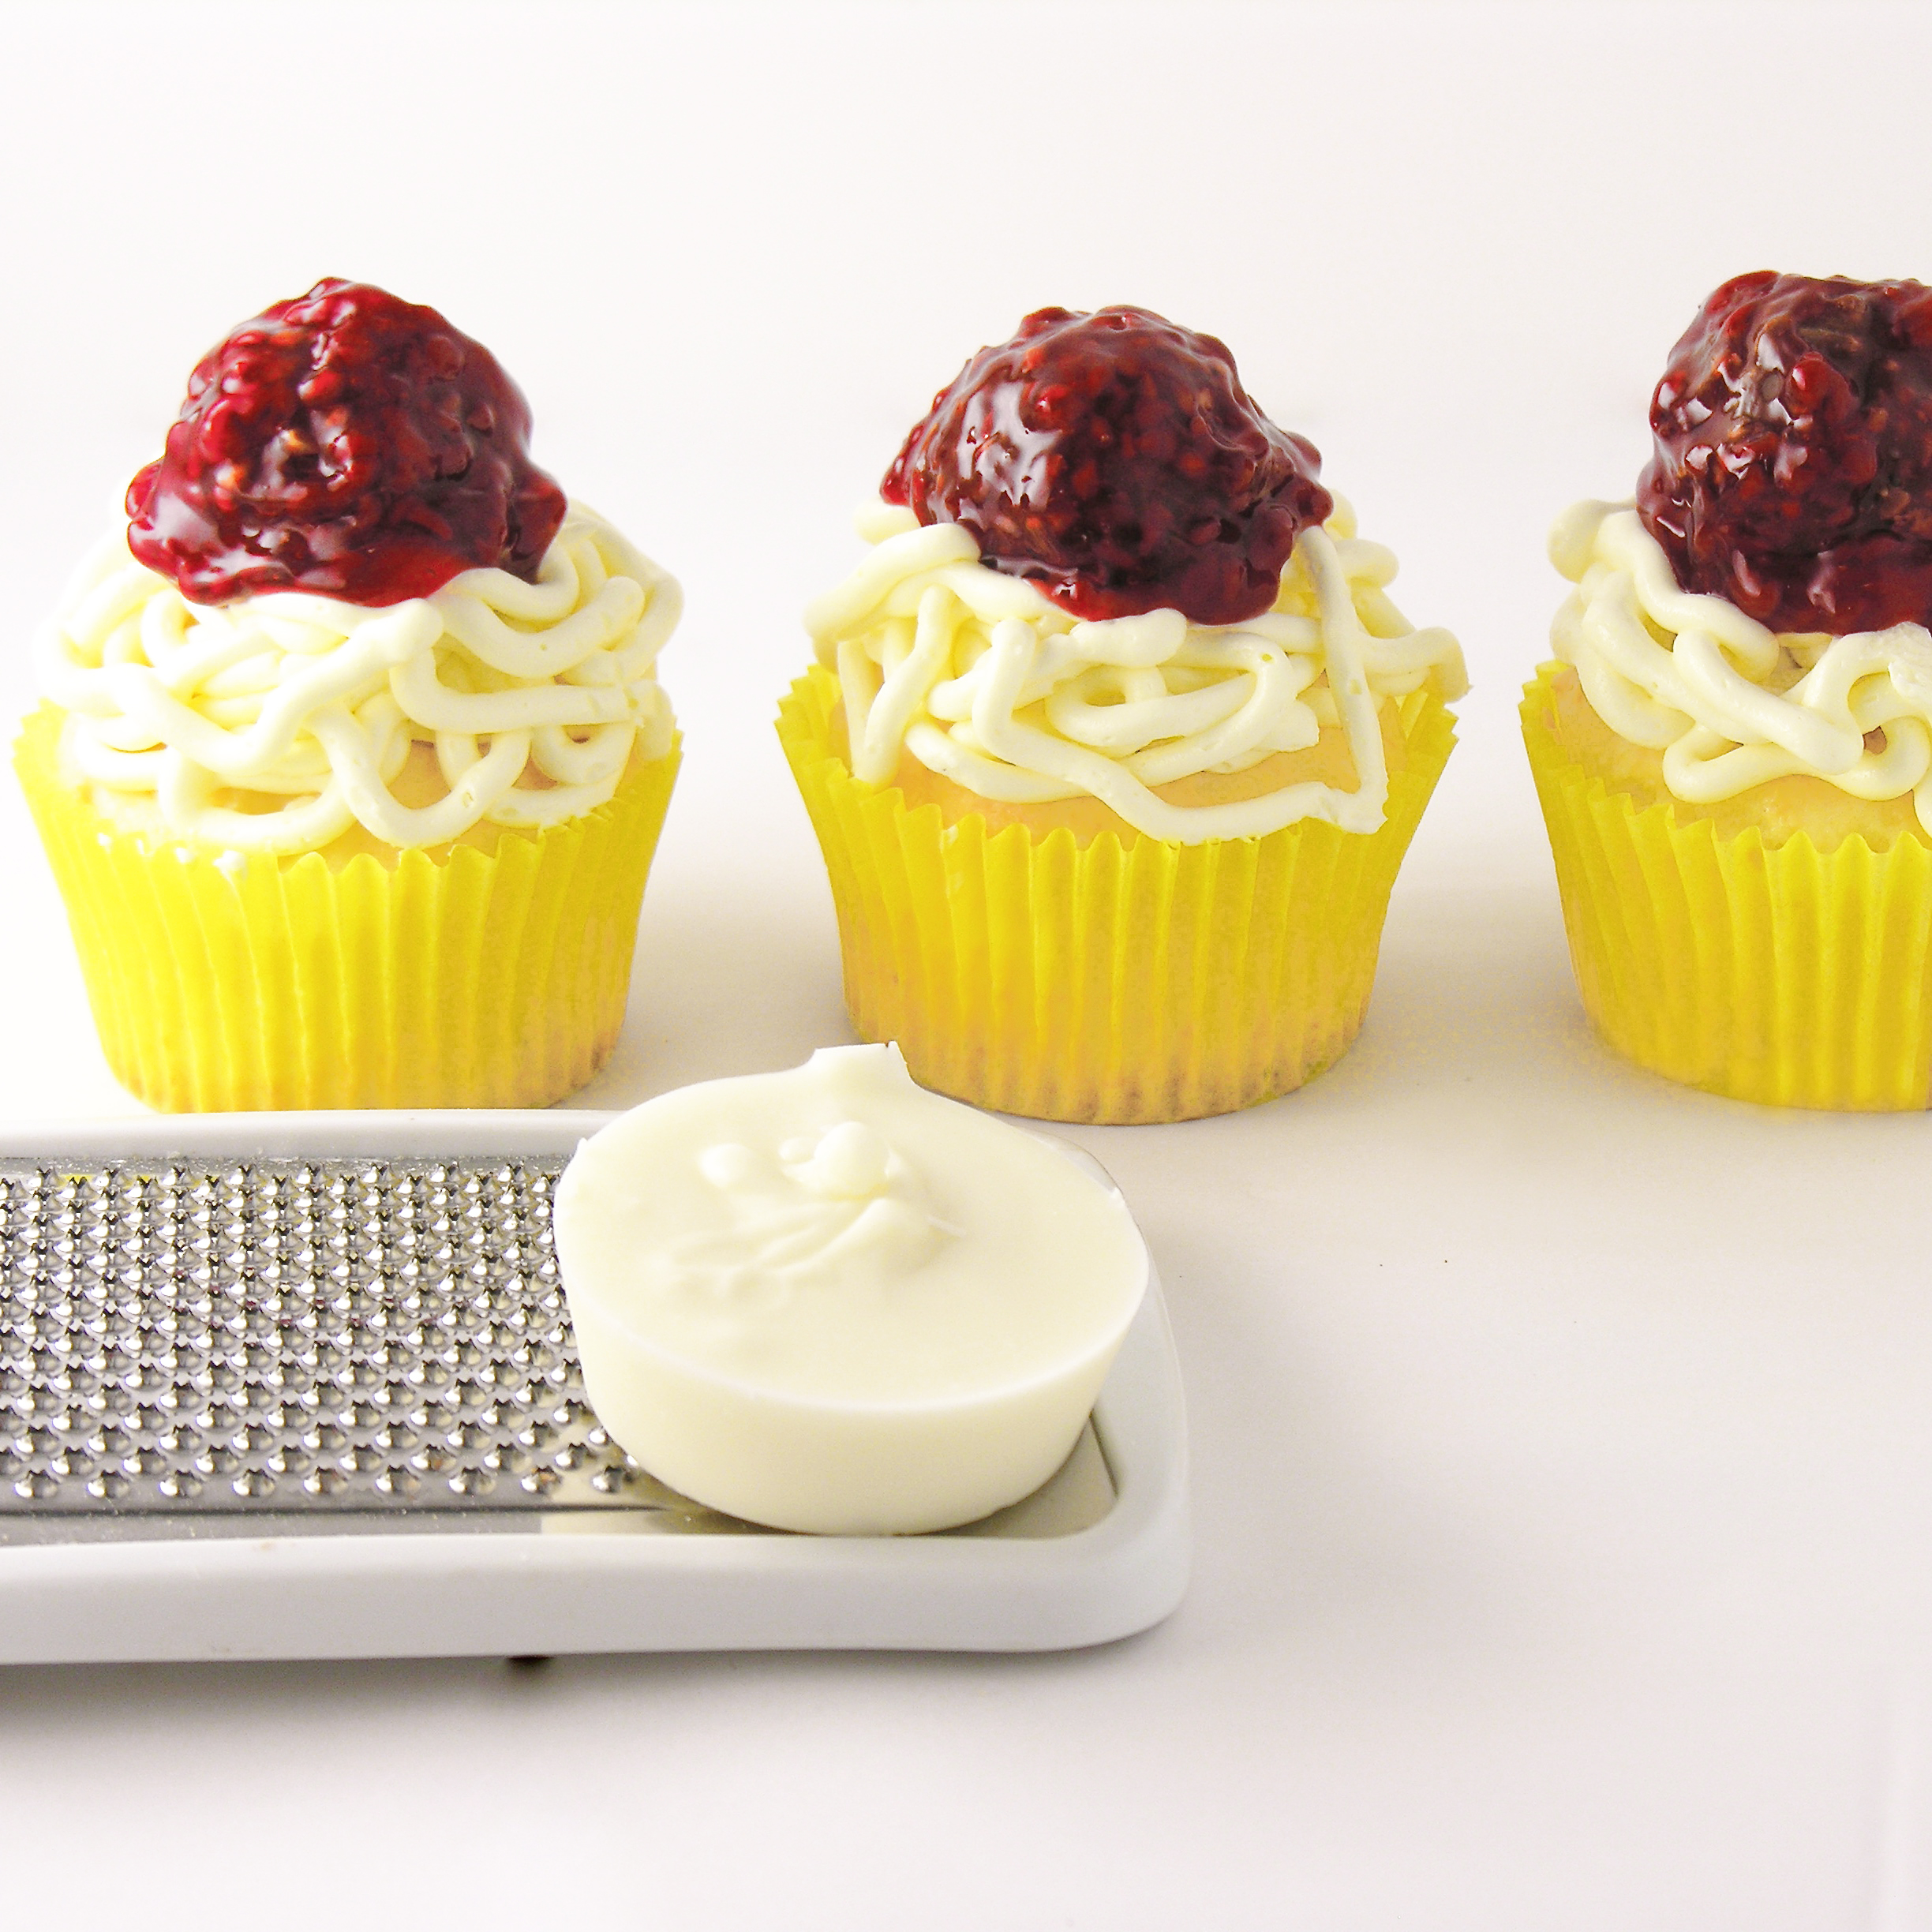
  • Melt white chocolate chips in the microwave in 30 second increments, stirring in between until melted and smooth.
  • Spoon this into a small paper or disposable plastic cup and place in the freezer for later.
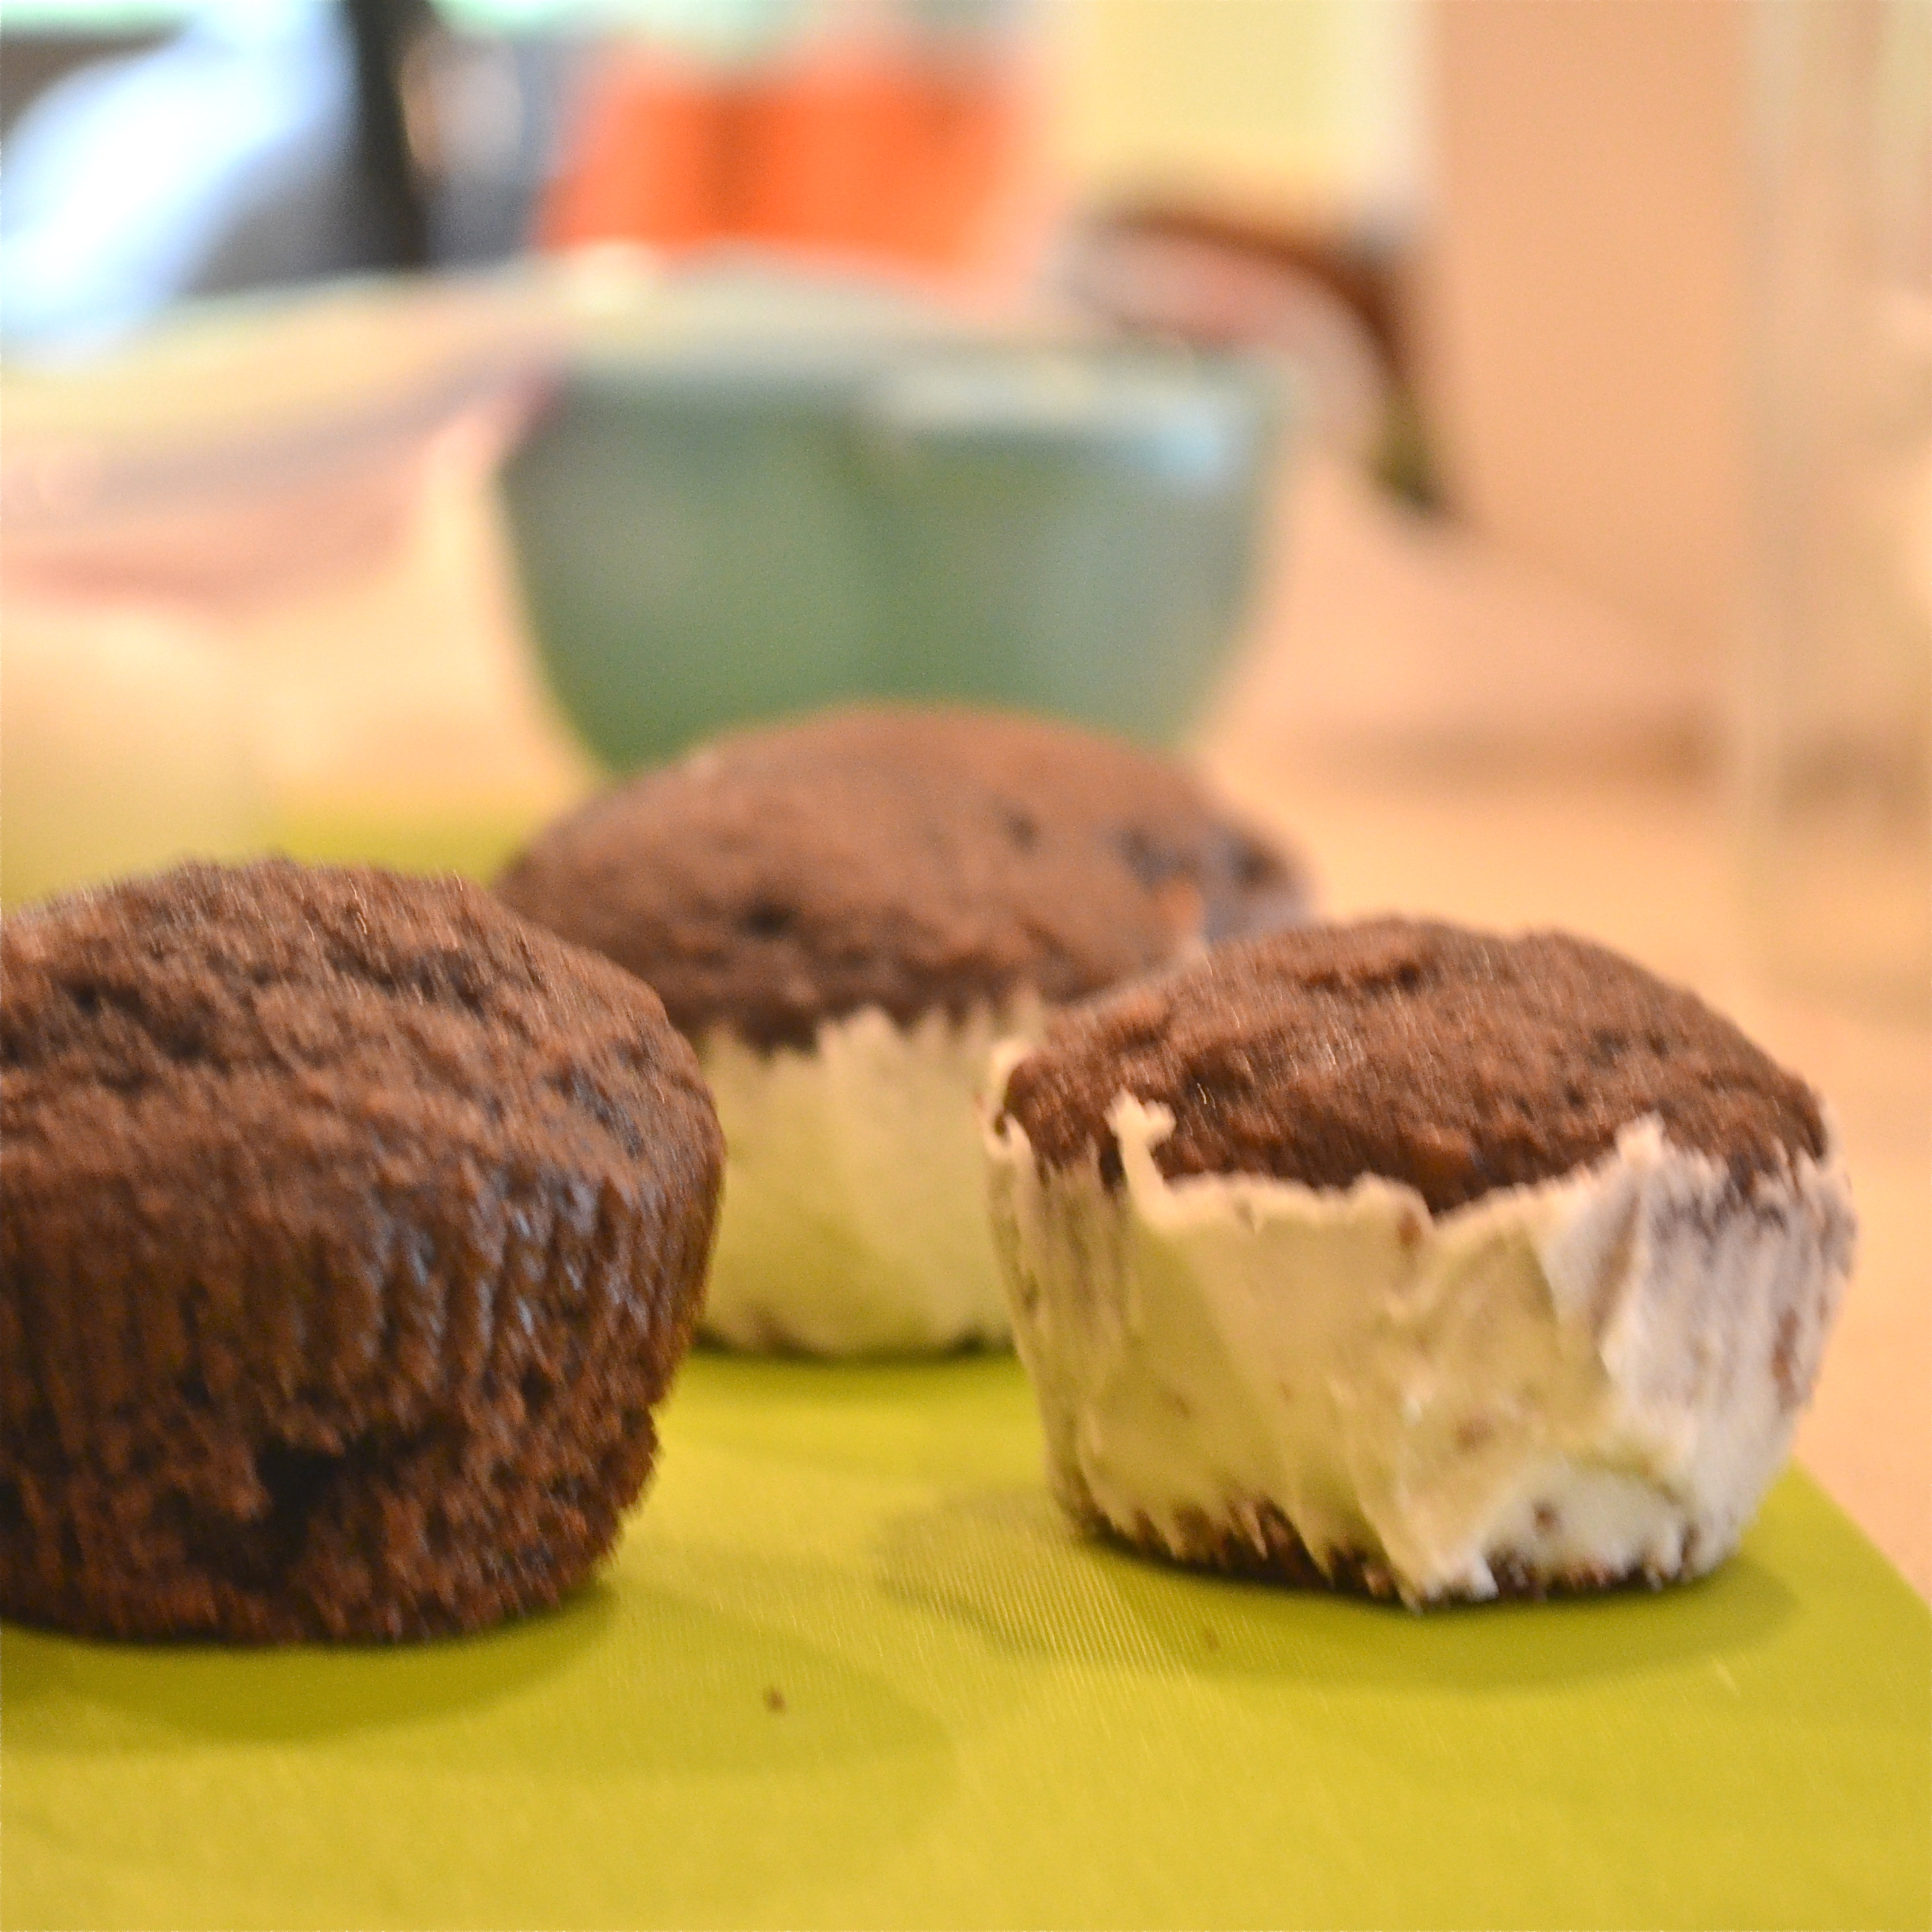
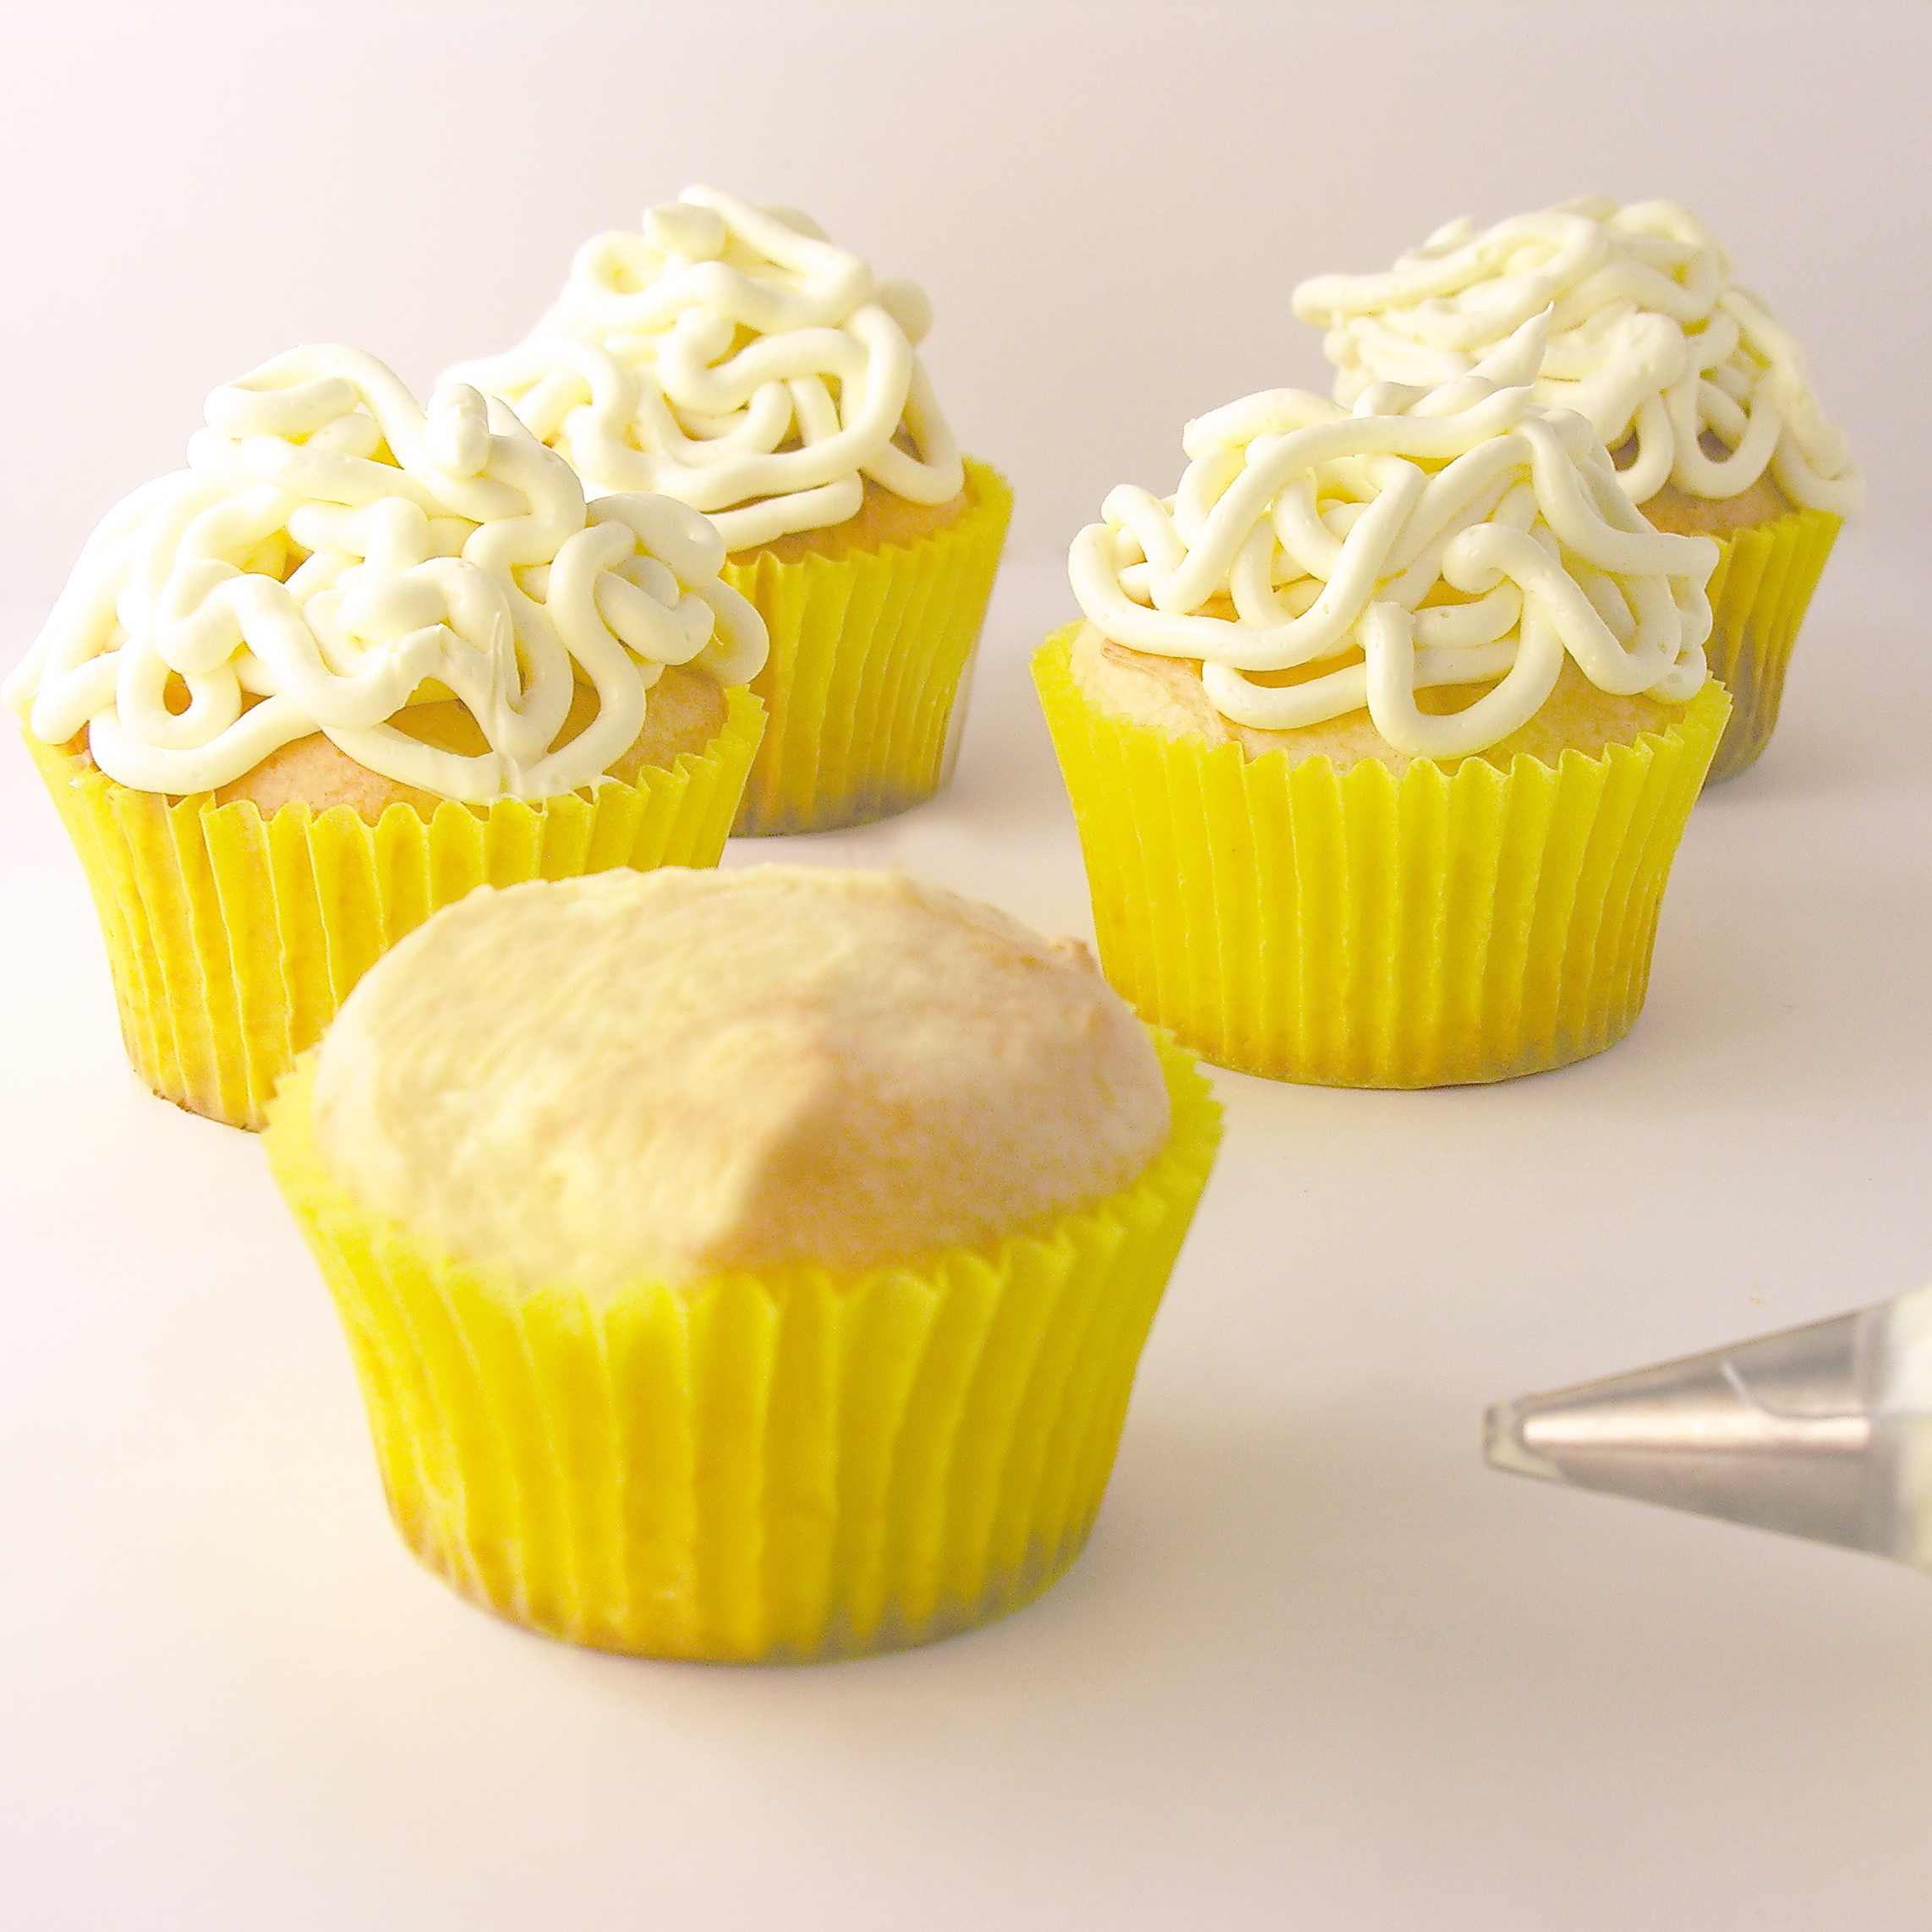
  • Make cake mix according to box, and divide into 24 cupcake liners in cupcake tins.
  • Bake according to package and cool. Place them into a couple of cake pans so you can move them easily into the fridge.
  • Place butters, vanilla, and powdered sugar into a large mixing bowl and beat on high until very light and fluffy (3-4 minutes).
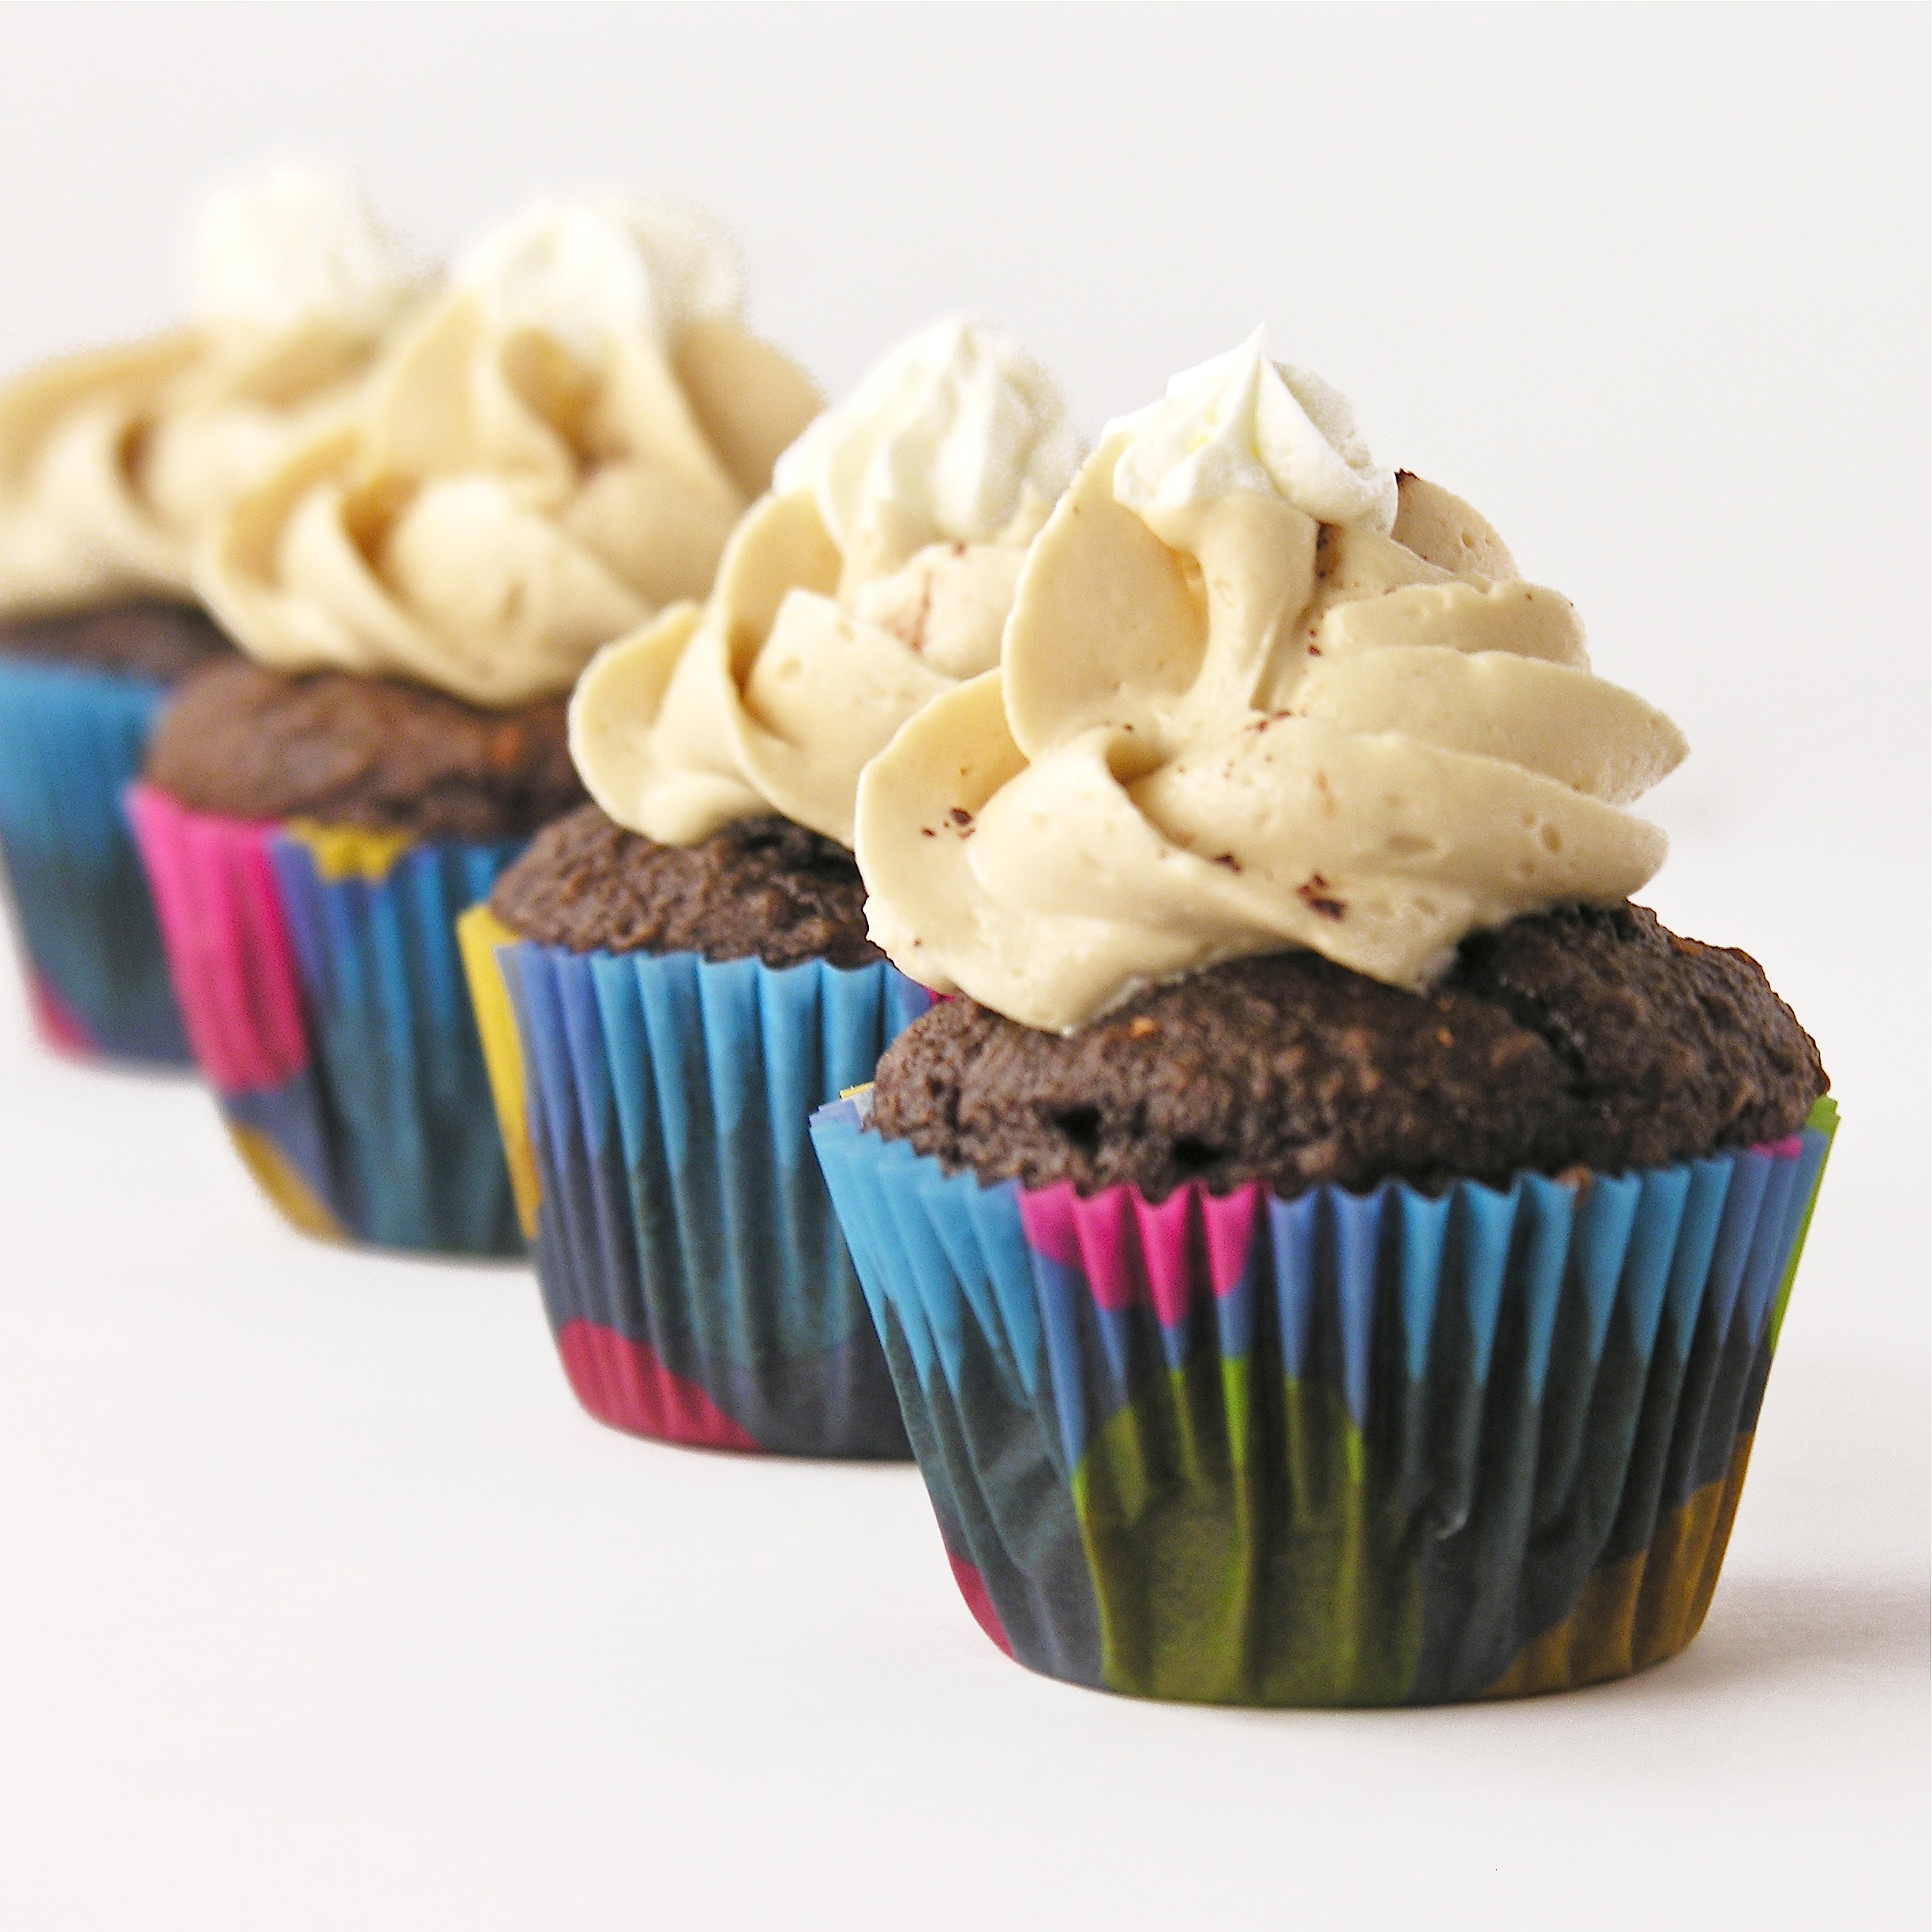
  • Add a TINY bit of yellow food coloring. Your frosting will already be a touch yellow from your butter, but you want it to be the pale yellow of spaghetti noodles.
  • Place frosting into a large zip-top bag and seal. Clip a corner, or if you have one, add a round decorating tip to a corner before adding frosting to the bag. You can experiment with the size. I liked nice fat noodles better than thinner ones. They were more defined.
  • Pipe random swirls of noodles on the tops of each cupcake. Be careful to not touch the tip to anything or they will smudge and look like frosting rather than noodles! 
  • Place cupcakes into the refrigerator for 15-30 minutes. You want that buttercream to harden up before you place anything on top.
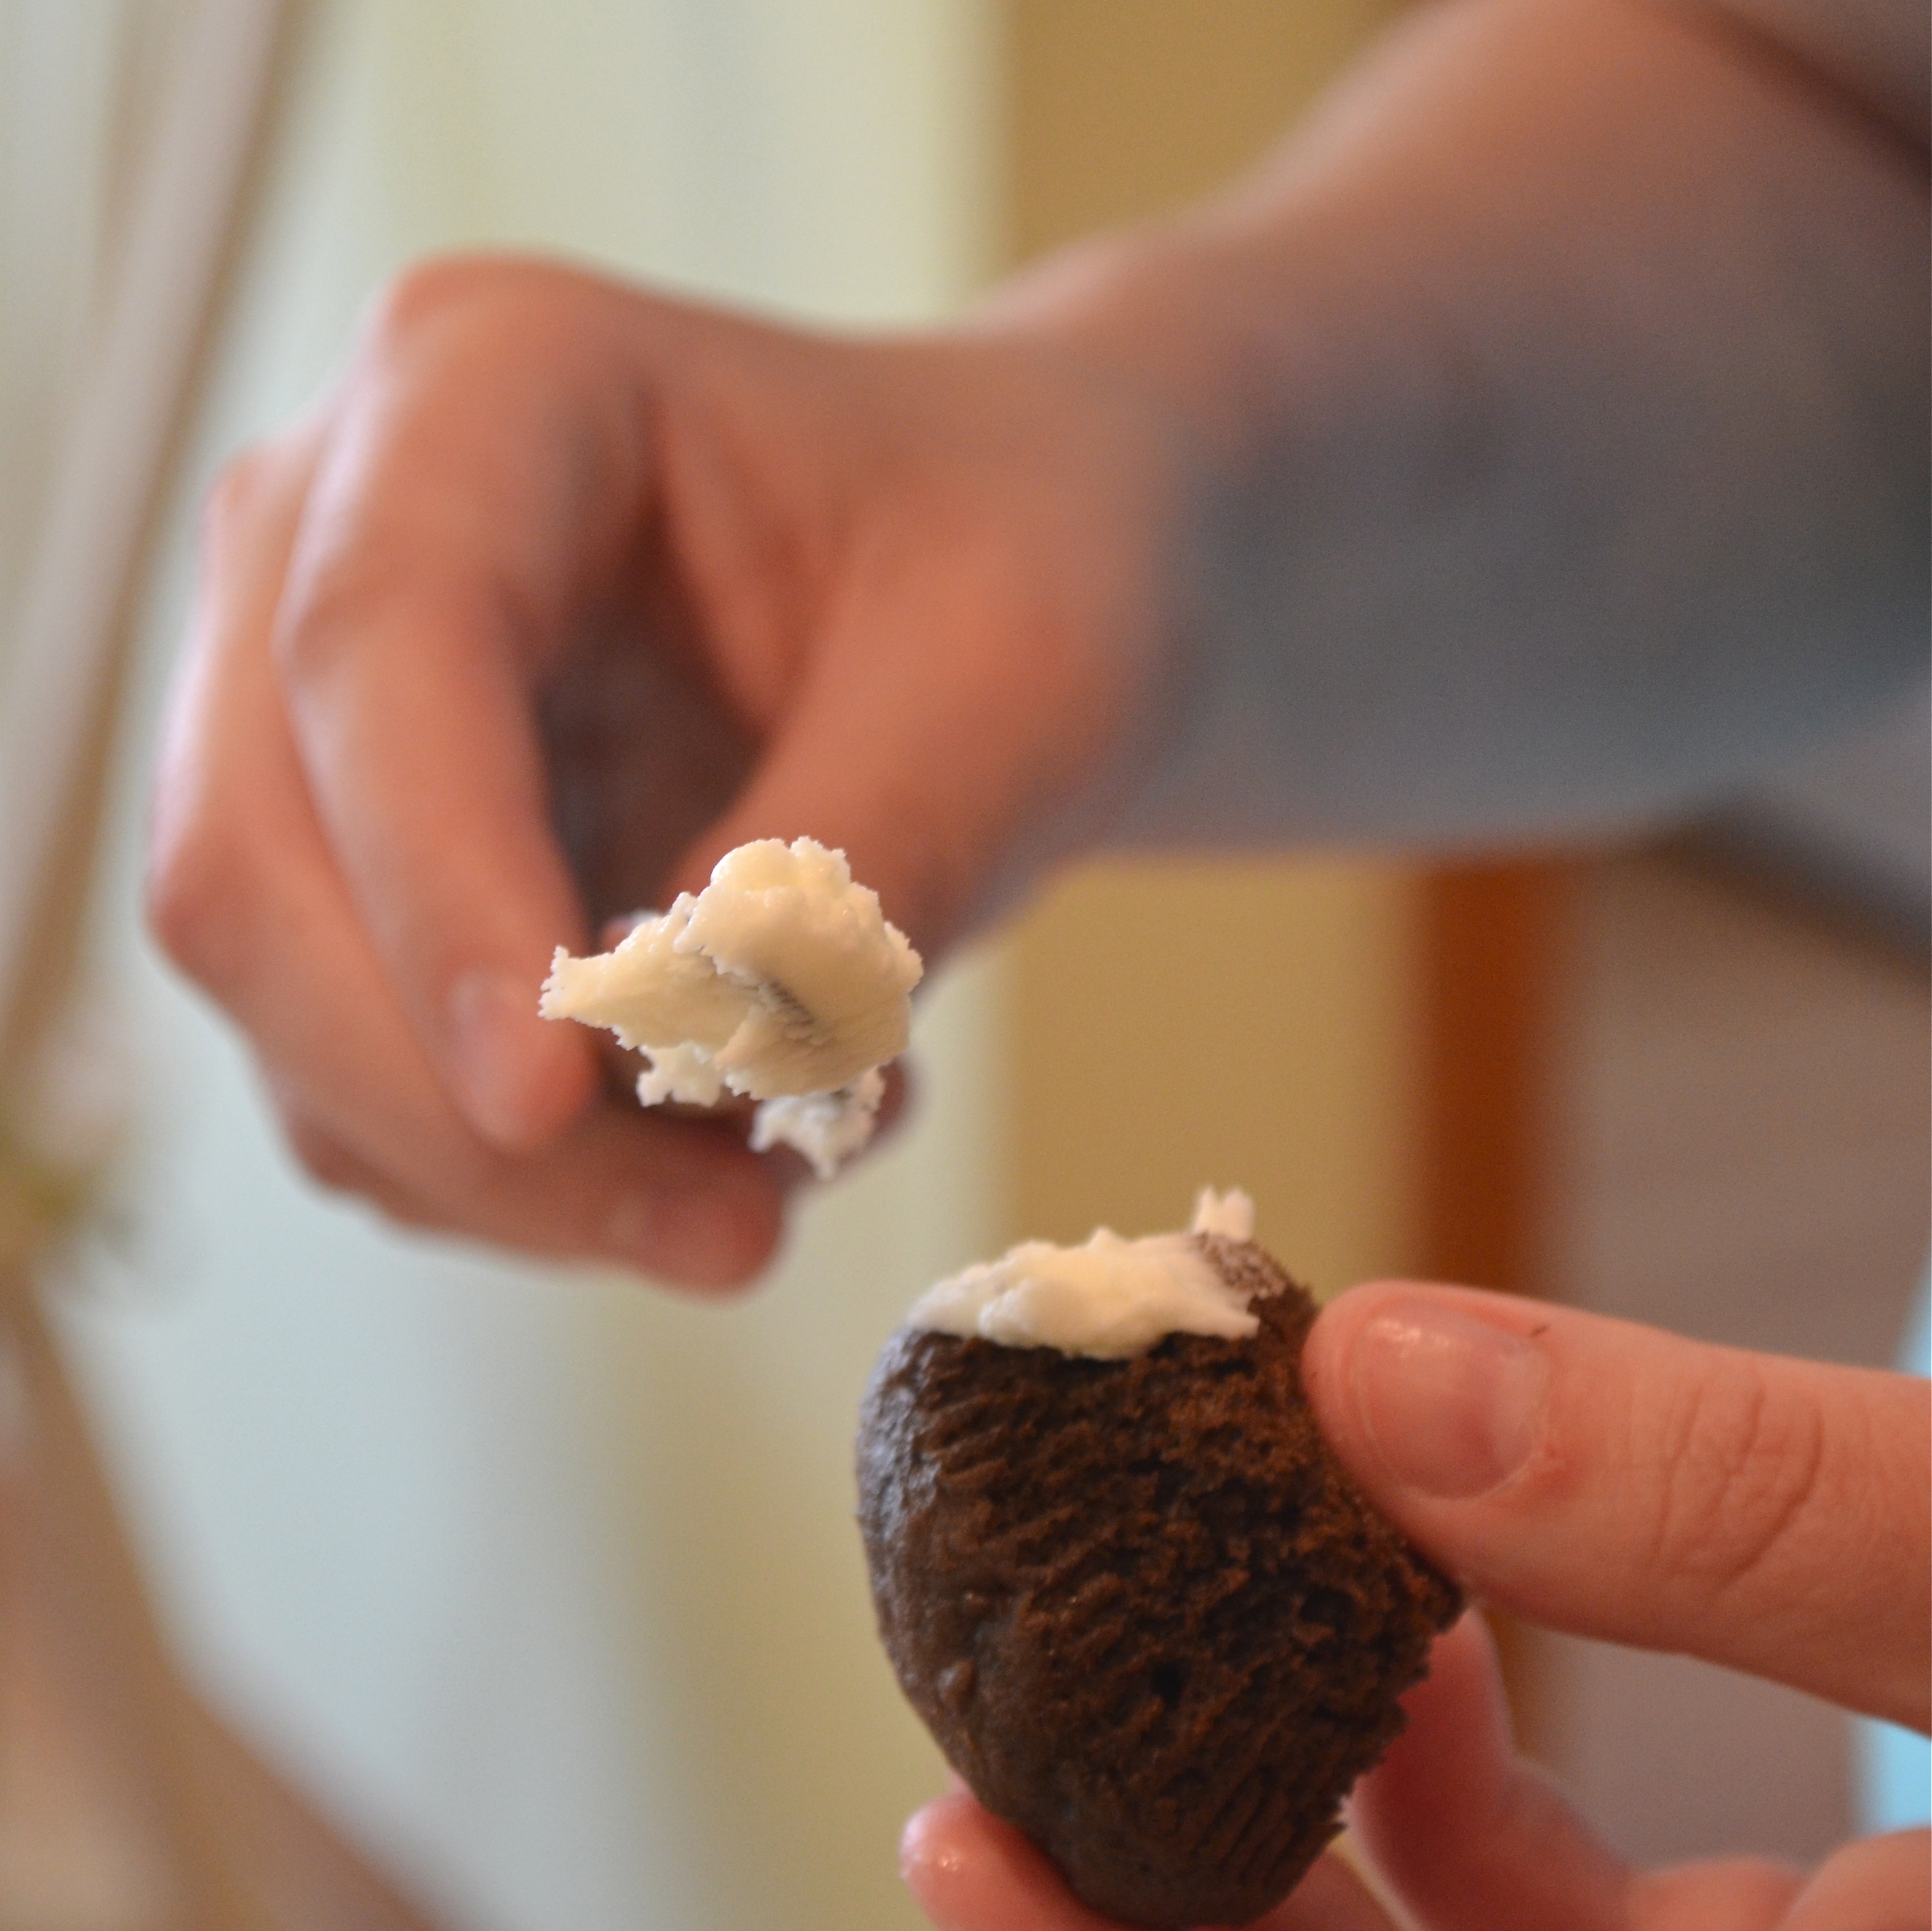
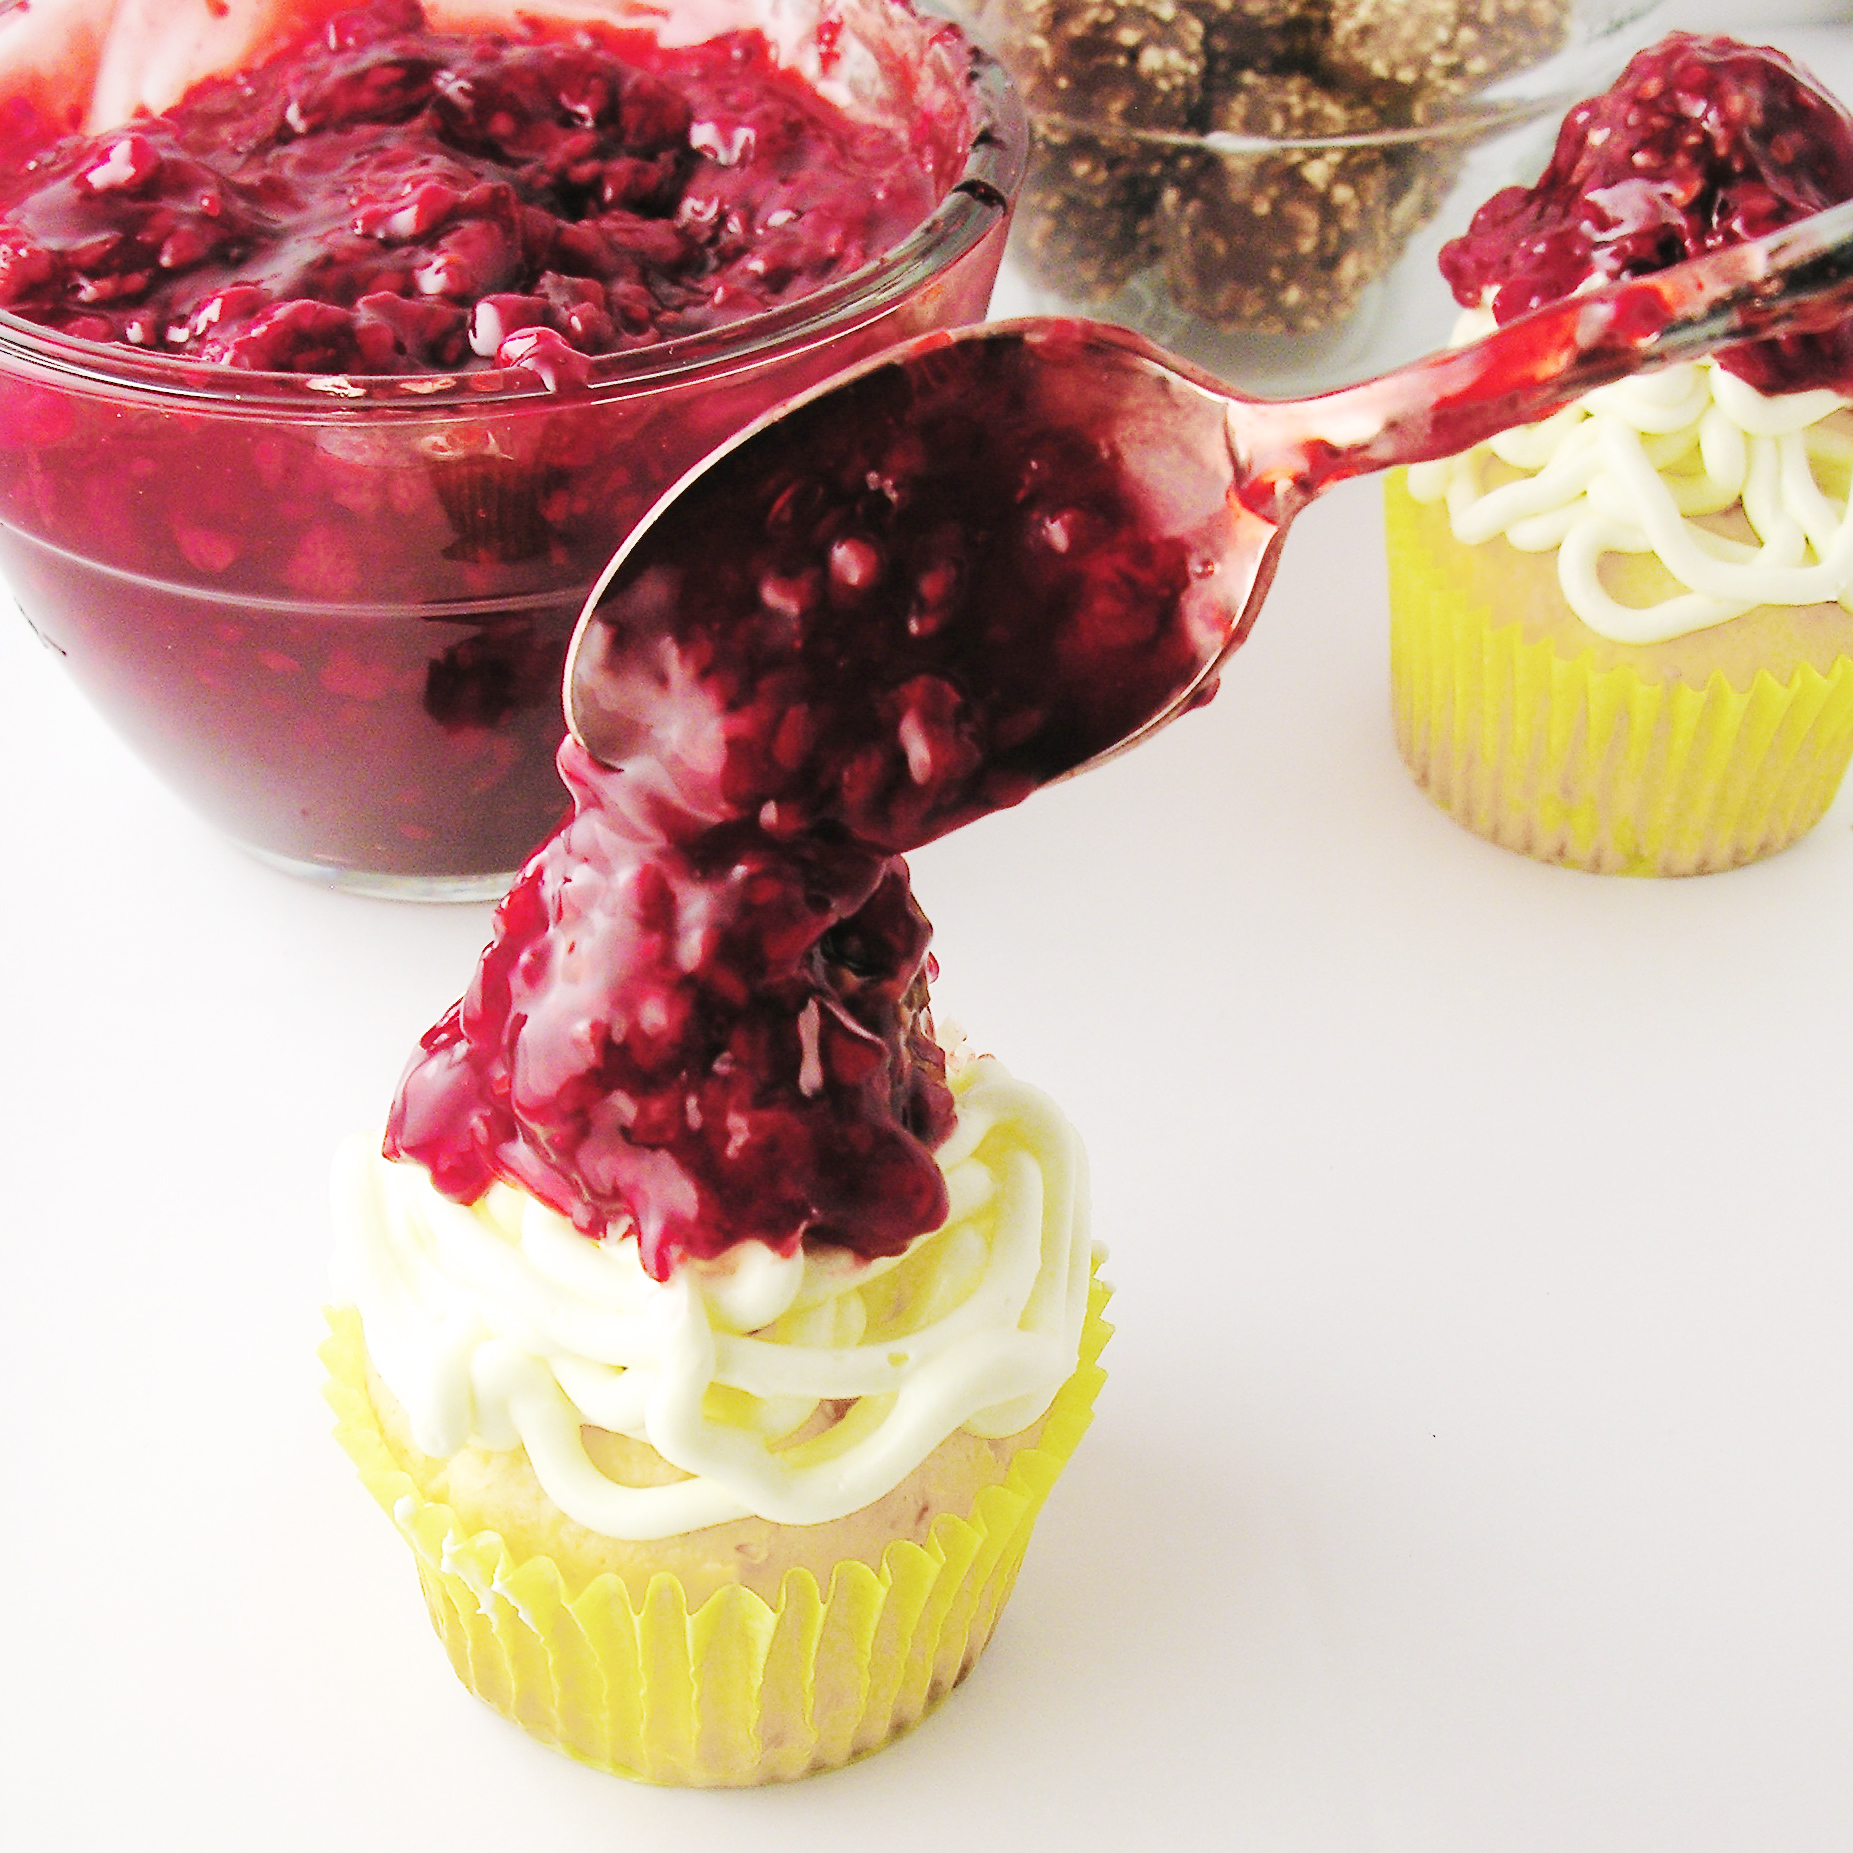
  • Open can of pie filling, and unwrap chocolates.

spaghetti-cupcakes spaghetti-cupcakes

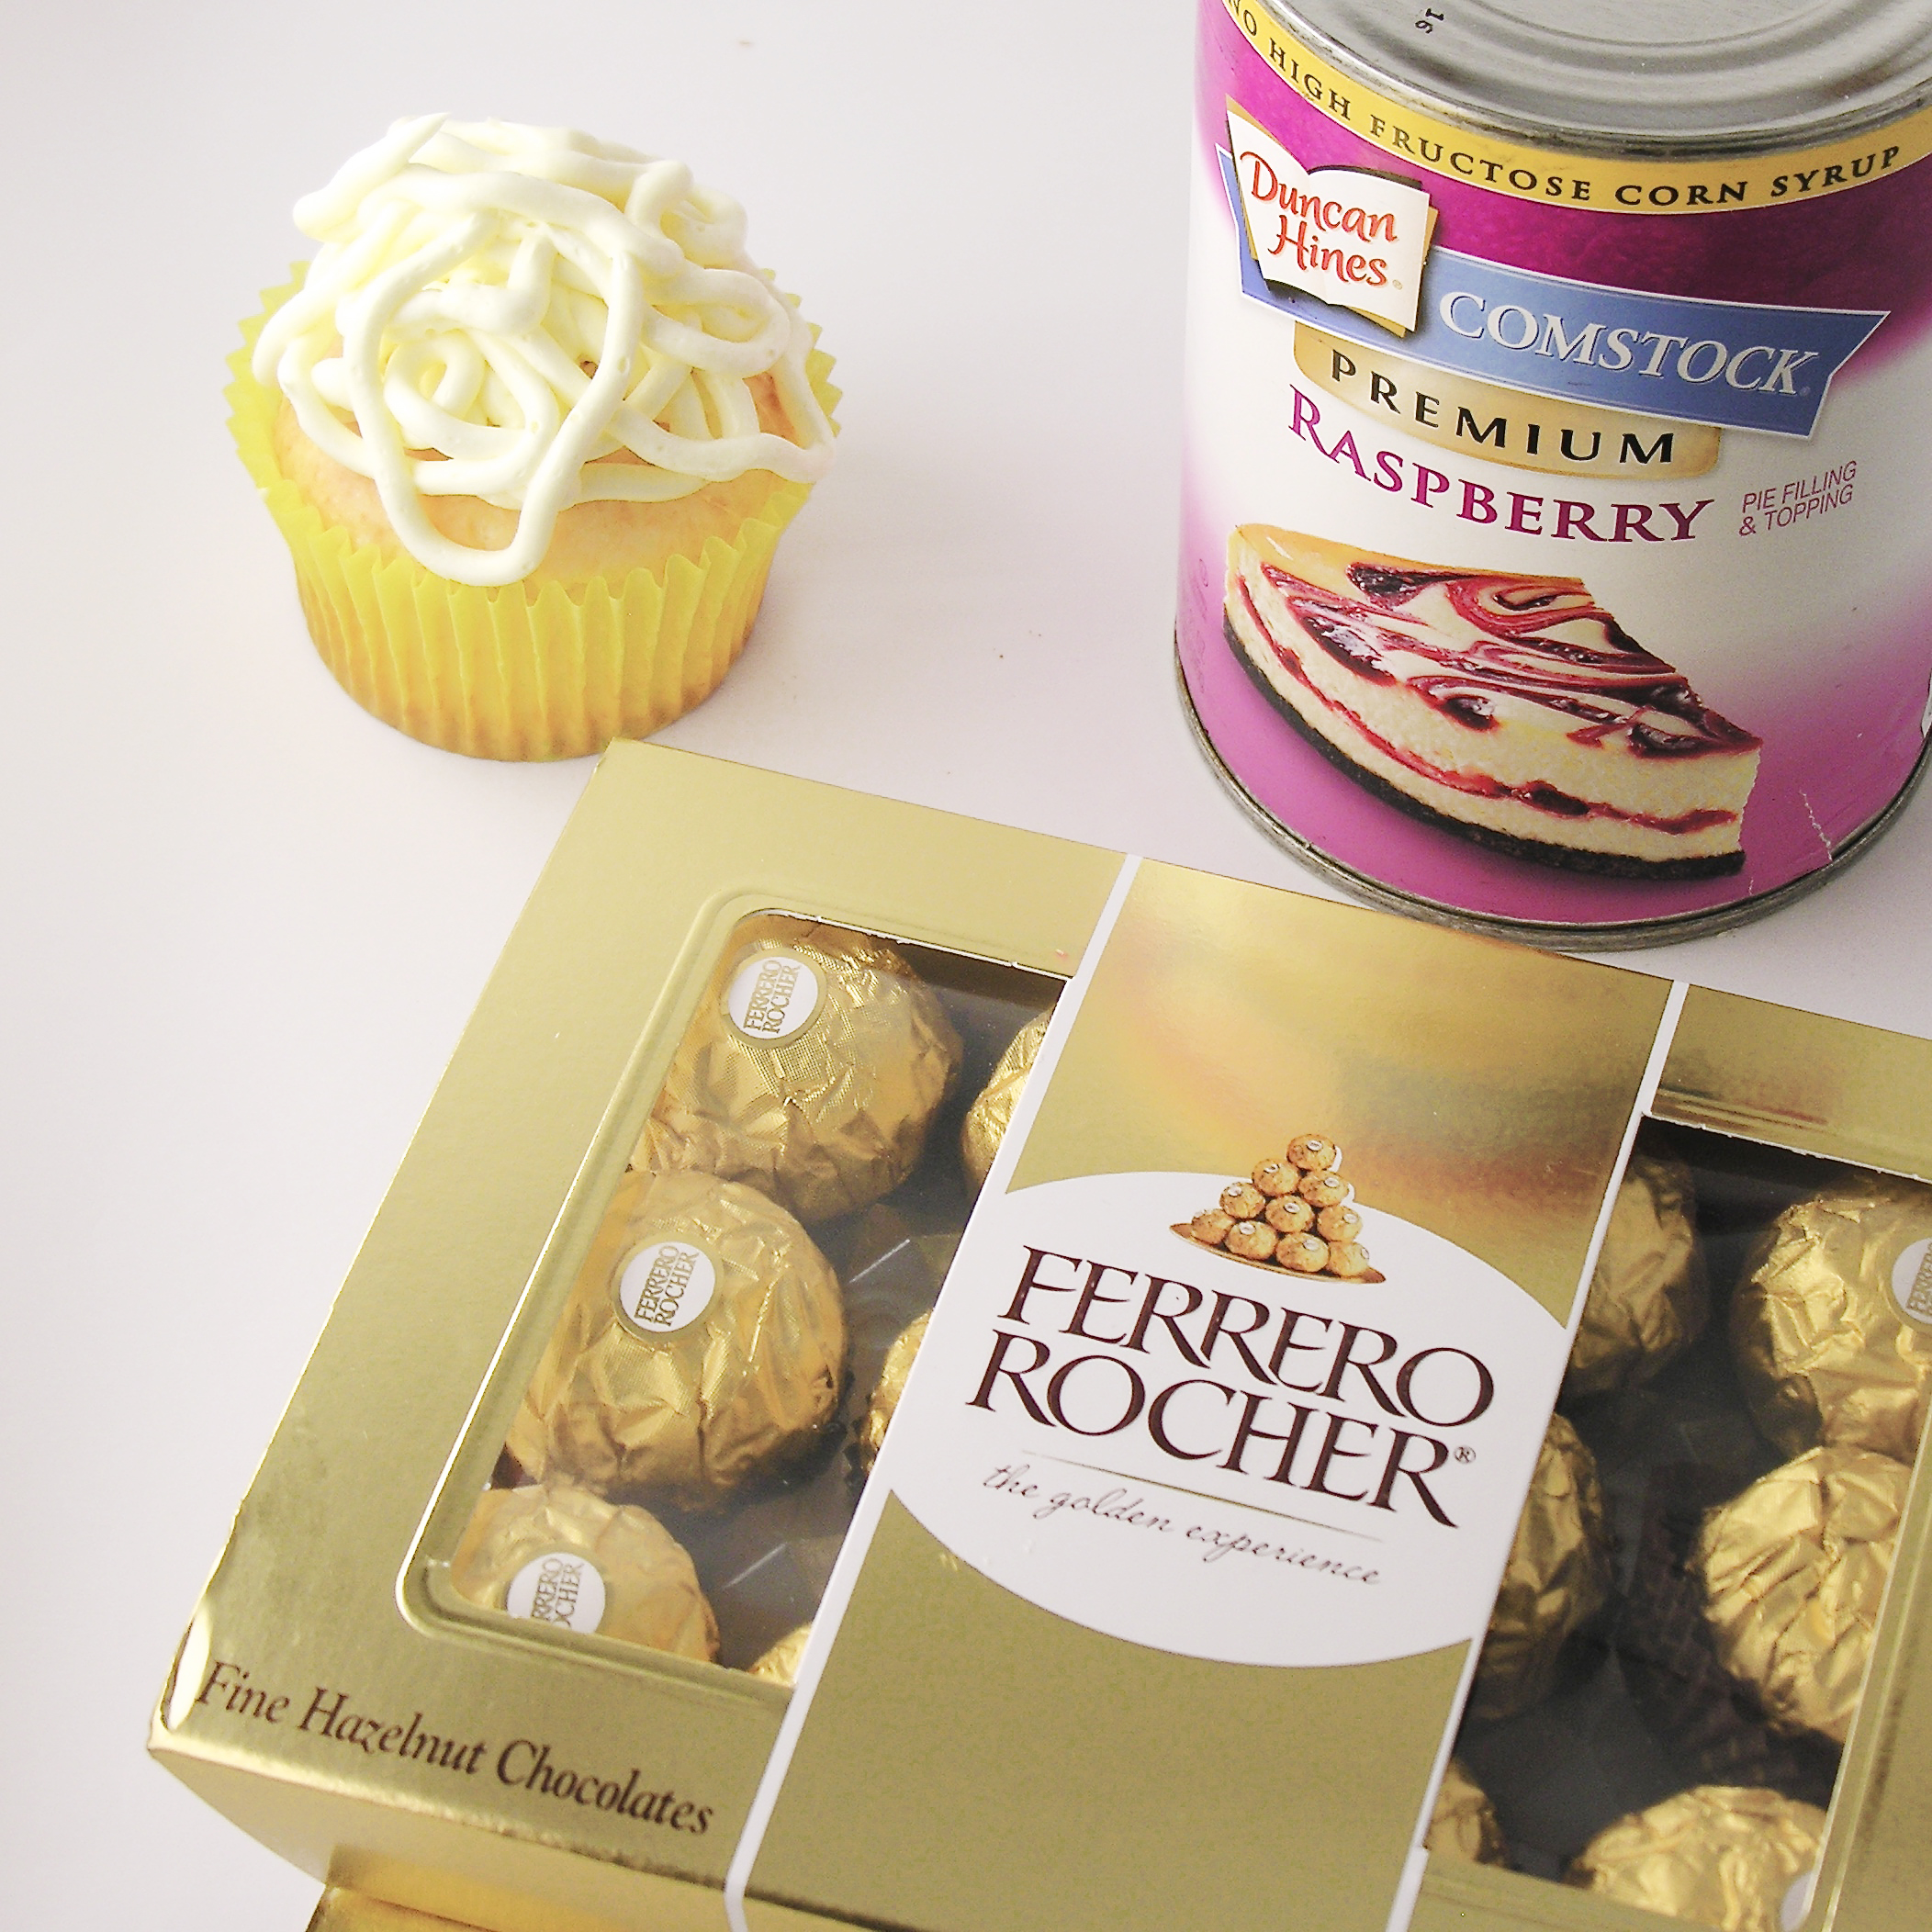
  • Remove cupcakes from fridge and place a chocolate into the pie filling. Gently spoon it out and set it on top of frosting “noodles”. I experimented, and it looks more realistic if you leave just a meatball on top, and don’t mess with artistically spooning sauce anywhere else- extra sauce makes it look messy, and you notice that the color isn’t exactly right. You can see how I did this wrong in the photos below:

spaghetti-cupcake spaghetti-cupcakes

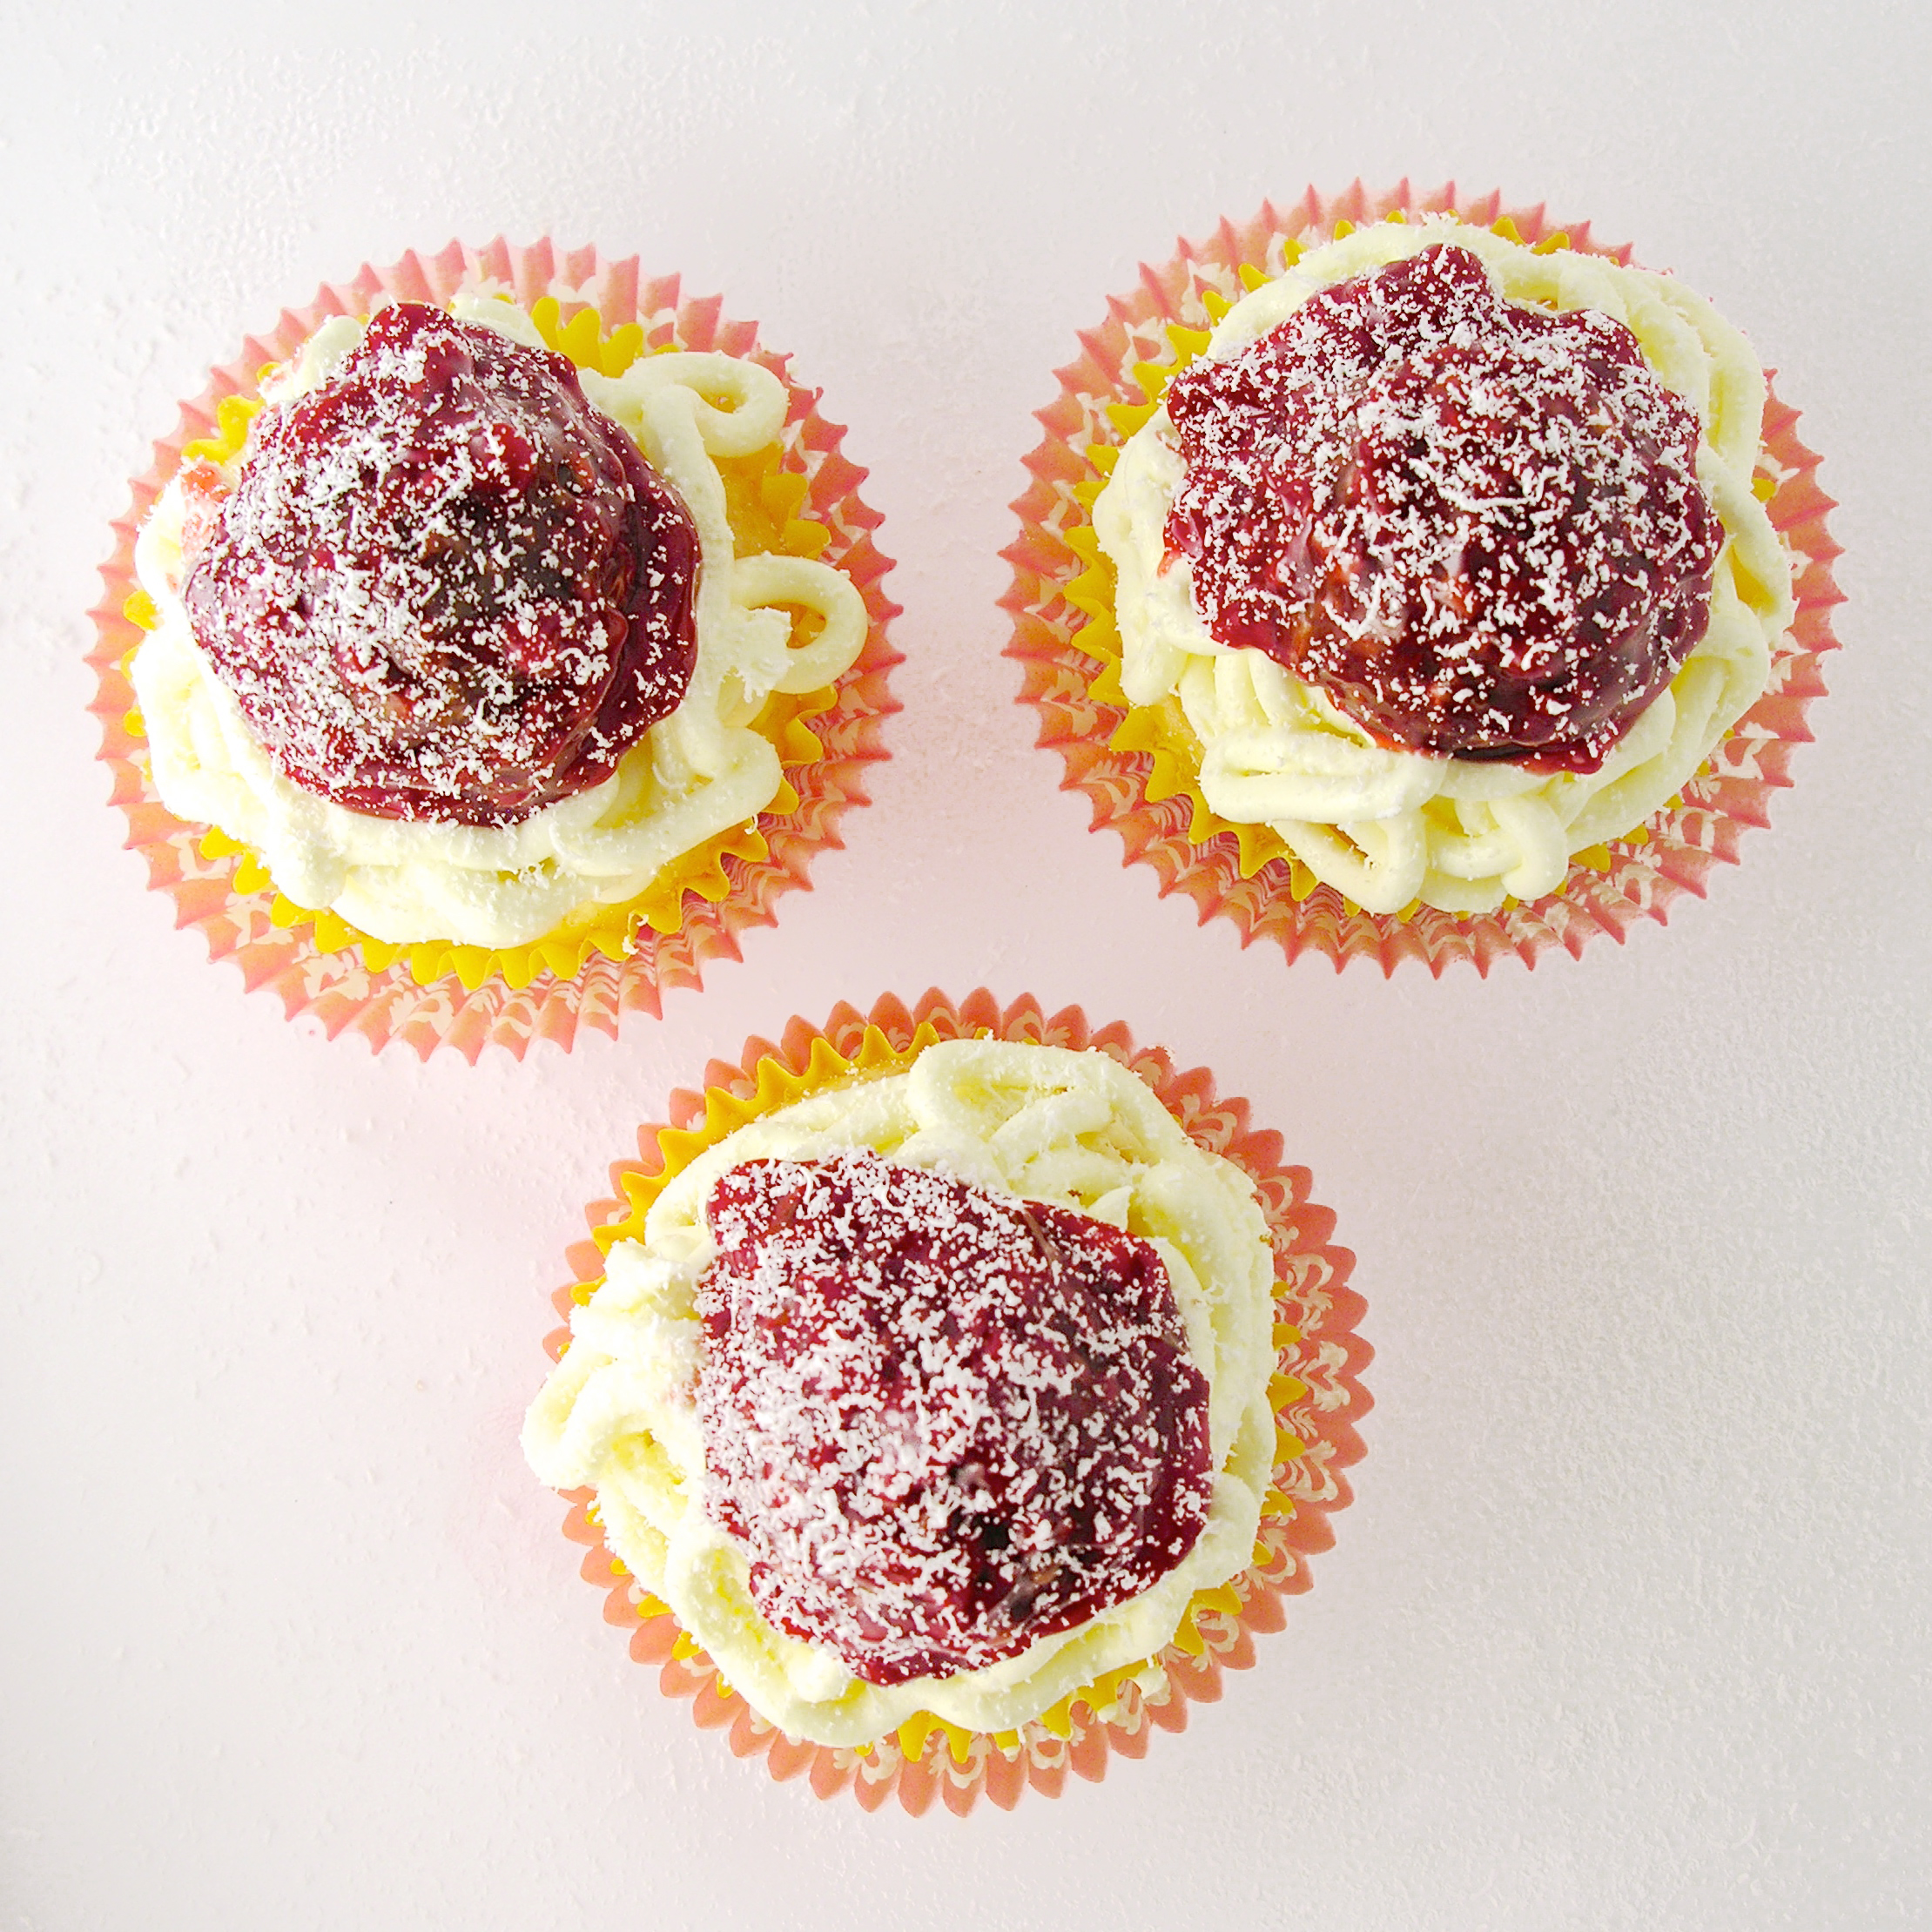
  • Once all cupcakes have a “meatball”, pull the cup of white chocolate out of the freezer. Tear away the paper cup- leaving a little circle of white chocolate.
  • Grate this over the top of each cupcake. This is the finishing touch- don’t skip this step 🙂 

spaghetti-cupcakes- parmesan

spaghetti-cupcakes4

My thoughts: I LOVE these!!!!!!!!!  They were so much fun to make and I was so surprised at how much they really look like spaghetti! Plus they are soooo yummy! Buttercream + raspberries + chocolate = yes please!!!!!! I hope you have a chance to fool someone you love with these delicious little treats this year!!!  ~r

spaghetti and meatball april fools cupcakes

Other fun April Fools’ ideas (click on a photo to see the recipe)

Fried Egg CookiesPoop cookies!Edible Jello Earthworm CupcakesHamburger Cookie!

Advertisement

Pecan Praline Cupcakes

Posted on

Praline Cupcakes1If you love pralines, you will love these pecan praline cupcakes with delicious homemade pralines on top!

Two desserts in one!

I’m a huge fan of pecan pralines. Our family has often traveled to the southeast part of the US and there’s just nothing better than a still-warm praline in Charleston or Savannah… YUM!  I’ve always wanted to try making homemade pralines, but I’ve never had a good recipe. Last month, we visited family friends, Dave and MaryAnne, and Dave told us he has the BEST pecan praline recipe. He whipped some up for us and oh my…. He shared his recipe and I had the idea to carry some of those flavors over into cupcakes.

Really, these two desserts stand alone, but are especially fun together!

Let’s start with those pralines (printable recipe):

Pecan Pralines

INGREDIENTS:

  • 3 cups of sugar
  • 1 1/4 cups of hot water
  • 1 1/4 cups of chopped pecans
  • 24-36 pecan halves
  • 1/4 teaspoon of cream of tartar
  • 1 teaspoon of maple extract

DIRECTIONS:

  • Use oil or butter to coat a mini muffin tin well.
  • Place all ingredients (except the whole pecans) into a large saucepan and heat over stove, stirring occasionally, until it reaches 234F degrees.
  • Remove from heat and stir for 5-8 minutes until the candy loses it’s glossy look and gets more cloudy and granular.
  • Spoon (carefully!!!) into well- greased muffin tin.
  • Press a pecan half into the top of each praline and allow to cool.
  • When cooled, tip onto clean surface and ENJOY!

Pecan Pralines

Now for those cupcakes…..! (printable recipe)

INGREDIENTS:

Cupcakes:

  • 2 1/2 cups flour
  • 3 teaspoons of baking powder
  • 1/2 teaspoon of salt
  • 1 1/2 cups granulated sugar 
  • 3/4 cups unsalted butter, softened
  • 3 eggs
  • 1 teaspoons of vanilla
  • 2 teaspoons of maple flavoring
  • 1/2 cup whipping cream
  • 1/4 cup of chopped pecans (as desired)

Praline Buttercream frosting:

  • 1/2 cup brown sugar (firmly packed)
  • 1/2 cup whipping cream
  • 2 sticks (one cup) butter
  • 5 cups powdered sugar

DIRECTIONS: (start the frosting first, as it needs to cool before beating)

Cupcakes:

  • Preheat the oven to 350 degrees. Line muffin tins with 24-30 cupcake liners 
  • In a large bowl, use a mixer to cream together the sugar and butter for about 3 minutes until light and fluffy.
  • Add eggs once at a time until incorporated and then mix in vanilla and maple flavoring.
  • In a different large bowl mix together the dry ingredients: flour, baking powder, and salt.
  • Add flour mixture to the sugar and butter, alternating with the cream.
  • Stir in pecans.
  • Fill cupcake liners about 2/3 full and bake for 15-18 min. Be careful to not over-bake.
  • Cool in pan for a few minutes before removing to finish cooling on the counter.

Frosting:

  • In a small sauce pan, heat brown sugar, cream and 2 tablespoons of butter on medium heat, stirring often, until sugar dissolves. Remove from heat and cool completely.
  • In a large bowl, beat together the cooled brown sugar mixture with remaining butter until smooth.
  • Add powdered sugar and beat on high until light and fluffy.
  • Place in a zip-top bag fitted with a decorator’s tip, and pipe frosting onto cooled cupcakes.
  • Top with a praline- or even a pecan half instead.
  • Enjoy!!

Praline Cupcakes

My thoughts: These are perfectly wonderful together in one beautiful dessert, or they can be made as individual recipes. Either way, if you love pecan pralines, you will love these yummy treats! Enjoy! ~r

Praline Cupcake5

Other fun cupcake recipes from Easybaked (click on the photo to see the recipe):

Malted Milkshake CupcakesKey Lime Cupcakes!Coconut Cupcakes!!!Rocky Road Cupcakes!!!!!


Maple Hedgehog Cupcakes!

Posted on

Hedgehog Cupcakes

Hedgehogs are the MOST adorable things, and these yummy maple cupcakes capture all the cuteness in edible form!

Seems like hedgehogs are all the rage these days. I’ve seen slippers and t-shirts and recently found the MOST adorable hedgehog salt and pepper shakers at Target.

I love them. I think they fall into the category: “so ugly they are cute”, in the animal kingdom…along with the walrus and basset hound…

In any case, I decided that the cupcake world needed a cute (and EASY) version of these, and here they are!

Hedgehog4

Now, the dilemma of every blogger of desserts is this: who do I give these to, so that I don’t eat them all and gain 500 pounds?

I had an obvious answer for these little hedgehogs: Warner Press!

You see, about a year ago at this time I was getting ready for the publication of my first cookbook, and I was partnered with an absolutely WONDERFUL publisher~ Warner Press. Through the process, many of the people I worked with became dear friends. One of those friends HATES hedgehogs. In fact, it is a long-standing office joke that Regina despises the cute little rodents. Obviously, she needed Hedgehog cupcakes~ so I went for a visit!

Warner Press

We had a fun day of cupcakes and catching up- and I promised them I would tell you all about the (adorable!) boxed set of Hedgehog cards that Regina reluctantly approved for publication. She was so convinced that they would be an epic fail, that she agreed to a wager: If the hedgehog cards make it into the top 10 selling items at Warner Press she would take them all out for dinner…and they are close…!

Hedgehog Cards!

I love them, and thought I’d give you all a chance to purchase some (and maybe put them into the top ten best selling items?!?!) They would be a cute gift for Mother’s Day! Click here to see the rest of the fun hedgie pictures and to order.

The cupcakes are as easy as can be! Here’s how we put them together: (printable recipe)

INGREDIENTS:

  • 1 boxed cake mix (plus water oil and eggs to make according to package)
  • 1 tub of pre-made vanilla frosting
  • 2 teaspoons of maple flavoring
  • 1 cup of chocolate jimmies
  • 1/2 cup of Wilton’s Candy Melts in dark chocolate (or you can use mini chocolate chips)
  • 1/4 cup of Wilton’s Candy melts in pink.

DIRECTIONS:

  • Make cake mix according to package and bake as cupcakes for recommended time and temp. Cool completely.
  • Place frosting into a small bowl and heat for just 15-20 seconds in the microwave until soft. Add maple flavoring and stir until combined.
  • Dip tops of cooled cupcakes into frosting and pull into a slight “point” on one end of the cupcake for a little nose (see photo)
  • Immediately (over a plate) pour and pat jimmies into place, opposite the “point”, leaving a small circular section empty for face. Finish all cupcakes this way ( if you use mini chips for eyes you should place them now, before the frosting hardens)

Hedgehog cupcakes 10Hedgehog cupcake11

  • Melt candy melts in the microwave in a small bowl in 30 second increments, stirring in between until smooth.
  • Place each color in a small zip-top bag and seal.
  • Clip a small corner off and squeeze out drops of chocolate for the eyes and pink candy melts for the nose- right on the end of the “point” left by the frosting.
  • Allow cupcakes to harden up.
  • Enjoy!!!!

Hedgehog cupcakes

My thoughts: Cute and easy! Plus that maple frosting is YUM-MY! You certainly could use your own favorite cupcake recipe for these too- I just used a cake mix for simplicity. Such a fun recipe for kids too! Gotta love those hedgehogs– right, Regina?!?  Enjoy!! ~r

Hedgehog2

Other unique cupcakes from Easybaked: (click a photo to see the recipe)

Apple cupcakes filled with seedsPancake Cupcakes!!!!Root Beer Float Cupcakes!!!!Bomb Pop Cupcakes!!!

Baked Alaska Cupcakes

Posted on

Baked Alaska Cupcakes!!!!Rich chocolate cupcakes topped with a scoop of ice cream and a cloud of toasted marshmallow meringue. Best. Dessert. Ever!!!!!

Every year for Christmas our family goes out to an incredible restaurant near Marshall, MI called Win Schulers. They have the most amazing prime rib…oh my.  Anyway, within a week of Christmas it is my birthday, my mom’s birthday and my sister-in-law’s birthday.  Schuler’s gives you a Baked Alaska for your birthday….so it’s a feast of Baked Alaska and it is SO good.  About 2 weeks ago I was craving it and suddenly was struck by the idea of making it in cupcake form.  A.M.A.Z.I.N.G.  Just go and make these.  Use your favorite ice cream.  You will love them…!

Baked Alaska Cupcakes!

Here’s the recipe: (printable version)

INGREDIENTS:

  • One boxed chocolate cake mix (plus the oil, water and eggs to make according to package)
  • One quart of your favorite ice cream (I used mint chip)
  • 8 egg whites
  • 2 cups of granulated sugar
  • 1/4 teaspoon of cream of tartar

DIRECTIONS:

  • Make cake mix according to box directions and divide equally into 24 cupcake liners in cupcake tins.
  • Bake according to package.
  • Cool completely (I refrigerated mine to get them nice and cold before adding the ice cream)
  • While they are baking and cooling, make the marshmallow meringue (I got my recipe here)

(Don’t be afraid….I was afraid to try this, it sounded complicated, but it isn’t hard- it just takes time with a mixer in your hand if you are like me and not fortunate enough to have a stand mixer!  It is actually kind of fun!  Make sure your bowl and beaters are free of any oils.  I swiped mine with a little lemon juice 1st)

  • Place egg whites, sugar and cream of tartar in a medium heat-proof bowl that will set on the top of a sauce pan of boiling water without touching the water.  (I had to experiment a bit to find a good fit)
  • Bring water to a boil in the saucepan and set the bowl on top.
  • Whisk ingredients together for about 3-4 minutes.  Sugar will be dissolved and egg whites should be heated to 145F degrees.
  • Remove bowl from top of sauce pan and beat on low until the mixture thickens a little, then beat on high for about 10 minutes.  The meringue will become the most beautiful, white, glossy mixture.  It should form stiff peaks before you stop beating it.
  • Spoon all that wonderful marshmallow yumminess into a bag fitted with a decorating tip.
  • Assemble one cupcake at a time, and then pop it into the freezer immediately.
  • Take a cupcake, use a small cookie scoop or melon baller and place a scoop of ice cream in the center of the cupcake.  Pipe meringue all around it, being careful to seal up all the ice cream at the bottom and them working your way up to a swirled top!

Marshmallow Meringue!Marshmallow Meringue!Marshmallow Meringue!!

  • When all cupcakes are prepared and in the freezer, use a kitchen torch
    to toast the marshmallow just before serving.
  • These are best served within a couple of hours of making them.  

Since they are a fork-eating-cupcake anyway, I see no harm in adding hot fudge….

Baked Alaska Cupcakes!!My thoughts: I loved them.  They satisfied my craving for a baked Alaska plus they have the cute factor of a cupcake!  Fun, fun, FUN!!!!! Enjoy!!!  ~r

Baked Alaska Cupcakes!!!Other yummy cupcakes:

Peanut Butter Cupcakes!!Key Lime Cupcakes!Doughnut cupcakes!!Chocolate molten lava cupcakes

Malted Milkshake Cupcakes

Posted on

Malted Milkshake Cupcakes

Dark chocolate cupcakes topped with the creamiest malt frosting ever.  Like a malted milkshake minus the cup!

I have an addiction to chocolate malts.  Not chocolate shakes, just malts.  The creamy, chocolatey kind that you drink through a striped straw at the pool.  My mom makes the best chocolate malts ever.  They are really simple to make, but there’s just something about her leaning out of the patio door and asking, “Anyone want a malt?” that makes me smile.  It’s one of our summer traditions.

Moms Malts!!{Her easy recipe? Ice cream, malt powder, cocoa and milk~ a blender full of ice cream plus cocoa and malt to taste, and milk to desired consistency}

I wanted to make a frosting that tastes like a malt.  It took me a couple of tries, but I finally hit the mark.  It’s wonderfully creamy and smooth.  It is also a very soft whipped icing that must be kept refrigerated because it has milk in it, and because it will not keep a pretty piped finish if it gets warm.

Believe me, the flavor and texture are worth it!

Malted Milk Cupcakes

Here’s how to make these yummy cupcakes! (printable recipe)

INGREDIENTS:

  • One boxed dark chocolate cake mix (plus water, eggs and oil to make according to box)
  • 4 packets of Dream Whip
  • 1 1/2 cups of cold milk
  • 6 Tablespoons of unsweetened cocoa powder
  • 6 Tablespoons of malt powder
  • 1/2 -1 cup of powdered sugar (to desired consistency)

DIRECTIONS

  • Make cake mix according to box and bake in 24 cupcake liners placed in muffin tins.
  • Cool cupcakes completely.
  • Put Dream Whip, milk, cocoa powder, malt powder and powdered sugar into a mixing bowl and blend together.
  • Using a mixer, beat until stiff peaks form (3-4 minutes) 
  • Add extra powdered sugar if needed, to desired consistency.  This is a soft whipped frosting, so it won’t be the consistency of a stiff buttercream~ even with lots of powdered sugar.  (believe me, I tried!)
  • Spoon frosting into a zip-top bag fitted with a decorating tip and pipe frosting on cupcakes.
  • Refrigerate until serving and just before serving add a malted milk ball and sprinkle with cocoa powder if desired for garnish.

ENJOY!!!

Malted milk cupcakes!!!!

My thoughts:  these are *almost* as good as my moms malts.  This frosting is really yummy.  It would be a great filling for a layer cake too~ or even a filling for cupcakes.  You could fill chocolate cupcakes with this and then just spoon some chocolate ganache over the top.  Oh the possibilities!  Hope you get to try these and enjoy them as much as we did!  ~r

Malted Milk Cupcakes!!!More recipes you might like:

Chocolate Mousse CakeStrawberry layer cakeMini chocolate chip cookie cheesecakesCake balls filled with cream cheese frosting

Mocha Cupcakes (in edible coffee cups!)

Posted on

Mocha cupcakes in edible fondant mug

Rich chocolate cupcakes and mocha buttercream nestled in an edible marshmallow mug…how much fun is that??

The past two posts have been full of my adventures with my friend Megan from Happily Ever After Cakes.  We made chocolate cut-out cookie pops decorated with royal icing and fondant-covered cupcakes decorated with fun ladybugs and caterpillars.  This is the third and final project from that weekend and I just love how it turned out!

This project starts with easy mini mocha cupcakes with mocha buttercream frosting.  You can stop there and they are just wonderfully yummy –even without the mug!

The mug uses my new-found love of marshmallow fondant to add a little “wow” factor to the cupcakes.

Let’s start with the cupcakes: (printer friendly recipe)

Mocha Cupcakes with ButtercreamINGREDIENTS: (makes and frosts 48 mini cupcakes)

  • One box of chocolate cake mix (plus eggs, oil and water to make according to box)
  • 3 Tablespoons of instant coffee granules (divided)
  • 2 sticks (1 cup) of salted butter- softened to room temperature
  • 2 sticks (1 cup) of unsalted butter- softened to room temperature
  • 3 cups of powdered sugar
  • 2 Tablespoons of vanilla

DIRECTIONS:

  • Preheat oven to 350F degrees
  • Make cake according to box, but add 2 Tablespoons of coffee granules to the water required by cake mix first.
  • Allow granules to dissolve and then add to cake mix with eggs and oil according to box.
  • Place mini cupcake liners into mini cupcake pan and spoon batter into liners.
  • Bake for about 12 minutes until centers are firm.
  • Cool completely
  • Make buttercream by placing vanilla and remaining 1 Tablespoon of instant coffee into a small bowl to dissolve.
  • Add butters and powdered sugar to a large bowl and beat on high until light and fluffy.
  • Remove a small bit of this vanilla-free icing to garnish the tops of cupcakes and set aside.
  • Add vanilla/coffee mixture and beat again until well- combined.
  • To make plain cupcakes, just pipe coffee frosting on top of cooled mini cupcakes and then pipe a tiny bit of the white frosting at the tip of the cupcake.
  • Sprinkle with cocoa powder if desired.

Yum.

To make the cupcakes into little edible mugs, you will need to make fondant and a thick buttercream ahead of time. My previous post goes into great detail on making fondant and buttercream icing.  Click here to see the entire process.

If you’d like to print the recipes for these two things:

Printer friendly recipe for thick buttercream icing

Printer friendly recipe for marshmallow fondant

Once you’ve made both of these items, assembling the little mugs is fairly easy:

  • Unwrap the mini cupcakes you wish to use in mugs.
  • Spread thick buttercream icing around the sides of each cupcake.
  • Roll fondant out  fairly thick and trim into rectangles that wrap around mini cupcake and touch without overlapping. (You’ll need to grab a cupcake and experiment until you know how long and high to make these)
  • Also cut small strips of fondant to use as mug handles.
  • Wrap sides of mug around the frosted edge of each mini cupcake and seal the edges by brushing with a bit of water and holding together.
  • Attach the handle over the sealed edge with a bit of water.

Spread buttercream over sides of mini cupcakeCupcakes ready to be covered in fondantWrap fondant around mini cupcakeAdd handle over seam, using water to attach it.

  • Set mugs on a plate or dish with a lipped edge to hold the handle in place until it sets.
  • Once handle is dried in place, pipe mocha frosting on top of cupcake to fill mug in.
  • Spread frosting flat and pipe a tiny bit of the white frosting on top.
  • Sprinkle with cocoa powder if desired.

Allow handle to harden in place.Pipe frosting into top of mug

Megan (more artistic than I!) decorated some mugs to personalize them for us.  She used decorating brushes with gel food coloring to paint the cups….aren’t they cute????

Edible mug cupcakes!!!My thoughts:  These are really yummy cupcakes- even without the mugs.  The mugs are a little time consuming, but if you want something REALLY unique and fun they are both!  The marshmallow fondant got rave reviews from our friends– they loved it and ate the entire mug with the cupcake.  

When you bite in, it is quite the surprise….so fun!!!!  Enjoy!!!

Edible mug cupcakes
You might also enjoy:

Nutter Butter Flip FlopsBlack Bottom Peanut Butter CookiesRaspberry Lemonade TrufflesFudgy bonbon cookies

Key Lime Cupcakes

Posted on

Key Lime Cupcakes!

These cupcakes are filled with a sweet key lime filling and topped with key lime buttercream…what could be better than that?  Oh, how about a graham cracker crust on the bottom of the cupcake?  This dessert is as close to key lime pie as you can get…without it being a pie!  (printer friendly recipe)

INGREDIENTS: (makes 24 cupcakes)

Filling:

  • 1 cup key lime juice (a labor of love….!)
  • 1 can (14 oz.) sweetened condensed milk
  • 1 egg

DSC_0009

Cupcakes:

  • 2 cups of graham crackers (finely crushed)
  • 3 Tablespoons of butter (melted)
  • 1 boxed yellow cake mix (plus water, oil and eggs to make according to package)

Frosting:

  • 2 sticks (8 oz) salted butter (at room temp)
  • 2 sticks (8 oz) unsalted butter (at room temp)
  • 3 cups of powdered sugar
  • 2 teaspoons vanilla
  • 2 Tablespoons of key lime juice

DIRECTIONS:

Filling:

  • Mix together key lime juice, sweetened condensed milk and egg and pour into a small casserole.
  • Bake at 325F degrees for 15-20 minutes (until center is set)
  • Cool completely.

Cupcakes:

  • Mix crushed graham crackers with melted butter.
  • Spoon about 1 teaspoon of this mixture into 24 cupcake liners in muffin tins (you’ll have a little left to garnish with at the end)
  • Press crumbs firmly into bottom of cup (I find my Mini Tart Shaper to be very useful for this)
  • Make cake mix according to box, and divide batter equally between the 24 cupcake liners.
  • Bake according to directions on box
  • Remove from oven and cool completely.
  • Core cupcakes (I love my Cupcake Plunger– it is so quick to use and saves the core to place back on top of the filling- to see a picture of how it works, click here).
  • Spoon cooled  filling into a zip top bag and clip a corner off.

Spoon Key Lime Filling into a zip top bag!

  • Pipe filling evenly into each cupcake, saving about 1/4 of a cup of filling to drizzle on the top at the end.
  • Place top of core back in place (you can trim some of the bottom off to make room for the filling if you need to)

Frosting:

  • Place butter, powdered sugar, vanilla and 2 Tablespoons of key lime juice into a large bowl.
  • Using a mixer, beat on high until light and fluffy.
  • Pipe frosting on top of cupcakes and drizzle remaining filling on top.
  • Sprinkle with remaining graham crust crumbs and ENJOY!!!!

Key Lime Cupcakes!

My thoughts:  I created these for a graduation party.  The challenge was to create a key lime cupcake for someone who LOVES key lime pie.  Key lime pie is one of my favorite desserts, so it was a fun task.  These were a big hit.  I love the balance between the tart center and the sweet cupcake and frosting.  

It’s spring~ you NEED a key lime cupcake!!!

Key Lime Cupcakes!!

You might also like:

Chocolate molten lava cupcakesCaramel Fudge Brownies!!Sweet Lime TartsTriple Chocolate Cheesecake 3

Gender Reveal (Surprise!) Cupcakes

Posted on

Gender reveal cupcakes!!!These cupcakes hold a secret—- is it a boy, or is it a girl?  The latest trend of having a gender reveal party is SO much fun when the gender is revealed with a yummy dessert!  Plus, I’ve included free printable cupcake toppers to go along with your party theme!

Gender reveal Cupcakes

A few weeks ago, Easybaked featured  a Polka Dot Cake using a Cake pop maker.  It was so much fun that I couldn’t help but think of other ways to use the idea.  These cupcakes are just wonderful– when you bite in the color is seamless- you can’t even tell that the cake pop was baked ahead.  Want to know how to do this?

Here we go:

INGREDIENTS:

  • 1 white cake mix (for about 18 cupcakes) or 1 white/ one chocolate for a combo and about 36 cupcakes
  • The oil, eggs and water required by your boxed mix(es)
  • Gel food coloring
  • Frosting (I used my buttercream recipe ~double it if you add the second cake mix)

This little chart should help you see how many cupcakes are made with just the white mix and how many are made when you use both a white and chocolate mix (I’m bad with math…I need visuals!!):

Gender reveal cupcakes

DIRECTIONS:

  • Plug in/heat up your cake pop maker
  • Make white cake mix according to box.
  • Take about 3/4 cup (1 1/4 cup for the double batch!) of batter and place it into a smaller bowl.
  • Color the batter using color gel (I like Wilton brand of Gel food coloring because they always come out bright.  Try Aqua or Pink.)
  • Follow the directions on your cake pop maker to use the colored batter to make cake balls.  Helpful hints:  work fast and use a small cookie scoop to evenly spoon batter into cups, and check them- I burnt my 1st batch following the directions!  You should have enough batter to have a practice round and adjust.

Color batter with gelsScoop batter into cake pop maker

  • While cake balls cool, spoon small amounts of your remaining white cake mix into 12-18 cupcake liners in a cupcake tin. (start with 12 and see how much batter you have left for the rest).
  • Spread the batter out along the bottom so you have a thin layer in each liner.
  • Set a cooled cake ball in the center of each liner and carefully scoop batter over the top (I found a medium cookie scoop to make this job MUCH easier!)

    Set cake ball into center of cupcake...Scoop batter over top of cake ball.

  • After your 12 are filled, continue on until you have used up all of your cake batter.
  • Bake at 350F degrees for about 20 minutes.
  • (If you are making the double batch, make your chocolate cake mix while the white cupcakes bake.  Set these up with the cake balls hidden inside the batter and bake for the same amount of time.)
  • Remove from tins immediately and cool on the counter.  Frost and decorate as desired.

Gender reveal cupcakes- two tone frostingPiping two tone icing colors!

Do you see how I piped the two-tone icing colors?  I’m sure there must be a better method than this…I am so not a cake decorator.  It turned out ok- but it was a little fussy to keep equal pressure on both colors at the same time.

The toppers are easy and inexpensive to make.  Simply click here to get a free pdf file of the owl toppers.  Print them on a heavy card stock paper, cut them out and use double sided tape to stick them back to back around a toothpick (one boy owl and one girl, back to back).

It's a boy!!!

It’s a boy!!!

My thoughts:  I love how the final cupcake is….just a cupcake.  It isn’t anything fancy or cream-filled…just a cupcake with a surprise.  These would be fun cupcakes for any party- you could even incorporate them in a game—whoever gets the (__color___) cupcake gets a prize!  I hope these make their way into a party of yours soon!  Enjoy!!! ~r

It's a girl!!!

It’s a girl!!!

Want some other shower ideas from easybaked?  Click on the image to be taken to the recipe.

Gender Reveal CupcakeRaspberry Confetti KissesGender reveal cookiesKool-Aid Truffles!!

A collection of mini cupcakes and a fundraiser for FUSION!

This post is a mid-week collection of cupcake recipes and a celebration for my friend Josh who is a missionary in Slovakia.  Those of you who have followed my blog for awhile will remember my lack of recipe posts for several weeks every summer because I travel to Slovakia to work with a mission organization called Josiah Venture.  This organization helps local churches reach teenagers with the message of God’s love for them.  Two of the ways they do this is through English camps (Americans going and teaching English–which is how I’ve been a part) and also through teaching music at camps.  My friend Josh heads up the music portion of this ministry in Slovakia.  After camps, he is able to go into schools and start clubs that teach music theory and also various instruments.  Many of the kids he works with come from really difficult home situations and they call Fusion “family”.

Easybaked was able to come alongside Josh for a fundraiser for Fusion this past weekend.  He hosted a coffeehouse and we helped provide (800!) mini-cupcakes in 8 different flavors.  It was such a great time to hear about what God is doing in Slovakia though Josh and Josiah Venture, and a lot of support was raised to help him in his work.

I rarely stray from simply sharing my recipes here, but I just had to give a shout-out to Josh and his hard work with these teens.  If you’d like to know more about him just click here.  You’ll be taken to his home page with Josiah Venture and also connected with his blog.

Thanks for giving your life here up to serve God far from home Josh!!!!!

Now cupcakes……

800 would have been impossible to do alone I think (how do bakeries manage?!?) So I enlisted 7 friends to help.  We had a training session in making butter cream and piping it and WOW—they did such a great job!!!!

These were our practice cupcakes….which we promptly ate up!

The night of the event we brought all of our unfrosted cupcakes to the venue and piped and decorated there– it ended up being a lot of fun to do them all together:

!

The eight flavors of cupcakes came either directly from the pages of easybaked- or they were inspired by a recipe here.  Since we are racing toward the holiday season, I thought I’d share each of the recipes with you in a unique way– with free printable recipe cards.  That way you can make them and share the recipe with your friends and family!  Fun!!

Click on the photo to be taken directly to the easybaked recipe that inspired the mini-cupcake.  Click on the words “recipe cards” under each photo to get a pdf that you can print and share.

Red Raspberry Minis — recipe card               Andes Mint Minis  — recipe card

Caramel Apple Minis — recipe card       Cinnamon Roll Minis — recipe card

Strawberry Lemonade — recipe card       Bubble Gum Minis– recipe card

Chocolate Ganache Minis–recipe card     Wedding Cake Minis —recipe card

The very last recipe wasn’t inspired by any recipe in particular, so if you click on the photo you will simply get….a photo.  Sorry about that!  My apologies also for the photography ~ my iphone did all of the work on this post 🙂

I hope you enjoy this collection of cupcake recipes and cards~ and thank you for allowing me to share a little bit of my heart with you in this post!  Back soon– in the meantime….enjoy!  ~r

Cinnamon Roll Cupcakes

These rich cupcakes, topped with vanilla buttercream frosting, have a gooey cinnamon roll filling that will leave you wanting cupcakes for breakfast every morning!  These are an absolutely perfect treat for a breakfast party or a brunch!

(makes 24 cupcakes)

INGREDIENTS:

  • One boxed yellow cake mix (with oil, water and eggs to make according to package)
  • 1 c. heavy whipping cream
  • 2 T. ground cinnamon
  • 6 T.  packed brown sugar
  • 3 1/2 c. powdered sugar (divided)
  • 2 sticks of unsalted butter, room temp
  • 2 sticks of salted butter, room temp
  • 2 T. clear vanilla flavoring

DIRECTIONS:

  • Make your filling first so it can cool while your cupcakes bake.
  • Place whipping cream, cinnamon and brown sugar in a large saucepan and bring to a boil, stirring constantly.  Set aside to cool (you can place this into the refrigerator if you want to speed the cooling process along.)
  • Make 24 cupcakes according to the directions on whatever box mix you choose  to use. (I like Duncan Hines)
  • Use a small paring knife to cut a small cone out of the top of each cupcake.

  • Finish the filling by adding 1/2 cup of powdered sugar to the (cooled!) cinnamon/brown sugar/cream mixture.
  • Beat on medium speed until well combined and creamy.
  • Place filling in a zip-top bag, clip a corner and pipe filling into each of the cone-shaped holes on the top of each cupcake.  You should have some filling left at the end- set this aside to drizzle on the top after frosting.
  • Make your buttercream frosting by placing all 4 sticks of  (softened) butter, 3 cups of powdered sugar and the vanilla in a large mixing bowl and beating on high until very light and fluffy.
  • Clip a corner of a zip top bag, place a decorating tip in the corner, fill the bag with frosting, zip it shut and pipe frosting over cupcakes, covering up the filling (check out this video if you need help piping frosting).
  • Drizzle the remaining filling over the top of each cupcake and sprinkle each with just a little cinnamon.

These cupcakes are best served shortly after they are made (like cinnamon rolls are!)  If you need to make them in advance, keep them refrigerated (because of the cream filling).  Be sure to let the cupcakes come to room temperature before you serve them or your buttercream will be hard.

My thoughts:  You know when restaurants indicate on a menu that a dish is one of their signature dishes and *hint hint* you should try it?  This is one of those recipes for this blog.  These are one of my very favorite creations thus far.  Now, I have to qualify that with this: I LOVE cinnamon rolls- especially big gooey ones, and I love frostings and fillings.  These cupcakes have gotten rave reviews with everyone I know.  The only negative comments I’ve heard have been from people who say there’s too much frosting/filling.  If you are the sort that scrapes frosting off things anyway, my recommendation is to cut the frosting recipe in half.  As for me…bring on the gooey sweet happiness!!!  I really REALLY hope you get a chance to try these –if you do, let me know what you think!  Enjoy!  -r

9-24-12 I’m adding to this post because my friend Megan just told me about a really cool time-saver—a cupcake corer!!! (honestly, what will they think of next….!)  I just ordered it and I’ll let you know what I think.  If you want to check it out yourself click here: Cupcake Corer.  So fun…!

%d bloggers like this: