Tag Archives: sprinkles

Maple Hedgehog Cupcakes!

Posted on

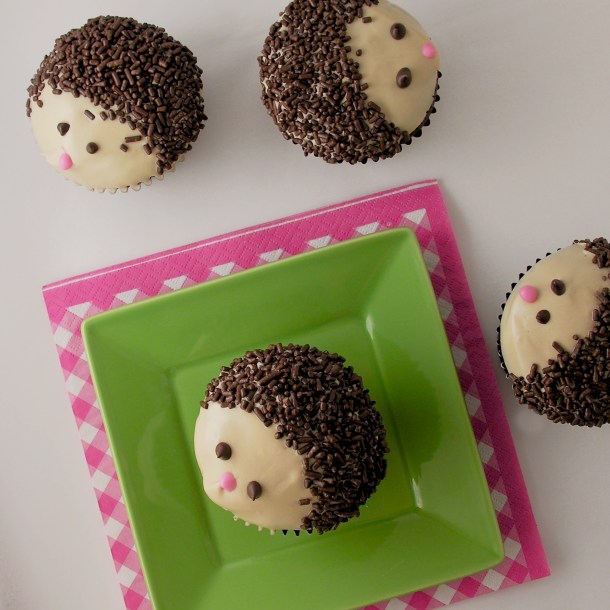
Hedgehog Cupcakes

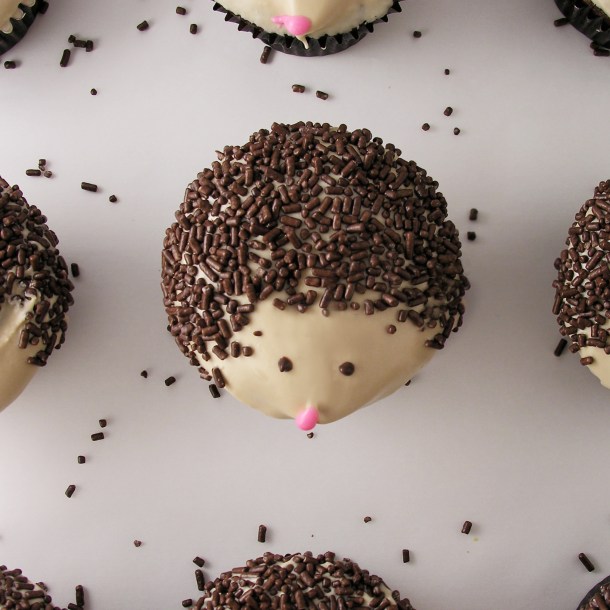
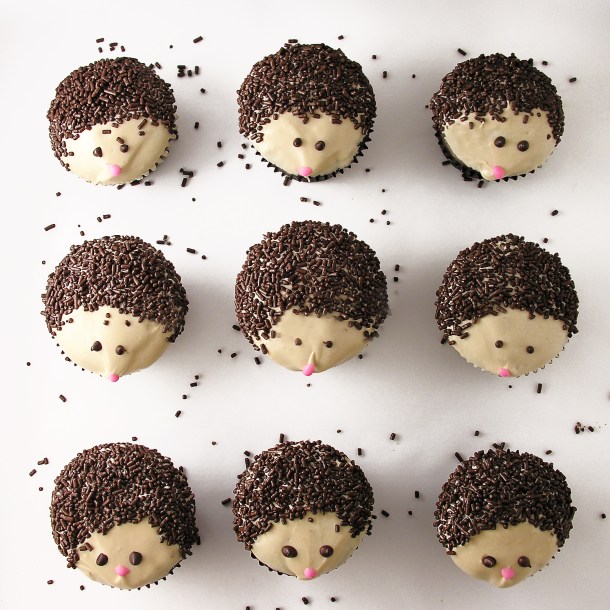
Hedgehogs are the MOST adorable things, and these yummy maple cupcakes capture all the cuteness in edible form!

Seems like hedgehogs are all the rage these days. I’ve seen slippers and t-shirts and recently found the MOST adorable hedgehog salt and pepper shakers at Target.

I love them. I think they fall into the category: “so ugly they are cute”, in the animal kingdom…along with the walrus and basset hound…

In any case, I decided that the cupcake world needed a cute (and EASY) version of these, and here they are!

Hedgehog4

Now, the dilemma of every blogger of desserts is this: who do I give these to, so that I don’t eat them all and gain 500 pounds?

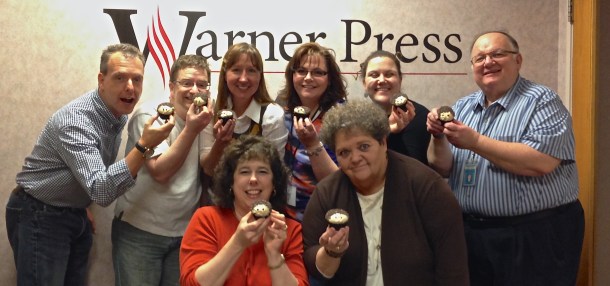
I had an obvious answer for these little hedgehogs: Warner Press!

You see, about a year ago at this time I was getting ready for the publication of my first cookbook, and I was partnered with an absolutely WONDERFUL publisher~ Warner Press. Through the process, many of the people I worked with became dear friends. One of those friends HATES hedgehogs. In fact, it is a long-standing office joke that Regina despises the cute little rodents. Obviously, she needed Hedgehog cupcakes~ so I went for a visit!

Warner Press

We had a fun day of cupcakes and catching up- and I promised them I would tell you all about the (adorable!) boxed set of Hedgehog cards that Regina reluctantly approved for publication. She was so convinced that they would be an epic fail, that she agreed to a wager: If the hedgehog cards make it into the top 10 selling items at Warner Press she would take them all out for dinner…and they are close…!

Hedgehog Cards!

I love them, and thought I’d give you all a chance to purchase some (and maybe put them into the top ten best selling items?!?!) They would be a cute gift for Mother’s Day! Click here to see the rest of the fun hedgie pictures and to order.

The cupcakes are as easy as can be! Here’s how we put them together: (printable recipe)

INGREDIENTS:

  • 1 boxed cake mix (plus water oil and eggs to make according to package)
  • 1 tub of pre-made vanilla frosting
  • 2 teaspoons of maple flavoring
  • 1 cup of chocolate jimmies
  • 1/2 cup of Wilton’s Candy Melts in dark chocolate (or you can use mini chocolate chips)
  • 1/4 cup of Wilton’s Candy melts in pink.

DIRECTIONS:

  • Make cake mix according to package and bake as cupcakes for recommended time and temp. Cool completely.
  • Place frosting into a small bowl and heat for just 15-20 seconds in the microwave until soft. Add maple flavoring and stir until combined.
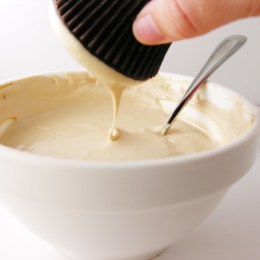
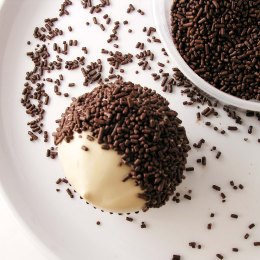
  • Dip tops of cooled cupcakes into frosting and pull into a slight “point” on one end of the cupcake for a little nose (see photo)
  • Immediately (over a plate) pour and pat jimmies into place, opposite the “point”, leaving a small circular section empty for face. Finish all cupcakes this way ( if you use mini chips for eyes you should place them now, before the frosting hardens)

Hedgehog cupcakes 10Hedgehog cupcake11

  • Melt candy melts in the microwave in a small bowl in 30 second increments, stirring in between until smooth.
  • Place each color in a small zip-top bag and seal.
  • Clip a small corner off and squeeze out drops of chocolate for the eyes and pink candy melts for the nose- right on the end of the “point” left by the frosting.
  • Allow cupcakes to harden up.
  • Enjoy!!!!

Hedgehog cupcakes

My thoughts: Cute and easy! Plus that maple frosting is YUM-MY! You certainly could use your own favorite cupcake recipe for these too- I just used a cake mix for simplicity. Such a fun recipe for kids too! Gotta love those hedgehogs– right, Regina?!?  Enjoy!! ~r

Hedgehog2

Other unique cupcakes from Easybaked: (click a photo to see the recipe)

Apple cupcakes filled with seedsPancake Cupcakes!!!!Root Beer Float Cupcakes!!!!Bomb Pop Cupcakes!!!

Upside Down Oreo Cupcakes

Upside Down Oreo Cupcakes

Turn these cupcakes upside down and find a cute “winter” Oreo on the top! Add a little bit of frosting in the middle and you have a delicious and beautiful winter dessert!

I saw this cute idea on the Oreo site and decided to “winterize” the idea. You’ll have to find the Winter Oreos- they have red filling and the most adorable designs on them, or you can use plain Oreos too- either way they are delicious!

Oreo Cupcakes!!

These aren’t difficult to make, but you will definitely need to keep them in a sealed container until serving them. I put all of mine away, but 2 didn’t fit and since that cupcake liner is pulled off, they got all hard and stale. In a container they kept fine for a couple of days!  On a side note: I used the Duncan Hines Blue Velvet mix and it was delicious! You could use Red Velvet or a White cake mix with food coloring too. Here’s how we made them: (printable recipe)

INGREDIENTS:

  • One box of Duncan Hines Blue Velvet cake mix (plus water, butter and eggs required by mix)
  • One package of “winter” Oreos
  • One tub of white frosting
  • Sprinkles as desired

DIRECTIONS:

  • Make cake mix as directed on box.
  • Place one Oreo each into 24 cupcake liners placed into muffin tins- making sure that cute winter design is facing down!
  • Spoon cake batter evenly into liners, making sure it get down around the sides of the Oreo
  • Bake cupcakes as directed by box and allow them to cool completely.
  • Remove cupcake liners, use a small knife to slice each one in half and spread some frosting between the 2 layers.
  • When cupcake is reassembled, sprinkle with fun sparkly sugars.
  • Store in an airtight container. I ADORE my cupcake carrier – it’s one of my favorite kitchen belongings and you should totally ask for one for Christmas!!!
  • Enjoy!!!!!!!

Oreo Cupcakes!

Aren’t those fun winter colors?  I love reds and blues for Christmas!

My thoughts: These are really easy and fun- I think with the lighter cake mix color you get a little more discoloration or “browning” around the Oreo cookie itself, that was my only disappointment. I think if you used a darker cake batter you wouldn’t notice it so much. The flavor was wonderful though. Thanks for the fun idea Oreo!!!!  Enjoy!

Oreo Cupcakes2

Other Christmas recipe ideas~ click on a photo to be taken to the recipe:

Hot Chocolate Pop!Peppermint Hot Chocolate Cupcakes!!!Gingerbread Cake RollReindeer Oreo Pops!!!

Need a fun and unique gift idea? Easybaked has adorable boxed sets of notecards. They have an Easybaked dessert photo on the front and a recipe on the back! The come in a cute box and the best part? They are ON SALE for Christmas, include free shipping and the site that is hosting them offers $10 off a $50 purchase! Enjoy!!! (Click on photo for more information)

Easybaked Card sale

Caramel Crisp Cookies

Posted on

Caramel Ritz Cookies

These crisp, caramel- filled cookies are absolutely delicious, can be decorated for any season and are SO easy!

These cookies have made a bigger impression on people than almost any dessert I’ve made. Everyone LOVES these! I love them too and they really are one of the easiest cookie ideas I’ve ever posted. Plus they are cute, and cute always gets bonus points in my book!

Caramel Ritz Cookies

These are made by pressing melted Rolos between Ritz crackers and then dipping them in chocolate… as easy as that! You almost don’t need a recipe, but for those of you who like having one, here you go: (printable version)

INGREDIENTS: (makes about 50 cookies)

  • One box of Ritz Crackers
  • One bag of Rolo caramel candies
  • Two bags of Wilton’s Candy Melts in dark chocolate

DIRECTIONS:

  • Unwrap all those little Rolos…this is the hardest part of this recipe….booooring!
  • Preheat oven to 350F degrees.
  • Place Ritz Crackers, bottom side up, on a cookie sheet and set one unwrapped Rolo on each one.
  • Put these into the oven and leave them for one to two minutes until the Rolo is soft enough to press flat with another cracker- I actually just kept checking until they were soft enough.
  • Remove them from the oven and use another Ritz cracker to make a little sandwich of that soft Rolo.
  • Allow these to cool completely- I put mine in the fridge for 20 minutes or so until they were nice and firm
  • Melt Candy Melts in the microwave in 30 second increments, stirring in between until they are completely melted and smooth.
  • Cover each cookie with melted chocolate and use a fork to lift the cookie up. Tap the fork against the side of the bowl to allow excess chocolate to drain off, slide bottom of cookie along edge of bowl to remove extra off bottom, and tip gently off fork and allow cookie to slide onto parchment or wax paper. Sprinkle/ decorate as desired and allow cookie to harden completely.

Caramel Rolo Ritz CookiesCaramel Ritz Cookies

If you want to skip the chocolate-dipped part, these are still a fun and yummy treat:

Caramel Rolo Ritz Cookies

My thoughts: As I said earlier, these are really yummy. I like that you can decorate them any way you want for any season- they are like Oreo pops- and you ALL know how much fun I have decorating those here! Use any color of Candy Melt, use sprinkles or drizzles….sky is the limit! My dad tried them and said, “When you put these on your blog, tell people they are the best cookies I’ve ever had.” So there you go. The best ever. Thanks dad!

Caramel Rolo Ritz CookiesOther Christmas cookie recipes you’ll have fun trying~ just click on the photo to see the recipe:

Chocolate bonbonsChristmas Cut-outsSnowman Oreo PopsChocolate Espresso Cookies!!!

Need a fun and unique gift idea? Easybaked has adorable boxed sets of notecards. They have an Easybaked dessert photo on the front and a recipe on the back! The come in a cute box and the best part? They are ON SALE for Christmas, include free shipping and the site that is hosting them offers $10 off a $50 purchase! Enjoy!!! (Click on photo for more information)

Easybaked Card sale

American Flag Oreo Pops

Posted on

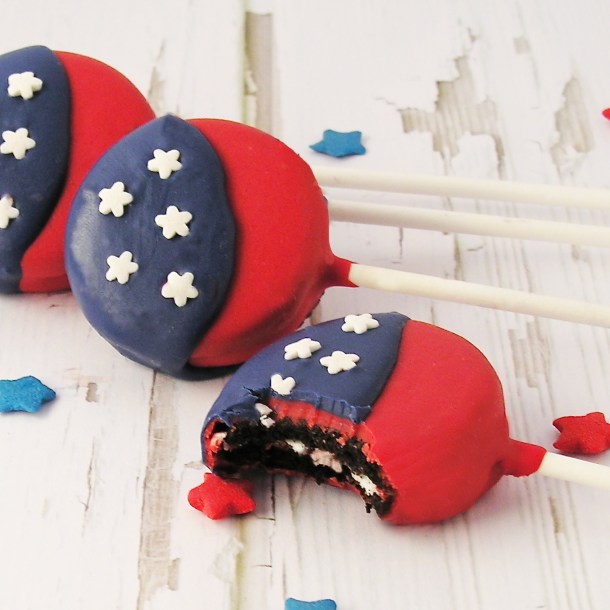
American Flag Oreo Pops!!!!Put a little red white and blue on your Oreos and celebrate the Fourth of July!

These are an easy treat that will make you (and everyone else) smile.  Plus there’s an Oreo inside- perfect!

I’ve said it before, and I will say it again– I’m addicted to Oreo Pops.  Most of you know that I’m living in Arizona for eight months with the Navajo.  I love it here, and the Navajo people are incredibly gracious about sharing life with me and teaching me all about their culture and traditions.  I had a hard time a couple of weeks ago though.  A puppy that I recently took in became very ill and the vet diagnosed her with parvovirus, a deadly disease that can be prevented with puppy vaccinations.  Most people here cannot afford to vaccinate (or spay and neuter) their dogs, so this puppy and all of her litter mates had to be put down.

Oreo...

Oreo…

So. Incredibly. Sad.  My little puppy was named Oreo, for her adorable black and white Oreo markings.

One of my friends here suggested we sell things at a local flea market this week, and I decided to make 100 Oreo Pops in a variety of forms to make money to help spay and neuter Oreo’s parents, and to vaccinate other puppies in the area.

I made ALL SORTS of Oreo pops, and these were one of my “new” designs.  I love how patriotic they are!

American Flag Oreo Pops!!!!!So, in honor of this wonderful, beautiful country that we all call home….Oreo Pops- in Red, White and Blue!!!

Here’s the recipe: (printable version)

INGREDIENTS:

  • One box of Double Stuff Oreos
  • One bag of Wilton’s candy melts in Red
  • One bag of Wilton’s candy melts in Blue
  • One jar of flower sprinkles (the white ones look like stars…?) 
  • 24 lollipop sticks

DIRECTIONS: (Need a visual?  Click here.)

  • Carefully twist apart all of the Oreo cookies
  • Using one of the lollipop sticks, make an indentation in the white filling of each cookie.
  • Melt the Red Candy Melts in the microwave in 30 second increments, stirring until completely melted and smooth.
  • Dip the end of one stick into the melted red chocolate, drizzle a little in the center of the white cookie filling and then gently press it into the indentation made.
  • Place the top of the cookie back on and allow red chocolate to harden (10 minutes or so), cementing the cookie back together with a stick inside.
  • Holding the stick, lower the entire Oreo into the bowl of melted red chocolate, spooning it over the top and sides to cover it completely.
  • Allow the excess red chocolate to drain off and gently place covered Oreo on a piece of parchment paper to harden and cool completely
  • Melt Blue candy melts in the same manner that you melted the red.
  • Allow the candy melts to cool just a bit before dipping (so that it doesn’t melt the red candy underneath).
  • Spoon a bit of blue chocolate over just the top end of the Oreo.  Tap to drain away excess blue chocolate and wipe back across a clean paper towel to remove any drips or splatter of blue.
  • Place on a clean piece of parchment paper to cool, and immediately place a few white “stars” on the blue.
  • Allow pop to harden completely.
  • Remove from paper and serve- or place in a small treat bag, tied with pretty ribbon.
  • Enjoy!

American Flag Oreo Pops!!!!My thoughts:  These are easy and fun to put together, and just so CUTE!  Happy Fourth of July!!!!!  ~r

Other fun (and very patriotic!) desserts to try here at Easybaked:

Patriotic Flip Flop Cookies!!!!Patriotic Bundt Cake!!!!Patriotic Polka Dot Cake!!!!Chocolate covered brownie stars


Shamrock Parfaits…the unplanned dessert.

Posted on

Shamrock Parfaits!!!!These lovely layered St. Patty’s Day treats were supposed to be a cake…but ended up even better!

I am in the middle of the Navajo Nation without a Bundt cake pan.  That is how this tale begins.  I am almost 3 hours from a store that sells Bundt pans.  In my mind, I wanted to make a lovely bundt cake full of swirls of various shades of green, topped with melted Key Lime frosting.  SO- I did what any enterprising blogging girl would do- I ordered a pan on ebay, with free shipping.  It took a week, but once I got it I was ready to go!  I divided my cake mix into 4 parts and colored each part an increasingly darker shade of green and swirled the colors together in the pan.  After it baked, I tipped it out on a cake rack and…..Bundt Cake disaster!

Sadness.

I let the disaster cool and re-thought my recipe.  I brought my favorite little Weck jars with me, and I had some heavy cream to whip… how about parfaits!!

Shamrock Parfaits!!!Here’s the recipe: (printable version)

INGREDIENTS: (makes 10-12 small parfaits)

  • One boxed white cake mix (Plus water, oil and eggs to make according to box)
  • Green food coloring gel
  • One tub of Pillsbury Key Lime Frosting
  • 2 cups heavy whipping cream
  • 3 Tablespoons of powdered sugar

DIRECTIONS:

  • Make cake according to boxed mix, adding green food color to make batter green (you can make several shades of green if you want, but you don’t have to).
  • Bake as directed in any cake pan you want (lol!)
  • Allow cake to cool completely.
  • Put heavy cream and powdered sugar in a large mixing bowl and beat on high until cream is whipped and light, holding stiff peaks.
  • Take the lid and foil wrap off the tub of frosting, and heat in the microwave for 20-30 seconds.  Stir until it is a nice smooth liquid.
  • Assemble your parfaits by spooning a bit of frosting into each glass, followed by a bit of crumbled cake, followed by a dollop of whipped cream.  Repeat these layers until you are at the top.
  • End with a swirl of whipped cream and some sprinkles.
  • Enjoy!

Shamrock Parfait!!!My thoughts:  These ended up being the yummiest dessert!  I had a family over to visit that night and they gobbled up every last bit of it and loved it.  That key lime frosting is the BOMB!  Yum!  Anyway, thanks for joining me on my latest Navajo kitchen adventure!  Happy St. Patricks Day!!  ~rShamrock Parfaits!!!!Usually I give you another four recipes related to this one.  But today I leave you with one. These are seriously some of the best cupcakes I’ve ever made, and they are perfect for St. Patrick’s Day….just click on the photo and you’ll be magically transported to the yummy recipe.  I present:  Bailey’s Irish Cream Cupcakes….Enjoy!!!! ~r

Baileys Irish Cream Cupcakes

Frog Prince Oreos

Posted on

Frog Oreos!!

These adorable edible frogs are made with Oreo cookies and pretzels- cute and soooo yummy!

“You have to kiss a lot of frogs before you meet your prince…..!”

Someone posted a picture of frogs made with Oreos on Facebook last week and I came across it just after spending time on the phone with a friend who’s just been “dumped” by her boyfriend.  When I saw the picture I immediately thought of all the “frogs” I’ve dated and knew I had to make us some frogs for Valentine’s Day!

I’ve only occasionally been in love on Valentine’s Day, and usually I watch horror movies with my other single friends to celebrate the day. Can you relate?  If so, these frogs are for you!!

Frog Oreos!

I am 2 1/2 hours from a Hobby Lobby.  It is (as far as I know) the only place I can get candy melts and other fun decorative things for food blogging.  When I packed up my car to move here for 8 months I remember packing the candy eyes.  I can see myself thinking, “Well, I’m sure the Navajo will not have a store that sells candy eyes…I better bring those!”

I didn’t bring them.  Or I lost them….?

So today I found myself standing in the kitchen with every ingredient I needed for these…except eyes.

I melted white and black candy melts and piped little eyes.  Don’t do that.  Go and buy the Candy Eyes.  They are super cheap and really cute.  My eyes are a little crazy looking….but then again, they remind me a little of some guys I’ve dated, so I guess it all worked out in the long run for me.

Frog Oreos!!

Ready for this recipe?  Here you go! (Printable Recipe)

INGREDIENTS:

  • One package of Oreo cookies
  • One bag of small pretzels
  • Two bags of Wilton candy melts in green
  •  Candy Eyes
  • Mini M&Ms (you’ll only need the red, so you can eat the rest!!)
  • Green jimmies (for the warts!)
  • Candy hearts (I piped mine with red candy melts, but I’d have used candy hearts if I’d had them!)

DIRECTIONS:

  • Melt the green candy melts in a microwave safe bowl in 30 second increments, stirring in between until completely melted and smooth.
  • Spread a sheet of parchment paper over the counter you will be working on.
  • Dip Oreos, one at a time, in the green candy melts, spooning the candy over the top and sides and then lifting with a fork and tapping excess away.  
  • Gently slide the covered Oreo against the edge of the bowl to remove excess candy melt from the bottom, and then slide off fork on to parchment paper.
  • Place two eyes on the top, an M&M in the front for a tongue, sprinkle with jimmies and place a heart candy on top.
  • Allow Oreos to completely harden.
  • Reheat candy melts if needed (they might harden up while the Oreos cool).
  • Dip pretzels into candy melts, using the same technique as the Oreos.  
  • Place two pretzels bottom to bottom on a clean sheet of parchment paper and while they are still melted, set a decorated Oreo on top and allow this to harden together.

My thoughts:  If you’ve never dipped things in chocolate or candy melts before, it will take you a little while to get the technique down.  The biggest tip I have is to tap off as much as you can before you set it on the parchment paper.  If you leave too much of the candy melts on the Oreo or pretzel it will drain off into a big puddle around it when you set it on the parchment paper.  It is also nice to have a clean set of tweezers handy to place the eyes and M&M with.  I had so much fun decorating mine…I think they got more cross-eyed and dumb looking the longer I thought about some of the guys my friends and I have dated.  I actually laughed out loud a few times.  I’m easily entertained!! 🙂

Frog6

If you are celebrating the holiday because you have found your prince, here are some ideas for YOU 😉

Raspberry Confetti KissesRaspberry Lemon Cream Cups!!!Baileys Irish Cream CupcakesRed velvet cookies with cream cheese icing!!

Candy EyesEditorial note:  I stopped at the local grocery to get milk today and wandered through the baking aisle.  They have candy eyes! I underestimated the Navajo Nation.  All of my new friends here are asking where to get the supplies to make these. Lavina and Kathy: they have candy eyes at Basha’s 🙂  Yay for us!!!

Toxic Slime-filled Cupcakes!

Posted on


Toxic Slime-filled Cupcakes!
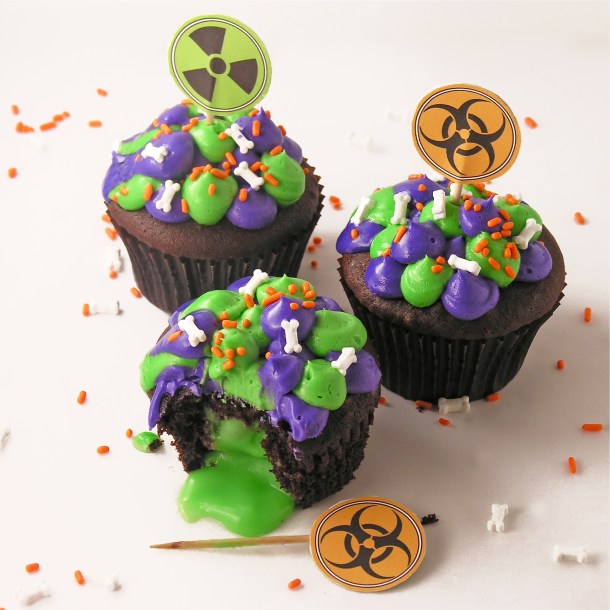
Fudge cupcakes filled with toxic green slime!  Yummy white chocolate pudding makes the slime and fun buttercream and bones complete this mad-scientist dessert.  Print some free radioactive cupcake toppers and you have such a fun October treat!!

These cupcakes are delicious…..  I know the green slime might throw you off, but that slime is the creamiest pudding filling….oh my.  It is like a custard filled doughnut…but better.

I’m a scientist in my day job, so when thinking creepy I tend toward the blood and guts variety more than ghosts and monsters.  I knew I wanted green slime, so I looked up recipes for ideas (realistic slime….it needed to be realistic….)  and I came across an adorable blog with the idea of using plain old pudding with green food coloring– easy! Plus I loved her frosting “blob” technique, so a few parts of this recipe are borrowed from ideas on Make Bake Celebrate.

I also created some free printable “radioactive” cupcake toppers for you.  Just click here for the link, print 2 pages on card stock, cut them out and use double-sided tape to stick them back-to-back over a toothpick.    Easy-peasy and a perfect finish on these!  Aren’t they fun?!???

Radioactive Cupcakes3
Lets make these cute little cupcakes together!  (printable recipe)

INGREDIENTS:

  • One boxed cake mix (plus water, oil and eggs to make according to box)
  • One box (3.3 oz.) Jello Brand White Chocolate Pudding (instant)
  • Milk (to make pudding according to package)
  • Green food coloring gel
  • Purple food coloring gel
  • 2 sticks (1 cup) salted butter
  • 2 sticks (1 cup) unsalted butter
  • 1 teaspoon clear vanilla
  • 3 cups powdered sugar
  • Sprinkles/ decorations for tops of cupcakes  (I used Wilton Bones Sprinkles)

DIRECTIONS:

  • Preheat oven to 350F degrees.
  • Make cupcakes according to box and divide evenly into 24 cupcake liners placed in cupcake tins.
  • Bake according to times given on boxed mix.
  • Remove from oven and cool completely.
  • Make pudding according to package and at the end add green food color gel (I used Leaf green by WIlton ) until it looks like radioactive slime!!!  Carefully spoon into a zip-top bag.
  • Core your cooled cupcakes- you can use a paring knife to just remove a core, but a cupcake corer is much faster and more uniform.  I use the Chicago Metallic Cupcake Plunger and it is cheap and small and perfect for the job!
  • Carefully clip a corner of your green slime (pudding) bag and fill each cupcake cavity about half full of “slime”.
  • Trim a little off the bottom of the “core” you removed and place it back on top of the filling- like a little cupcake cork!

Filling Cupcakes with Slime!Filling cupcakes with slime!

  • Make frosting by combining butters, powdered sugar and vanilla in a large mixing bowl and beating it on high until light and fluffy.
  • Divide frosting in half and mix green into one half and purple into the other half until fully combined.
  • Place each color of frosting in a bag that has been fitted with a Wilton 2A round decorating tip.  Pipe round dots of frosting in alternating colors all over each cupcake top.

Frosting creepy cupcakes!

  • Add sprinkles, bones, skulls, eyeballs…. any cool and creepy decorations you want!
  • Top each cupcake with a free printable topper and ENJOY!!!!

Radioactive Cupcakes filled with SLIME!
My thoughts:  I would make these again in a heartbeat.  I might make them again this weekend.  Yes, they are super fun, but the pudding is really SO good inside!  I feel like every cupcake should have pudding inside…!  I always love to watch the reactions when people bite into things for the first time– and these don’t disappoint!!!  Lots of laughter and smiles at this yummy green slime!  Enjoy!!!!!! ~r

Radioactive Cupcakes!!!

Other fun Halloween treats to try!!

Sweet Tart and Pixie Stix CakePeanut Butter Caramel SauceHalloween Bundt CakeFall acorn cupcakes!