Tag Archives: muffin tins

Malted Milkshake Cupcakes

Posted on

Malted Milkshake Cupcakes

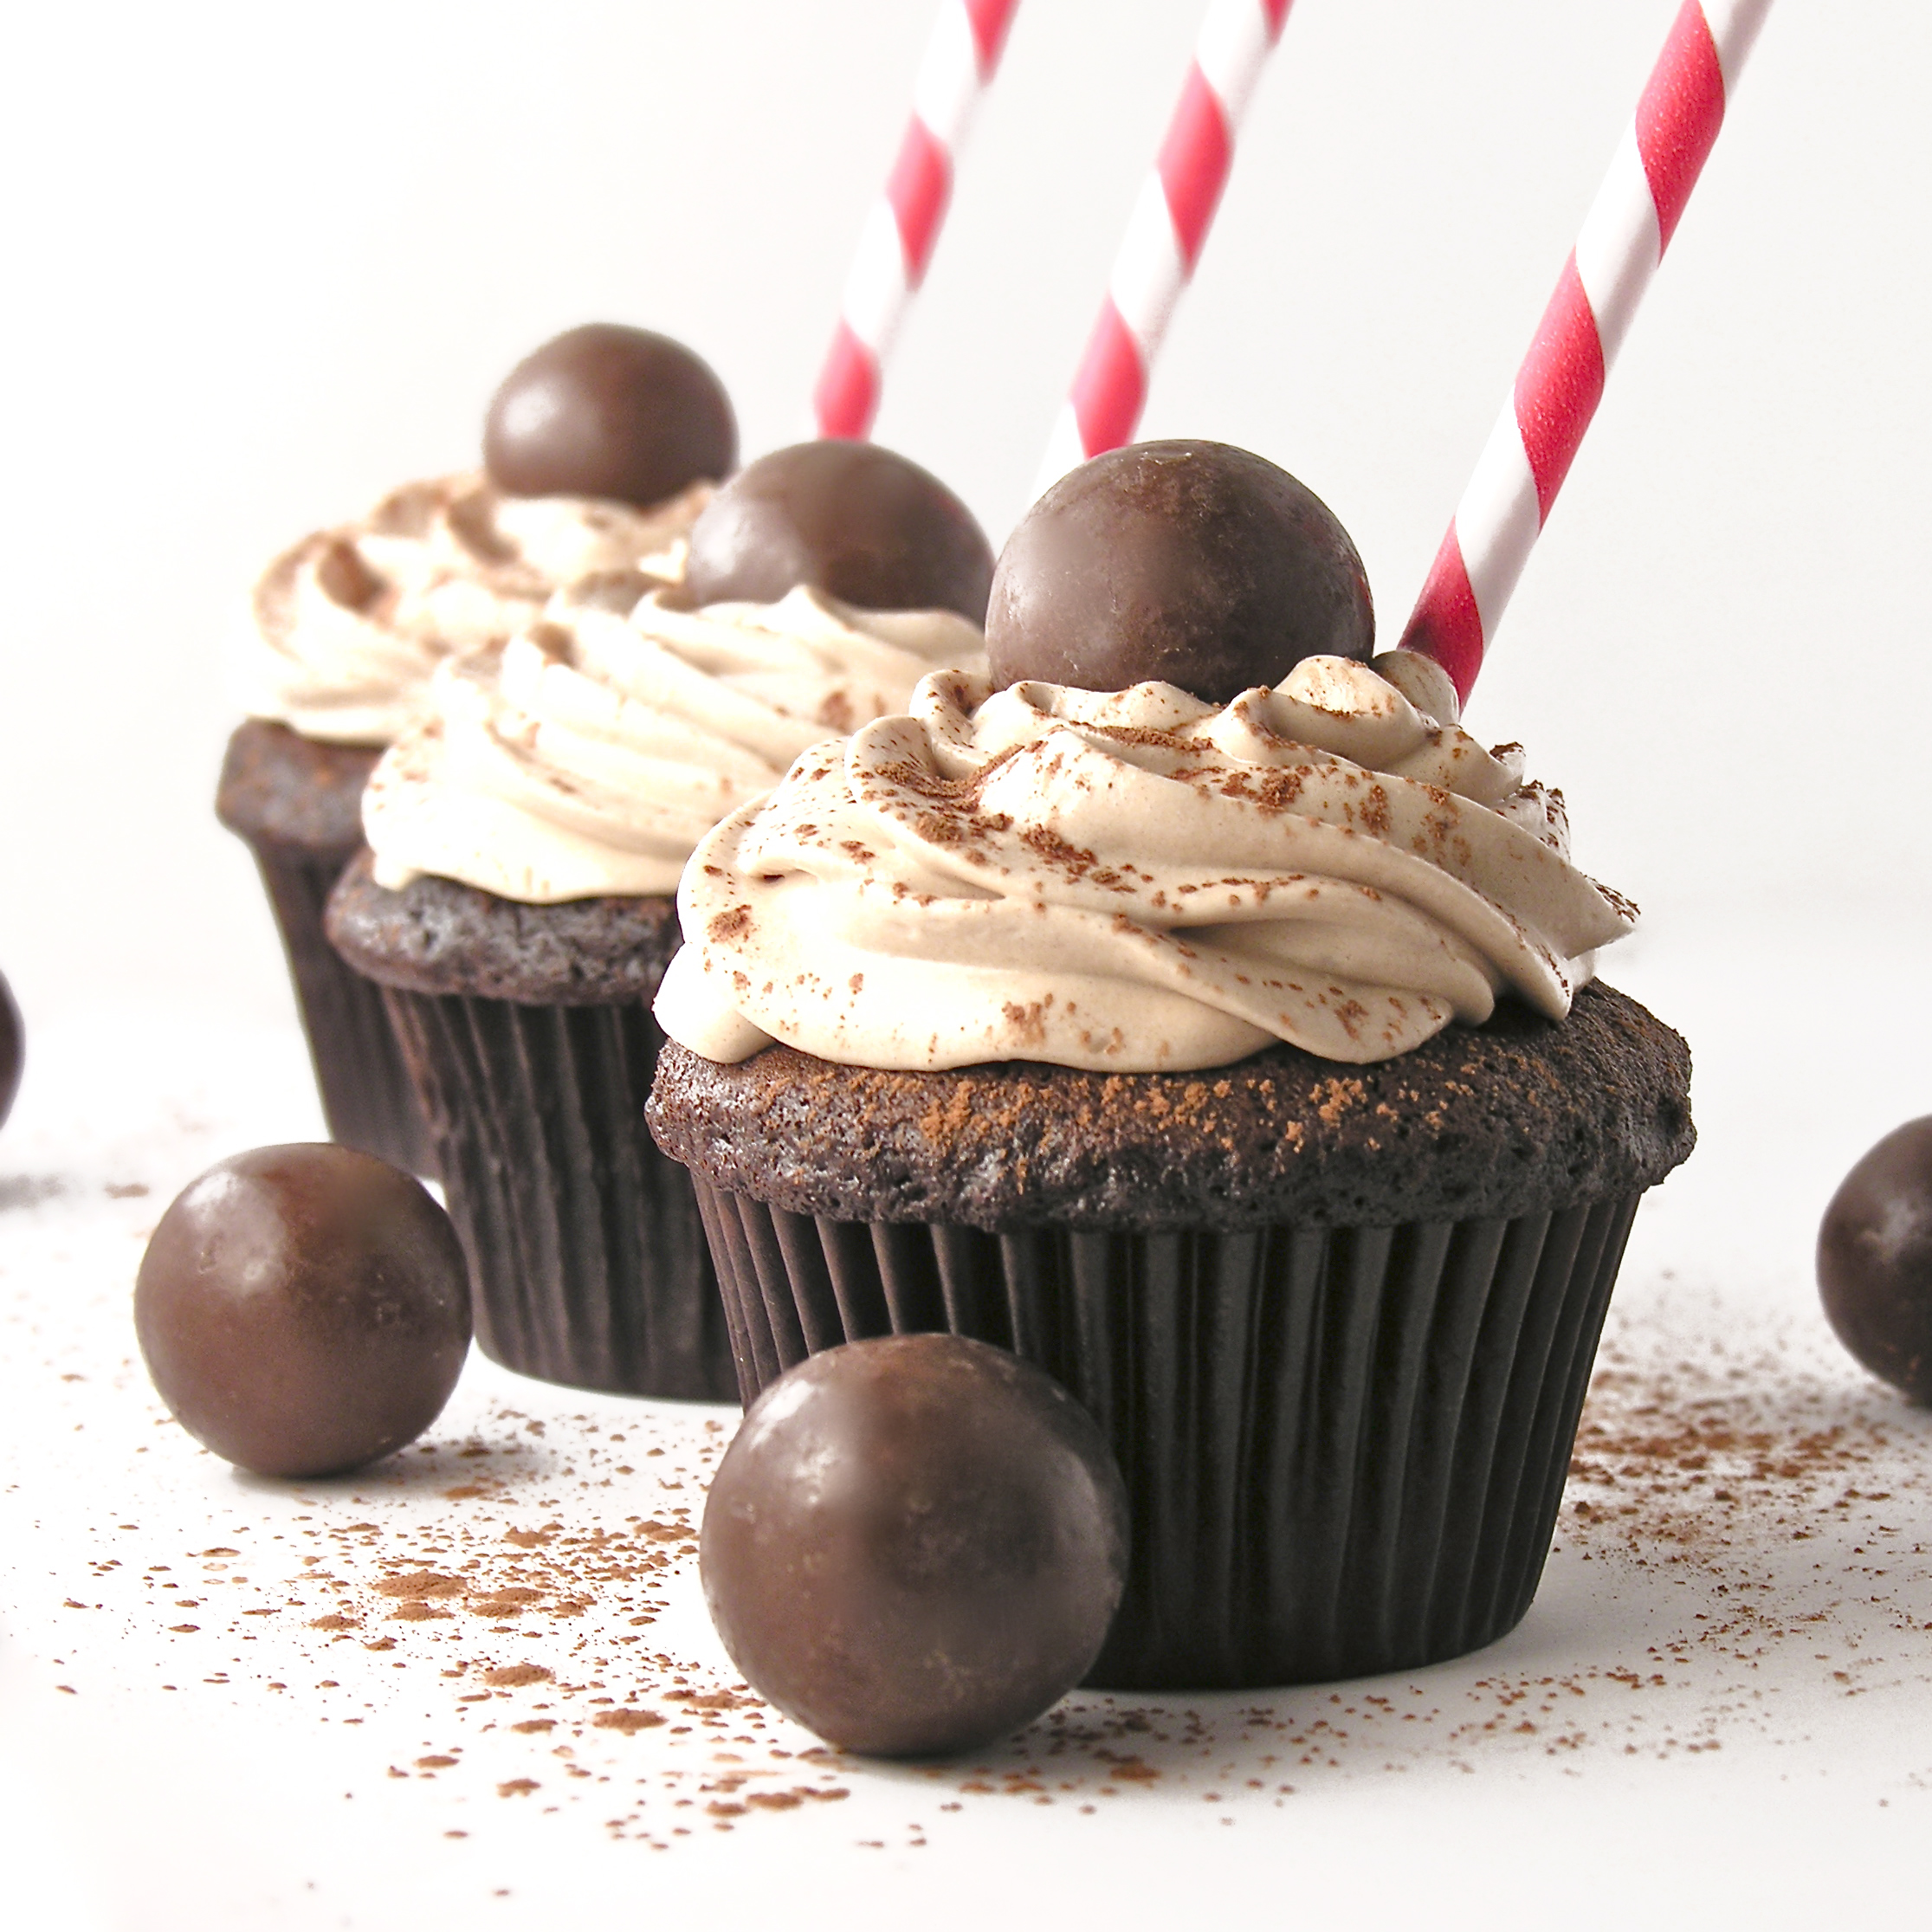
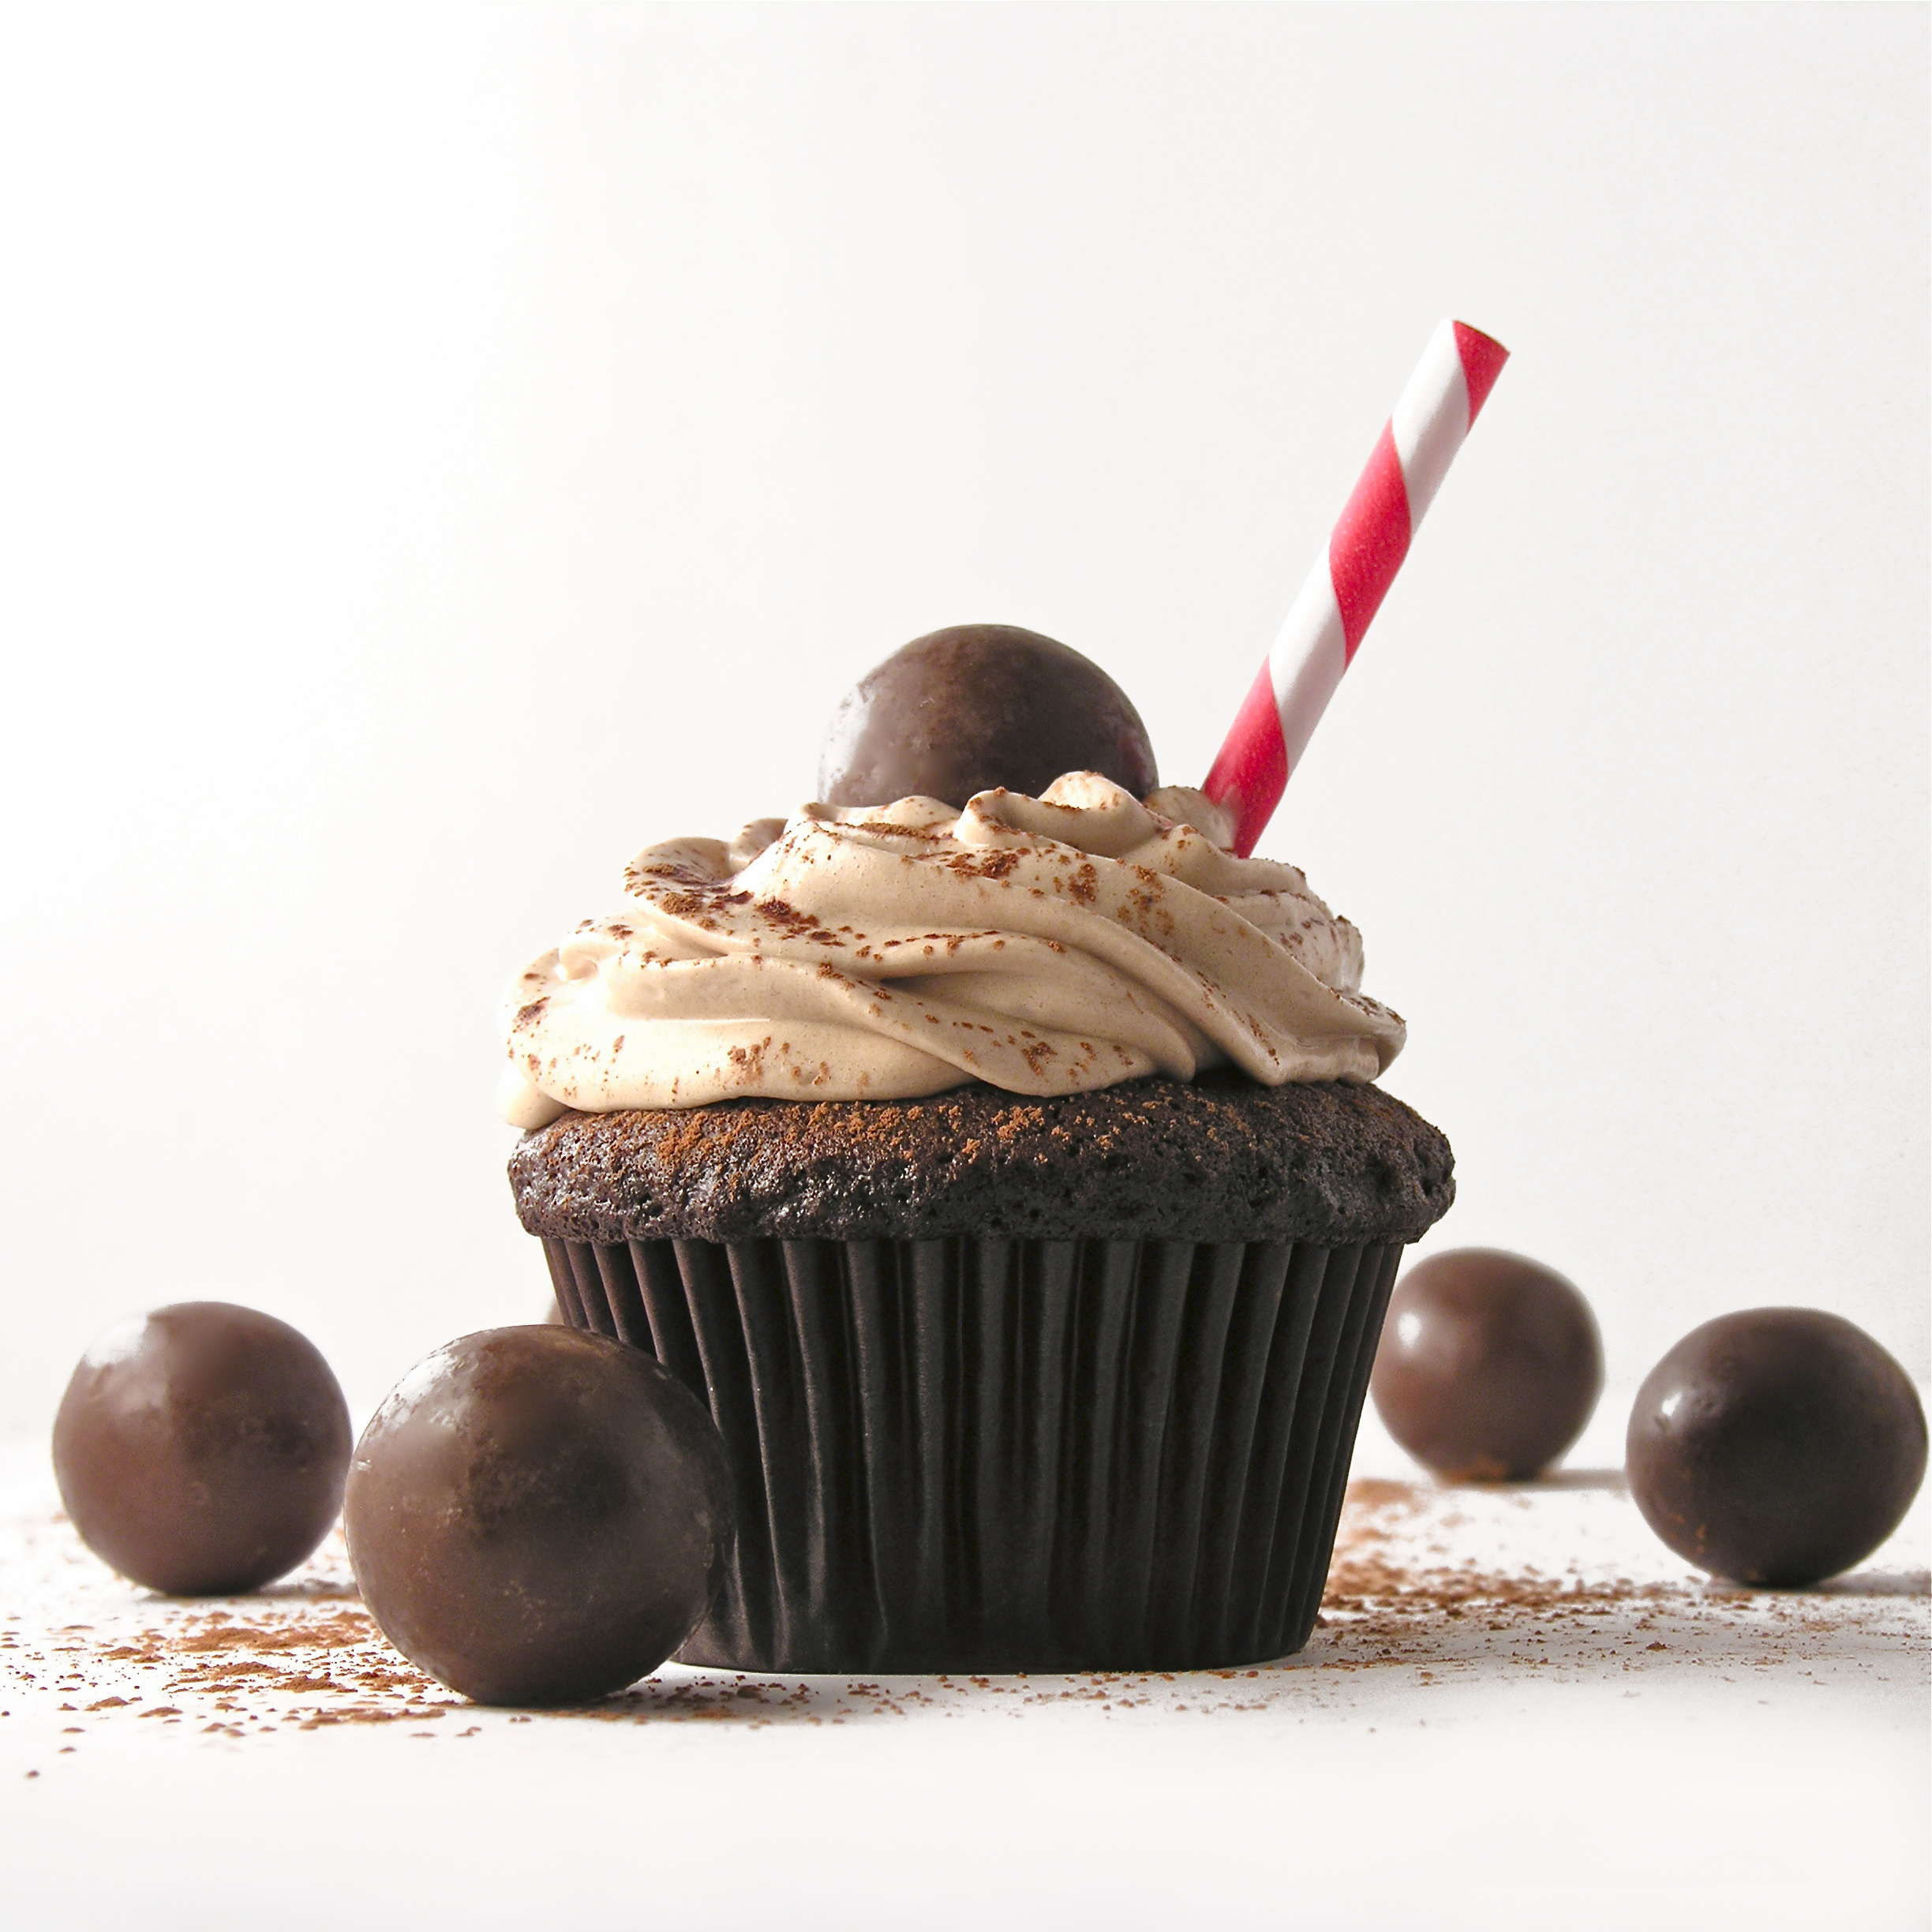
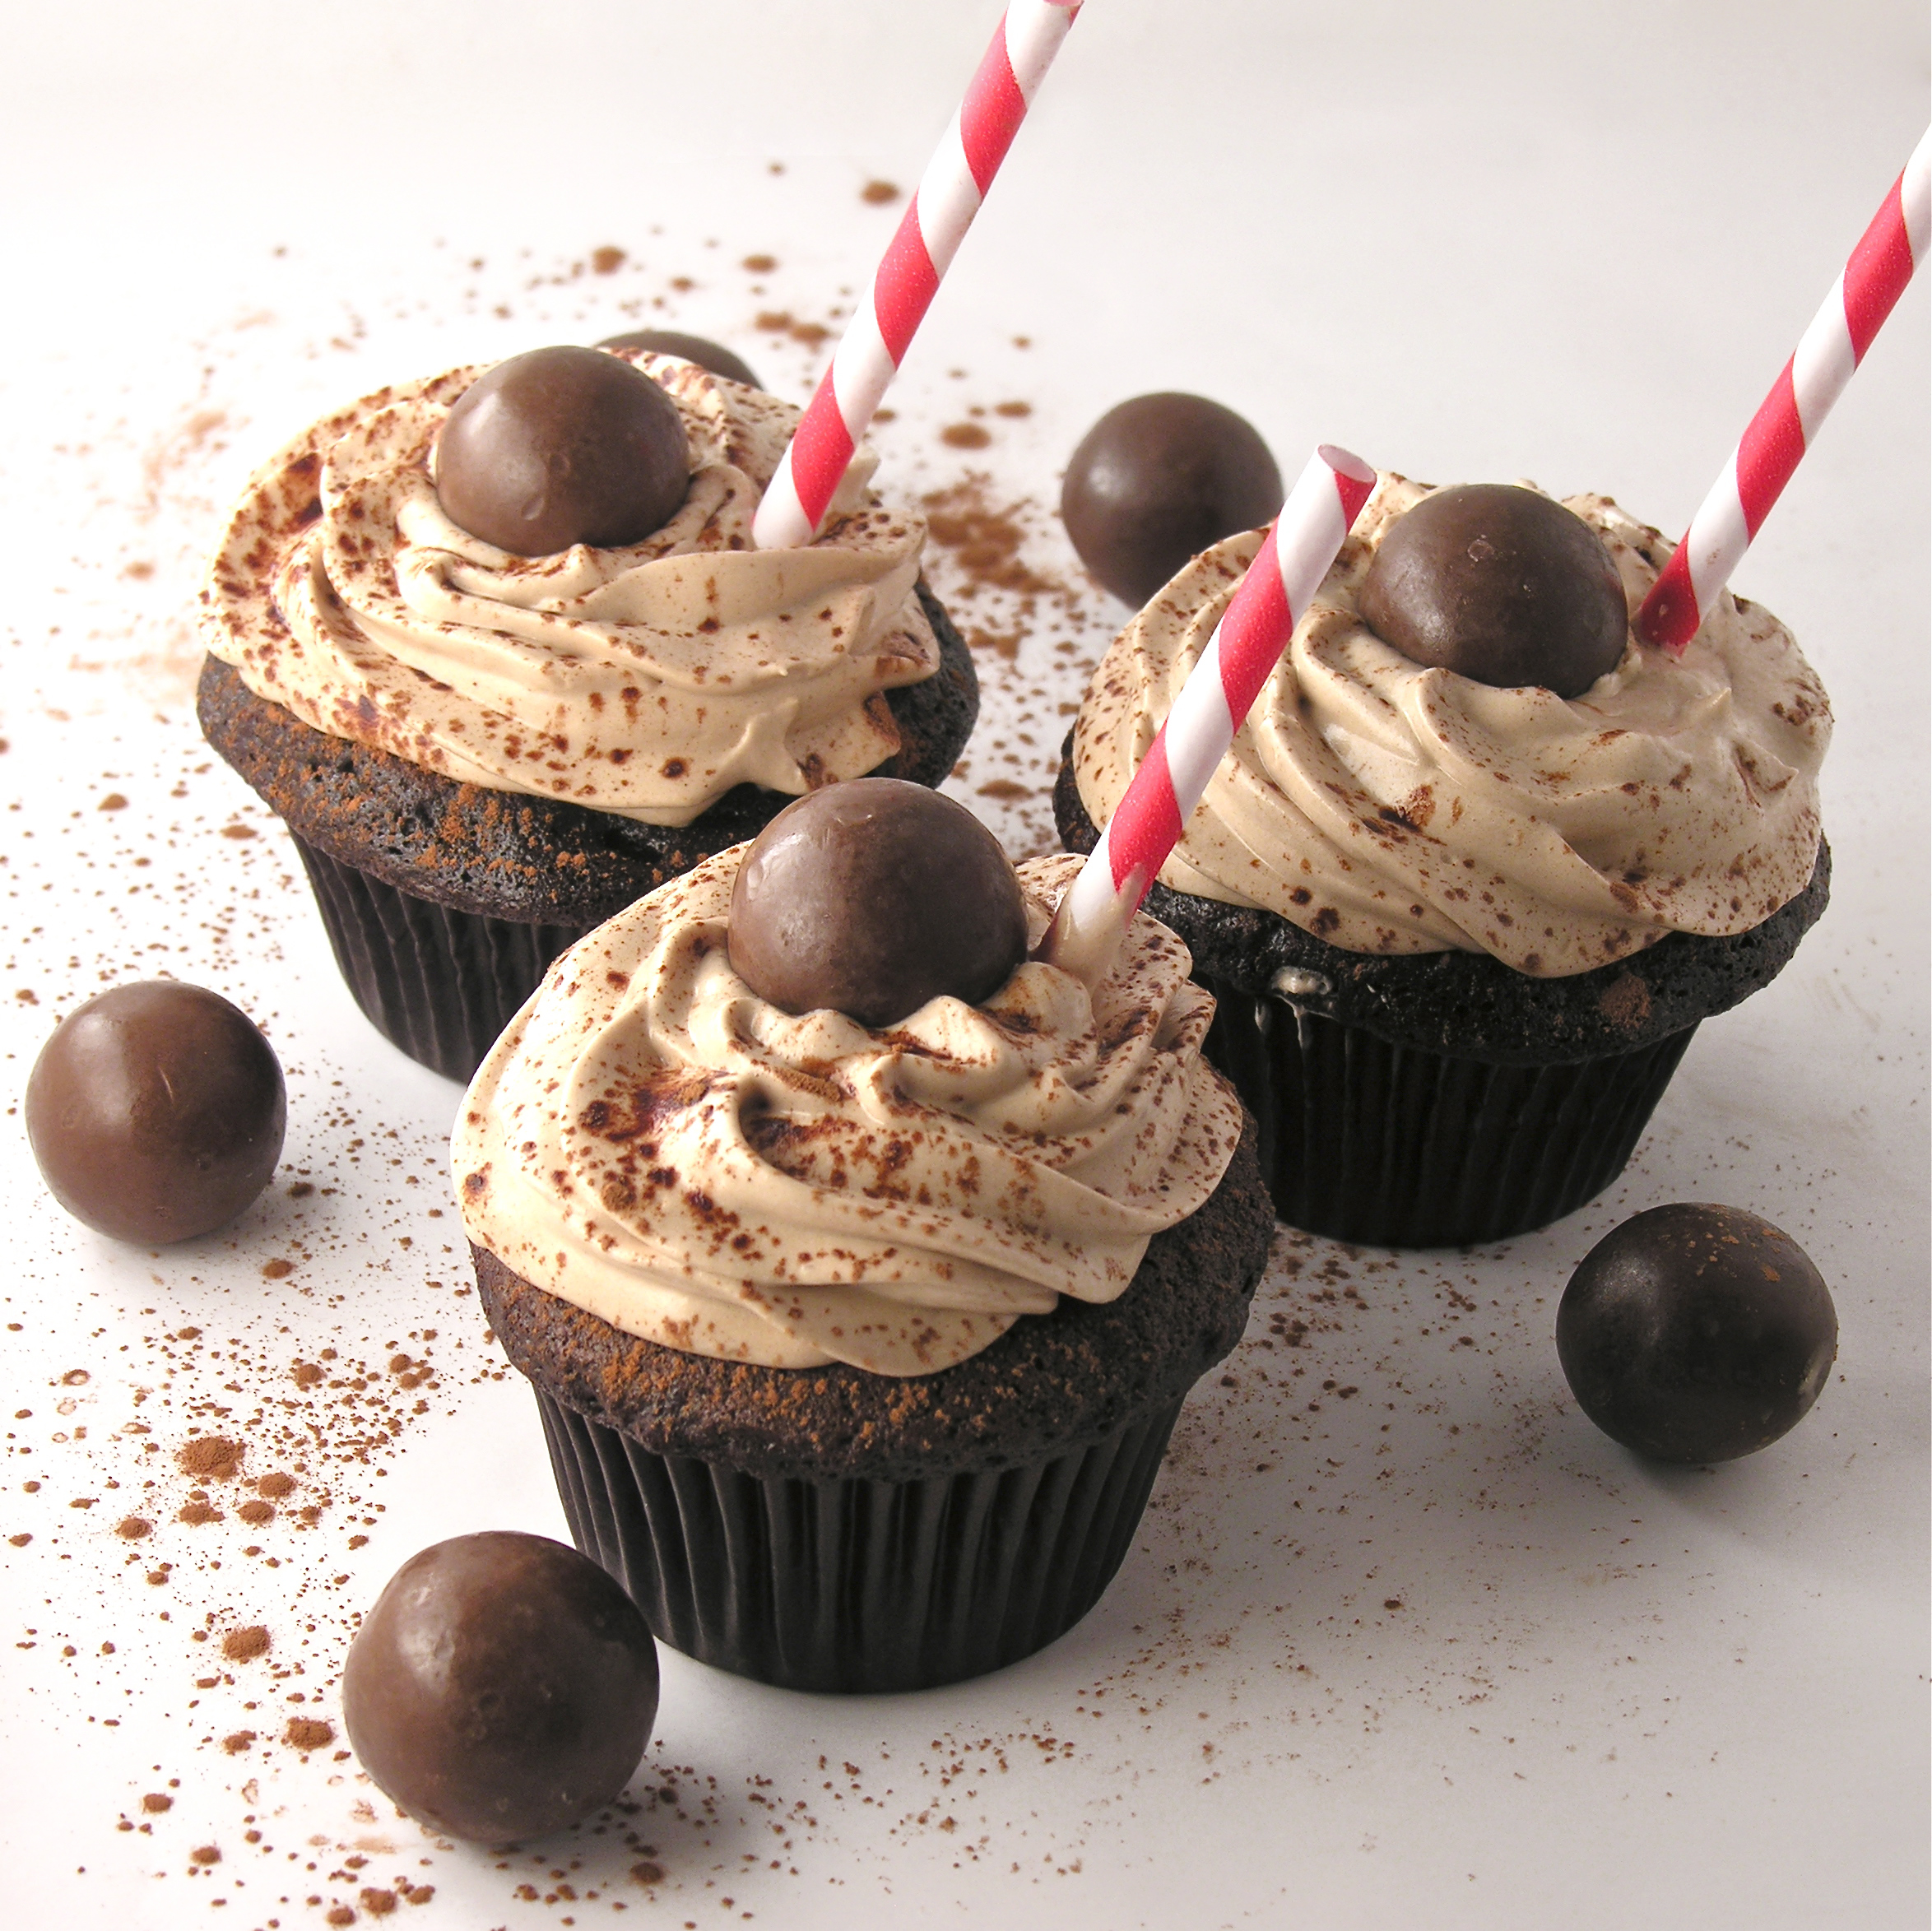
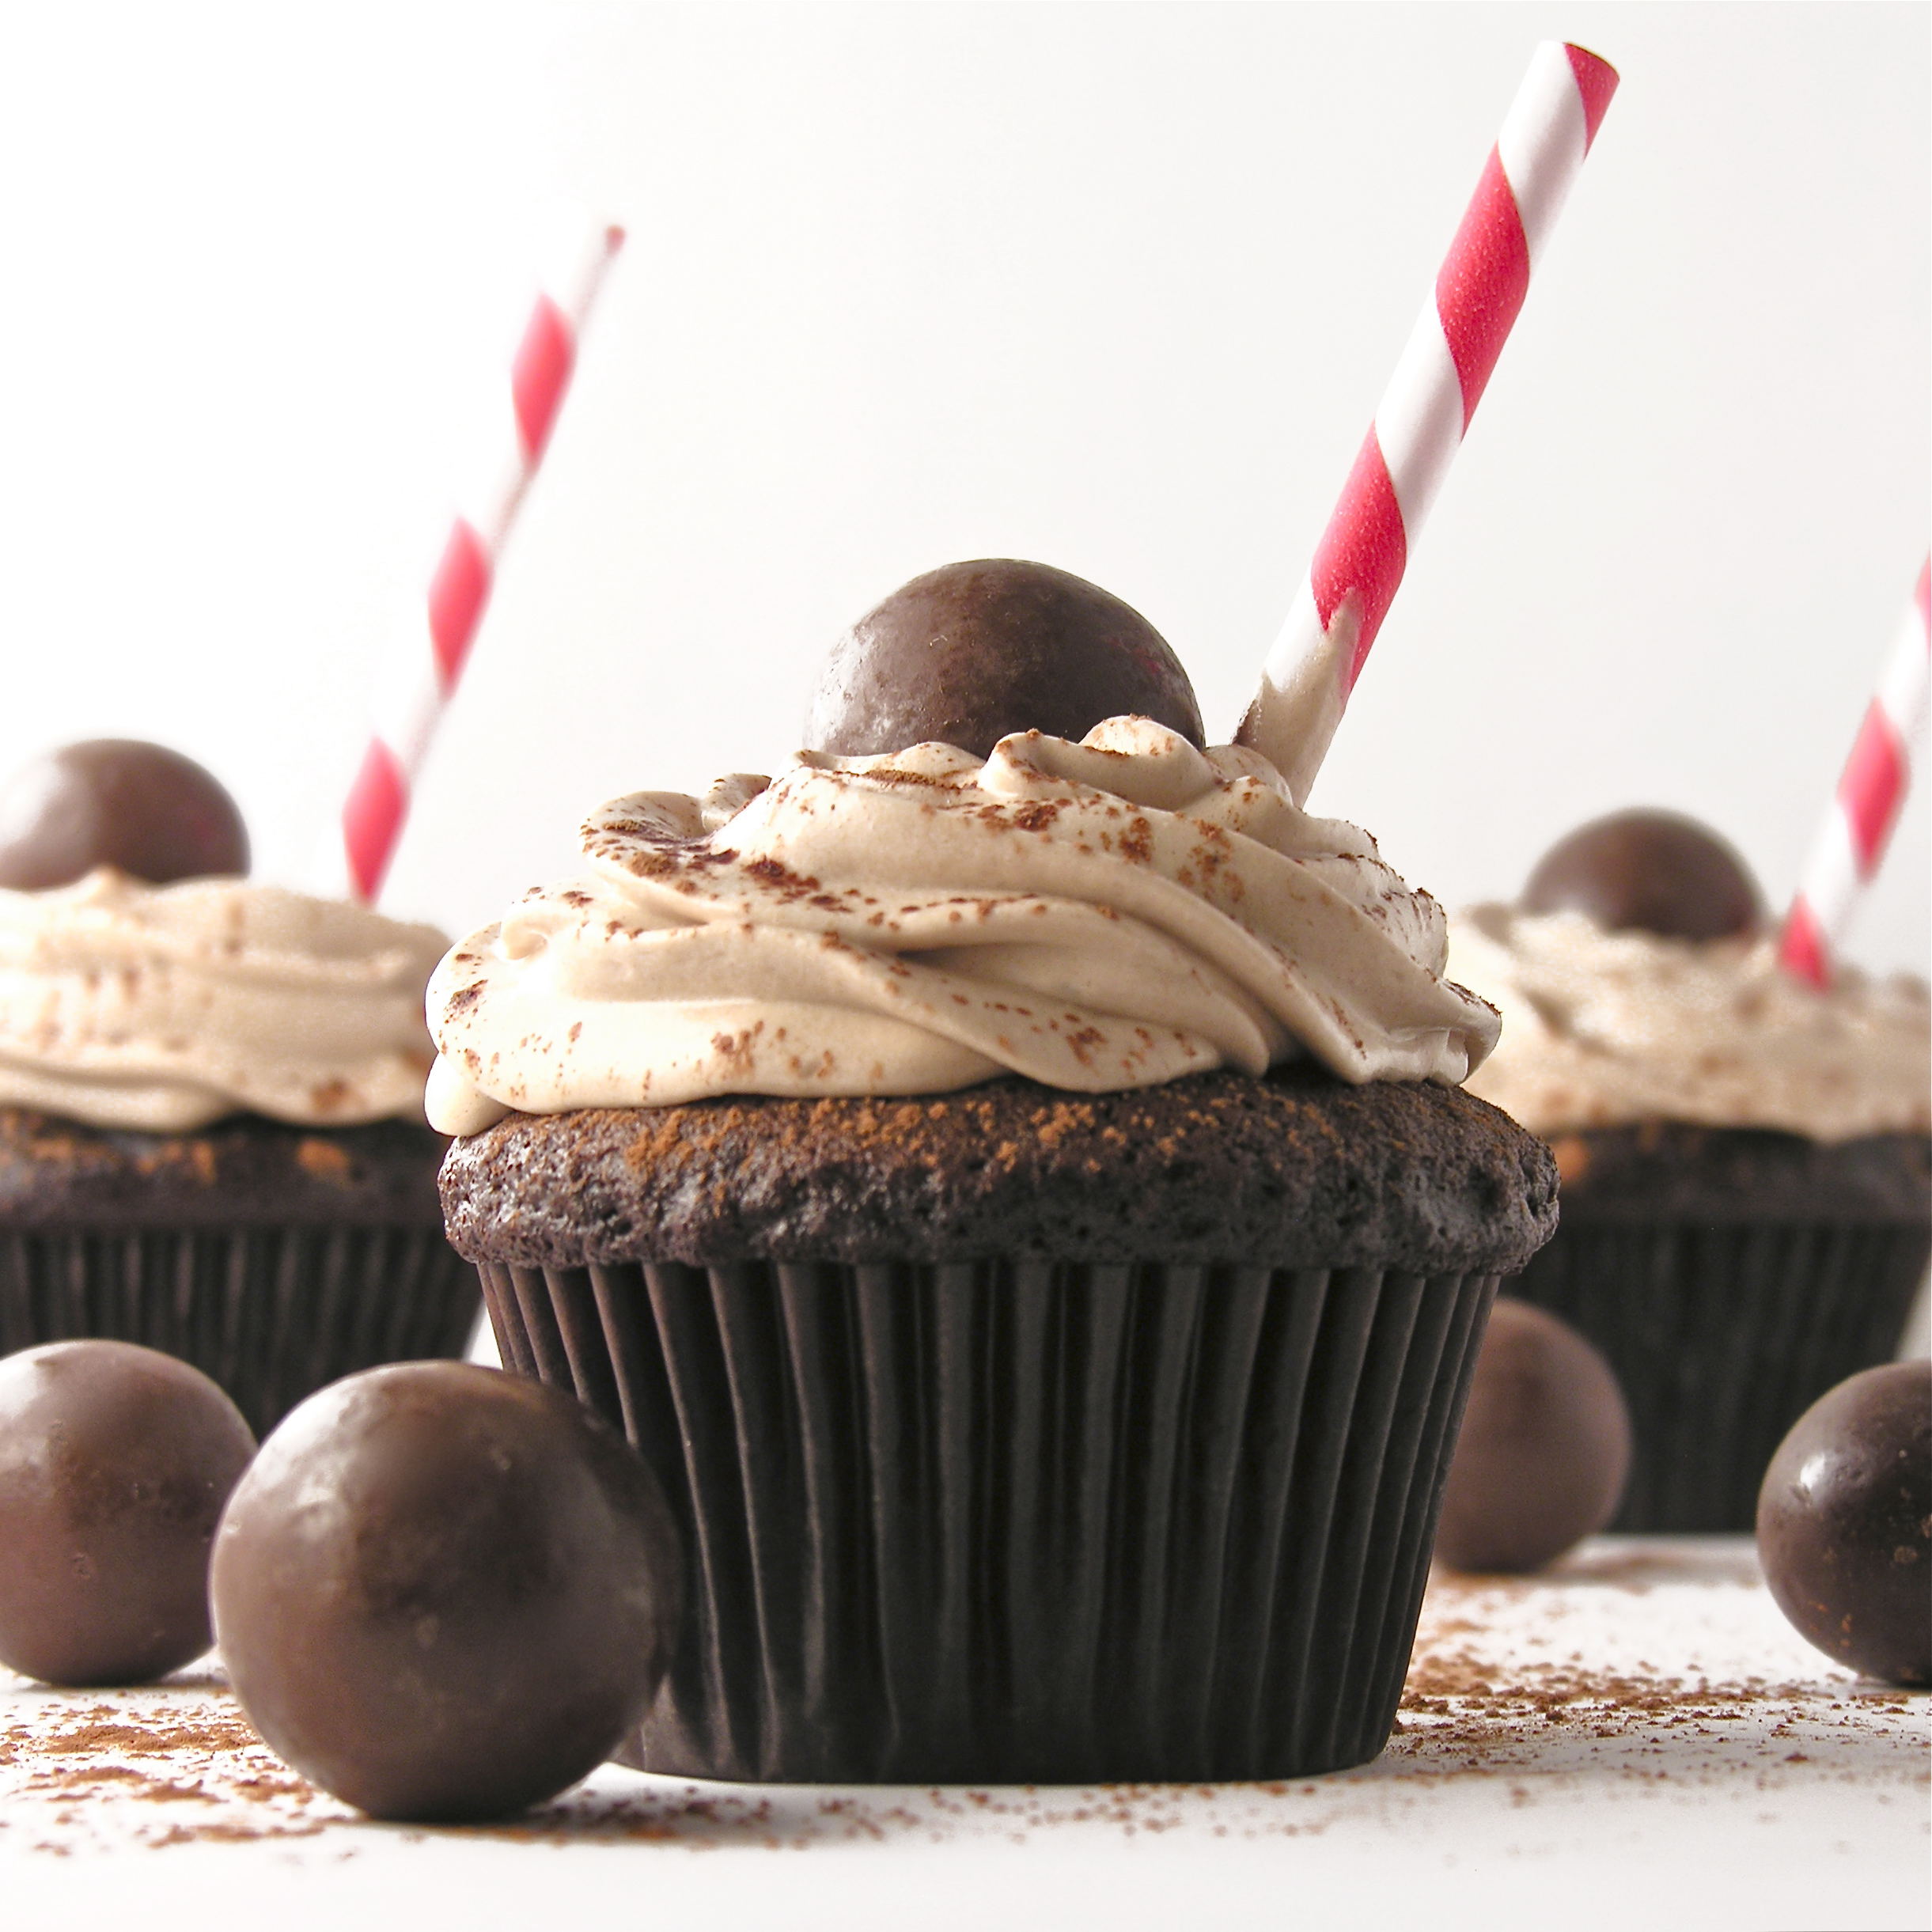
Dark chocolate cupcakes topped with the creamiest malt frosting ever.  Like a malted milkshake minus the cup!

I have an addiction to chocolate malts.  Not chocolate shakes, just malts.  The creamy, chocolatey kind that you drink through a striped straw at the pool.  My mom makes the best chocolate malts ever.  They are really simple to make, but there’s just something about her leaning out of the patio door and asking, “Anyone want a malt?” that makes me smile.  It’s one of our summer traditions.

Moms Malts!!
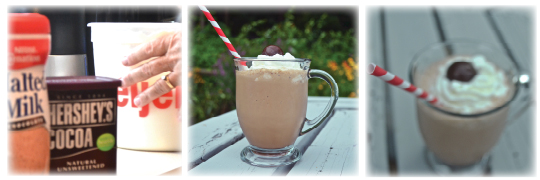
{Her easy recipe? Ice cream, malt powder, cocoa and milk~ a blender full of ice cream plus cocoa and malt to taste, and milk to desired consistency}

I wanted to make a frosting that tastes like a malt.  It took me a couple of tries, but I finally hit the mark.  It’s wonderfully creamy and smooth.  It is also a very soft whipped icing that must be kept refrigerated because it has milk in it, and because it will not keep a pretty piped finish if it gets warm.

Believe me, the flavor and texture are worth it!

Malted Milk Cupcakes

Here’s how to make these yummy cupcakes! (printable recipe)

INGREDIENTS:

  • One boxed dark chocolate cake mix (plus water, eggs and oil to make according to box)
  • 4 packets of Dream Whip
  • 1 1/2 cups of cold milk
  • 6 Tablespoons of unsweetened cocoa powder
  • 6 Tablespoons of malt powder
  • 1/2 -1 cup of powdered sugar (to desired consistency)

DIRECTIONS

  • Make cake mix according to box and bake in 24 cupcake liners placed in muffin tins.
  • Cool cupcakes completely.
  • Put Dream Whip, milk, cocoa powder, malt powder and powdered sugar into a mixing bowl and blend together.
  • Using a mixer, beat until stiff peaks form (3-4 minutes) 
  • Add extra powdered sugar if needed, to desired consistency.  This is a soft whipped frosting, so it won’t be the consistency of a stiff buttercream~ even with lots of powdered sugar.  (believe me, I tried!)
  • Spoon frosting into a zip-top bag fitted with a decorating tip and pipe frosting on cupcakes.
  • Refrigerate until serving and just before serving add a malted milk ball and sprinkle with cocoa powder if desired for garnish.

ENJOY!!!

Malted milk cupcakes!!!!

My thoughts:  these are *almost* as good as my moms malts.  This frosting is really yummy.  It would be a great filling for a layer cake too~ or even a filling for cupcakes.  You could fill chocolate cupcakes with this and then just spoon some chocolate ganache over the top.  Oh the possibilities!  Hope you get to try these and enjoy them as much as we did!  ~r

Malted Milk Cupcakes!!!More recipes you might like:

Chocolate Mousse CakeStrawberry layer cakeMini chocolate chip cookie cheesecakesCake balls filled with cream cheese frosting

K-cup Cupcakes

Posted on

K-cup cupcakes!!

These  mini vanilla cupcakes are topped with the yummiest fondant and decorated like Keurig K-cups!  So fun!!!

My friend and coworker Mary just got a new job.  When I was thinking about her going-away party I just kept wondering how I could make a dessert that looked like a K-cup coffee pod.  Mary is known in our lab as the K-cup supplier.  Anyone who finds themselves without a coffee pod can find one in Mary’s supply…she literally orders by the case online and at any given time she has maybe 10 different flavors.  Now that she’s gone we really miss her (and her coffee!)
This is less of a recipe and more of an “idea” post.  It was a good chance for me to practice with the fondant recipe my friend Megan gave me a couple of months ago and a fun little art project to challenge my (terrible!) painting skills!
K-cup cupcakes!!!!

(It was also really a fun project to take pictures of!!!)
Want to know how to do this crazy edible art project?
Here it is:

  • Make thick buttercream icing and fondant first.  It’s easiest if I just send you to my original fondant recipe for the tutorial and directions.  Just click here to open that page.
  • For the cupcakes just use your favorite cupcake recipe (which for me was a white cake mix!)
  • I used little cocktail nut cups as my cupcake liners, because they look like the sides of the K-cup pods, but you could certainly use mini white cupcake liners.
  • Place the liners in mini muffin tins and fill about halfway up with cake batter (under-fill them a little, so that the tops bake relatively flat and not mounded up like a typical cupcake)
  • Bake according to your recipe.  My mini cupcakes baked for 12 minutes at 350F degrees.
  • Color fondant as desired and roll it flat.  Cut it into circles that are the size of the cupcake tops.  I used a small round cookie cutter.
  • Use thick buttercream to frost a smooth layer on the top of a cooled cupcake and then immediately press a fondant circle on top of the buttercream.
  • Cut colored fondant into any shapes you might need on top and use a small amount of water  to attach these  shapes to the top of the fondant circle.

K-cup cupcakeK-cup cupcakes!

  • Once those extra pieces are attached, use a small brush to wipe away excess powdered sugar and then use gel food coloring and a fine tipped brush to paint on the fondant.  I used an actual pod as a model to paint from.

Paint cupcake with food color gels.

(note: you might need to add a little white food coloring to the dark colors to make them show up- otherwise your dark blues and greens will look like black when used as paint.)

Be creative and use your imagination!  I just pulled all of my pod flavors out and tried to pick ones that were fun – but also ones I thought I could handle copying!  I wanted to do a Starbucks pod- but that logo…!  Yikes.  No way I could paint anything that looked like that!!

K-cup cupcakes!!!!K-cup cupcakes!!

My thoughts:  These aren’t what I would qualify as easy, but they are really a fun afternoon project.  Very relaxing.  I’m POSITIVE you all can paint better than I, and if you like to just create and paint and color you will love this project!  Take your time and enjoy the process. (and don’t actually try to brew one- lol!  I had someone ask me about that and I had to explain that the above picture is simply a creative presentation of a cupcake!!)

I’m dedicating this post to you Mary!!  I miss working with you and I hope your new coworkers realize how lucky they are to have you!!!

This is also a shout out to Keurig and the genius of those delicious little coffee pods– you make every morning so much happier for me!!!  Lots of love from Easybaked to all of you!  ~r

K- cup cupcakes!!!

Other mini desserts you might enjoy:

Cookie Dough CupcakesChocolate Raspberry Mini CupcakesRich Chocolate Ganache Mini CupcakesMint Creme Brownie Cups

S’mores Cookie Cups

Posted on

S'more Cookie Cups!!

These mini graham cracker cookie cups are overflowing with soft marshmallow and chocolate~ a perfect replica of the summertime favorite~ in cookie form!!

These little cookie cups were eaten up faster than any dessert I can remember.  You simply can’t stop at one!  I guess that’s because they are made with all the ingredients used in S’mores!  The marshmallow stays soft, and the  soft chocolate layer on the inside….?  Oh my.

S'more cookie cups!

Here’s how to make them: (printable recipe)

INGREDIENTS: (makes 48 mini cups)

  • One tube of refrigerated sugar cookie dough
  • 1 cup of finely crushed graham crackers
  • 1/4 cup of heavy cream
  • 1/2 cup semi-sweet chocolate chips
  • 1  (13oz) jar of Jet-Puffed Marshmallow fluff
  • 48 Hershey Kisses (unwrapped!)

DIRECTIONS:

  • Preheat oven to 350F degrees.
  • Place cookie dough and crushed grahams (save 2 to 3 tablespoons of crumbs to sprinkle over cups at end) in a mixing bowl and using hands, combine crushed grahams with cookie dough until completely incorporated.
  • Evenly divide dough into mini muffin tins (I used a medium cookie scoop to do this and got about 48 cookies)
  • Bake at 350F degrees for 7 to 9 minutes, until turning a light brown at edges.
  • Remove from oven and immediately press centers in using a mini tart shaper (or a wooden spoon~ although I highly recommend the tart shaper as it is a small and inexpensive tool that I love and use all the time!)
  • Allow cups to cool for 2-3 minutes and then gently run a small knife around the edges and pop the cup out of the tin.  Allow cup to completely cool on counter.
  • Place all cups on a cookie sheet (preferably one with raised edges)
  • In a small sauce pan, heat up heavy cream until just bubbling at the edges (20 seconds or so).
  • Add chocolate chips, cover and allow them to sit for 5 minutes.
  • Stir melted chips with cream until smooth (turn heat back on if needed)
  • Place chocolate sauce in a zip-top bag, clip a corner and pipe chocolate evenly into each cup.

Graham cookie cupsPiping chocolate into cookie cup

  • Fill a mug or small bowl with HOT water, and place a medium cookie scoop into it.  Shake off excess water and scoop one scoop of marshmallow fluff into each cookie cup.  Place scoop back in hot water as soon as the fluff starts to stick to the scoop.

Scoop Marshmallow into cookie cupSmores cookie cups--yum!!

  • Turn broiler on high and place entire cookiesheet full of cookies in the oven under the broiler.  WATCH the cookies– in about 30 seconds the marshmallows will start to brown.  Take the cookie cups out and immediately place a Hershey kiss on the top of each hot marshmallow top.  Sprinkle with graham crumbs (and drizzle with a little white chocolate if you like).
  • Let these sit for about an hour.  The bottom of the kiss will melt and attach to the marshmallow.
  • You can serve these warm, or at room temp.
  • Once they are cooled, you can store them in an airtight container for about a week.

S'mores cookie cups!

My thoughts~ These cookie cups were a big hit.  They really capture the flavor of a s’more and they aren’t very difficult to make.  The marshmallow fluff was a little fussy, just because it is so sticky.  I highly recommend it though- it was perfect biting into the gooey soft cream rather than an actual marshmallow.  It captured that melted marshmallow feel.  I *highly* recommend you use a cookie scoop for these.  You can get a scoop almost anywhere these days, but if you can’t find one, try ordering one at Amazon.  I hope you really enjoy making (and eating!) these yummy little treats!!! ~r

Melted Smores cup

Other cookie cup recipes you might enjoy:

Gooey filling in Seven layer cups!Fruit Loop Confetti Cups!!Caramel Coconut Creme CupsSalted Caramel Cookie Cup!!!

Grasshopper Mint Cupcakes

Posted on

I just love anything that combines mint and chocolate.  I was thinking about those yummy chocolate covered “grasshopper” mint cookies the other day and decided right then and there that I’d try a cupcake recipe in those flavors.

One of my favorite trends in the world these days is the invention of the cupcake store.  We have several here in my hometown- one of which was actually invited to compete on the TV show “Cupcake Wars”.  I love to see the different ideas these little bakeries have for cupcake treats.

About a month ago my friend Megan came to visit.  She’s 1/2 of the team at Happily Ever After Cakes out in Pennsylvania and we met 2 years ago in Russia. Since we share a love for all things sweet AND she was flying into Chicago, we decided to try Sprinkles Cupcakes.  It was amazing- really the best cupcakes I’ve had from a bakery.  The cupcakes were simple– but the frostings….oh my.  I’m obsessed with making the salted caramel frosting they have.  It was the best frosting ever.  Here’s some pictures from our trip– so much yumminess in one little store.

The flavors we tried were: Red velvet, Salted caramel, Mocha and Coconut.  We loved them all- but especially the Salted caramel….!

On to our recipe this week— yummy mint grasshopper cupcakes!  (Makes 24)

INGREDIENTS:

  • One boxed chocolate cake mix (with water, oil and eggs to make according to box)
  • Approximately 36 Andes Mints
  • 1 stick of salted butter (room temp)
  • 1 stick of unsalted butter (room temp)
  • 1 1/2 c. powdered sugar
  • 2 t. mint extract
  • green food coloring

DIRECTIONS:

  • Preheat oven to 350 degrees.
  • Make cake mix as directed on box.  Evenly divide it into 24 cupcake papers in muffin tins.
  • Place one Andes mint candy into the center of each unbaked cupcake.

  • Bake at 350 degrees as directed on box.
  • Cool completely.
  • Combine butters, powdered sugar, mint and food coloring in a large mixing bowl and beat on high until very light and fluffy.
  • Place frosting into a zip top bag fitted with a large star decorating tip in one corner.
  • Pipe frosting on each cooled cupcake.
  • Top each cupcake with 1/2 of an Andes Mint Candy.

My thoughts:  These turned out so yummy– just a note that some of the Andes mints sank all the way to the bottom of the cupcake– they still tasted really good in the cupcake– but they weren’t all as fun as the one in my picture (below).  Another note– this frosting recipe makes just enough to frost 24 cupcakes– if you like lots of frosting, double the recipe.  Enjoy!!!!  -r