RSS Feed

Tag Archives: peppermint

Candy Cane Brownies

Candy Cane Brownie

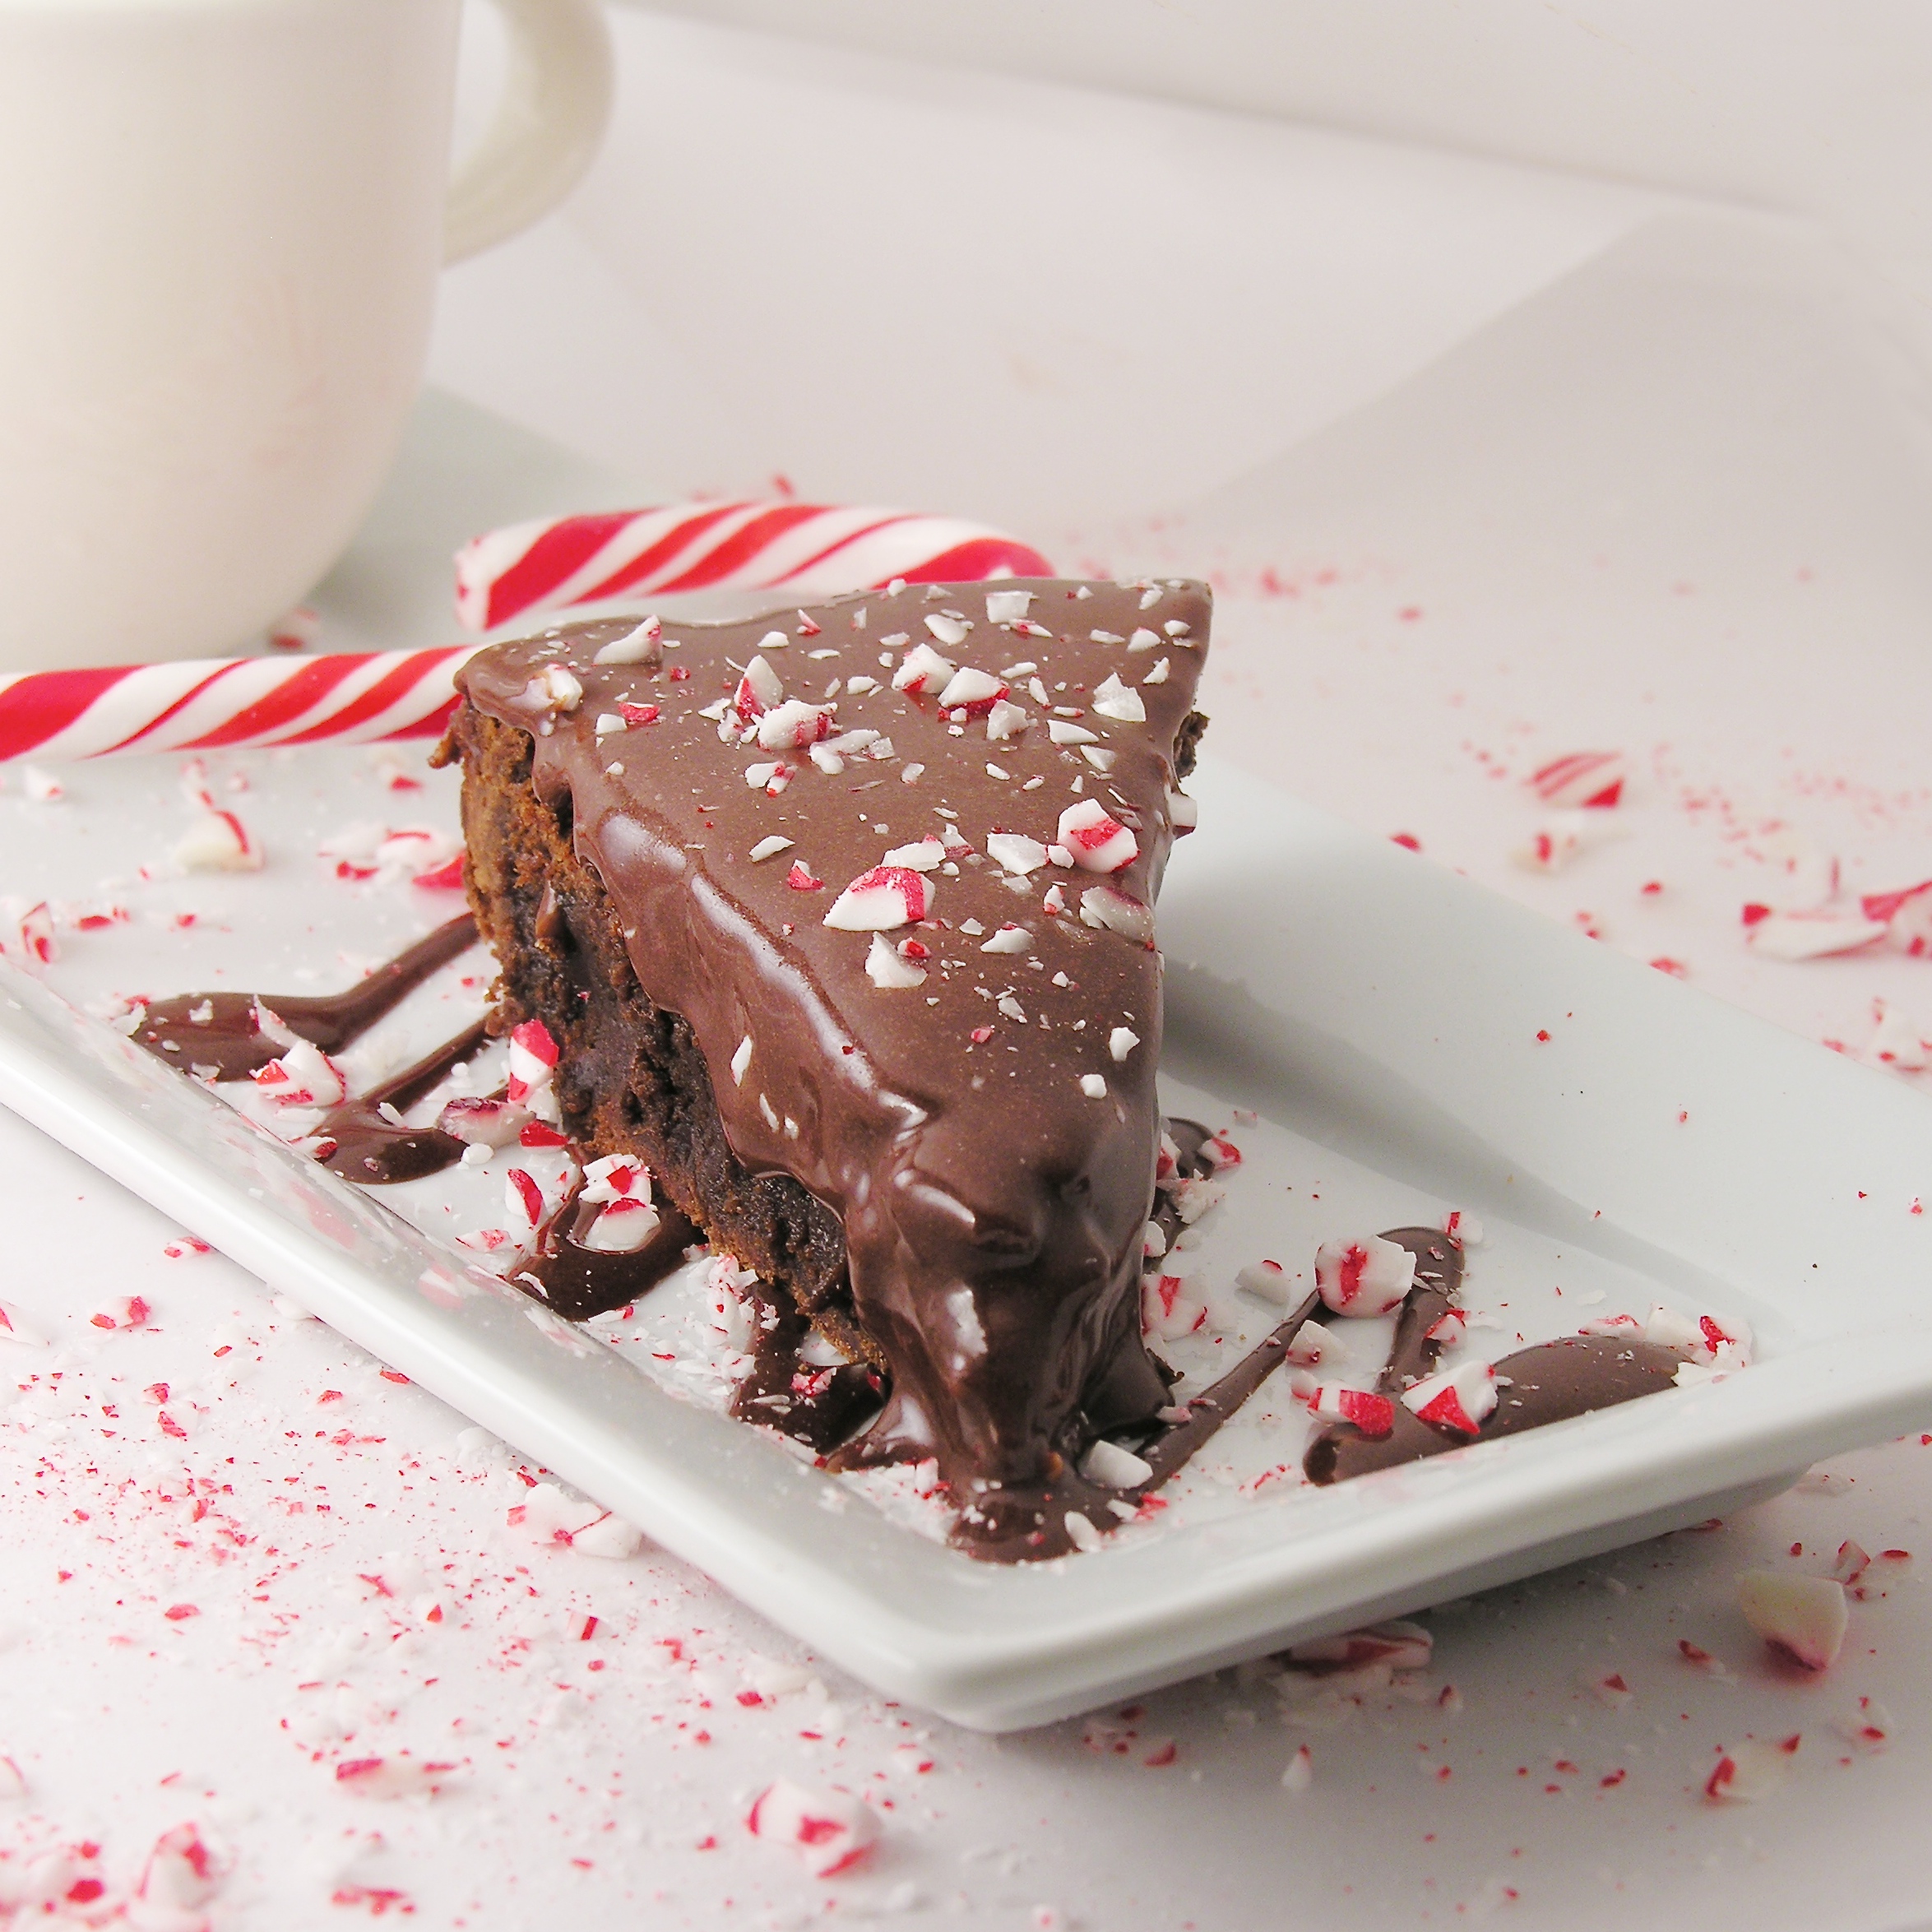
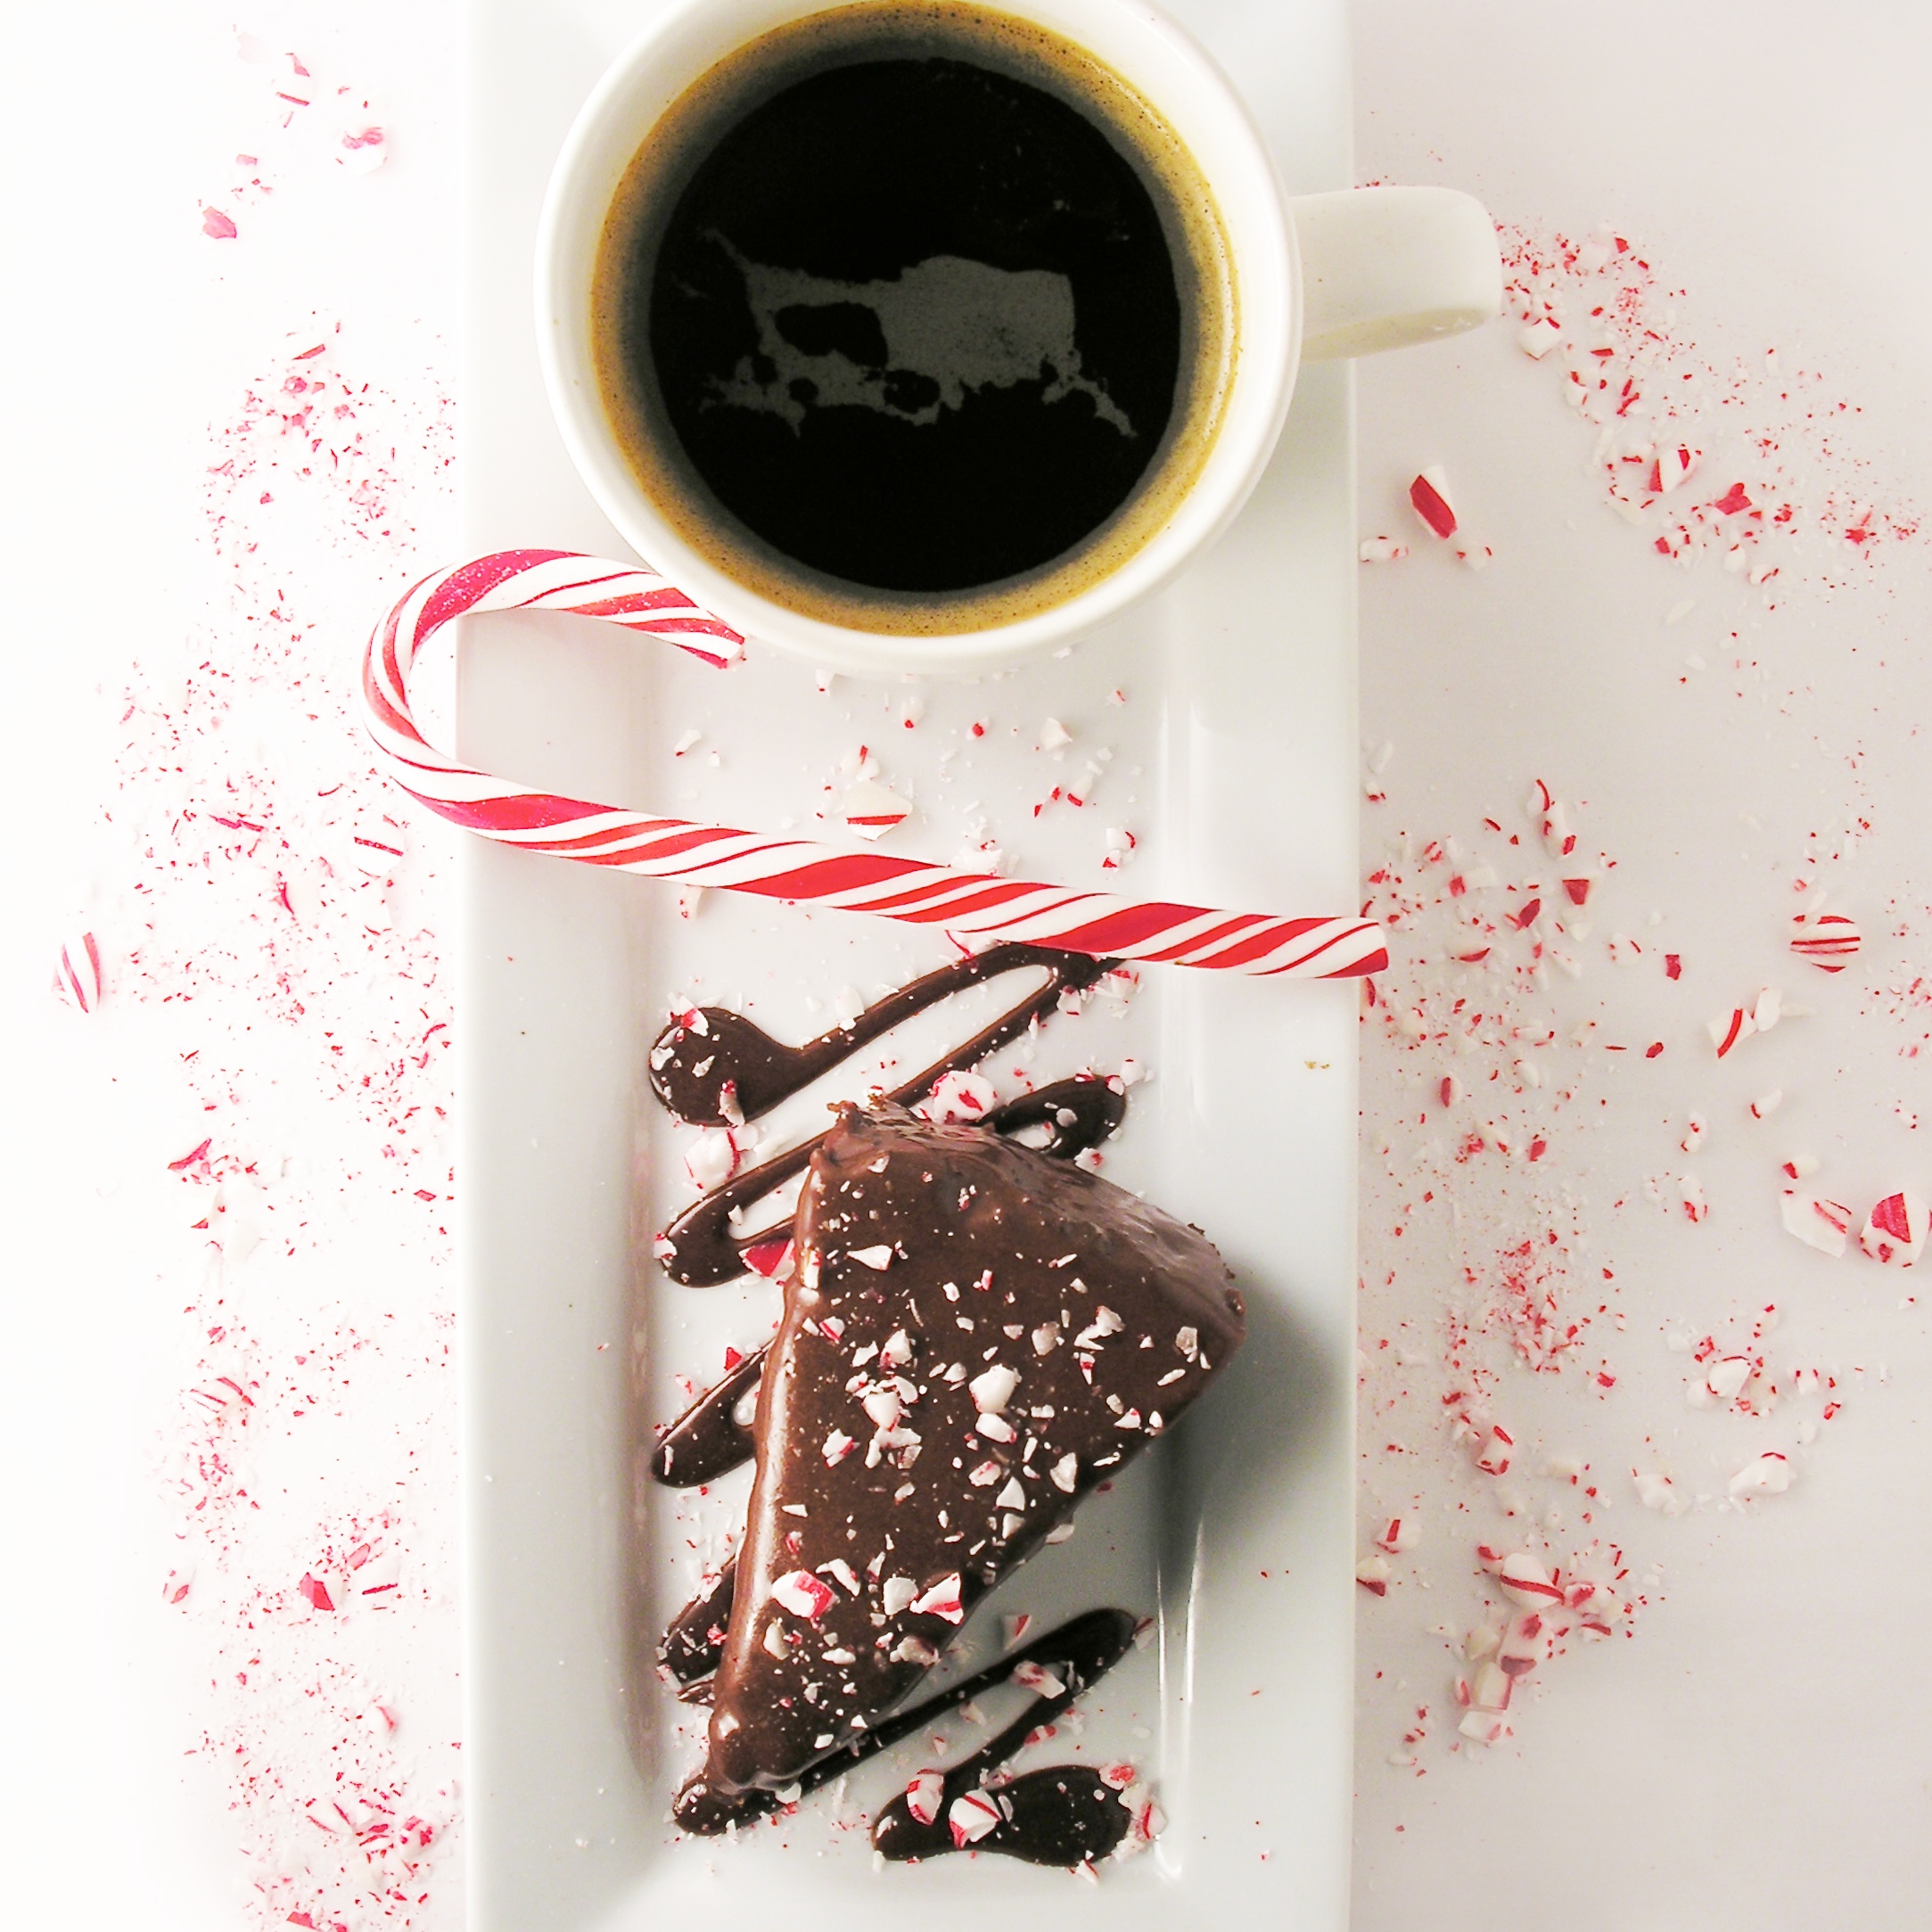
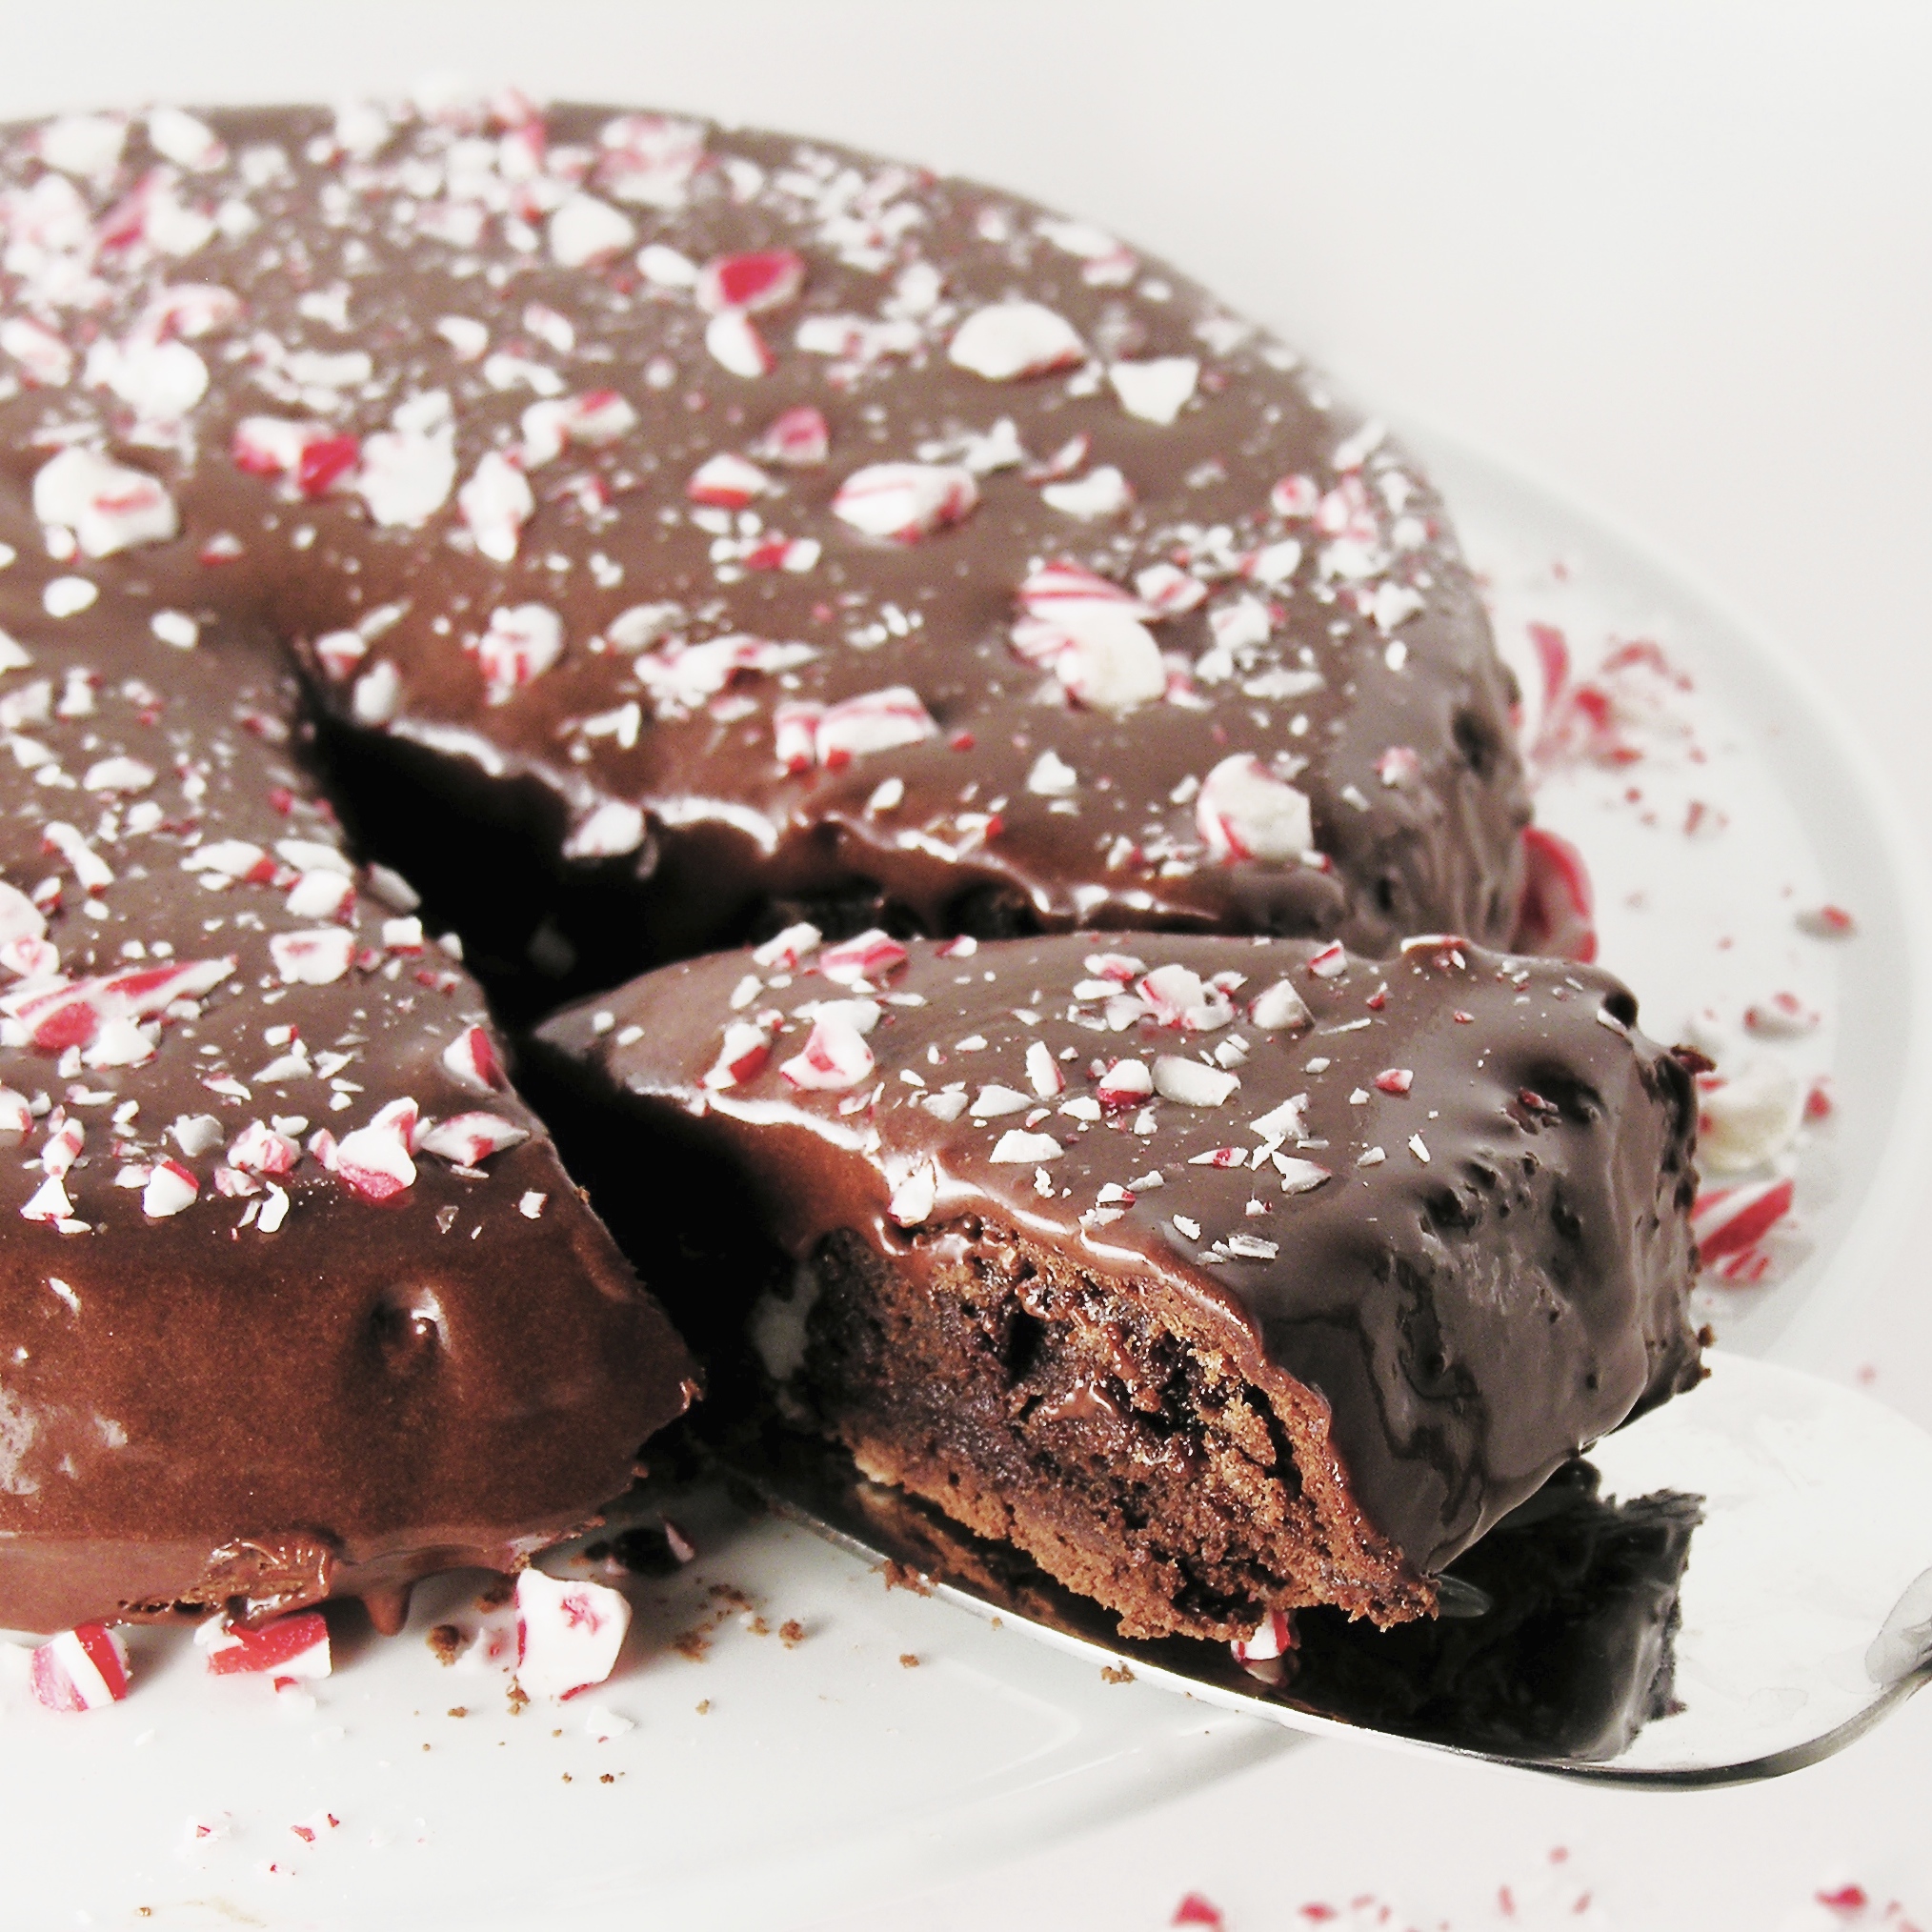
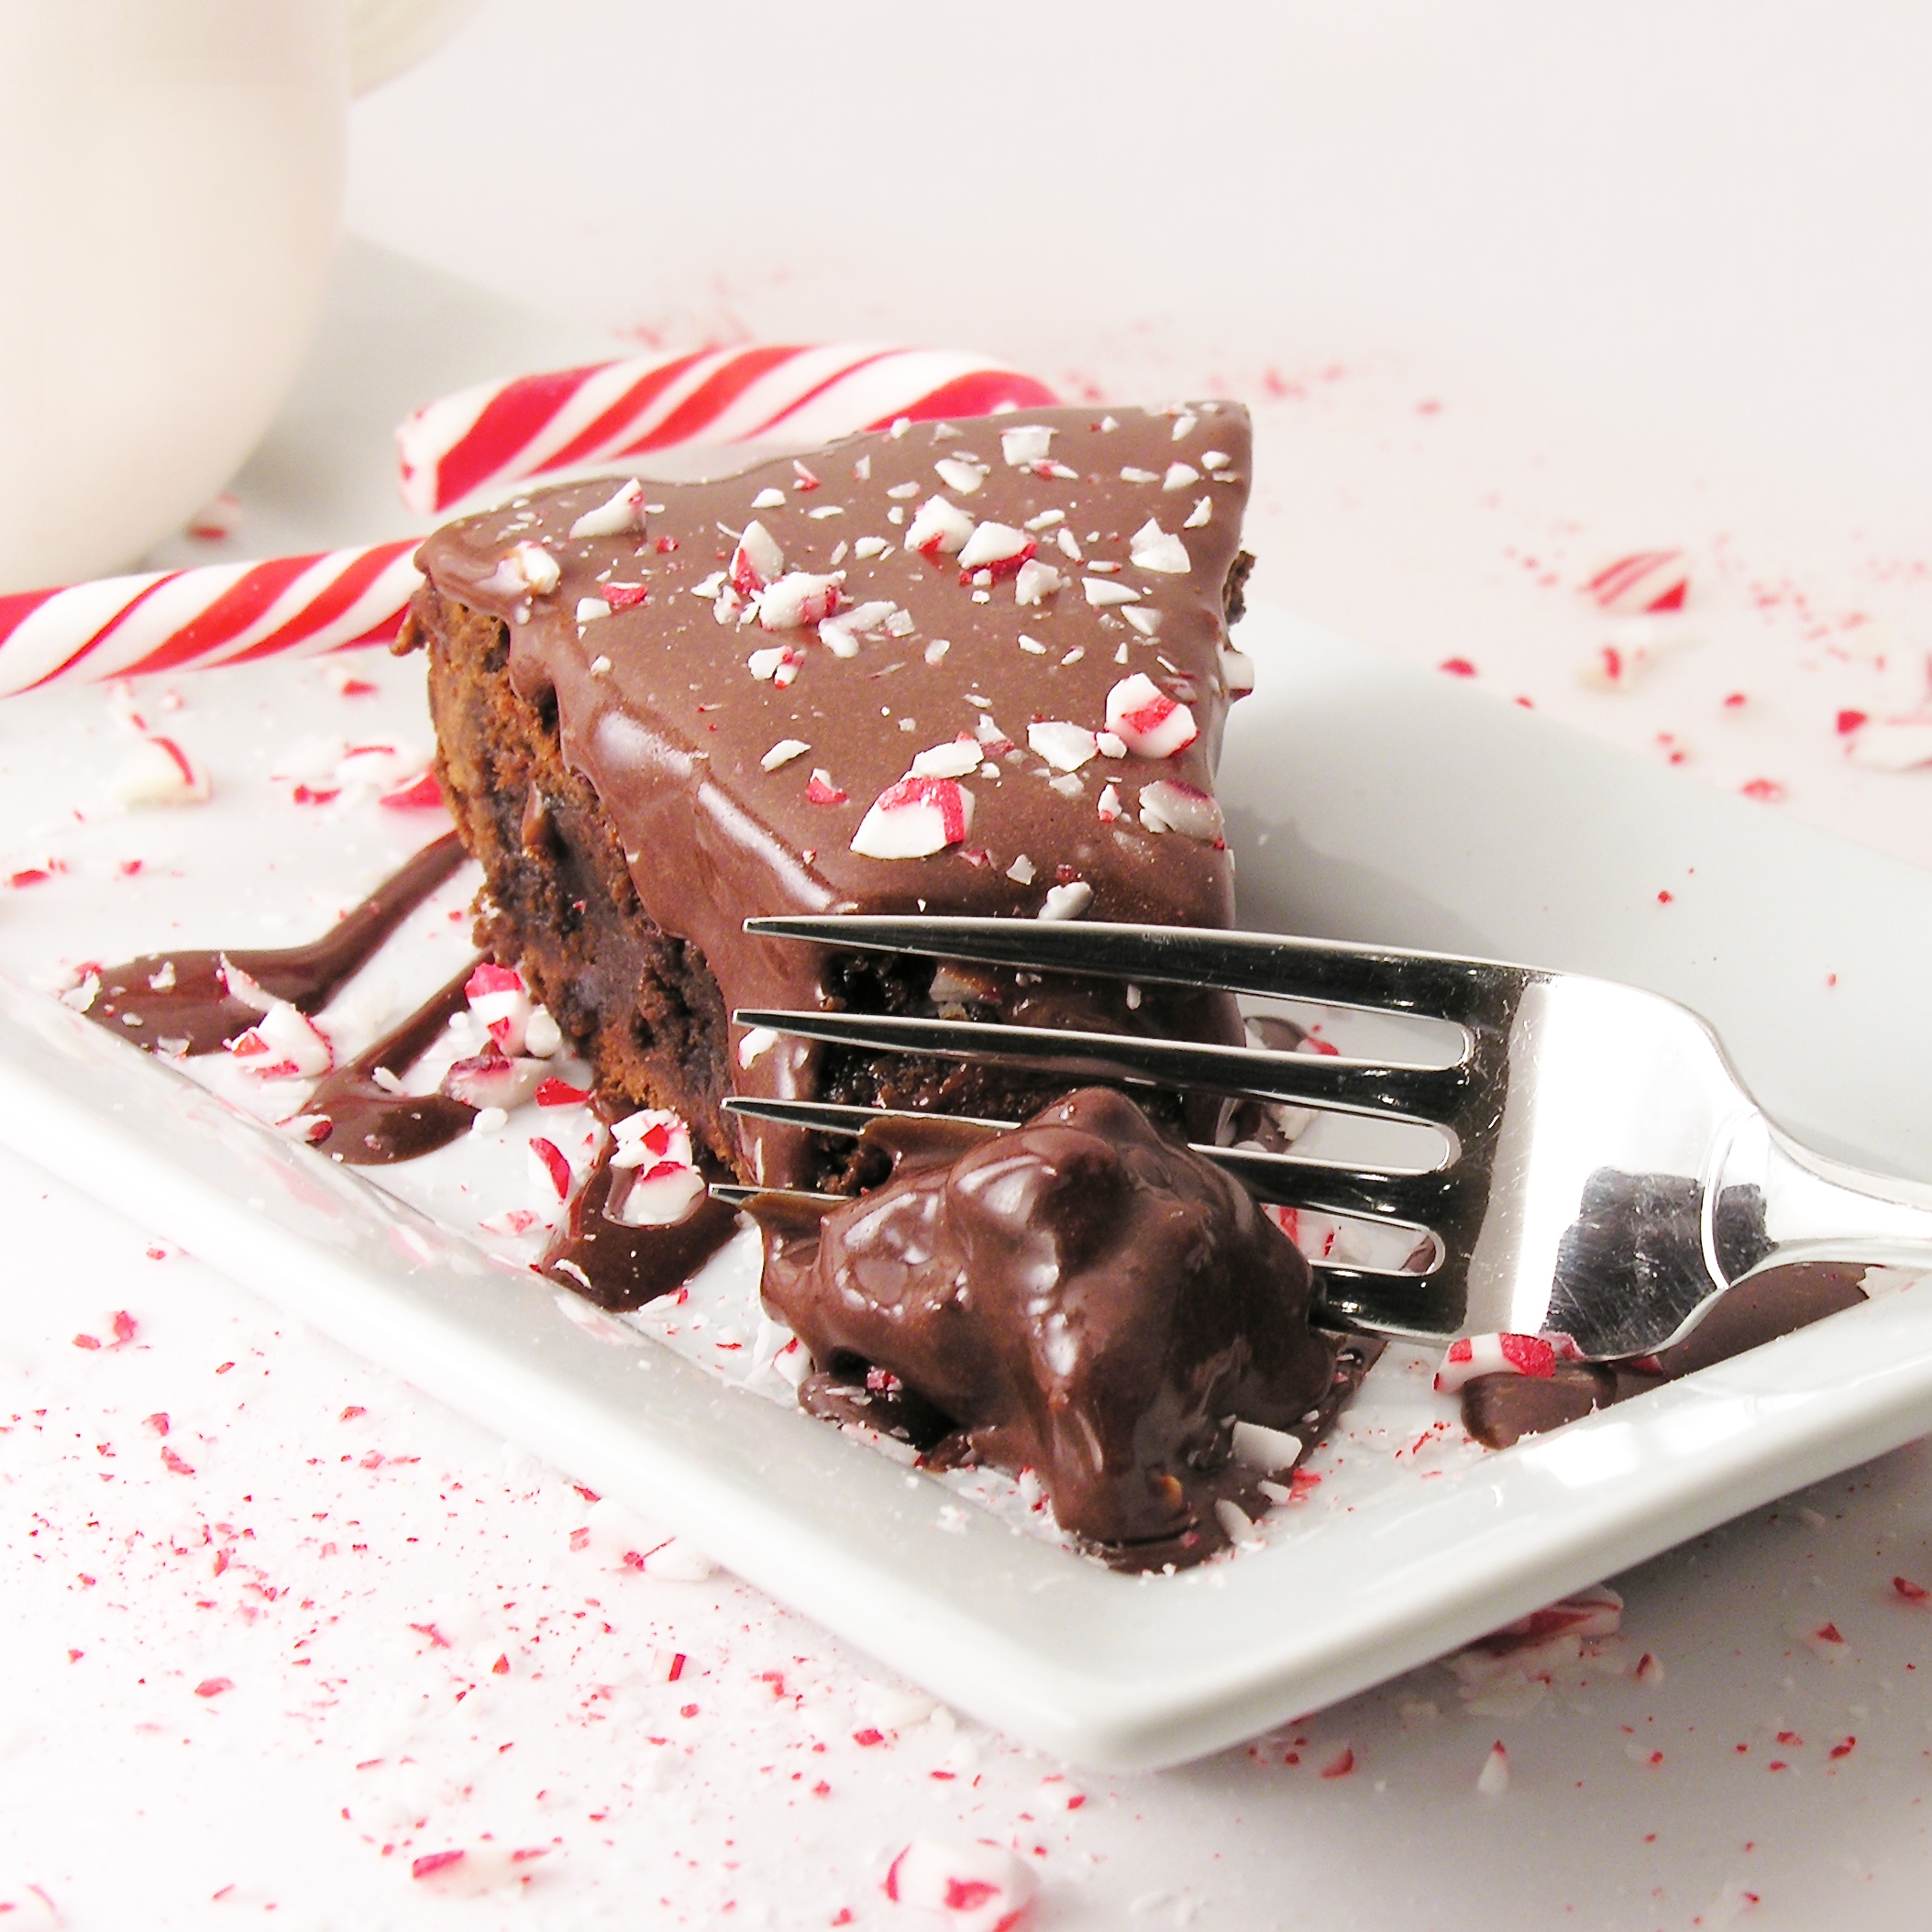
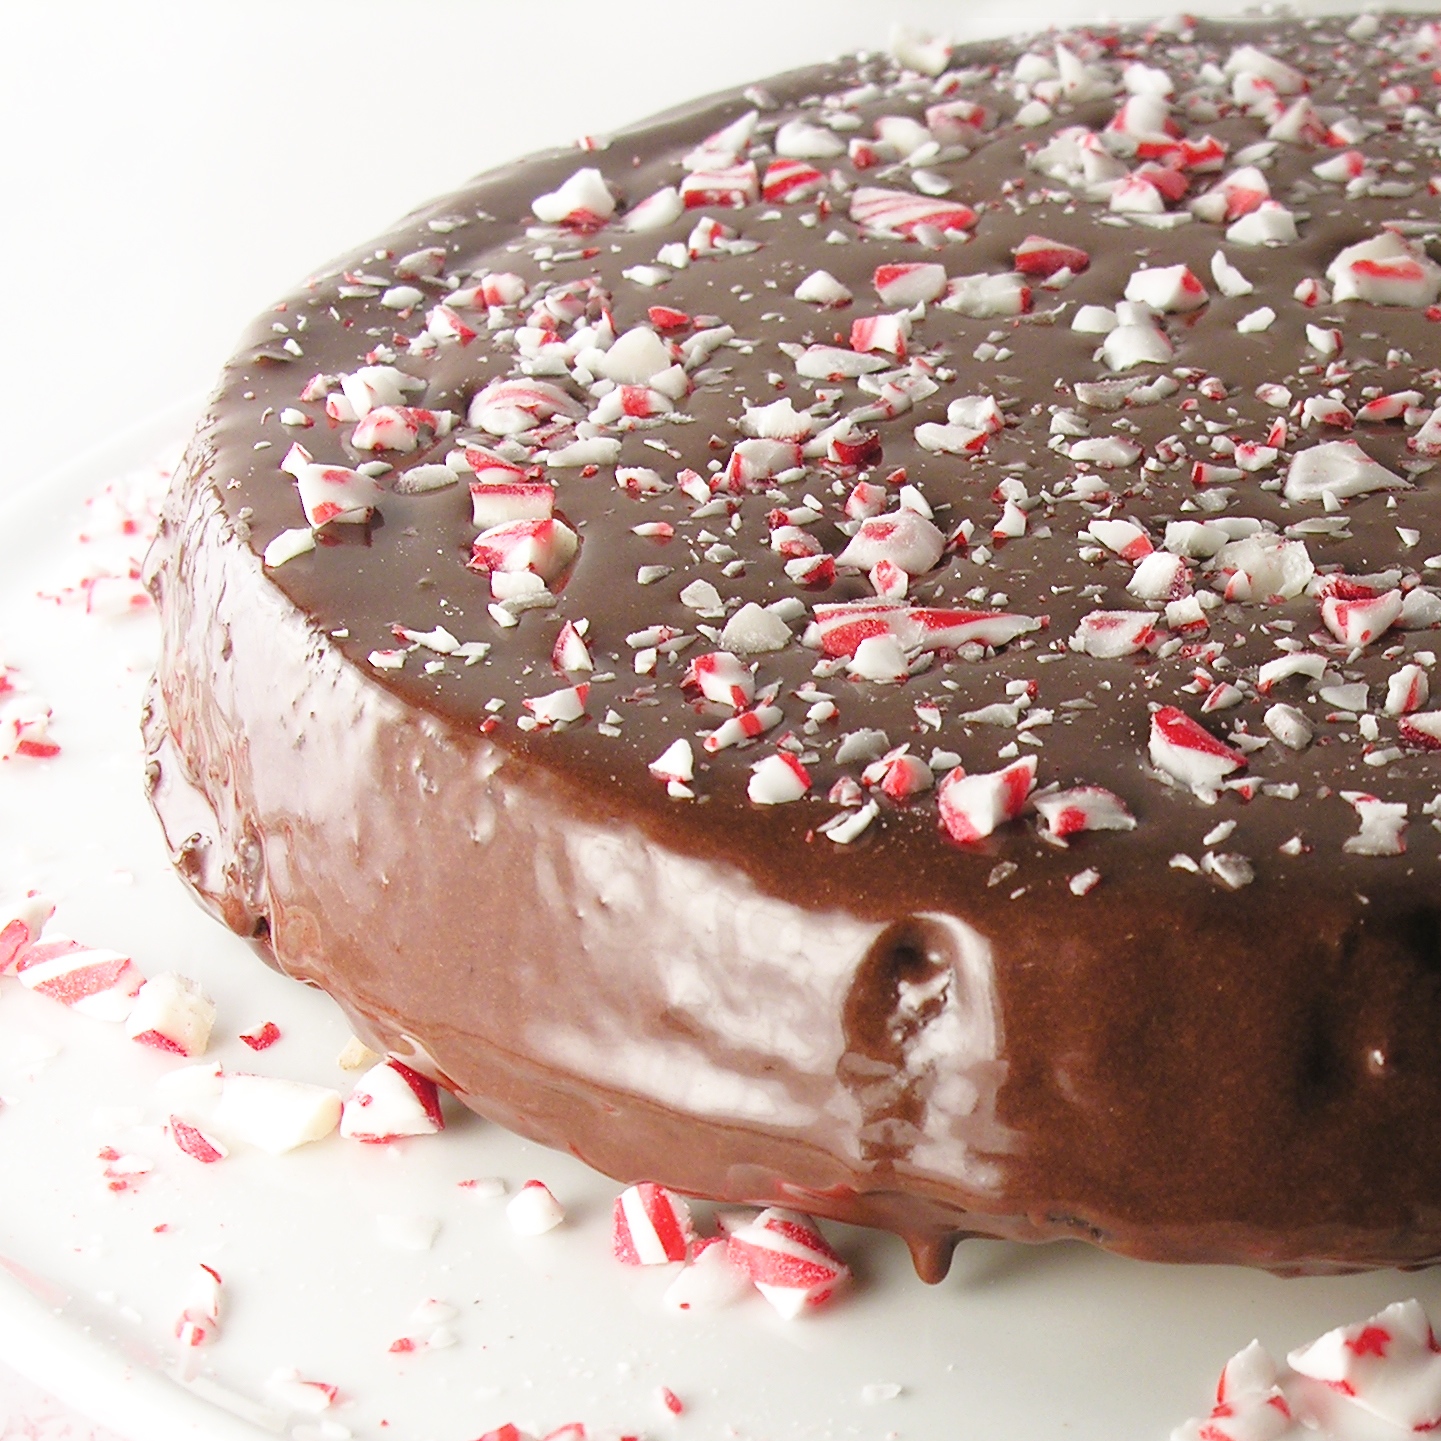
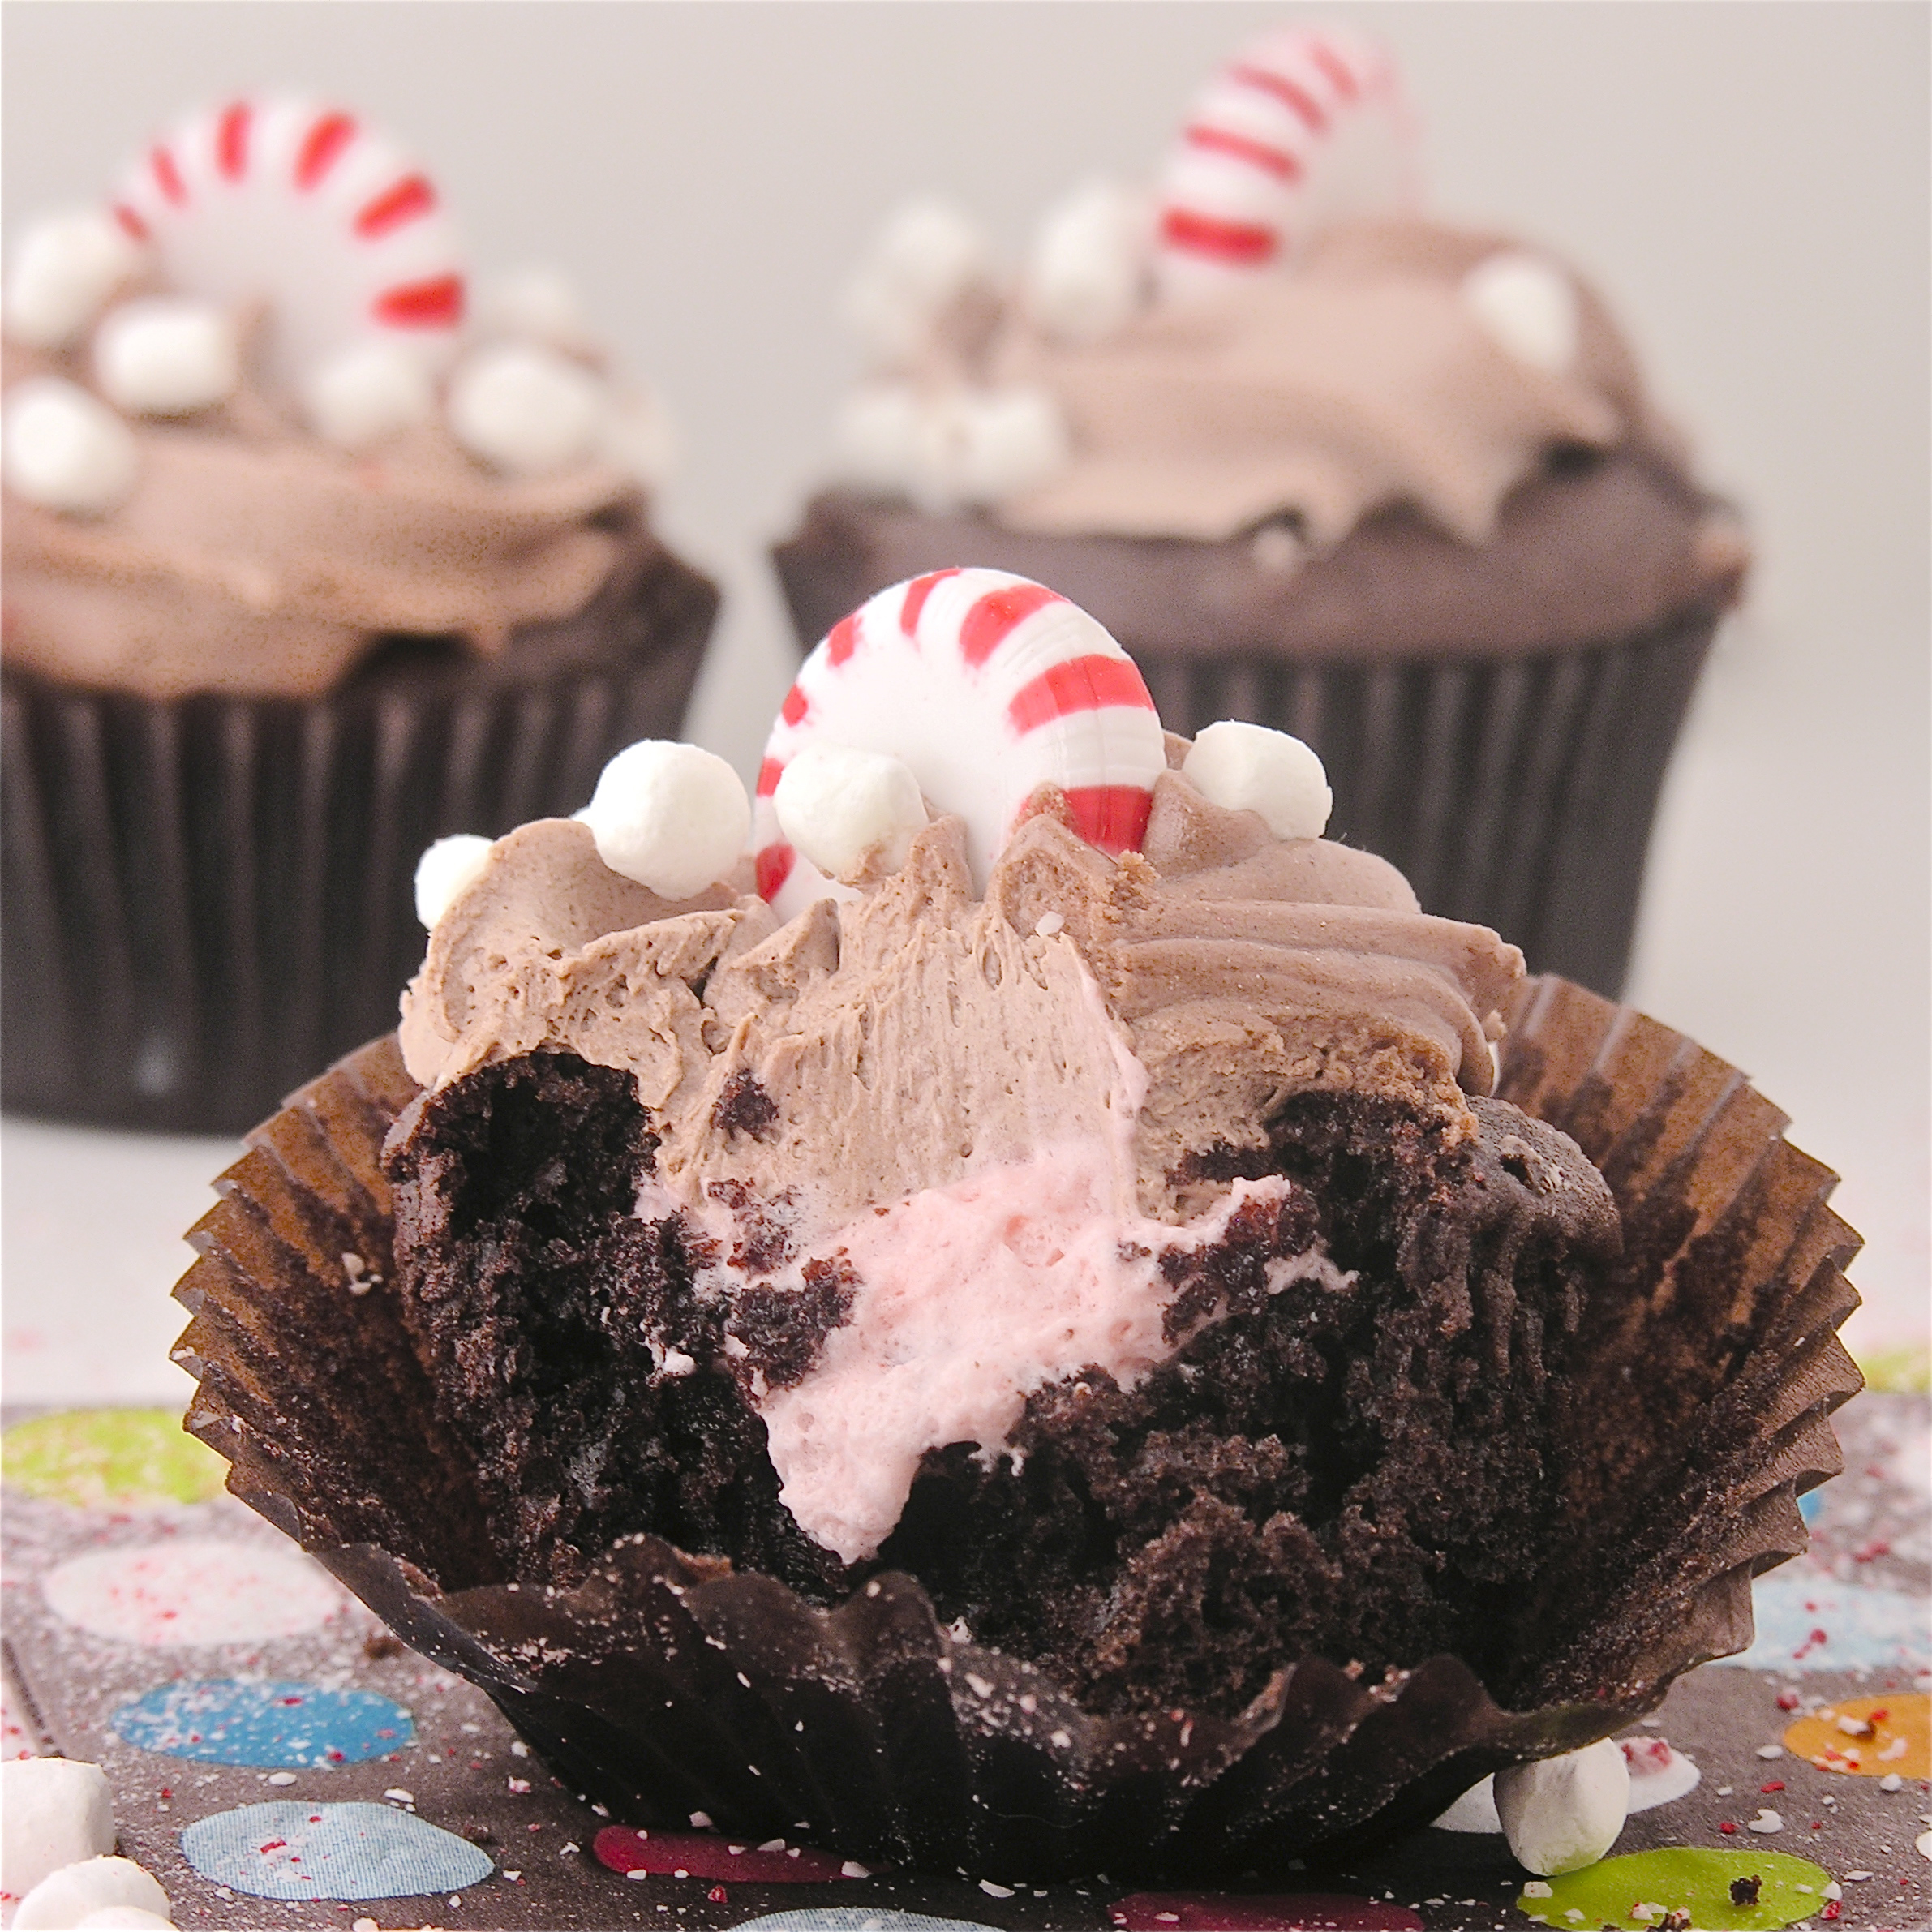
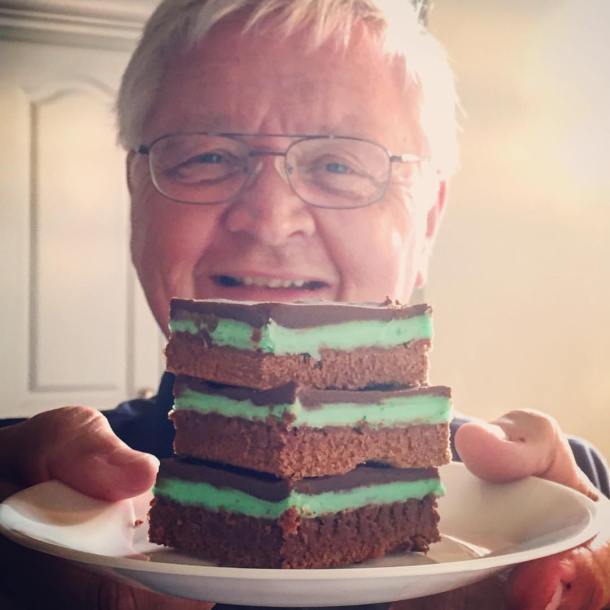
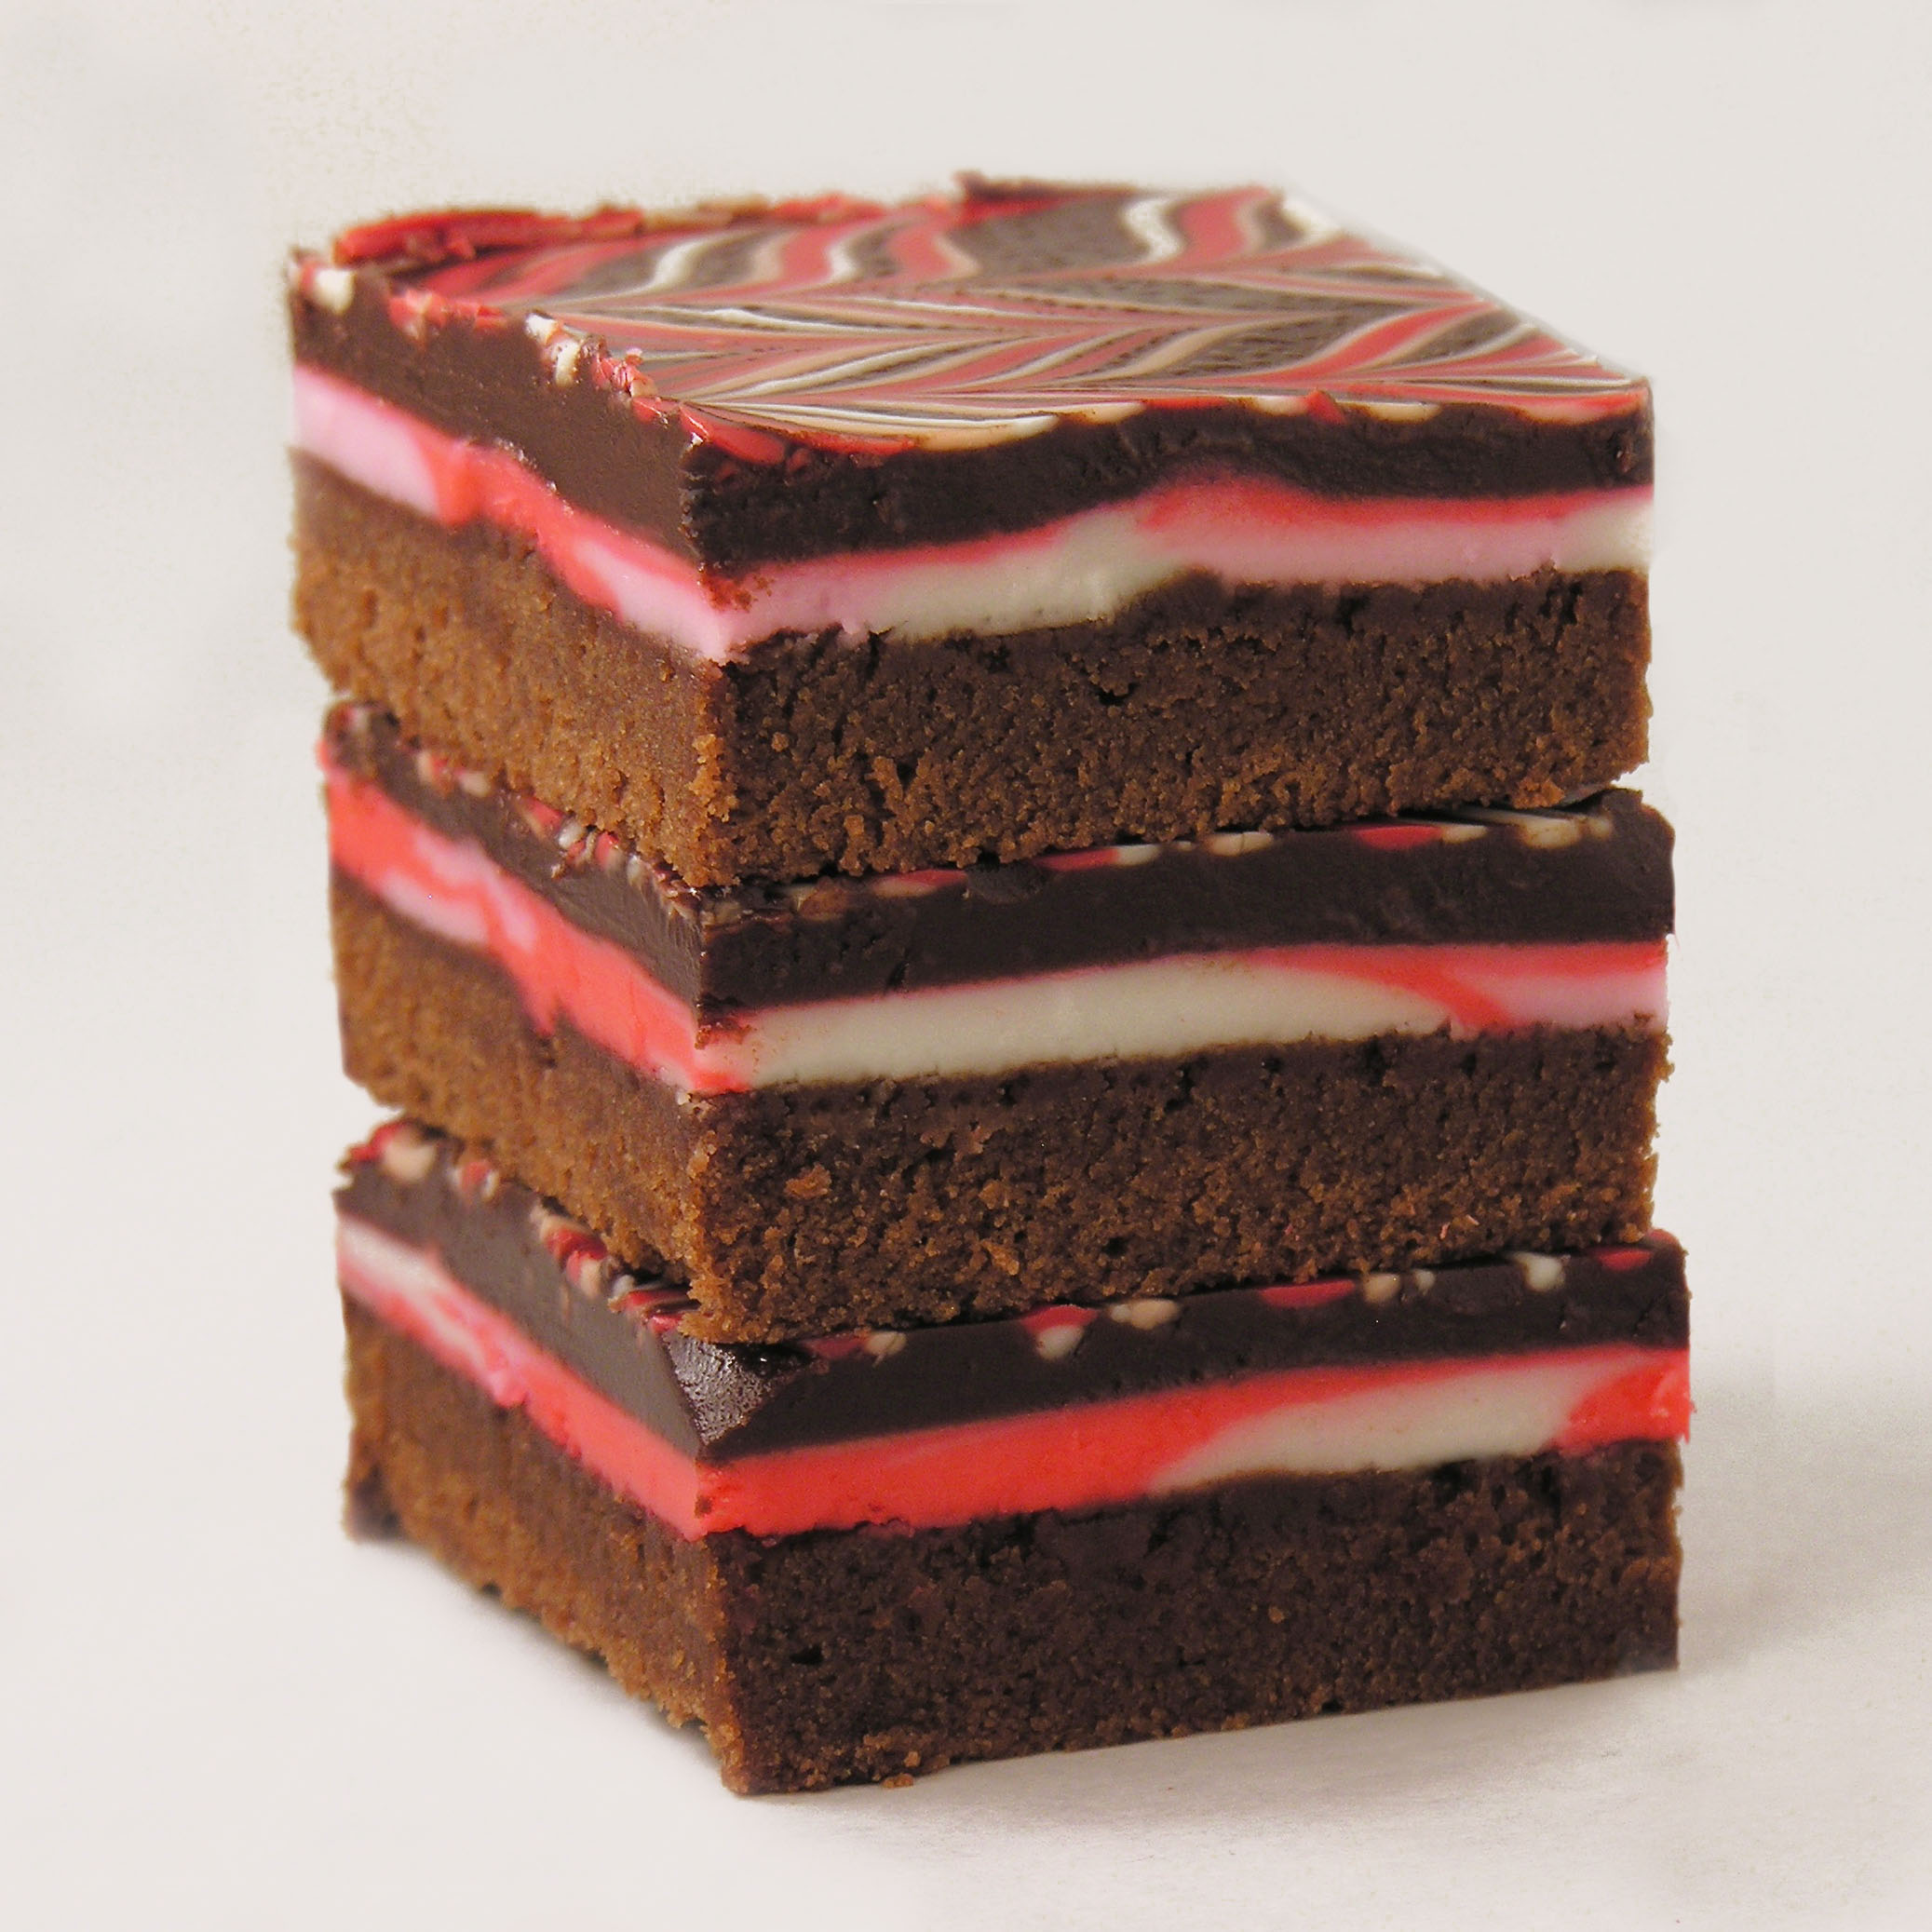
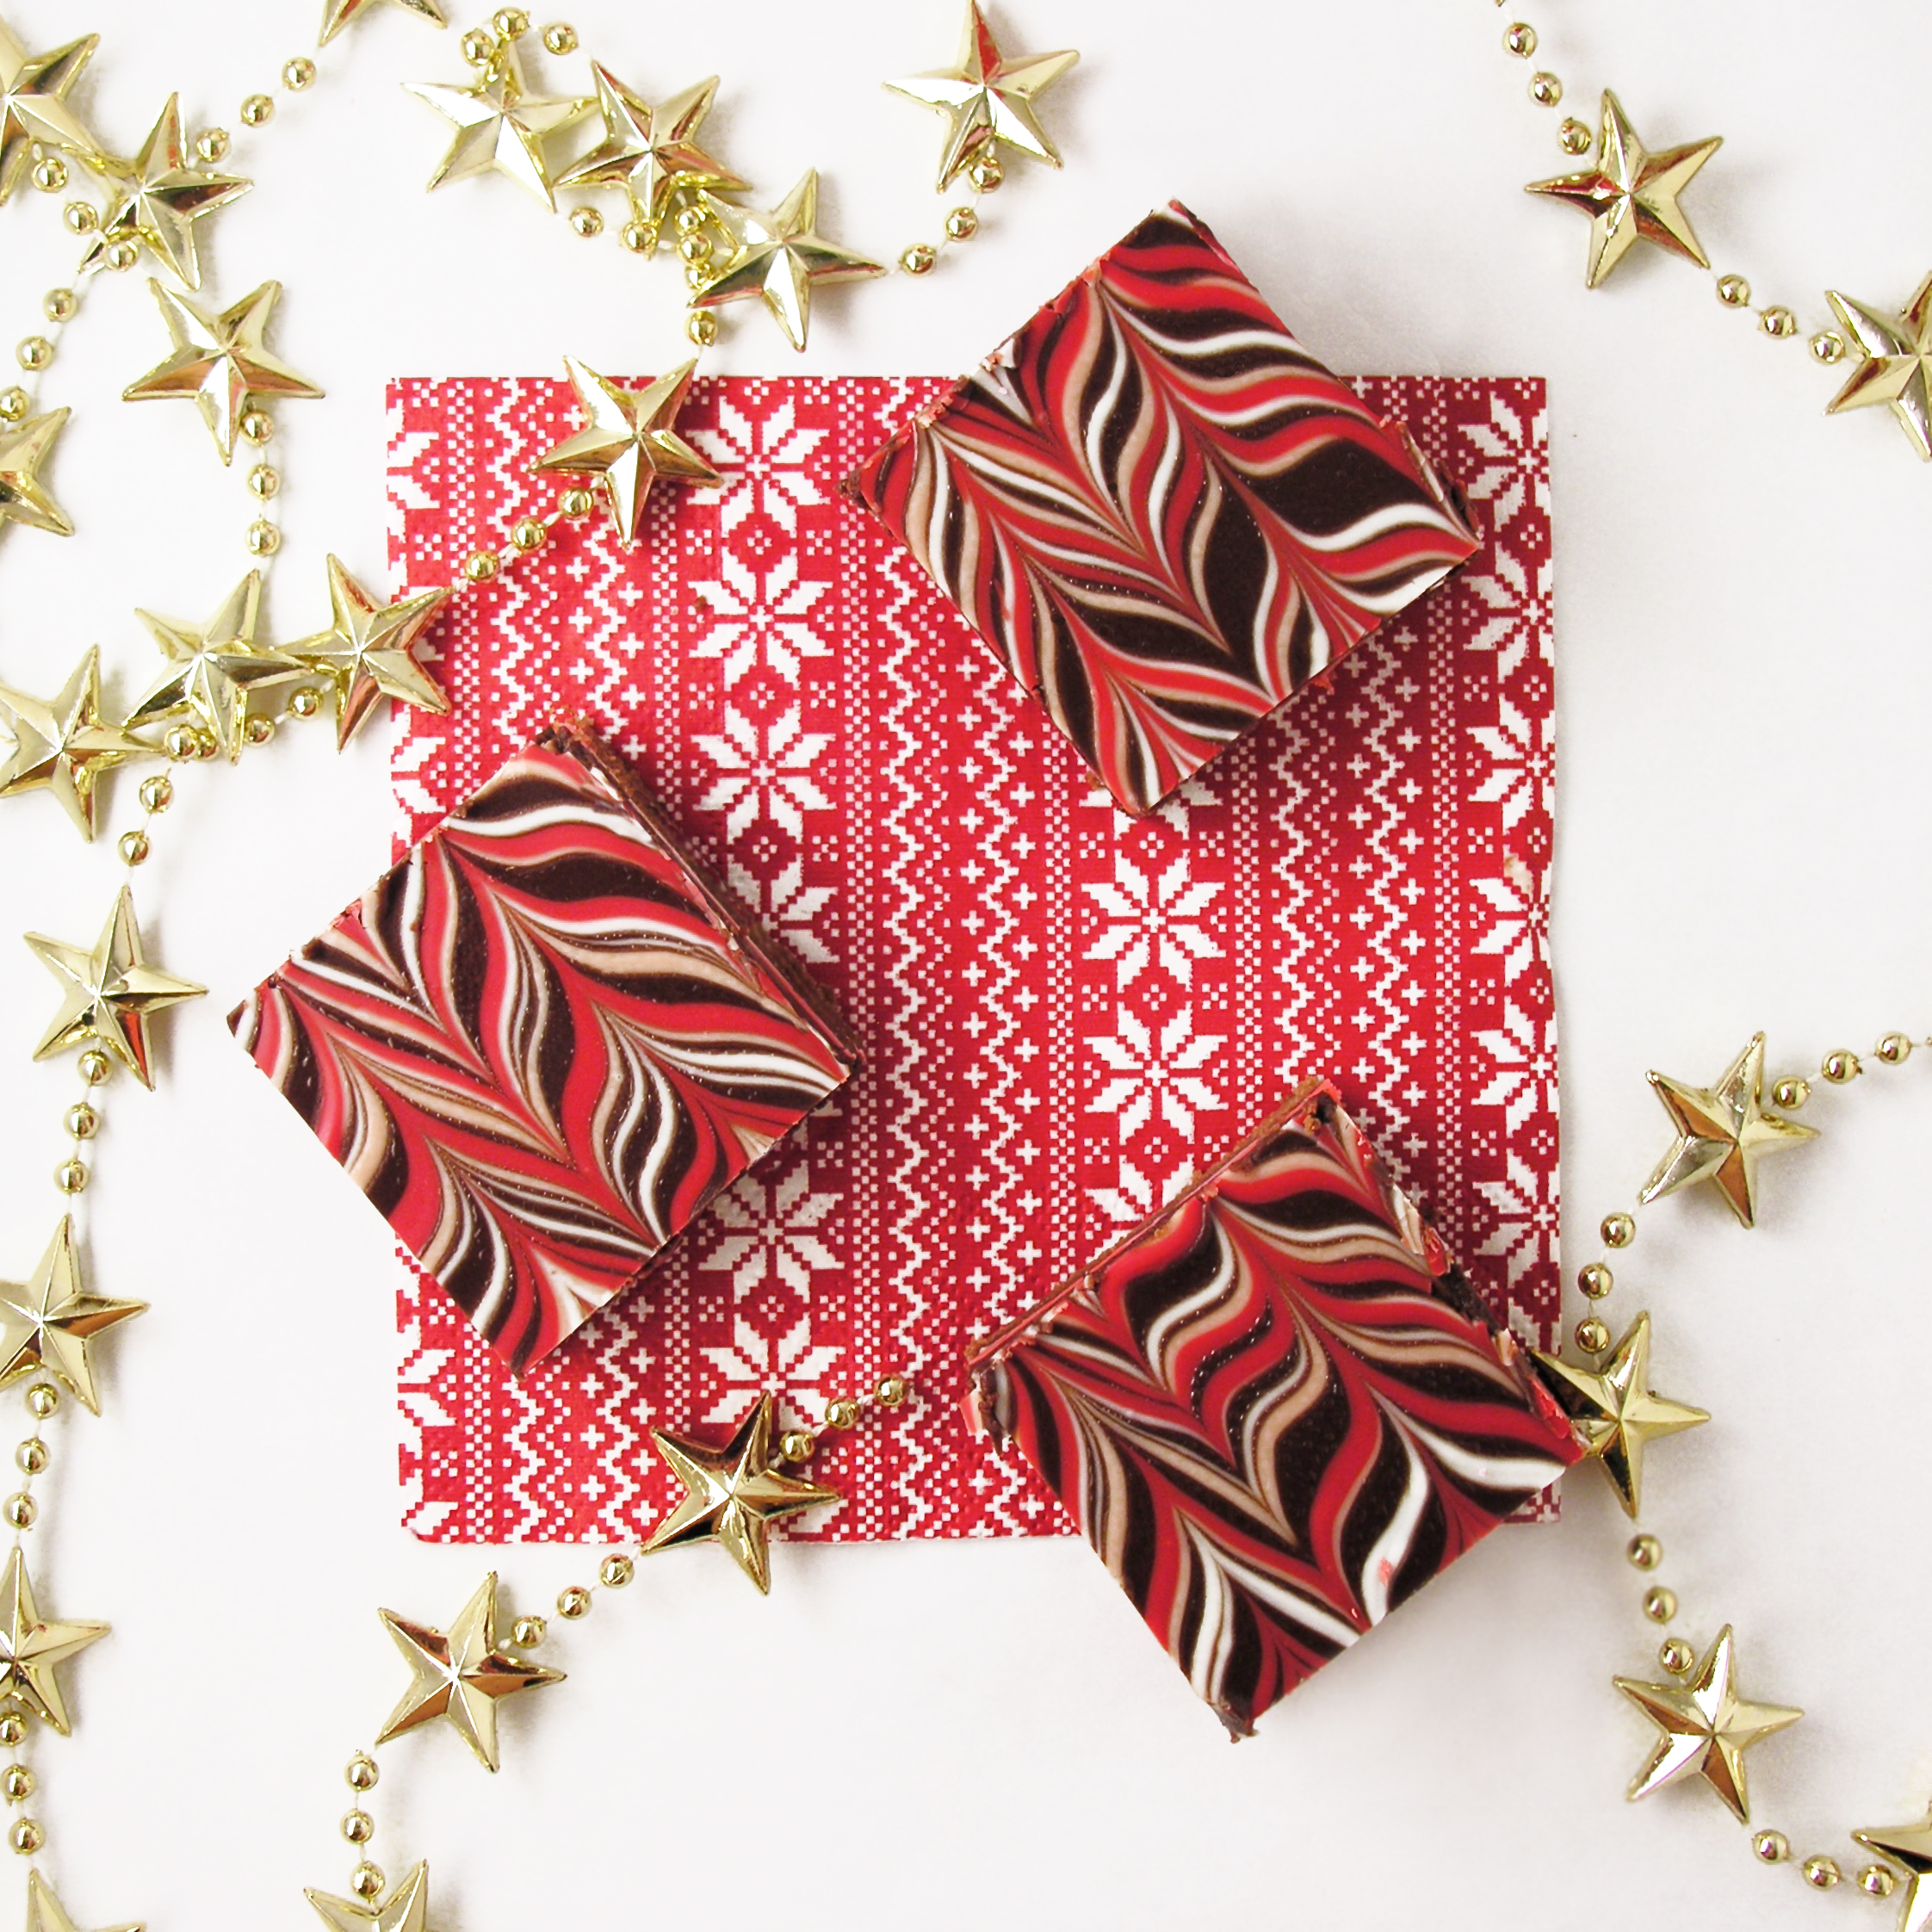
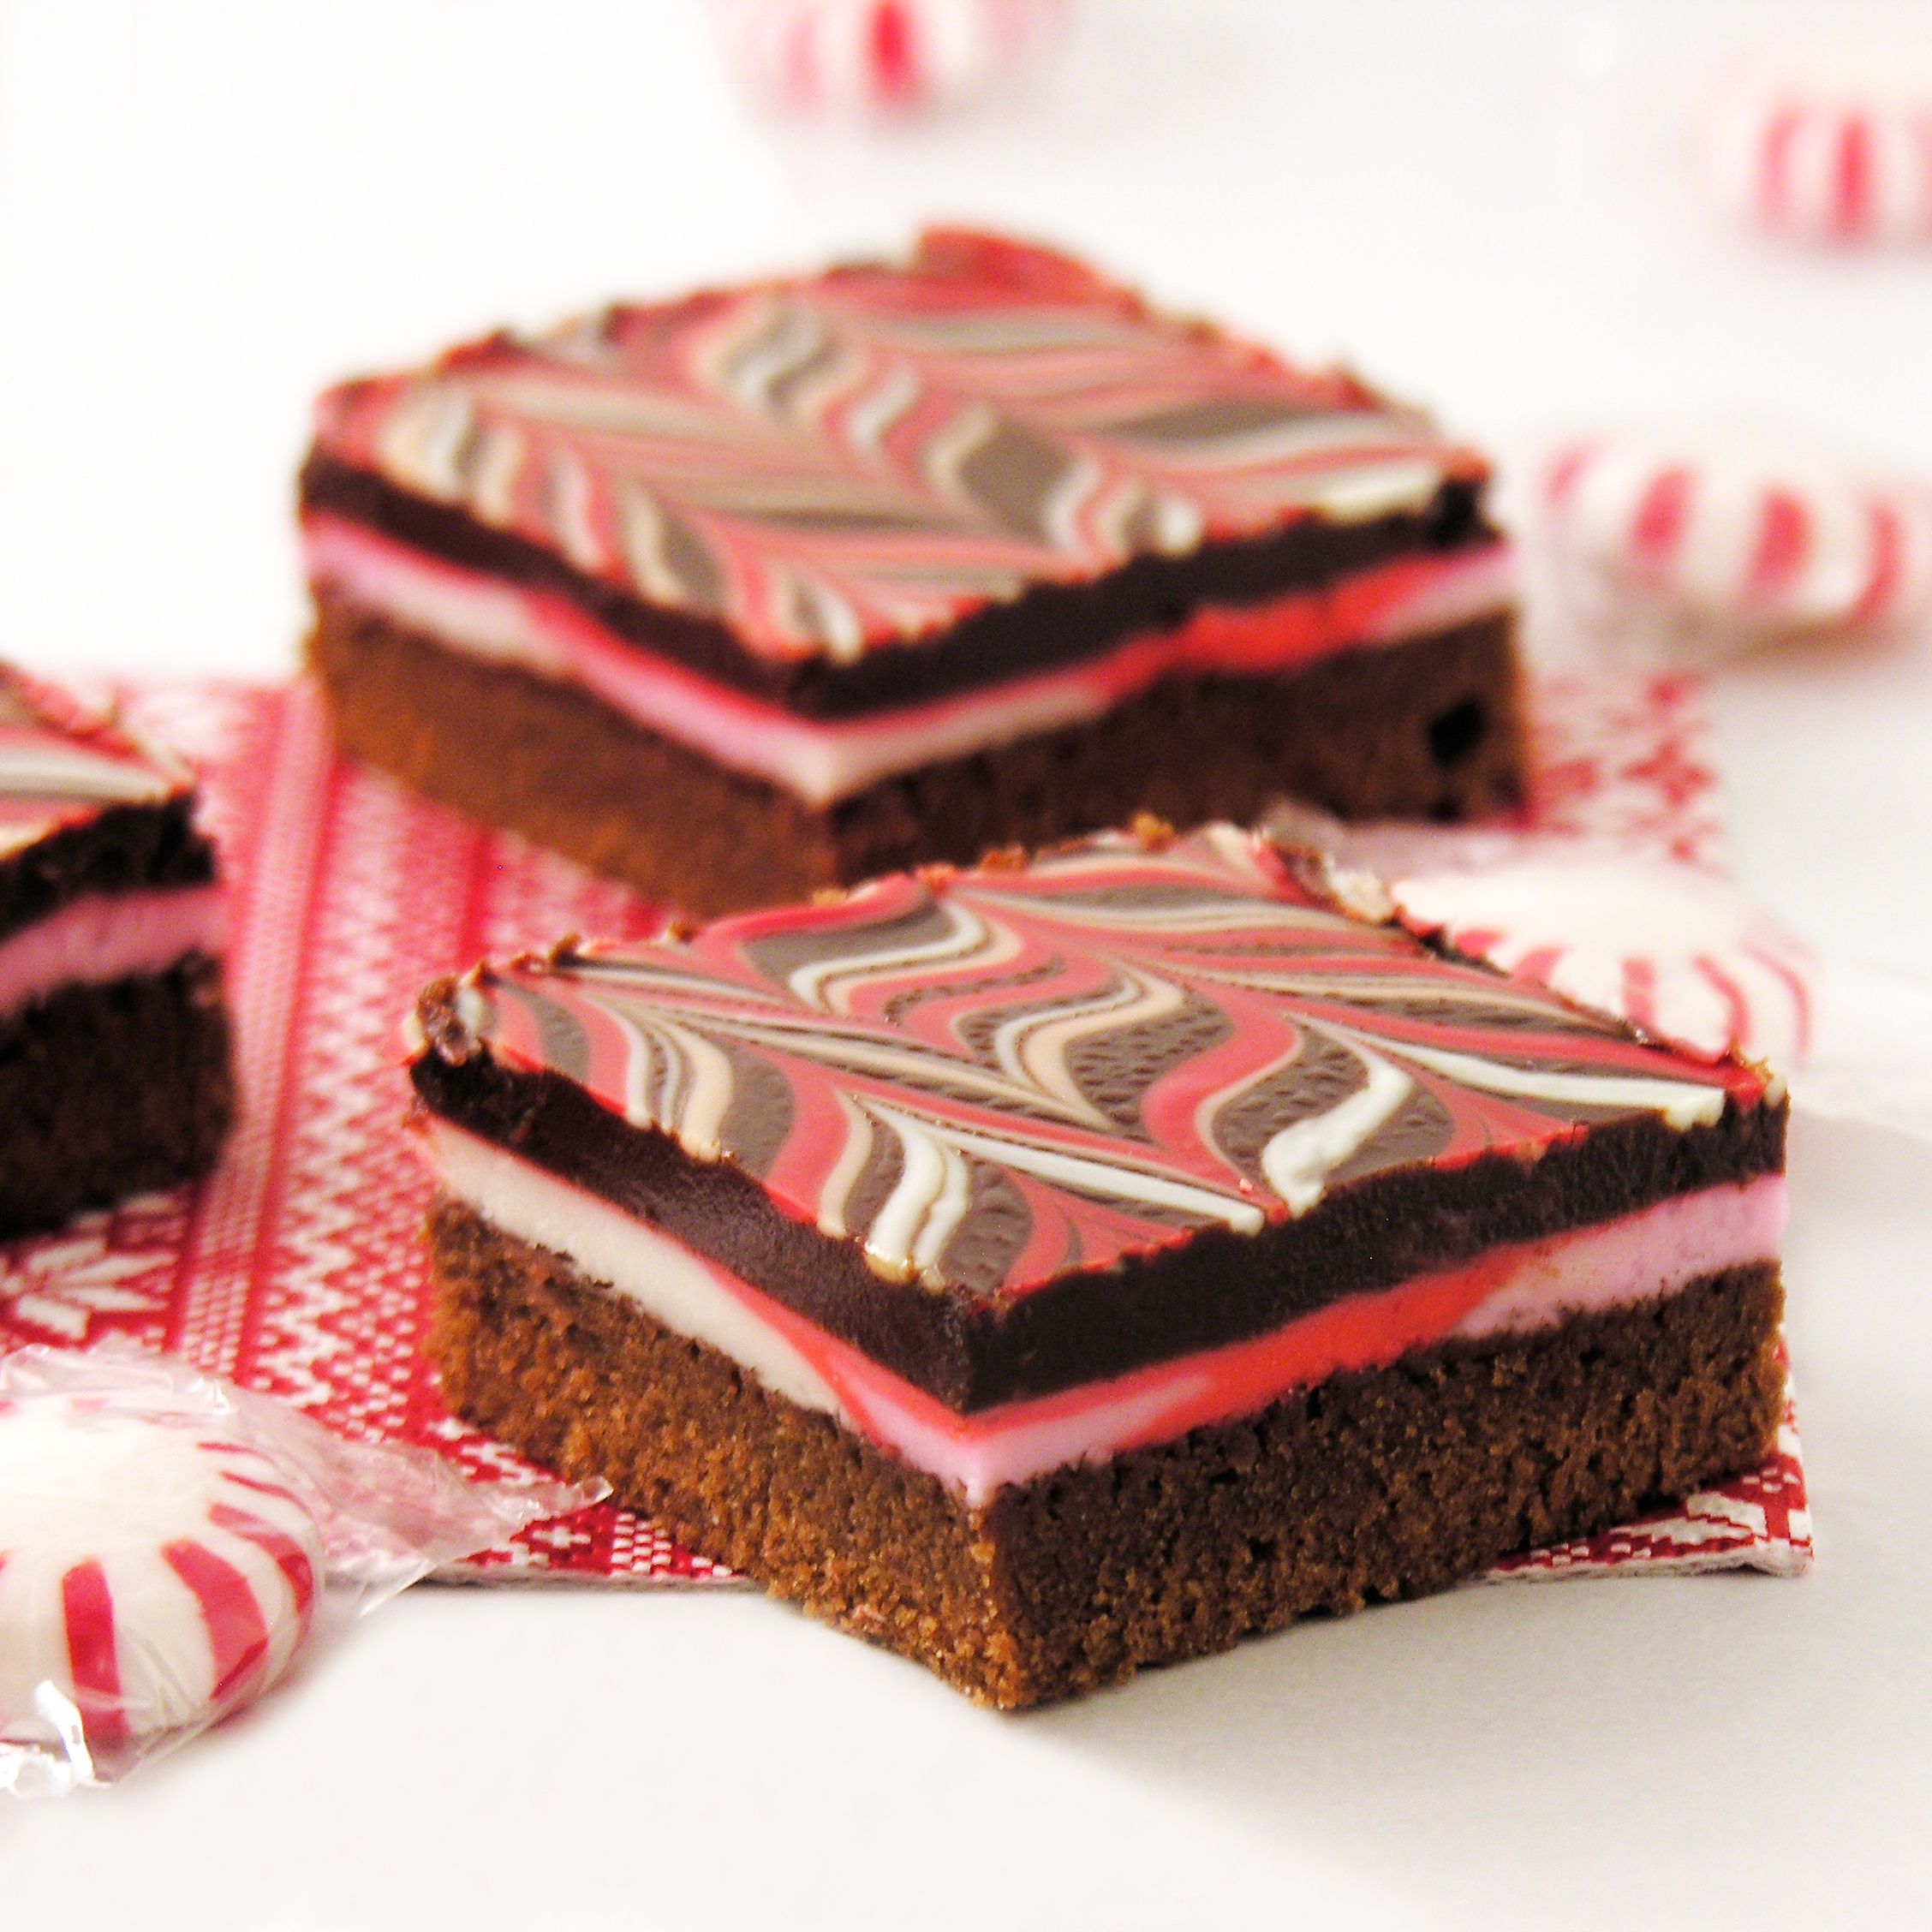
Nothing says Merry Christmas like peppermint and chocolate! These beautiful little brownies combine those two flavors in a colorful, layered treat!

These brownies are an Easybaked staple. I’ve swapped that peppermint filling up for everything from cookie dough to caramel. I love recipes that can be changed up with different flavors and looks!!! This peppermint candy cane flavor is the most beautiful filling I’ve used in these though. The guests at every party I’ve shared them at have all commented on how pretty and festive they are. They just make me smile- and they really aren’t that difficult to make! Promise.

Candy Cane Brownies

This recipe makes a lot of brownies. The good news? They freeze really well and can be made ahead for all your Christmas gatherings. Just pop them out of the freezer and thaw!

Here’s how we made them: (printable recipe)

INGREDIENTS:

Brownie:

  • 1cup butter
  • 2 cups sugar
  • 3 eggs
  • 2 teaspoons vanilla
  • 2 cups flour
  • 1/2 cup cocoa
  • 1/2 teaspoon salt
  • 1 cup milk

Peppermint Filling:

  • 5 cups powdered sugar
  • 8 tablespoons melted butter
  • 2 teaspoons peppermint extract
  • red and pink food coloring 


Fudge Topping:

  • 12oz. semi-sweet chocolate chips
  • 12 tablespoons butter (do not substitute margarine here!)
  • Wilton Candy melts in Red, Pink and White (if desired for design on top)

DIRECTIONS:

Brownie:

  • Preheat oven to 350.
  • Cream butter and sugar together. 
  • Beat in eggs, cocoa, vanilla and salt.
  • Add flour and milk (alternating them and mixing well in between)
  • Spread evenly in greased jelly roll pan (12 1/2 x 17 1/2 x 1″).
  • Bake at 350 degrees for 15 minutes or until done in center and just starting to pull away from sides.
  • Cool.  

Mint Frosting:

  • Add melted butter to sugar and extract.
  • Mix well, using water to bring it to a thick but spreadable consistency.
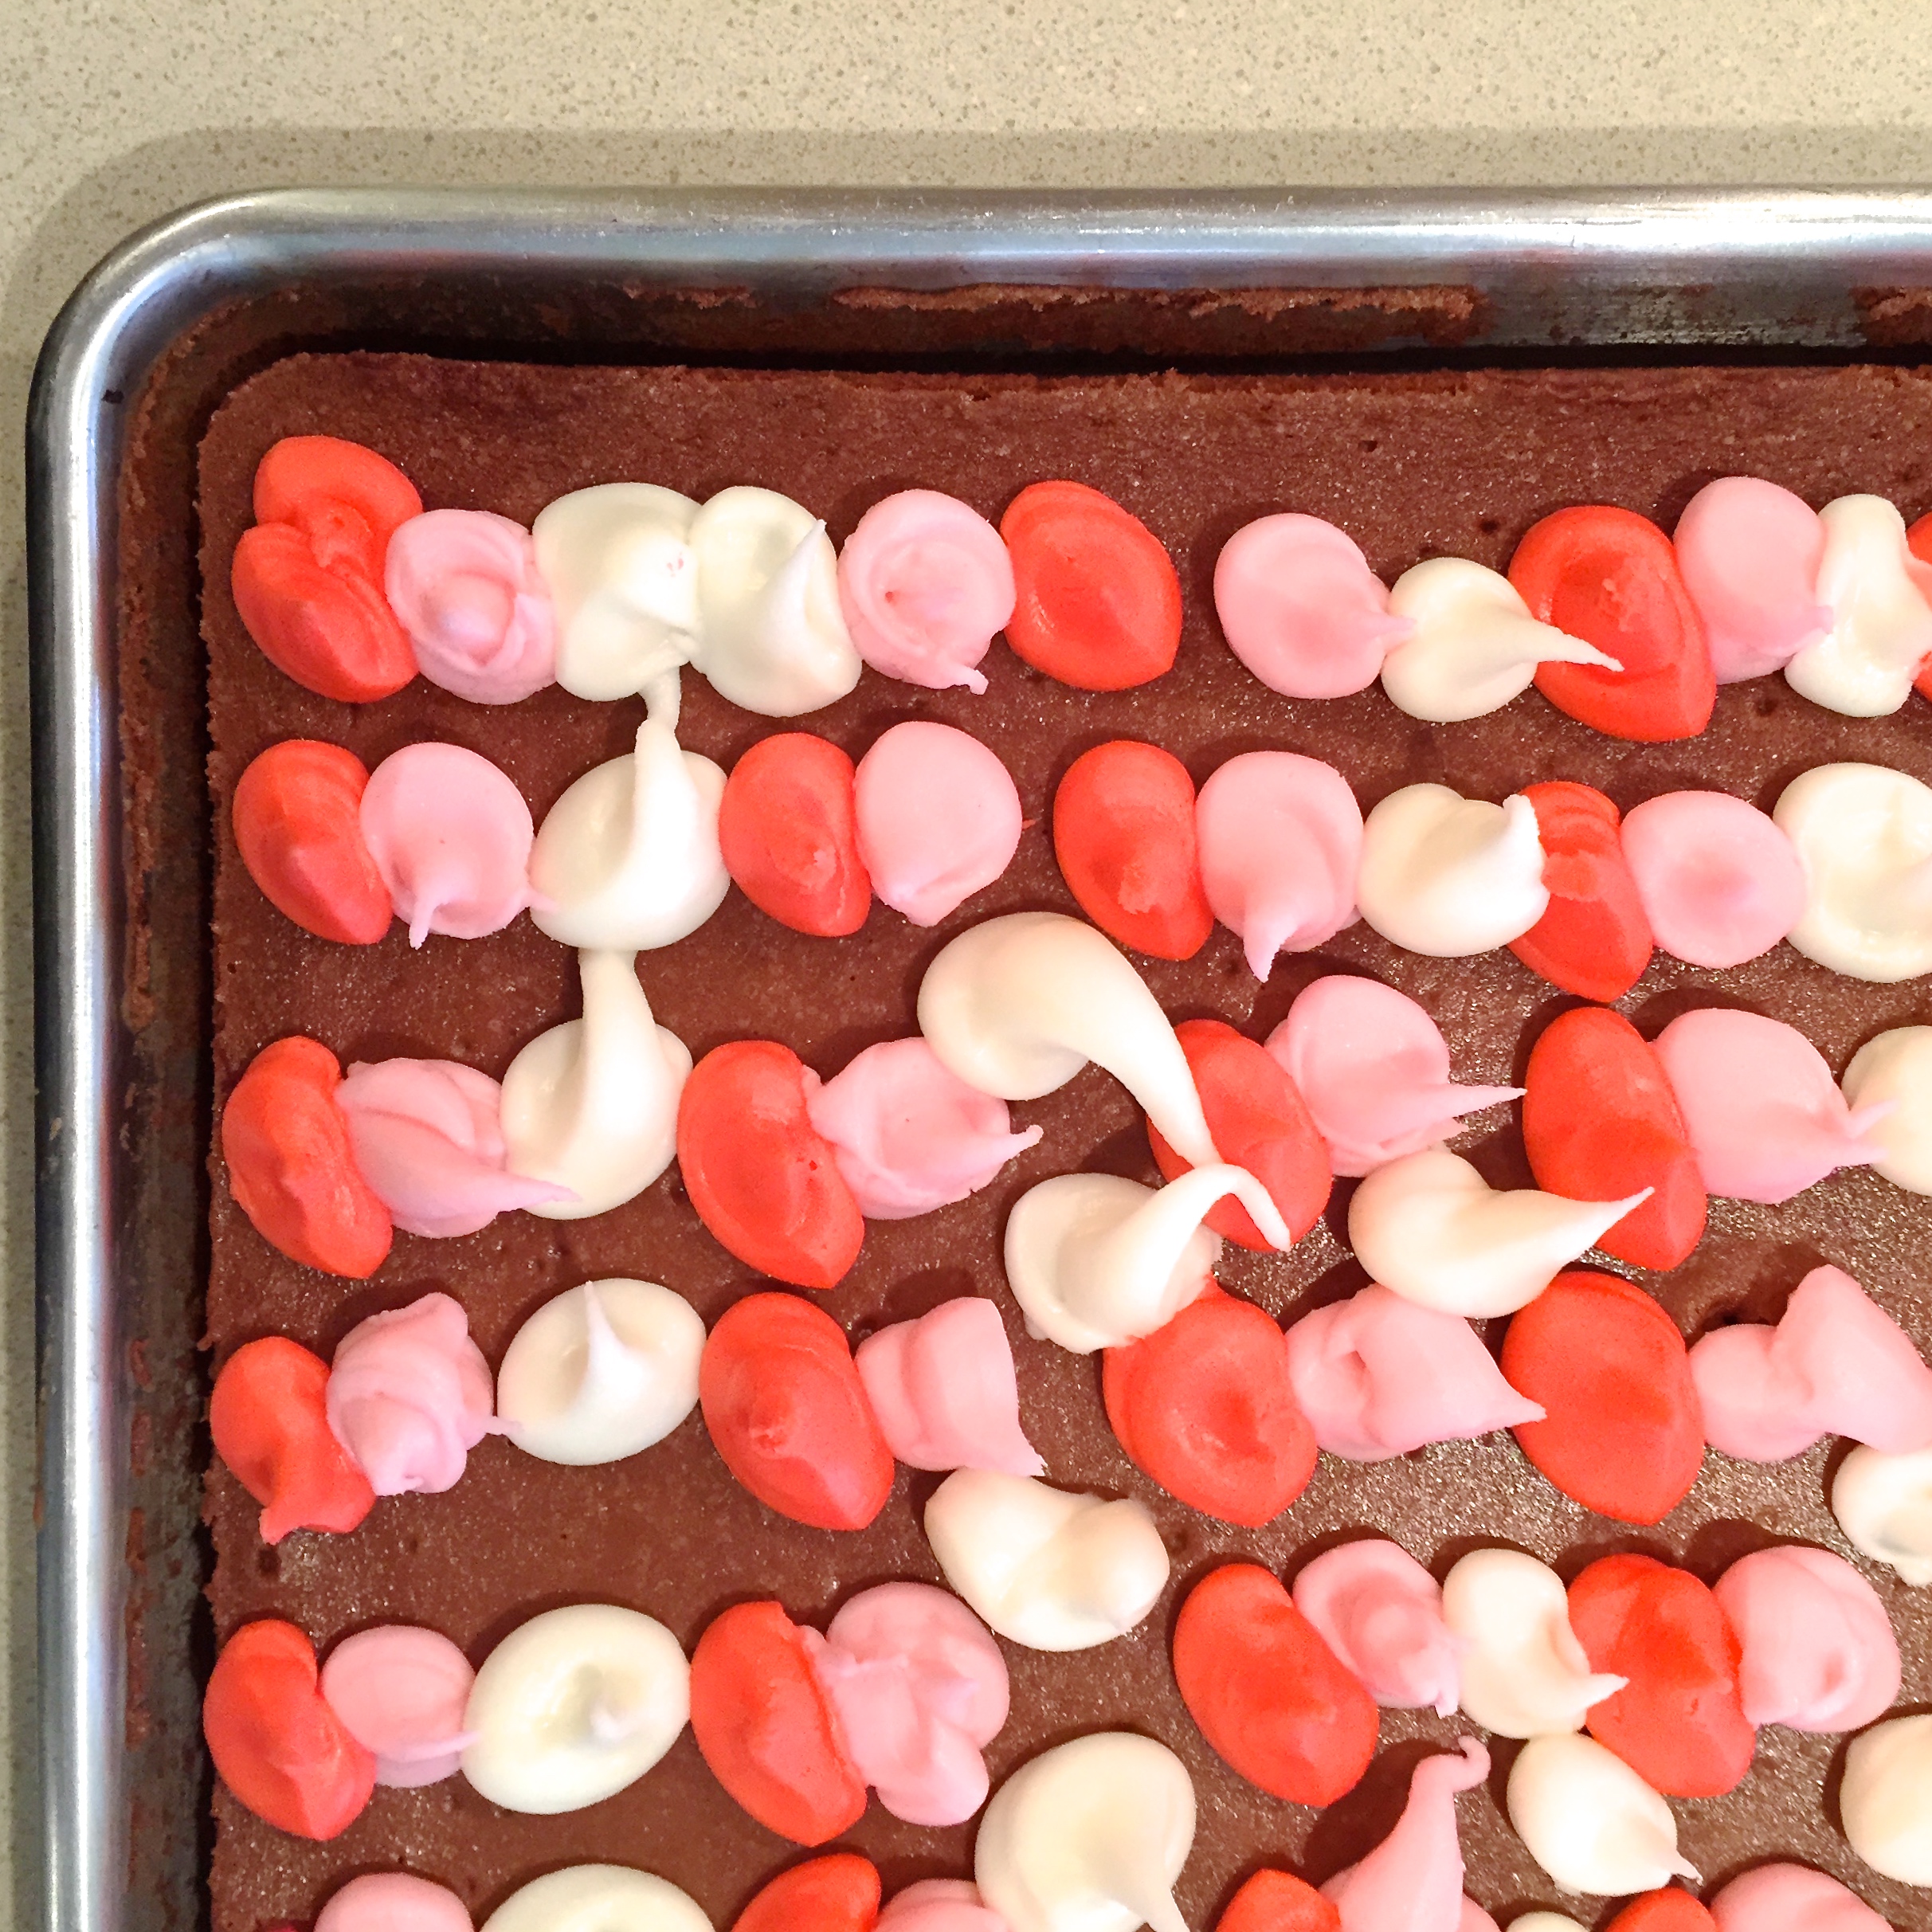
  • Divide into 3 parts and use food coloring to color one part red, and one part pink.
  • Place little dollops of each colored filling all over the cooled brownies (I placed the fillings in small zip-top bags, clipped a corner off and piped these on.
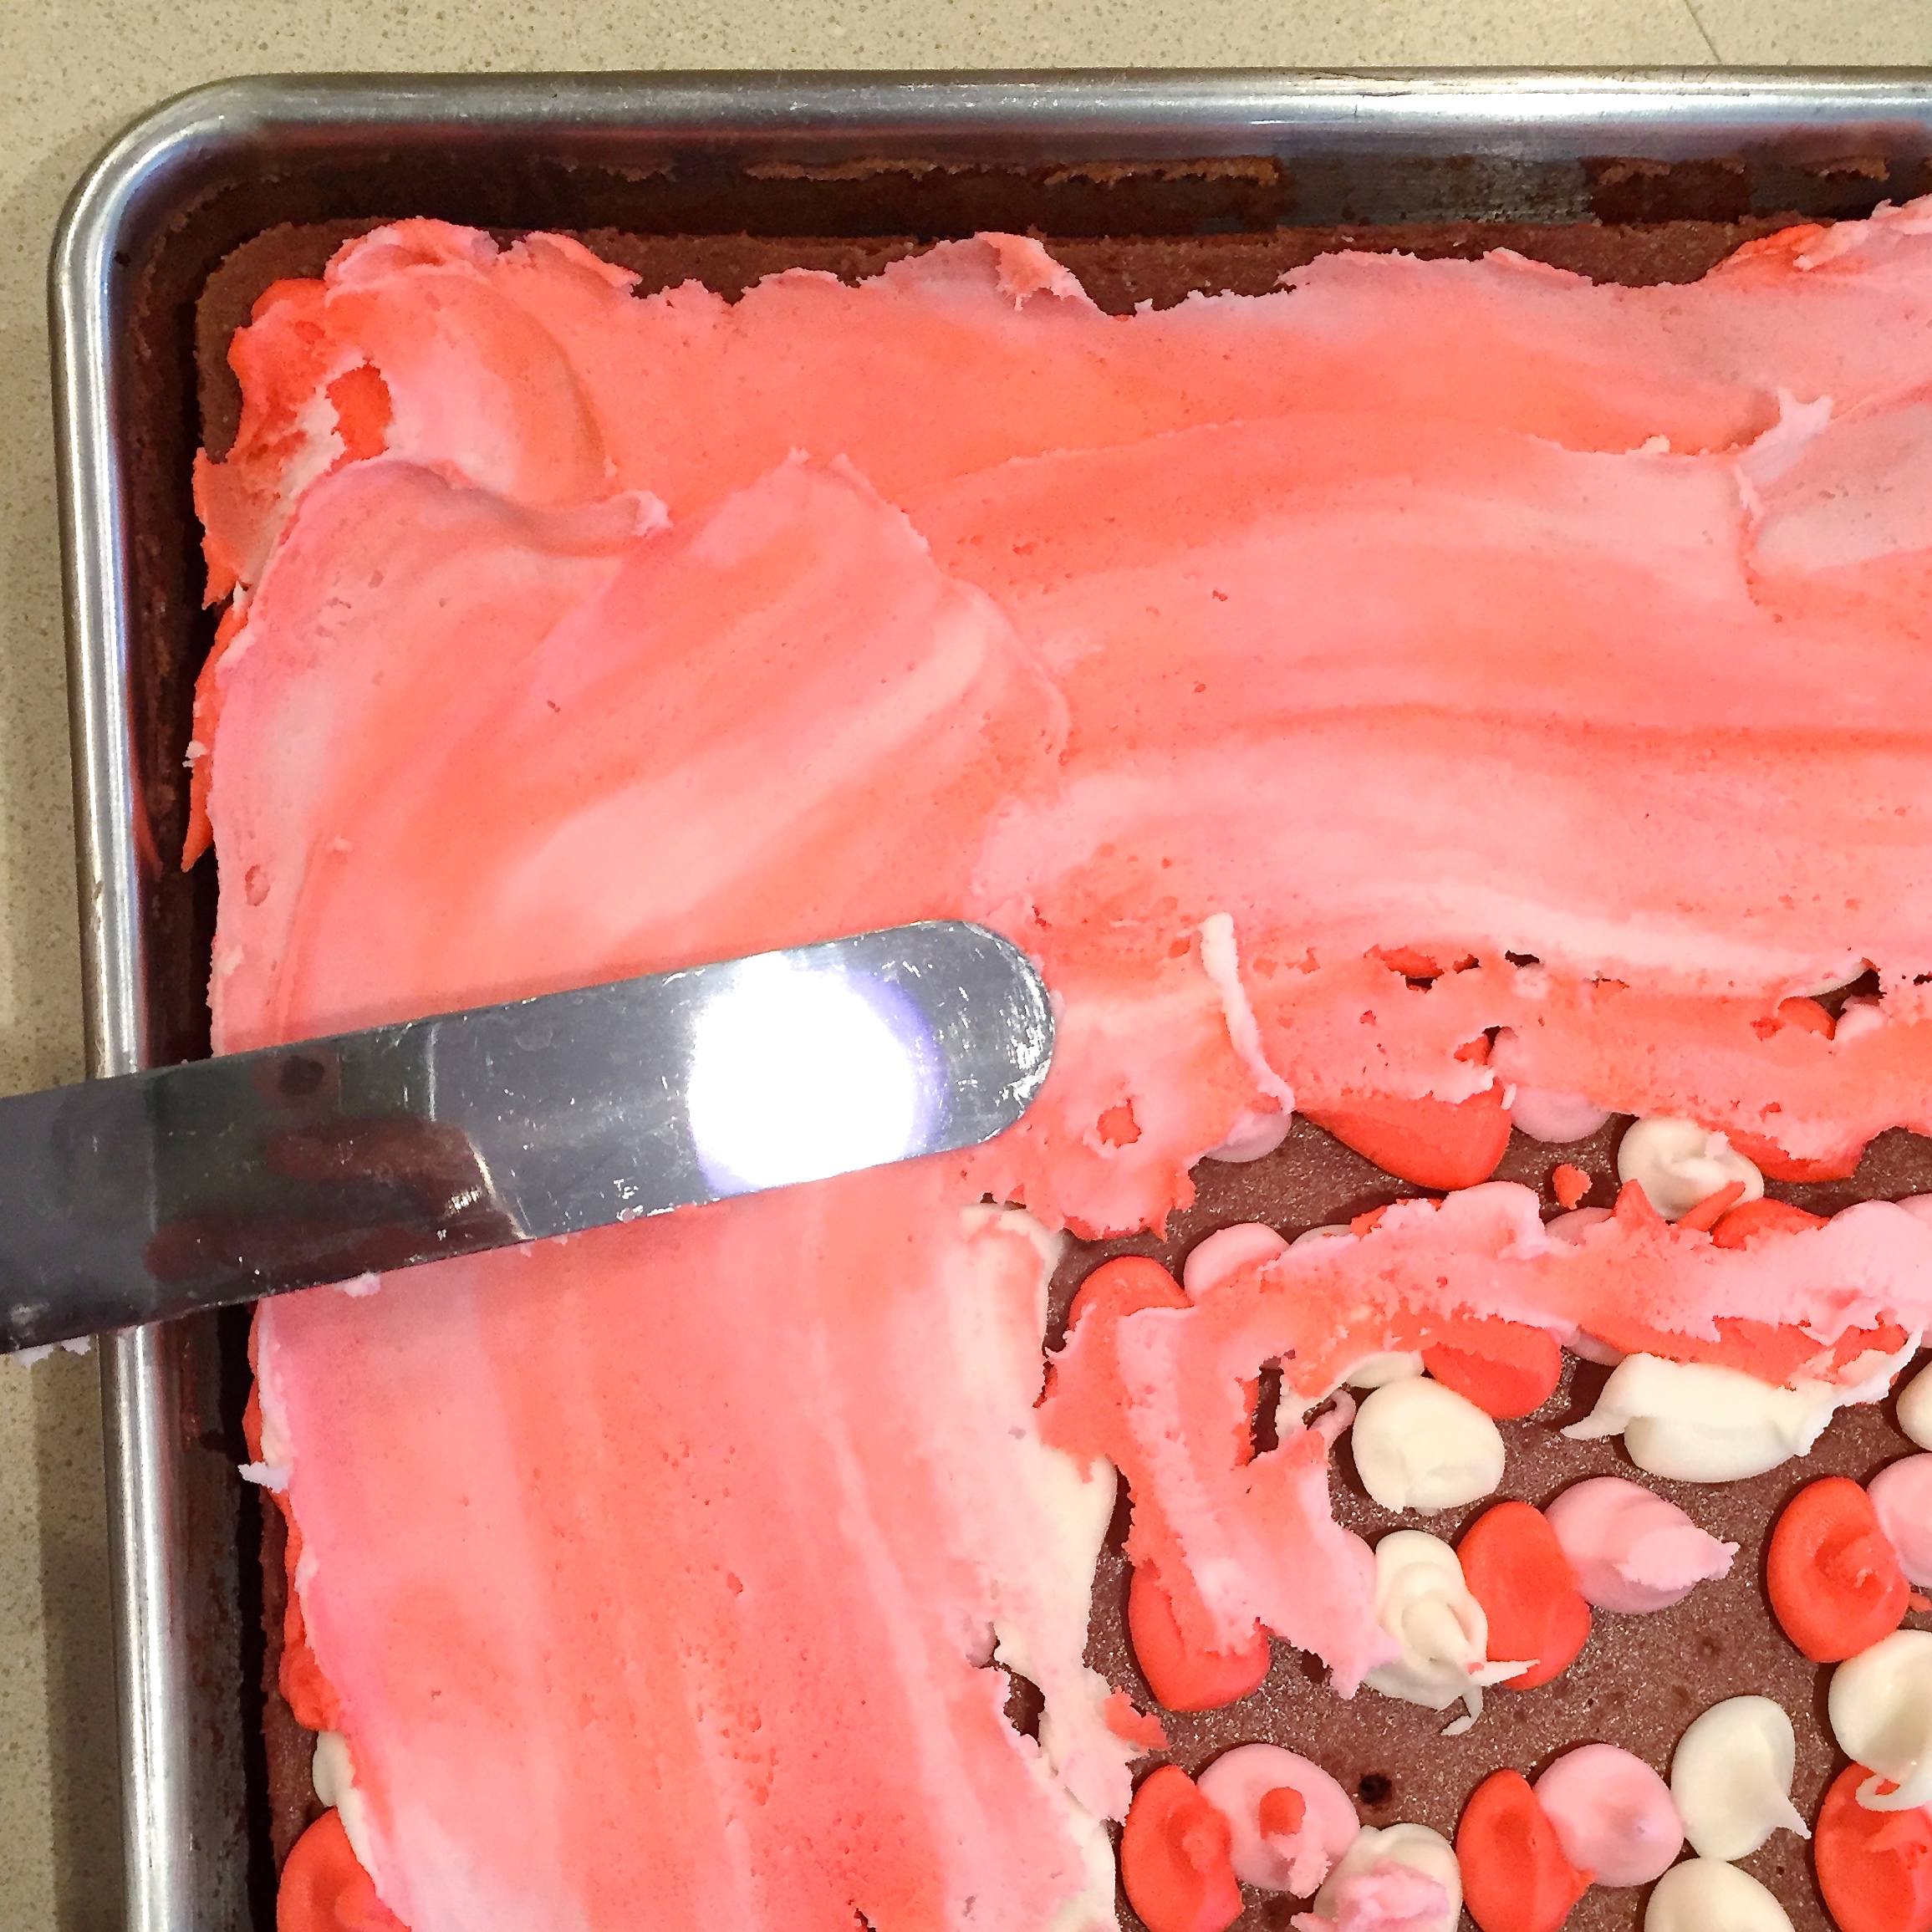
  • Spread colors together into one even layer that covers entire top of brownies.

IMG_5323  IMG_5325

Fudge Topping:

  • Melt butter and chocolate together in the microwave in 30 second increments, stirring in between until completely melted and smooth.
  • If desired, melt about 1/8cup each of Wilton’s Candy Melts in White, Red and Pink. Place in small zip-top bags and clip corner on each.
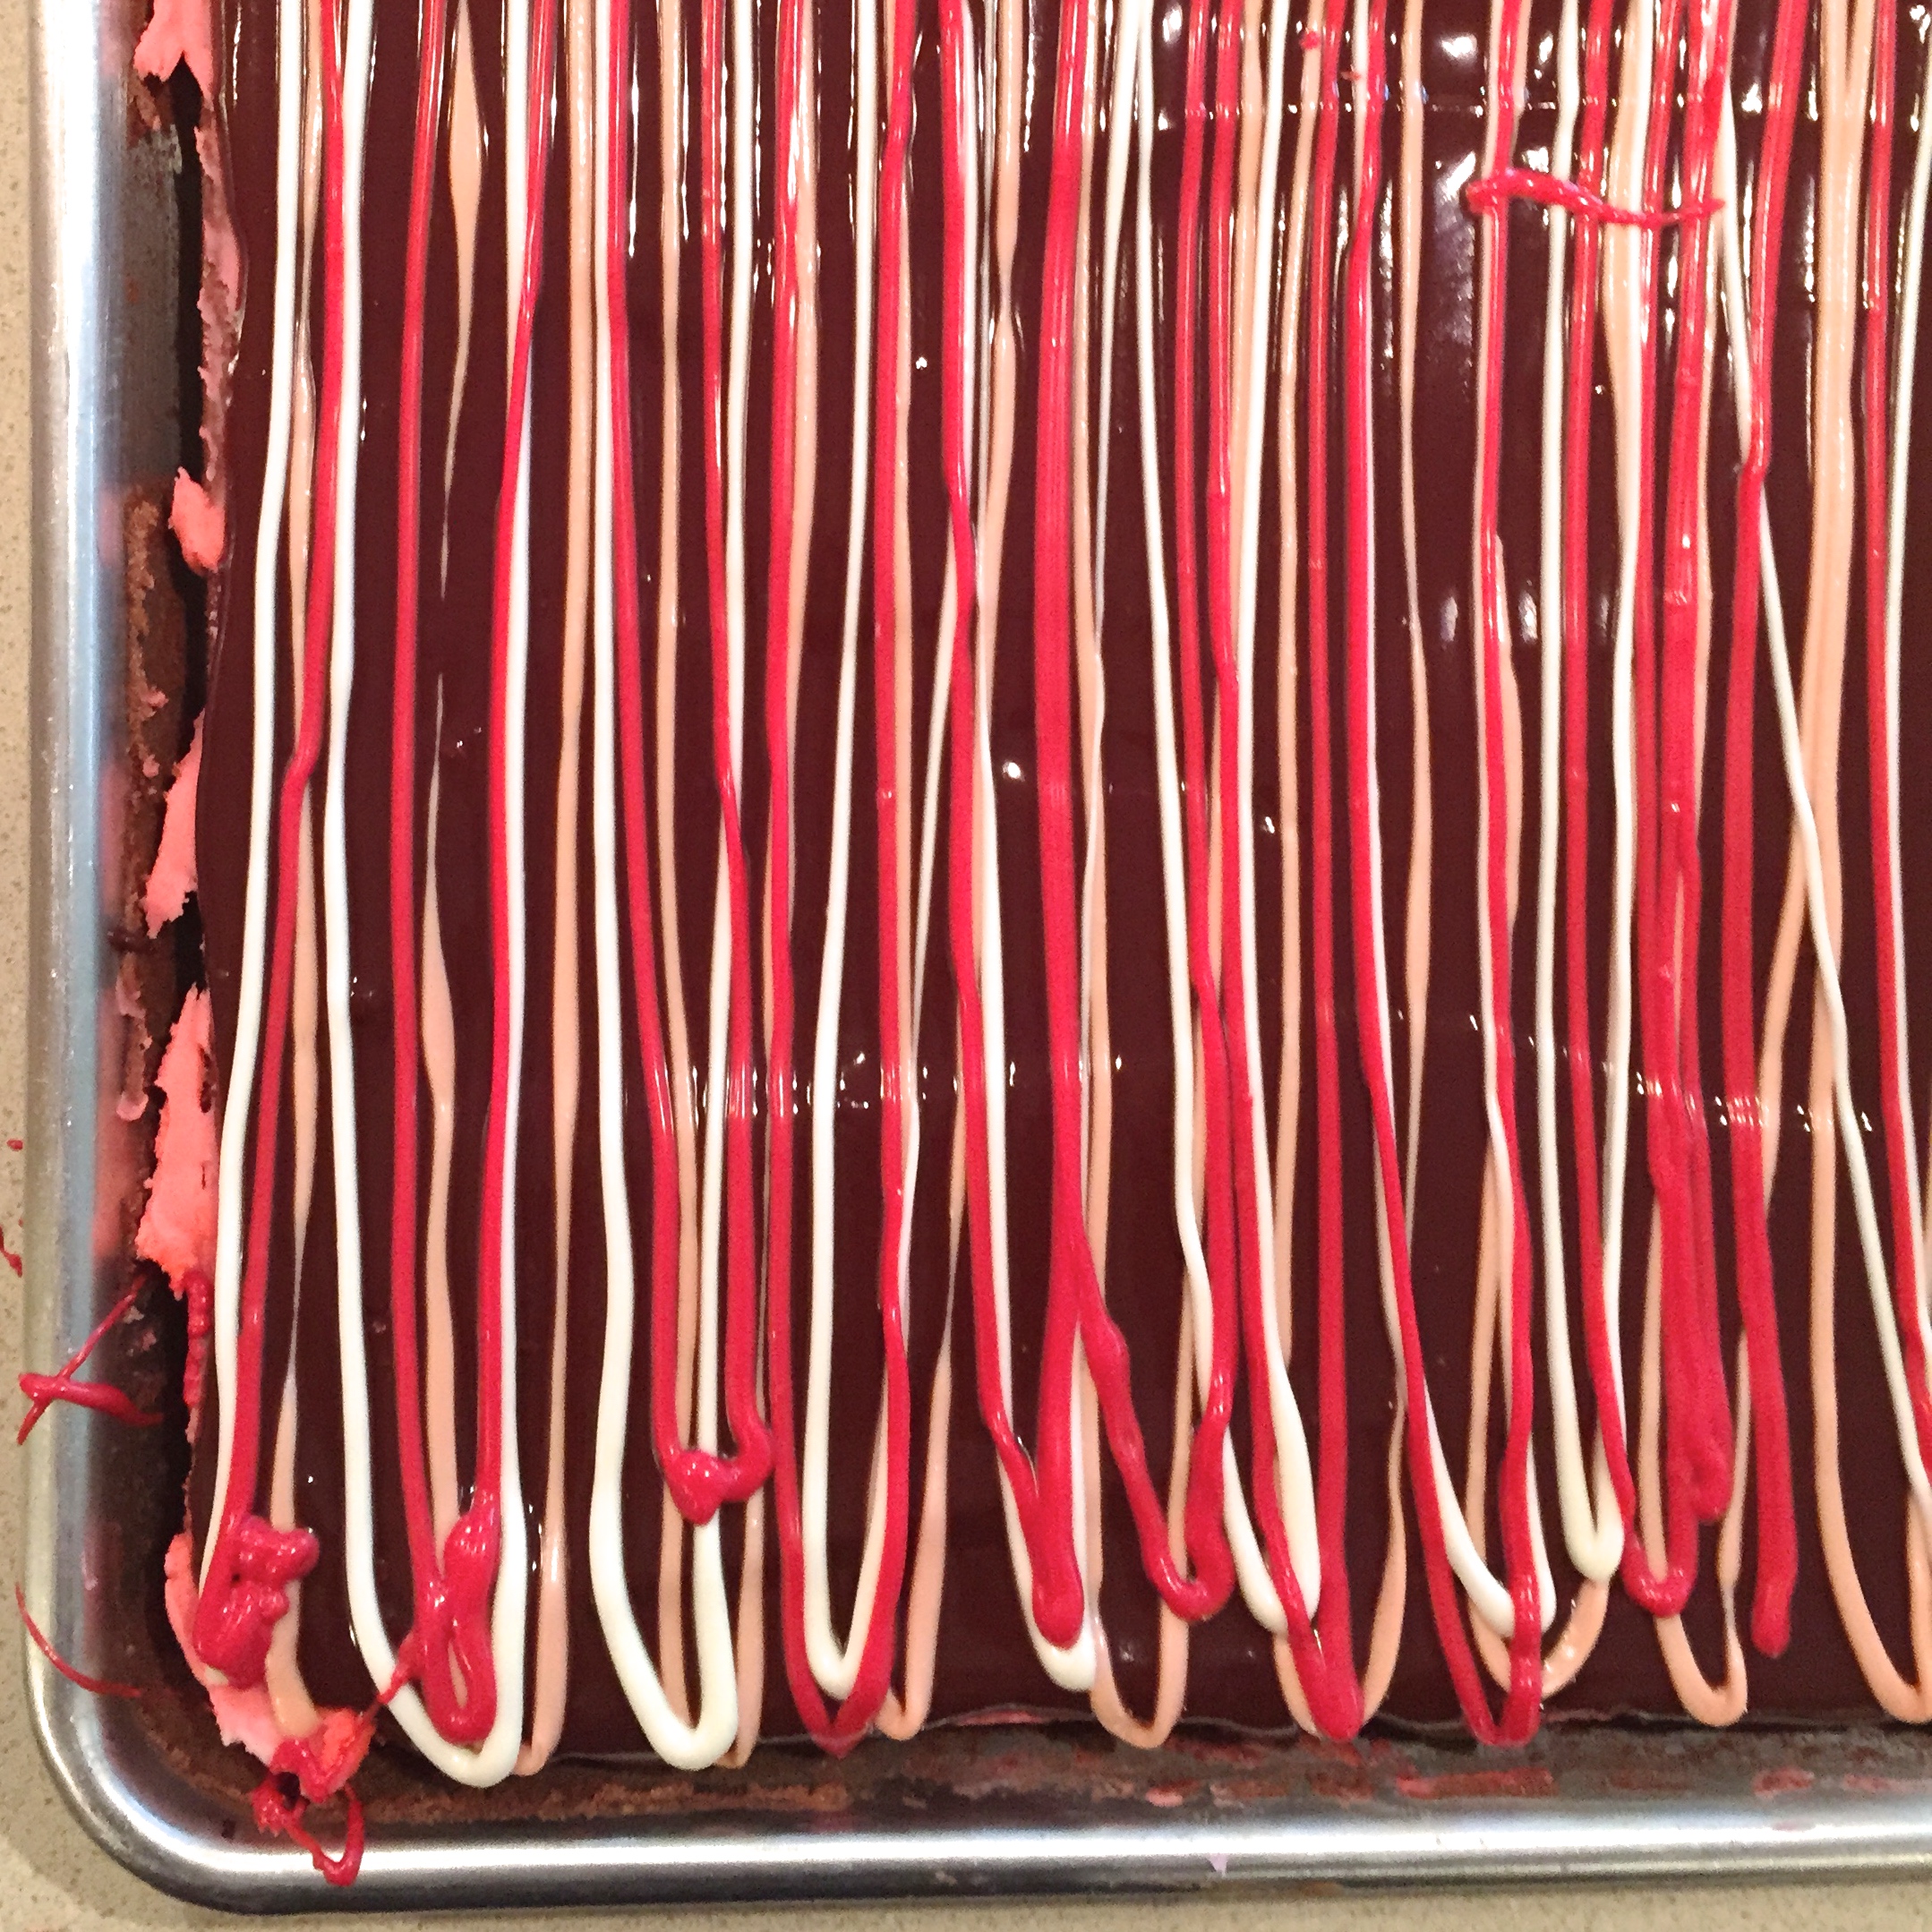
  • Pour melted chocolate and butter mixture over peppermint filling and spread evenly over top.
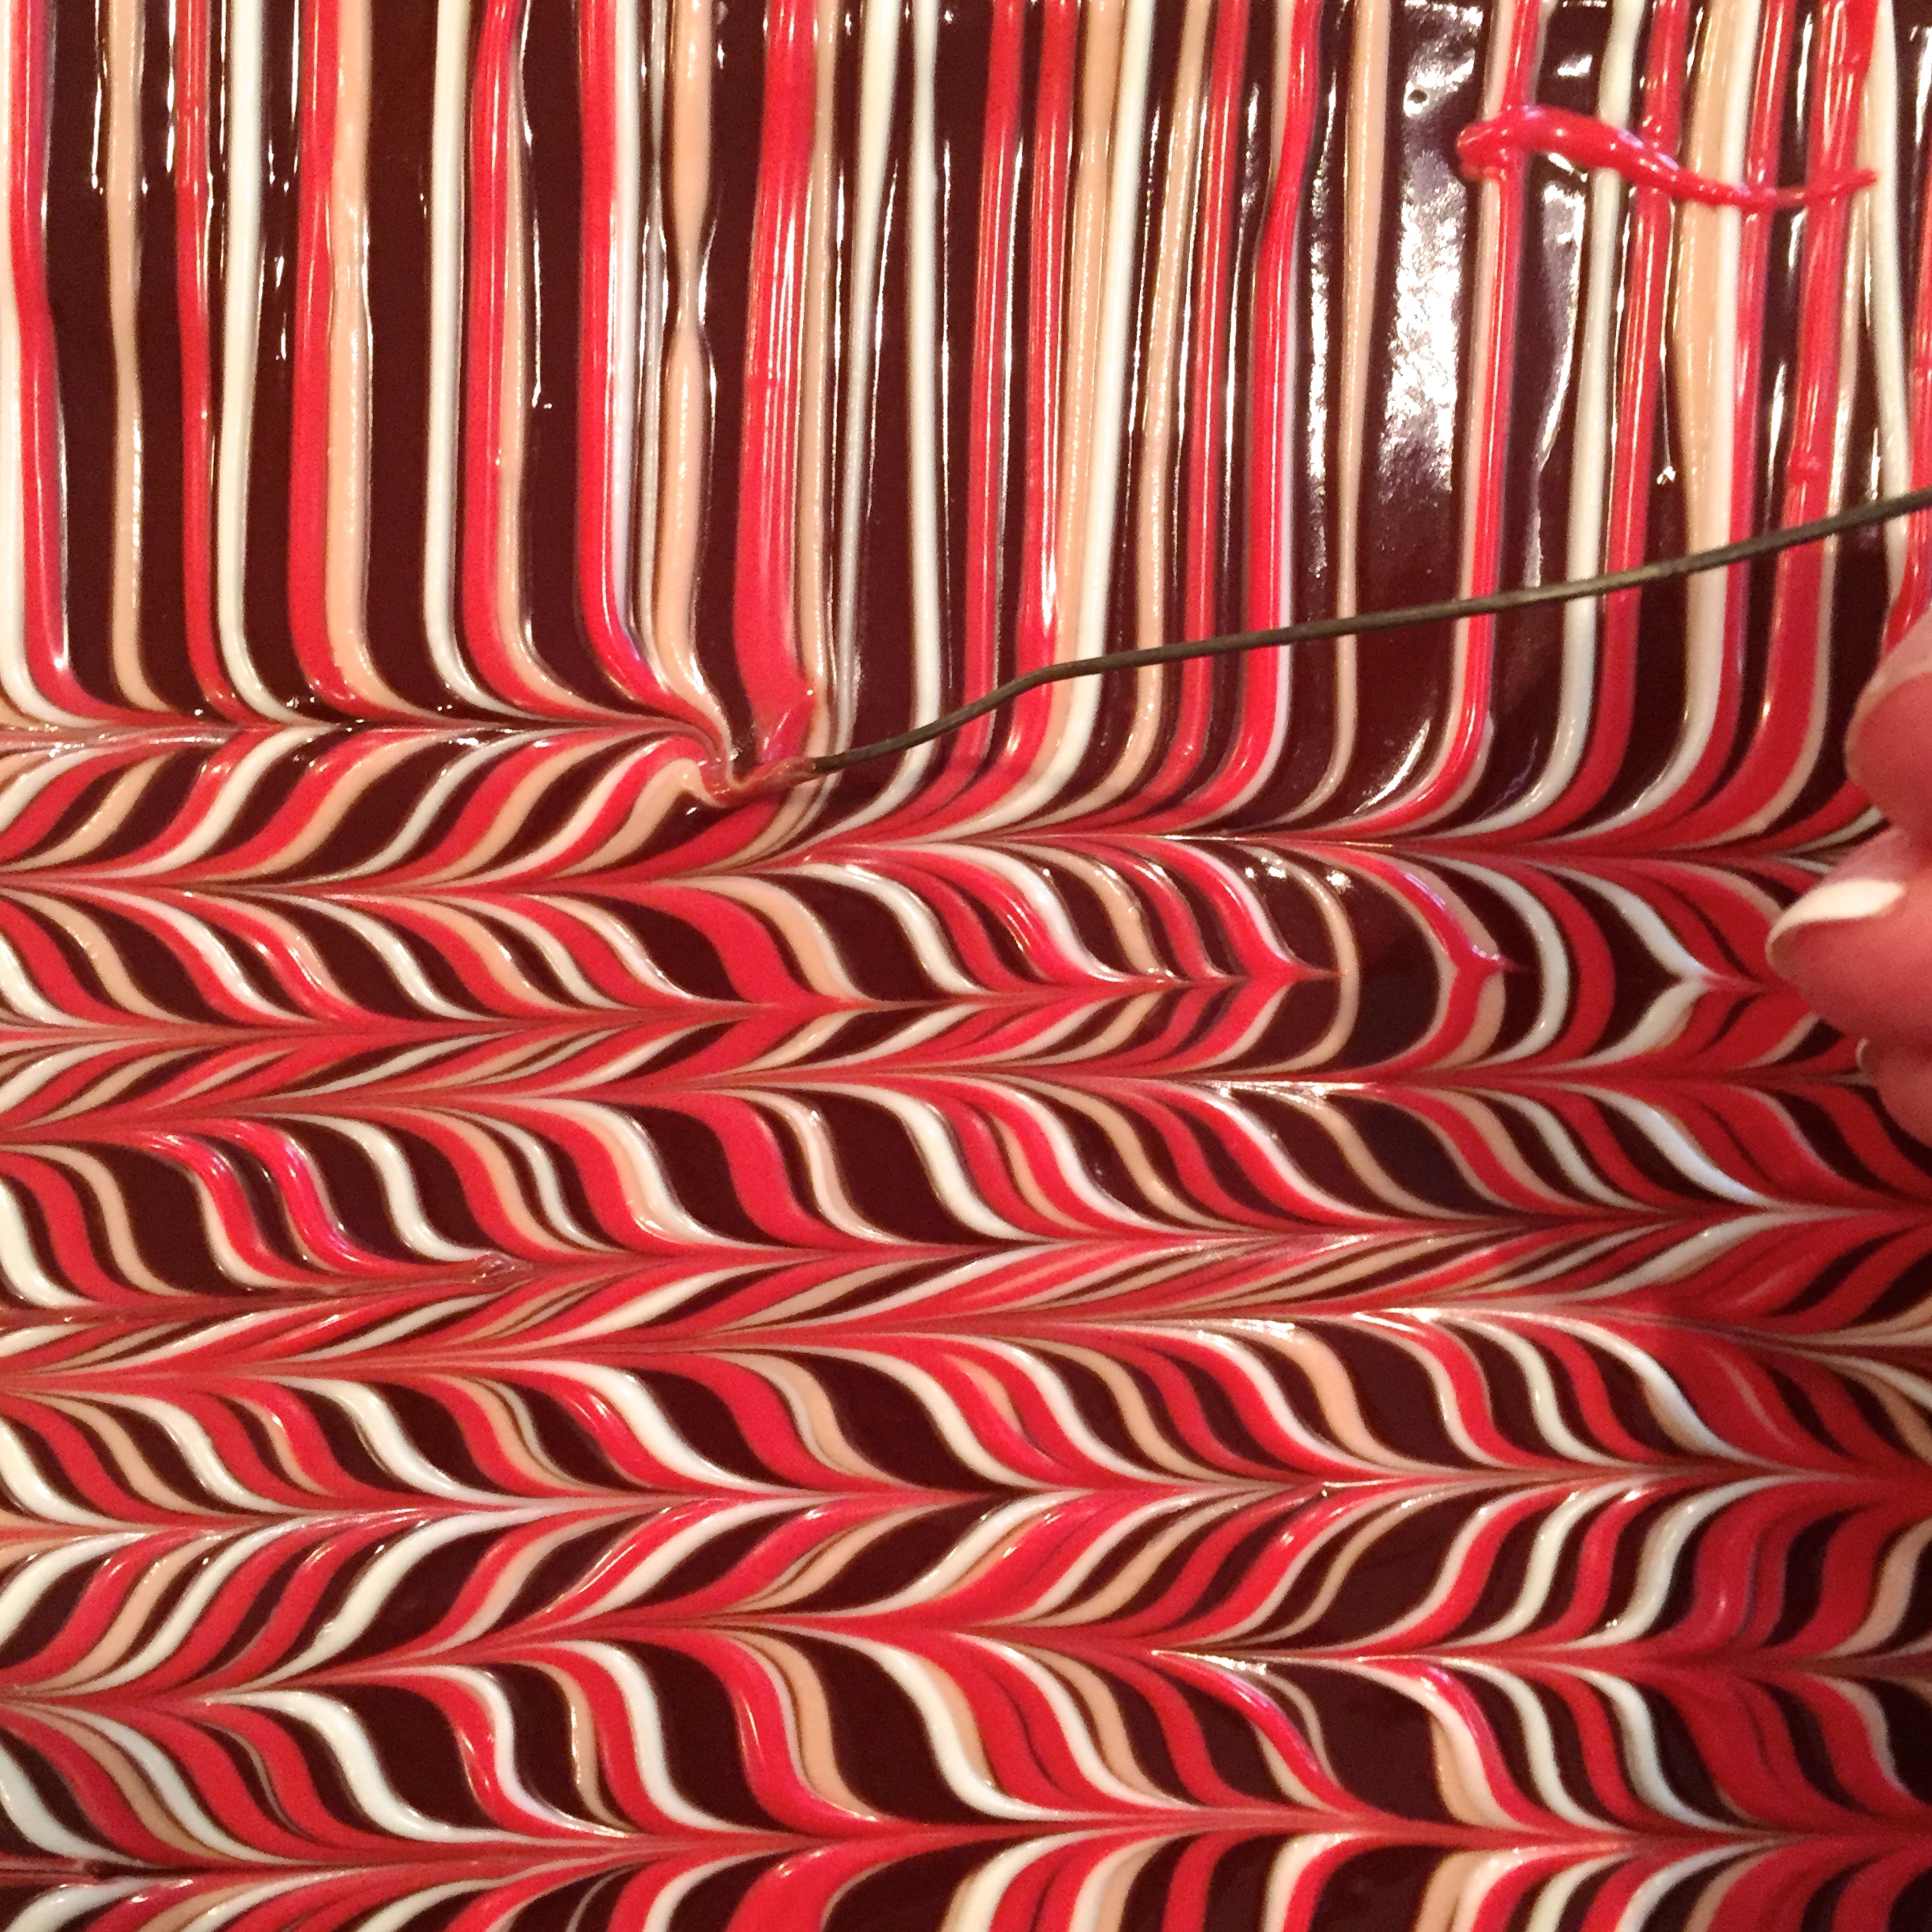
  • Immediately, pipes lines in all three candy melt colors across the entire top of the brownies.
  • Immediately after piping, use a toothpick or a cake-tester to drag across these lines- first one direction and then back the opposite to make the colorful design on top.
  • Chill until top layer is hard and cut into squares.

IMG_5326   IMG_5328

My thoughts: Love them! This brownie recipe never fails me, and I love experimenting with different flavors of filling! These will add a festive and fun layer to any dessert tray at your Christmas celebrations!  Enjoy!! ~r

Candy Cane Brownies6

Candy Cane Brownies5

Take a look at some of the other fillings we have used in these brownies: (click on a photo to open the recipe)

Cookies Dough BrowniePeanut Butter Fudge Brownies!!!!Caramel Fudge Brownies!!Coconut Brownie Cups


Advertisement

Christmas Card Cookies

Christmas Card Cookies

These adorable cookies don’t just taste yummy- they also bear Christmas words of cheer with every delicious bite!

I saw this fun silicone mold by Wilton at my local grocery, and I couldn’t resist! So fun!!!

I made two varieties of these little cookie cards: Peppermint mocha and Gingerbread chocolate. Both were delicious and so fun to make!

You can use any of your favorite cut-out cookie recipes partnered with any Wilton Candy Melt flavors on top, but I thought these two combinations were delicious!

Christmas Card Cookie1

Want to know how to make these? Let’s start with the “card” toppers.

  • You’ll need about 3 bags of Wilton Candy Melts to make 24 cookie toppers.
  • Melt them in the microwave, one bag at a time, in 30 second increments, stirring between until smooth.
  • Spoon about 2 tablespoons into each cavity and use a small spoon to spread into corners.
  • Tap mold on counter to remove bubbles and freeze for about 10 minutes.
  • Carefully peel the mold away from each bar and repeat this process until you have 24.

This process takes a little time, but it can be done ahead of time and the little bars can be stored in an airtight container in a cool spot until needed. Keep different flavors separated from each other, and put a little parchment or wax paper between layers.

Then you can make the cookies!

One of my favorite Christmas recipes (of all time) is my grandma’s gingerbread cookie recipe. It’s on this blog a couple of times, but you can get the original (in grandma’s handwriting!) by clicking here. I paired this cookie with dark chocolate Wilton’s candy melts.

Gingerbread Cookies!

The other recipe I used, with peppermint card toppers, was my espresso cutout cookies. There’s nothing like peppermint, coffee and chocolate all together! You can see this recipe originally published on Easybaked by clicking here.

Chocolate Espresso Cookies!!!

  • Make your cookie dough according to whatever recipe you desire and then use a cookie cutter to cut a large rectangle cookie. I used a 4.5″ x 3″ cutter that I found here.
  • Bake, cool and then take a little extra Candy Melt and a food-safe brush and brush melted candy on the back of each bar to attach it to the top of each cookie.
  • Press the bar down using a little wax paper on the top (if you touch it with your bare fingers you will get prints!)
  • Allow bar to harden onto the cookie and then serve! I placed each one in a little cello bag sealed with a sticker and gave them away with gifts.


Christmas Card Cookies6

So fun!!!!

Christmas Card Cookies

My thoughts: These are a fun, creative and easy way to say Merry Christmas! The variety of flavors you can use is limited only by your imagination- but I recommend you use a cookie recipe that doesn’t “puff up” too much. You can see in my photos that my gingerbread cookies puffed up a little- making my edges not as pretty and straight as those chocolate espresso ones that don’t expand much at all. The gingerbread/chocolate combination was so yummy that I got over the slightly curved edges though!  I hope you get a chance to try these- so fun!!  ~r

Christmas Card Cookies2

Other Christmas recipe ideas here at Easybaked: (click on a photo to see the recipe)

Spiced Mocha MixCreamy cheesecake with sour cream toppingReindeer Oreo Pops!!!Pecan Pie Cupcakes

.


Peppermint Brownie Cake

Posted on

Peppermint Brownie Cake
This dense chocolate cake is more like a brownie, and full of chopped peppermint patties!  This will satisfy your biggest chocolate craving!

This recipe is the perfect solution to the January candy candy dilemma.  Although there are no candy canes in this cake (there are gooey York Peppermint patties instead!), this cake is just beautiful decorated with your leftovers from Christmas.

Peppermint Brownie Cake
This cake also showcases my theme for the month of January—–melted frosting! I’ve become addicted to melting tubs of ready-made frosting to use in and on various dessert recipes.  It changes the consistency of the frosting- turning it into a fudge-like topping or filling and its SO easy– just melt and pour.  I can’t wait to show you some of my other melted frosting ideas!

Ok- so you probably want the recipe!  Here you go: (click here for a printable version)

INGREDIENTS:

  • 1/2 cup butter
  • 4 oz. unsweetened baking chocolate
  • 1 1/4 cups flour
  • 3/4 teaspoons baking powder
  • 1/2 teaspoon salt
  • 3 eggs
  • 1 1/3 cups granulated sugar
  • 1 teaspoon vanilla
  • 1 1/4 cups of peppermint patties (quartered)
  • 1 tub of pre-made chocolate frosting
  • 3-4 candy canes to decorate with as desired.

DIRECTIONS:

  • Preheat oven to 325F degrees
  • Cut parchment paper to fit in the bottom of a 9-inch round cake pan.
  • Liberally grease bottom and sides of pan, and place parchment paper in bottom.
  • Melt butter and unsweetened chocolate in a small bowl using the microwave in 30 second increments and stirring in between.
  • Allow this to cool slightly while you prepare other ingredients.
  • In a medium bowl, stir the flour, baking powder and salt together.
  • Cut peppermint patties into quarters,
  • In a large bowl, beat eggs, sugar and vanilla together for about one minute.
  • Add melted chocolate and beat on low until well combined.
  • Beat in the flour mixture.
  • Stir peppermint patties in using a spoon.
  • Pour batter into pan, smoothing the top, and bake for 30-35 minutes.
  • Be careful to not over-bake.  
  • Remove from oven and allow cake to cool for about 10 minutes, this will allow the peppermint patties to harden up a little.
  • Run a small knife around the edge of the pan and tip cake over onto a cake rack.
  • Remove parchment paper and allow cake to cool completely.
  • Spoon tub of frosting into a small bowl and melt in microwave for 20-30 seconds. 
  • Stir and pour over cooled cake.  Do this while the cake is still on the cake rack, with a plate underneath to catch the drips.  You will not need to use the entire tub of frosting to cover the cake.  I placed my leftovers in a zip top bag, clipped a corner and made fun zig zags on the plates I used to serve the cake.  You could also dip graham crackers or apple slices in it…for a little post-cake-making snack!!!  YUM!
  • Sprinkle with crushed candy canes and ENJOY!!!

Peppermint Brownie Cake!!
My thoughts:  This is an old recipe for me- I’ve been making it for years with a terribly complicated glaze recipe over the top.  Honestly, this melted frosting is better- and SO much easier!  One note:  I was in a rush to take my pictures, so I took them right away.  Once this sets and cools, the glaze will harden into a fudge like consistency, and it won’t run like it is in my pictures.   
Peppermint Brownie Cake!!!

OR you could just eat it up before it cools and enjoy all the gooey warm minty happiness!  Enjoy!!!~r Peppermint Brownie Cake!!
Other minty desserts here on easybaked:

Mint Creme Brownie CupsHot chocolate Pops!Peppermint Chocolate CookiesAndes Mint Cupcakes

Peppermint Hot Chocolate Cupcakes

Posted on

Rich chocolate cupcakes filled with peppermint cream and topped with a chocolate frosting made with hot chocolate mix ~ a perfect winter treat!

(the hot cocoa frosting is to DIE for…just thought you should know that right up front….!)

I love hot chocolate…. it is one of my favorite parts of winter.  My friend Dawn recently suggested we participate in a Hot Chocolate Run.  If you’ve never heard of this (I hadn’t!) let me show you a little of the amazingness that makes up a Hot Chocolate Run.

Hot Chocolate RaceStarting line of the Hot Chocolate Race

Finisher's MugYUM!!!!

Nothing motivates better than chocolate, I always say!  Who needs a medal when you can have a big cup of cocoa and warm chocolate fondue after a race?

In any case, I’ve been moderately addicted to hot cocoa ever since that weekend.  We all know what happens when I get a flavor stuck in my mind right?  Cupcakes happen.  Hot Chocolate Cupcakes in this case– with some peppermint as a bonus.  If you don’t like peppermint you can easily leave it out of this recipe, but I love the combination!  Are you ready to make these?  Here we go.

INGREDIENTS:

  • One boxed dark chocolate cake mix (plus oil, water and eggs needed to make mix according to box)
  • One packet of Dream Whip (what is Dream Whip? Click HERE)
  • 1/2c. cold milk
  • 3 t. vanilla (divided)
  • 3 tablespoons of finely crushed peppermint candies (I used Peppermint Sprinkles )
  • 1 stick (4 oz.) of salted butter at room temp.
  • 1 stick (4 oz.) of unsalted butter at room temp.
  • 1 cup powdered sugar
  • 1/2 cup of hot cocoa mix (I used Nestle)
  • Kraft Mallow Bits  and peppermint candies to decorate as desired.

DIRECTIONS:

  • Make cake mix according to box, and bake in 24 cupcake liners in muffin tins.
  • Cool cupcakes completely.
  • Make cream filling by placing Dream whip, milk and 1 t. vanilla in a mixing bowl and beating on high until light and fluffy.
  • Add finely crushed  peppermint candy and gently fold in until well combined.
  • Hollow a core out of each cupcake (I used a Chicago Metallic Cupcake Plunger that was recommended to me by a friend– LOVED it!)

Chicago Metallic Cupcake PlungerSo easy to core cupcakes!

(If you have baking friends this is SUCH an inexpensive and fun stocking stuffer idea– it only took me about 5 minutes to core all 24 cupcakes– and I stopped to take pictures!)

  • Pipe filling into each cupcake core.
  • Make frosting by combining butters, powdered sugar, cocoa mix and 2 t. vanilla in a large bowl and beating on high until fluffy.
  • Pipe frosting over cupcakes and decorate as desired.  (The mallow bits were really yummy with this frosting!


Peppermint Hot Chocolate Cupcakes!!!

My thoughts:  Fun and yummy winter treat!!  Not a fan of peppermint?  Just leave the crushed peppermint out of the filling and you have a yummy whipped cream taste with your hot chocolate frosting instead!  

One note:  Put the peppermints on just before serving as the frosting eventually makes them a little sticky.  I hope you and your family love these little treats!  Enjoy!!!  ~r

Peppermint Ice Cream Pie

Posted on


Creamy ice cream in a rich chocolate crust- a cold, refreshing and easy summer treat!

I love ice cream pie.  My mom has been making these since I was little.  It is less of a recipe and more of an idea because there is absolutely no baking involved.  By far, this is the easiest dessert ever posted on this blog.  Are you ready?

INGREDIENTS:

  • One half gallon of ice cream (any flavor- I used peppermint stick)
  • 2 pre-made chocolate graham cracker crusts.
  • One jar of hot fudge sauce
  • Cool Whip topping (if desired)

DIRECTIONS:

  • Spoon all of ice cream into a large bowl and mix until softened.
  • Divide the ice cream evenly between the 2 pie crusts, spreading it in evenly to fill each crust.

  • Cover and freeze overnight.
  • Top with drizzles of Hot fudge and some Cool Whip topping when you serve it!

My thoughts:  This is such an easy recipe to make ahead and keep in the freezer for a time when you need a dessert but don’t have time to make one.  Quick and easy and so refreshing and  yummy!  Enjoy!!!!!  -r

NOTE:  This recipe will be automatically posted for me as I will be out of the country for a few weeks.  I will be unable to answer your questions or respond to your comments during this time– my apologies ahead of time!  I will catch up with all of you when I return!  -r


Grasshopper Mint Cupcakes

Posted on

I just love anything that combines mint and chocolate.  I was thinking about those yummy chocolate covered “grasshopper” mint cookies the other day and decided right then and there that I’d try a cupcake recipe in those flavors.

One of my favorite trends in the world these days is the invention of the cupcake store.  We have several here in my hometown- one of which was actually invited to compete on the TV show “Cupcake Wars”.  I love to see the different ideas these little bakeries have for cupcake treats.

About a month ago my friend Megan came to visit.  She’s 1/2 of the team at Happily Ever After Cakes out in Pennsylvania and we met 2 years ago in Russia. Since we share a love for all things sweet AND she was flying into Chicago, we decided to try Sprinkles Cupcakes.  It was amazing- really the best cupcakes I’ve had from a bakery.  The cupcakes were simple– but the frostings….oh my.  I’m obsessed with making the salted caramel frosting they have.  It was the best frosting ever.  Here’s some pictures from our trip– so much yumminess in one little store.

The flavors we tried were: Red velvet, Salted caramel, Mocha and Coconut.  We loved them all- but especially the Salted caramel….!

On to our recipe this week— yummy mint grasshopper cupcakes!  (Makes 24)

INGREDIENTS:

  • One boxed chocolate cake mix (with water, oil and eggs to make according to box)
  • Approximately 36 Andes Mints
  • 1 stick of salted butter (room temp)
  • 1 stick of unsalted butter (room temp)
  • 1 1/2 c. powdered sugar
  • 2 t. mint extract
  • green food coloring

DIRECTIONS:

  • Preheat oven to 350 degrees.
  • Make cake mix as directed on box.  Evenly divide it into 24 cupcake papers in muffin tins.
  • Place one Andes mint candy into the center of each unbaked cupcake.

  • Bake at 350 degrees as directed on box.
  • Cool completely.
  • Combine butters, powdered sugar, mint and food coloring in a large mixing bowl and beat on high until very light and fluffy.
  • Place frosting into a zip top bag fitted with a large star decorating tip in one corner.
  • Pipe frosting on each cooled cupcake.
  • Top each cupcake with 1/2 of an Andes Mint Candy.

My thoughts:  These turned out so yummy– just a note that some of the Andes mints sank all the way to the bottom of the cupcake– they still tasted really good in the cupcake– but they weren’t all as fun as the one in my picture (below).  Another note– this frosting recipe makes just enough to frost 24 cupcakes– if you like lots of frosting, double the recipe.  Enjoy!!!!  -r

Peppermint Crunch Bars

Posted on

Crispy bars of fudge and peppermint topped with a chocolate glaze.

(I told you I would have to try another recipe with those wonderful little Kraft Mallow Bits!!)

INGREDIENTS:

  • 1 (8oz) package of Philadelphia Cream Cheese
  • 4 c. semi sweet chocolate chips (divided)
  • 4 c. crisp rice cereal
  • 2 c. peppermint Mallow bits
  • 12 T butter

DIRECTIONS:

  • Melt 2 c. of chocolate chips in the microwave in 30 second increments until completely melted and smooth.
  • Soften cream cheese in microwave until smooth and creamy.
  • Combine soft cream cheese and melted chocolate.
  • Add crisp rice cereal and mallow bits(save a few to sprinkle on top!).  Stir until completely coated with the chocolate mixture.
  • Press mixture into the bottom of a foil-lined 9 x 13 cake pan.
  • Melt remaining 2 c. of chocolate chips and butter in microwave until smooth.
  • Pour chocolate glaze over the top of peppermint crisps and sprinkle with remaining mallow bits.
  • Refrigerate for a few hours before cutting.  To cut: remove from pan using foil and cut into squares

My thoughts: Easy, fun and YUM!  Enjoy!

.

Peppermint Chocolate Drops

Posted on

I love new products in the grocery store. Love them.  Last week, on an end cap there was something intriguing: Jet-puffed Mallow Bits by Kraft.  My store had them in plain and peppermint.  They are exactly like the tiny crunchy marshmallow bits found in hot chocolate packets….but in sprinkle form (and in yummy peppermint!).

I tossed a container in my cart and immediately began to daydream about all the wonderful things I could put them in….these cookies are just the beginning….don’t be surprised if you see these little pieces of crunchy happiness in another post soon.

These little chocolate drops have a rich cocoa flavor.  They are just FULL of mini chocolate chips and gooey peppermint marshmallows….   *love*

INGREDIENTS:

  • 1 c. margarine
  • 1 1/4 c. sugar
  • 2 eggs
  • 1/2c. cocoa
  • 2-3 c. flour
  • 1 t. baking soda
  • 1/4 t. salt
  • 2 c. mini chocolate chips
  • 2 c. Mallow Bits in peppermint

DIRECTIONS:

  • Preheat oven to 350 degrees.
  • Line cookie sheets with parchment paper.
  • Cream together margarine and sugar.
  • Use a mixer to beat margarine and sugar together for 2 minutes on medium until fluffy.
  • Beat in eggs, one at a time.
  • Beat in cocoa.
  • Add flour, salt and baking soda and mix by hand (dough will be very thick).
  • Add chocolate chips and mallow bits.
  • Knead dough together until smooth (add more flour if too sticky to knead)
  • Roll teaspoons of dough into balls and place on parchment paper on a cookie sheet. (I use a Small Cookie Scoop to make my cookies all the same size)
  • Bake at 350 for 8-10 minutes.
  • Cool on parchment paper.

These are the perfect party cookie and just in time for Valentines day!  Enjoy!

Mint Creme Brownies

Posted on

If you like mint with your chocolate these brownies are the recipe for you!  Rich and chewy, these brownies are topped with a creamy mint layer and rich chocolate.

INGREDIENTS:

BROWNIE:

  • 1cup butter
  • 2 cup sugar
  • 3 eggs
  • 2 teaspoons vanilla
  • 2 cups flour
  • 1/2 cup cocoa
  • 1/2 teaspoon salt
  • 1 cup milk
  • 1 cup chopped walnuts (optional)

MINT FROSTING:

  • 5 cups powdered sugar
  • 8 tablespoons melted butter
  • 2 teaspoons peppermint extract
  • green food coloring (to desired shade of green)

CHOCOLATE GLAZE:

  • 12oz. semi-sweet chocolate chips
  • 12 tablespoons butter (do not substitute margarine here!)
DIRECTIONS:
BROWNIE:
  • Preheat oven to 350.
  • Cream butter and sugar together. 
  • Beat in eggs, cocoa, vanilla and salt.
  • Add flour and milk (alternating them and mixing well in between)
  • Spread evenly in greased jelly roll pan.
  • Bake at 350 degrees for 15 minutes or until done in center and just starting to pull away from sides.
  • Cool.  

MINT FROSTING:

  • Add melted butter to sugar and extract.
  • Mix well, using water to bring it to a thick but spreadable consistency.
  • Add food coloring to desired shade of green.
  • Spread over cooled brownies and chill for a few minutes to harden up.
CHOCOLATE GLAZE:
  • Melt butter and chocolate together in the microwave in 30 second increments, stirring in between until completely melted and smooth.
  • Pour over cooled mint frosting and spread evenly over top
  • Chill until top layer is hard and cut into bars.


Optional decorating:
  • Using  green chocolate melts that are melted and placed in a ziplock with a corner clipped, drizzle over the top of the warm glaze.  
  • Draw a tooth pick , knife or skewer through the chocolate- 1st one direction and then back the other to make a fun design on the top of these bars.

My thoughts:  These brownies are 100% mom 🙂  I grew up enjoying these yummy treats (she always put the nuts in though and I really prefer them without!)  My mom is an amazing cook and baker- these are just one of many of her recipes I love!  I’ve no idea where she got this recipe– I do know that its been modified throughout the years (more mint…more chocolate- YUM!)  One fun twist to this is that you can color the mint layer with any color.  I’ve matched shower colors with these– made orange halloween brownies….etc.  REALLY fun and yummy recipe– enjoy!  -r

15252625_10153986260942513_8337325014979743591_o

Here we are, six years later. We lost mom to cancer 2 years ago and we miss her SO much. When I asked dad what he wanted for his birthday this year he requested these yummy brownies. This picture was so fun, I thought I’d add it here! So thankful for the recipes that remind me of mom! ~r

%d bloggers like this: