Tag Archives: sweet chocolate chips

S’mores Cookie Cups

Posted on

S'more Cookie Cups!!

These mini graham cracker cookie cups are overflowing with soft marshmallow and chocolate~ a perfect replica of the summertime favorite~ in cookie form!!

These little cookie cups were eaten up faster than any dessert I can remember.  You simply can’t stop at one!  I guess that’s because they are made with all the ingredients used in S’mores!  The marshmallow stays soft, and the  soft chocolate layer on the inside….?  Oh my.

S'more cookie cups!

Here’s how to make them: (printable recipe)

INGREDIENTS: (makes 48 mini cups)

  • One tube of refrigerated sugar cookie dough
  • 1 cup of finely crushed graham crackers
  • 1/4 cup of heavy cream
  • 1/2 cup semi-sweet chocolate chips
  • 1  (13oz) jar of Jet-Puffed Marshmallow fluff
  • 48 Hershey Kisses (unwrapped!)

DIRECTIONS:

  • Preheat oven to 350F degrees.
  • Place cookie dough and crushed grahams (save 2 to 3 tablespoons of crumbs to sprinkle over cups at end) in a mixing bowl and using hands, combine crushed grahams with cookie dough until completely incorporated.
  • Evenly divide dough into mini muffin tins (I used a medium cookie scoop to do this and got about 48 cookies)
  • Bake at 350F degrees for 7 to 9 minutes, until turning a light brown at edges.
  • Remove from oven and immediately press centers in using a mini tart shaper (or a wooden spoon~ although I highly recommend the tart shaper as it is a small and inexpensive tool that I love and use all the time!)
  • Allow cups to cool for 2-3 minutes and then gently run a small knife around the edges and pop the cup out of the tin.  Allow cup to completely cool on counter.
  • Place all cups on a cookie sheet (preferably one with raised edges)
  • In a small sauce pan, heat up heavy cream until just bubbling at the edges (20 seconds or so).
  • Add chocolate chips, cover and allow them to sit for 5 minutes.
  • Stir melted chips with cream until smooth (turn heat back on if needed)
  • Place chocolate sauce in a zip-top bag, clip a corner and pipe chocolate evenly into each cup.

Graham cookie cupsPiping chocolate into cookie cup

  • Fill a mug or small bowl with HOT water, and place a medium cookie scoop into it.  Shake off excess water and scoop one scoop of marshmallow fluff into each cookie cup.  Place scoop back in hot water as soon as the fluff starts to stick to the scoop.

Scoop Marshmallow into cookie cupSmores cookie cups--yum!!

  • Turn broiler on high and place entire cookiesheet full of cookies in the oven under the broiler.  WATCH the cookies– in about 30 seconds the marshmallows will start to brown.  Take the cookie cups out and immediately place a Hershey kiss on the top of each hot marshmallow top.  Sprinkle with graham crumbs (and drizzle with a little white chocolate if you like).
  • Let these sit for about an hour.  The bottom of the kiss will melt and attach to the marshmallow.
  • You can serve these warm, or at room temp.
  • Once they are cooled, you can store them in an airtight container for about a week.

S'mores cookie cups!

My thoughts~ These cookie cups were a big hit.  They really capture the flavor of a s’more and they aren’t very difficult to make.  The marshmallow fluff was a little fussy, just because it is so sticky.  I highly recommend it though- it was perfect biting into the gooey soft cream rather than an actual marshmallow.  It captured that melted marshmallow feel.  I *highly* recommend you use a cookie scoop for these.  You can get a scoop almost anywhere these days, but if you can’t find one, try ordering one at Amazon.  I hope you really enjoy making (and eating!) these yummy little treats!!! ~r

Melted Smores cup

Other cookie cup recipes you might enjoy:

Gooey filling in Seven layer cups!Fruit Loop Confetti Cups!!Caramel Coconut Creme CupsSalted Caramel Cookie Cup!!!

Chocolate Lava Cupcakes

Posted on

These rich chocolate cupcakes are made with a cake mix, but filled with warm chocolate fudge that pours out when you take a bite~ yum!!!!!

INGREDIENTS: (makes 18-20 cupcakes)

  • One boxed dark chocolate cake mix (plus water, eggs and oil to make according to box)
  • 1 c. semi sweet chocolate chips
  • 1/2 c. whipping cream
  • 1/4 c. cocoa powder
  • 1/2 c. white baking chips

DIRECTIONS:

  • Heat semi-sweet chips and whipping cream in the microwave, stirring every 30 seconds until completely melted and smooth, making a ganache.
  • Refrigerate for about 2 hours, until hardened to a soft fudge consistency.
  • Scoop small balls of cold chocolate ganache out of bowl using a small cookie scoop (I highly recommend a small cookie scoop for this job- the chocolate is sticky and hard to work with until it is rolled in cocoa- a scoop makes it so much easier!)
  • Roll balls in cocoa powder and keep refrigerated until use.
  • Preheat oven to 350F degrees
  • Make cake mix according to box and spoon about 1 1/2 tablespoons of batter in 18-20 cupcake liners in tins.
  • Gently press a ball of ganache into the center of each cupcake.

  • Cover each ball with a small scoop of cake batter- just enough to cover the ball completely.
  • Bake at 350F for the time recommended on the box.
  • Remove from oven and serve warm with ice cream and drizzles of white chocolate.

If you aren’t serving immediately, warm each cupcake in the microwave for 15-20 seconds before serving.

My thoughts: I’ve had many a molten lava cake and cupcake before, but usually they fall apart right out of the pan.  These cupcakes hold together beautifully and don’t leak all that warm fudge out until they are cut into.  They are perfect re-heated and sooooo yummy with a little ice cream and raspberry sauce.  A perfect treat for a chilly fall day!!  Enjoy!!  ~r

Other cupcake recipes you might enjoy: (click on the image to be taken to the recipe)

Caramel Fudge Brownies

Posted on

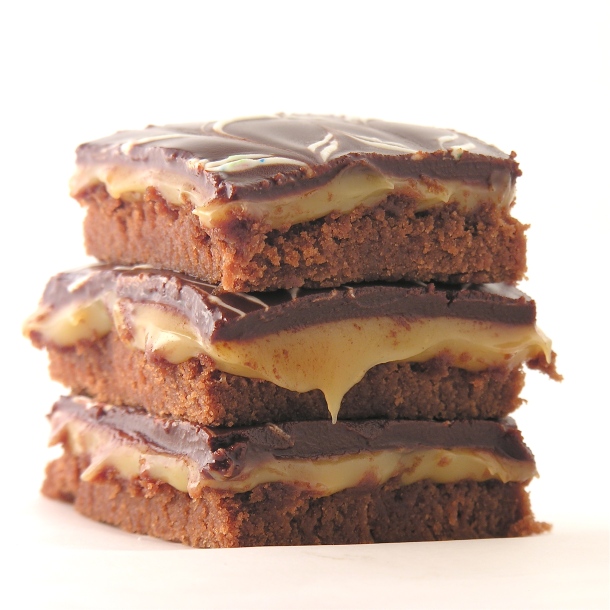
Layers of brownie, soft caramel and fudge make this dessert irresistible!!!
If these brownies look familiar to you, it is because they are the very same recipe as my Mint Creme Brownies but with a thick layer of caramel instead of the mint creme.  I love these brownies because they hold together so well and are so chocolatey and rich- the sky is the limit as far as different toppings you could layer on top of them, but here’s a recipe for caramel:
INGREDIENTS:
BROWNIE:

  • 1c. butter
  • 2c. sugar
  • 3 eggs
  • 2 tsp. vanilla
  • 1/2c. cocoa
  • 1/2tsp. salt
  • 2 c. flour
  • 1c. milk
  • 1 c. chopped pecans (optional)

CARAMEL:

  • 32 Kraft caramels (unwrapped)
  • 1/2c. butter
  • 1 (14 oz.) can of sweetened condensed milk.

FUDGE GLAZE:

  • 12oz. semi-sweet chocolate chips
  • 12 T. butter (do not substitute margarine here!)

DIRECTIONS:
BROWNIE:

  • Preheat oven to 350.
  • Cream butter and sugar together. 
  • Beat in eggs, cocoa, vanilla and salt.
  • Add flour and milk (alternating them and mixing well in between).
  • Spread evenly in greased jelly roll pan.
  • Bake at 350 degrees for 15 minutes or until done in center and just starting to pull away from sides.
  • Cool.  

CARAMEL:

  • Place unwrapped caramels, butter and sweetened condensed milk into a saucepan and heat until completely melted.
  • Stir this constantly to prevent scorching (about 6-8 minutes).
  • Gently pour over cooled brownies and spread to edges.
  • Put entire pan in freezer while you make the glaze (10-15 min) to allow the caramel to harden a little.

FUDGE GLAZE:

  • Melt butter and chocolate together in the microwave in 30 second increments, stirring in between until completely melted and smooth.
  • Pour over cooled caramel and gently spread evenly over top
  • Chill until top layer is hard and cut into bars.

My thoughts:  The mint creme brownies are one of my favorite desserts— add caramel instead and these are just soft gooey sweet amazingness.  If you want a harder caramel layer just store these in the fridge until you serve them.  Softer caramel?  Leave at room temperature and serve with a fork!   I wish I didn’t have a plate of them left in my kitchen….they are calling me….do you hear them??   Enjoy!!! r-

Mini Boston Cream Pies

Posted on


These miniature Boston Cream Pies are the CUTEST treat!  Covered in chocolate glaze with a surprise yummy filling in the middle, these are sure to make you and your family smile!

When you are as obsessed with desserts as I am, you get really fun kitchen presents!  For my birthday last year, my friend Angie got me the most adorable Mini Cake Pan ever.  They are made by Wilton and they create cute little layer cakes that have a square of filling on the inside.  I love them and decided to use them with this Boston cream Pie recipe instead of just a plain old regular size cake.  If you want to try the pans out just click on Mini Cake Pan and you can see them on Amazon– if you don’t want another kitchen gadget (I totally understand the dilemma!) just make this recipe in two regular round cake pans- put the filling in the middle and just pour that glaze right over the top.

Ingredients:

  • One white cake mix (with water, oil and eggs to make according to box)
  • One box (3.4 oz) JELL-O instant vanilla pudding
  • 1 c. milk
  • 1 1/2 c. Cool Whip Topping
  • 2 c. semi sweet chocolate chips
  • 1c. unsalted butter
  • 1 T. corn syrup

Directions:

  • Make glaze 1st: Melt together chocolate chips, butter and corn syrup and mix well.  Refrigerate at least one hour.
  • Preheat oven to 350 degrees.
  • Make cake mix (whole egg method) according to box.
  • Spoon about 1/2 c. batter into each well greased Mini Cake Pan.
  • Place pans on a cookie sheet and bake at 350 degrees for 18-20 minutes.
  • Tip pans over onto a cake rack and allow cakes to cool completely.

  • Repeat process (one cake mix makes 4 to 5 full (two piece) cakes).
  • To make filling, combine pudding mix with milk and whisk for 2 minutes.
  • Fold Cool Whip topping in and set aside for at least 5 minutes.
  • Trim bottoms of cakes flat and spoon filling into each cavity.

  • Tip one cake on top of the other, keeping the filling in the center.
  • Remove glaze (it will be pretty thick) from the fridge and frost tops and sides of each cake.
  • Reheat remaining glaze and pour over the top of each cake to make a smooth outer layer (do this on a cake rack over a cookie sheet so excess glaze can drip through).
  • Chill until glaze is hard.


My thoughts:  I just served these last night and they were a huge hit.  Everyone loved how cute they were and the surprise filling in the center.  I loved the creamy filling with the rich glaze…YUM!  The glaze is a little difficult to get right (I thought!)  I was hoping for a smoother finish- but it tasted GREAT!  –Enjoy!!!!!!!  -r