Category Archives: Cookie Cups

No-Bake Easter Nest Cookies

Posted on

Easter nest 4-1These crunchy little nest cookies are filled with the (seriously addictive!) Cadbury mini eggs and a pinch of coconut. A perfect Easter treat! 

Easter nest 6-1

I just want you to know… I am the owner of the perfect no-bake cookie recipe. It’s my mom’s recipe, and it is perfect because it was the recipe we grew up enjoying. My mom passed away about 6 years ago, and I cherish every recipe I have of hers. When I was thinking about making Easter nest cookies, this recipe was the 1st to pop into my head. For sure I could have made it with the traditional oatmeal, but that’s not very nest-y, is it? So I used shredded wheat (the big ones!) I had to look a little bit to find the full-size shredded wheat (there are like a million flavors of mini!), but I found it- and it worked perfectly. I see you, chow-mien nest-makers- but I just could not bring myself to cover chow mien noodles in chocolate. Ewww. Sorry. Sticking with cereal here 🙂

Easter Nest 2-1

Want to know how to make these little nest cookies? Here is the recipe: (printable version)

Ingredients: (makes 24 mini nest cookies)

  • 2 cups sugar
  • 1/2 cup milk
  • 1/2 cup margarine (or one stick of butter)
  • 1/2 cup cocoa
  • 1/2 cup peanut butter (creamy)
  • 3 teaspoons vanilla extract
  • 4 cups of broken up shredded wheat (this was 9 big pieces, broken up)
  • 1/2 cup coconut (optional) with a tiny bit of green food coloring
  • 72 mini Cadbury eggs (just get a big bag- you’ll want the rest- I promise!)

Directions: 

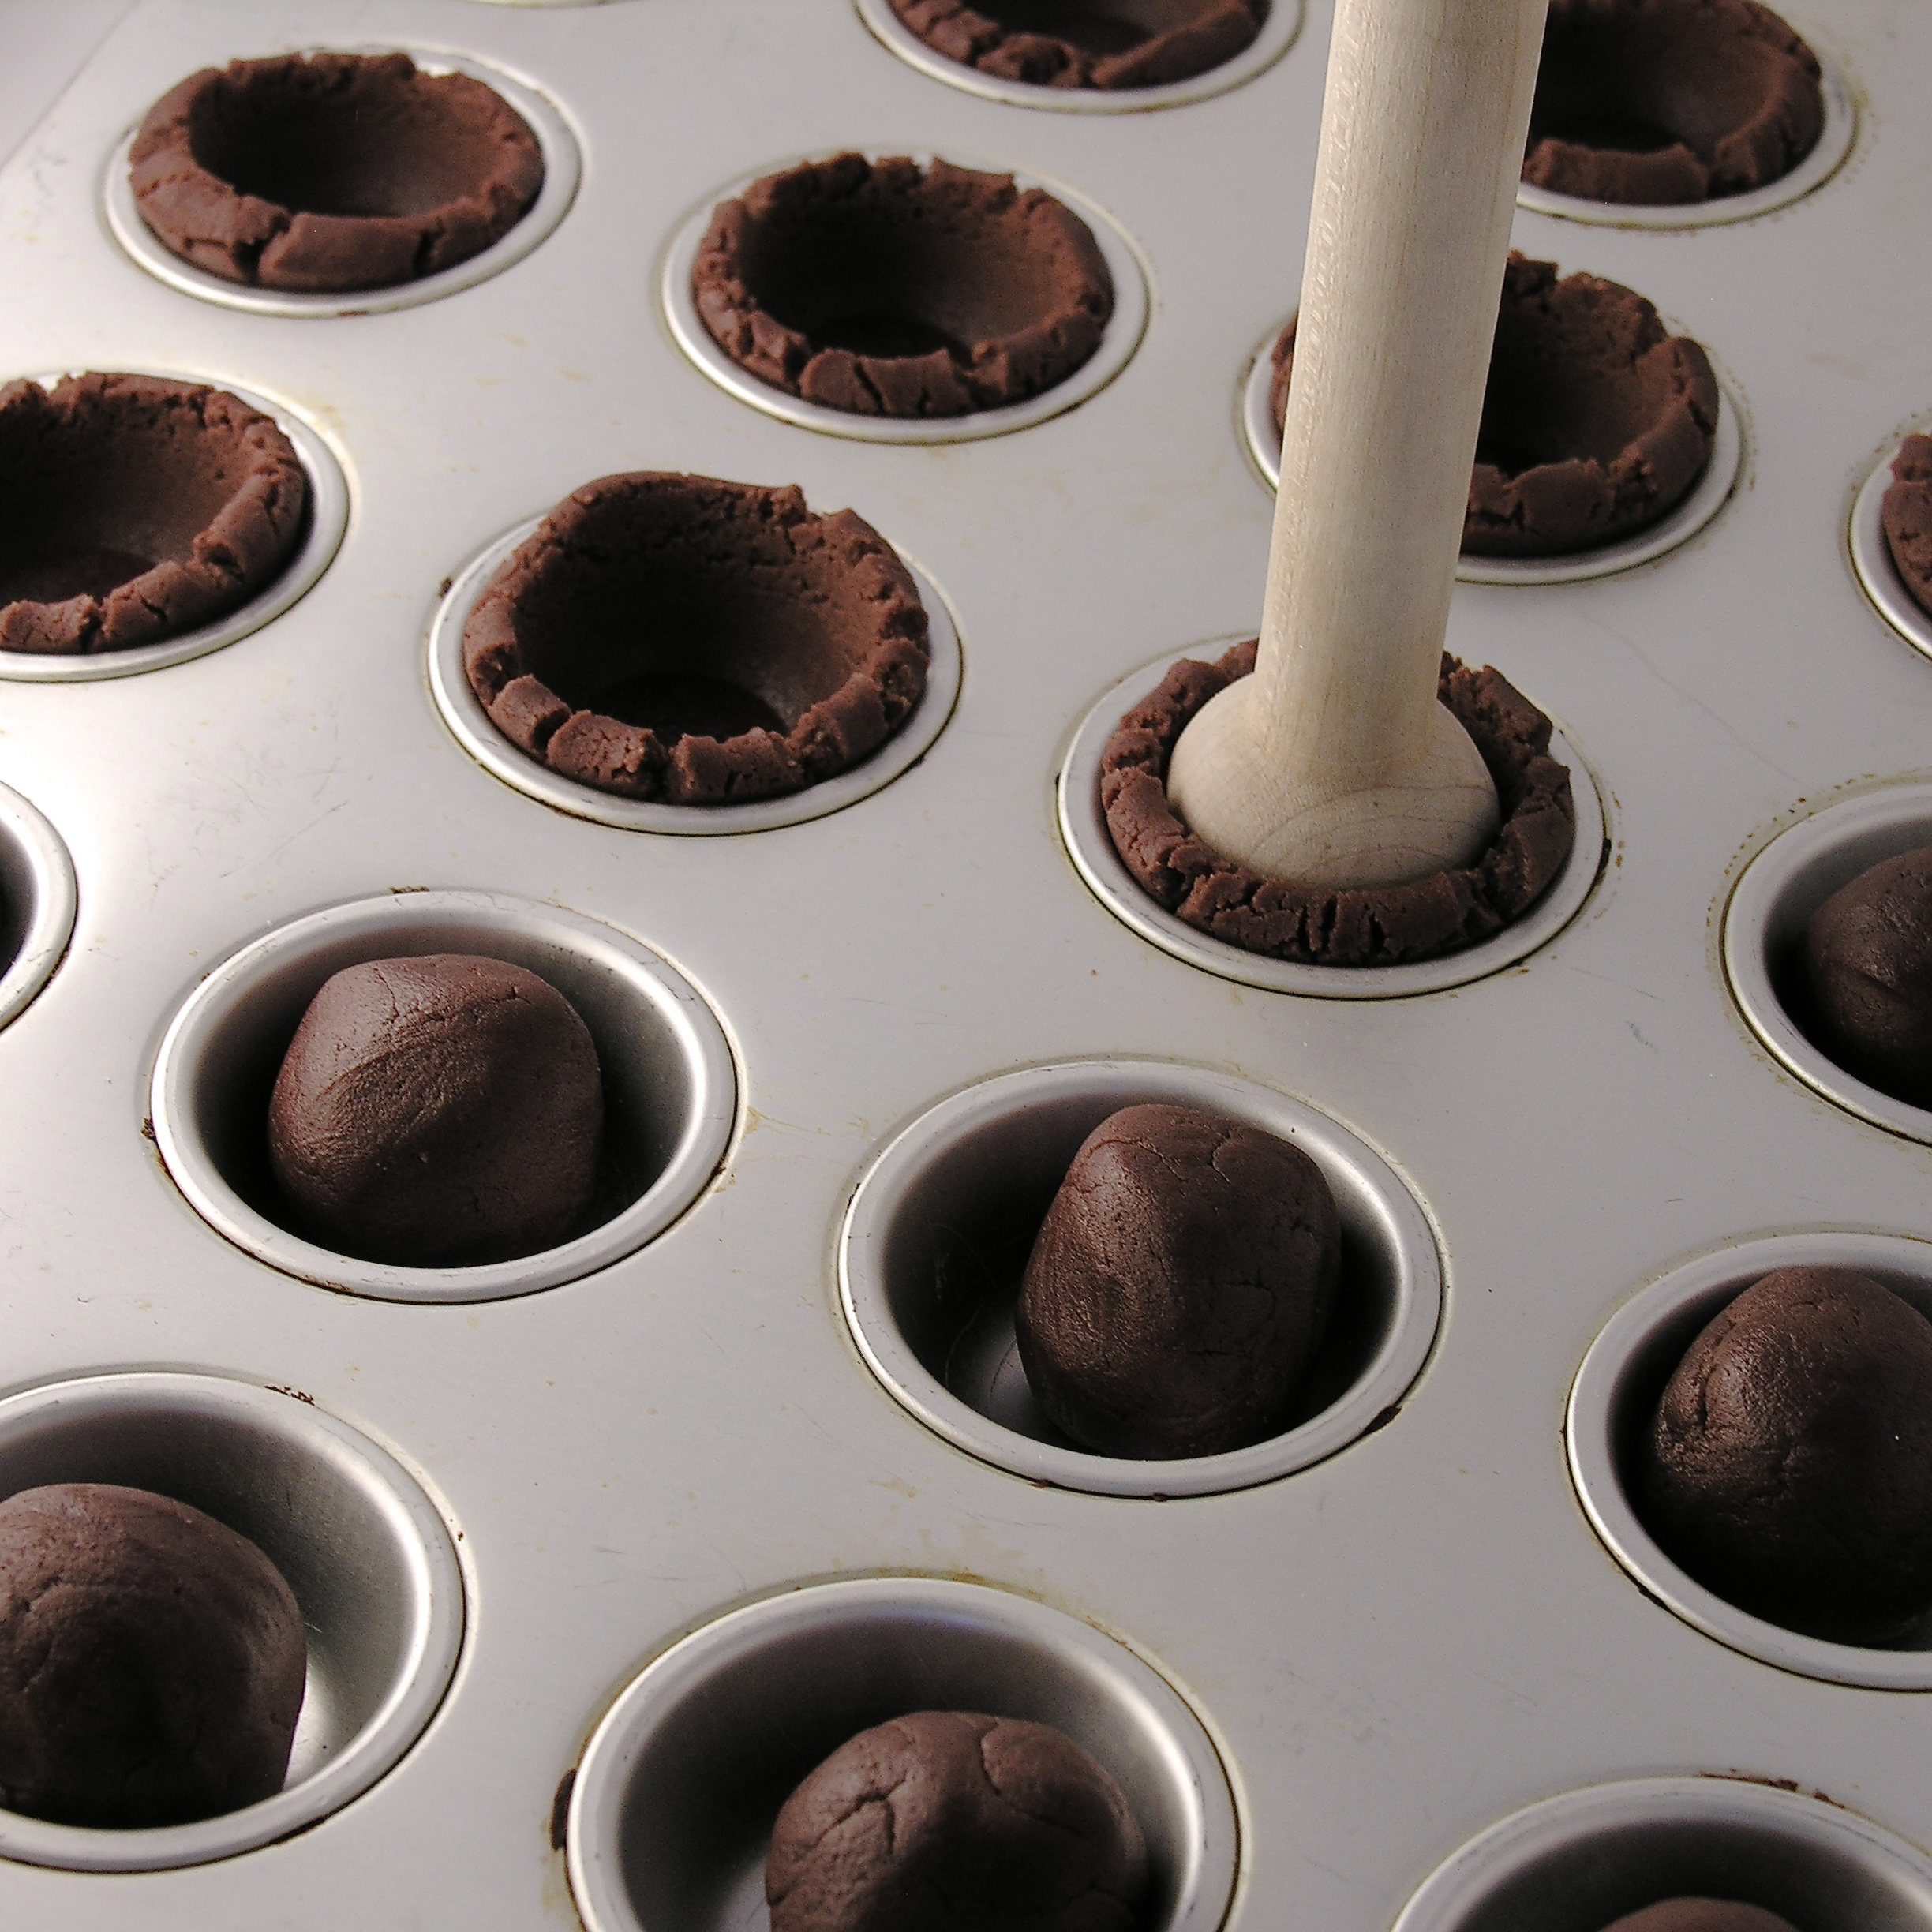
  • Crunch up the shredded wheat until you have 4 cups.
  • If you use coconut, place it in a zip-top bag with the food coloring and shake until green.
  • Spray a mini-muffin tin with non-stick spray and set aside. 
  • Measure sugar, milk, margarine, and cocoa into a large saucepan. 
  • Heat until boiling (stirring constantly) and then boil for 2 minutes. 
  • Add peanut butter and vanilla. Stir until smooth. 
  • Take off heat, and add Shredded wheat, stirring until it is completely coated. I recommend adding it one cup at a time and using a little less if it gets too thick to stir well.
  • Working quickly, spoon or scoop into mini-muffin tin. 
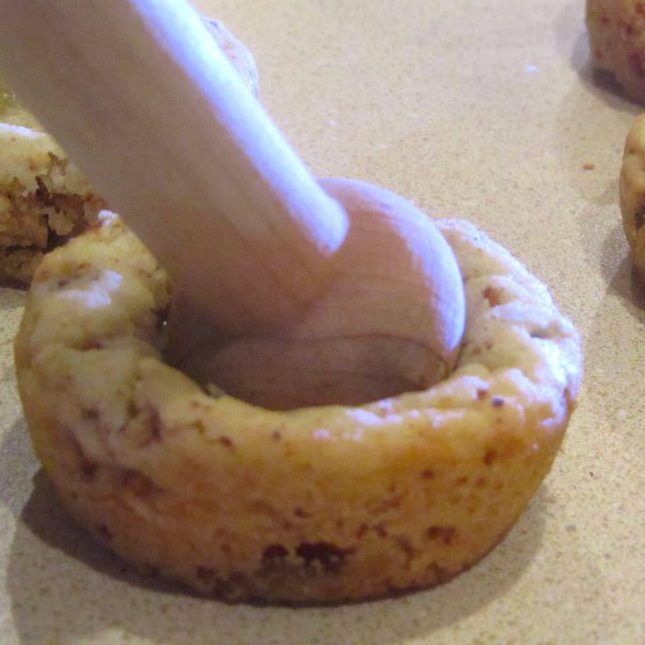
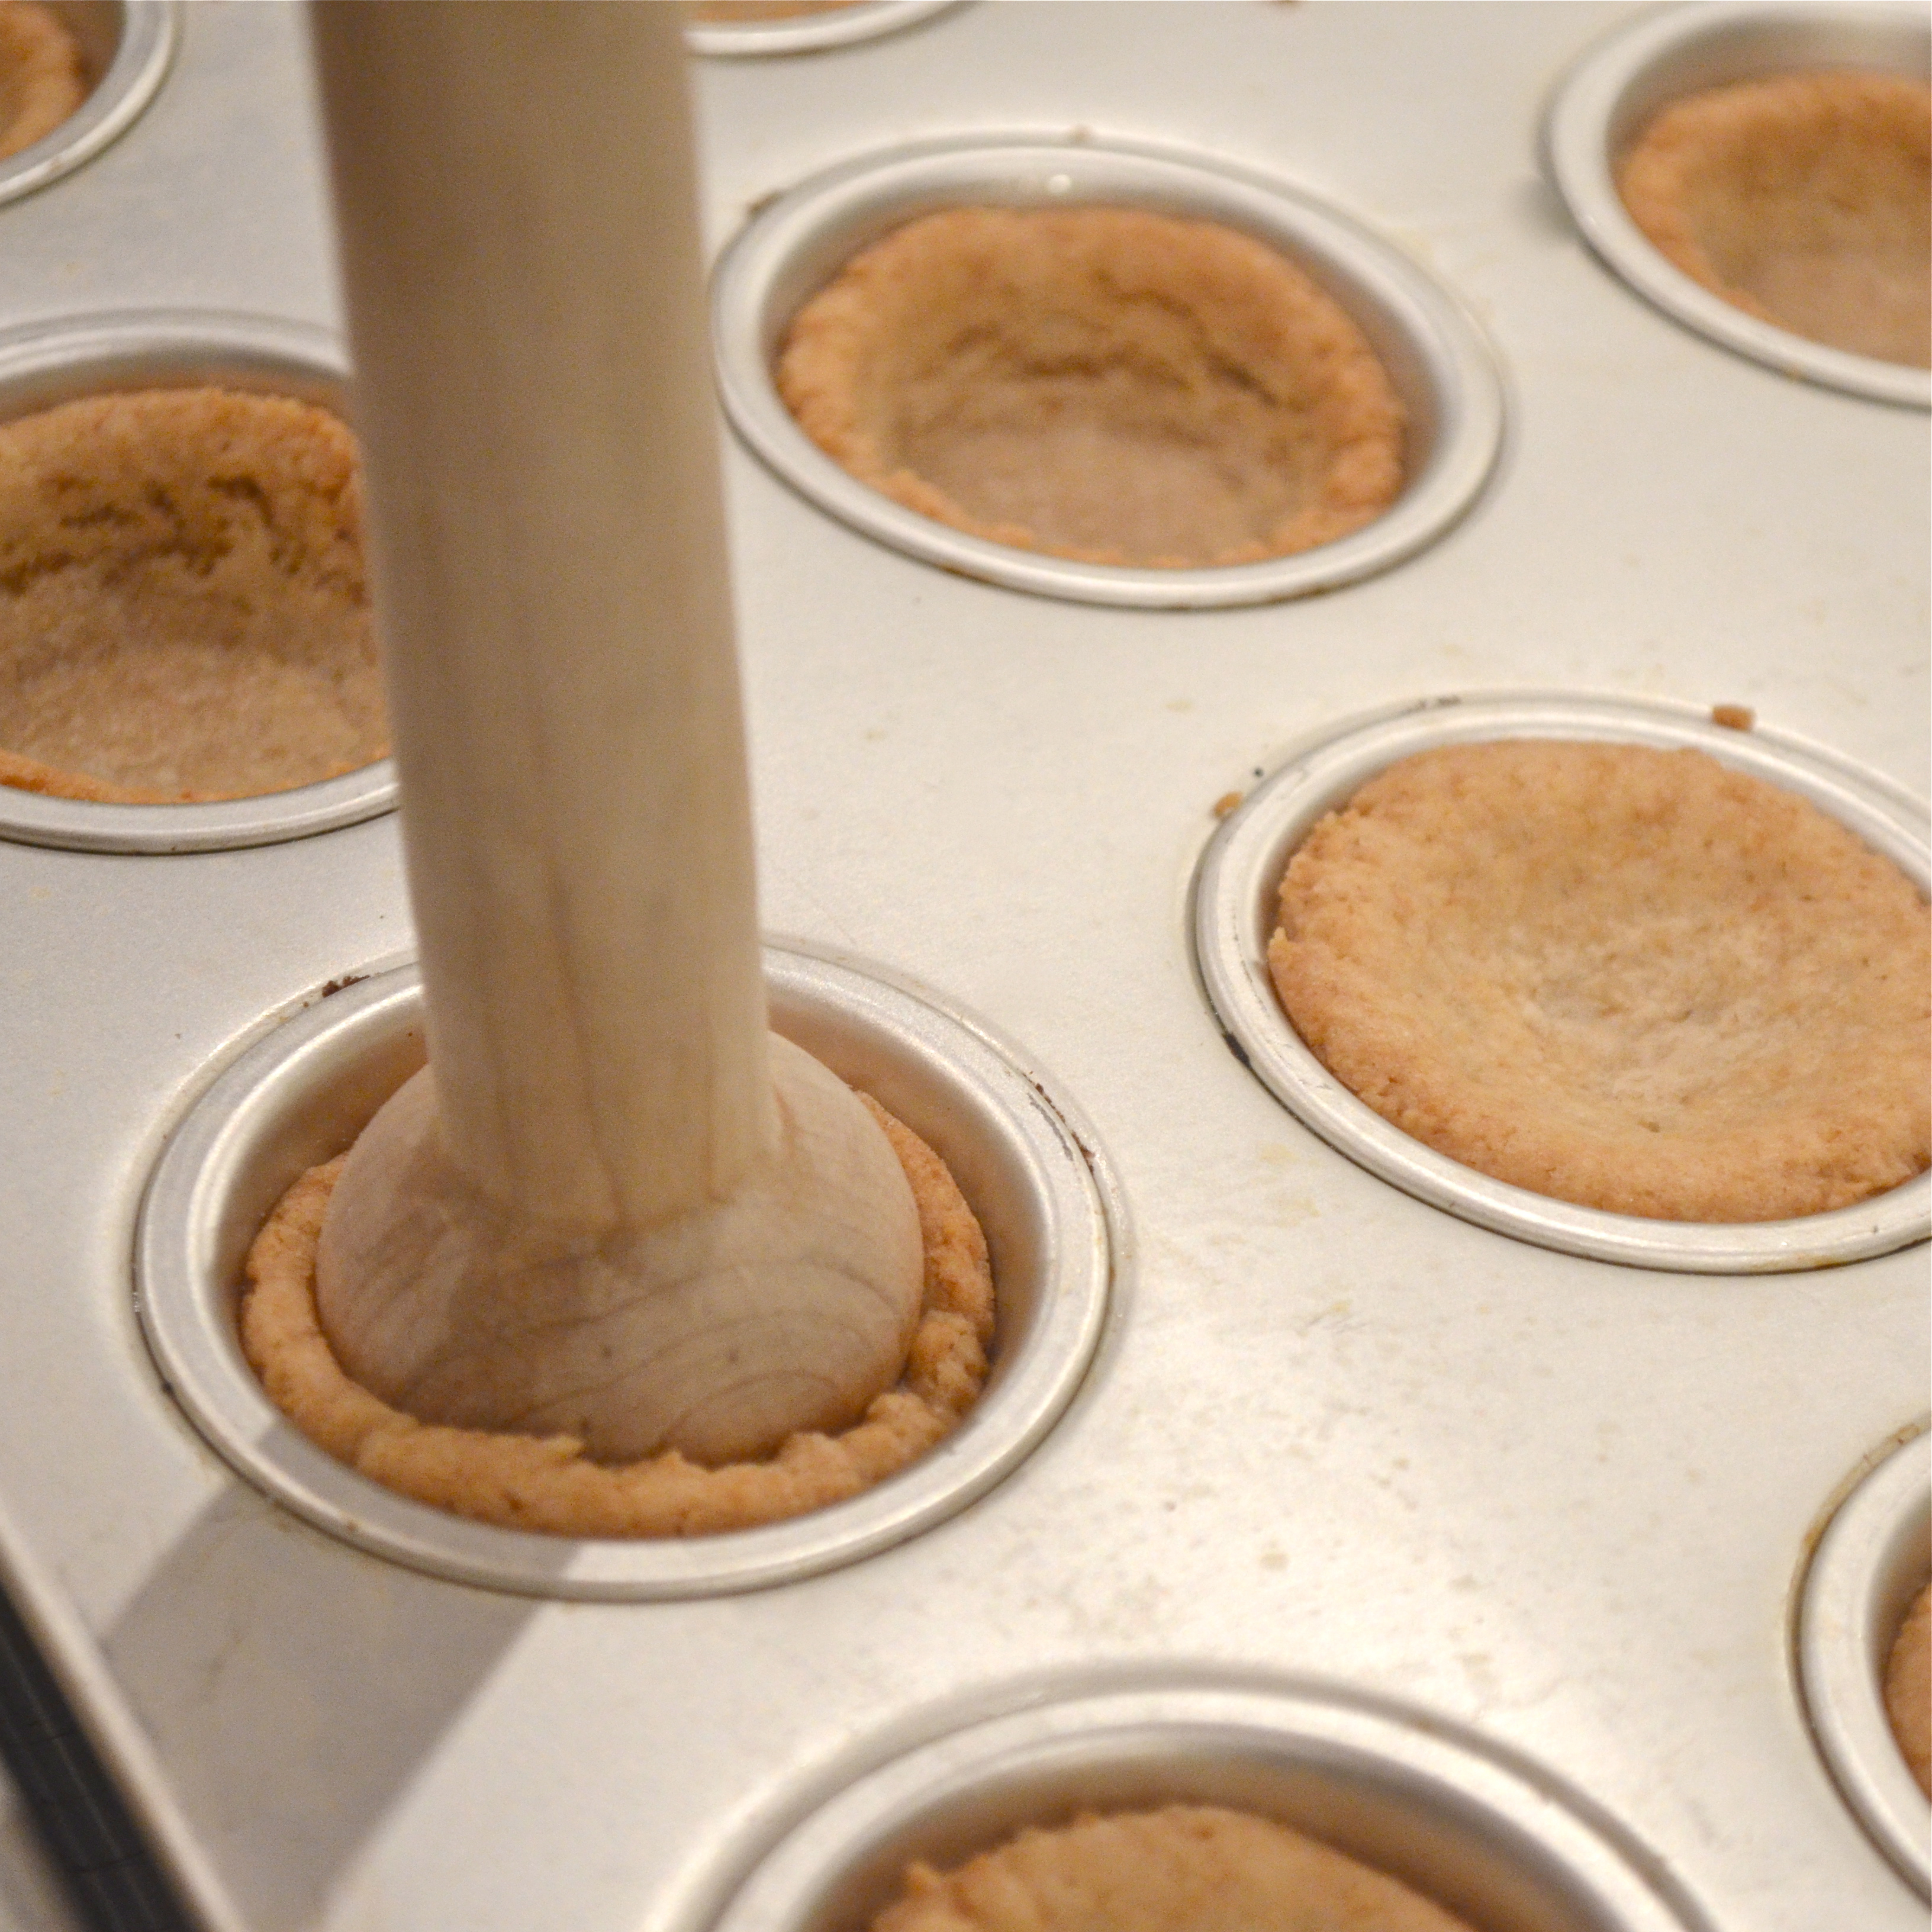
  • Use a tart shaper or a rounded measuring spoon to press the center in (spray this item with cooking spray between each nest to keep it from sticking). 
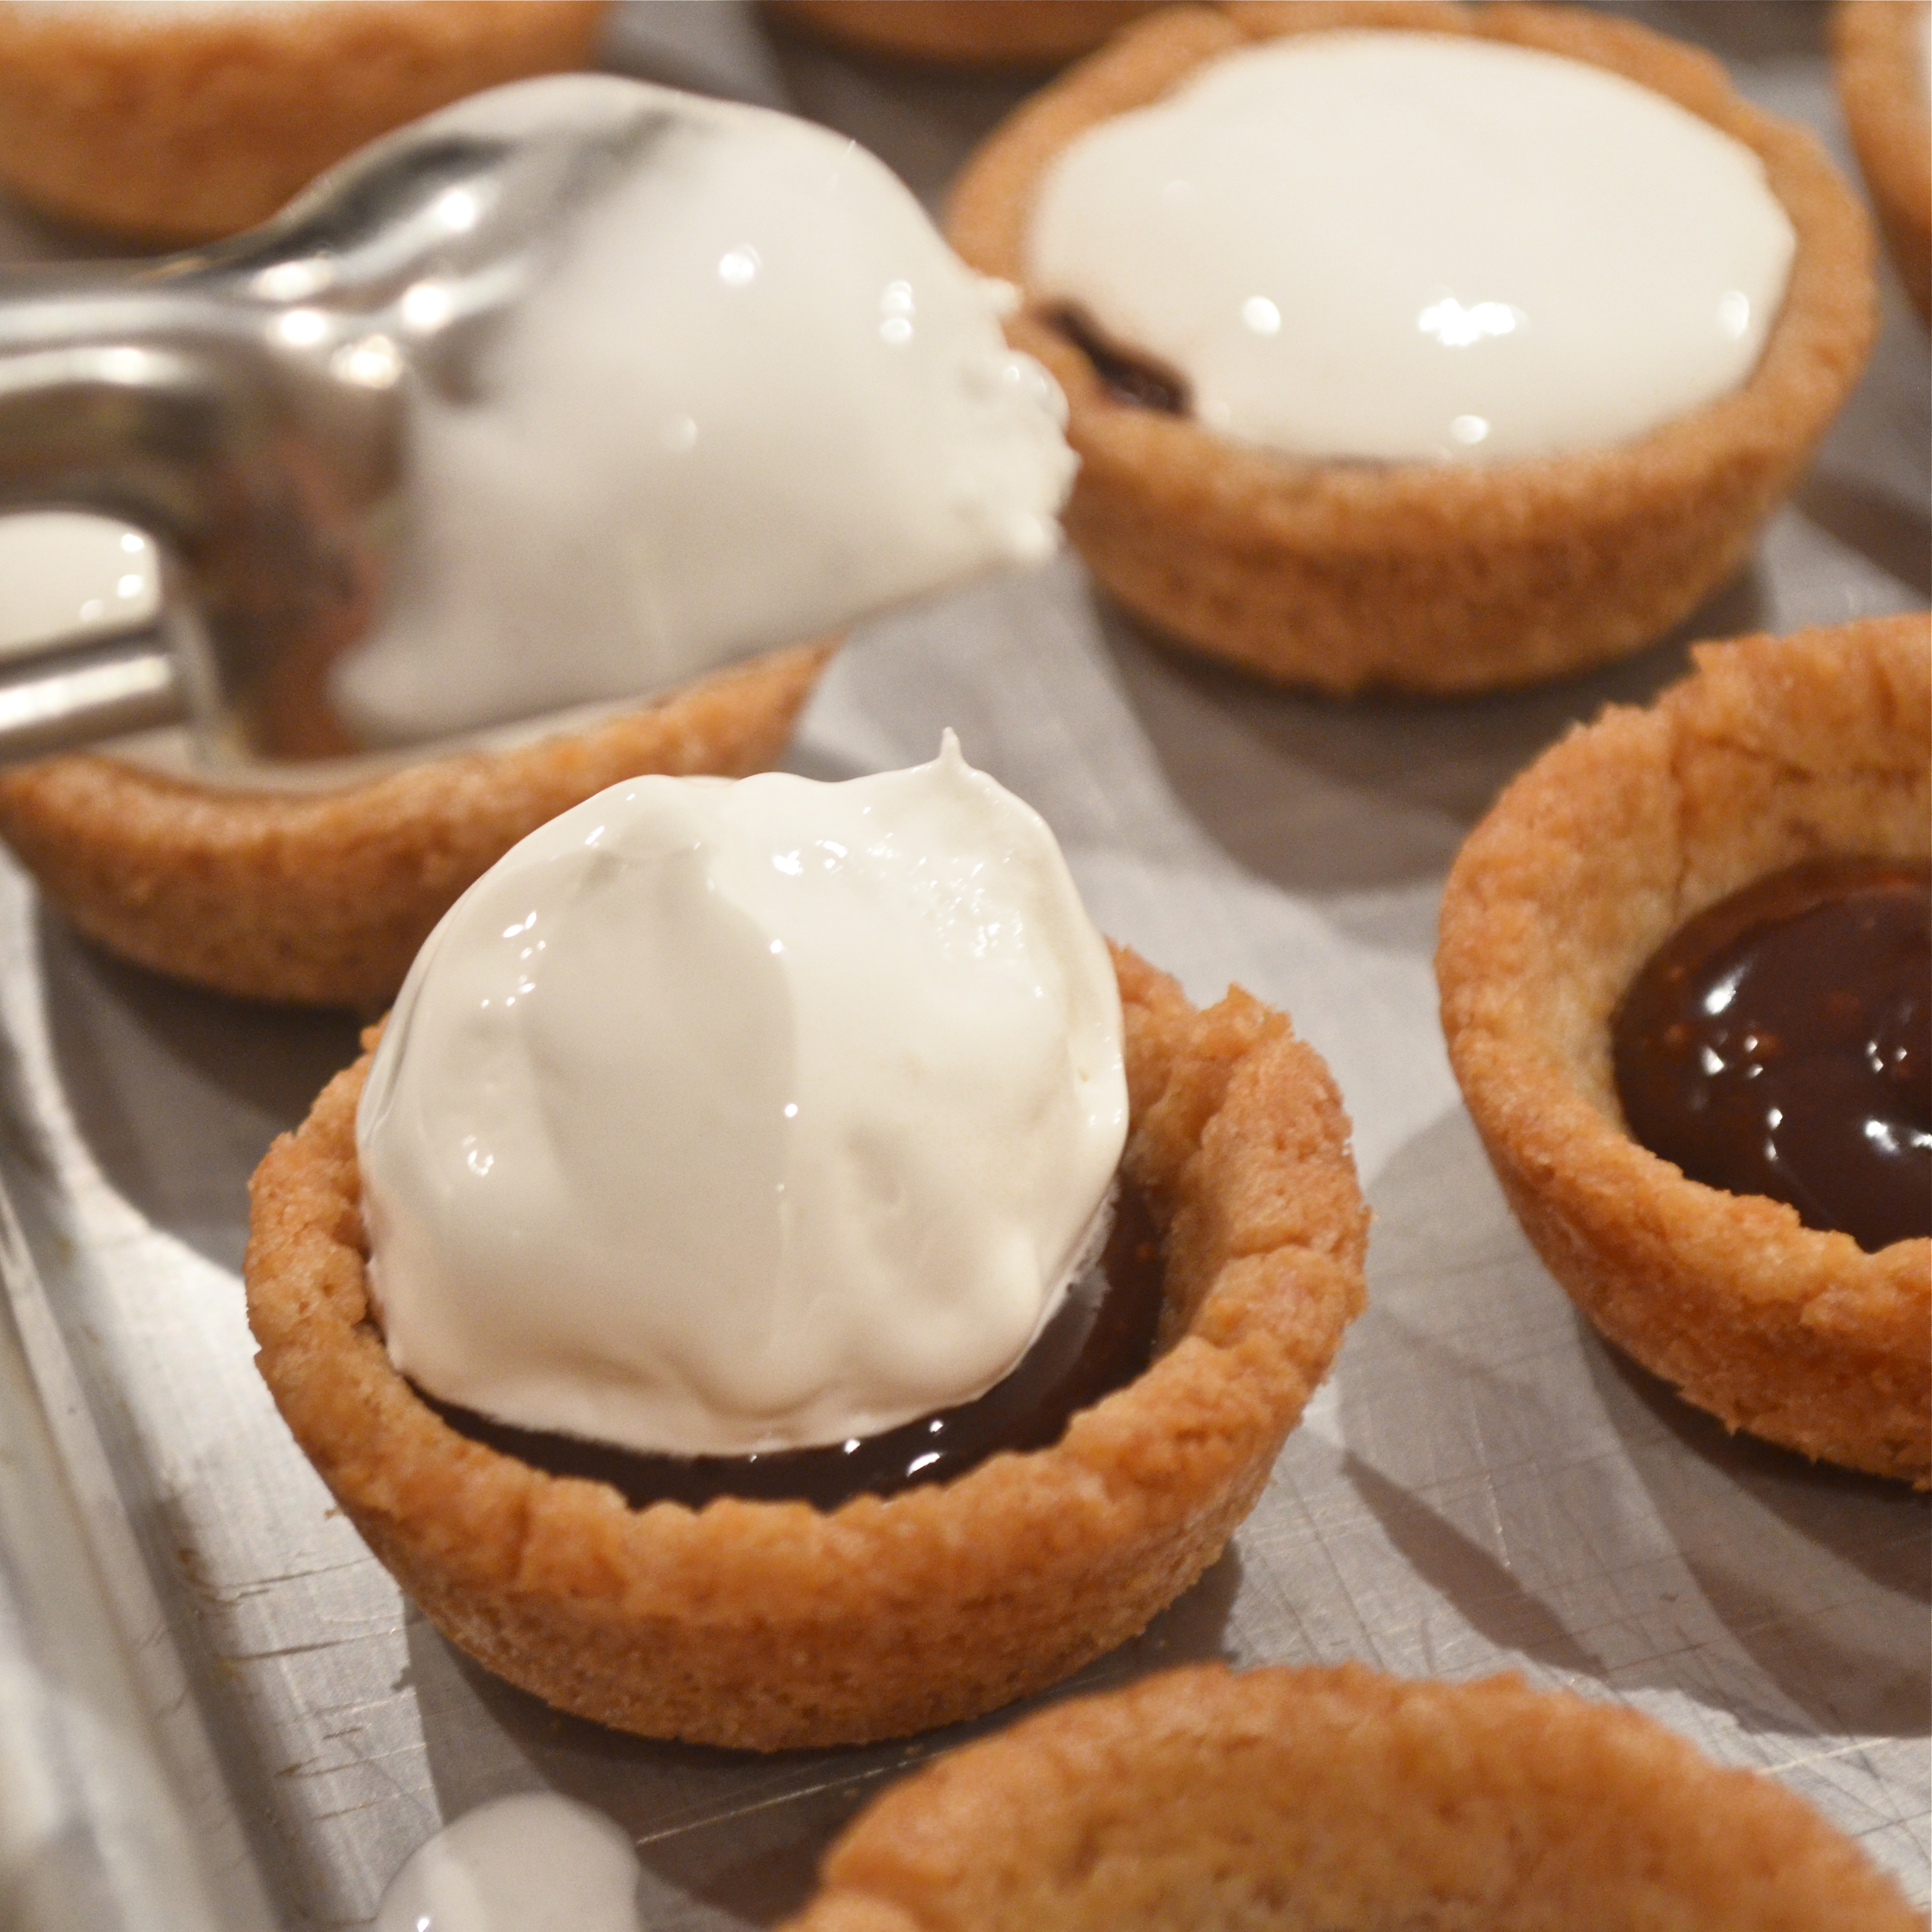
  • Sprinkle a little coconut over each nest. 
  • Press three eggs into each nest. 

Nest process1Process3Process2

  • Allow nests to cool and harden.
  • Use a small knife to pop nests out of pan. 
  • Enjoy! 

Easter nest 5-1

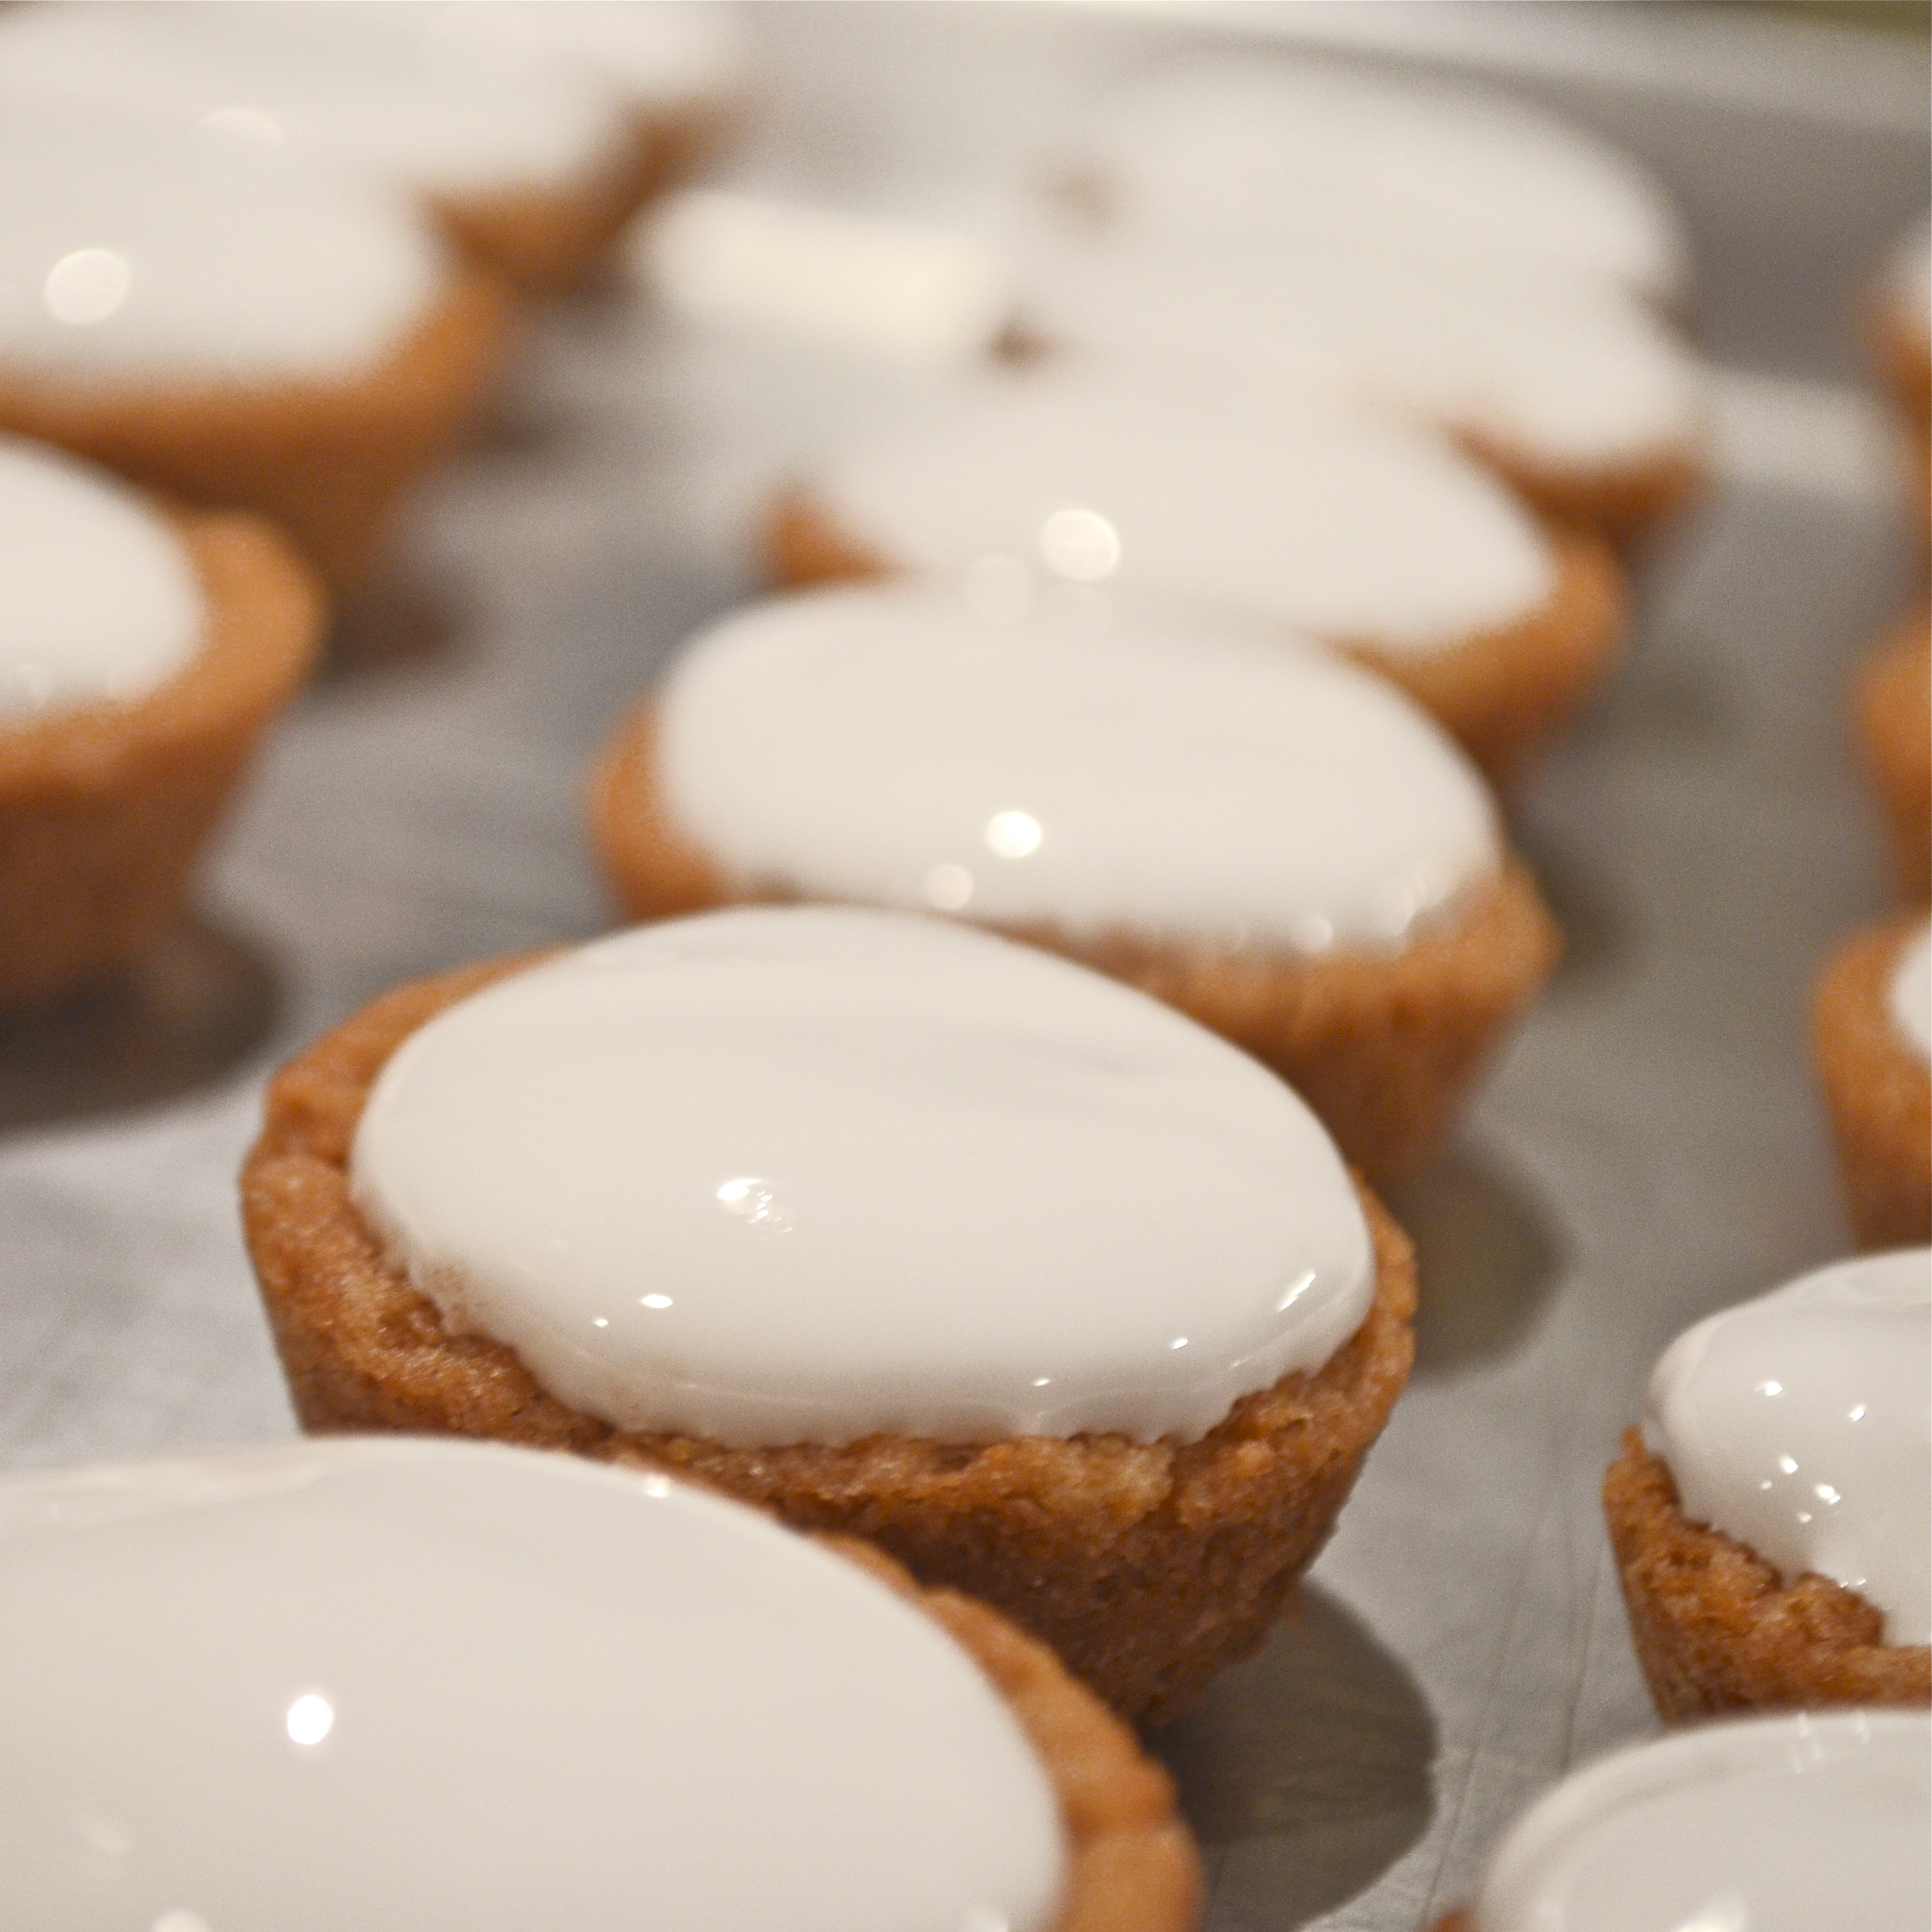
My thoughts: I love how interesting these cookies taste with a different cereal added! For sure the shredded wheat gives these a more nest-like appearance. I really wanted to get the Cadbury eggs that are shimmery, but I couldn’t find them at my grocery, so I sprinkled a few edible sparkles over the top. 

If you want to try these with the oatmeal (and experience one of my favorite cookies from childhood), I will leave you with my mom’s original recipe (in her handwriting :)). I actually remember her writing this out for me (from memory). I’d just gotten my 1st apartment out of college and was craving these and she pulled out her notepad and jotted this down for me.

Just a note though- she NEVER used butter (even though the recipe says butter). Butter translated to her was always Country Crock. I use margarine as well- just to be true to her recipe- but I’m sure butter works fine too. Enjoy! ~r

Mom's recipe

Looking for other fun recipe ideas for Easter? We have lots of them! Just click a photo to see the recipe!

babychicks3cadbury-egg1dscn8243jelly-bean-cookies1

Lemony Ginger Snap Cups

Posted on

Creamy lemon pie inside of a chewy gingersnap cookie cup! A perfect summer treat!

I am usually several week to months ahead in this blog. In January I am thinking about Easter, at Halloween I am baking Christmas cookies. But today- I am behind! Goodness, I’ve had such a busy spring and summer. I was 2 months ahead and now I’ve got nothing planned for the coming weeks. All that to say- I needed something SO easy and quick this week. These are a perfect recipe for easy and quick! 🙂

They don’t LOOK easy and quick- but 30 minutes, including baking time, is all you’ll need! Love it!

Here’s how we made them: (printable recipe here)

INGREDIENTS: 

  • One tube of refrigerated sugar cookie dough
  • About 3 cups of gingersnaps cookies (you’ll need 2 cups of them crushed)
  • One can of lemon pie filling
  • One container of Cool Whip (or make your own whipped cream if you prefer)

DIRECTIONS:

  • Preheat the oven to 350F degrees.
  • In a large mixing bowl, use clean hand to knead together 1 and 1/2 cups of cookie crumbs with the refrigerated cookie dough. 
  • Divide evenly into 12 muffin tins and press into bottom. 
  • Bake for 16- 20 minutes.
  • Use a tart shaper or a wooden spoon to press the centers in, forming a cookie cup (photo below is from an earlier cookie cup recipe, but shows how you should shape the cups. It is easier if you shape them in the tin and allow them to cool, which is not what the photo shows- sorry!).
  • Allow cup to cool completely and use a small knife to pop each cookie cup out of the tin.
  • Spoon or pipe lemon pie filling into each cookie cup.


  • Top with cool whip (I used a zip-top bag, fitted with a piping tip, to pipe mine on in swirls). 
  • Sprinkle remaining crumbs on tops. 
  • Keep  covered and refrigerated until serving. 
  • Enjoy!

My thoughts: Easy and delicious! The ginger snap crust is a perfect combination with that lemon filling! Delicious summer flavor combination. I hope you get a chance to try these!!  Enjoy! ~r

Other fun summer recipes on Easybaked (click on a photo to see the recipe):

Boston Cream Cookie Cups

Posted on


boston-cream-cookie-cupsThese adorable cookie cups are filled with white chocolate pudding, and topped with rich chocolate and buttercream.

A perfect mini-dessert!

Let’s hear it for Boston Cream Pie! I’m not sure why they call it pie when it is so obviously cake… but that aside, it is wonderful! I love little bite-size mini desserts, and I’ve wanted to create a Boston cream pie one for some time. These turned out exactly like I wanted them to. Beautiful, bite-sized, and delicious! 🙂

boston cream cookie cups

Plus we use refrigerated cookie dough and instant pudding- so these are easy to make!

Here’s how we made these little guys (printable recipe here)

INGREDIENTS: (makes 48 cookie cups)

  • One tube of refrigerated sugar cookie dough
  • 1 box (3.3 oz.) of instant Jell-O brand white chocolate pudding (plus milk to make according to box)
  • 2 sticks of butter (divided)
  • 1 cup of semi-sweet chocolate chips
  • 1 cup of powdered sugar
  • 1 teaspoon vanilla
  • Red Sixlets candy or sprinkles

DIRECTIONS:

  • Preheat oven to 350F degrees and liberally spray a mini muffin tin with cooking spray.
  • Roll cookie dough into 48 small balls (about 1 heaping teaspoon in size)
  • Place balls into mini muffin cups and bake for 8-10 minutes.
  • Use a tart shaper or a wooden spoon to press centers of baked cookie into a cup.

img_1651 img_1653

  • Cool just slightly and then run a small knife around edges to free cup from tin. Cool completely.
  • Make pudding according to box and place into a large zip-top bag. Clip a corner and pipe evenly into all 48 cups.
  • Melt 1 stick of butter and chocolate chips in a microwave in 30-second increments, stirring until smooth.
  • Spoon into a zip-top bag, clip a corner and pipe over top of pudding.

img_1666 img_1671

  • Allow chocolate to harden.
  • Place stick of butter, powdered sugar and vanilla into a mixing bowl and beat on high until light and fluffy.
  • Spoon into a small zip-top bag that has been fitted with a decorating tip, and pipe a dollop of icing on top of each cookie cup.
  • Top with a Sixlet candy and ENJOY!!!

boston-cream-cookies

My thoughts: These are so yummy. A little extra work to make them into little mini-desserts, but aren’t they cute??? I love the cookie flavor with the filling and chocolate- it adds a different taste than your usual Boston Cream Pie 🙂 One note: make these just a day or so before serving them, as the pudding tends to make the cookie cups a little soggy after sitting a few days. Hope you get a chance to try these! ~r

boston-cream-cookie-cups

Other fun mini-desserts here on Easybaked (click on a photo to see the recipe):

Sweet Lime TartsMini Pineapple Upside Down cakeCookie Dough CupcakesTriple Chocolate Truffle Cups


Fun recipes for kids!

Posted on

Strawberry Lemonade Cupcakes!!!!!Summer is almost here- and that means summer vacation! I remember spending my summer days in the kitchen with cookbooks I’d gotten out of the library, trying new things. Sometimes I baked with mom- and sometimes I ventured out on my own and learned valuable lessons like you can’t put the whole egg in when the recipe calls for just egg whites!

As an adult, I love baking with kids. I love creating recipes that make kids smile. My childhood interest turned into a lifelong hobby for me, and it’s fun to share that with a new audience.

I thought I’d share some of my favorite kid-friendly recipes that have been posted on Easybaked over the years.

Some of these are featured in my cookbook for kids, “Life is Sweet, Baking Devotions for Kids”.

As I share photos of these recipes, click on the photo to be taken to the recipe!

Easy Recipes- ones that kids can make on their own or with a little adult supervision.

Cinnamon Cheesecake Sundaes– use wonton wrappers to make crispy little cups. Fill them up with a no-bake cheesecake and sundae toppings. Kids love to make their own creative sundaes!

Cinnamon Cheesecake Sundaes


Nutter Butter Flip Flops- less baking and more art! Simply dip Nutter Butter cookies in Wilton’s candy melts and draw on flip-flop straps. It might take a little practice, but learning to dip things in chocolate is a skill everyone should learn!

Nutter Butter Flip Flops

Tie-Dye Cake- If your kids love color, this cake will make them smile! You color cake mix in all the shades of the rainbow and then bake it into a swirling masterpiece. With blue frosting. Everyone loves blue frosting- right?!?

Tie-Dye Cake with Blue Raspberry Frosting!

Hamburger Cookies- They look like hamburgers but taste like chocolate. What kid wouldn’t love that! Easy and quick to make- and very cute when served with those mini potato sticks as french fries!

Hamburger Cookie!

Earthworm Cupcakes- Kids will love making these jello “worms” and poking them into Oreo crumbs. Not just your USUAL dirt cupcakes- because this time the worms look REAL!

Edible Jello Earthworm Cupcakes

“Pup”cakes- If your kids are looking for someone special to bake for… try these super-easy cupcake treats for dogs! Peanut butter happiness for everyone!

Pupcakes8

Confetti Kisses- here’s that chance to learn about egg whites! A little supervision if they’ve never divided an egg before- and help with beaters- but add some Jell-O and you have such a fun treat!

Raspberry Confetti Kisses


Recipes for kid’s parties: These are fun ideas to surprise kids with. Maybe they help create the masterpiece- or you create it for them. These are a little more difficult, but so much fun!

Frozen S’mores Cups!

frozen s'more cups

Kool-aid Truffles

Kool-Aid Truffles!!

Candy-filled Cake

Confetti Cake Filled with Candy

A Dr. Seuss-style stack of cupcakes

Pile of Cupcakes!

Polka Dot Cake!

Polka Dot Cake!!!

Toxic Slime Cupcakes!

Toxic Slime-filled Cupcakes!

Oreo Frogs!

Frog Oreos!!

Root beer float cupcakes (one of my favorite cupcake recipes!)

Root Beer Float Cupcakes!!!!

And last…but certainly not least:

Kool Aid Pie!

KoolAid Pie

I hope I’ve inspired a little summer fun in the kitchen!  Enjoy! ~r

12291253_10153201470262513_496953405046934959_o

One of our specialties here on Easybaked is our fun-to make (and eat!) Oreo pops! We have them for every season! (click on photo to get directions!)

Original Oreo pops!!!!!Mummy Oreo Pops!Snowman Oreo PopsLadybug Oreo Pops!

Reindeer Oreo Pops!!!Rainbow Oreo Pops!!!!Goldfish Oreo Pops!American Flag Oreo Pops!!!!

Turtle Cookie Cups

Posted on

Turtle Cookie Cup

Chocolate cookie cups full of creamy caramel, chocolate and pecans.  So many fun fall flavors in one little dessert!

There’s something about November that makes me think caramel and pecans. Comfort food, maybe? Thanksgiving?  I’m not sure, but these yummy little treats hit the spot!  They are fun to make, and a pretty mini dessert for all those November and December get-togethers.

Here’s how they are made: (printable recipe)

INGREDIENTS:

Cookies:

  • 2 sticks (one cup) butter (softened)
  • 1 ½ cups sugar
  • 2 eggs
  • 1 teaspoon of vanilla extract
  • 2/3 cup unsweetened cocoa powder
  • 3 cups flour
  • ½ teaspoon salt
  • ½ teaspoon baking powder

Toppings:

  • 1 bag of Wilton’s candy melts in milk chocolate
  • 2 cups of chopped pecans and about 60 whole pecans
  • 32 Kraft caramels (unwrapped)
  • 1 can (14oz) sweetened condensed milk
  • 1 stick (1/2 cup) butter

DIRECTIONS:

Cookies:

  • Preheat oven to 350 degrees
  • Add butter, sugar, eggs and vanilla together in a large mixing bowl
  • Blend on medium speed with a mixer until smooth
  • Gradually add dry ingredients and mix until smooth (use clean hands at the end, and knead into a soft ball of dough
  • Use a small cookie scoop (I used one that holds ½ tablespoon of batter) to portion your dough into mini muffin tins that have been sprayed with non-stick spray
  • Use a tart shaper, or a wooden spoon to press the dough into a cup shape.

Making cookie cups

  • Bake at 350F degrees for 7-8 minutes and remove from oven.
  • Press centers in a second time and allow cups to cool for just a couple of minutes.
  • Use a small paring knife to pop each cup out and allow them to cool on the counter.

Toppings:

  • Place caramels, sweetened condensed milk and butter into a medium saucepan and heat on medium over the stove until all of the caramels are melted.
  • Heat milk chocolate candy melts in the microwave in 30 second increments until melted and smooth.
  • Place chopped pecans into a small bowl.
  • To assemble, dip top edge of cup in candy melts and then in chopped nuts.

Dipping tops of cookie cups in chocolate

  • Place caramel sauce into a sturdy zip top bag and clip a corner.
  • Pipe caramel into each cup until filled completely and top with a whole almond.
  • Allow caramel and chocolate to firm up.
  • Store in an airtight container for 2-3 days.
  • Enjoy!

Turtle Cookie Cup2

My thoughts: These are a little time-consuming to make, but sooooo yummy. They are a perfect mini-dessert for any of the upcoming holidays, and they got RAVE reviews in my little world! That caramel….!!!! Enjoy! ~r

Other fun mini desserts here at Easybaked (click on a photo to see the recipe)

Cheesecake Sundaes Mint Creme Brownie CupsCake balls filled with cream cheese frostingMini chocolate chip cookie cheesecakes

Fudge Stripe Cookie Cups

Posted on

Fudge Stripe Cookie cups

These dark chocolate cups have a surprise inside: a crunchy little fudge stripe cookie!

I just love those fudge stripe cookies.  Even when I am trying to watch my calorie intake, I get the little 100 calorie packs as a treat.  They are just soooo yummy!  Those little mini cookies were the inspiration for these cookie cups.  They fit perfectly inside, and make for a wonderful surprise when you bite into one!

Fudge Stripe Cookie Cups!

So much fun!  Best use of diet food  EVER!

Here’s how we made them: (for a printable recipe click here)

INGREDIENTS: (makes 44-48 mini cookie cups)

  • 1 stick (1/2 cup) butter, softened
  • 3/4 cup of granulated sugar
  • 1 egg
  • 1/2 teaspoon vanilla extract
  • 1/3 cup of unsweetened cocoa powder
  • 1 1/2 cups flour
  • 1/4 teaspoon salt
  • 1/4 teaspoon baking powder
  • One box of Keebler Mini Fudge Stripe cookies
  • One tub of vanilla frosting.
  • A little bit of melted chocolate to drizzle on top, if desired

DIRECTIONS:

  • Preheat oven to 350F degrees.
  • Make cookies by combining butter, sugar, egg, vanilla and cocoa powder and beating until completely combined.
  • Add other dry ingredients gradually, mixing with beaters until too heavy to beat. Use clean hands to knead dough into a soft ball.
  • Use a small cookie scoop (I used a scoop that holds 1/2 Tablespoon of batter) to portion out your dough into mini muffin tins that have been sprayed with non-stick spray.
  • Use a tart shaper or a wooden spoon to press the dough into a cup shape (really, the tart shaper works best for this and you will use it again- I use mine all the time!)

Making cookie cups

  • Bake at 350F degrees for 7 to 8 minutes and remove from oven.
  • Press centers in a second time with the tart shaper and allow them to cool for just a couple of minutes.
  • Use a small paring knife to pop each cup out and allow them to cool completely on the counter.
  • Place one mini Fudge Stripe Cookie to each cup
  • Spoon frosting into a small bowl and microwave for 20-30 seconds, until soft.  Stir until smooth.
  • Spoon frosting into a sturdy zip-top bag and clip a corner off.  Pipe frosting over cookie to the top of each cup

Fudge Stripe Cookie Cups!

  • Pipe chocolate stripes on top to decorate.
  • Allow frosting to firm up.
  • Enjoy!

Fudge Stripe Cookie Cups

My thoughts:  These are SO easy to make and such cute little desserts.  I’m addicted to desserts that surprise you when you bite into them- and these do just that!  I hope you enjoy making and sharing these fun little treats!  Enjoy!! ~r

Fudge Stripe Cookies1

Other cookie cup dessert recipes:

Salted Caramel Cookie Cup!!!Pecan Pie cookie cups with dark chocolateSeven Layer CupsMelted Smores cup


Triple Chocolate Truffle Cups

Posted on


Triple Chocolate Truffle Cups

Delicious dark chocolate cookie cups filled with melted milk chocolate and a white chocolate truffle.  Yum.

I love little mini desserts.  I used to work for a hospital and they would have a big, fancy Christmas party every year.  My favorite part was all the adorable little desserts at the end.  You can try like 8 of them for the calorie price of one big dessert!

This is an adorable (easy to make!) mini dessert.  Perfect for showers, receptions, tea parties and any occasion that calls for a little bit of “fancy” dessert.

The cookie cups use my favorite chocolate cut-out cookie recipe (pressed into a cup!), melted chocolate and a Lindt White Chocolate Truffle. Quick, easy, and delicious!

Triple Chocolate Truffle Cookie Cups!

Here’s the recipe: (printable version)

INGREDIENTS: (makes about 48 mini desserts)

  • 1 stick (1/2 cup) butter, softened
  • 3/4 cup of granulated sugar
  • 1 egg
  • 1/2 teaspoon vanilla extract
  • 1/3 cup of unsweetened cocoa powder
  • 1 1/2 cups flour
  • 1/4 teaspoon salt
  • 1/4 teaspoon baking powder
  • 1 bag of Wilton’s milk chocolate Candy Melts (if you want to melt higher end chocolate for this, feel free!)
  • Approximately 48 Lindt White Chocolate Truffles (Walmart has them in large boxes of 60, for a reasonable price)

DIRECTIONS:

  • Preheat oven to 350F degrees.
  • Make cookies by combining butter, sugar, egg, vanilla and cocoa powder and beating until completely combined.
  • Add other dry ingredients gradually, mixing with beaters until too heavy to beat. Use clean hands to knead dough into a soft ball.
  • Use a small cookie scoop (I used a scoop that holds 1/2 Tablespoon of batter) to portion out your dough into mini muffin tins that have been sprayed with non-stick spray.
  • Use a tart shaper or a wooden spoon to press the dough into a cup shape (really, the tart shaper works best for this and you will use it again- I use mine all the time!)

Making cookie cups

  • Bake at 350F degrees for 7 to 8 minutes and remove from oven.
  • Press centers in a second time with the tart shaper and allow them to cool for just a couple of minutes.
  • Use a small paring knife to pop each cup out and allow them to cool completely on the counter.
  • Melt candy melts in a microwave safe bowl, in the microwave, in 30 second increments, stirring in between until melted and smooth.  
  • Pour melted chocolate into a sturdy zip-top bag.  Zip it closed and clip a corner off.
  • Unwrap all of your Lindt truffles.
  • Carefully pipe warm chocolate into each cookie cup, filling each one about half way.
  • Gently press a truffle into the center of each chocolate-filled cup, allowing the warm chocolate to squeeze up around the edges (yum!)
  • Drizzle any left-over chocolate over the tops of the mini-desserts and allow them to cool and harden completely.
  • Enjoy!!!

Triple Chocolate Truffle Cookie Cups!!!My thoughts: Well, you can see for yourself what happens when you bite into this little dessert. Pure deliciousness!!!! Those truffles are so good.  Mine got a little melted before I cut one in half– but all that soft white chocolate….!!! They make this dessert a touch pricey- but they are SO worth the cost!  If you want to make a smaller batch just cut the cookie recipe in half.  I hope you get a chance to try these- I am filing this recipe away for the next time I need something little for favors or a mini dessert table.  These are perfect for both!  Enjoy!!!!  ~r

Triple Chocolate Truffle Cups

Other mini desserts you might enjoy:

Melted Smores cupDark Chocolate Ganache CupcakesKoolaid truffles!!Mini Pineapple Upside Down Cakes

Easter Egg Cups!

Posted on

 Cadbury Egg Cookie Cups!!These rich chocolate cookie cups are dipped in chocolate and filled with a rich cream “egg”.  A perfect Easter treat!!!

Cadbury Egg Cookie Cups!!!!

Do you love Cadbury Eggs?  I’m addicted.  That’s why I decided that there simply must be a chocolate cookie cup filled with Cadbury-like cream.  I used my favorite recipe for chocolate cut-out cookies and they baked just beautifully into firm little cups.  I dipped the tops in melted chocolate and piped yummy cream filling inside.  Fun and delicious!

Cadbury Egg Cookie Cups!!!!

Here’s the recipe: (printable recipe)

INGREDIENTS:

Cookie Cup:

  • 2 sticks (1 cup) butter, softened
  • 1 1/2 cups sugar
  • 2 eggs
  • 1 teaspoon vanilla extract
  • 2/3 cup unsweetened cocoa powder
  • 3 cups flour
  • 1/2 teaspoon salt
  • 1/2 teaspoon baking powder
  • 1 bag of Wilton’s dark chocolate candy melts.

Filling:

  • 3/4 cup light Karo syrup
  • 12 tablespoons of butter (softened)
  • 2 tablespoons vanilla
  • 4 cups powdered sugar
  • 1 to 2 tablespoons of water (for consistency)

DIRECTIONS:

  • Preheat oven to 350F degrees.
  • Add butter, sugar, eggs, vanilla and cocoa together in  large mixing bowl.
  • Blend on medium speed with a mixer until smooth.
  • Gradually add dry ingredients and mix until smooth (use clean hands at the end, to knead into a soft ball of dough)
  • Divide dough into 24 balls of equal size, and place each one in a muffin cup.
  • Press an indentation into each ball using a tart shaping tool (or the end of a wooden spoon)
  • Bake at 350F degrees for 8-10 minutes.  Press Tart shaping tool into center again, to reshape cups.
  • Allow the cups to cool for about 5 minutes in pan, then run a small paring knife around edge to pop cup out of pan.
  • Cool completely on counter.
  • Melt Wilton’s candy melts in microwave in 30 second increments, stirring between until completely melted and smooth.  Dip tops of cups into melted chocolate and allow them to harden completely.

Making cookie cupsDipping tops of cookie cups in chocolate

  • Make filling by adding all of the filling ingredients together except for the water and sugar.
  • Beat these on high until smooth and creamy.
  • Add sugar and beat on high until creamy
  • Add water until it is a nice spreadable, but not runny, consistency.
  • Beat until very smooth.
  • Take about 1/4 out and color with yellow food color gel.
  • Pipe white filling into cups 1st and then add a fun yellow “yolk” on top.
  • Enjoy!!

Cadbury Egg Cookie Cups!!!!My thoughts:  These are so0000  yummy.  If you want to save time, skip the chocolate dip on the edges.  This cookie recipe is just so tasty- and so versatile.  I’ve used it for so many things now.  Your family will gobble these up (once you convince the kids they aren’t really eggs!)  I hope you enjoy them! ~r

Other fun spring recipe ideas:

Strawberry Cookies with Sweet Tart FrostingChocolate cut-out cookiesStrawberry Lemonade Birthday CakeBubble Gum Cupcakes!


Frosty Fall Pudding Treats

Posted on

Frosty Candy Corn Dessert!
Who says you can’t do frozen treats for Halloween??  These yummy little frosty pudding cups have a Golden Oreo crust and are decorated like fun candy corn treats!

I’m back with a recipe in my Chicago Metallic Mini Cheesecake Pan.
For those of you who haven’t gotten one of these yet, they are SO much fun.  I’ve done some of my favorite desserts in this little pan.  You can do this particular dessert in cupcake liners placed in muffin tins, but they are just SO cute in the mini cheesecake pan.

Here’s how the pan works:  You get a pan that looks just like a muffin tin but each cup has a hole in the bottom.  You also get 12 little metal disks that fit perfectly in each cup, covering up that hole.  You make, bake, freeze, etc. your dessert and then just push up through that hole in the bottom and the disk pushes out with your little dessert on top.  I love fun individual desserts, so this is pretty much the perfect idea, in my opinion!

These are really easy, but they need to freeze for several hours/overnight, so make them ahead.

Frosty Fall Pudding Treat!!

Here’s the recipe: (printable version)

INGREDIENTS:

  • One package of Golden Oreos
  • 1 package (4 servings, 3.3 oz.) of Jell-O Instant White Chocolate Pudding
  • 1 1/2 cups of cold milk
  • 1 (8 oz.) container of Cool-Whip topping (thawed in refrigerator)
  • Food colorings in yellow and orange
  • Fall sprinkles

DIRECTIONS:

  • Crush about 2/3 package of Golden Oreos in a food processor or large food chopper.
  • Add orange food coloring until desired shade of orange is reached and mix on high until cookie bits and color are well combined.
  • Place metal disks into cheesecake pan and spoon cookie crumbs evenly into all 12 wells of mini- cheesecake pan (or cupcake liners), and press firmly into bottom (I use a Mini Tart Shaper– and I love it!)
  • In a large mixing bowl, mix cold milk with pudding for 2 minutes.
  • Add yellow food coloring to get desired shade and mix until well combined.
  • Fold in 1/2 of the Cool Whip (the rest will be used as topping- keep it refrigerated until use)
  • Spoon pudding mixture into a large zip-top bag (and zip it tight).
  • Cut a corner of the bag off and pipe pudding mixture into each cup, all the way to  the top.
  • Use a knife to smooth the tops flat and cover entire pan with plastic wrap.
  • Freeze until serving (at least a few hours)
  • Before serving, remove pan from freezer and allow it to warm up a little bit before popping desserts out.
  • Press a finger up through the hole in the bottom of the pan, pushing each dessert up- grab it by the crust and take metal disk off the bottom.
  • Serve immediately, or place in a sealed container back in the freezer until ready to serve.
  • Pipe remaining Cool Whip on top of each little dessert cup and decorate as desired.
  • Enjoy!!

Frosty Fall Pudding Treats!!!My thoughts:  There are two things that make a dessert perfect in my mind.  Taste and the amount of smiles that happen when you serve them.  These are really yummy (how can you go wrong with pudding and Oreos???) and the number of smiles….?  Well, you are just going to have to make them to see that for yourself!  Enjoy!! ~R

Other mini-cheesecake pan recipes you will love:

Mini chocolate chip cookie cheesecakesFrozen S'mores CupsMini Cookie Dough CheesecakeRaspberry Lemon Cream Cups!!!

S’mores Cookie Cups

Posted on

S'more Cookie Cups!!

These mini graham cracker cookie cups are overflowing with soft marshmallow and chocolate~ a perfect replica of the summertime favorite~ in cookie form!!

These little cookie cups were eaten up faster than any dessert I can remember.  You simply can’t stop at one!  I guess that’s because they are made with all the ingredients used in S’mores!  The marshmallow stays soft, and the  soft chocolate layer on the inside….?  Oh my.

S'more cookie cups!

Here’s how to make them: (printable recipe)

INGREDIENTS: (makes 48 mini cups)

  • One tube of refrigerated sugar cookie dough
  • 1 cup of finely crushed graham crackers
  • 1/4 cup of heavy cream
  • 1/2 cup semi-sweet chocolate chips
  • 1  (13oz) jar of Jet-Puffed Marshmallow fluff
  • 48 Hershey Kisses (unwrapped!)

DIRECTIONS:

  • Preheat oven to 350F degrees.
  • Place cookie dough and crushed grahams (save 2 to 3 tablespoons of crumbs to sprinkle over cups at end) in a mixing bowl and using hands, combine crushed grahams with cookie dough until completely incorporated.
  • Evenly divide dough into mini muffin tins (I used a medium cookie scoop to do this and got about 48 cookies)
  • Bake at 350F degrees for 7 to 9 minutes, until turning a light brown at edges.
  • Remove from oven and immediately press centers in using a mini tart shaper (or a wooden spoon~ although I highly recommend the tart shaper as it is a small and inexpensive tool that I love and use all the time!)
  • Allow cups to cool for 2-3 minutes and then gently run a small knife around the edges and pop the cup out of the tin.  Allow cup to completely cool on counter.
  • Place all cups on a cookie sheet (preferably one with raised edges)
  • In a small sauce pan, heat up heavy cream until just bubbling at the edges (20 seconds or so).
  • Add chocolate chips, cover and allow them to sit for 5 minutes.
  • Stir melted chips with cream until smooth (turn heat back on if needed)
  • Place chocolate sauce in a zip-top bag, clip a corner and pipe chocolate evenly into each cup.

Graham cookie cupsPiping chocolate into cookie cup

  • Fill a mug or small bowl with HOT water, and place a medium cookie scoop into it.  Shake off excess water and scoop one scoop of marshmallow fluff into each cookie cup.  Place scoop back in hot water as soon as the fluff starts to stick to the scoop.

Scoop Marshmallow into cookie cupSmores cookie cups--yum!!

  • Turn broiler on high and place entire cookiesheet full of cookies in the oven under the broiler.  WATCH the cookies– in about 30 seconds the marshmallows will start to brown.  Take the cookie cups out and immediately place a Hershey kiss on the top of each hot marshmallow top.  Sprinkle with graham crumbs (and drizzle with a little white chocolate if you like).
  • Let these sit for about an hour.  The bottom of the kiss will melt and attach to the marshmallow.
  • You can serve these warm, or at room temp.
  • Once they are cooled, you can store them in an airtight container for about a week.

S'mores cookie cups!

My thoughts~ These cookie cups were a big hit.  They really capture the flavor of a s’more and they aren’t very difficult to make.  The marshmallow fluff was a little fussy, just because it is so sticky.  I highly recommend it though- it was perfect biting into the gooey soft cream rather than an actual marshmallow.  It captured that melted marshmallow feel.  I *highly* recommend you use a cookie scoop for these.  You can get a scoop almost anywhere these days, but if you can’t find one, try ordering one at Amazon.  I hope you really enjoy making (and eating!) these yummy little treats!!! ~r

Melted Smores cup

Other cookie cup recipes you might enjoy:

Gooey filling in Seven layer cups!Fruit Loop Confetti Cups!!Caramel Coconut Creme CupsSalted Caramel Cookie Cup!!!