Tag Archives: cool whip

Lemon Cream Cupcakes

Posted on

Lemon Cream5

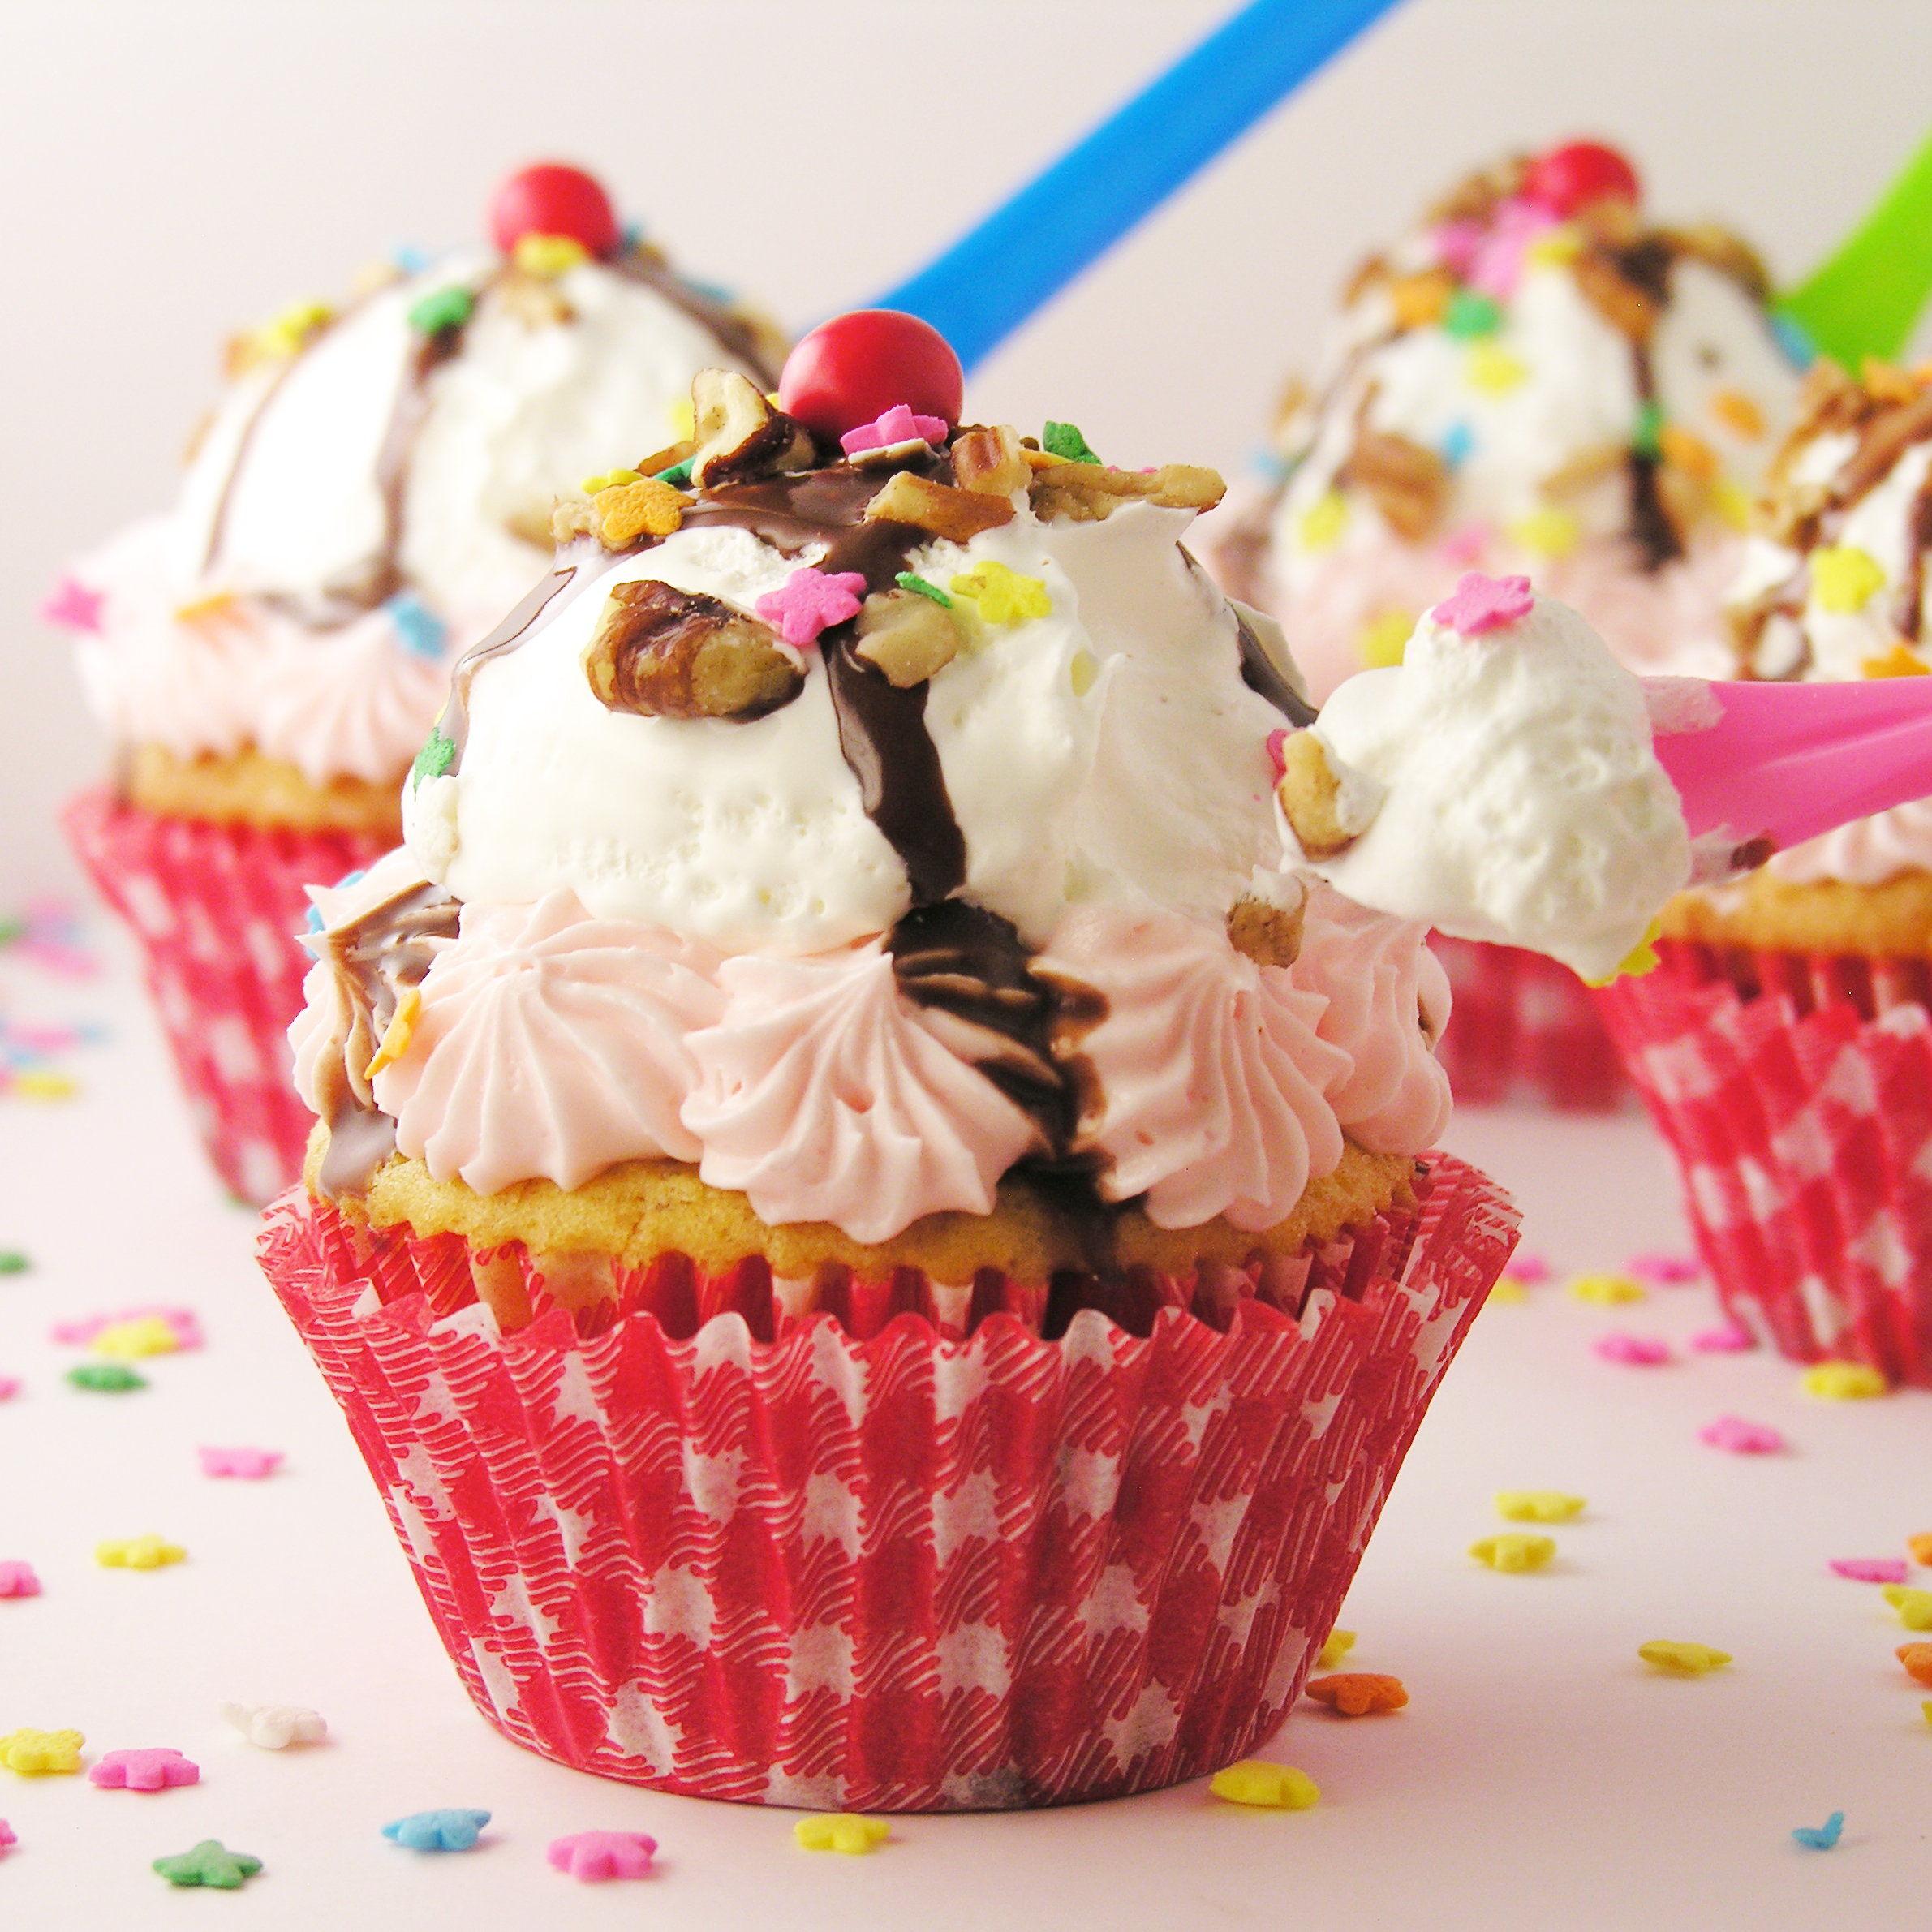
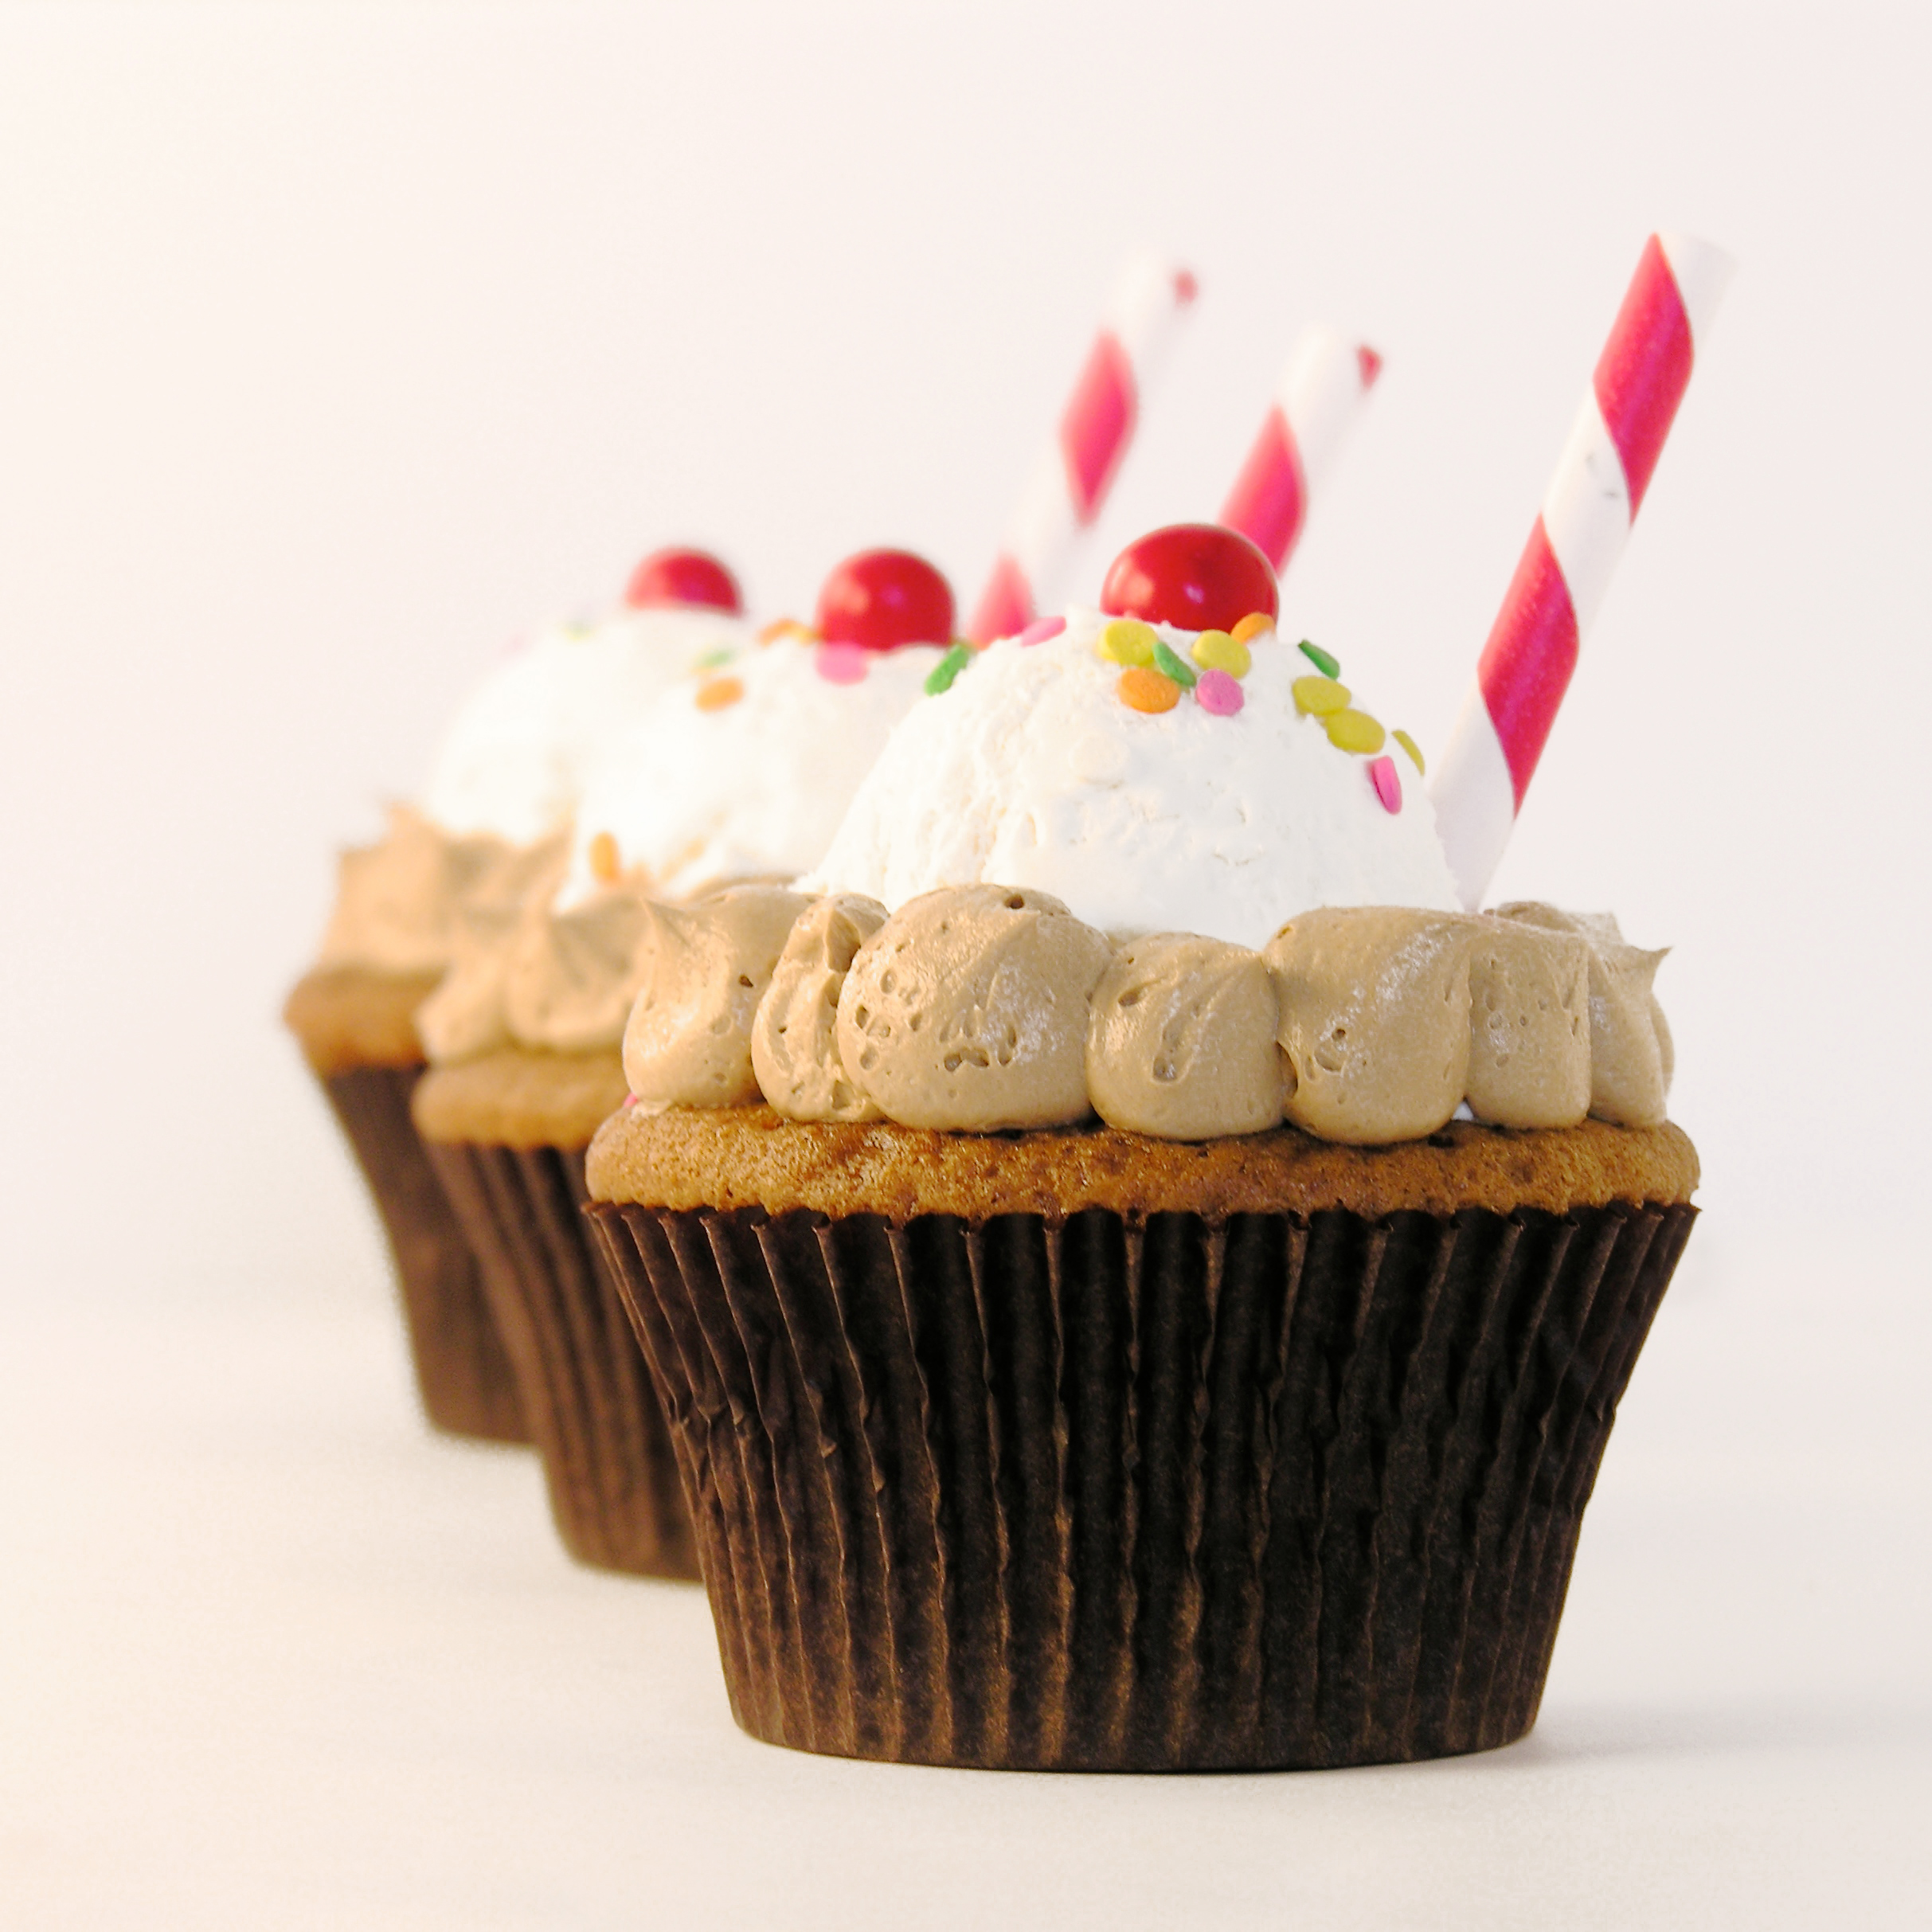
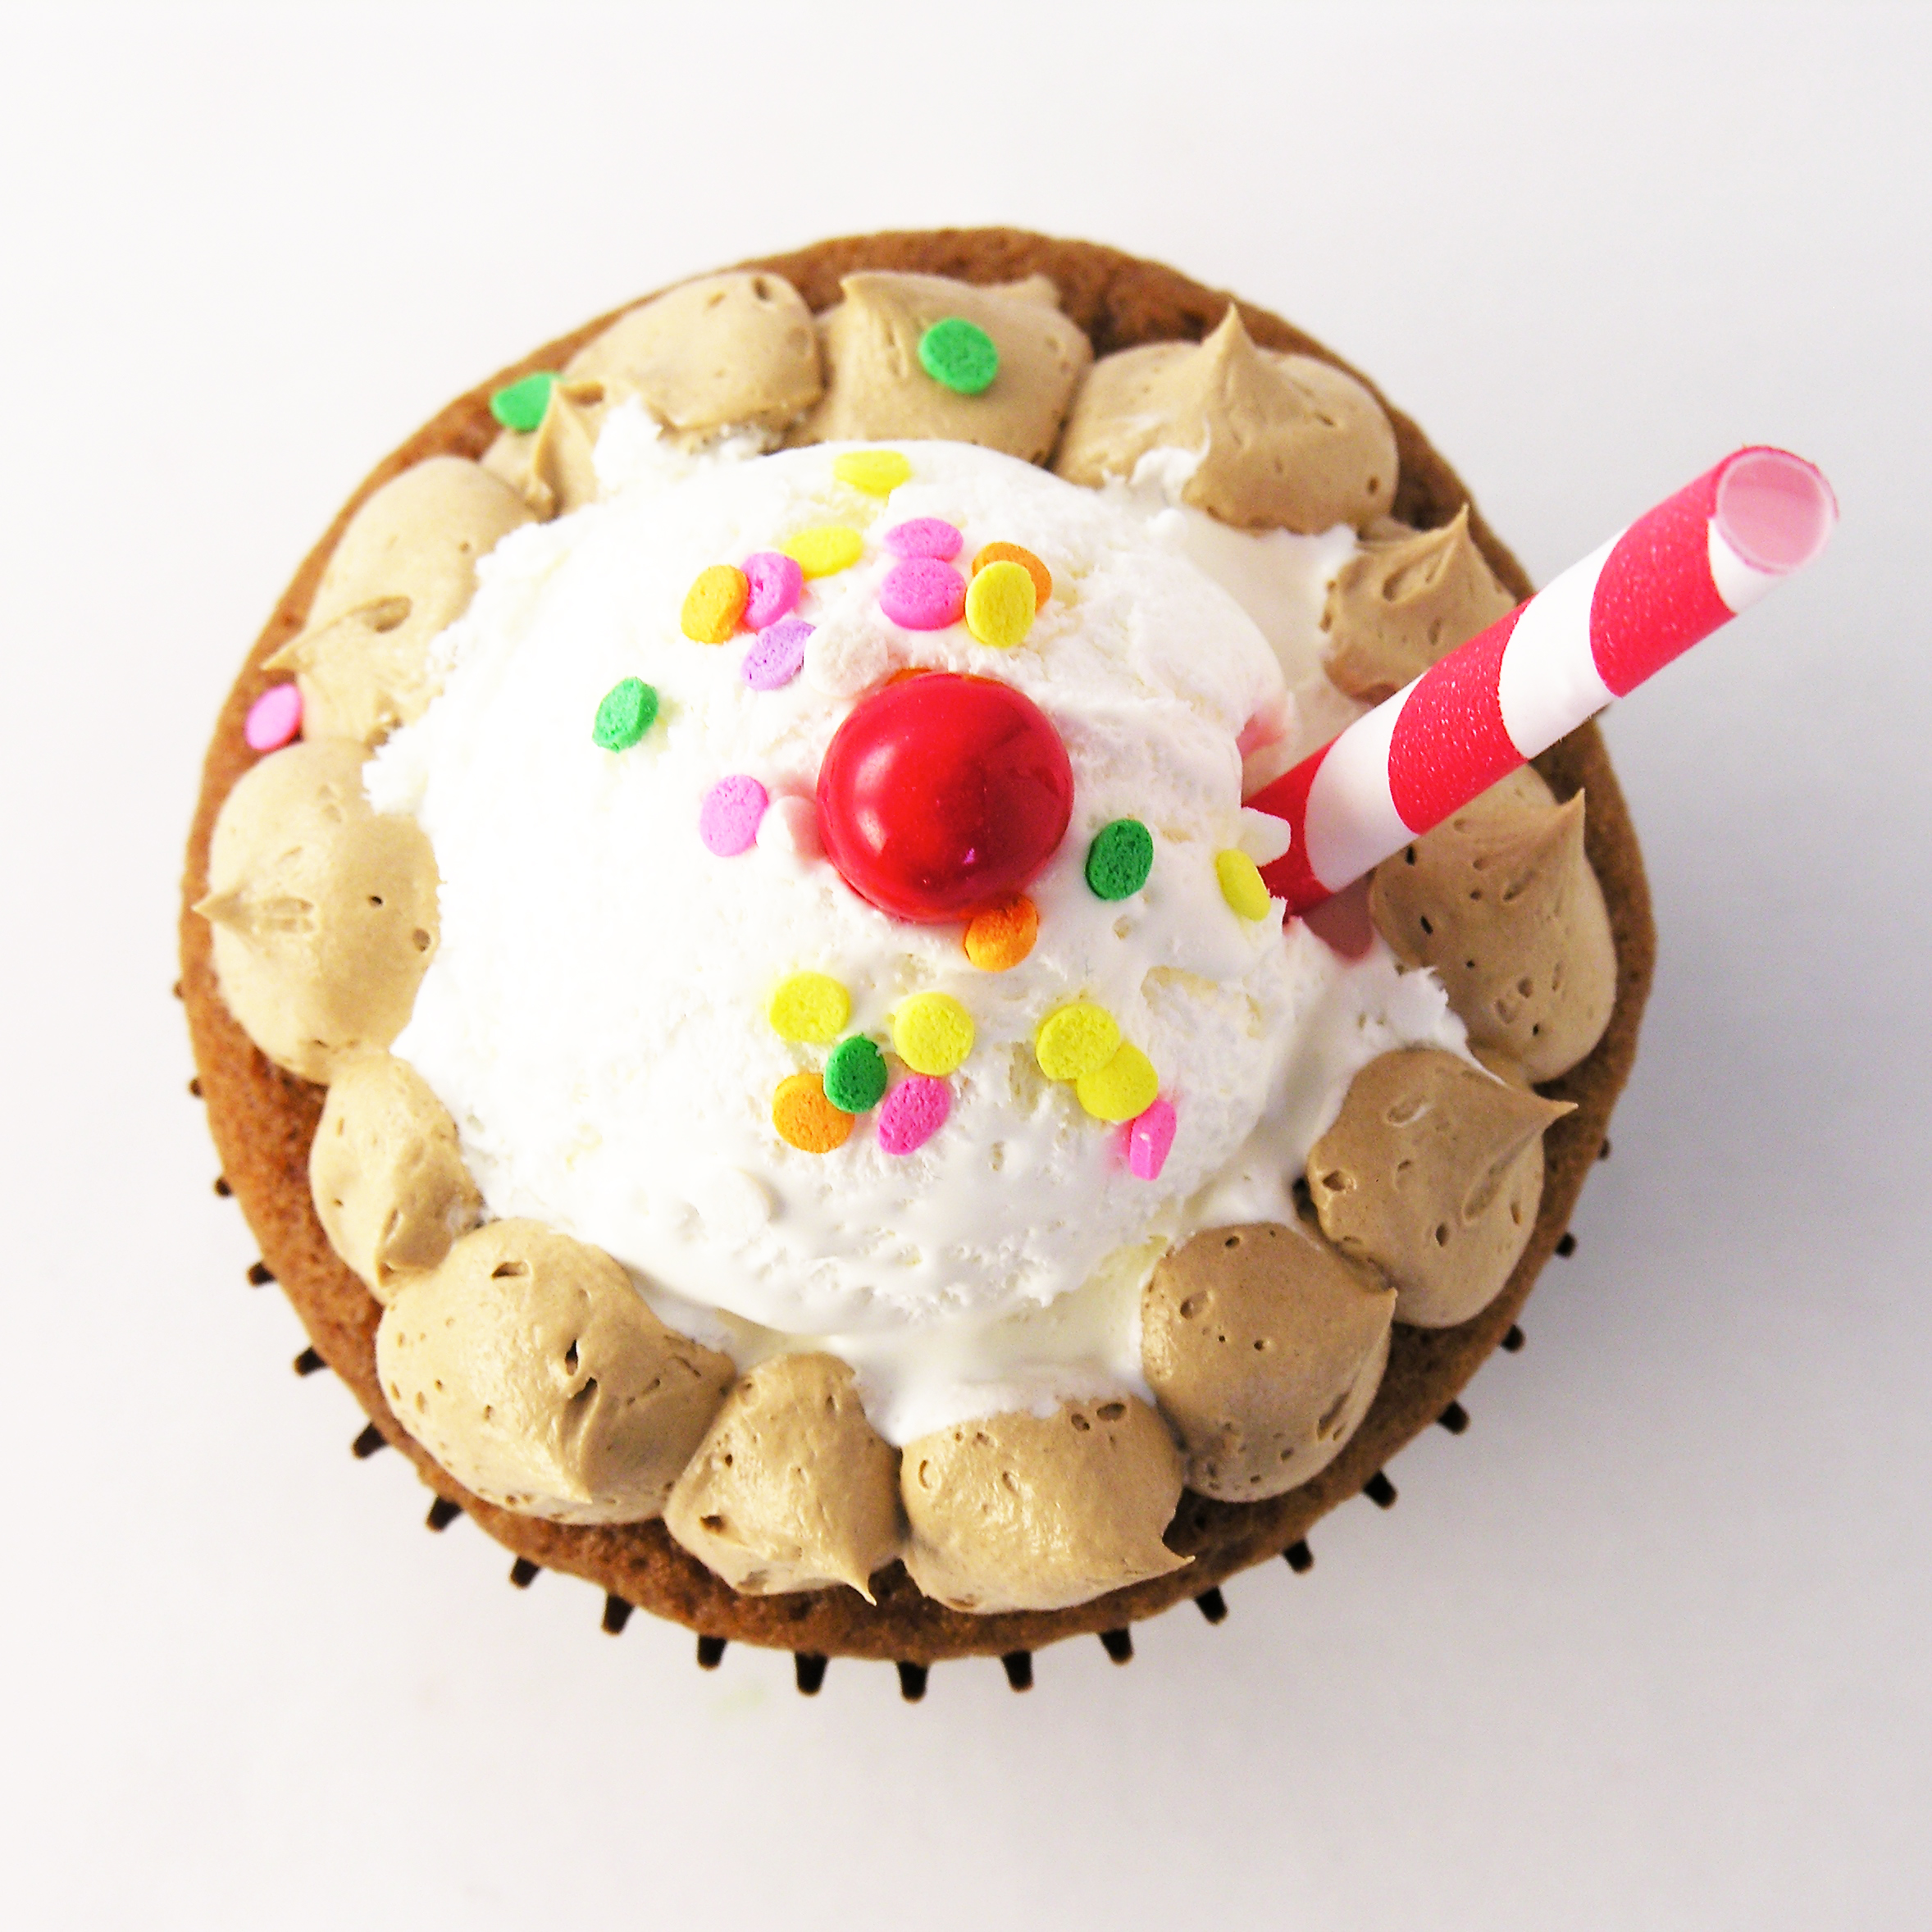
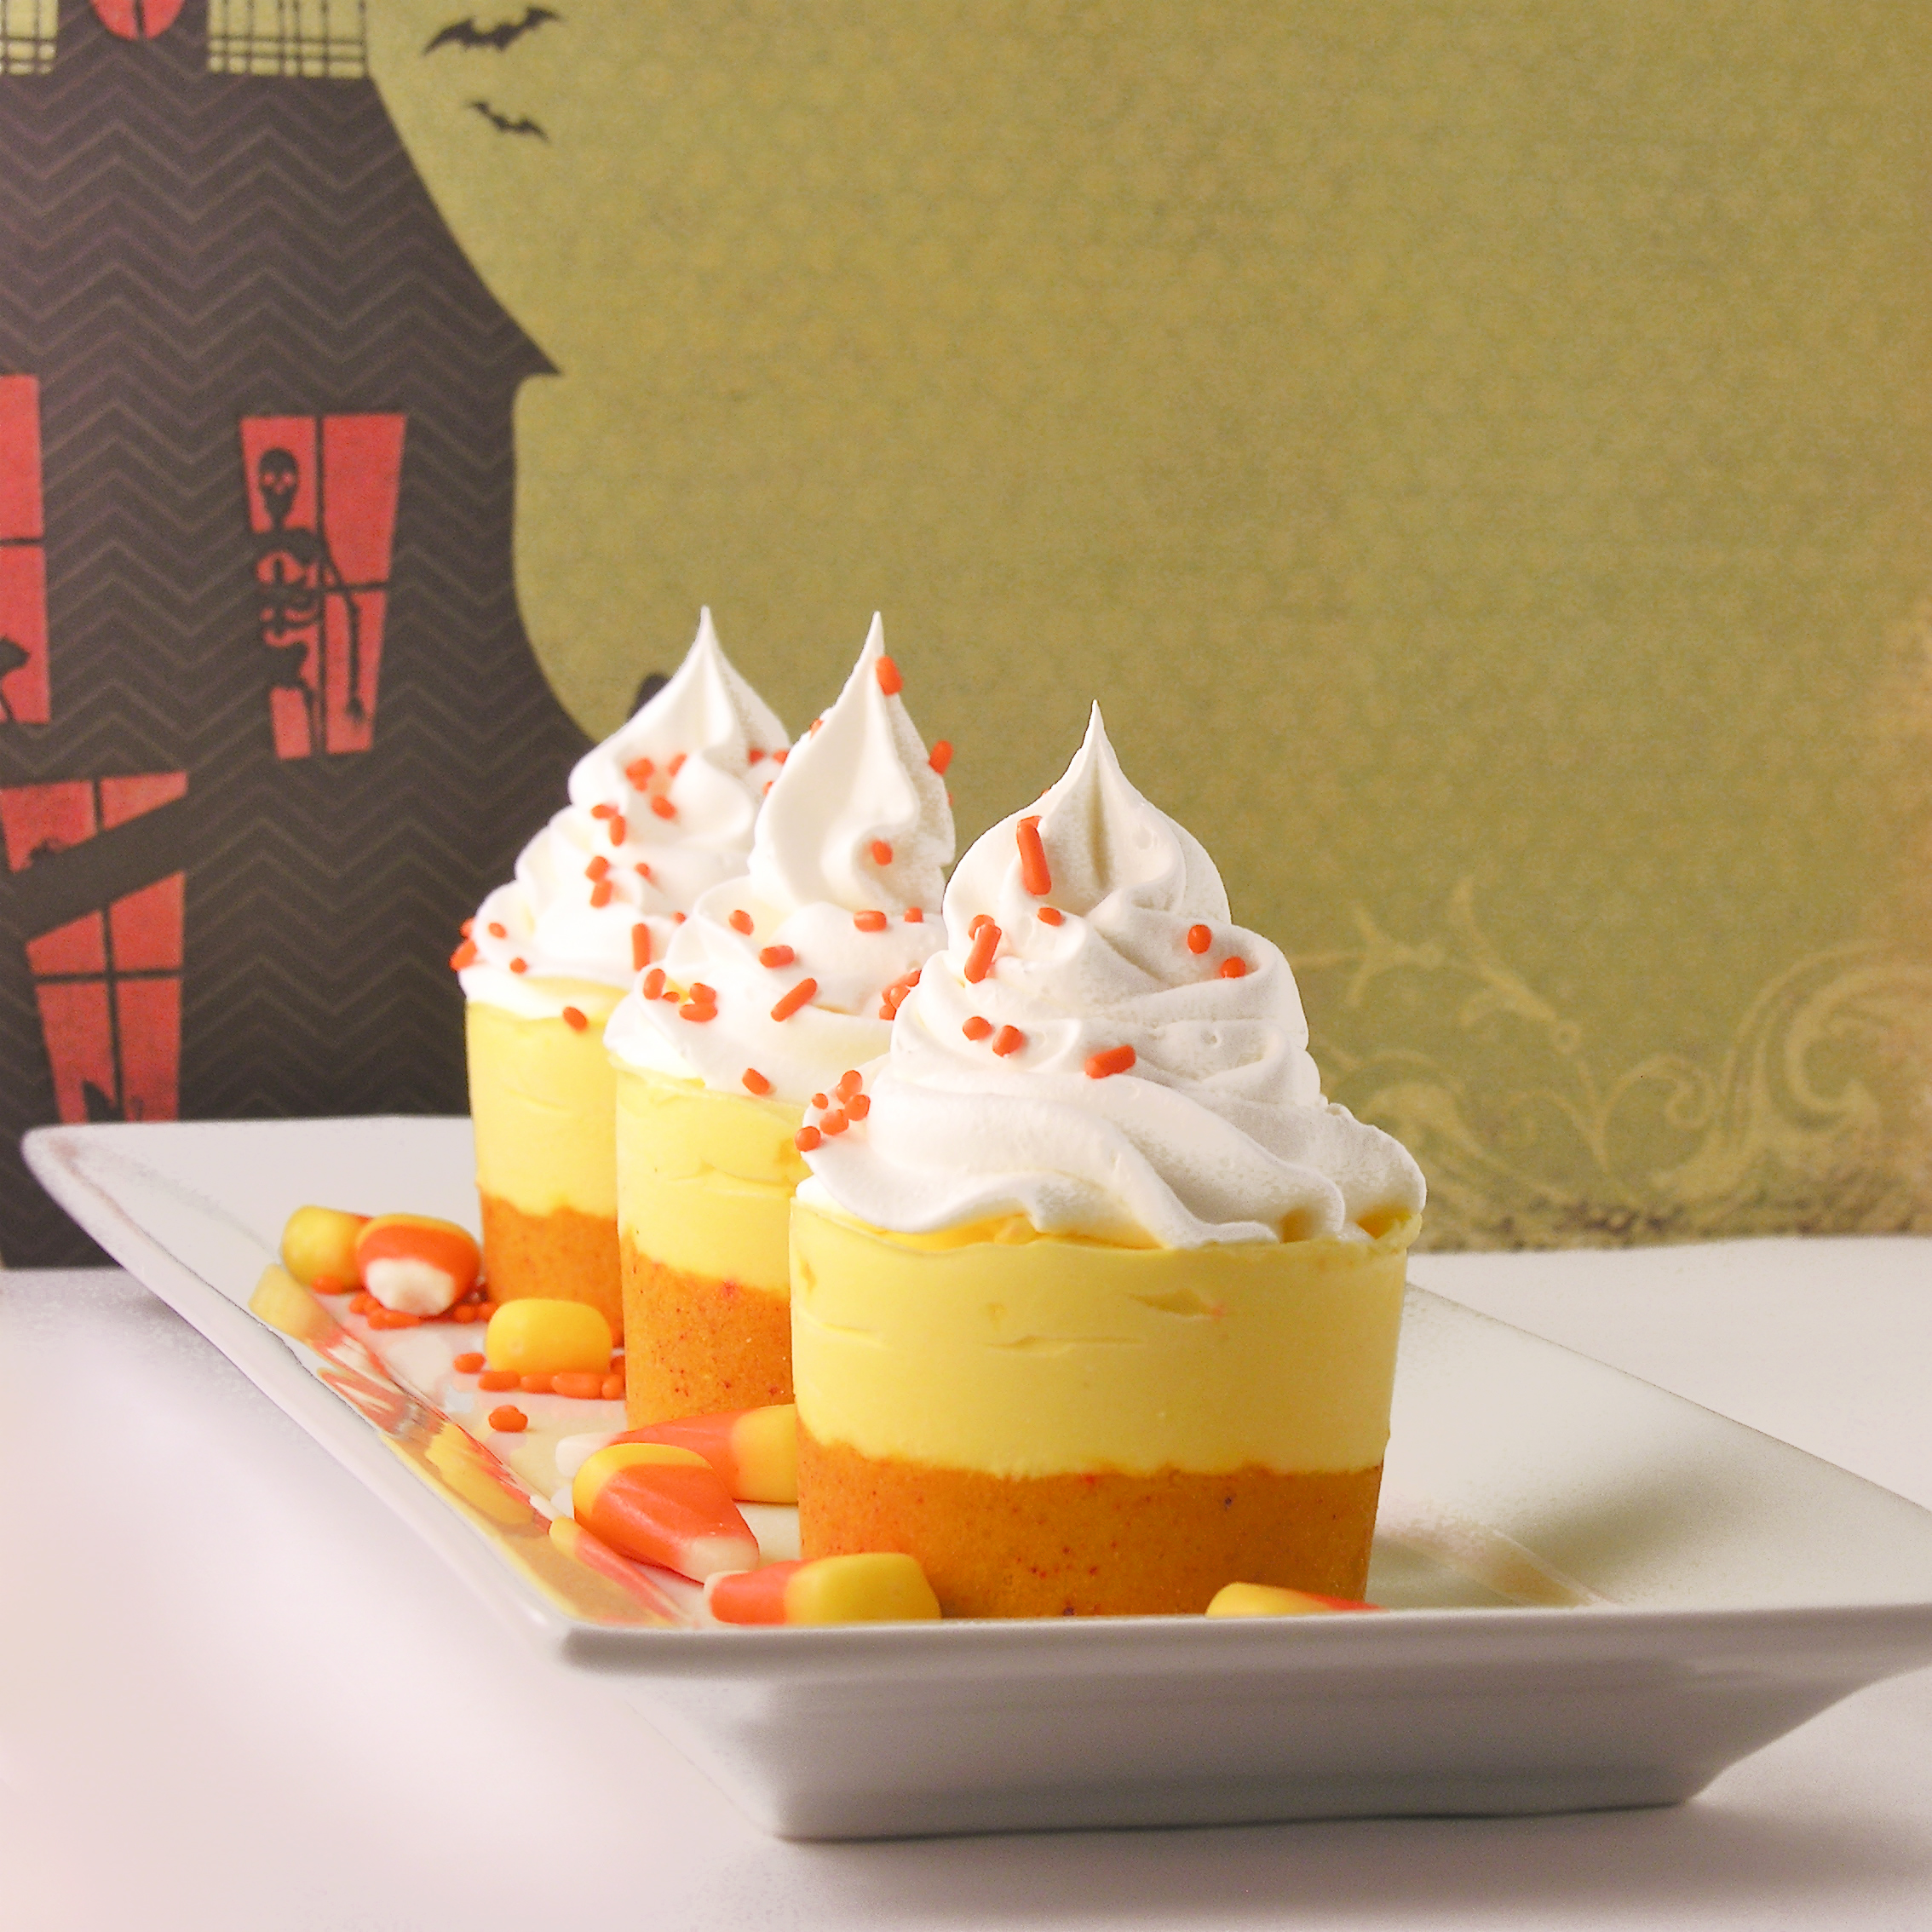
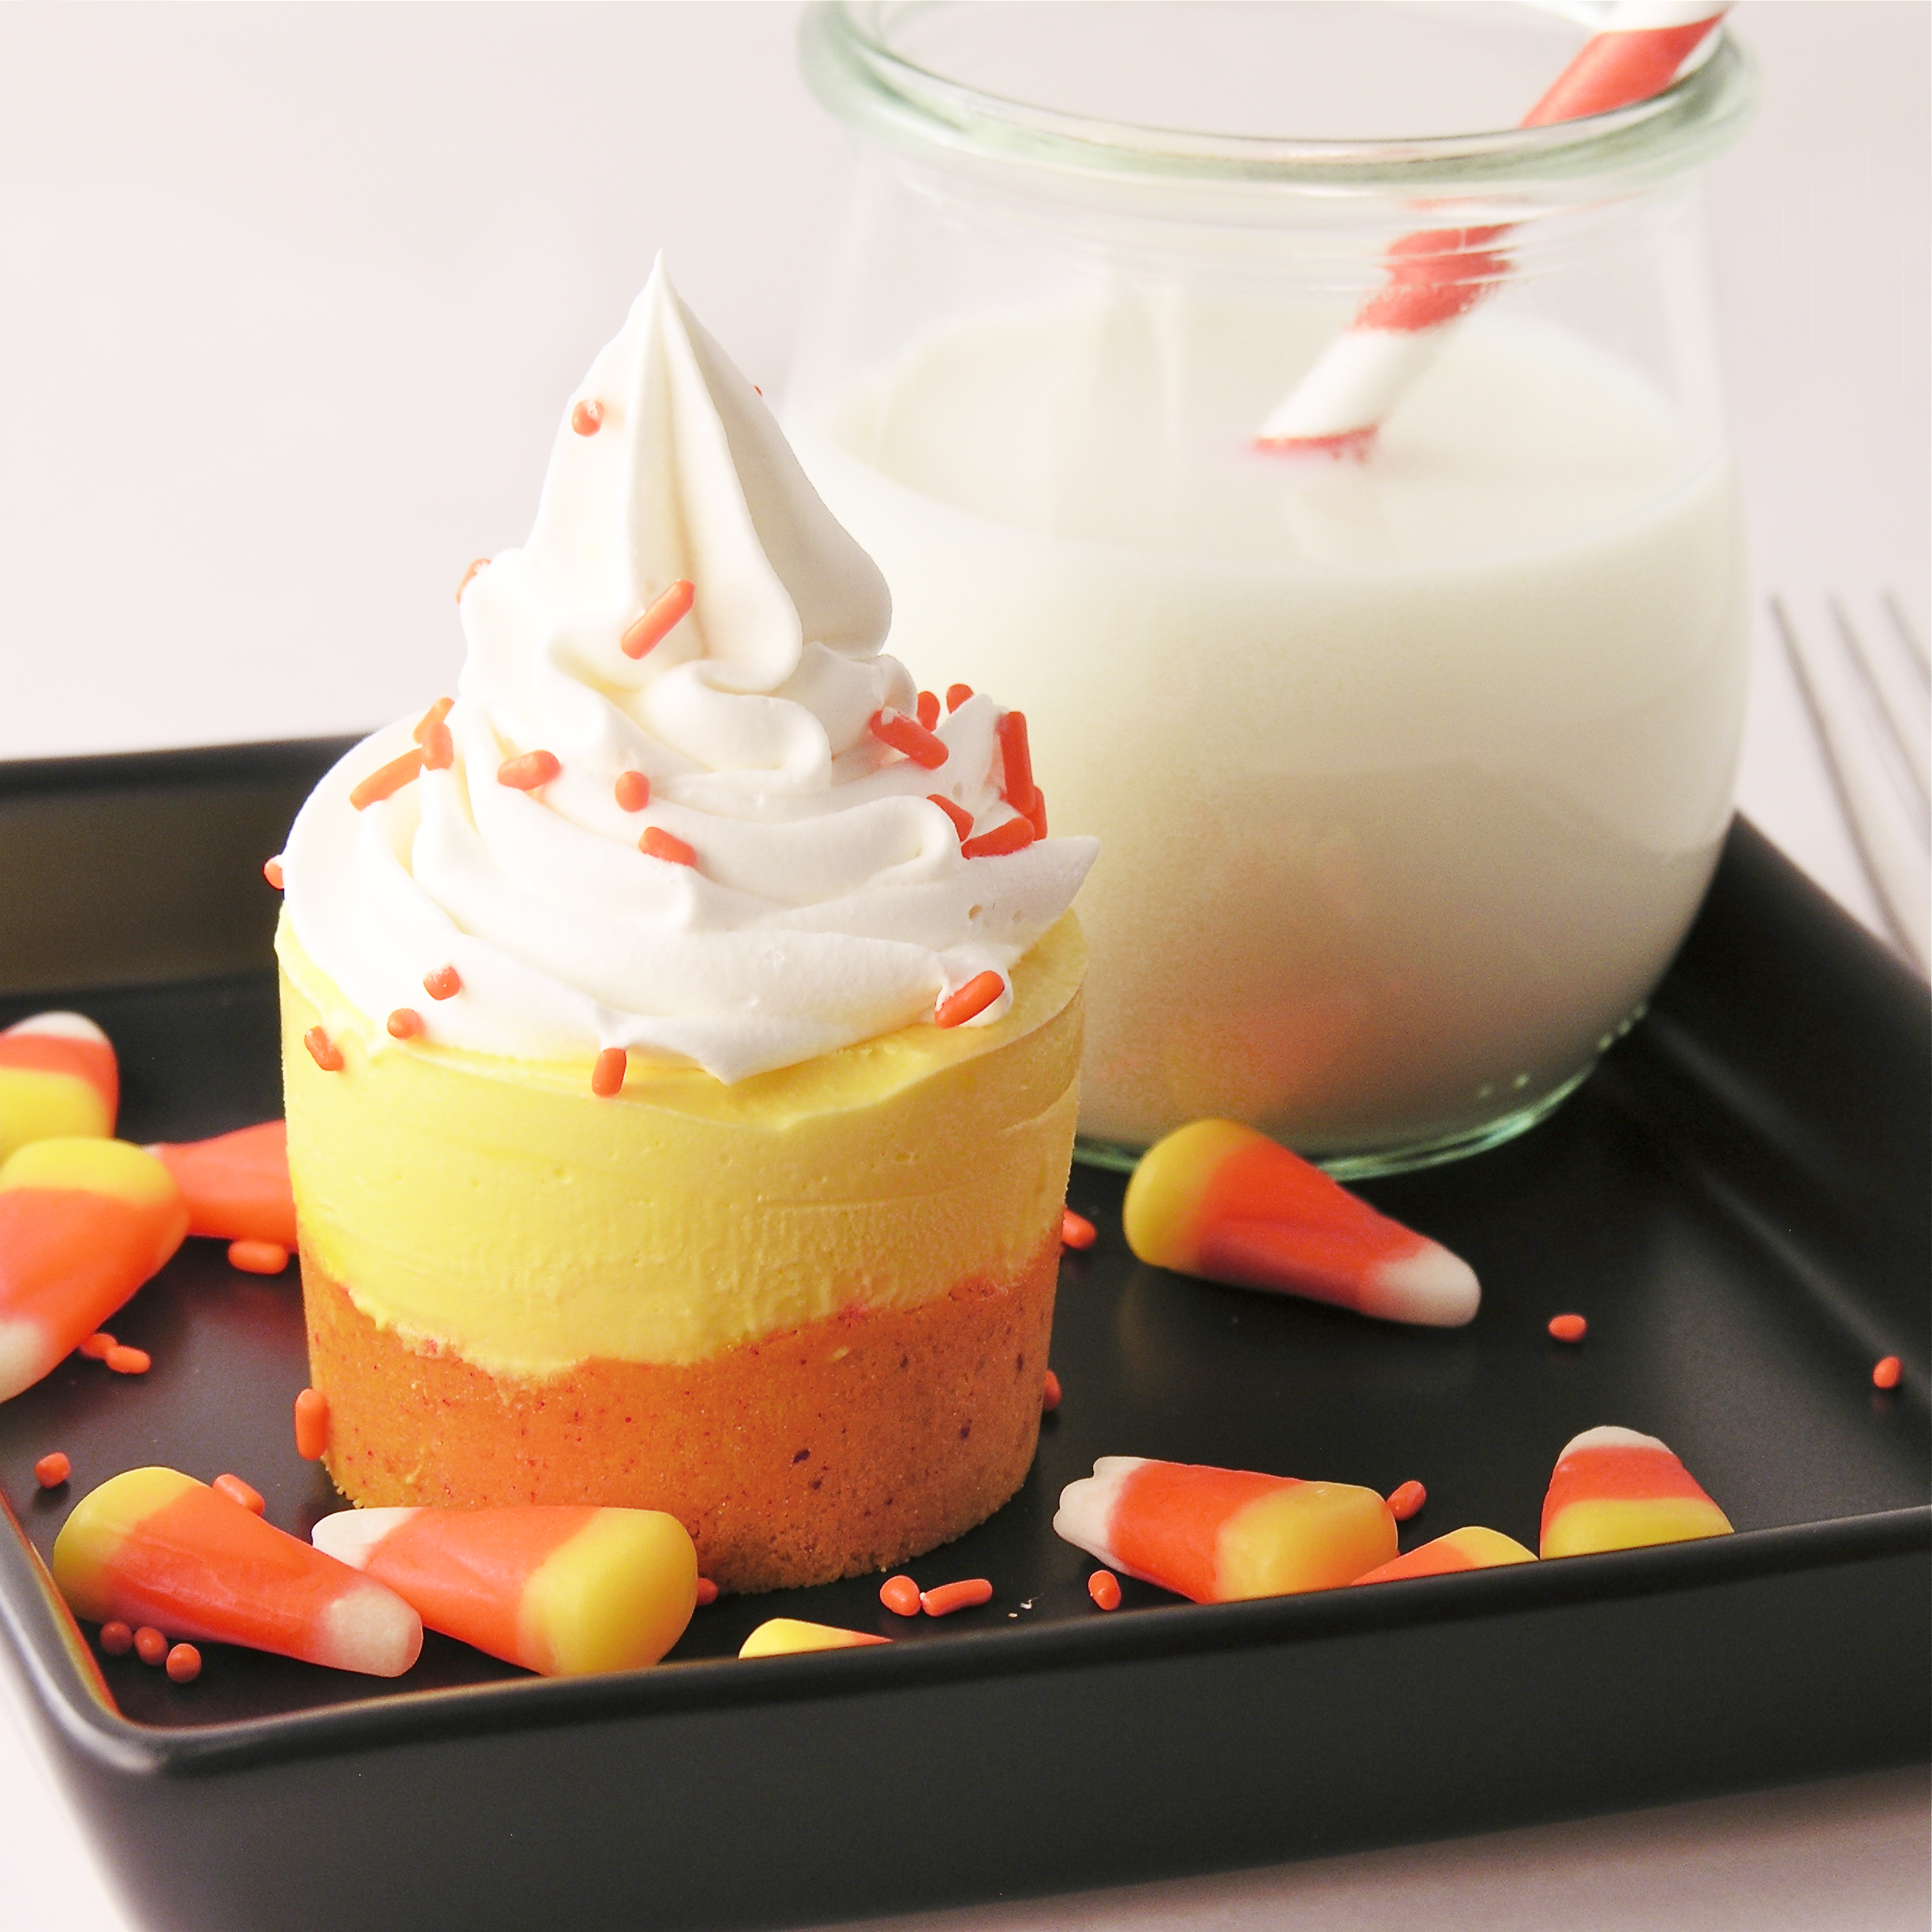
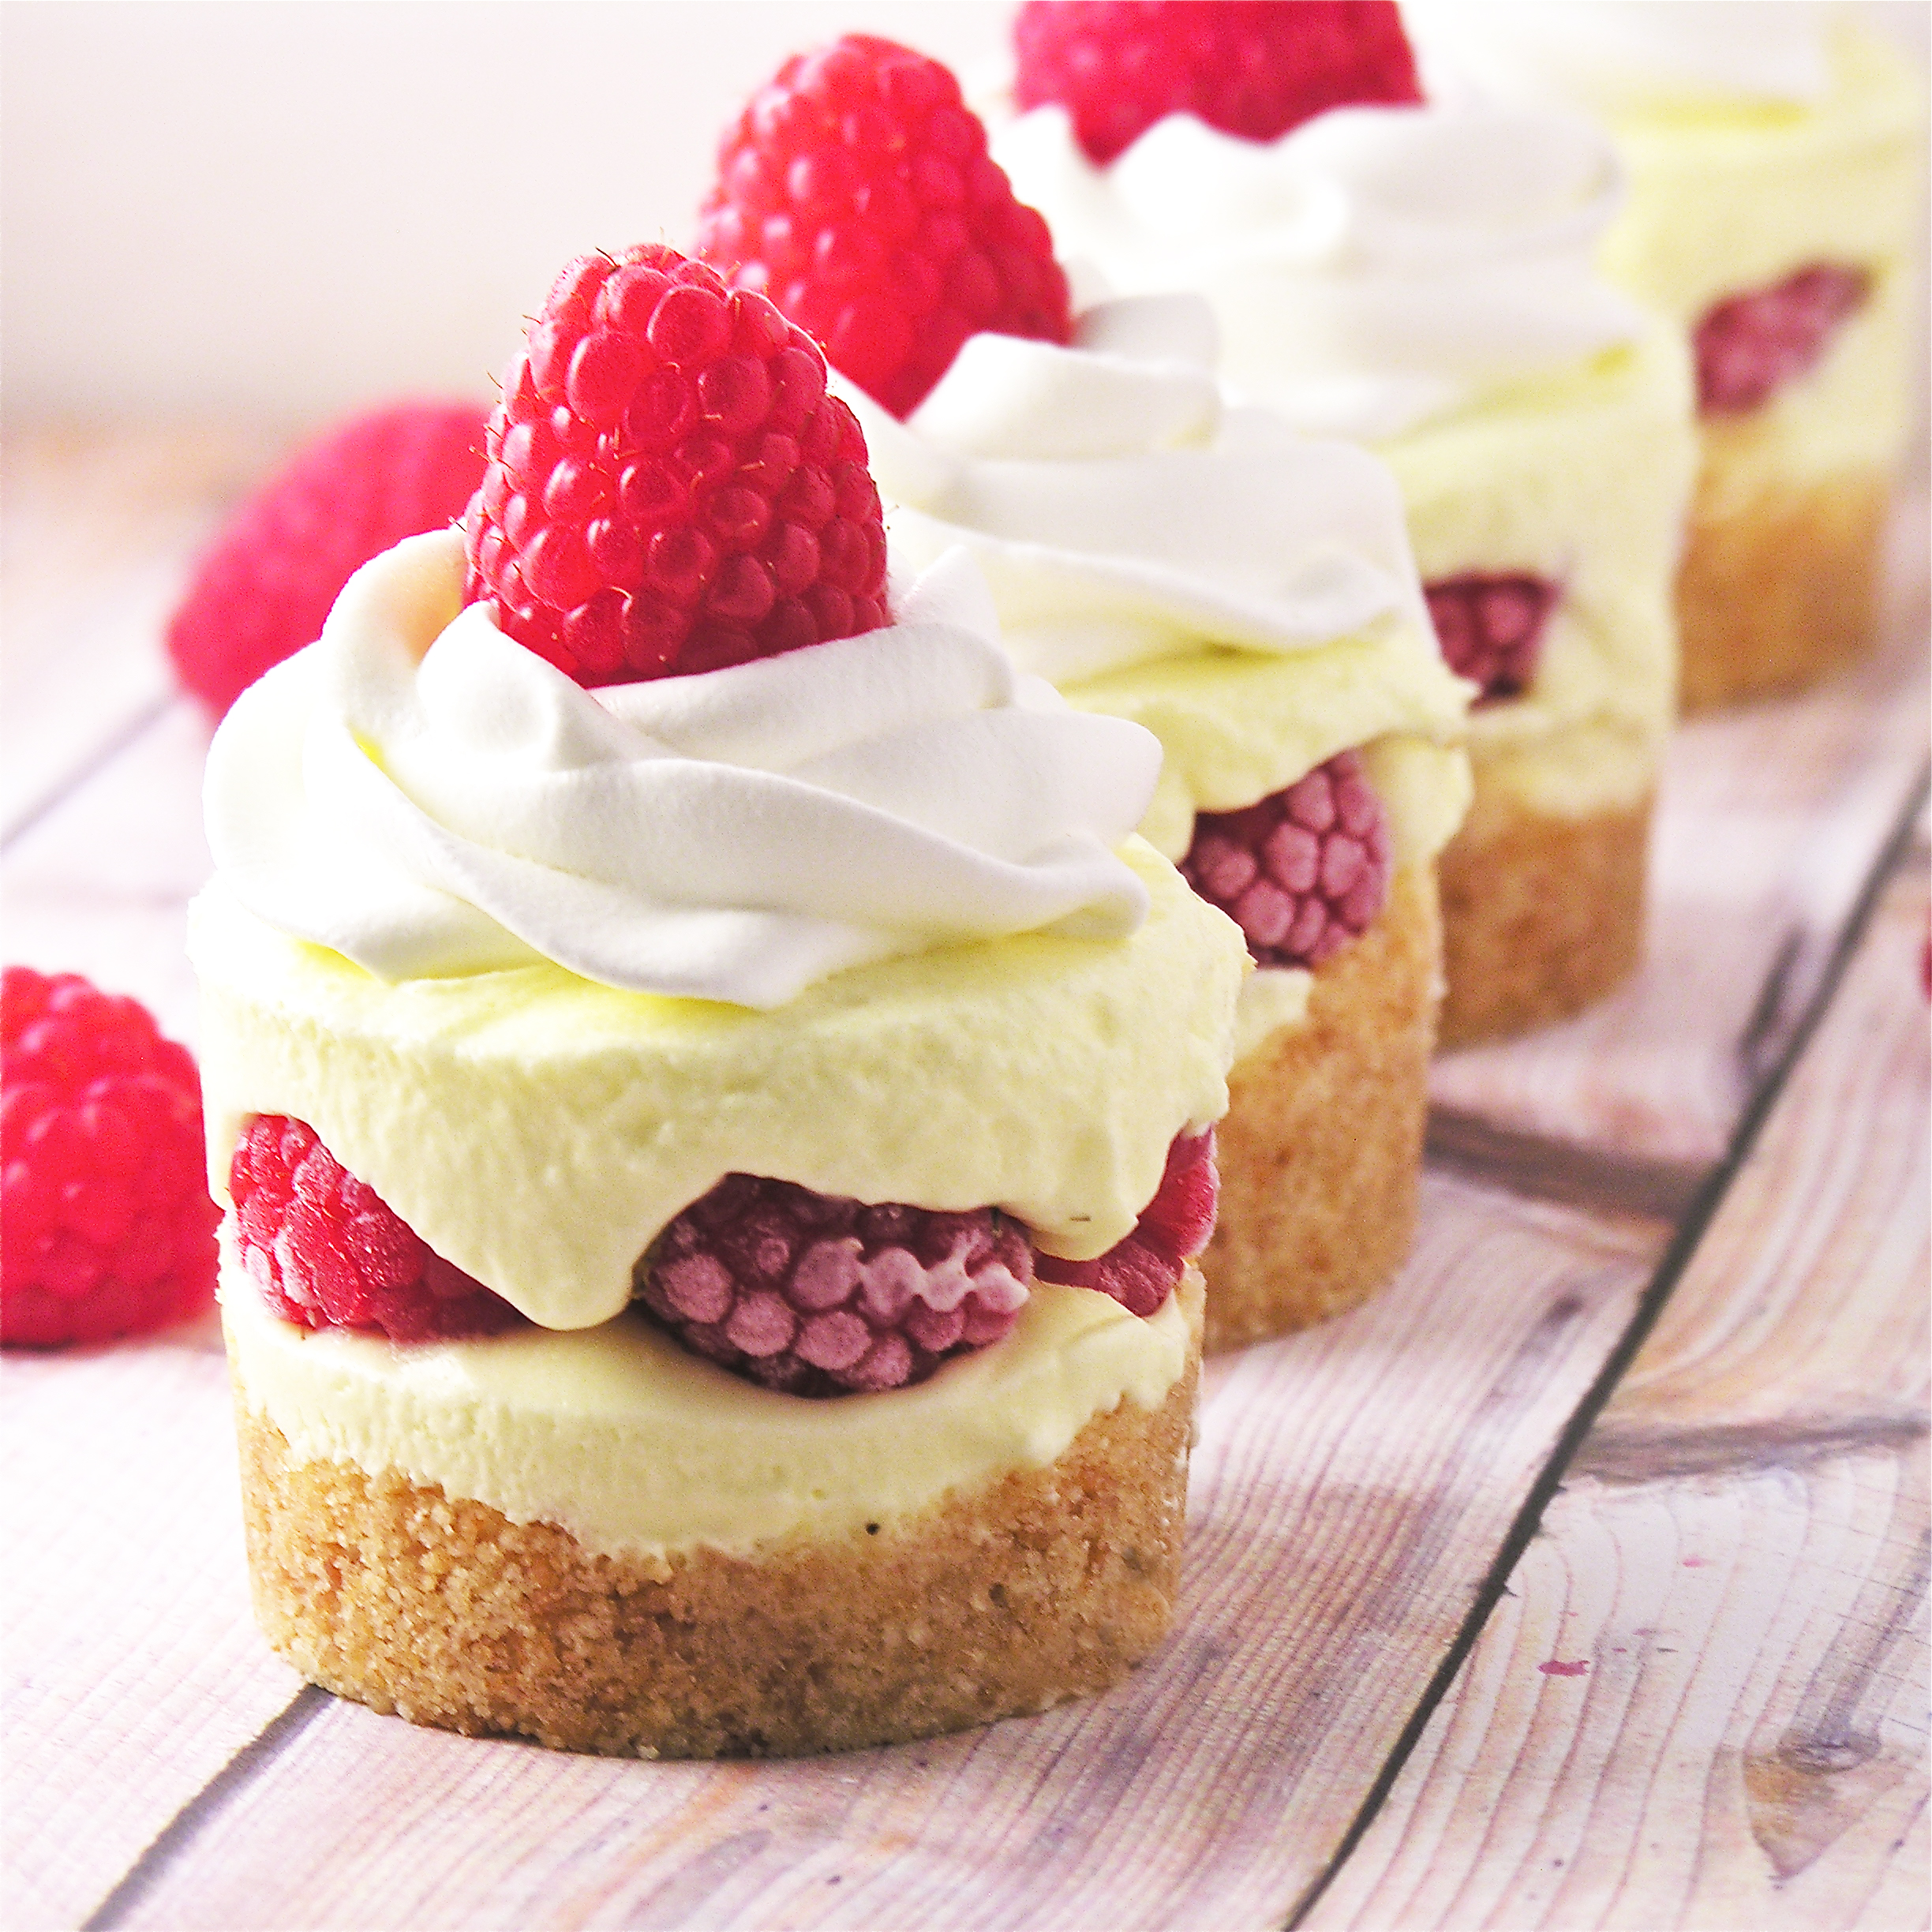
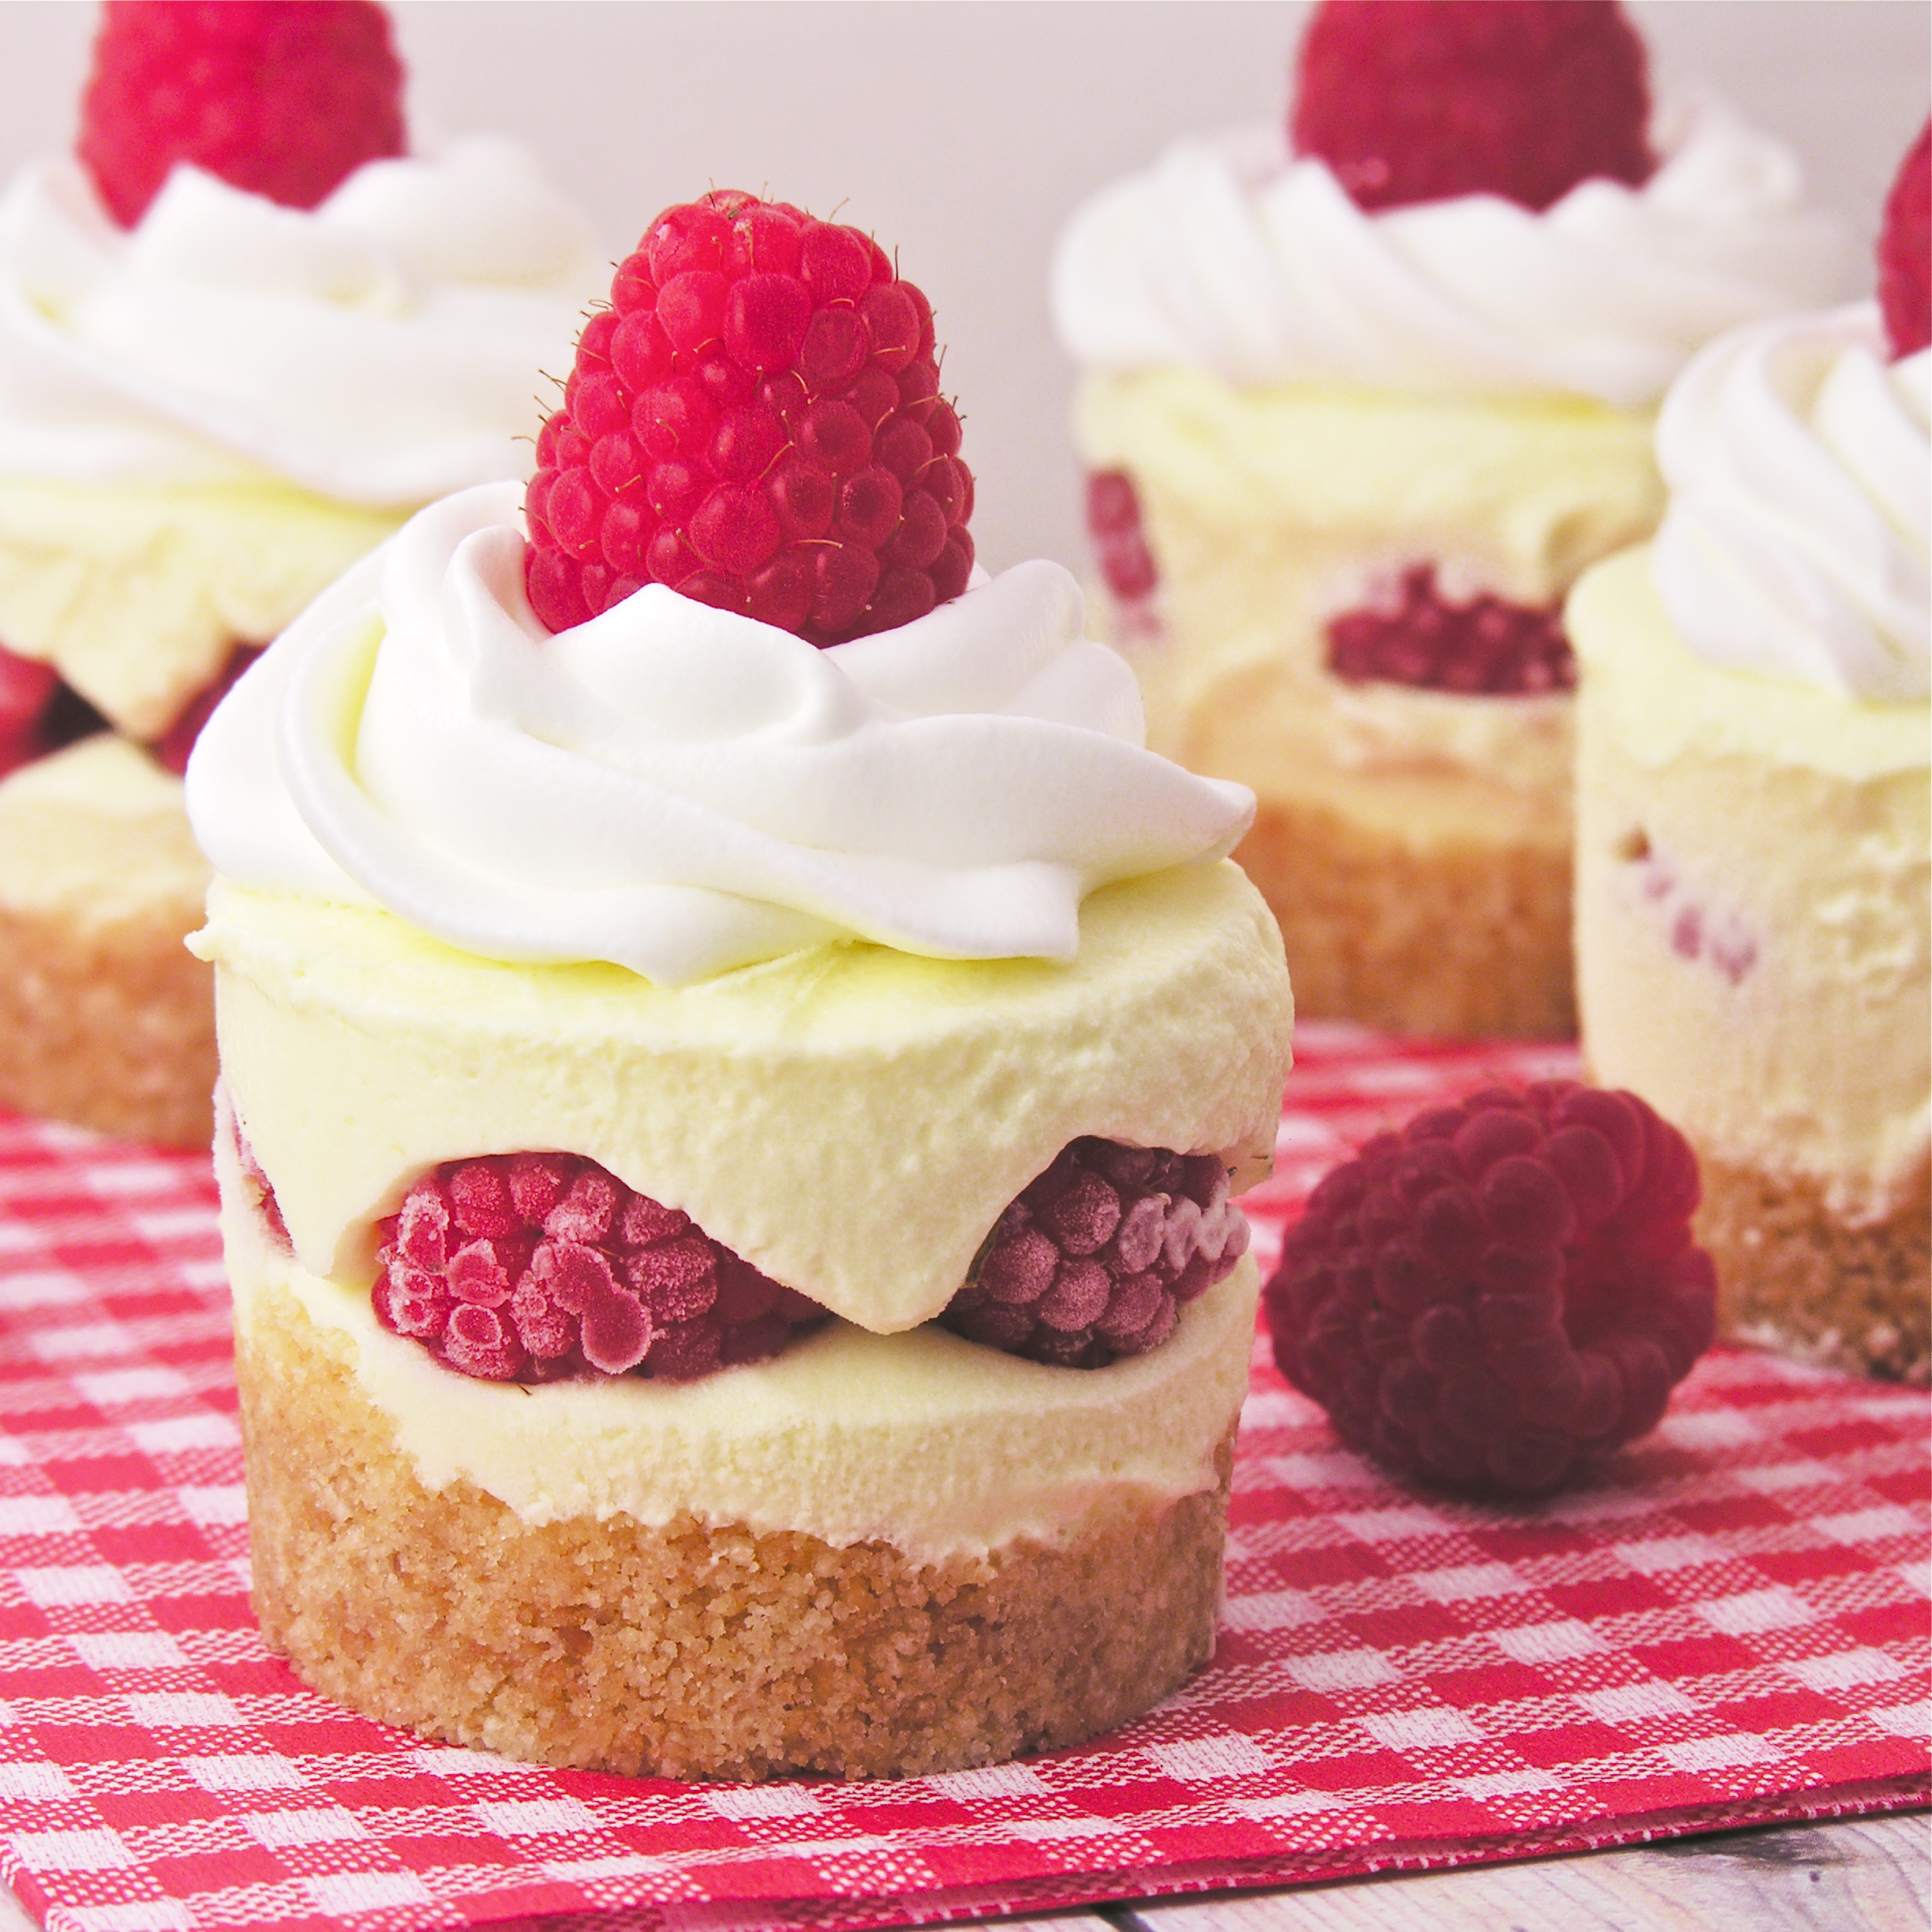
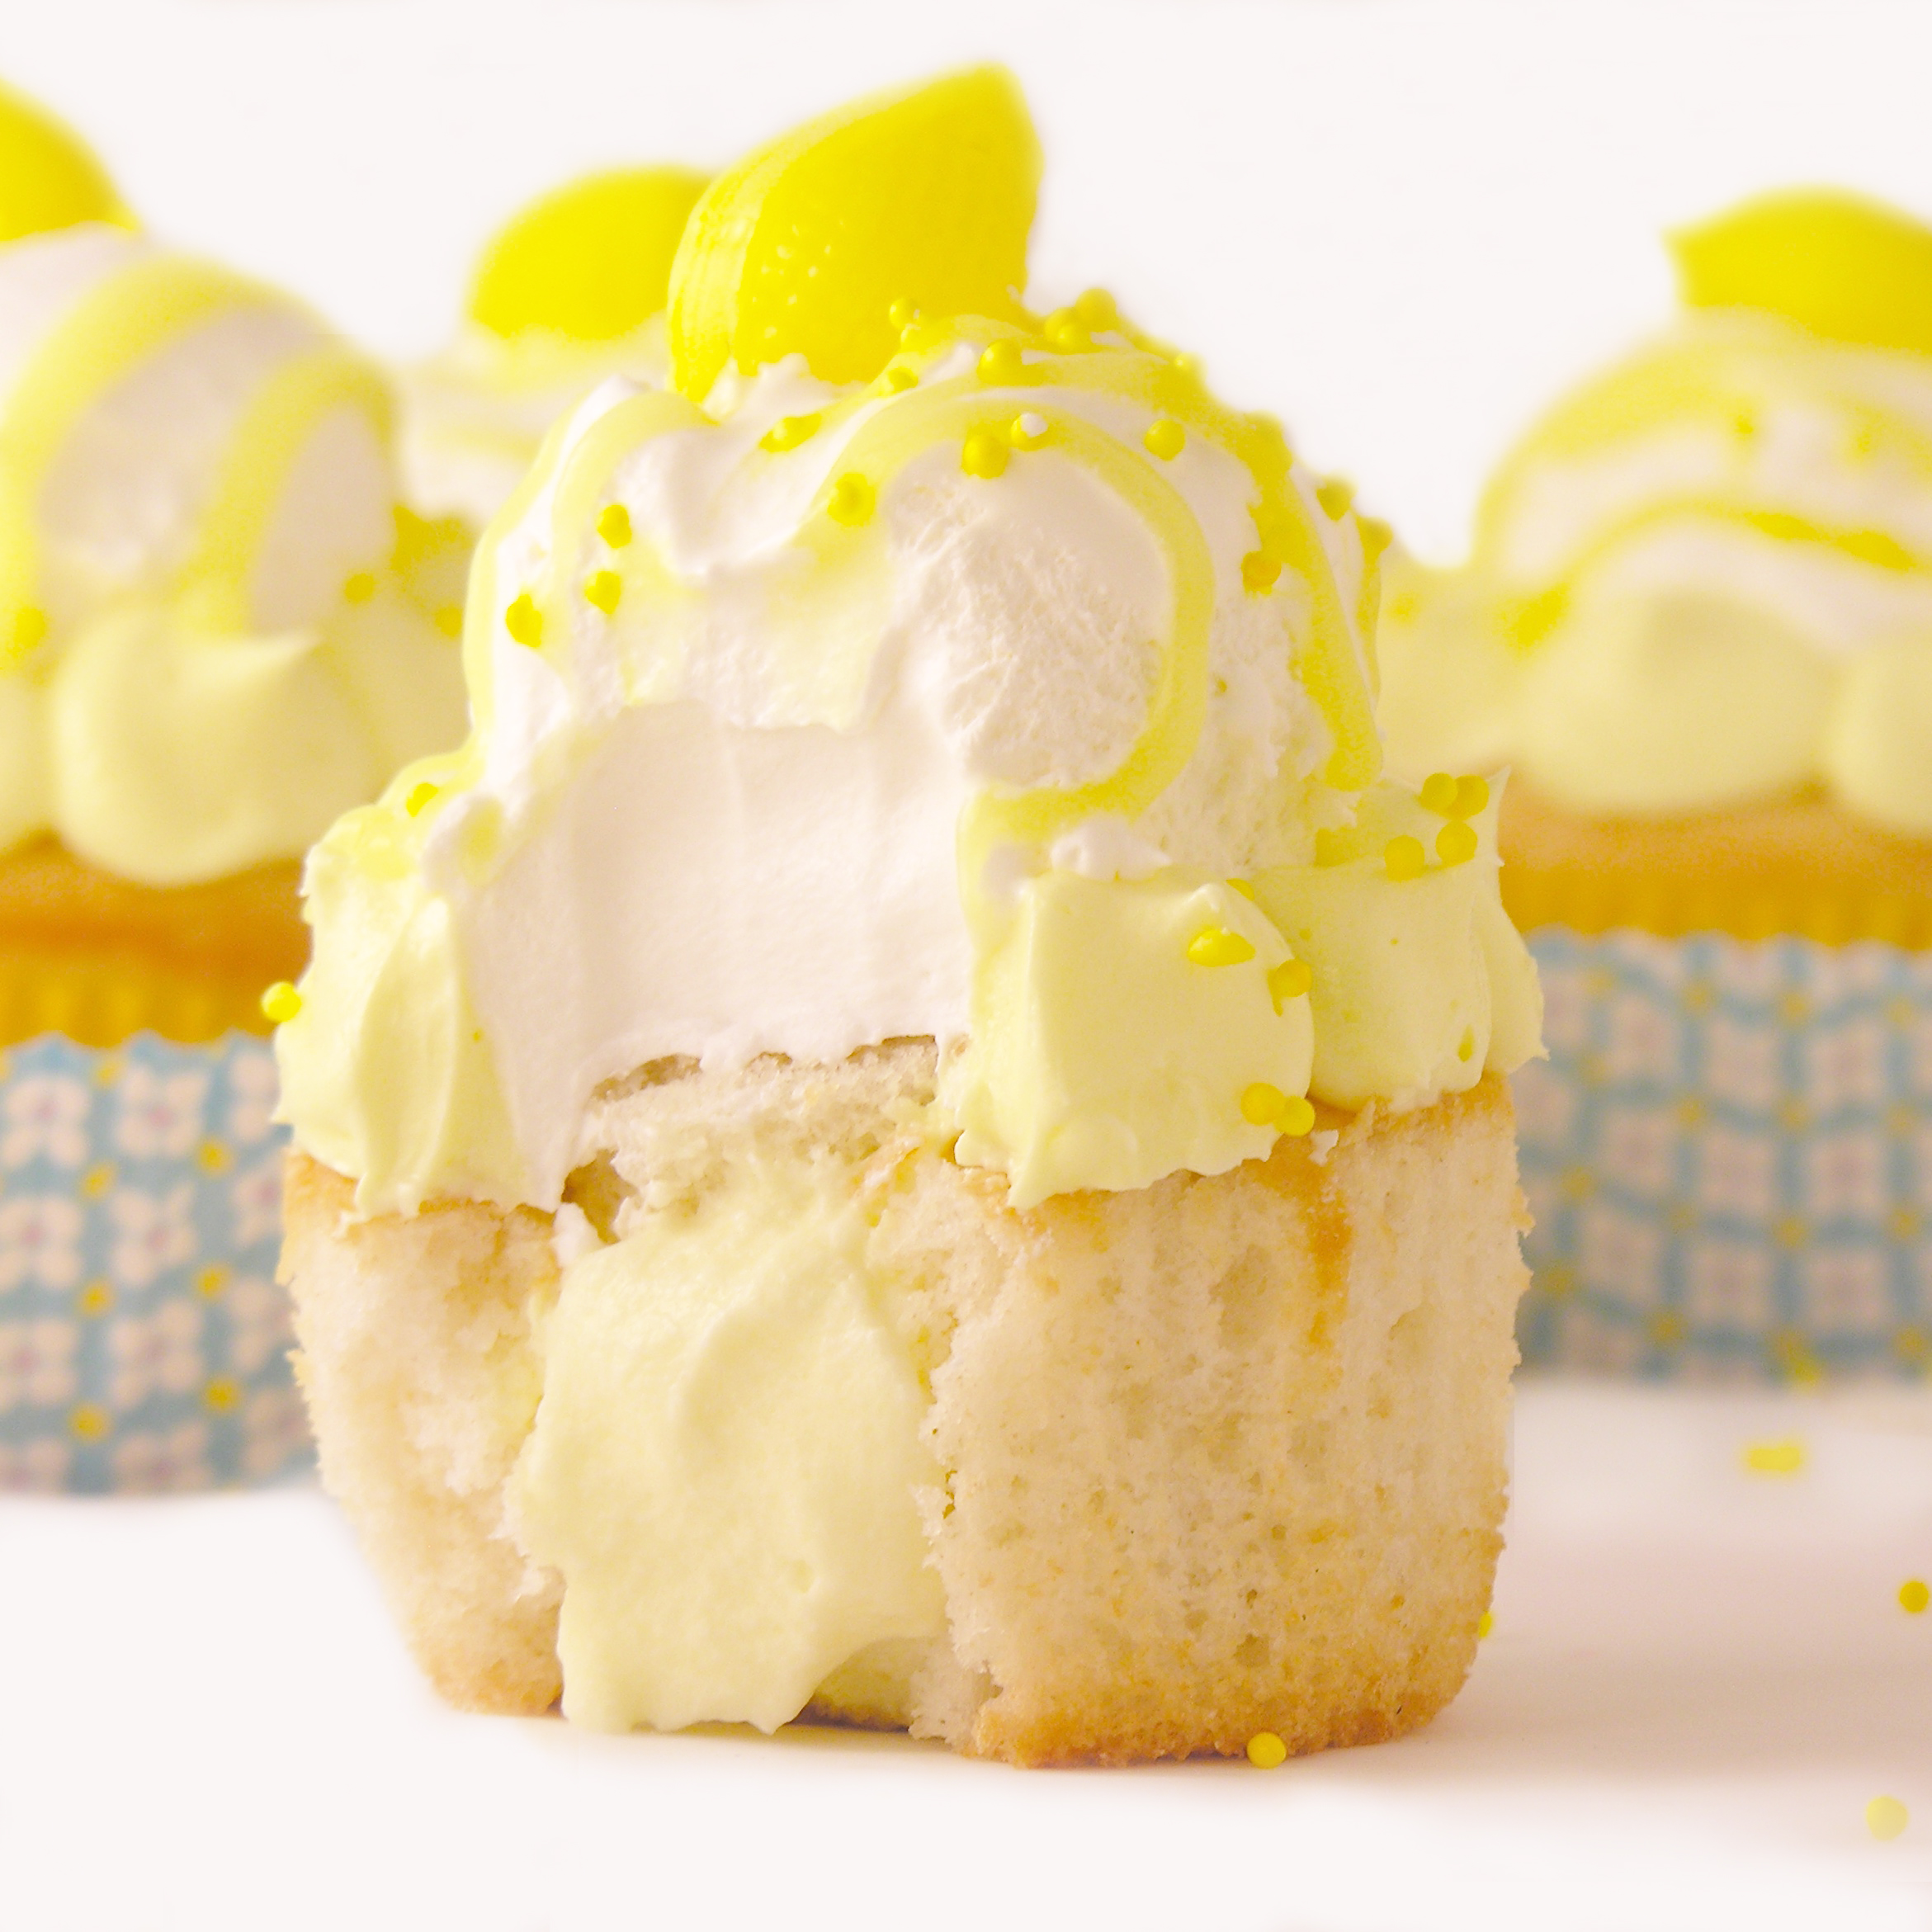
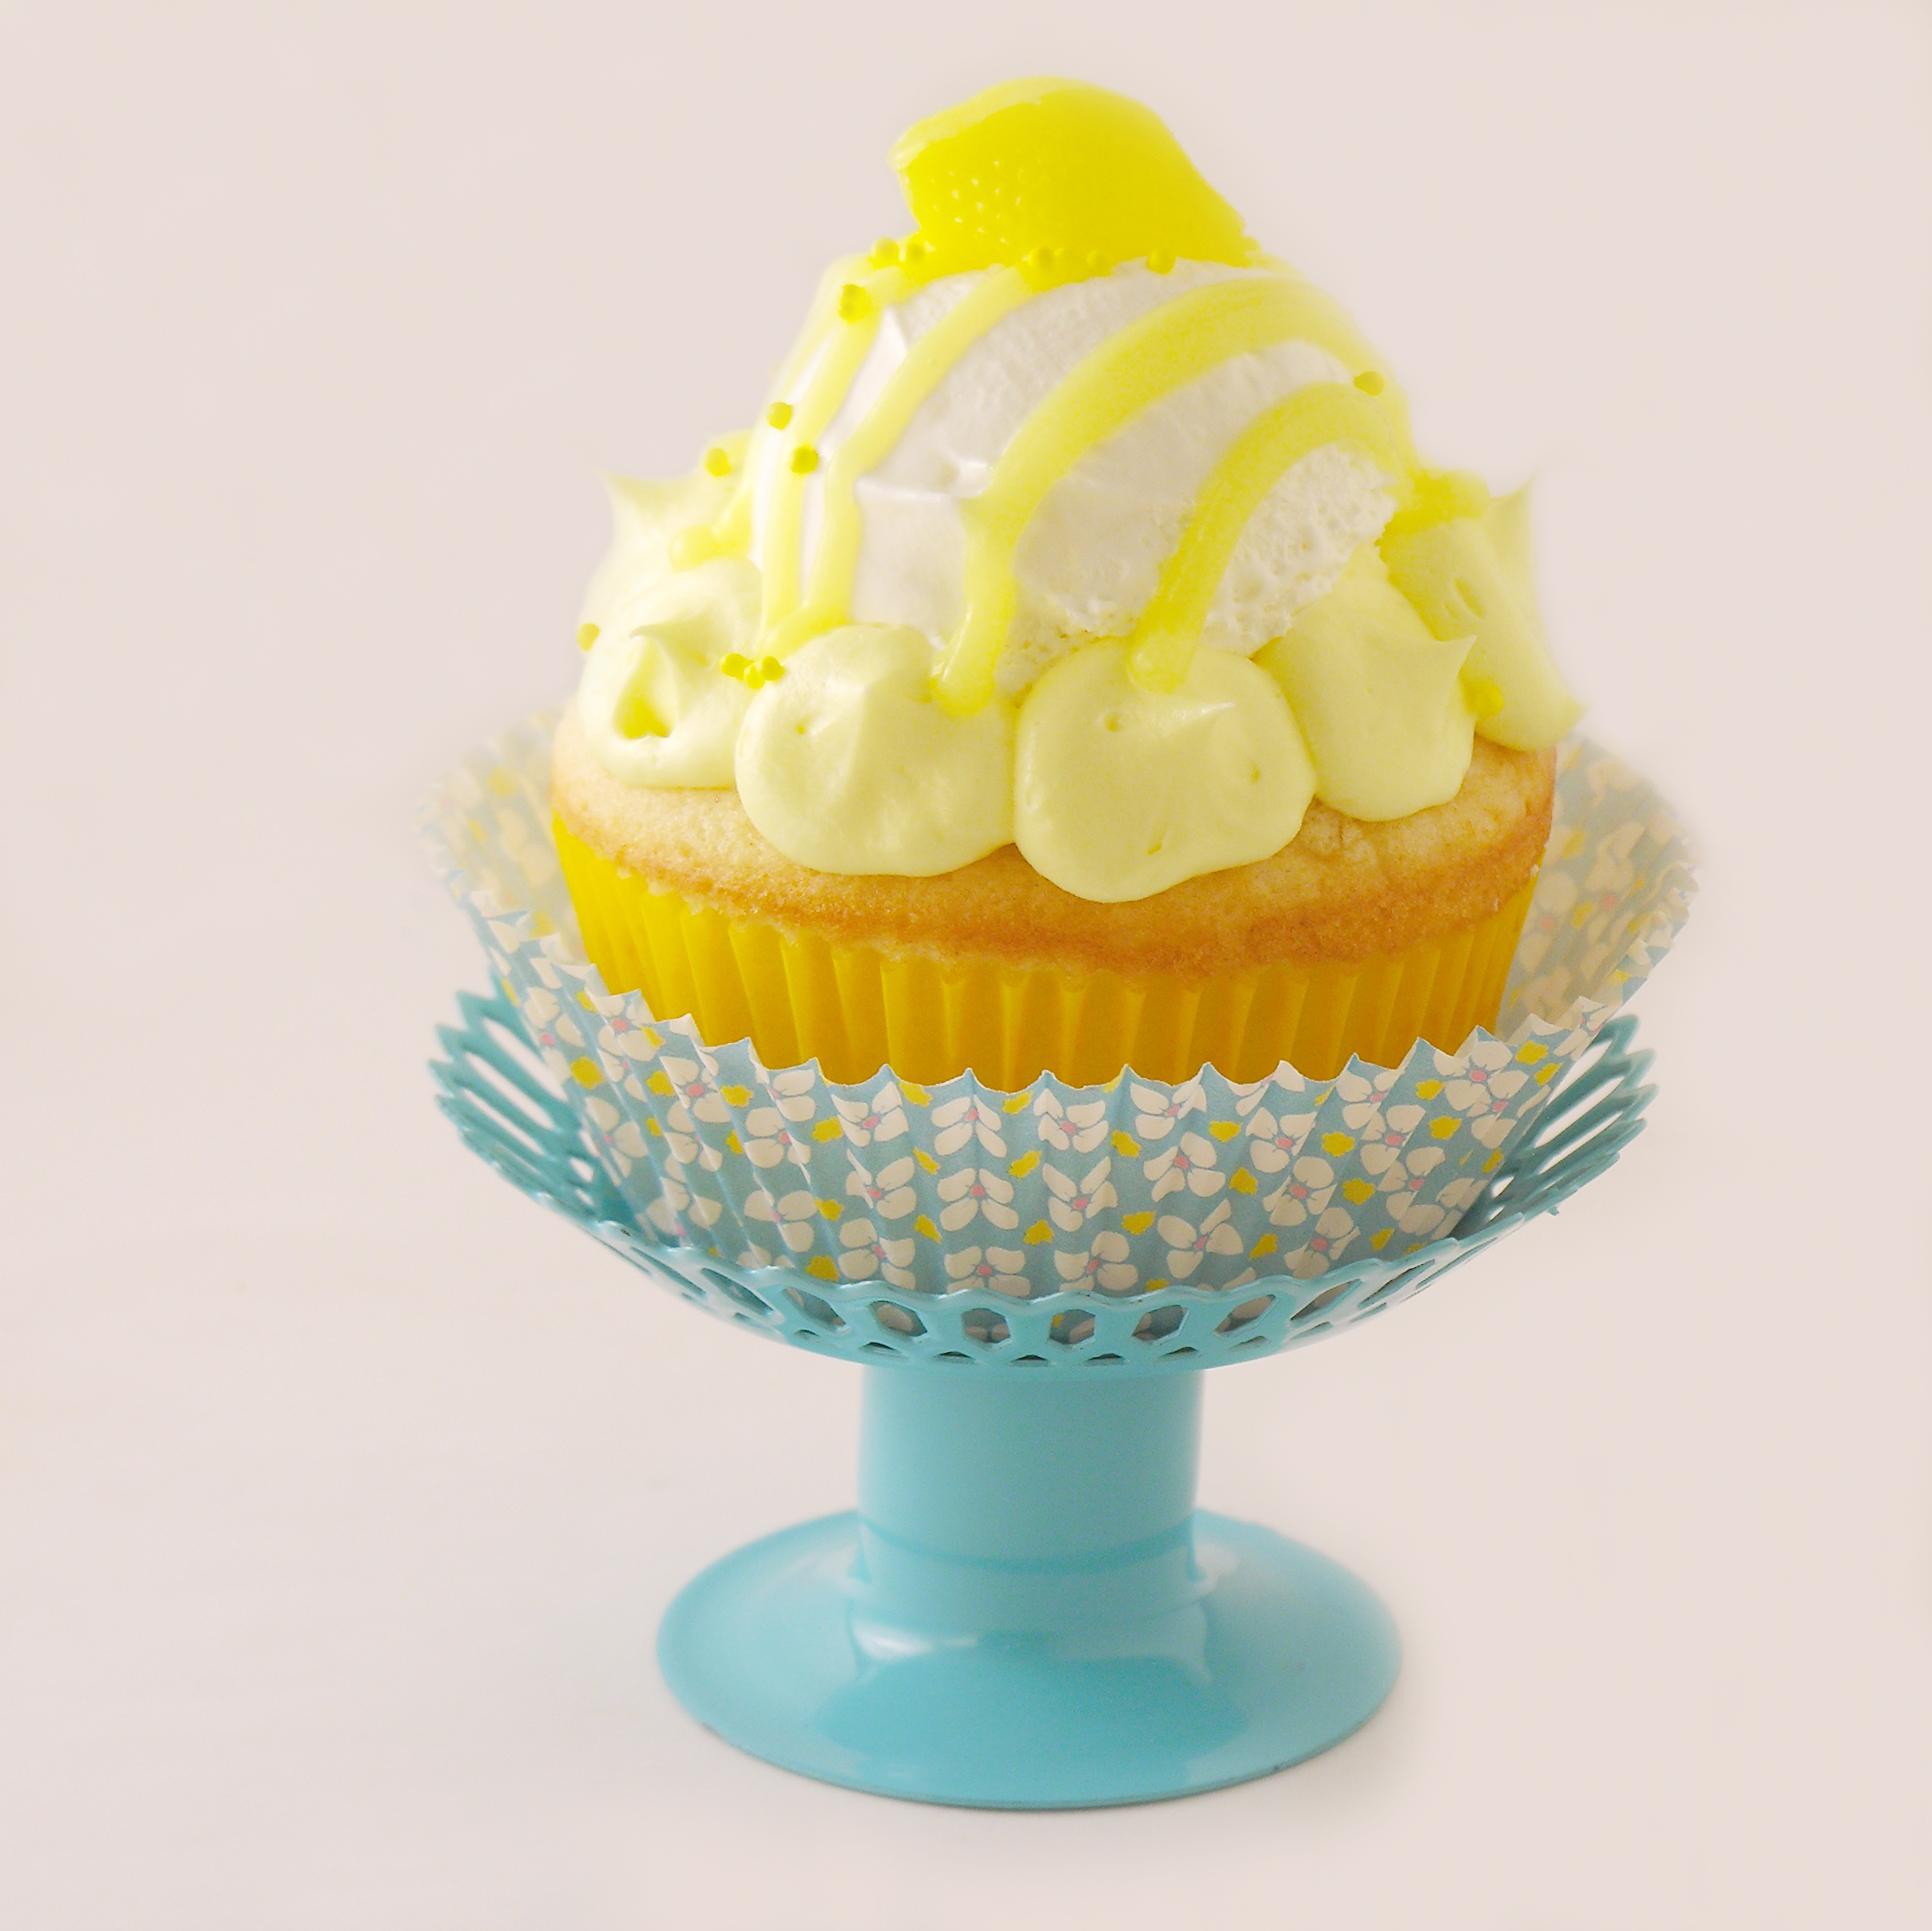
Delicious white cupcakes filled with a lemon cream and topped with lemon buttercream and a scoop of whipped topping! Yum!!!

I love lemon- but in moderation. A dessert that is overwhelmingly lemon isn’t my favorite (which is why you see very few lemon recipes on this blog!) These are the perfect creamy mix of white cake and sweet lemon flavor though. I love them! I’ve become a big fan of putting a scoop of whipped topping in the center of a cupcake and surrounding it with a flavored buttercream. It cuts the sweetness and the flavor. These also have a creamy lemon filling that is sooooo yummy.

Lemon Cream7

Ready for the recipe? Here you go. (printable version here)

INGREDIENTS:

  • One boxed white cake mix with eggs, water and oil to make according to package
  • One small package of instant lemon pudding (with 2 cups of milk to make according to package)
  • 2 tubs of Cool Whip topping (frozen)
  • 2 sticks of butter (softened)
  • 1 1/2 cups of powdered sugar
  • 2 teaspoons of lemon extract
  • Yellow food coloring
  • Lemon drops and sprinkles (optional for decoration)

DIRECTIONS:

  • Make cake mix according to package and bake in 24 cupcake liners placed in a muffin tin. Cool completely.
  • Make pudding mix according to package. Spoon about 1/3 cup into a small zip-top bag and set aside.
  • Add 1/2 of one container of Cool Whip, to remaining pudding, mixing until well- combined. Place in a zip-top bag and set aside.
  • In a medium bowl, beat butter, powdered sugar, lemon extract and yellow food color together on high until light and fluffy. Place in a zip-top bag with a circular decorating tip inserted into one corner. Set aside.
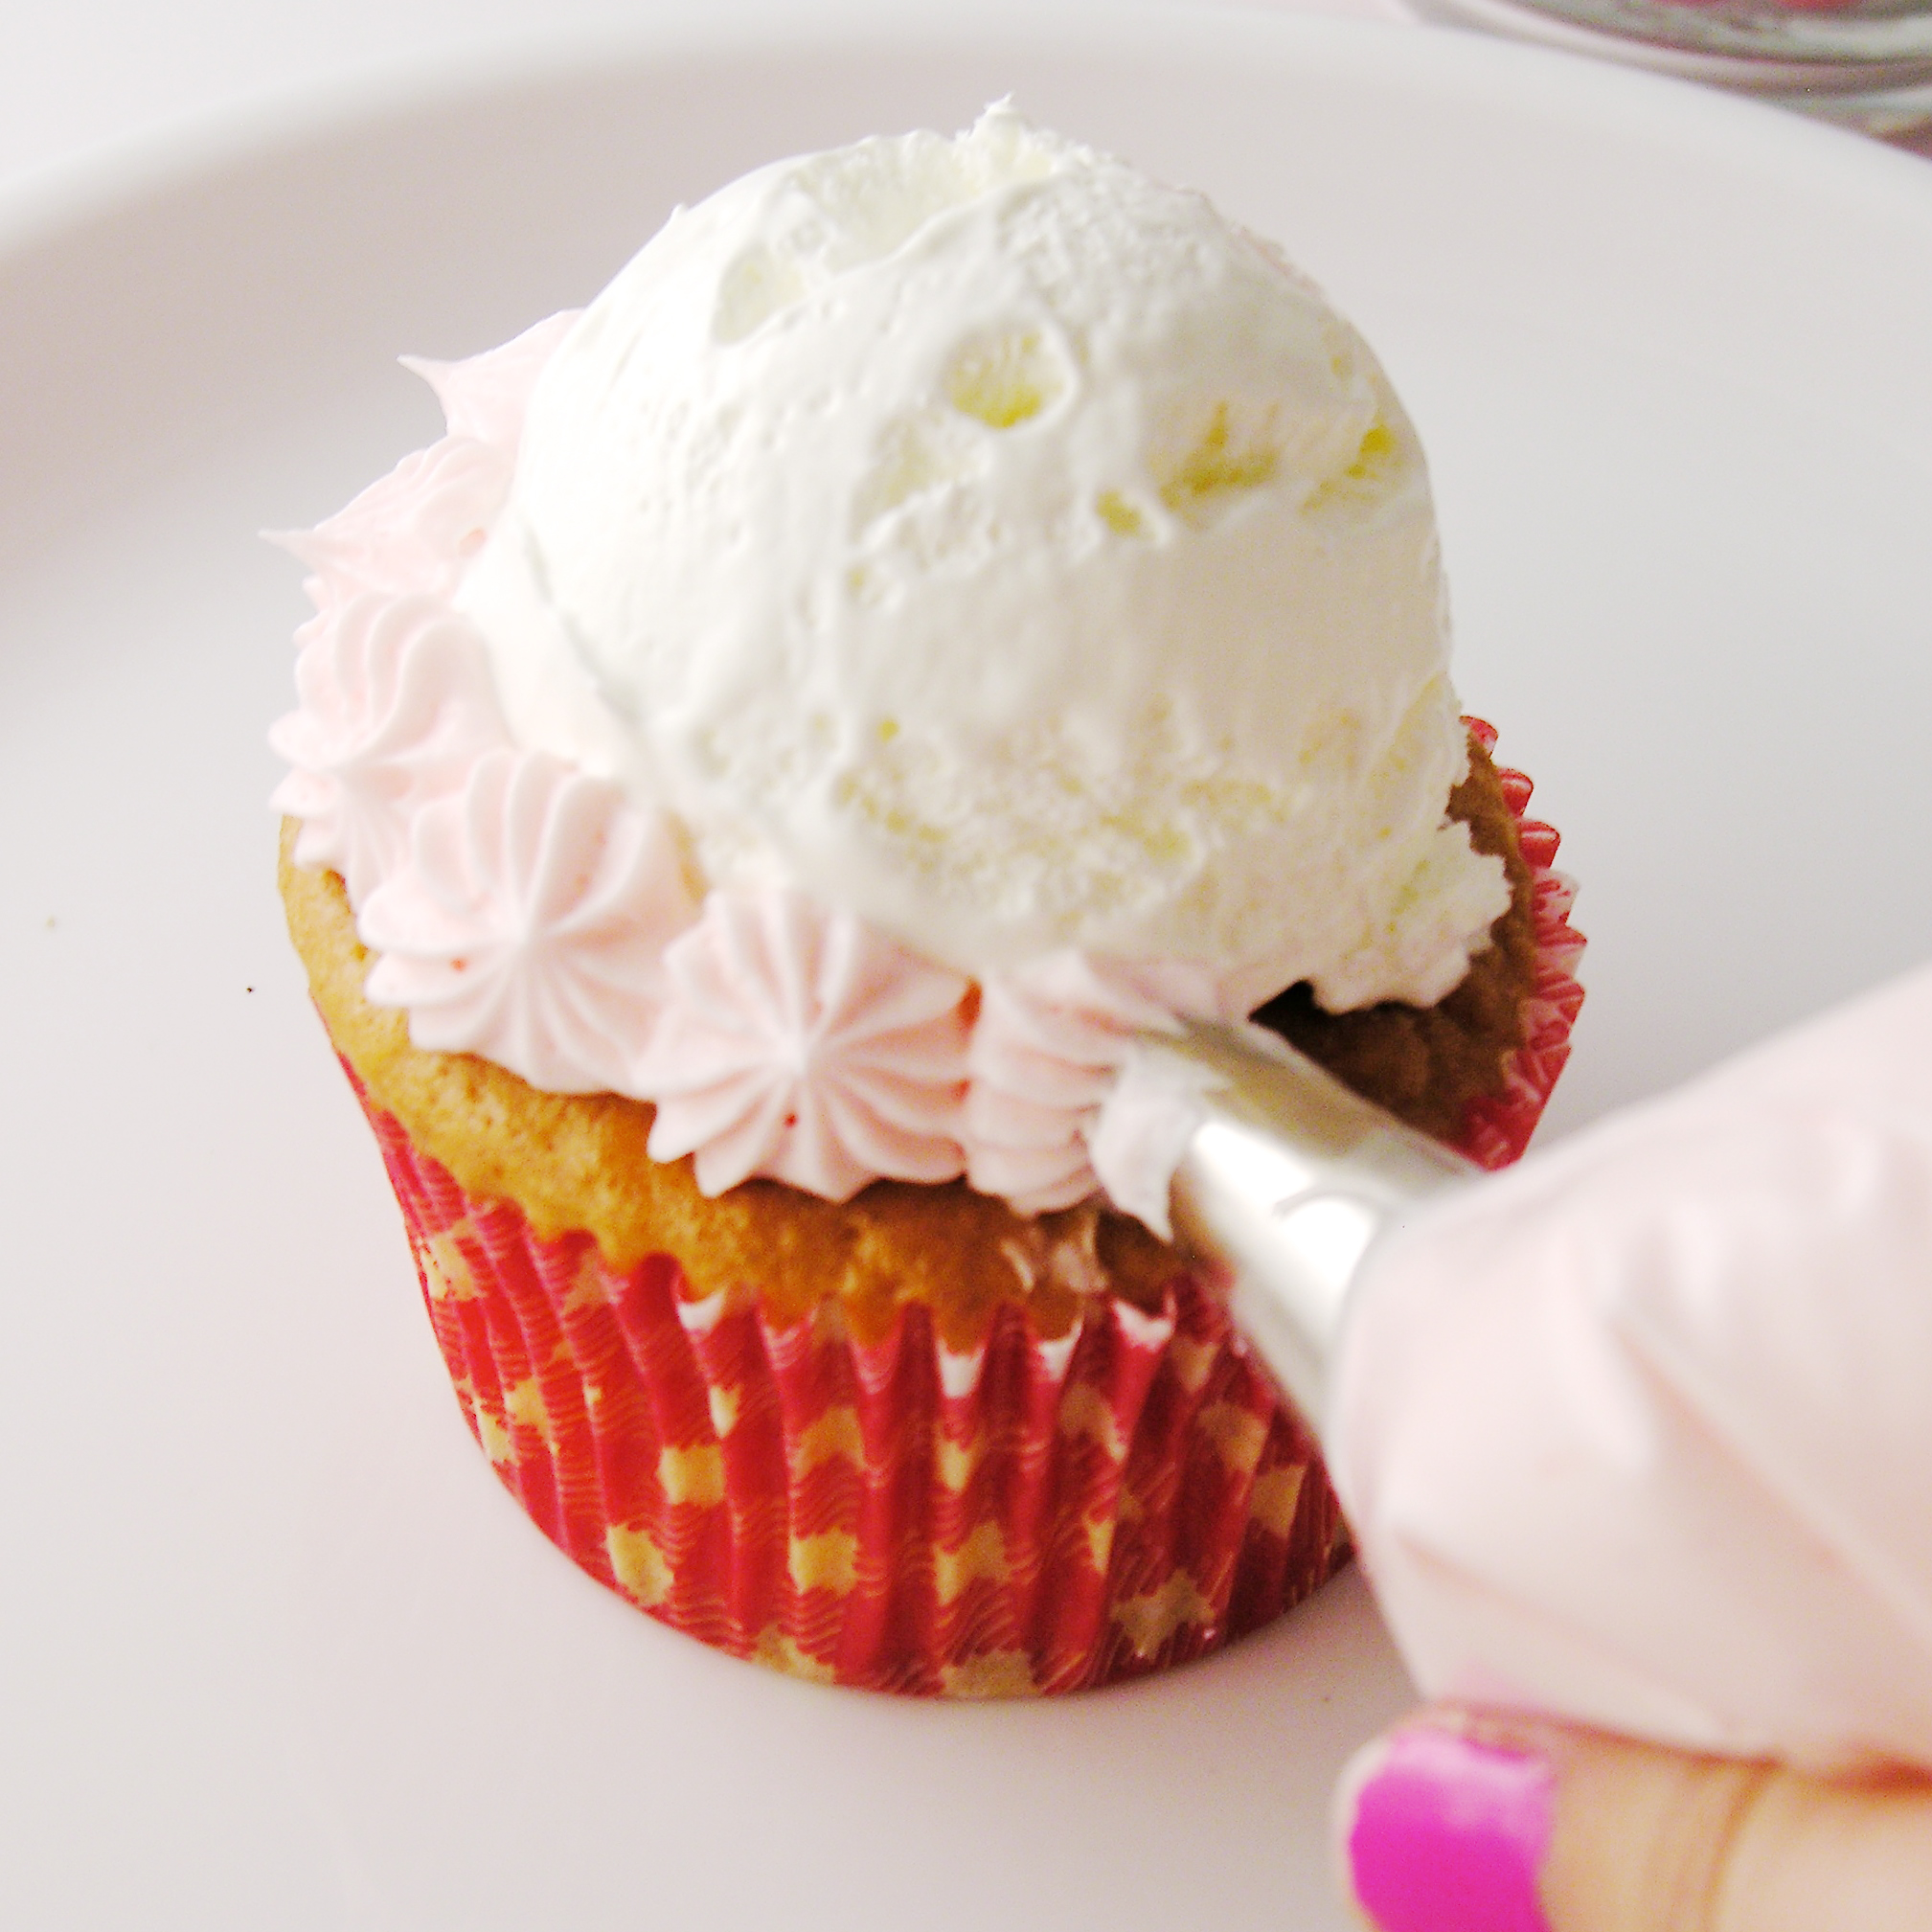
  • Remove a core from each cupcake. You can use a knife or a cupcake corer to do this, but save the top of this core.
  • Clip a corner off the pudding/Cool Whip mixture bag and pipe this into the center of each cupcake, setting the top of the core back on when filled.
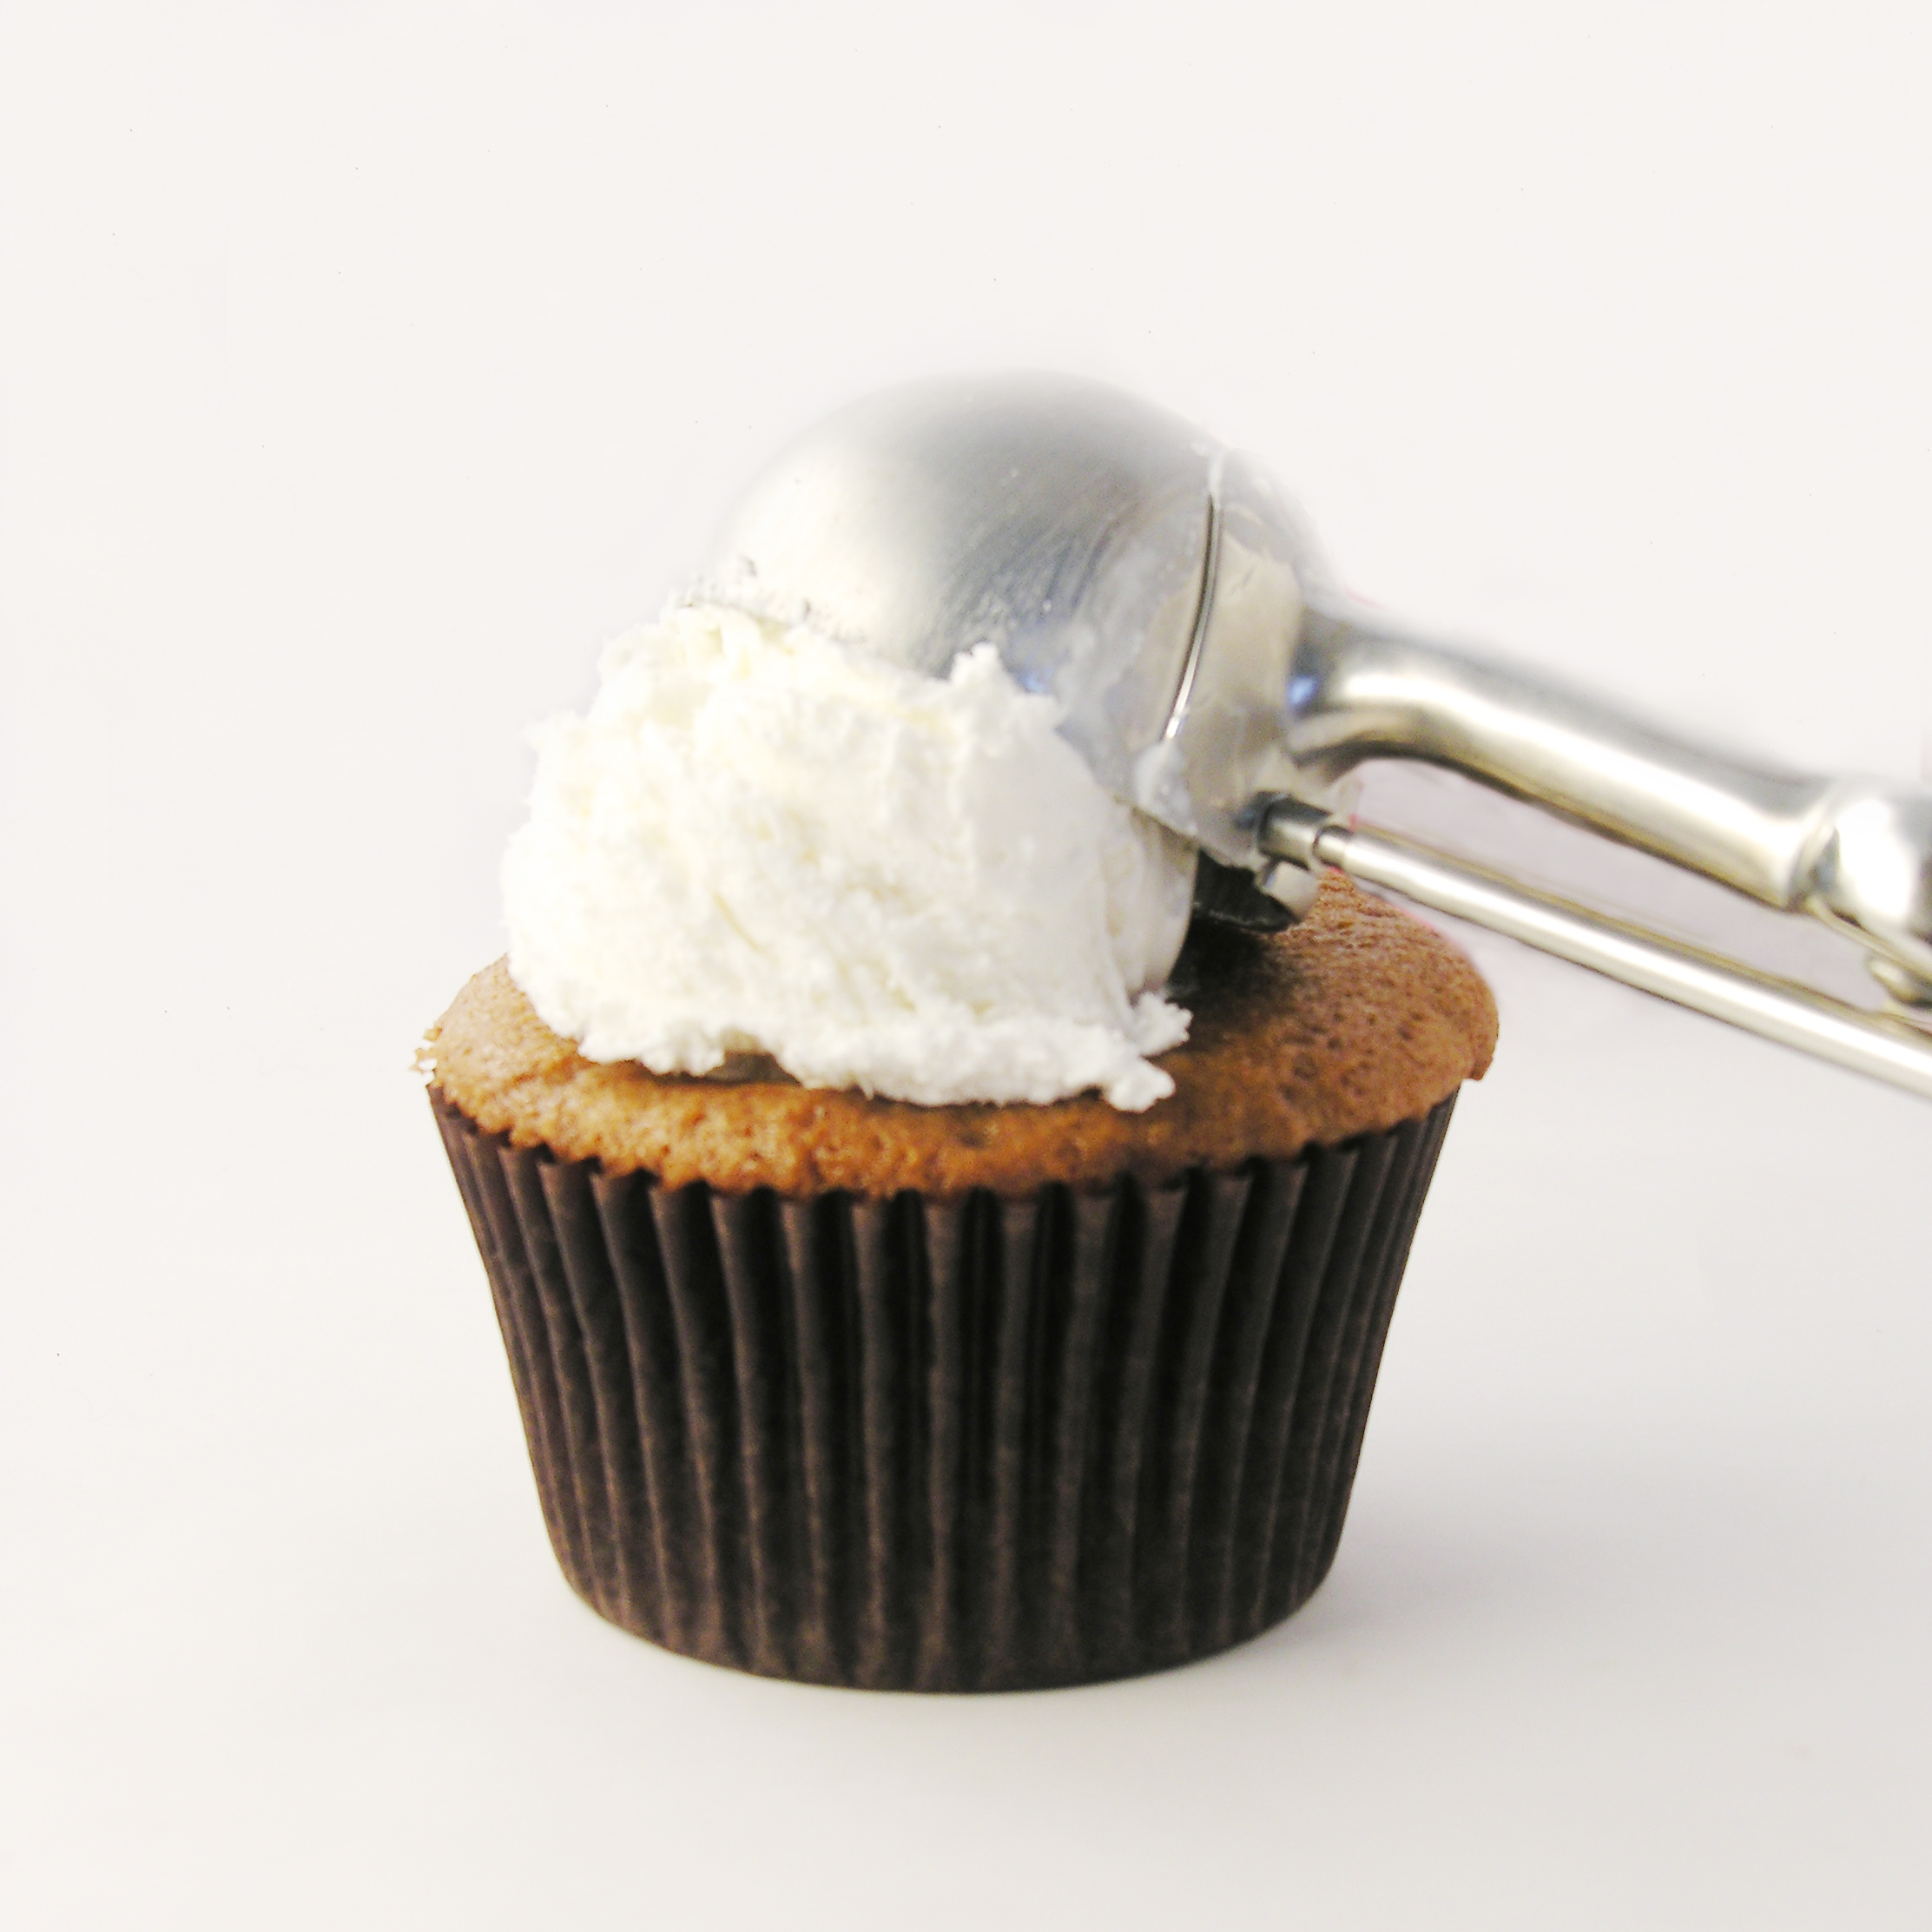
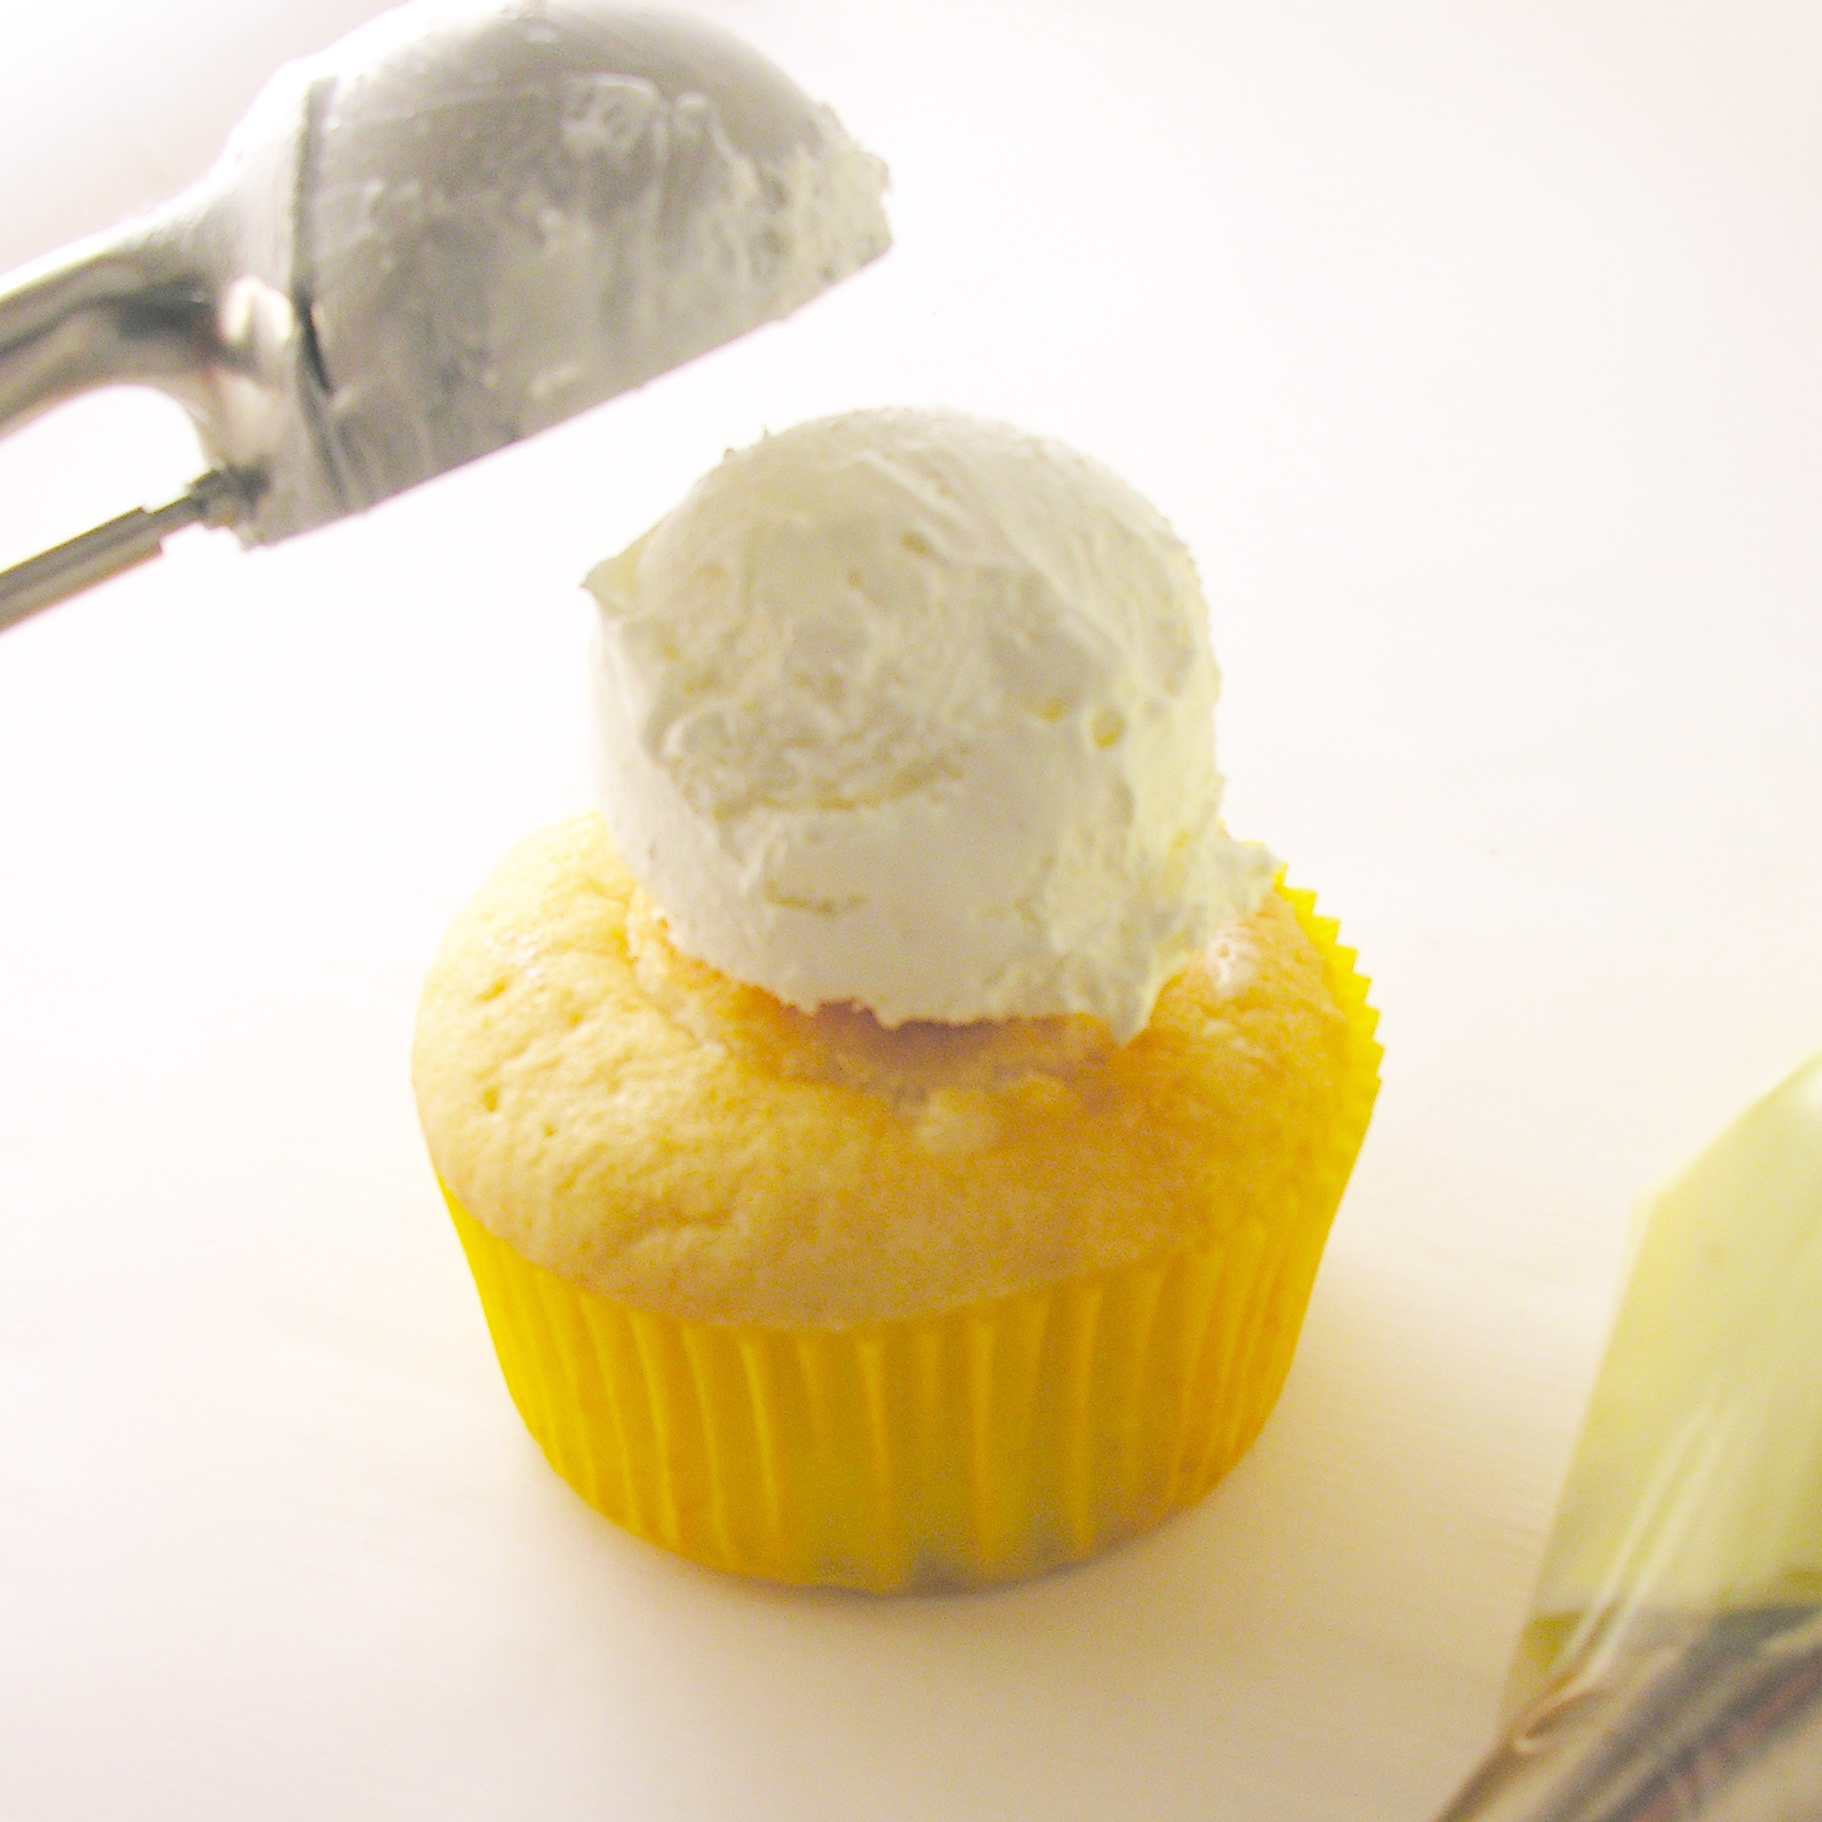
  • Use a medium cookie scoop, melon baller or ice cream scoop to spoon a rounded ball of frozen Cool Whip onto the center of each cupcake.
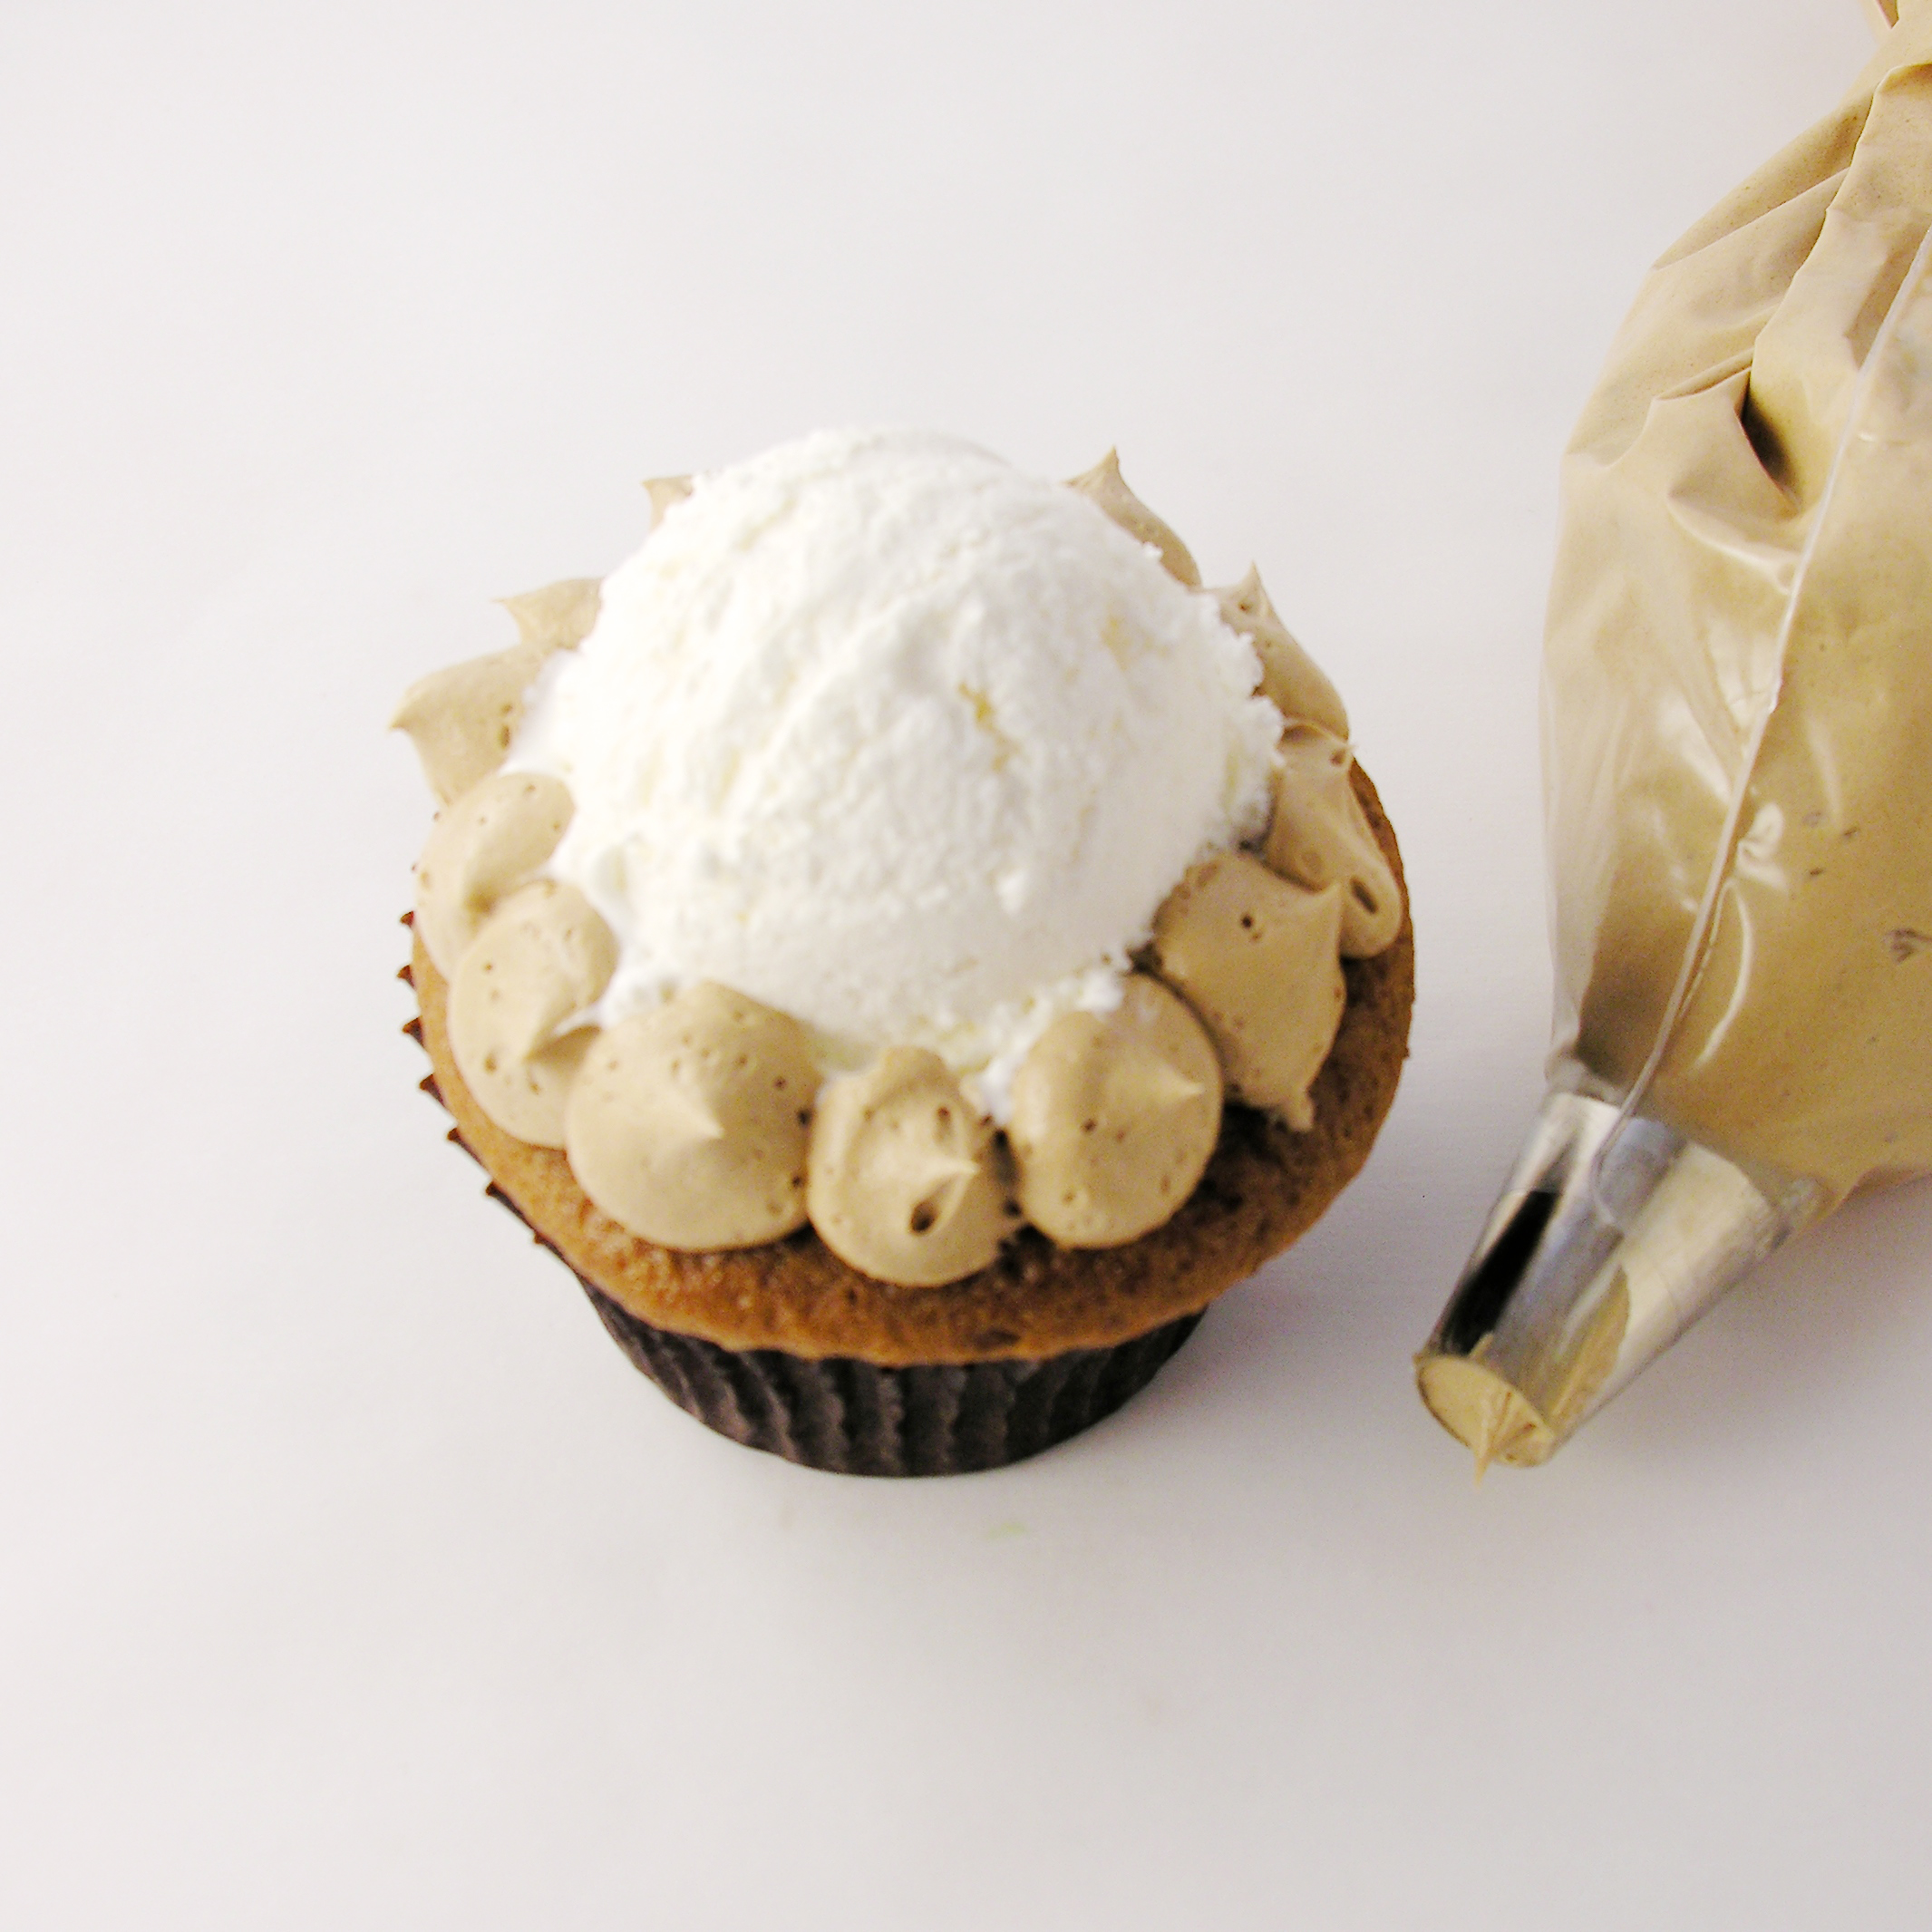
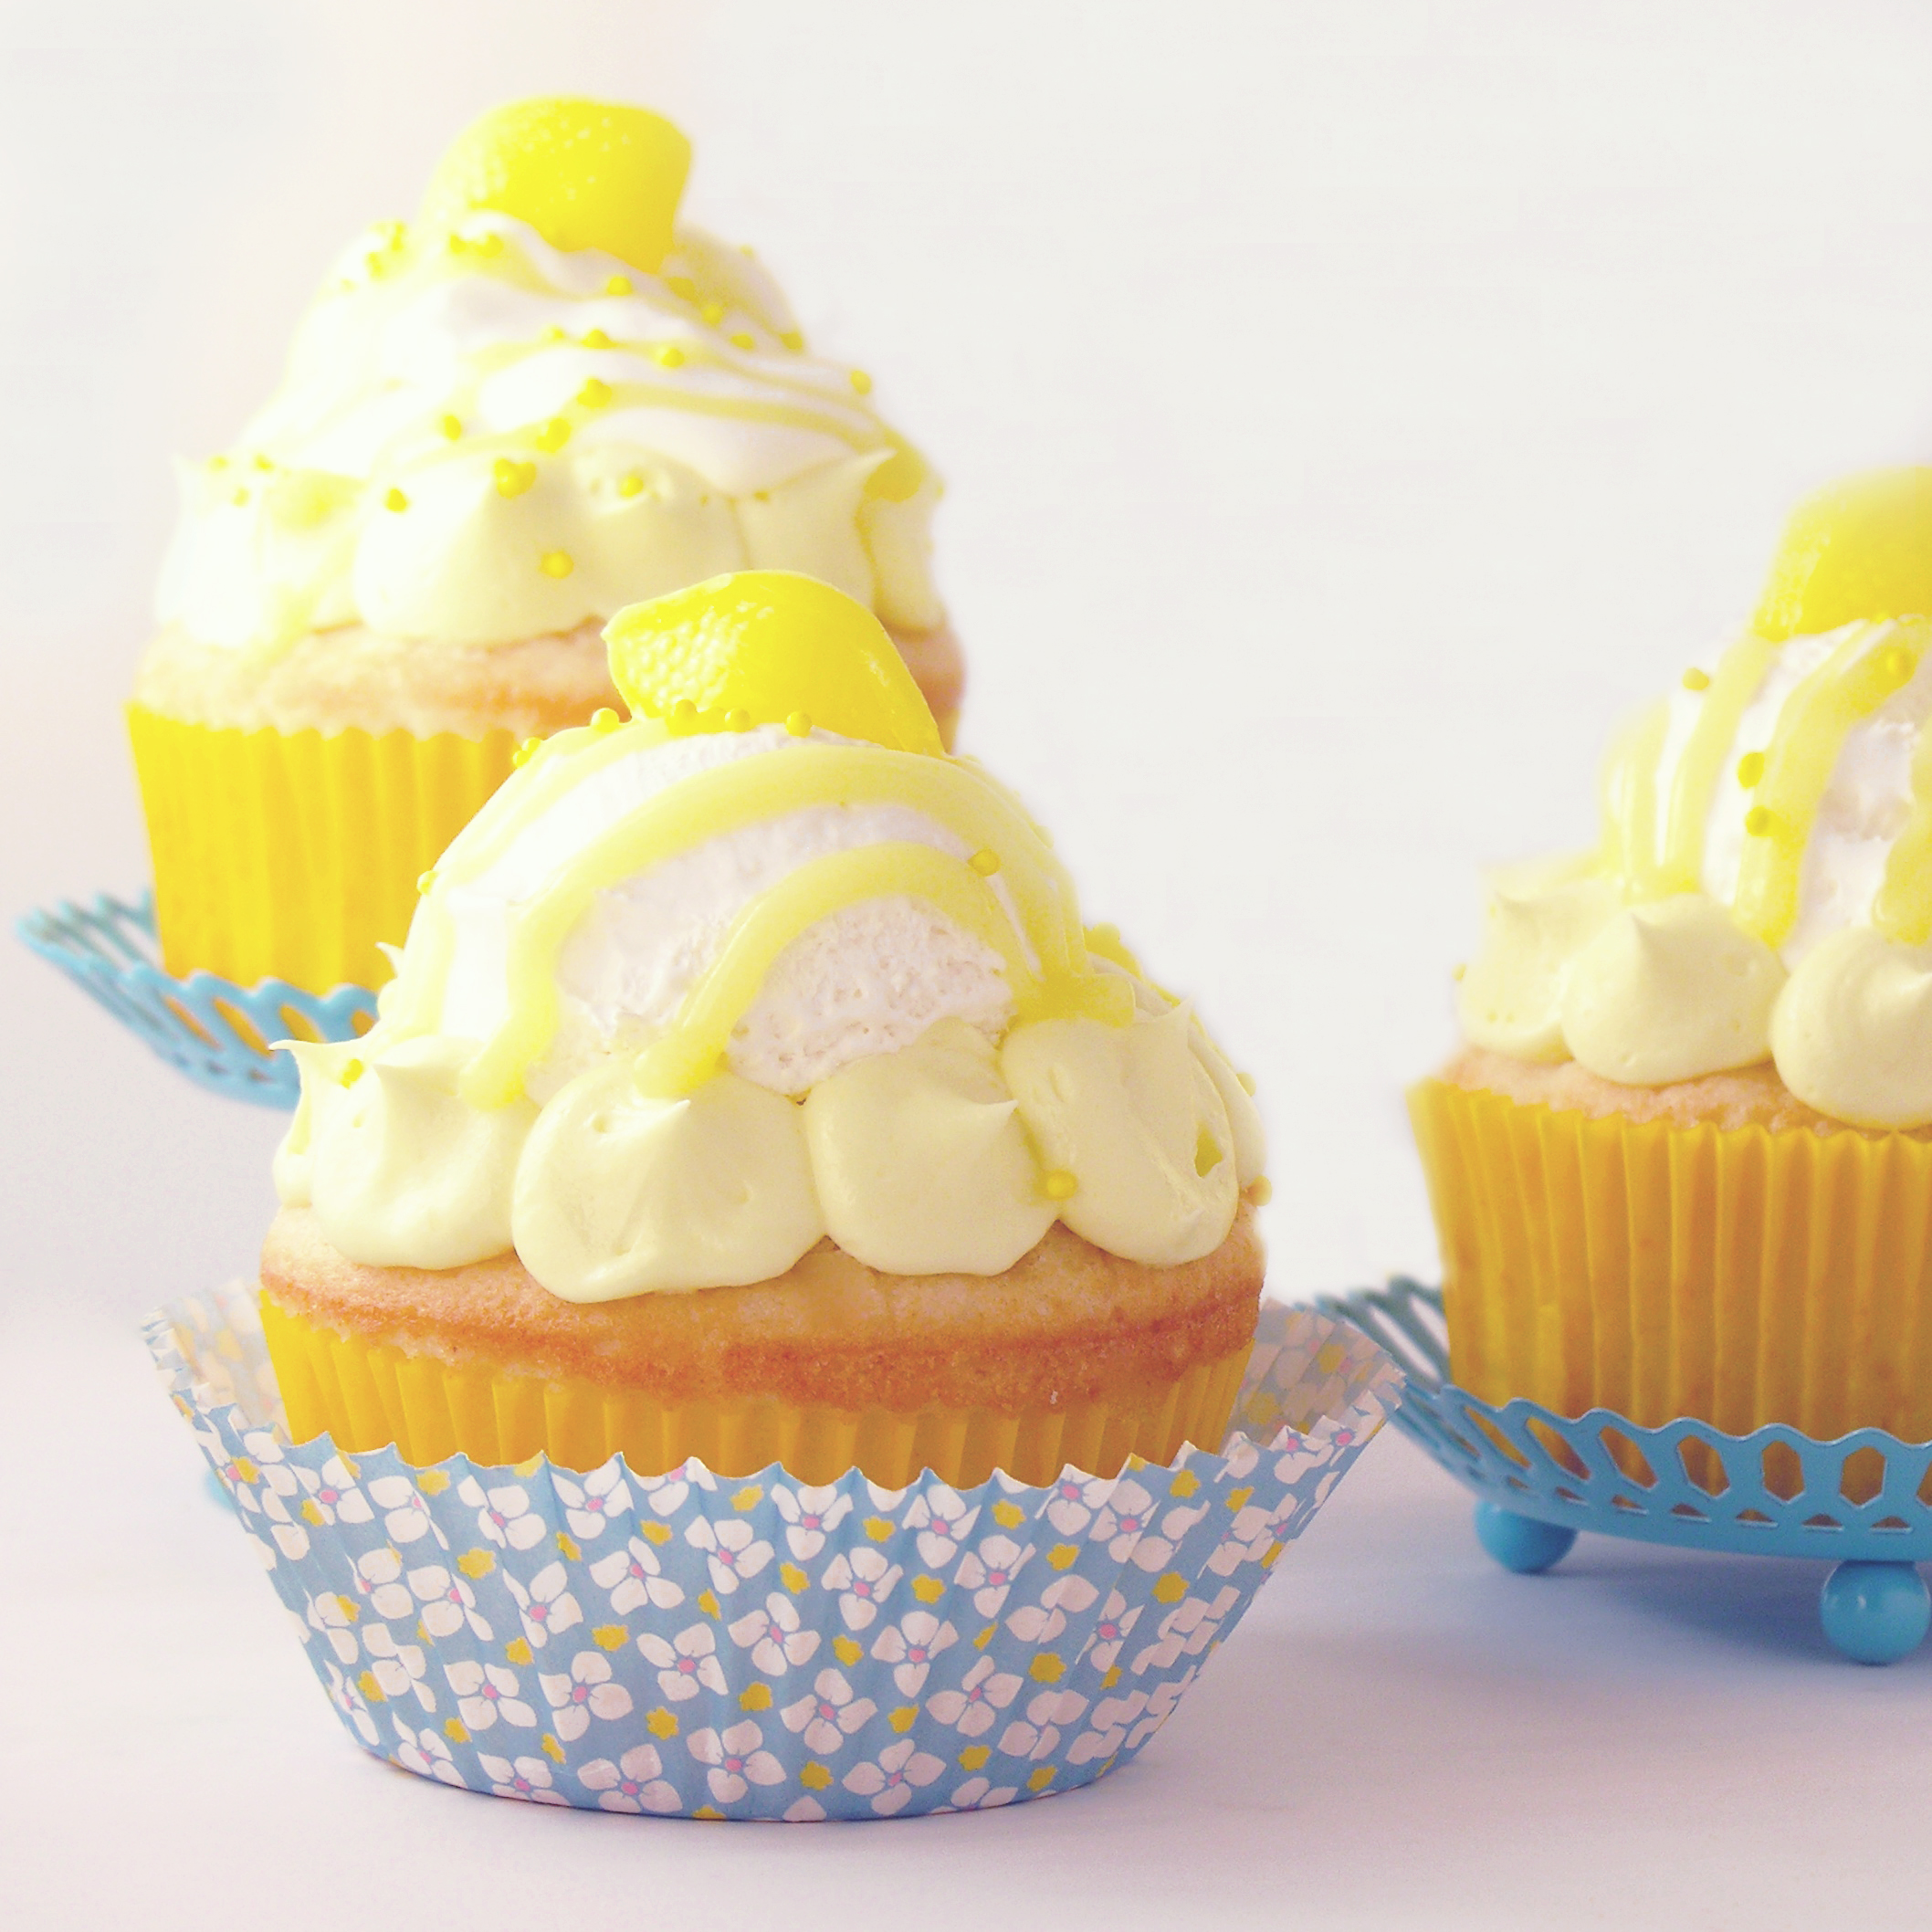
  • Pipe lemon frosting around the edges of this scoop by squeezing small circles of frosting all around the edge.

Lemon Cream1Lemon Cream2

  • Cut a small(!) corner off the bag of plain pudding and drizzle this over the top. 
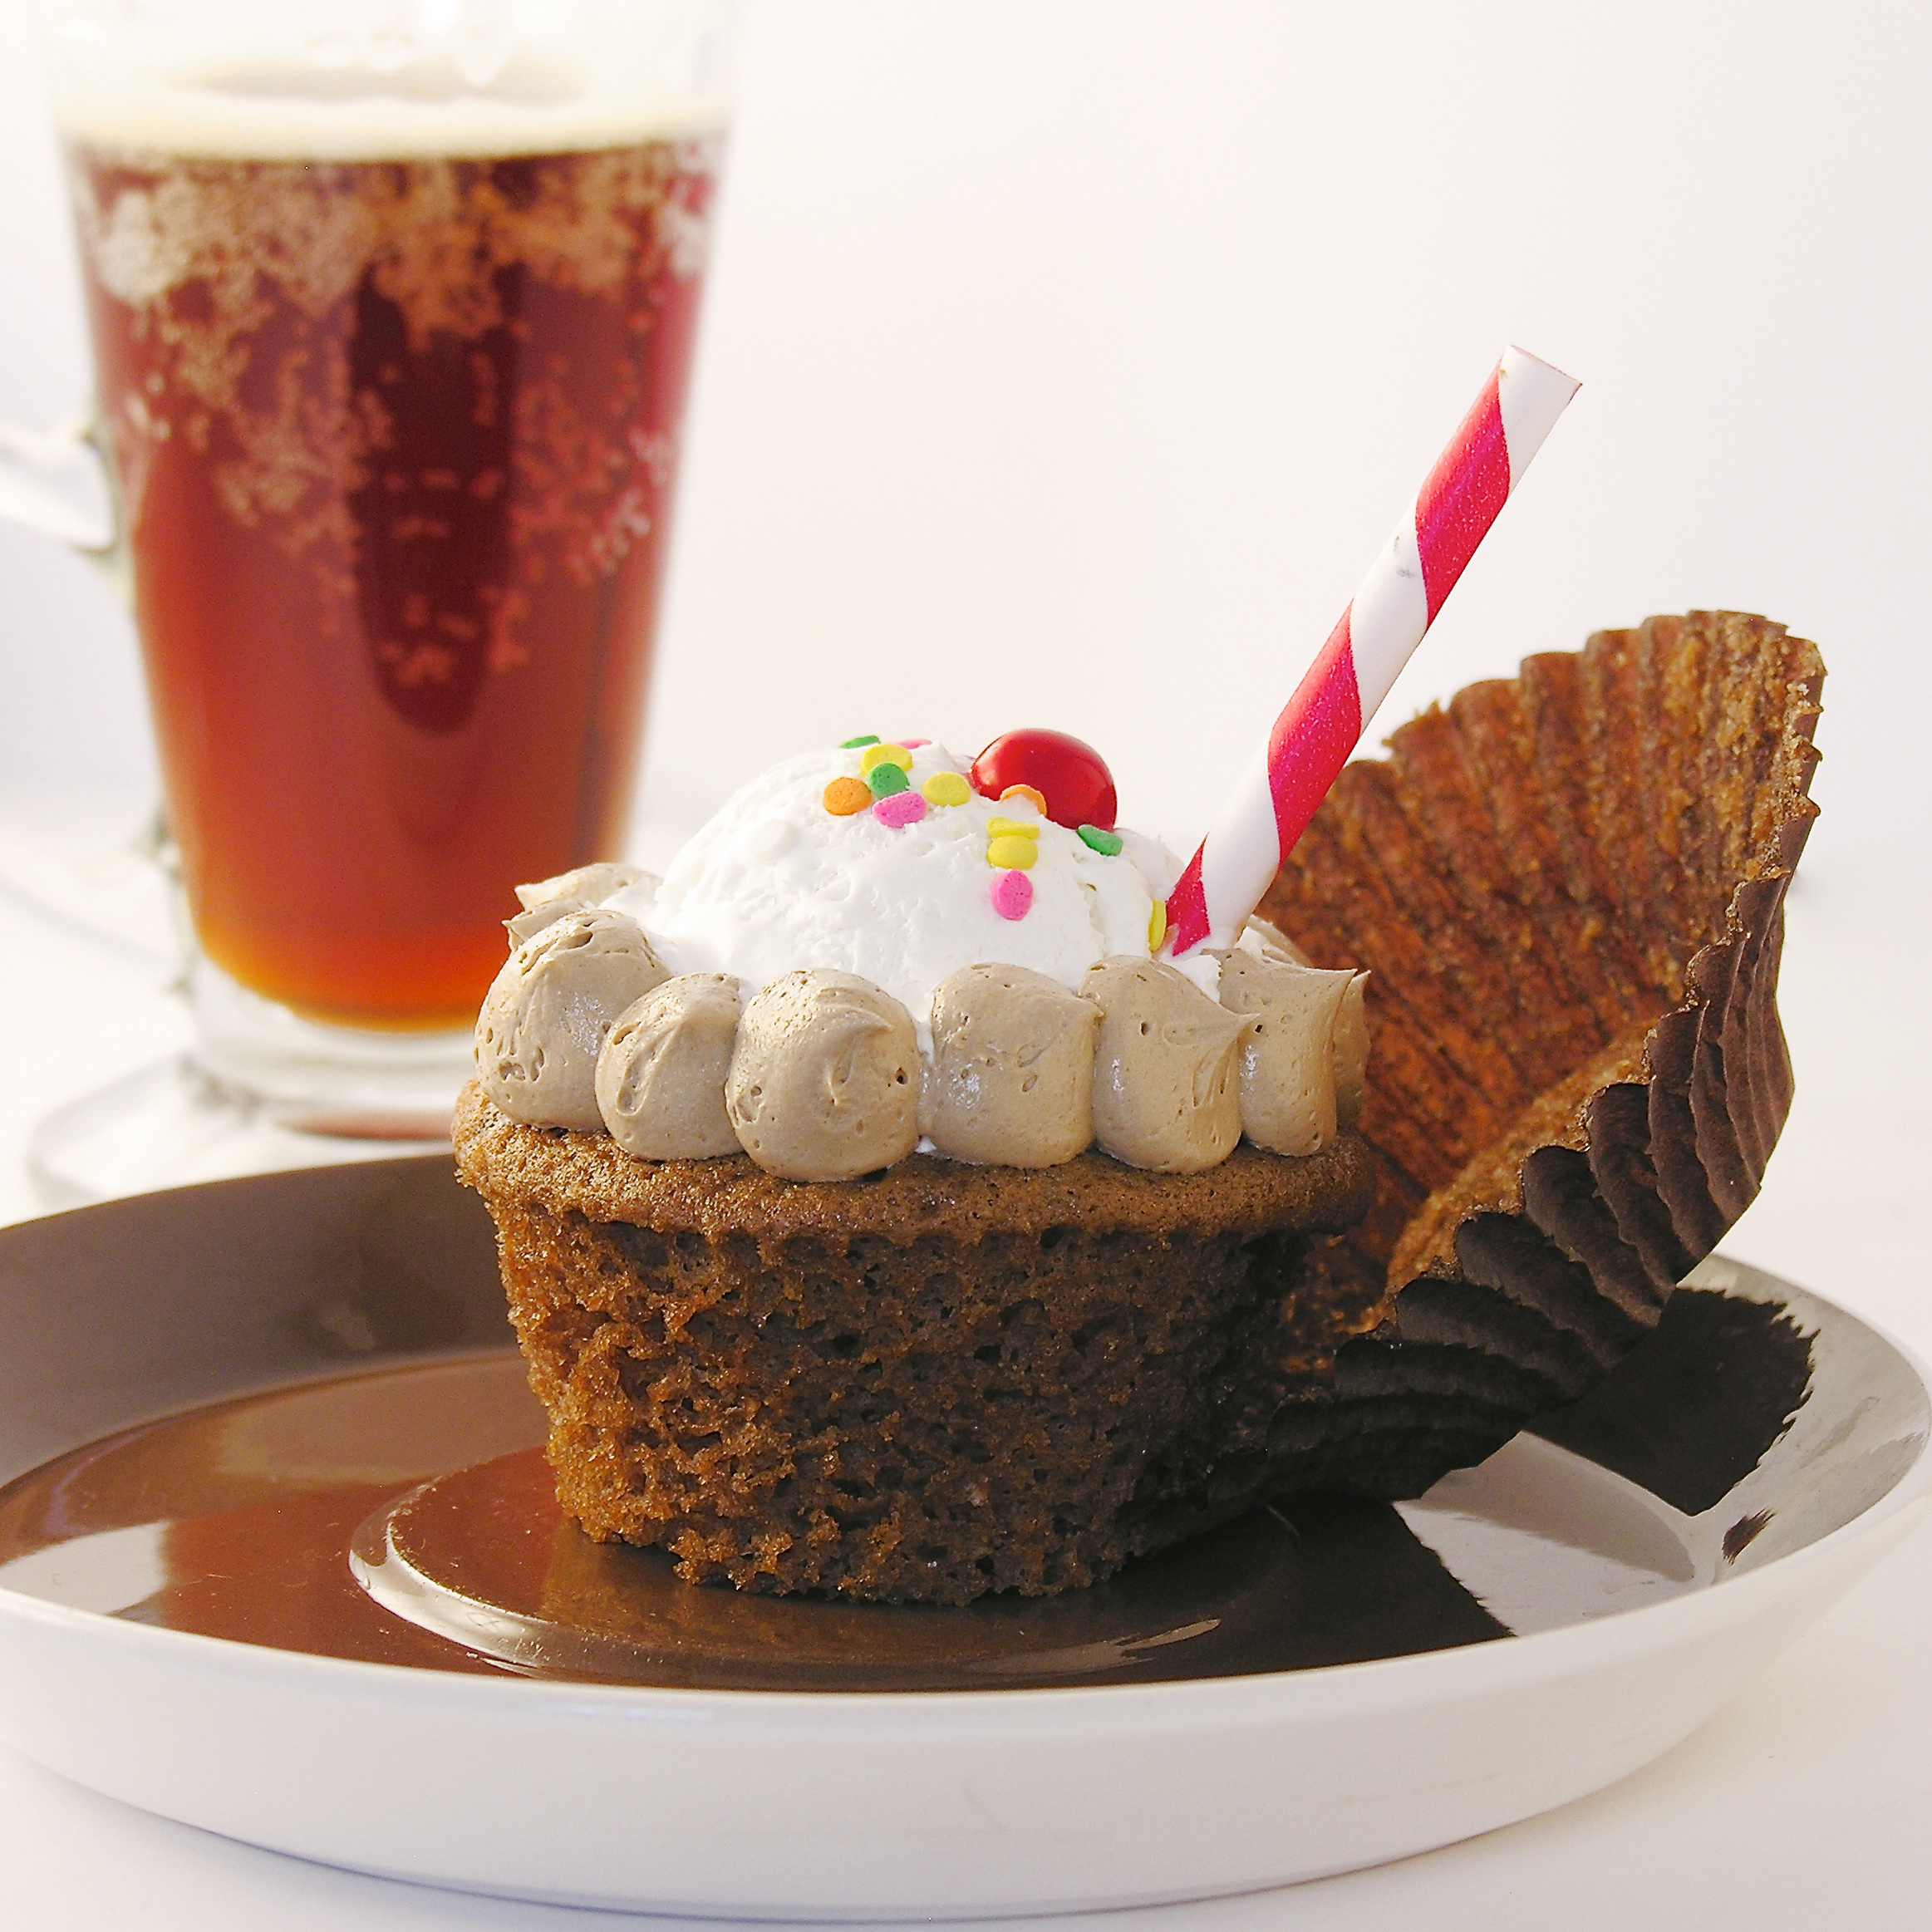
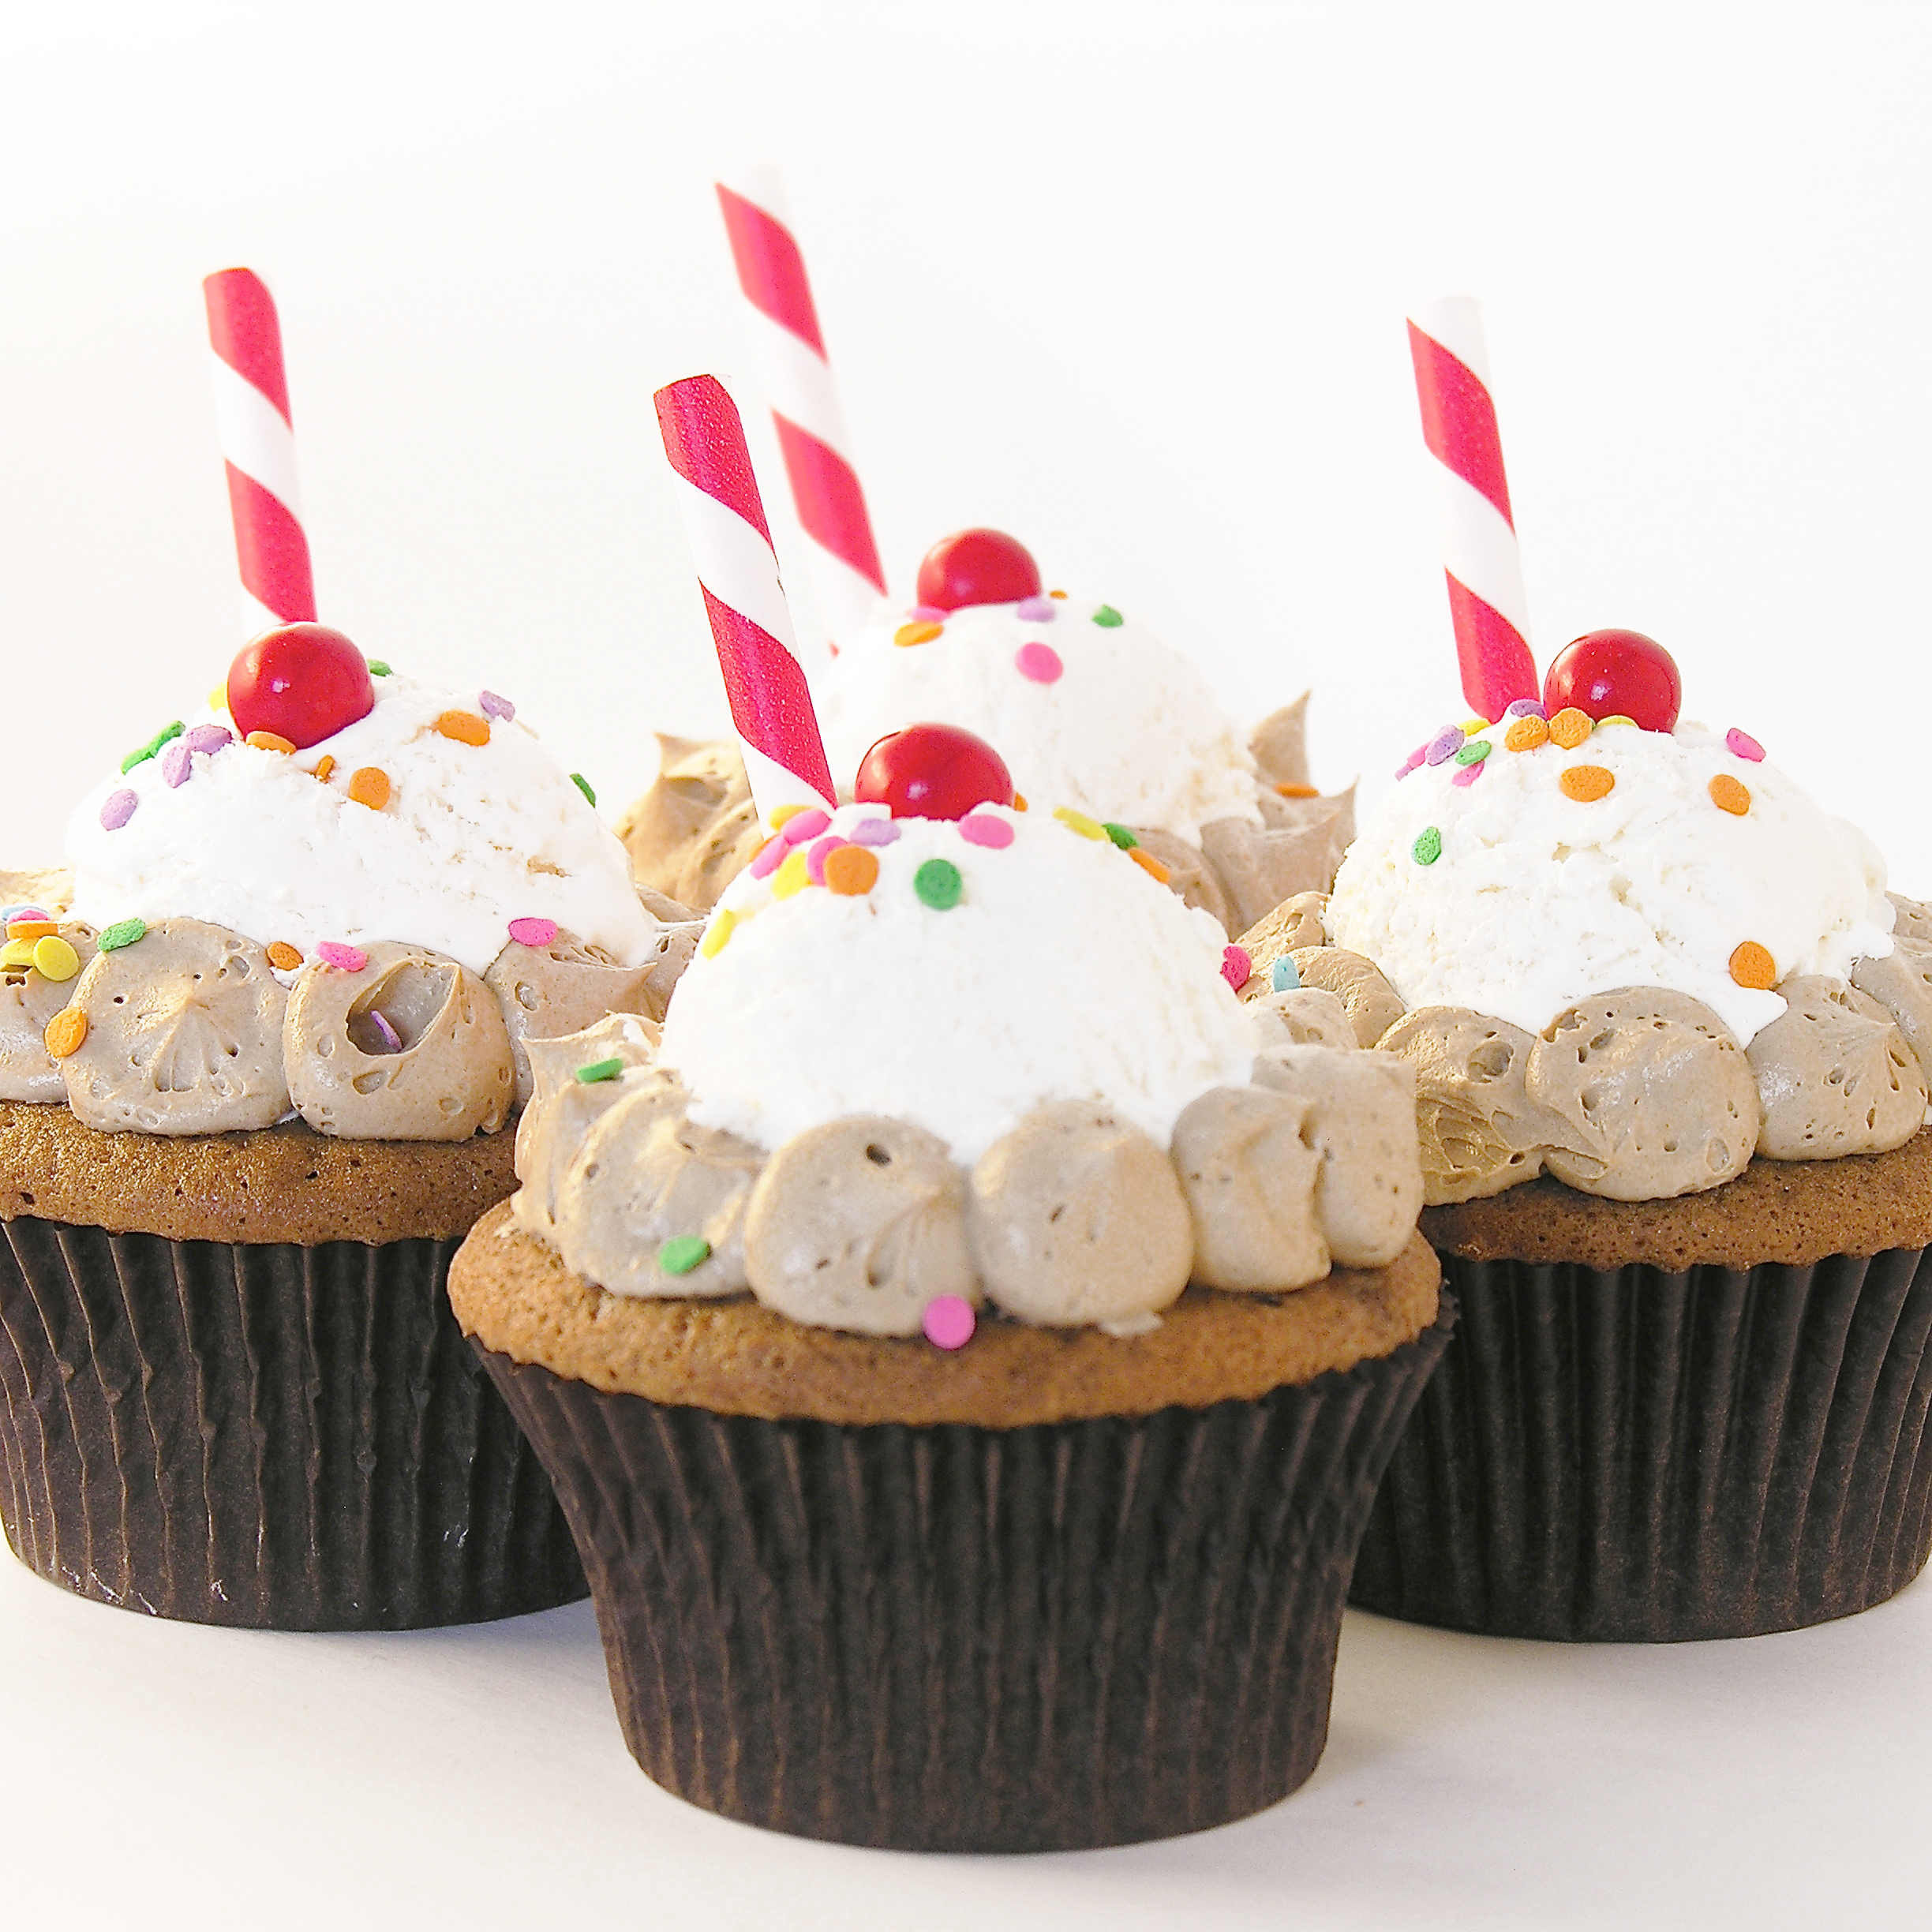
  • Decorate as desired. If you use a lemon drop, add this just before serving so it doesn’t get sticky.
  • Keep these cupcakes refrigerated until serving.
  • Enjoy!!!

Lemon Cream3

My thoughts: These are truly delicious. They are light and refreshing and just the right blend of lemon and sweet. A perfect summer dessert!  I really hope you enjoy them!  ~r

Lemon Cream4

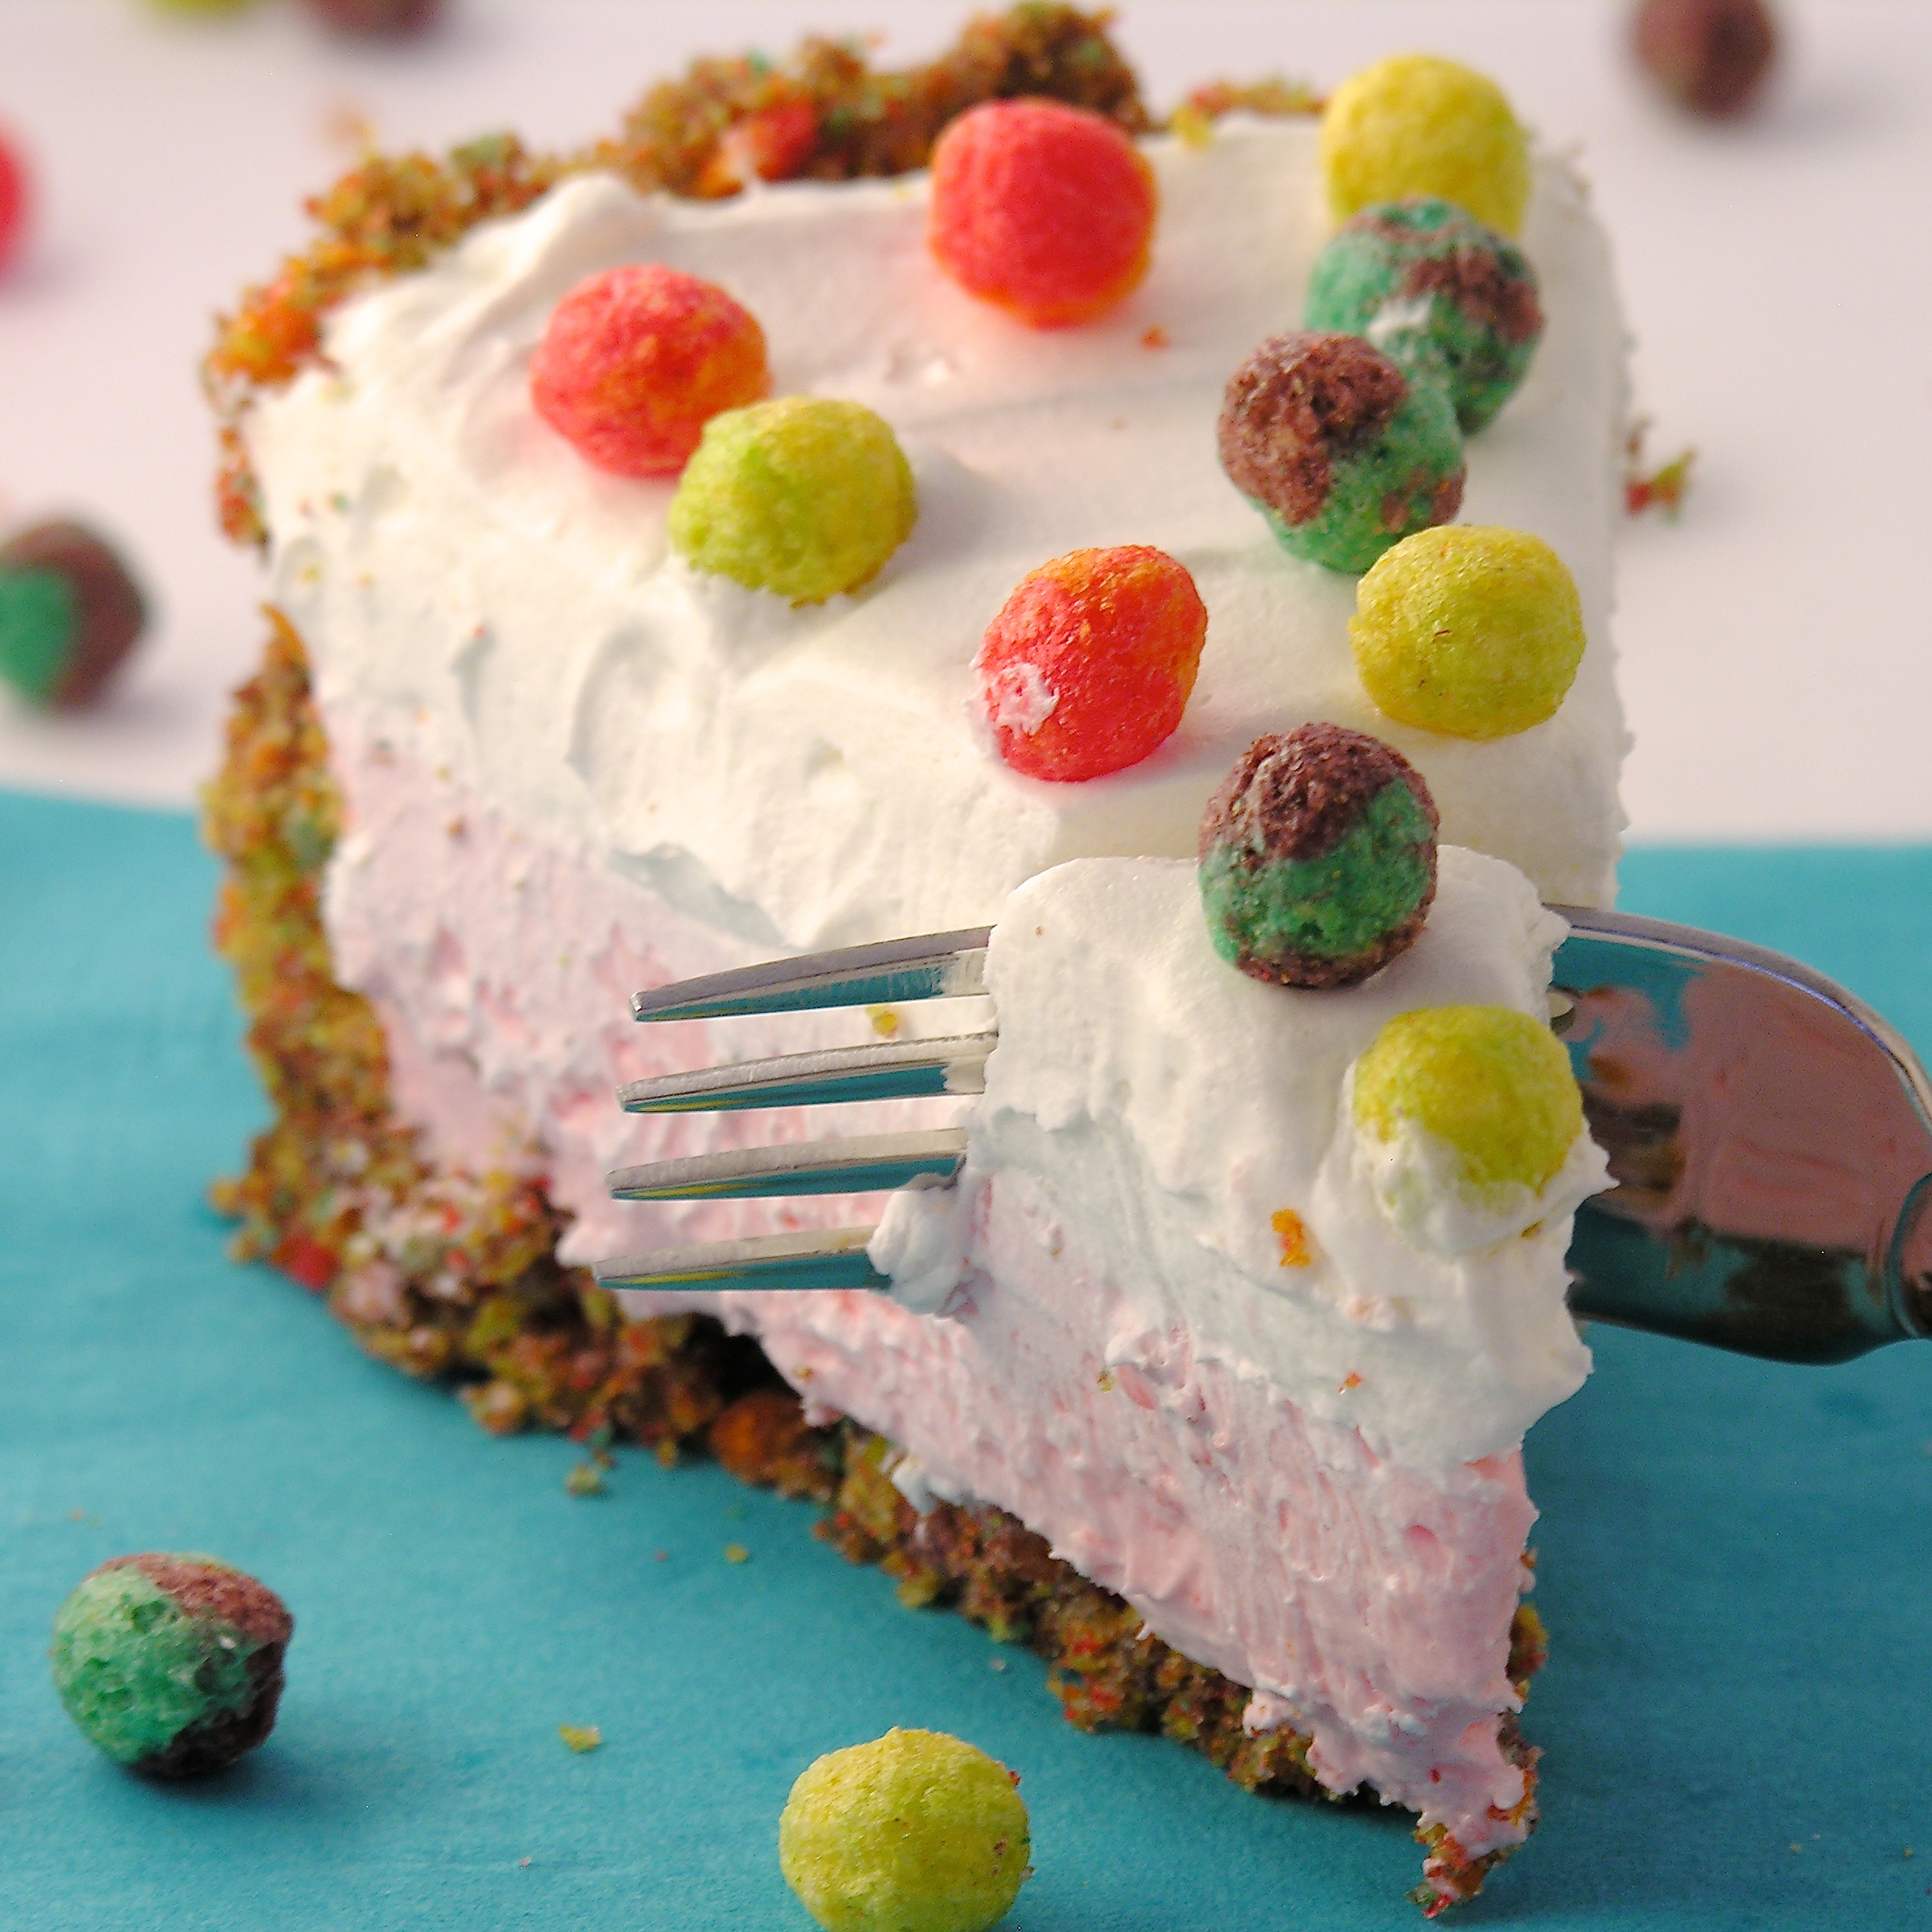
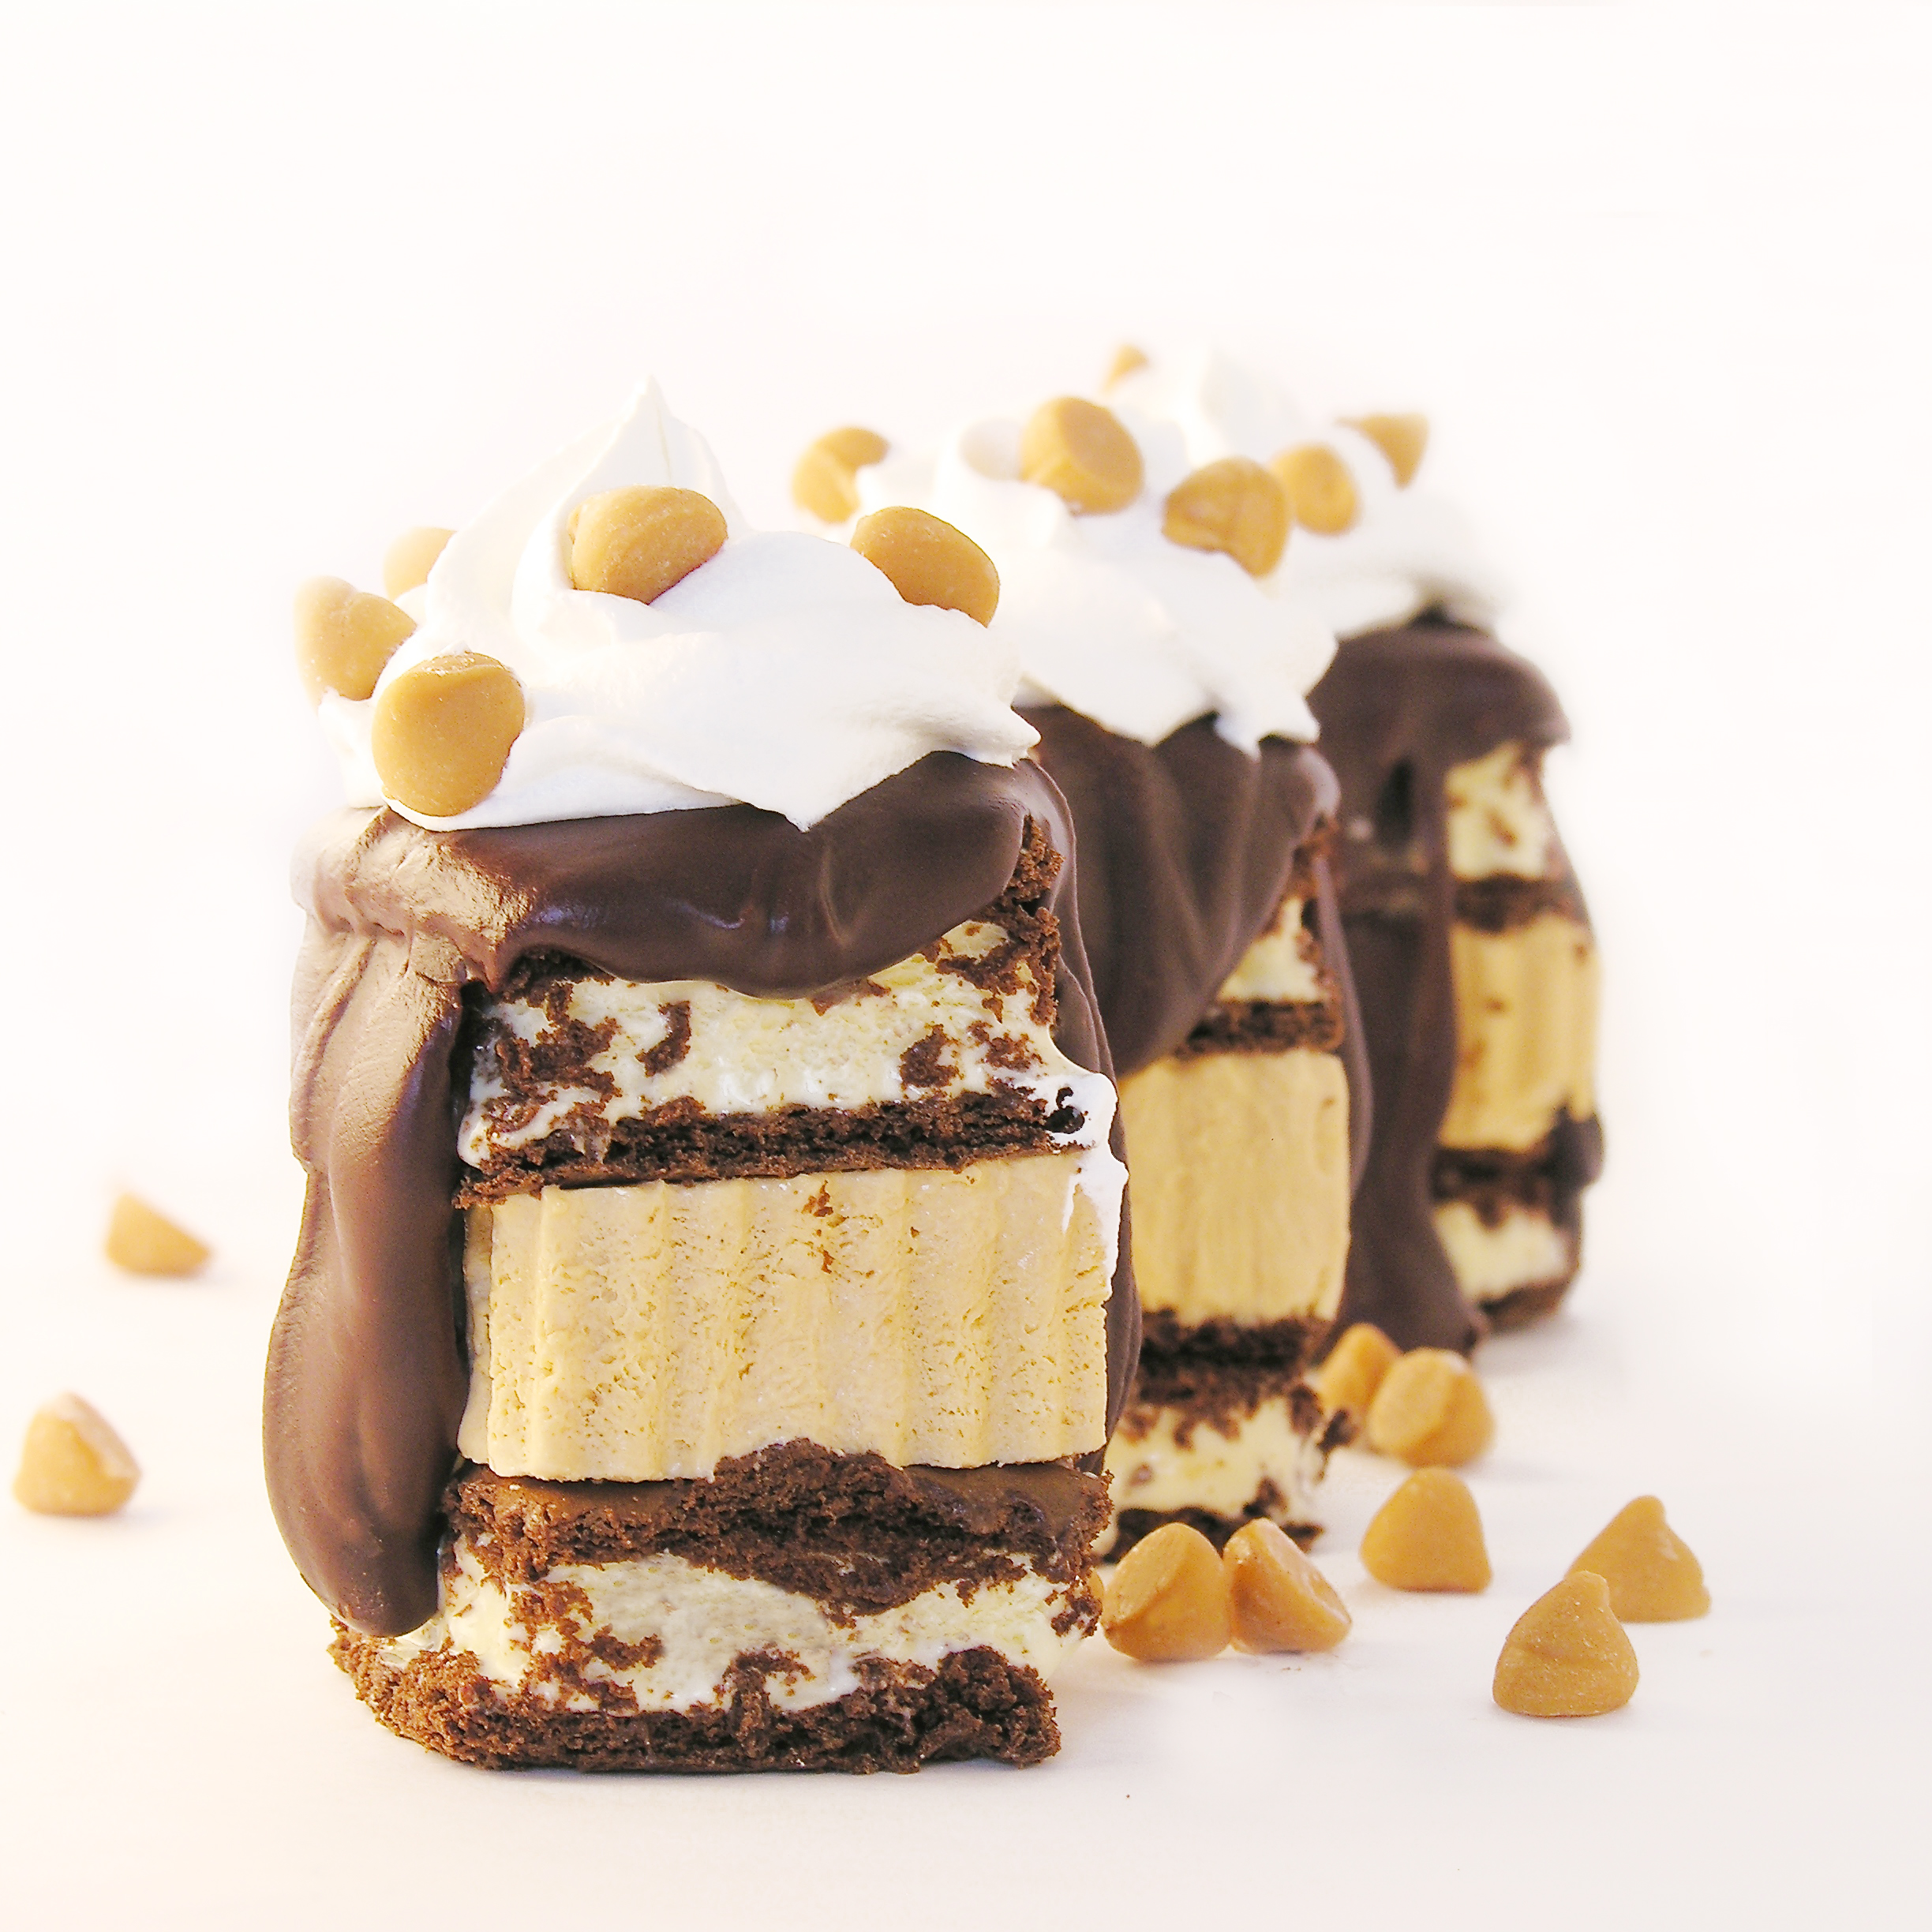
Other light and refreshing summer treats: (click on a photo to see the recipe)

Strawberry-Lemonade Layer CakeMango Smoothie PopsPudding popsicles!Key Lime Cake

Banana Split Cupcakes!

Posted on

Banana Split Cupcakes

Do you like banana split sundaes? If so, you will love these little cupcake treats- tasty and oh, so cute!!

I love going out for ice cream- not the soft-serve window kind, but the sit-down in a cute parlor with a million combinations of ice creams and toppings to decide from kind. I usually skip the banana split, because I’m not a huge fan of bananas unless they are in bread (or, in this case a cupcake!). Banana splits are the gold-standard of ice cream though- they have that sundae “look” to them. They are pretty.

I wanted to capture the look, and flavor of a sundae in these cupcakes and I love how they turned out! YUM!!!!

A few months ago I made Root Beer Float Cupcakes using scoops of Cool Whip as ice cream. They were so easy and cute and DELICIOUS, that I used the same idea here~ with banana cupcakes and a yummy strawberry ice-cream-topping filling!

Banana Split Cupcakes2 Want to try them? Here’s how we made them: (printable recipe)

INGREDIENTS:

  • One boxed banana cake mix (I used Duncan Hines), plus water, oil and eggs to make according to box.
  • 1 stick (1/2 cup) of salted butter (softened)
  • 1 stick (1/2 cup) of unsalted butter (softened)
  • 1 1/2 cups of powdered sugar
  • 2 teaspoons of strawberry flavoring
  • 2 tubs of Cool Whip (frozen)
  • One jar of strawberry ice cream topping
  • One bottle of chocolate “shell” ice cream topping
  • 1/2 cup of chopped pecans
  • Sprinkles and spoons (optional)

DIRECTIONS:

  • Make cake mix according to package and bake in 24 cupcake liners in muffin tins.
  • Make frosting by combining butters, powdered sugar and strawberry flavoring in a large bowl and beating on high until light and fluffy. Place in a zip-top bag, fitted with a decorating tip.
  • When cupcakes are cool, remove a core from the center using a knife or a cupcake corer. Spoon about 1 tablespoon of strawberry ice cream topping into the middle (you could use pineapple here too, if you wanted) Place “top” of core back on cupcake.
  • Use a cookie scoop or a small ice cream scoop to scoop frozen Cool Whip onto the top of one cupcake. Immediately pipe frosting around the edges of the scoop to hold it in place. Keep cupcakes chilled as soon as they are frosted, and keep your second tub of Cool Whip in the freezer until ready to use.
  • Once all cupcakes are frosted, drizzle them with chocolate shell- this makes a little bit of a mess, but I just dropped them into a second cupcake liner to catch the drips 🙂

Banana Split CupcakesBanana Split Sundae

  • Immediately sprinkle with nuts and decorations.
  • Keep cupcakes refrigerated until serving.
  • Enjoy!!!

Banana Split Cupcakes

My thoughts: These are a little more time consuming that your average cupcake– but look at how fun they are!! The flavors and textures are just perfect too- that cold Cool Whip and those crunchy nuts with the banana cupcakes… YUM! I really hope you get a chance to try these little treats! ~r

Banana Split Cupcakes

Other ice cream- inspired treats here at Easybaked: (click on a photo to see the recipe)

Butterscotch Ice cream towers!!!!Heath Bar Ice Cream Dessert3Raspberry Lemon Cream Cups!!!Ice Cream Cake

Kool Aid Pie!

Posted on

KoolAid PieWith a fruit cereal crust and sweet, creamy Kool Aid filling, this cake will have you and every child in your life asking for seconds!

This recipe is made in a springform pan- like a cheesecake. The crust is made of crushed Trix Cereal and I made my filling with watermelon Kool Aid.  It was perfect with the sweet crust and slightly tart filling.  The cool thing?  You can use ANY flavor of Kool Aid you want!  Blue Raspberry, Green Apple, Cherry, Grape, Strawberry….ANYTHING!

Kool Aid Cake!

So. Much. Fun!!!!!!!!!

Here’s how we made it: (for a printable recipe, click here)

INGREDIENTS:

  • 6 cups of Trix Cereal (crushed into about 3 cups)
  • 1 stick (1/2 cup) butter (melted)
  • 3 Tablespoons of sugar
  • 1 package (8 oz) of Philadelphia Cream Cheese (softened to room temperature)
  • 1 packet of Kool Aid drink mix (any flavor~ if you use a lemonade, add it to taste, as it will be more tart than the other flavors)
  • 1 (13 oz) jar of Jet-Puffed Marshmallow Creme
  • 1 tub (8 oz) of Cool Whip (thawed in refrigerator)

DIRECTIONS:

  • Preheat oven to 350F degrees
  • In a large mixing bowl, combine crushed cereal, sugar and melted butter. Mix until well- combined,
  • Press into an un-greased, 8″ springform pan, pressing crumbs up sides and into bottom.
  • Bake at 350F degrees for 15-18 minutes.
  • Leave sides on pan, and cool completely.

Crushed CerealKool Aid Pie Cereal Crust!!

  • Make filling by creaming together the cream cheese with the Kool Aid. Add Kool Aid according to how much flavor, color and tartness you enjoy.  I added the whole packet, and YUM!
  • Mix in the entire container of Marshmallow Creme and blend well.
  • Fold in 1/2 of the Cool Whip until well blended.
  • Carefully spoon filling into cooled cereal crust, and very gently (as to not pick up crumbs of cereal), spread it to the edges.
  • Spoon remaining Cool Whip on top.
  • Store chilled, and just before serving remove sides of pan, and sprinkle extra cereal on top.

Kool Aid Pie with Cereal Crust!

My thoughts:  The only thing even a tiny bit hard about this recipe is pressing that crust into a springform pan.  The rest is just mixing and pouring.  So easy- but such a pretty and fun dessert.  The watermelon version I made got RAVE reviews and it was gone in one evening.  Almost everyone had seconds!  I wasn’t sure how well the watermelon flavor would go over, but it was so refreshing!  I loved it!  I hope you get a chance to try this easy summer recipe!  Enjoy!!! ~r

Kool Aid Pie!!!

 More recipes that kids will love:

Hamburger Cookie!Toxic Slime-filled Cupcakes!Ladybug Oreo Pops!Confetti Cake Filled with Candy

Butterscotch Ice Cream Towers

Posted on

Butterscotch Ice cream towers!!!!

 These beautiful, stacked desserts have layers of ice cream sandwich and a creamy butterscotch filling.  Topped with melted chocolate, they make a fun and elegant summer dessert!

Butterscotch Ice cream towers!

I’ve been craving ice cream sandwiches.  These little desserts were a combination of that craving and an extra box of butterscotch pudding in my cupboard.  I love how they turned out!  They require some hands-on time and an overnight in the freezer, so they aren’t a last minute idea- but I think the extra time is worth it!!  The end result is pretty and SO yummy!  Here’s the recipe:

INGREDIENTS: (printable recipe here)

  • One box of 12 ice cream sandwiches
  • 1 (3.4 oz) package of Jell-O Instant Butterscotch pudding mix
  • 1 1/2 cups of cold milk
  • 1 tub of Cool Whip topping
  • 1 cup of chocolate chips
  • 6 tablespoons of butter

DIRECTIONS:

  • Make butterscotch filling first, and freeze overnight
  • In a large bowl, beat together milk and pudding mix on high for 3 to 4 minutes until thick.
  • Fold in 1/2 of the container of Cool Whip topping
  • Put parchment paper in a small (I used a 9×9 square) pan, and spread pudding mixture evenly into container.
  • Freeze overnight.
  • To assemble, use a fluted square (I used a 2″ inch square) cookie cutter to cut ice cream sandwiches.  I got 2 squares from each sandwich. Return to freezer after cutting.

Butterscotch Ice cream Towers

  • Remove pudding mixture from freezer, lift out of pan using edges of parchment paper, and lay on a clean counter.
  • Cut squares using the same cookie cutter (dip in warm water between cuts, if it becomes sticky), return to freezer as you cut them.
  • Assemble no more than one or 2 hours before serving, and keep frozen.
  • Melt chocolate chips and butter together in the microwave in 30 second increments, stirring in between, until melted and smooth.
  • Place an ice cream sandwich square on a plate, top with butterscotch filling square, top with a second ice cream sandwich square.
  • Drizzle with melted chocolate (and I added a few butterscotch chips).
  • Return to freezer and keep frozen until serving.


Butterscotch Ice Cream Towers!!

My thoughts:  These are the most spectacular dessert to serve (you should have heard the oohhh’s and ahhh’s!), and the most awkward dessert to eat.  The kids figured out that you need to just pick these up and eat them with your fingers!  I allowed mine to melt just a touch, and then it was perfect with a fork!  The flavors are so yummy! Butterscotch and chocolate?  Yes, please!!!!  Enjoy!  ~r

Other yummy frozen treats:

Mango Smoothie PopsPudding popsicles!Frosty Almond Joy Cups!Heath Bar Ice Cream Dessert3


Root Beer Float Cupcakes!

Posted on

Root Beer Float Cupcakes!!!!These cupcakes capture all the summer flavors of a root beer float~ all you need is a frosty mug!

People ask me a lot about if I would ever open a bakery, and I always say no.  I can’t imagine making hundreds of the same thing every day.  My favorite part of baking is the process of creating something new.

I thought about this recipe for a long time.  I wanted root beer in the cupcake and root beer in the frosting, but how to create that “scoop of ice cream” flavor without actually using ice cream?  I sometimes cheat in my photos by using scoops of frozen cool whip instead of ice cream.  It melts slower and keeps a scoop shape longer under the heat of my photography lights.  I decided to try Cool Whip as my scoop of ice cream for these cupcakes.

Oh my.  If I could jump up and down and point giant neon arrows toward this cupcake recipe I would.  These are so, sooooooooooo good. You need to make these!!!  They even use a cake mix, so they aren’t horribly complicated.  That Cool Whip…with the root beer buttercream…. perfect.

Root Beer Float Cupcakes!!!Here’s the recipe: (printable version)

INGREDIENTS: (makes 24-26 cupcakes)

  • One boxed white cake mix, plus water, oil and eggs to make according to package.
  • 1 cup of root beer
  • 5 teaspoons of root beer concentrate (divided)
  • 1 stick (1/2 cup) of salted butter (softened)
  • 1 stick (1/2 cup) of unsalted butter (softened)
  • 1 1/2 cups of powdered sugar
  • 2 tubs of Cool Whip (frozen)
  • Sprinkles and straws (optional)

DIRECTIONS:

  • Make white cake mix as directed on box.
  • After beating cake, add root beer and 3 teaspoons of root beer concentrate. Mix well until combined.
  • Place cupcake liners in muffin tins and fill each one only about 1/2 full (these cupcakes rise a bit higher than just a plain mix)
  • Bake according to package directions, remove from oven and cool completely.
  • Make buttercream by adding both butters, powdered sugar and 2 teaspoons of root beer concentrate to a mixing bowl and beating on high for 4-5 minutes until very light and fluffy.
  • Place frosting into a sturdy zip-top bag that has been fitted with a large round decorating tip in one corner.
  • Assemble cupcakes one at a time.
  • Use a medium cookie scoop and place a ball of frozen Cool Whip in the center of a cupcake.
  • Pipe round “bubbles” around it immediately, by squeezing the frosting out into a circle and then pulling straight out.

Root Beer Float CupcakesRoot Beer Float Cupcakes

  • Only have one container of Cool Whip out at a time, and if it starts to get soft, switch it back into the freezer to harden up.
  • Keep these chilled until you serve them.
  • Just before serving, add some sprinkles and a straw for a root beer float feel!
  • Enjoy!!

Root Beer Float Cupcakes!!My thoughts:  Such a fun summer dessert.  It is actually very light and not too sweet because a lot of the topping is just Cool Whip.  I was really happy with how this experiment came out and I can’t wait to make them again!  Enjoy!!!!!

Root Beer Float Cupcakes!!

Our very first cookbook is available for purchase this week!!!  Check it out in our new “Store” tab.  You can also find our greeting cards from Warner Press and our fun new recipe notecards distributed by Trifle Recipe Cards there.

These aren’t our first cupcakes that recreate a yummy beverage!  Try these other fun recipes:

Lime Soda Cupcakes!!!!Malted Milkshake CupcakesStrawberry Lemonade Cupcakes!!!!Baileys Irish Cream Cupcakes

Frosty Fall Pudding Treats

Posted on

Frosty Candy Corn Dessert!
Who says you can’t do frozen treats for Halloween??  These yummy little frosty pudding cups have a Golden Oreo crust and are decorated like fun candy corn treats!

I’m back with a recipe in my Chicago Metallic Mini Cheesecake Pan.
For those of you who haven’t gotten one of these yet, they are SO much fun.  I’ve done some of my favorite desserts in this little pan.  You can do this particular dessert in cupcake liners placed in muffin tins, but they are just SO cute in the mini cheesecake pan.

Here’s how the pan works:  You get a pan that looks just like a muffin tin but each cup has a hole in the bottom.  You also get 12 little metal disks that fit perfectly in each cup, covering up that hole.  You make, bake, freeze, etc. your dessert and then just push up through that hole in the bottom and the disk pushes out with your little dessert on top.  I love fun individual desserts, so this is pretty much the perfect idea, in my opinion!

These are really easy, but they need to freeze for several hours/overnight, so make them ahead.

Frosty Fall Pudding Treat!!

Here’s the recipe: (printable version)

INGREDIENTS:

  • One package of Golden Oreos
  • 1 package (4 servings, 3.3 oz.) of Jell-O Instant White Chocolate Pudding
  • 1 1/2 cups of cold milk
  • 1 (8 oz.) container of Cool-Whip topping (thawed in refrigerator)
  • Food colorings in yellow and orange
  • Fall sprinkles

DIRECTIONS:

  • Crush about 2/3 package of Golden Oreos in a food processor or large food chopper.
  • Add orange food coloring until desired shade of orange is reached and mix on high until cookie bits and color are well combined.
  • Place metal disks into cheesecake pan and spoon cookie crumbs evenly into all 12 wells of mini- cheesecake pan (or cupcake liners), and press firmly into bottom (I use a Mini Tart Shaper– and I love it!)
  • In a large mixing bowl, mix cold milk with pudding for 2 minutes.
  • Add yellow food coloring to get desired shade and mix until well combined.
  • Fold in 1/2 of the Cool Whip (the rest will be used as topping- keep it refrigerated until use)
  • Spoon pudding mixture into a large zip-top bag (and zip it tight).
  • Cut a corner of the bag off and pipe pudding mixture into each cup, all the way to  the top.
  • Use a knife to smooth the tops flat and cover entire pan with plastic wrap.
  • Freeze until serving (at least a few hours)
  • Before serving, remove pan from freezer and allow it to warm up a little bit before popping desserts out.
  • Press a finger up through the hole in the bottom of the pan, pushing each dessert up- grab it by the crust and take metal disk off the bottom.
  • Serve immediately, or place in a sealed container back in the freezer until ready to serve.
  • Pipe remaining Cool Whip on top of each little dessert cup and decorate as desired.
  • Enjoy!!

Frosty Fall Pudding Treats!!!My thoughts:  There are two things that make a dessert perfect in my mind.  Taste and the amount of smiles that happen when you serve them.  These are really yummy (how can you go wrong with pudding and Oreos???) and the number of smiles….?  Well, you are just going to have to make them to see that for yourself!  Enjoy!! ~R

Other mini-cheesecake pan recipes you will love:

Mini chocolate chip cookie cheesecakesFrozen S'mores CupsMini Cookie Dough CheesecakeRaspberry Lemon Cream Cups!!!

Raspberry Lemon Cream Cups

Posted on

Raspberry Lemon Cream Cups!!!

These adorable chilled lemon and raspberry treats are creamy, sweet summer dessert perfection!

I love lemon and raspberry together and I just couldn’t resist trying a new flavor combination in my mini cheesecake pan !  The sweet raspberries and tart lemon cream are a perfect ending to any meal!  Want to try them???

Here’s how:  (printer friendly recipe)

Ingredients:

  • 40 Nilla Wafers
  • 4 Tablespoons of melted butter
  • 1 package (4-serving size) of instant lemon pudding
  • 1 1/2 cups of cold milk
  • 1 container of Cool Whip topping
  • 2-3 cups of fresh raspberries (about 60 berries)

Directions:

  • In a food processor or a large food chopper, crush Nilla wafers to fine crumbs.
  • Add melted butter to crumbs and pulse a few more times to combine.
  • Prepare mini cheesecake pan by placing metal disks in the bottom of each cup.
  • Evenly divide crumbs between all 12 cups.
  • Press firmly into bottom of each cup using a mini tart shaper or the end of a wooden spoon.
  • In a large mixing bowl, combine cold milk with packet of pudding mix.  Beat on medium for 2 minutes.
  • Mix in HALF of the Cool Whip topping (the rest will be used on top once dessert is frozen, so you can return it to the refrigerator).
  • Spoon/pour pudding mixture into a large zip-top bag and carefully clip a corner off.
  • Pipe filling into each cup, covering crust and filling only half way.
  • Place 4 to 5 fresh raspberries on top of filling in each cup.
  • Pipe filling over raspberries until it reaches top of cup (be sure to push filling down around berries and not just on top of them). You will probably have a little lemon filling left at the end. I can tell you from experience that Nilla Wafers dipped in this filling are AMAZING!!
  • Use a knife to level the tops of each cup.
  • Cover with plastic wrap and freeze for several hours (or overnight!)
  • Once frozen, (and just before serving) allow pan to warm just slightly at room temperature and then use your fingers to push up on metal disk and push each dessert out of the pan.
  • Remove metal disks from bottom crust.
  • Pipe remaining Cool Whip on top and garnish with remaining raspberries on top.

Raspberry Lemon Cream Cups!!!

These can be served frozen, or allowed to warm at room temperature for a little while before serving.  Don’t leave them at room temperature for longer than an hour or so, or your crust will start to get soggy!

My thoughts:  I cannot even think of the words to describe how yummy these little cups are.  Plus they are EASY to make and quick (except for the freezer time, of course!)  If you do not have a mini cheesecake pan, you can make these in cupcake liners in a muffin tin…or you could get a mini-cheesecake pan and add to the fun in your life.  I absolutely love mine!!!  So many possibilities!!

Raspberry Lemon Cream Cup!!!

Other recipes that use the mini-cheesecake pans:

Frosty Almond Joy Cups!Mini Cookie Dough CheesecakeMini Pineapple Upside Down CakesFrozen S'mores Cups

Frosty Almond Joy Cups

Posted on

Frosty Almond Joy Cups!These adorable frozen cups are layered with chocolate, coconut and almonds.  A new twist on some favorite flavors!!  These use a mini cheesecake pan that is SO much fun, but if you want, you can make these in muffin tins lined with cupcake papers instead.  This recipe makes 12 frozen cups.

INGREDIENTS:

  • 1 1/2 c. of crushed Oreo cookies
  • 1/2 c. semi-sweet chocolate chips
  • 1/4 c. whipping cream
  • About 2 cups of shredded, sweetened coconut
  • About 1 cup of slivered almonds
  • 1 1/2 c. cold milk
  • 1 box (4 servings, 3.9 oz) instant coconut pudding
  • 1 (8 oz) container of Cool Whip (thawed in fridge)
  • 1/4 c. Wilton’s Candy Melts (to drizzle on top as decoration)

DIRECTIONS

  • Crush Oreos into fine crumbs. (I love my KitchenAid food chopper for this job!)
  • Prepare mini cheesecake pan by placing disks into the bottom of each cup.
  • Evenly divide crust mixture into all 12 cups (I used a Mini Tart Shaper to press crumbs firmly into the bottom of each cup).
  • Place semi-sweet chocolate chips and whipping cream into a small bowl and microwave in 30 second increments, stirring in between, until melted and smooth.
  • Spoon chocolate into a zip top bag, cut a tip off and evenly pipe chocolate into the center of each cup, on top of the crust.
  • Sprinkle about a tablespoon of coconut and slivered almonds into each cup

Almond Joy How-to

  • Mix cold milk with pudding on medium speed for 2 minutes. Fold in 1/2 of the Cool Whip container (the rest will be used as topping).
  • Spoon filling into a large zip top bag (and ZIP it or you might have a mess!)  Clip a corner off and pipe pudding into each cup evenly.  Try to pipe it in between the coconut and almonds so that the whole cup is filled.  I did have a little left over (which was really tasty straight out of the bag!)
  • Use a knife to smooth the tops level with the top of the pan.
  • Freeze for at least a couple of hours.
  • Allow the pan to warm just a bit before popping each dessert cup out.  Poke a finger up through the hole in the bottom of the pan and grab that Almond Joy cup by its crust.  Remove the disk from the bottom and you are ready to add topping. 
  • For topping, I just piped a little bit of the left over Cool Whip on each dessert using a decorating tip.  Then I topped it off with a little melted chocolate (Wilton’s candy melts) and a whole almond with some coconut.  You could decorate yours however you want!
  • Serve cold right away– or put them in a sealed container and freeze until you are ready to serve.

Frozen Almond Joy Cups!!My thoughts:  I love Almond Joy candy bars…I love Oreos and anything frozen….so I love these!  These were inspired by an earlier recipe, Frosty S’mores Cups.  I ran across coconut pudding in the store the other day and the wheels started turning.  I think it turned out perfectly– it’s like a coconut cream pie with Almond Joy bars mixed in. mmmmm…….!  I hope you enjoy these little treats!  

Almond Joy cups!
Do you like coconut?  We LOVE it here at Easybaked!  Click on a picture to see other recipes with this yummy ingredient:

Caramel Coconut Creme CupsCoconut Cheesecake BonbonCreamy Coconut CheesecakeLemon Drop Cookies with Coconut

Strawberry Lemonade Cupcakes!!!!

Posted on

Strawberry Lemonade Cupcakes!!!!

Two years ago today, I started a blog.  I had no idea it would blossom into what it is today, and no idea I would have so much fun with it!  I’ve made such great new friends, learned so much about photography and design, and loved every second of the process.

In honor of our anniversary, I chose the recipe that is (by far!) the most visited on the site and re-made it in cupcake form.  Strawberry Lemonade Cake is already on the Easybaked site twice:

Strawberry-Lemonade Layer CakeStrawberry Lemonade Birthday Cake

Strawberry Lemonade Layer Cake                       Strawberry Lemonade Birthday Cake

The Layer Cake is more like a torte, the lemonade mixture is more like a filling than a frosting.

The Birthday Cake has a lemonade frosting, and it is one of my very favorite frostings ever.  It’s soooo creamy and light.

Both recipes top the list of my most popular recipes, together they have been viewed just over 435,000 times (as of today…!)

It seemed fitting that I feature everyone’s favorite recipe to celebrate two years with all of you~ so let me present:  Strawberry Lemonade Cupcakes:

Strawberry Lemonade Cupcakes!!!!!

These are easy to make (much easier than a layer cake, in my opinion) and just the yummiest treat.  I loved the pink wrappers and the paper straws I found for these- I think they would be such a fun shower, picnic or birthday party treat!!

INGREDIENTS:

  • One box of strawberry cake mix (plus oil, water and eggs as directed on box)
  • 2- 8oz. packages of Philadelphia Cream Cheese (softened to room temp.)
  • 1 packet (0.23oz.) of Kool-Aid Lemonade
  • Yellow food coloring  (as desired for color)
  • 1- 7oz. container Jet-Puffed Marshmallow Creme
  • 1/3 c. powdered sugar
  • 8 oz. Cool Whip Topping
  • Confetti sprinkles and paper straws to decorate as desired

DIRECTIONS:

  • Make cake according to box and bake in 24 cupcake liners placed in cupcake tins, as directed.  Cool completely.
  • In a mixing bowl, cream together cream cheese, lemonade and yellow food coloring until smooth.
  • Beat marshmallow creme and powdered sugar into cream cheese mixture and then fold in Cool Whip until completely smooth.  
  • Spoon frosting into a zip top bag that has a piping tip inserted into one corner (I used a Wilton 1M star tip).
  • Pipe frosting on tops of each cupcake- you can be generous, as this recipe makes a lot of frosting and the frosting is so light and fluffy.
  • Decorate as desired.
  • Refrigerate and serve chilled.  
  • Enjoy!!!!!

Strawberry Cupcakes!!!!

My thoughts:  A tried-and-true recipe in a fun new format…what’s not to love about that?!?  I’m incredibly thankful for all of YOU who visit, comment, “like”, rate and (most of all) MAKE the recipes I create!  I had no idea how much I would love hearing from complete strangers that a recipe “made my husband’s birthday perfect” or “made all the kids at the party laugh”.  When I hear how happy a recipe makes you and your family it literally makes my day…and fuels my desire to bake and share more!  Here’s to another year of Easybaked recipes!  Enjoy!  ~r

Strawberry Lemonade Cupcakes Front and Back

06-13-14 Did you know, that this recipe is now available in a set of adorable note cards? With a picture of these cupcakes on the front, the recipe on the back, and lots of space inside to write a note, these are a PERFECT little gift!  Why send just a card, when you can send the gift of a recipe as well?!?  Click here for more information and to order.

Strawberry Lemonade Cupcakes !!!!

A year of easybaked recipes.....

Such a fun year….check out our photo gallery for these and other yummy treats!

Easter Mini-Cheesecakes

Posted on

Easter Cheesecake Cups

These colorful mini-cheesecakes are made with malted milk ball eggs and have a sugar cookie crust…yum!

I love seasonal candy.  I love Cadbury eggs at Easter and Tim Tams at Christmas and conversation hearts at Valentines Day….but the Whopper brand malted milk ball eggs are the best.  Did any of you use the outside shell as colorful “lipstick” as a kid?  So fun!  Crunch them up in a whipped cheesecake and put them in a fun Mini Cheesecake Pan for a dessert that will make everyone smile!

INGREDIENTS: (makes 12 mini cheesecakes)

  • One Nestle Sugar Cookie Dough Bar (the refrigerated dough that is scored into 24 squares)
  • 8 oz. of Philadelphia Cream Cheese (softened)
  • 1/3 c. granulated sugar
  • 2 t. vanilla
  • 1 (8 oz) container of Cool Whip
  • 2 bags (10 oz. each) of Whopper’s Robin Eggs (I used mini’s, but I’m sure the full size would work fine too.)  You could use regular Whopper candies to get the same flavors when the seasonal Robin’s Eggs are not available.

DIRECTIONS:

  • Preheat oven to 350 degrees.
  • Prepare pan by placing the metal disks into each cup (the Mini Cheesecake Pan comes with metal disks that sit at the bottom of each cup- like the bottom of a spring form pan!)
  • Break apart 1/2 of cookie dough bar.  (This recipe makes 12 cheesecakes but the bar contains 24 cookies.  You can double this recipe and make 24 cheesecakes or just make the other 12 cookies another time.)
  • Roll each cookie dough square into a ball and put it into a greased cup in the mini cheesecake pan.
  • Bake at 350 for 12-14 minutes.
  • Cool completely.
  • In a mixing bowl, cream together softened cream cheese and sugar. 
  • Add vanilla.
  • Smash one full bag of Malted Milk Chocolate Eggs.  I put them in a ziplock , placed them on a cutting board and hit them with a hammer until they were in pieces about the size of mini chocolate chips.
  • Fold about 2/3 of Cool Whip and  the one bag of smashed eggs into the cream cheese mixture.
  • Spoon cheesecake mixture into a large zip-top bag.  Clip a large piece of one corner off and pipe filling evenly over each cooled cookie crust.
  • Use a knife or spatula to smooth tops of cheesecakes flat across top of pan.
  • Freeze for about 3-4 hours (or overnight)
  • Remove from freezer, pop cheesecakes out by pushing up on the bottom of each cup. (This took a little practice for me- you have to push it up high enough to grab it by the cookie part.)
  • Remove the metal disk from the crust.
  • Pipe remaining 1/3 of Cool Whip on top of each cheesecake and decorate with  malted milk chocolate eggs as desired
  • Keep refrigerated until serving.

Easter Cheesecake Cups

My thoughts:  These are a yummy, colorful and fun Easter treat!  They go together fast too- which is always a bonus for me.  You can make these in a muffin tin, if you don’t want to invest in the mini-cheesecake pan- but mine has been a great addition to my kitchen- so many fun things to make in it!!!  Hope you enjoy these fun little treats!!!  ~r

Easter Cheesecake Cups!!

Other Easter ideas from Easybaked (click on an image to get the recipe):

Chocolate Easter Eggs with Peanut Butter FillingEasy Easter cut out cookiesOreo pops!!!!!Raspberry Confetti Kisses

Other ways to use your Mini Cheesecake Pan:

frozen s'more cupsMini Pineapple Upside Down CakesMini chocolate chip cookie cheesecakesMini Cookie Dough Cheesecake