Tag Archives: cream

Mud Pie!

Posted on

Mud Pie!

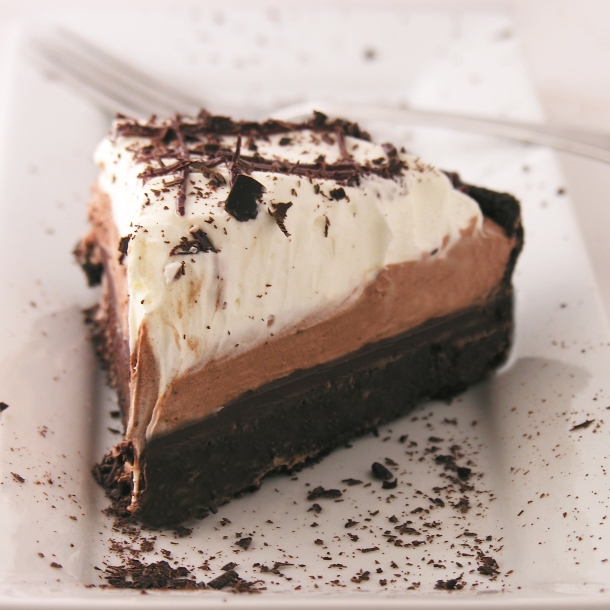
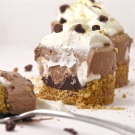
A layer of dense cake, topped with fudge, chocolate mousse and whipped cream. Yum.

Life is mud right now. At least if you live in the midwest and regularly walk a dog. My pup’s little white paws and belly are just caked in mud after every trip down our walking trail. There’s one kind of mud I don’t mind though- the edible kind!

Have you ever tried Mississippi Mud pie? I feel like there’s not an “official” recipe for this pie- sometimes pudding, sometimes marshmallow…I just put several things I love into an Oreo crust and called it mud. And it is delicious. I really think you’ll like it!

Mud Pie

Here’s how we did it: (printable recipe)

INGREDIENTS:

  • One pre-made Oreo crumb crust

Cake layer:

  • 1/2 bag of Nestle dark chocolate chips (this ends up being just a little less than 1 cup)
  • 2 egg yolks
  • 2 Tablespoons vanilla
  • 3 Tablespoons of heavy cream
  • 3 Tablespoons of powdered sugar

Fudge layer:

  • remaining 1/2 bag of Nestle dark chocolate chips (this ends up being just a little less than 1 cup)
  • 1/2 cup of heavy cream

Chocolate Mousse Layer:

  • 1 Packet of Dream Whip
  • 1/3 cup milk
  • 1/4 cup cocoa
  • 1/2 cup powdered sugar

White whipped topping:

  • 1 packet of Dream Whip
  • 1/2 cup milk

DIRECTIONS:

Cake Layer:

  • Unwrap Oreo crust and preheat oven to 350F degrees
  • Melt chocolate chips in the microwave in 30 second increments, stirring in between until smooth.
  • In a separate bowl combine eggs, cream, vanilla and powdered sugar.
  • Add cream mixture to chocolate and blend well.  Pour into crust and bake for 20 – 25 minutes until center is set. Cool completely.

Fudge Layer:

  • Melt remaining chocolate chips and cream together in microwave in 30 second increments, stirring between until melted and smooth.
  • Pour all but about 1/8 cup over cooled cake and allow this layer to firm up (I placed it in the refrigerator while I made the remaining 2 layers).
  • Pour remaining 1/8 cup into a small zip-top bag to use later for drizzle.

Chocolate Mousse Layer:

  • Add all ingredients to mixing bowl and beat on high for 3-4 minutes until light and fluffy.
  • Spoon on top of fudge layer and spread to edges.

Whipped topping:

  • Add all ingredients to mixing bowl and beat on high for 3-4 minutes until light and fluffy.
  • Spoon on top and spread to edges.
  • Take your small bag with 1/8 cup chocolate fudge filling (The one you set aside earlier), clip corner of bag and drizzle over the top. (I added a little shaved chocolate too)
  • Enjoy!

Mud Pie!

My thoughts: This is really as good as it looks…dense fudge bottom topped with the creamiest chocolate toppings. I usually eat that one bite I take off for a picture and give every bit of the rest away. But I ate the whole piece. Bad day for the diet, but a wonderful day to really savor this rich chocolate dessert. This is on my list of “must-make-again” recipes! I hope you get a chance to try it and enjoy it as much as I did!!!! Enjoy! ~r

Mud Pie!!!

Is chocolate the only way to do dessert in your house? Here are some other incredible chocolate treats from Easybaked~ just click on the photo to see the recipe!

Chocolate Mousse CakeTriple Chocolate Cheesecake 2Brownie Oreo Cookie CupGerman Chocolate Pie

Mini S’mores Pies

Posted on

S'mores Pie!!!Rich dark chocolate pie in a graham crust, topped with marshmallow meringue.  S’mores with a new, fun look!

Everyone loves these flavors together.

Don’t they?

It just occurred to me that someone might hate s’mores.

Ok, well I don’t personally know anyone who doesn’t just adore this flavor combination.  I LOVE them, and crave them, and sometimes cheat by making them in the microwave when it’s snowing and a campfire is out of the question!

These little pies capture the flavor of a s’more, but add a rich chocolate flavor that is incredibly delicious, and can’t be had with just 2 squares of Hershey’s chocolate.  Or four squares… sometimes I use four.  Don’t tell.

S'mores Pie!!!

Here’s how these simple little treats are made: (printable version)

INGREDIENTS: (makes 12 mini pies)

  • 12 pre-made mini graham cracker crusts.
  • 1 cup of Ghirardelli Bittersweet chocolate chips (melted)
  • 1 cup of Ghirardelli Semi-sweet chocolate chips (melted)
  • 8 eggs (divided)
  • 5 Tablespoons of heavy whipping cream
  • 2 Tablespoons of vanilla
  • 2 cups of granulated sugar
  • 1/4 teaspoon of cream of tartar

DIRECTIONS:

  • Preheat oven to 350F degrees.
  • Divide eggs, keeping ALL of the 8 egg whites and only 5 of the yolks.
  • Place the melted chocolate, 5 egg YOLKS, whipping cream and vanilla in a large mixing bowl and stir until well combined.
  • Evenly divide among all twelve mini pie crusts.
  • Bake (I put them all on a baking sheet) for 14-16 minutes, until the middle of each pie is set.
  • Make meringue while these bake, by adding all of the 8 egg WHITES, sugar and cream of tartar together in a medium heat-proof bowl that will sit on the top of a sauce pan of boiling water without touching the water.  (I had to experiment a bit to find a good fit.)
  • Bring water to a boil in the saucepan and set the bowl on top.
  • Whisk ingredients together for about 3-4 minutes.  Sugar will be dissolved and egg whites should be heated to 145F degrees.
  • Remove bowl from top of sauce pan and beat on low until the mixture thickens a little, then beat on high for about 10 minutes.  The meringue will become the most beautiful, white, glossy mixture.  It should form stiff peaks before you stop beating it.
  • Spoon all that wonderful marshmallow yumminess into a bag fitted with a decorating tip.
  • Once mini pies are removed from the oven, let them cool completely.
  • Pipe marshmallow meringue on the top of each pie and toast it with a kitchen torch.
  • Add a few graham cracker crumbs if you want, and enjoy!!!!


S'mores Pies!!!!My thoughts:  These are delicious. You can see from my pictures that I didn’t beat my meringue as long as I should have.  The are not the tall swirls of happiness I wanted them to be….  it was only my second time making meringue though, so I guess I won’t beat myself up too much.  My 1st time was perfect.  If you want to see how fluffy it SHOULD be, click here.  I LOVE this meringue.  When you read the instructions you might think it is too hard to make- but once you do it, you will realize that it isn’t hard at all.  Just a lot of time with a mixer in your hands.  I hope you get a chance to try this recipe out!  Enjoy! ~r
S'mores Pie!!!

We like our chocolate and marshmallow here at easybaked… here are other recipes that feature that yummy combo:

frozen s'more cupsMelted Smores cupRocky Road Cupcakes!!!!Baked Alaska Cupcakes!!


Easter Egg Cups!

Posted on

 Cadbury Egg Cookie Cups!!These rich chocolate cookie cups are dipped in chocolate and filled with a rich cream “egg”.  A perfect Easter treat!!!

Cadbury Egg Cookie Cups!!!!

Do you love Cadbury Eggs?  I’m addicted.  That’s why I decided that there simply must be a chocolate cookie cup filled with Cadbury-like cream.  I used my favorite recipe for chocolate cut-out cookies and they baked just beautifully into firm little cups.  I dipped the tops in melted chocolate and piped yummy cream filling inside.  Fun and delicious!

Cadbury Egg Cookie Cups!!!!

Here’s the recipe: (printable recipe)

INGREDIENTS:

Cookie Cup:

  • 2 sticks (1 cup) butter, softened
  • 1 1/2 cups sugar
  • 2 eggs
  • 1 teaspoon vanilla extract
  • 2/3 cup unsweetened cocoa powder
  • 3 cups flour
  • 1/2 teaspoon salt
  • 1/2 teaspoon baking powder
  • 1 bag of Wilton’s dark chocolate candy melts.

Filling:

  • 3/4 cup light Karo syrup
  • 12 tablespoons of butter (softened)
  • 2 tablespoons vanilla
  • 4 cups powdered sugar
  • 1 to 2 tablespoons of water (for consistency)

DIRECTIONS:

  • Preheat oven to 350F degrees.
  • Add butter, sugar, eggs, vanilla and cocoa together in  large mixing bowl.
  • Blend on medium speed with a mixer until smooth.
  • Gradually add dry ingredients and mix until smooth (use clean hands at the end, to knead into a soft ball of dough)
  • Divide dough into 24 balls of equal size, and place each one in a muffin cup.
  • Press an indentation into each ball using a tart shaping tool (or the end of a wooden spoon)
  • Bake at 350F degrees for 8-10 minutes.  Press Tart shaping tool into center again, to reshape cups.
  • Allow the cups to cool for about 5 minutes in pan, then run a small paring knife around edge to pop cup out of pan.
  • Cool completely on counter.
  • Melt Wilton’s candy melts in microwave in 30 second increments, stirring between until completely melted and smooth.  Dip tops of cups into melted chocolate and allow them to harden completely.

Making cookie cupsDipping tops of cookie cups in chocolate

  • Make filling by adding all of the filling ingredients together except for the water and sugar.
  • Beat these on high until smooth and creamy.
  • Add sugar and beat on high until creamy
  • Add water until it is a nice spreadable, but not runny, consistency.
  • Beat until very smooth.
  • Take about 1/4 out and color with yellow food color gel.
  • Pipe white filling into cups 1st and then add a fun yellow “yolk” on top.
  • Enjoy!!

Cadbury Egg Cookie Cups!!!!My thoughts:  These are so0000  yummy.  If you want to save time, skip the chocolate dip on the edges.  This cookie recipe is just so tasty- and so versatile.  I’ve used it for so many things now.  Your family will gobble these up (once you convince the kids they aren’t really eggs!)  I hope you enjoy them! ~r

Other fun spring recipe ideas:

Strawberry Cookies with Sweet Tart FrostingChocolate cut-out cookiesStrawberry Lemonade Birthday CakeBubble Gum Cupcakes!


Raspberry Lemon Drop Cakes

Posted on

Raspberry Lemon Drop Cakes!!
Moist yellow cake bowls filled with lemon and topped with whipped raspberry cream.  These are such a unique and flavorful dessert- you are going to love them!

This is recipe #2 in my tribute to melted frosting.  Last week we used a chocolate frosting and this week- lemon frosting.  The plan for this recipe was chocolate cake bowls with chocolate filling and raspberry cream.  I caught myself half-way through making a yellow cake mix before I remembered I wanted to do chocolate though.

I have a lot on my mind these days!

SO, I sat down and thought about what flavors are good with yellow cake mix and I already had a tub of lemon frosting…and here we go! It was a fortunate mistake, because these are delicious.  One of my new favorites!  I even ate one for breakfast, and with a cup of coffee?  Perfection!

Here’s the recipe:  (printable version)

INGREDIENTS:

  • 1 box of yellow cake mix (plus oil, water and eggs to make according to package)
  • 1 tub of lemon frosting
  • 1 packet of Dream Whip
  • 1/3 cup cold milk
  • 1 tablespoon of powdered sugar
  • 1 teaspoon vanilla
  • 1/4 cup of raspberry preserves (more or less, to taste)

DIRECTIONS:

  • Preheat oven to 350F degrees.
  • Make yellow cake mix according to package.
  • Grease 4 Wilton fillable mini cake pans, and fill each one about 2/3 full.  This will use about 1/2 of the batter- so you will fill these pans again once the 1st set is through baking.
  • Bake at 350F degrees for 20-30 minutes, until a toothpick inserted comes out clean.
  • Tip cakes onto a cake rack to cool.  Trim bottoms flat, if needed.
  • Spoon tub of frosting into a microwave safe bowl and heat in microwave for about 30 seconds.  Stir.
  • Spoon melted lemon frosting into each cake “cup”, filling each to the top.

Raspberry Lemondrop Cakes1

  • Place remaining frosting into a small zip top bag.
  • Place Dream Whip, milk, powered sugar and vanilla into a large mixing bowl and beat on high for about 2 minutes, until a thick, whipped consistency.
  • Fold raspberry preserves in, and place into a zip top bag that has been fitted with a decorator tip.
  • Pipe whipped topping on top of each cake.
  • Clip a small corner off the bag of remaining frosting and drizzle liberally over the top of each cake. 
  • Top with a fresh raspberry if desired.
  • Keep these chilled until serving- and ENJOY!!! 

Raspberry Lemondrop Cakes4c

My thoughts: I’m not kidding you– these are amazing!  If you don’t want to use the pans (they are a really fun addition to your kitchen though!) you could do a layer cake:  2 round cakes with lemon icing and whipped topping in the middle and lemon icing poured over the top- see my Chocolate Mousse Cake for how to assemble.  These are a must-try recipe!!!  SO easy with that melted frosting– love it!!!
Raspberry Lemon drop cakes!!

One more picture:

Raspberry Lemon drop cakes!!!!
Want some other ideas for those cute little pans?  Here’s a couple- just click on the picture to see the recipe!

Mini Filled Boston Cream Pies!Heath Bar crunch filled mini cake

Ruthanne news:  I don’t often post about my personal life here, because my goal is to just get yummy recipes to you without a ton of personal commentary.  When I really want to just see a recipe, I hate scrolling through 3 pages of of kids and dog stories first, so I promised myself that this site would be more about recipes than about me!!!

I have a few really exciting things going on that I wanted to share with you though~

First, Warner Press Publishing contacted me about making a boxed set of greeting cards from my recipes and photos.  These are available now in many Christian bookstores or on their site.  Click here to check them out!

Second, I have a cookbook for kids coming out this summer!  I’m so excited about this project- there’s nothing better than time in the kitchen with your kids!  Details to follow on this!

Third, I lost my job in genetics.  Our hospital can “no longer invest in expensive cutting edge technology due to the affordable care act”.  Thats a quote.  I struggled with what comes next and eventually (after much soul searching and prayer!) decided to move out to Arizona for the next 8 months to work alongside a church in the Navajo Nation.  I’m writing this blog from the comfort of a motel in Tucumcari, New Mexico.  I’ve driven about 1200 miles from home and I’m about 6 hours from my new home in Rough Rock Arizona.  My car is literally packed to the ceiling with things- about half of those things are supplies for baking, blogging and photography!  I’m hoping to continue creating and posting for all of you!

Many thanks to each of you for being a part of the easybaked community!  I’m incredibly glad you are along for this journey!  ~r

Sunset over New Mexico

Sunset over New Mexico

Red Chocolate Cream Cake

Grandma's Chocolate Cream Cake


This dense chocolate cake is filled with a wonderful cream (think twinkies!) and covered in a rich fudge frosting.  Every bite is soooo delicious!

This recipe is a little slice of my past (no pun intended).  This is my grandmother’s Red Chocolate Cream Cake.  It is the cake I’ve had nearly every birthday of my life.  Every time I eat it I remember being a little girl at grandma’s house.  It is definitely an old-school recipe.  Don’t file this one under “easy”, but it is worth every minute of effort in putting it together.  I just love family recipes!

Red chocolate cream cake!

Ruthanne at 6!!Yep- that’s my cute little six-year-old self with a birthday cake from grandma!  Fun memories!

Want to know how to make this?  Here we go:   (printable recipe)

INGREDIENTS:

Cake

  • 1/4 cup Crisco
  • 1/4 cup salted butter (at room temp)
  • 1 1/2 cups sugar
  • 2 unbeaten eggs
  • 2 1/4 cups cake flour
  • 3/4 teaspoon salt
  • 1 cup buttermilk
  • 2 squares (1 oz. each) of unsweetened baking chocolate (melted and cooled)
  • 1 teaspoon red food coloring
  • 1 teaspooon baking soda
  • 1 Tablespoon vinegar

Cream Filling:

  • 2 Tablespoons flour
  • 1/2 cup milk
  • 1/4 cup Crisco
  • 1/4 cup salted butter (at room temp)
  • 3/4 cup sugar
  • 1/2 teaspoon vanilla
  • pinch of salt

Icing:

  • 1/2 cup milk
  • 1/4 cup salted butter (cut into cubes)
  • 1 cups semi sweet chocolate chips
  • 1 teaspoons vanilla
  • 2 1/4 cups powdered sugar

DIRECTIONS:

Cake:

  • Preheat oven to 350F degrees.
  • Cream shortening and butter together and add sugar.  Mix well.
  • Add eggs, one at a time, beating on low between each one.  Beat until creamy.
  • Sift flour and salt together.
  • Add flour/salt, alternating with buttermilk, beating on low speed.  Do not over-beat.
  • Add food coloring and warm (not hot!) melted chocolate.  Mix on low speed.
  • Lastly, in a small cup mix together baking soda and vinegar and add to the batter while foamy.
  • Mix but do not over-beat.
  • Divide into two 9-inch pans that have been sprayed with cooking spray and have a circle of parchment paper set in the bottom.
  • Bake at 350F degrees for 25-30 minutes.  Check at 25 by inserting a toothpick.  When it comes out clean, cake is finished.
  • Remove cakes from oven and allow them to set in pans for 5-10 minutes.
  • Tip cakes out of pans on a cake rack and cool completely.

Filling:

  • While cake is baking, start to make filling.
  • In a small saucepan, cook flour and milk together on stove, stirring often until thick and smooth. Cool completely.
  • Add the rest of ingredients to a mixing bowl and cream together.
  • Add cooled flour mixture and beat on high until a light whipped cream consistency (about 5 to 8 minutes).
  • Trim layers of cooled cake and place filling between the two layers.

Icing:

  • In a saucepan on the stove, heat milk, butter (cut into cubes) and chocolate until completely melted and smooth.
  • Cool completely.  Add powdered sugar and vanilla and beat on high.  Frost top and sides of cake.
  • Enjoy!!!

Grandma's Red Chocolate Cream Cake!
My thoughts:  I have a lot of thoughts… At the front of my mind is this:  My grandma Ann is 95 years old and she made this cake well into her late 80’s for us.  At age 42 I am barely able to keep track of all these steps…I am very impressed by her baking and multi-tasking abilities!!!  Wow.

Chocolate Cream Cake!

Ok- other thoughts:  This cake tends toward dry.  Mine turned out great this time, but sometimes it’s a bit dry.  Be meticulous with your measurements and err toward less rather than more with the dry ingredients.  I also read that you can add a bit of oil to any cake recipe to moisten it up.  Might be worth trying?  That said- the flavor of this cake is out of this world- really, no other cake I’ve had tastes like this one.  It’s wonderful!

The filling….beat it FOREVER.  The biggest mistake I’ve made with this cake over the years is the cream filling.  You really do need to beat it for 5-10 minutes.  For a girl without a stand mixer this is an ETERNITY of beating filling, but you really have to.  It is soooooooooo good.  I think I need to double it next time, I like it so much.

The frosting is a glaze-type frosting.  It is very soft at first.  The best thing to do is to refrigerate about half of it until it is spreadable, frost the tops and sides, and then pour the remaining soft frosting over the top and just smooth it over the whole thing.  Eventually all of it hardens into a spectacular smooth fudge icing.  You will love it!

Grandma's chocolate cake!!

I hope you get a chance to try this incredible cake!  

Many thanks to grandma Ann for the wonderful recipe (and for celebrating my birthday by making this cake for so many years!)~  Love you!!

Grandma!

Celebrating grandma’s 95th birthday this year!

Cakes!!!  Other fun cake recipes!!!

Tie-Dye Cake with Blue Raspberry Frosting!Key Lime CakeStrawberry layer cakeChocolate Mousse Cake

Raspberry Lemon Cream Cups

Posted on

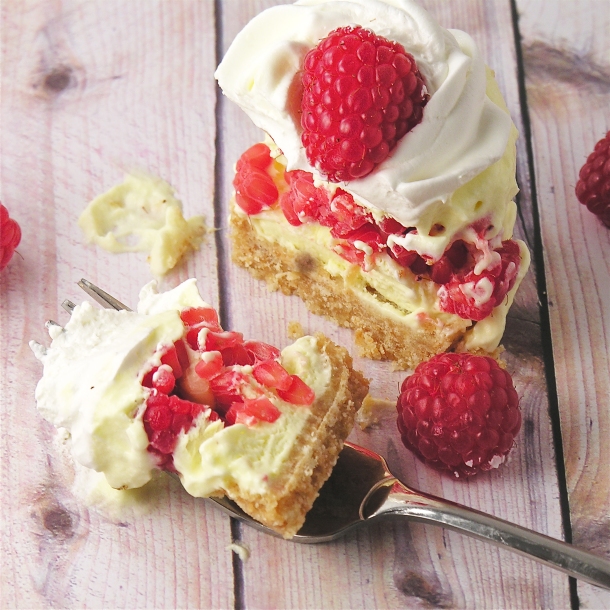
Raspberry Lemon Cream Cups!!!

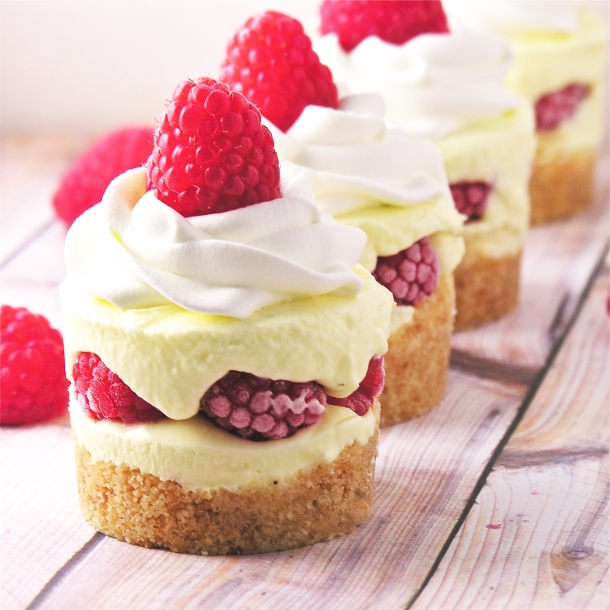
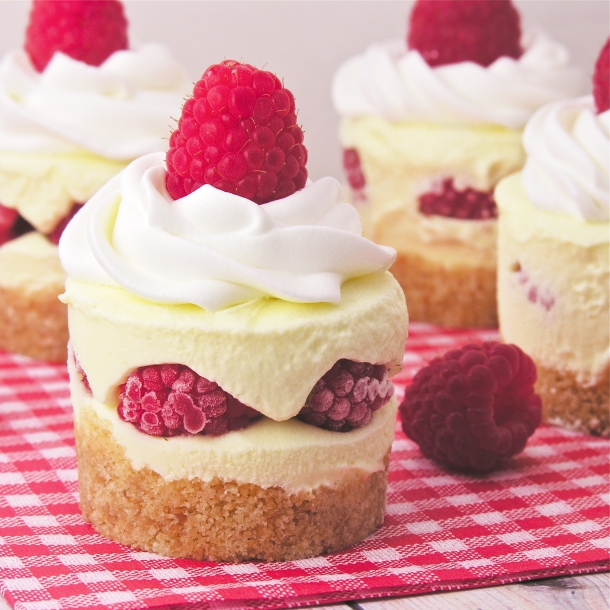
These adorable chilled lemon and raspberry treats are creamy, sweet summer dessert perfection!

I love lemon and raspberry together and I just couldn’t resist trying a new flavor combination in my mini cheesecake pan !  The sweet raspberries and tart lemon cream are a perfect ending to any meal!  Want to try them???

Here’s how:  (printer friendly recipe)

Ingredients:

  • 40 Nilla Wafers
  • 4 Tablespoons of melted butter
  • 1 package (4-serving size) of instant lemon pudding
  • 1 1/2 cups of cold milk
  • 1 container of Cool Whip topping
  • 2-3 cups of fresh raspberries (about 60 berries)

Directions:

  • In a food processor or a large food chopper, crush Nilla wafers to fine crumbs.
  • Add melted butter to crumbs and pulse a few more times to combine.
  • Prepare mini cheesecake pan by placing metal disks in the bottom of each cup.
  • Evenly divide crumbs between all 12 cups.
  • Press firmly into bottom of each cup using a mini tart shaper or the end of a wooden spoon.
  • In a large mixing bowl, combine cold milk with packet of pudding mix.  Beat on medium for 2 minutes.
  • Mix in HALF of the Cool Whip topping (the rest will be used on top once dessert is frozen, so you can return it to the refrigerator).
  • Spoon/pour pudding mixture into a large zip-top bag and carefully clip a corner off.
  • Pipe filling into each cup, covering crust and filling only half way.
  • Place 4 to 5 fresh raspberries on top of filling in each cup.
  • Pipe filling over raspberries until it reaches top of cup (be sure to push filling down around berries and not just on top of them). You will probably have a little lemon filling left at the end. I can tell you from experience that Nilla Wafers dipped in this filling are AMAZING!!
  • Use a knife to level the tops of each cup.
  • Cover with plastic wrap and freeze for several hours (or overnight!)
  • Once frozen, (and just before serving) allow pan to warm just slightly at room temperature and then use your fingers to push up on metal disk and push each dessert out of the pan.
  • Remove metal disks from bottom crust.
  • Pipe remaining Cool Whip on top and garnish with remaining raspberries on top.

Raspberry Lemon Cream Cups!!!

These can be served frozen, or allowed to warm at room temperature for a little while before serving.  Don’t leave them at room temperature for longer than an hour or so, or your crust will start to get soggy!

My thoughts:  I cannot even think of the words to describe how yummy these little cups are.  Plus they are EASY to make and quick (except for the freezer time, of course!)  If you do not have a mini cheesecake pan, you can make these in cupcake liners in a muffin tin…or you could get a mini-cheesecake pan and add to the fun in your life.  I absolutely love mine!!!  So many possibilities!!

Raspberry Lemon Cream Cup!!!

Other recipes that use the mini-cheesecake pans:

Frosty Almond Joy Cups!Mini Cookie Dough CheesecakeMini Pineapple Upside Down CakesFrozen S'mores Cups