RSS Feed

Tag Archives: melted frosting

Chocolate Covered Strawberry Cupcakes

Posted on

Chocolate covered Strawberry cupcakes1
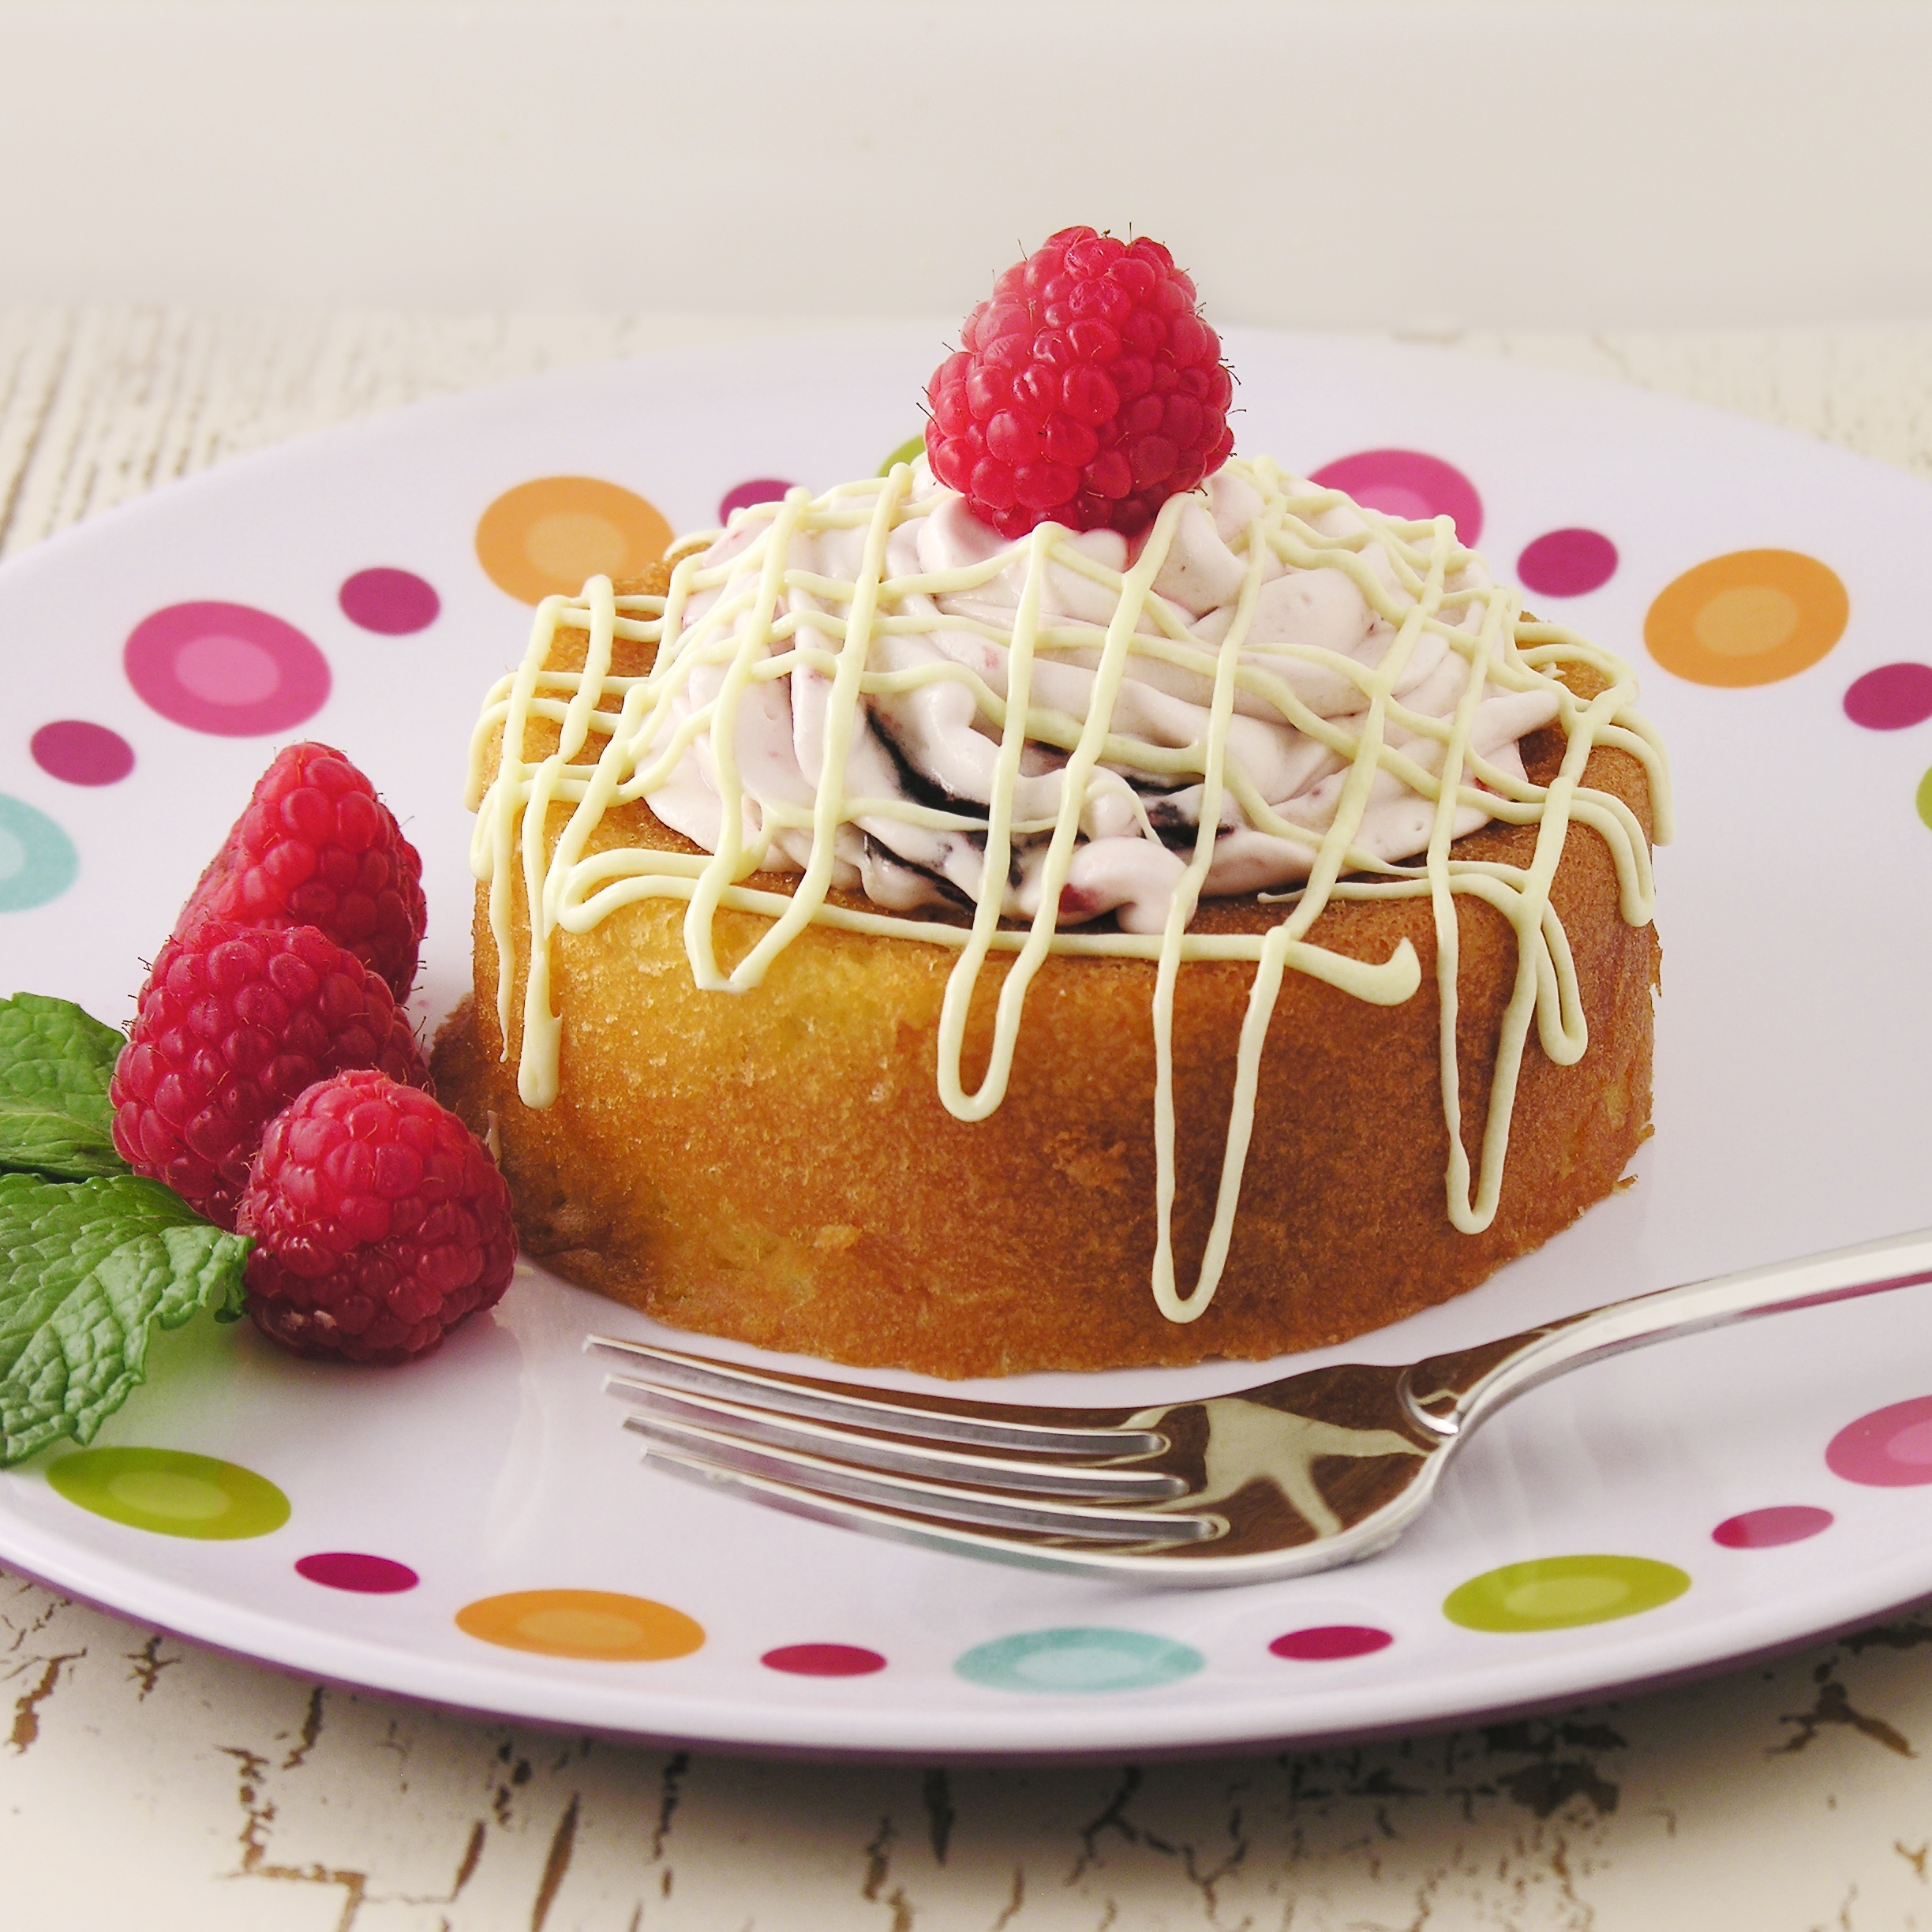
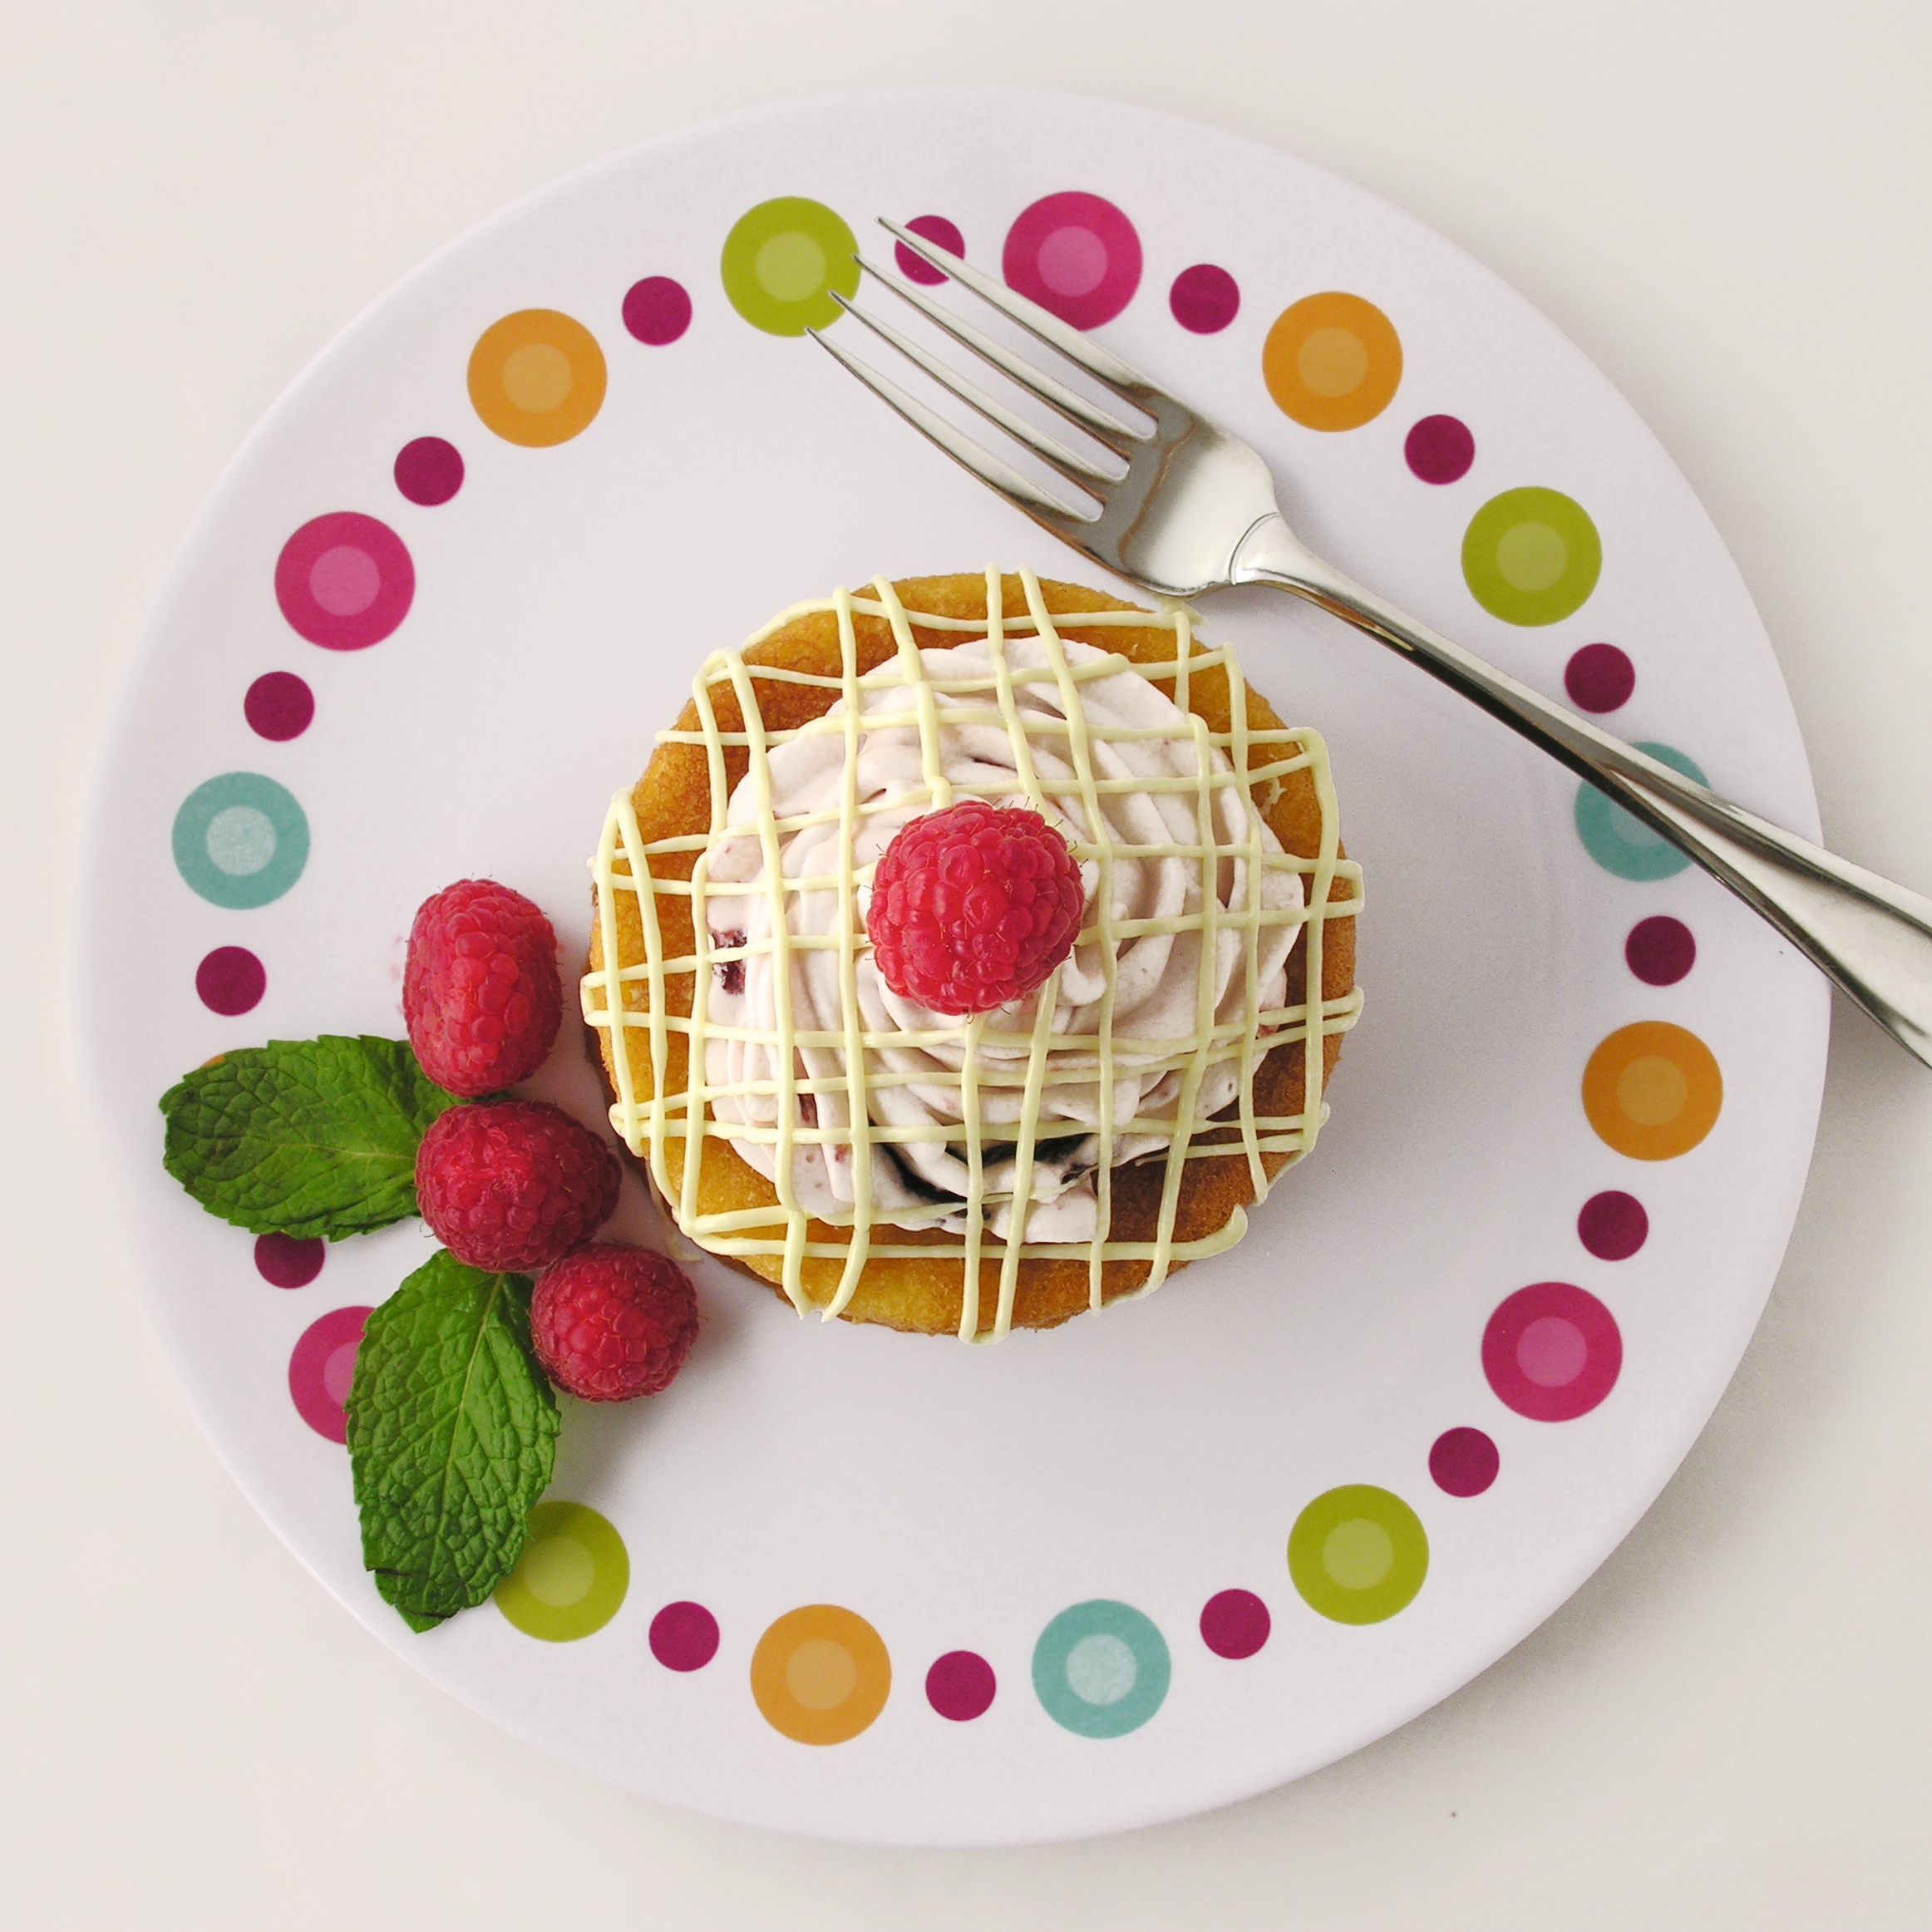
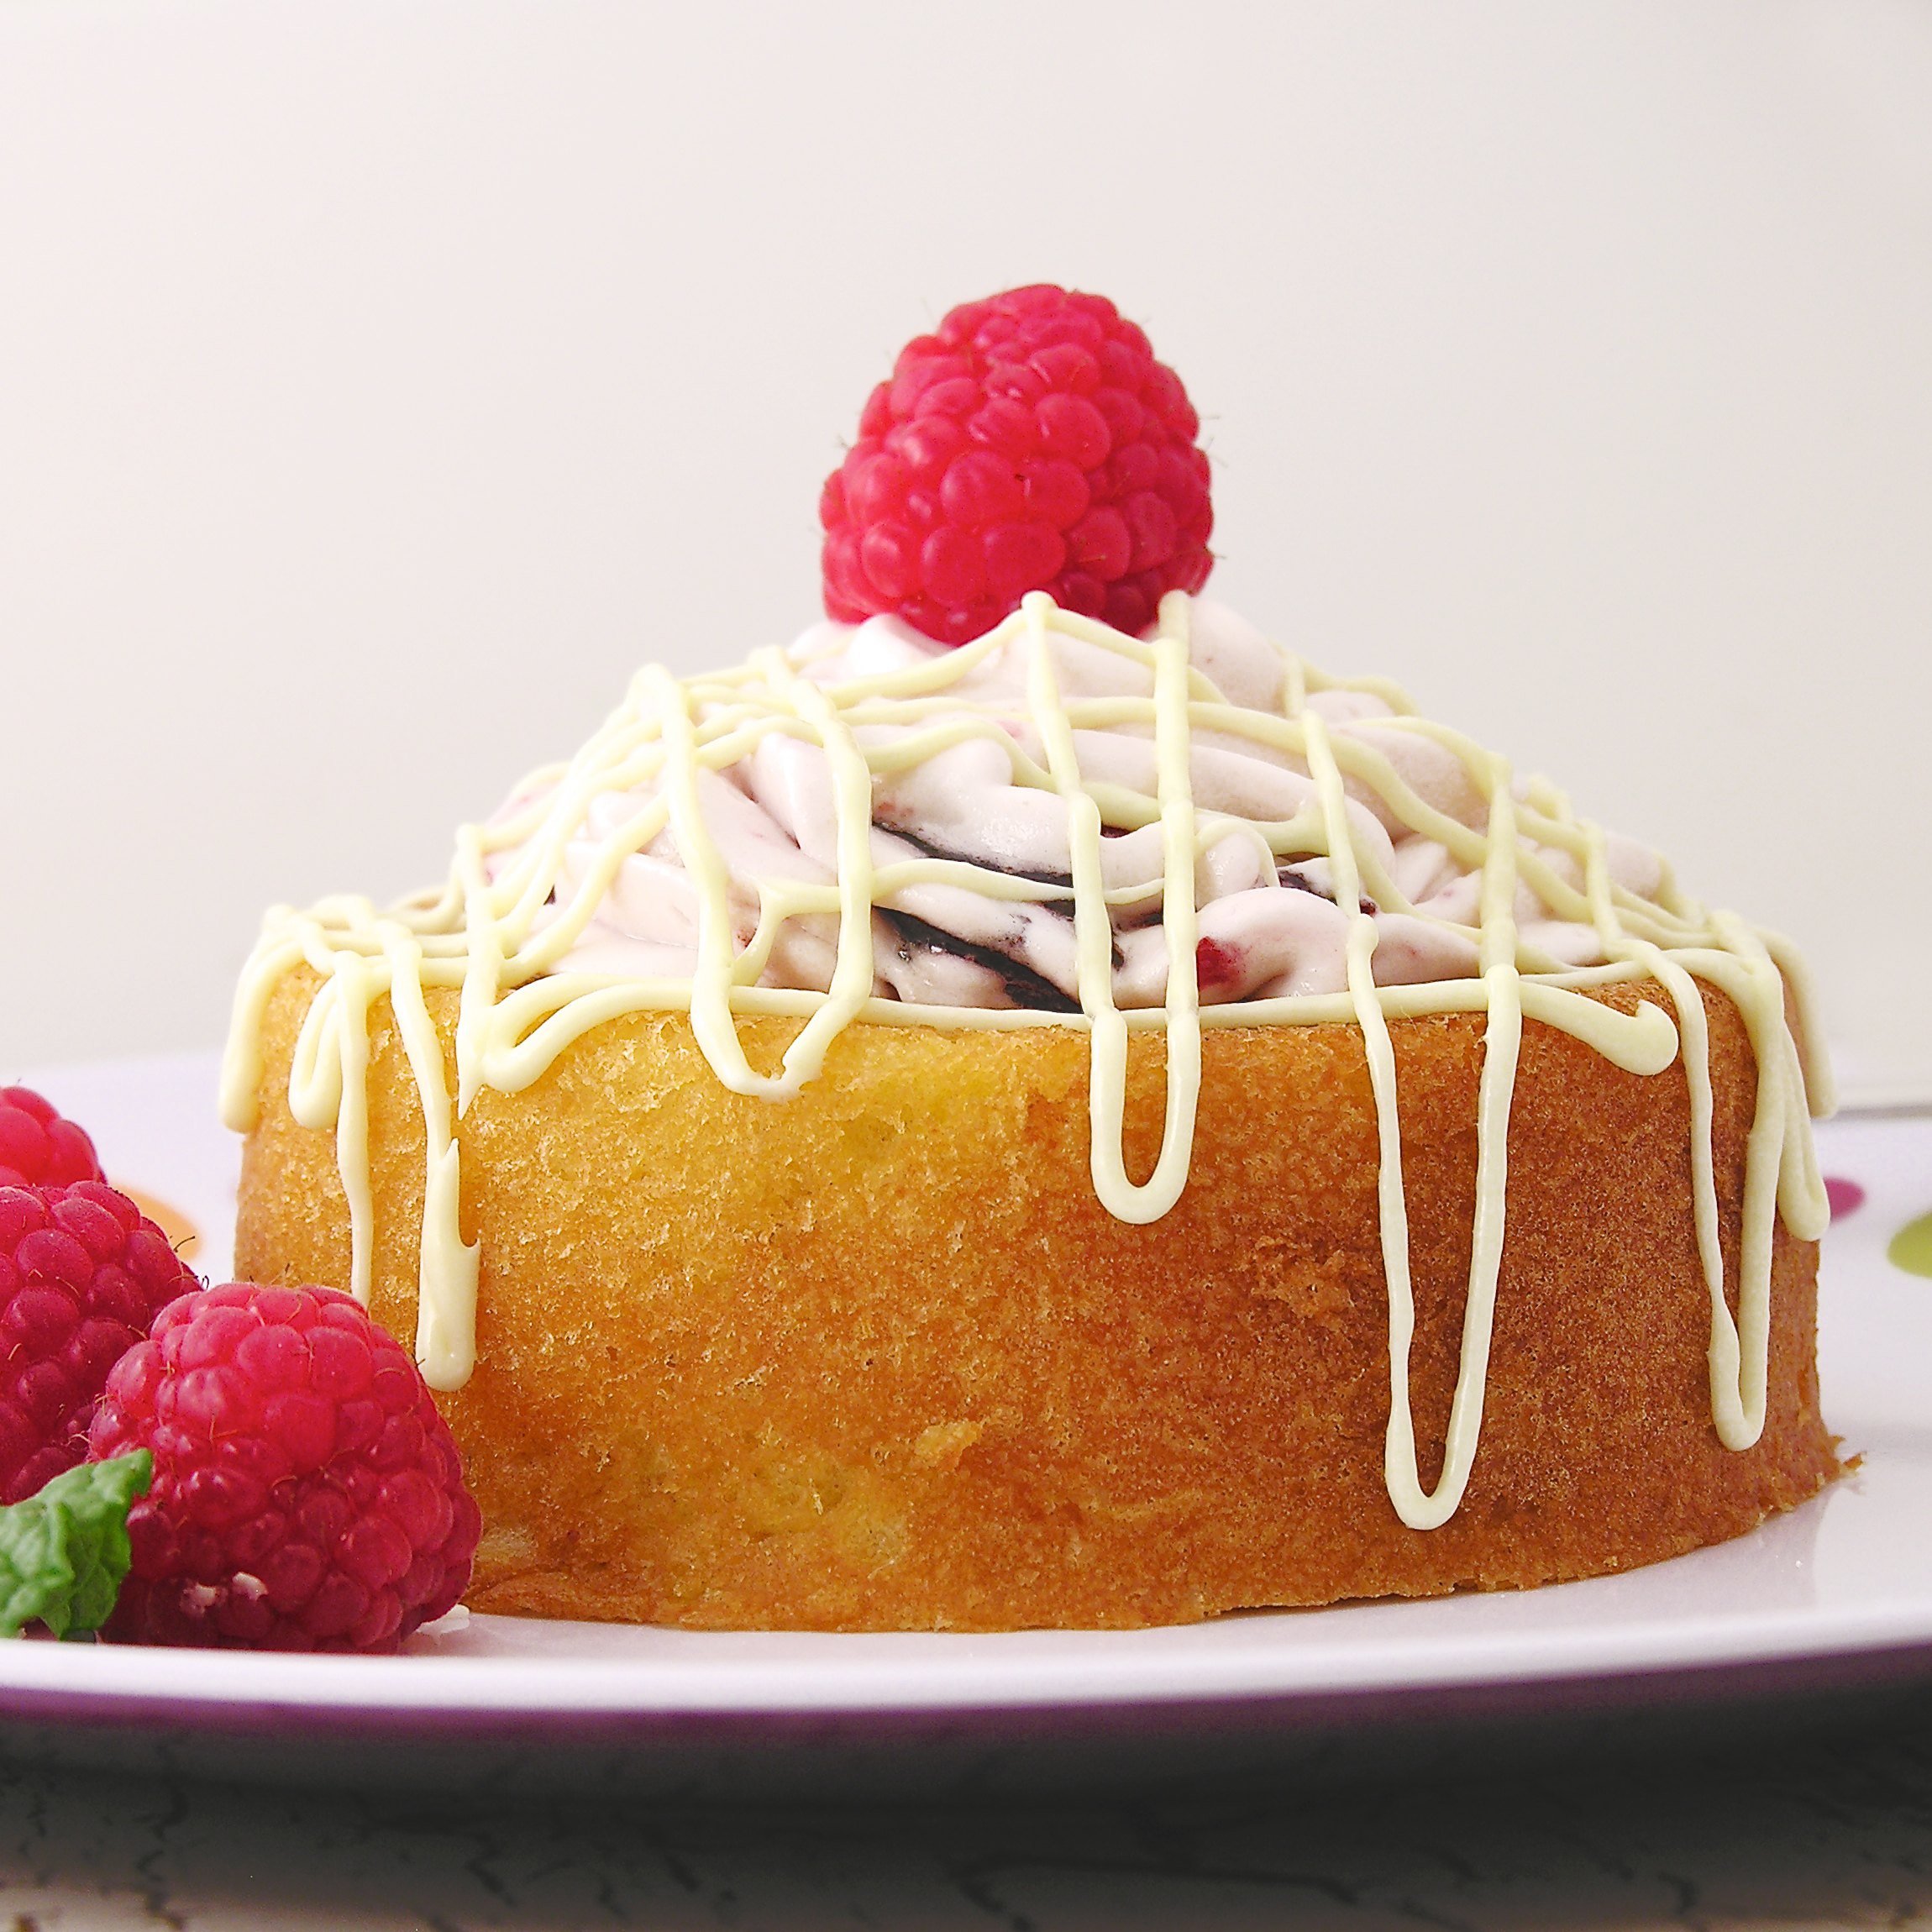
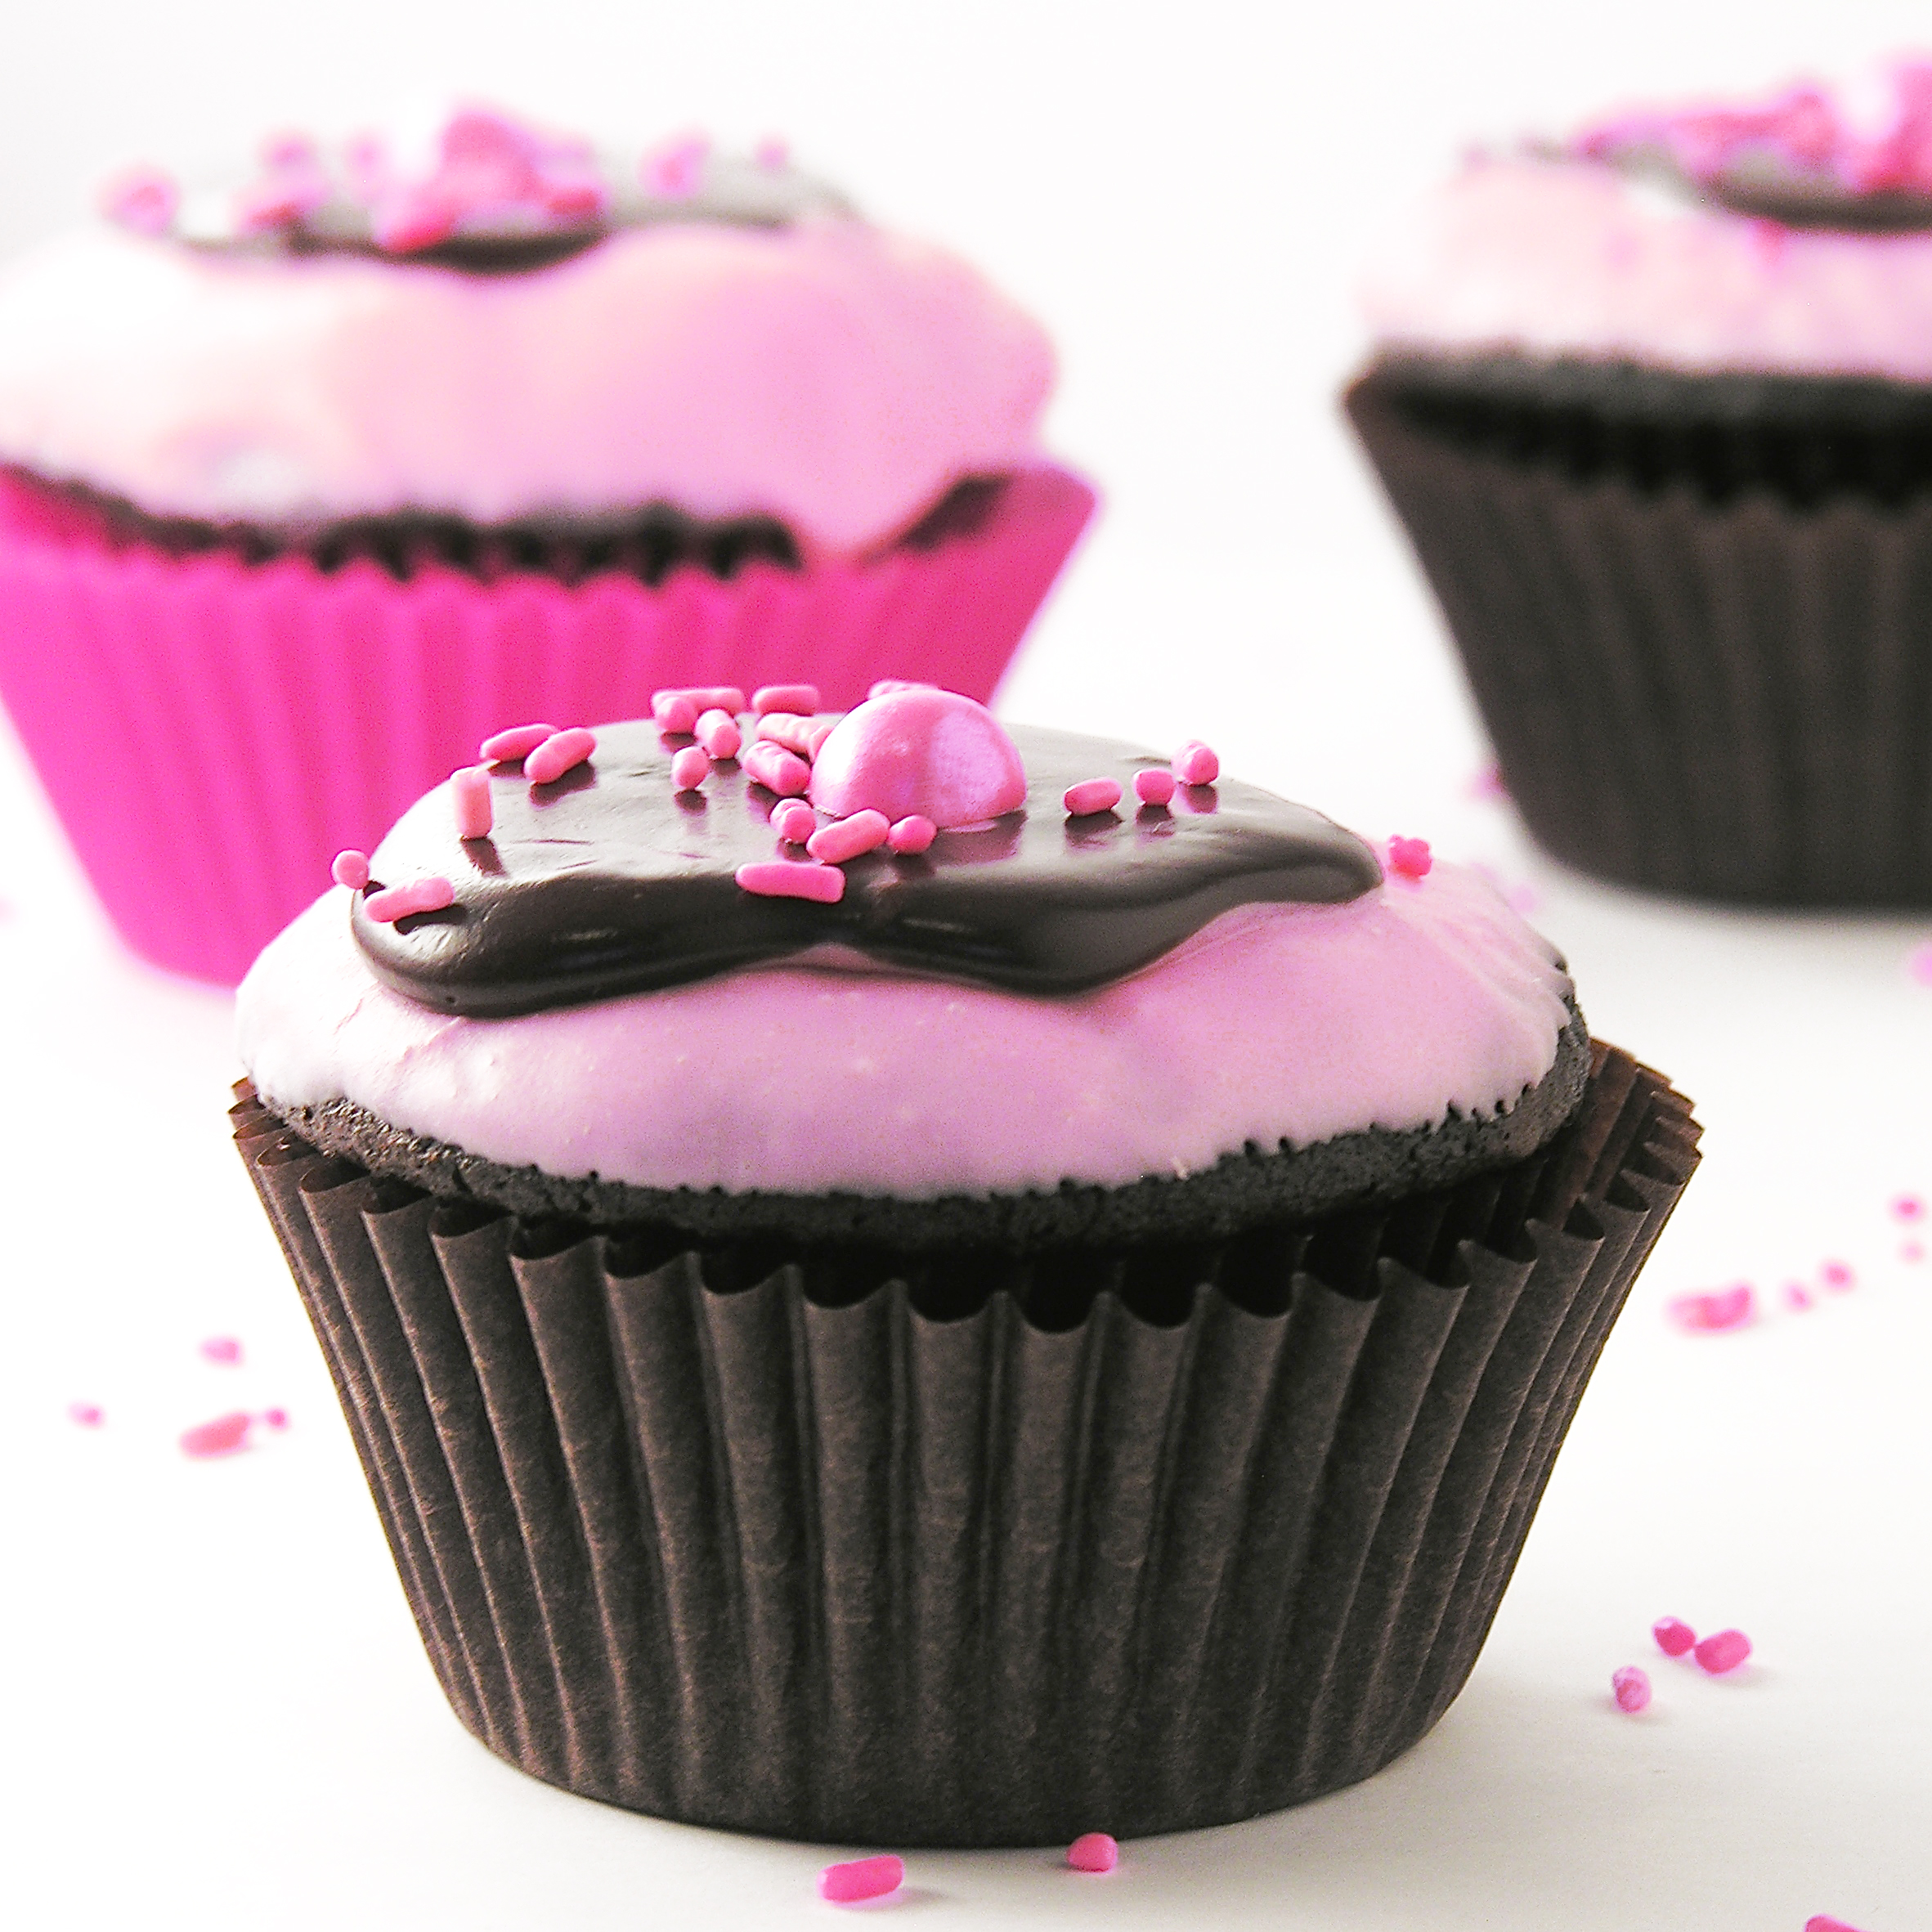
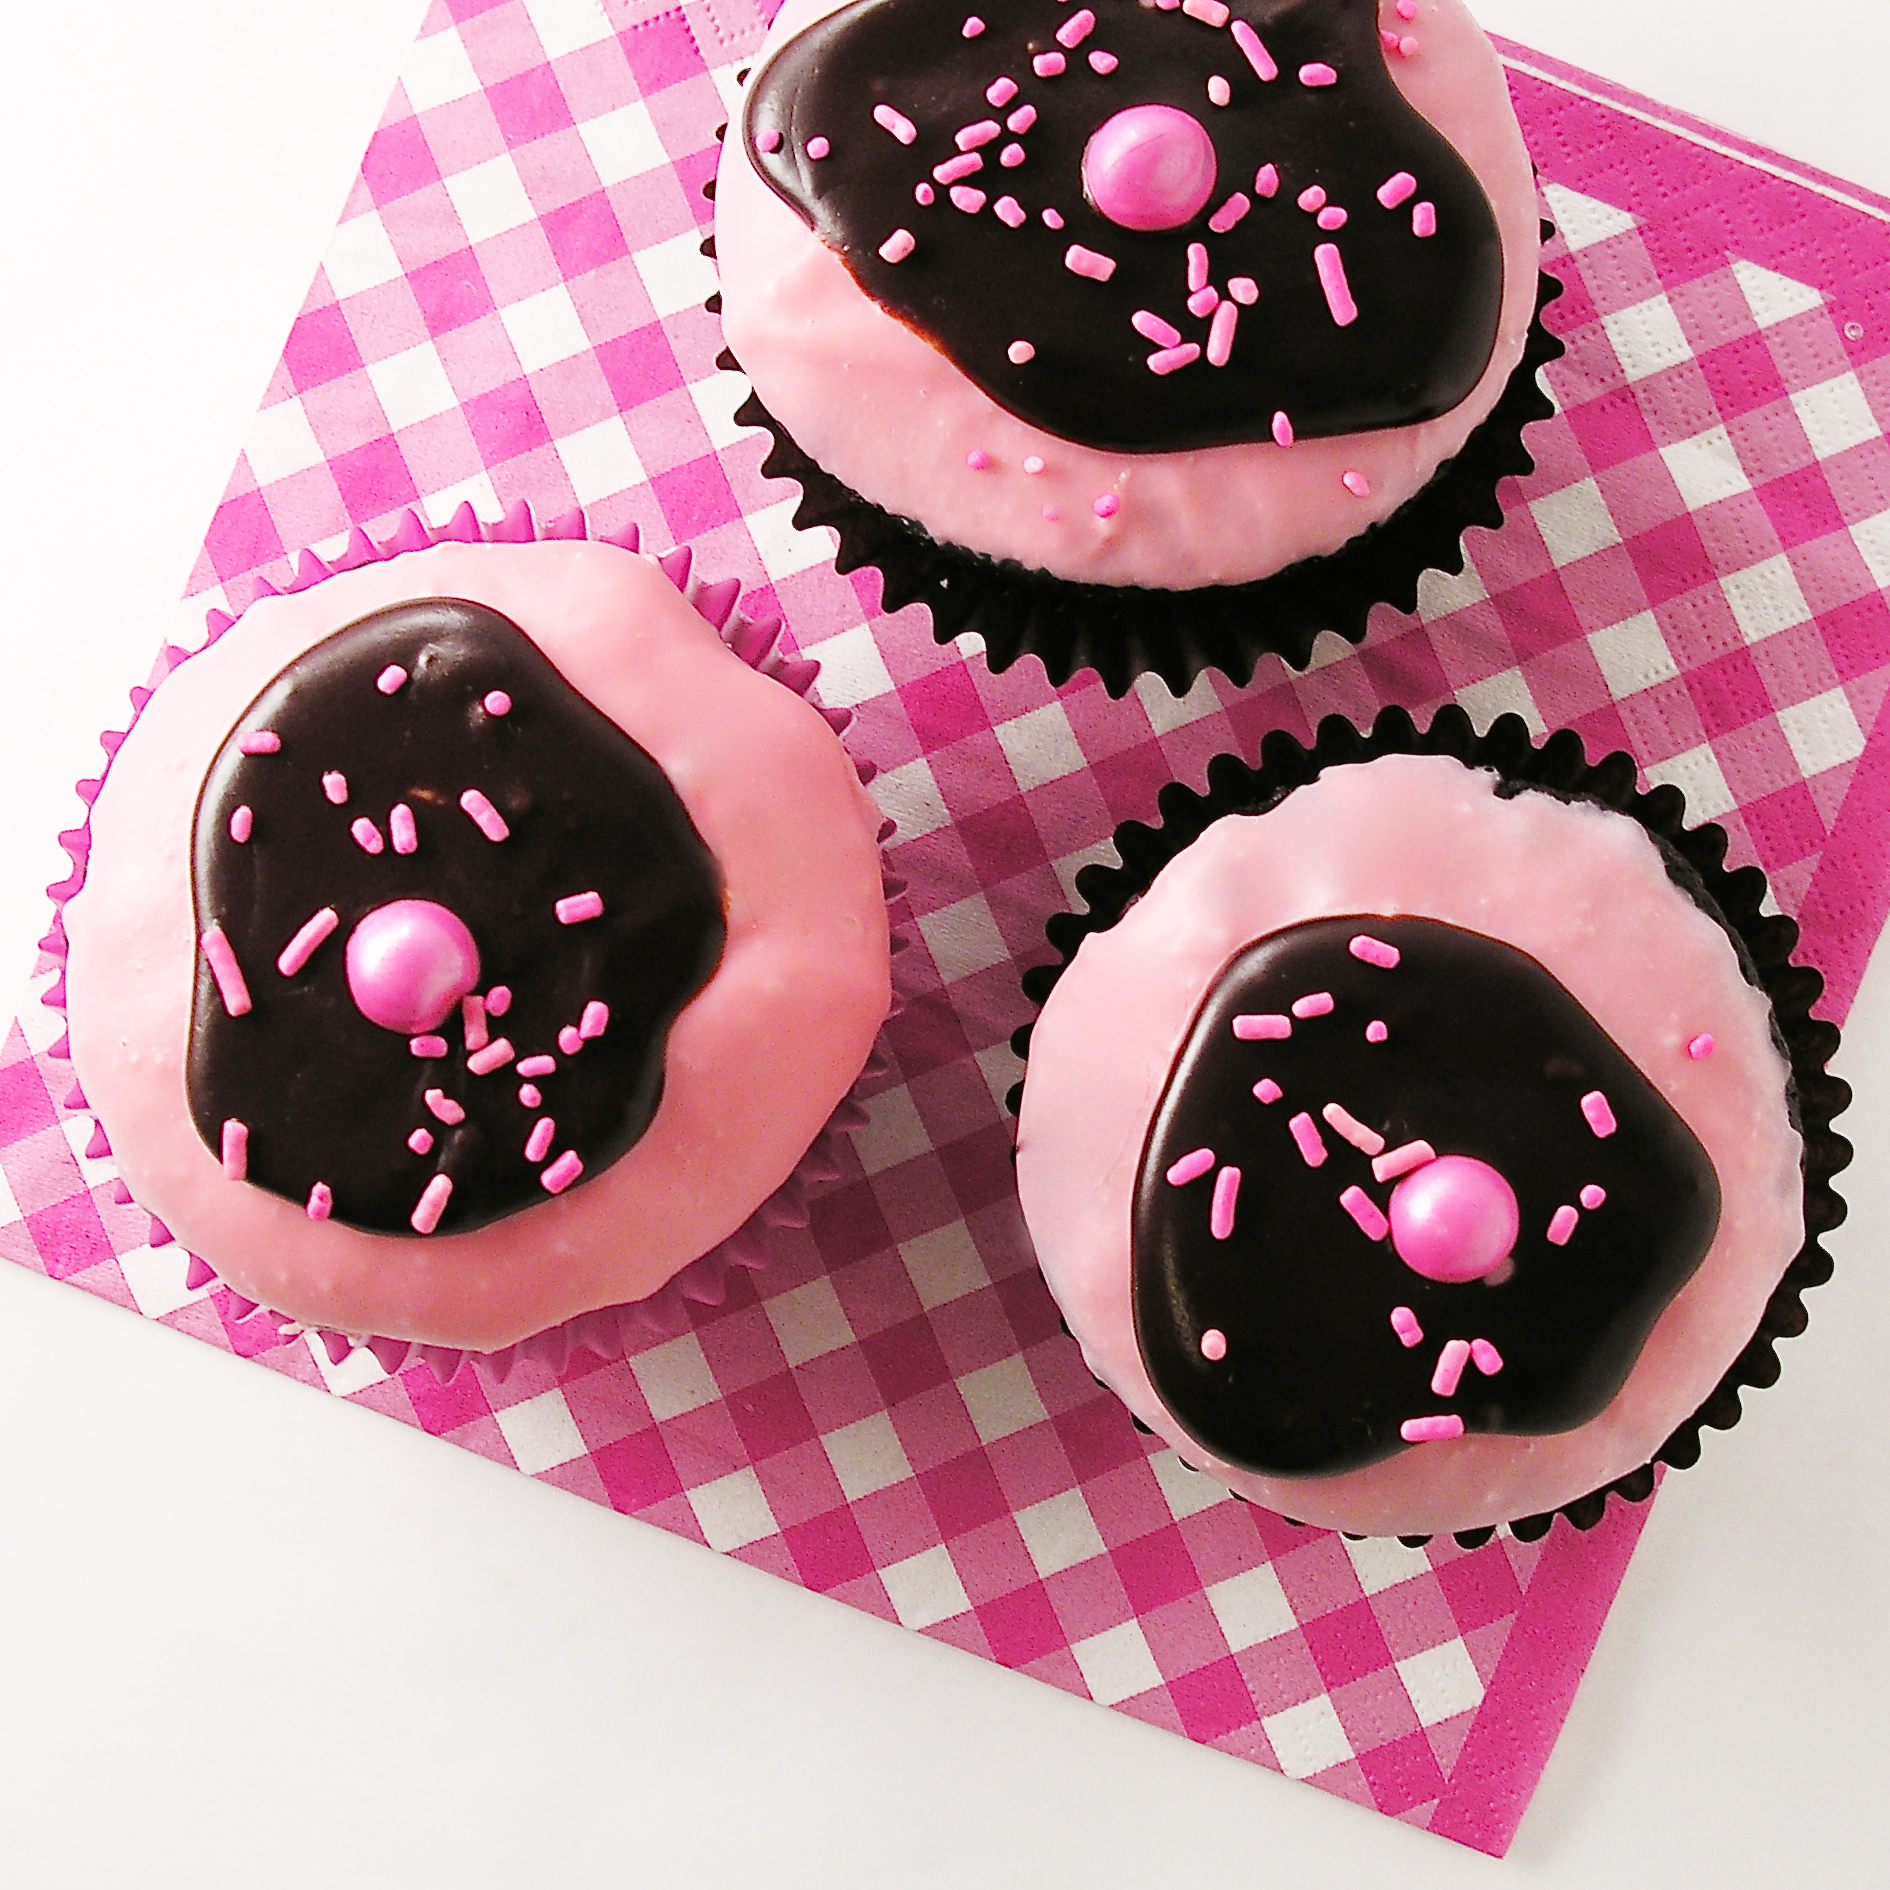
Easy and fun, these are the perfect Valentine’s Day cupcake!

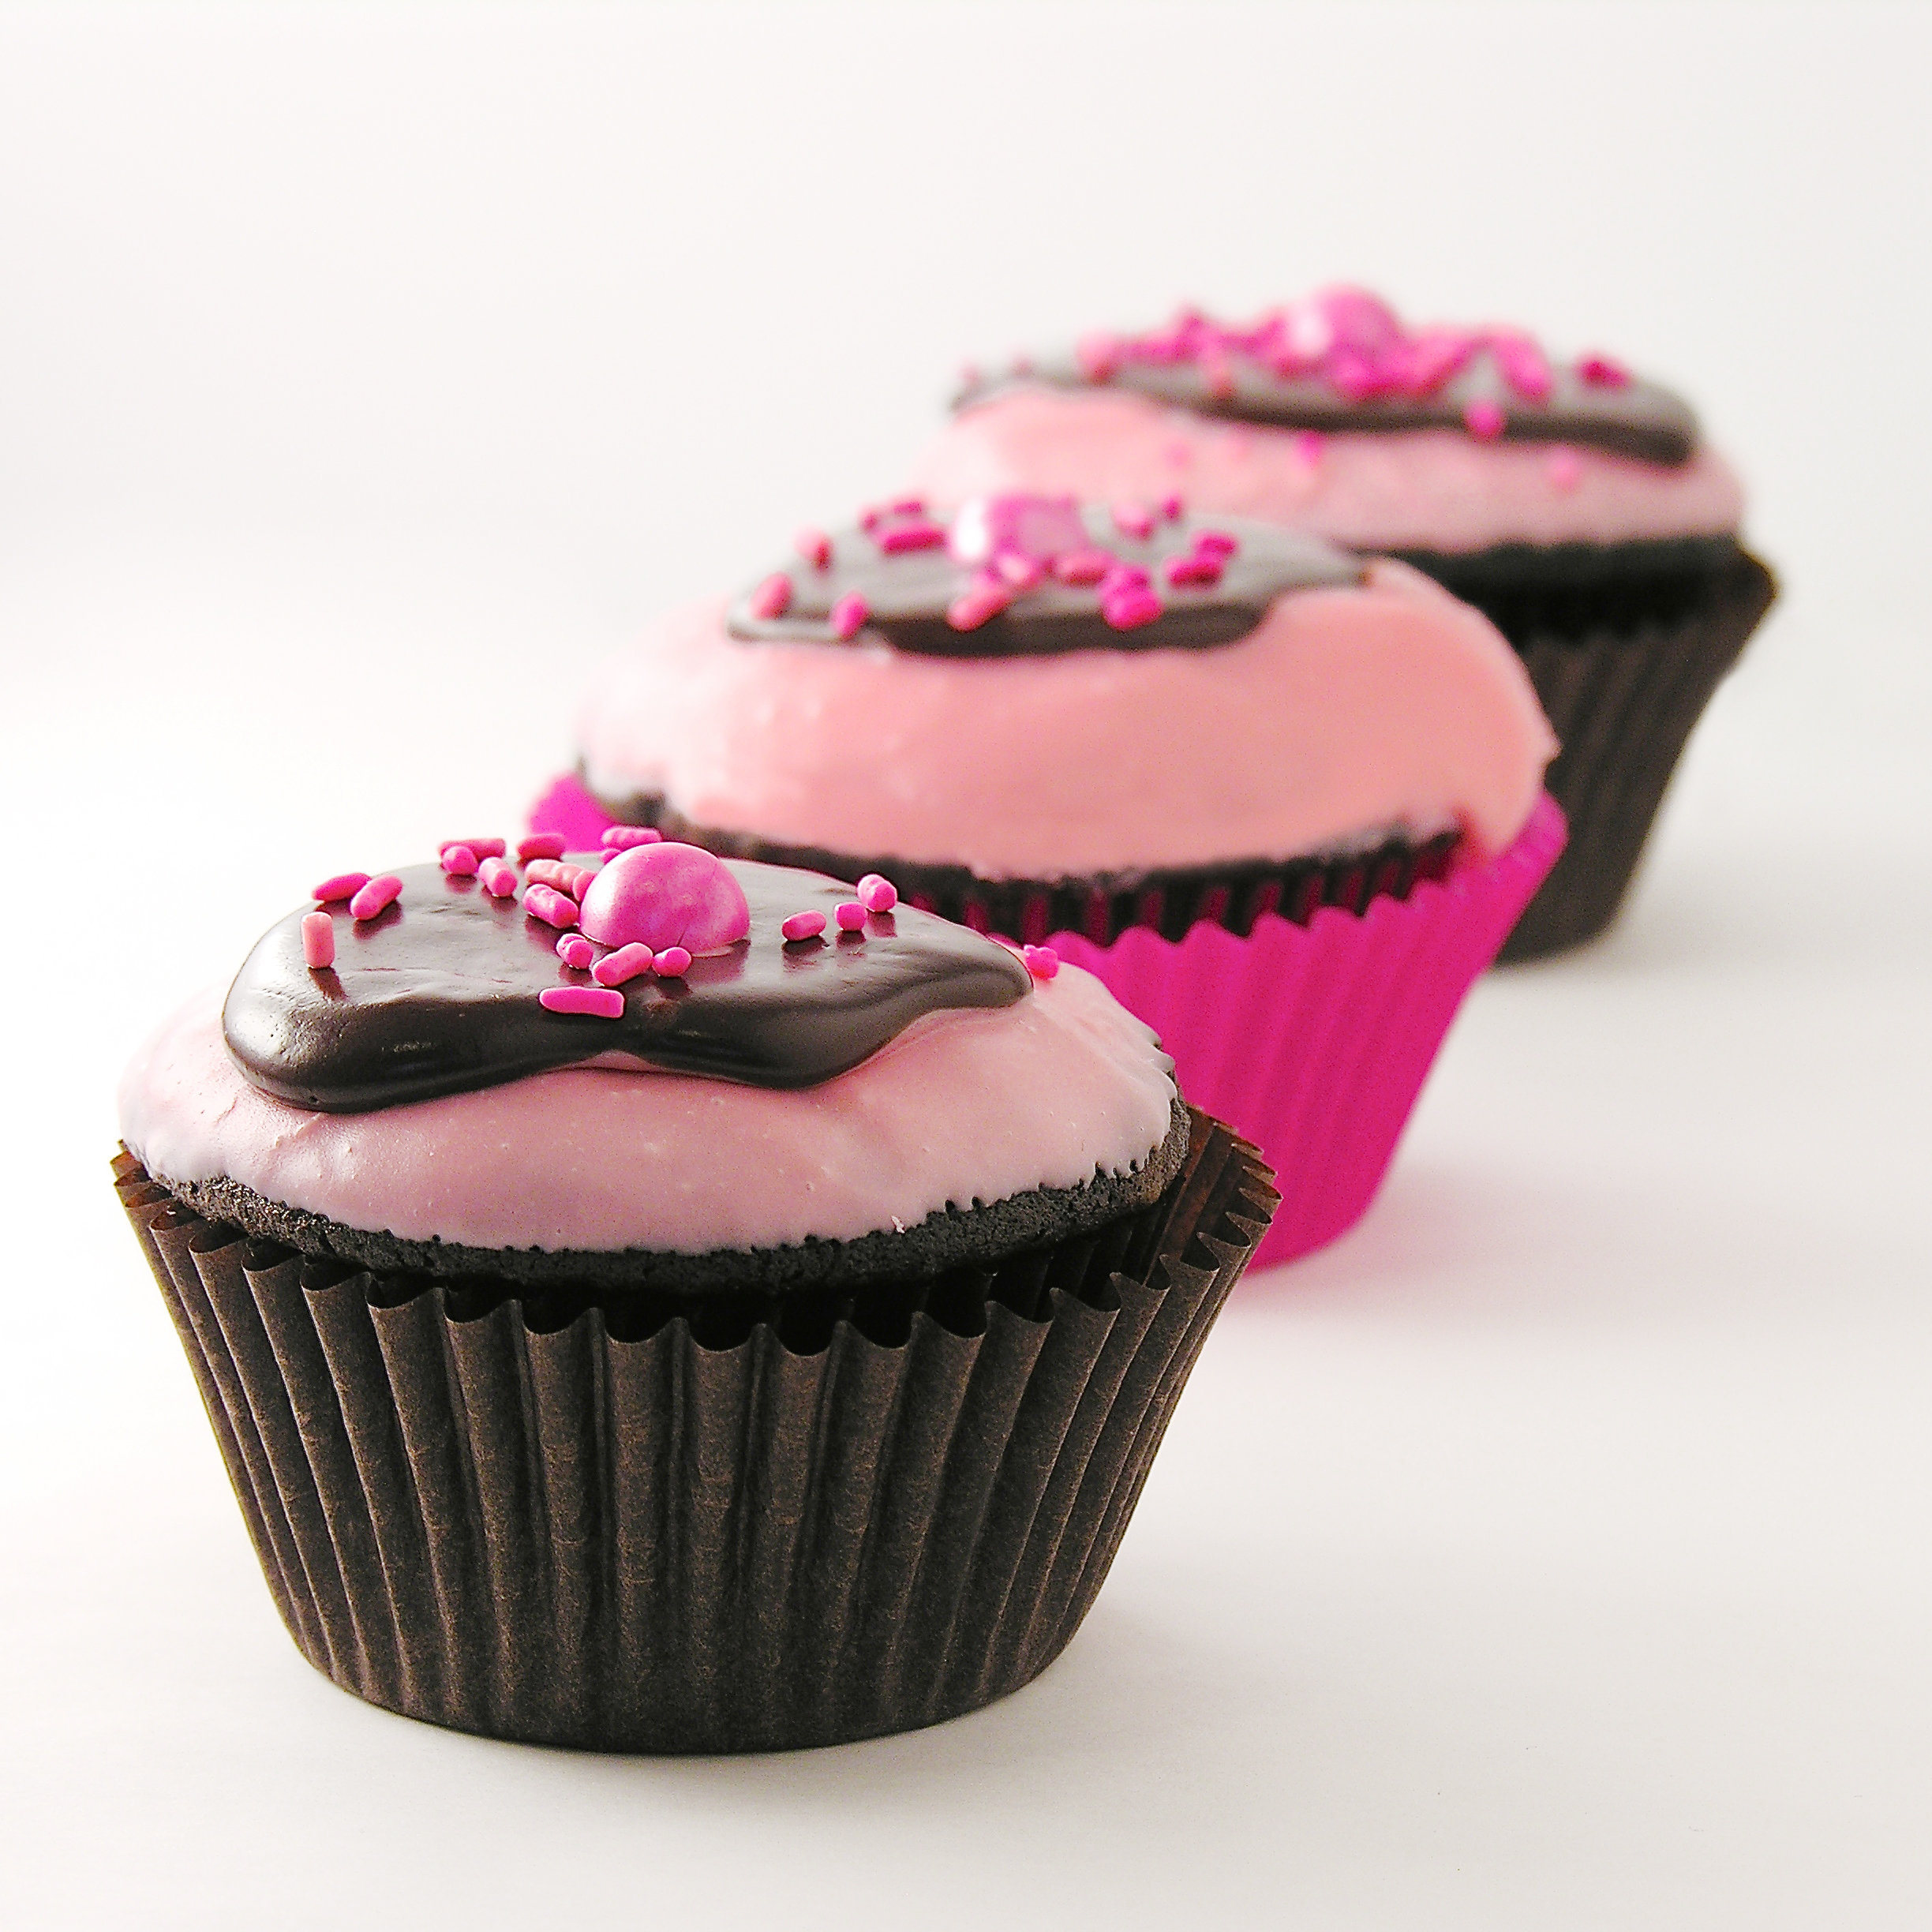
The story begins: “I had an extra tub of strawberry frosting….”

Last fall, as I was preparing to leave the Navajo reservation and move back to the Midwest, I committed to using up everything in my cupboards rather than buying any new food that I would have to fit in my car for that long trip home.

One of the items in the back of my baking cupboard was one tub of strawberry frosting, and it was the inspiration for this yummy (and incredibly easy!) cupcake idea.

I used a chocolate mix for these cupcakes (also remaining in my cupboard), but you could certainly make your favorite chocolate cupcake recipe for these.

Chocolate Covered Strawberry Cupcakes

When they all were done and I’d taken some pictures, I decided to hold this recipe for February as a fun Valentine’s Day treat! Here it is!!! (printable version)

INGREDIENTS:

  • One boxed chocolate cake mix (with water, oil and eggs to make according to package)
  • One tub of strawberry frosting
  • 1/2 cup of whipping cream
  • 1 cup of semi-sweet chocolate chips
  • 24 Pink Sixlets candies and sprinkles (as desired for decoration)

DIRECTIONS:

  • Make cake mix according to package and bake in 24 cupcake liners placed in tins as directed. Cool.
  • Make chocolate sauce by melting whipping cream and chocolate chips together in a sauce pan, stirring often, until fully melted and smooth.
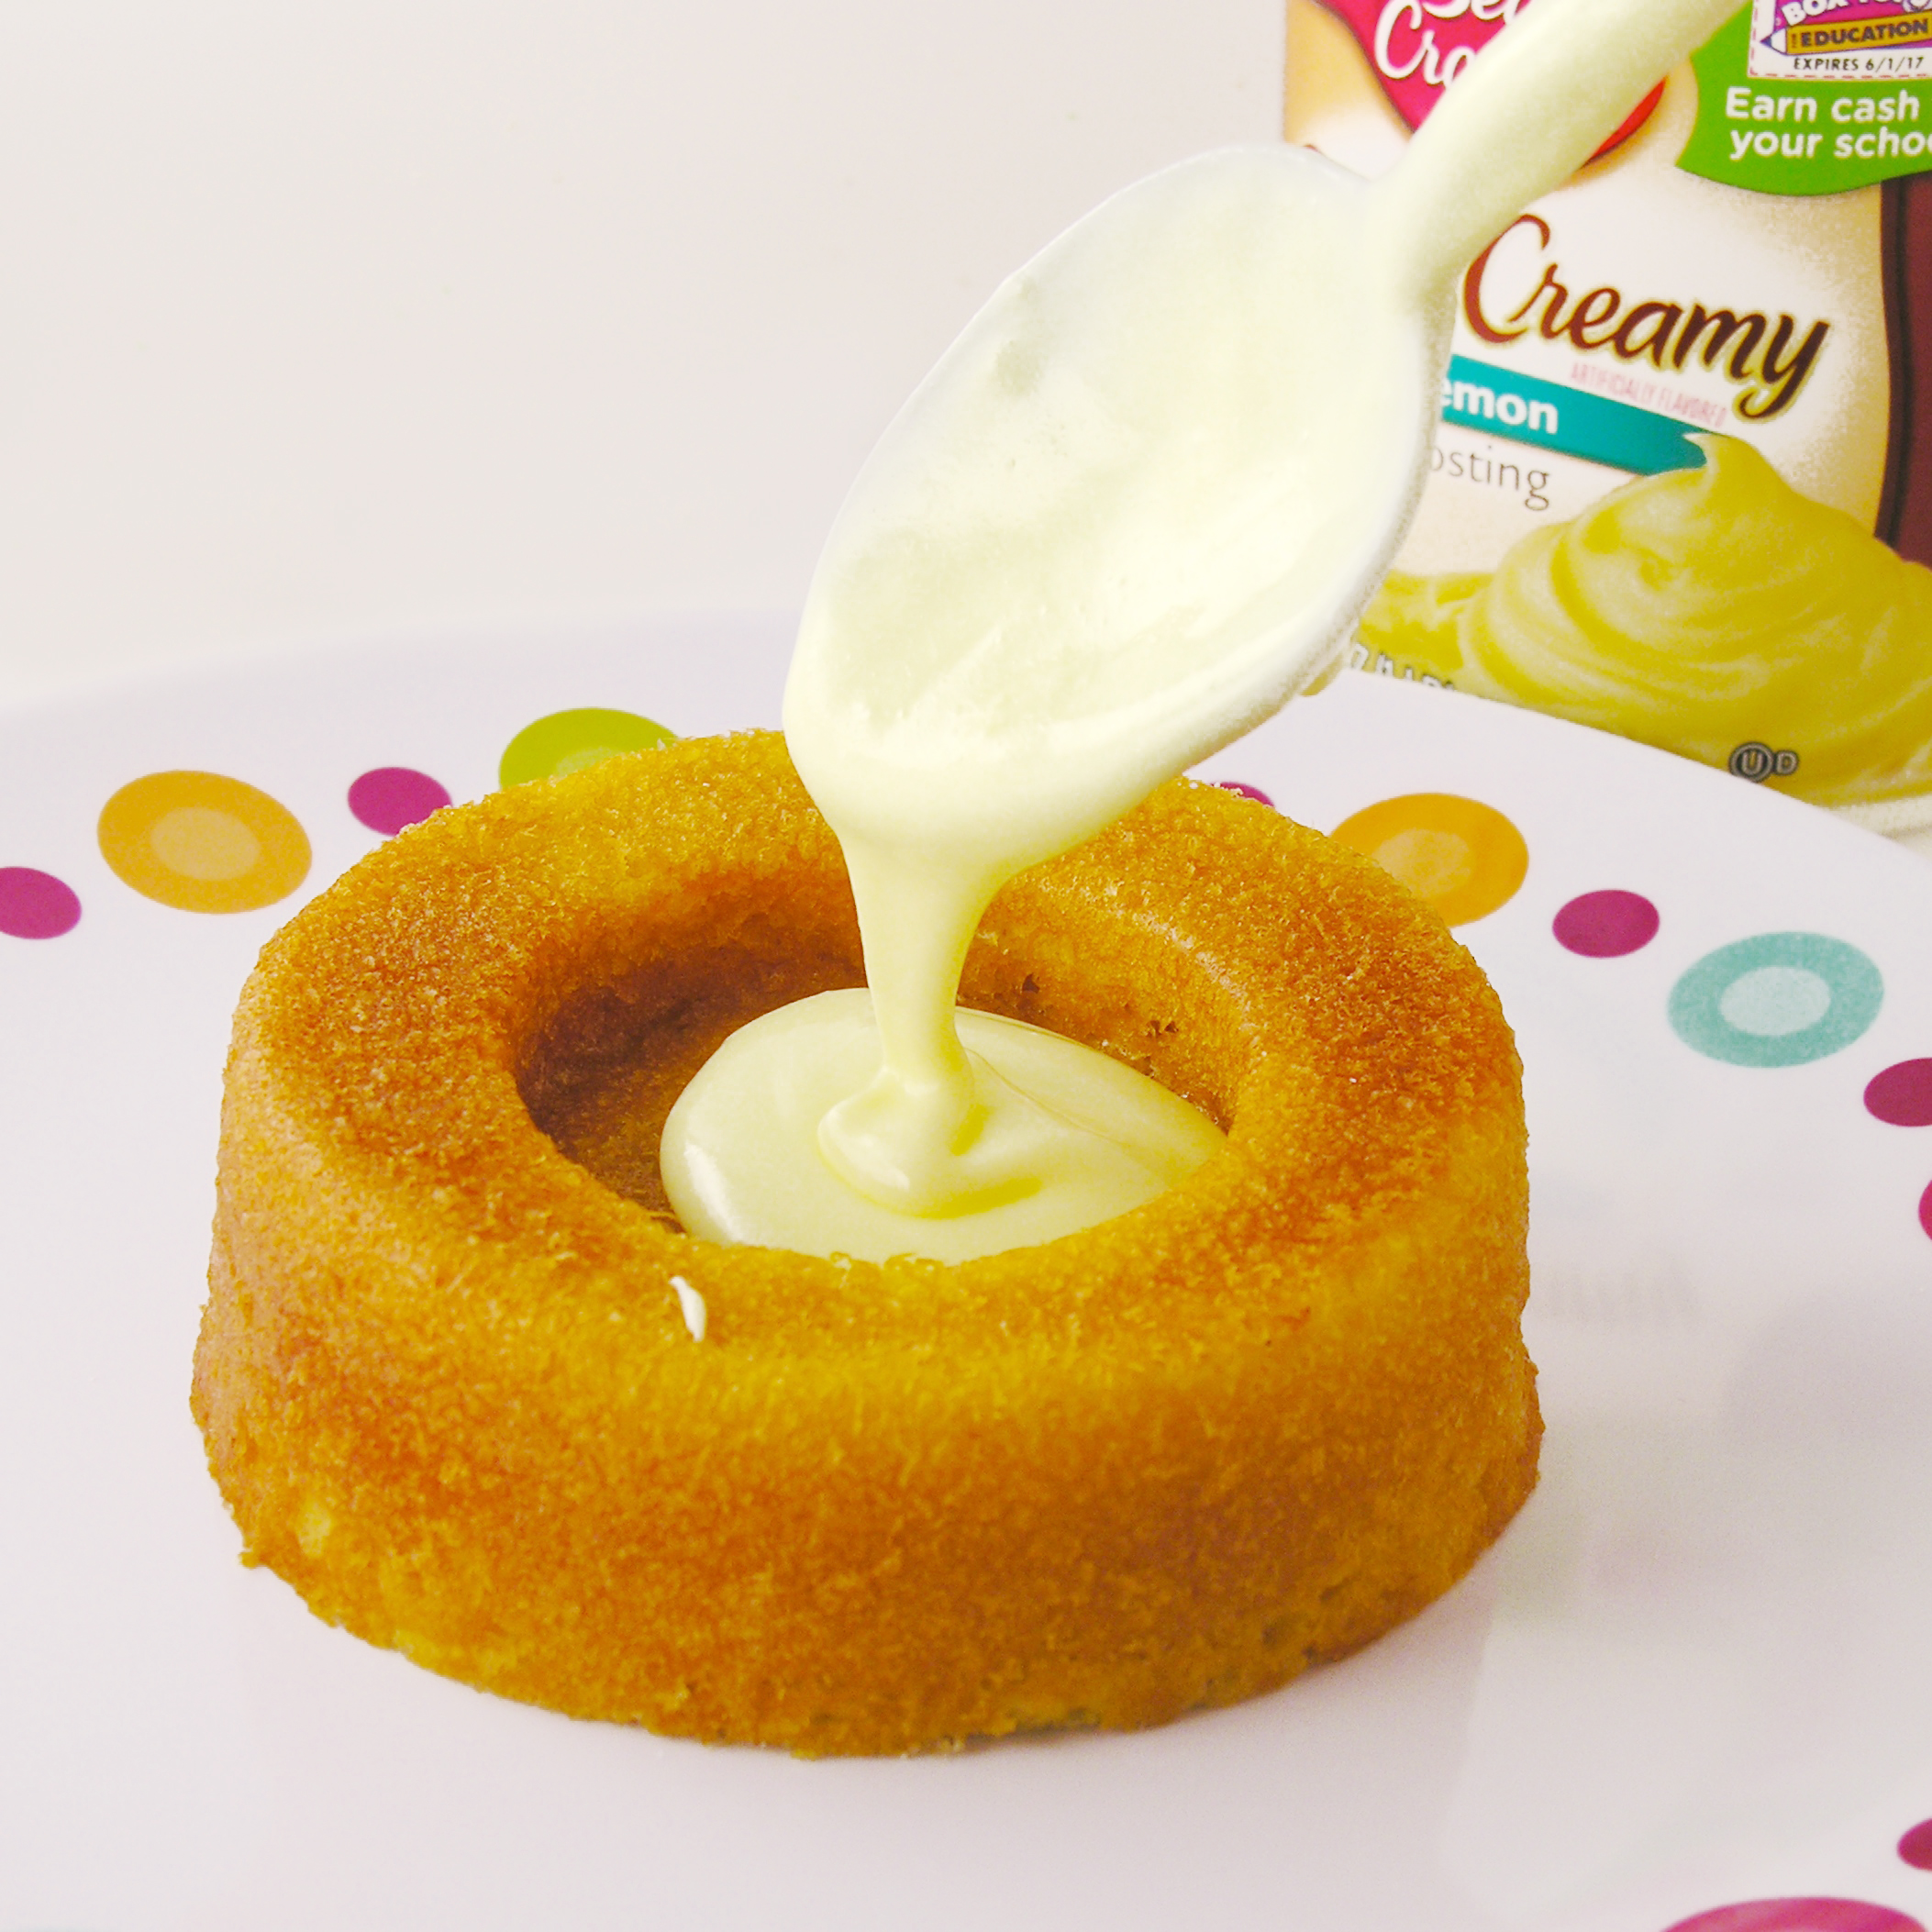
  • Spoon strawberry frosting into a microwave-safe bowl, and heat for 15-30 seconds until smooth and liquid when stirred.
  • Grasp a cooled cupcake by the bottom and dip the entire top of the cupcake into the softened strawberry frosting. Set each cupcake on a cookie sheet and set these in the refrigerator to harden up for 5 to 10 minutes.
  • Gently spoon a dollop of chocolate onto the center of a cupcake and smooth it toward the edges, trying to keep it from running over. A couple of mine did and they were fine once they hardened up, just a little messy.
  • Place decorations on immediately and refrigerate until both chocolate and strawberry frosting are firm. They should be fine at room temperature once they have hardened.
  • Enjoy!

Chocolate Covered Strawberry Cupcake2

My thoughts: These are such an easy cupcake to make, but they are SO yummy- and cute! I love the chocolate and strawberry combination. I hope you have a chance to make these for YOUR sweetheart this year! ~Enjoy!

Other fun Valentine recipe ideas (just click on a photo to see the recipe!)

Frog Oreos!!White Chocolate Strawberry Cookies!!Chocolate covered Strawberry cake roll-- all fixed!!!Raspberry Confetti Kisses

Advertisement

Peanut Butter Cupcakes

Posted on

Peanut Butter Cupcakes!!!!!!Moist cupcakes filled with a creamy peanut butter cup and topped with peanut butter cream icing and a mini peanut butter cookie.  This is a peanut butter lover’s dream come true!

I was determined to get mini peanut butter cups into the center of these cupcakes.  I did some of them plain, and tossed some in flour 1st and all of them sank to the bottom.  Sad me.  I think the only alternative is to either eat them on the bottom (still yummy!!) or invest in one of those fun little pans that hold candy in the middle.  Have you seen them?  Click here if you want to check them out.  Now that I’m in the middle of the Navajo Nation, I seriously doubt I will be coming across one- lol!  Maybe I will order one once I have an address to send it to!!

Peanut Butter Cupcakes!!!!

These happy little cupcakes use melted frosting on the tops—I’m addicted to melting frosting now!!!  Make me stop!!!

Here’s the recipe (printable version)

INGREDIENTS:

  • One boxed yellow cake mix (plus water, oil and eggs to make according to directions)
  • 24 Mini Reese peanut butter cups
  • 1 tub of chocolate frosting
  • 3 sticks (1 1/2 cups) butter (softened to room temperature)
  • 1 cup of creamy peanut butter
  • 3 cups powdered sugar
  • 1 Tablespoon vanilla
  • 24 mini Nutter Butter cookies for decoration

DIRECTIONS:

  • Preheat oven to 350F degrees.
  • Make cake mix according to box directions and divide equally into 24 cupcake liners placed in tins.
  • Place a mini peanut butter cup on the top of each cup full of batter

Peanut Butter Cupcake3

  • Bake according to box directions, remove from oven and cool completely.
  • Spoon tub of chocolate frosting into a microwave-safe bowl and microwave for about 30 seconds.  Stir until well mixed.
  • Dip the top of each cupcake in the chocolate frosting and allow them to cool, and to harden a little.

Peanut Butter Cucpake2

  • Place remaining melted frosting in a small zip top bag and zip it closed.
  • To make peanut butter frosting, place butter, vanilla, and peanut butter into a large bowl and mix on high until smooth (about a minute)
  • Add powdered sugar and beat on low until combined and then on high until light and fluffy.
  • Place frosting in a zip-top bag fitted with a decorating tip and pipe on top of each cooled cupcake.
  • Clip a corner off of the bag filled with the melted chocolate frosting and drizzle over the top of each cupcake.
  • Top with a mini Nutter Butter cookie.

Peanut Butter Cupcakes!!!!

My thoughts:  YUM!  These are perfect if you love peanut butter.  I love the fudgy layer of melted frosting on the top– when I shared these with friends they all loved that part.  You could dip cupcakes into all sorts of melted frostings– so many flavor possibilities!!!! FUN!!!!   I hope you really enjoy these!!! ~r

Chocolate Peanut Butter Cupcakes6-13-14: Did you know, that this yummy recipe is available on adorable blank note cards?  With a picture of the cupcakes on the front, the recipe on the back, and plenty of room inside for a message, these make the PERFECT gift.  Why send just a card, when you can send the gift of a recipe instead??  Click here for more information and to order.

Peanut Butter Cupcakes!!

I usually give you other similar fun recipe to try on easybaked at this point, but my internet is so slow that I’m skipping it this week!!  🙂 The photo gallery is always a fun spot to shop for recipe ideas… since your internet is likely faster than mine this week, I will let you hunt for treasures on your own!!!  Have a good one!!!!! ~r

Raspberry Lemon Drop Cakes

Posted on

Raspberry Lemon Drop Cakes!!
Moist yellow cake bowls filled with lemon and topped with whipped raspberry cream.  These are such a unique and flavorful dessert- you are going to love them!

This is recipe #2 in my tribute to melted frosting.  Last week we used a chocolate frosting and this week- lemon frosting.  The plan for this recipe was chocolate cake bowls with chocolate filling and raspberry cream.  I caught myself half-way through making a yellow cake mix before I remembered I wanted to do chocolate though.

I have a lot on my mind these days!

SO, I sat down and thought about what flavors are good with yellow cake mix and I already had a tub of lemon frosting…and here we go! It was a fortunate mistake, because these are delicious.  One of my new favorites!  I even ate one for breakfast, and with a cup of coffee?  Perfection!

Here’s the recipe:  (printable version)

INGREDIENTS:

  • 1 box of yellow cake mix (plus oil, water and eggs to make according to package)
  • 1 tub of lemon frosting
  • 1 packet of Dream Whip
  • 1/3 cup cold milk
  • 1 tablespoon of powdered sugar
  • 1 teaspoon vanilla
  • 1/4 cup of raspberry preserves (more or less, to taste)

DIRECTIONS:

  • Preheat oven to 350F degrees.
  • Make yellow cake mix according to package.
  • Grease 4 Wilton fillable mini cake pans, and fill each one about 2/3 full.  This will use about 1/2 of the batter- so you will fill these pans again once the 1st set is through baking.
  • Bake at 350F degrees for 20-30 minutes, until a toothpick inserted comes out clean.
  • Tip cakes onto a cake rack to cool.  Trim bottoms flat, if needed.
  • Spoon tub of frosting into a microwave safe bowl and heat in microwave for about 30 seconds.  Stir.
  • Spoon melted lemon frosting into each cake “cup”, filling each to the top.

Raspberry Lemondrop Cakes1

  • Place remaining frosting into a small zip top bag.
  • Place Dream Whip, milk, powered sugar and vanilla into a large mixing bowl and beat on high for about 2 minutes, until a thick, whipped consistency.
  • Fold raspberry preserves in, and place into a zip top bag that has been fitted with a decorator tip.
  • Pipe whipped topping on top of each cake.
  • Clip a small corner off the bag of remaining frosting and drizzle liberally over the top of each cake. 
  • Top with a fresh raspberry if desired.
  • Keep these chilled until serving- and ENJOY!!! 

Raspberry Lemondrop Cakes4c

My thoughts: I’m not kidding you– these are amazing!  If you don’t want to use the pans (they are a really fun addition to your kitchen though!) you could do a layer cake:  2 round cakes with lemon icing and whipped topping in the middle and lemon icing poured over the top- see my Chocolate Mousse Cake for how to assemble.  These are a must-try recipe!!!  SO easy with that melted frosting– love it!!!
Raspberry Lemon drop cakes!!

One more picture:

Raspberry Lemon drop cakes!!!!
Want some other ideas for those cute little pans?  Here’s a couple- just click on the picture to see the recipe!

Mini Filled Boston Cream Pies!Heath Bar crunch filled mini cake

Ruthanne news:  I don’t often post about my personal life here, because my goal is to just get yummy recipes to you without a ton of personal commentary.  When I really want to just see a recipe, I hate scrolling through 3 pages of of kids and dog stories first, so I promised myself that this site would be more about recipes than about me!!!

I have a few really exciting things going on that I wanted to share with you though~

First, Warner Press Publishing contacted me about making a boxed set of greeting cards from my recipes and photos.  These are available now in many Christian bookstores or on their site.  Click here to check them out!

Second, I have a cookbook for kids coming out this summer!  I’m so excited about this project- there’s nothing better than time in the kitchen with your kids!  Details to follow on this!

Third, I lost my job in genetics.  Our hospital can “no longer invest in expensive cutting edge technology due to the affordable care act”.  Thats a quote.  I struggled with what comes next and eventually (after much soul searching and prayer!) decided to move out to Arizona for the next 8 months to work alongside a church in the Navajo Nation.  I’m writing this blog from the comfort of a motel in Tucumcari, New Mexico.  I’ve driven about 1200 miles from home and I’m about 6 hours from my new home in Rough Rock Arizona.  My car is literally packed to the ceiling with things- about half of those things are supplies for baking, blogging and photography!  I’m hoping to continue creating and posting for all of you!

Many thanks to each of you for being a part of the easybaked community!  I’m incredibly glad you are along for this journey!  ~r

Sunset over New Mexico

Sunset over New Mexico

Chocolate Mousse Cake

Posted on

This wonderful cake recipe is courtesy of my Uncle John.  He has made this cake for family gatherings for years now and it is one of my favorites.  I think I’d have tried it sooner if I’d known how EASY it is.  There’s nothing better than a really easy dessert that looks this fancy!

INGREDIENTS:

  • 1 boxed chocolate cake mix- I like Duncan Hines!  (with oil/eggs/water to make according to directions)
  • 2 packets of Dream Whip (I’d never heard of this– it comes in a box and was near the jello/pudding boxes at the grocery.  There are 4 packets per box, and if you order them in a 6-pack at Amazon they are much cheaper than in the store.)
  • 3/4 c. milk
  • 1 t. vanilla
  • 3T. cocoa powder
  • 3T. powdered sugar
  • one container of pre-made chocolate frosting.

DIRECTIONS:

  • Make cake mix according to box and bake in 2 – 8 or 9 inch round pans (I cut parchment paper to fit and place it in the bottom of each pan so that it comes out easier).
  • Cool cakes completely on a wire rack and while they are cooling make your mousse.
  • Put Dream Whip, milk, vanilla, cocoa powder and powdered sugar into a mixing bowl and blend together.
  • Using a mixer, beat until stiff peaks form (3-4 minutes)
  • Scoop chocolate frosting into a microwave safe bowl and heat for only about 20-30 seconds in the microwave.  Heat until frosting is melted into a hot fudge consistency.
  • Use a large serrated knife to level your two cakes.
  • Place 1st cake on serving plate, leveled edge up.
  • Pour about 1/4 of melted frosting on top of cake and spread to cover (I put this layer in the fridge for about a minute just to cool the warm frosting down before adding the mousse layer)
  • Spoon all of the mousse on top of the cake and spread it ALMOST to the edges.
  • Top with second cake– put the leveled edge against the mousse…this keeps all the crumbs in the middle and leaves a nice flat surface on the top of your cake. Gently press top layer down to squeeze the mousse all the way to the edges.
  • Pour the rest of the melted frosting over the entire cake and let it drip over the edges.
  • Refrigerate until serving.

My thoughts:  WHO KNEW you could melt frosting and make such a wonderful fudge-like topping?  Learn something new every day.  Uncle John sometimes adds peppermint extract to the mousse– so yummy– and I had the thought while I was making this that a layer of raspberry preserves somewhere in the middle would be amazing.  I think you will just love this mousse.  It is so creamy and flavorful.  

If you live in Africa and cant find Dream Whip PLEASE don’t ask me what to substitute– I have no idea what this stuff is…it’s MAGIC 🙂 and I love it!   

Curiosity got he better of me…. here’s what Dream Whip is: click here  (I still think it’s magic.)

Enjoy this recipe friends!  Thanks for the inspiration Uncle John!!!   -r

%d bloggers like this: