RSS Feed

Tag Archives: spring

Mud Pie!

Posted on

Mud Pie!

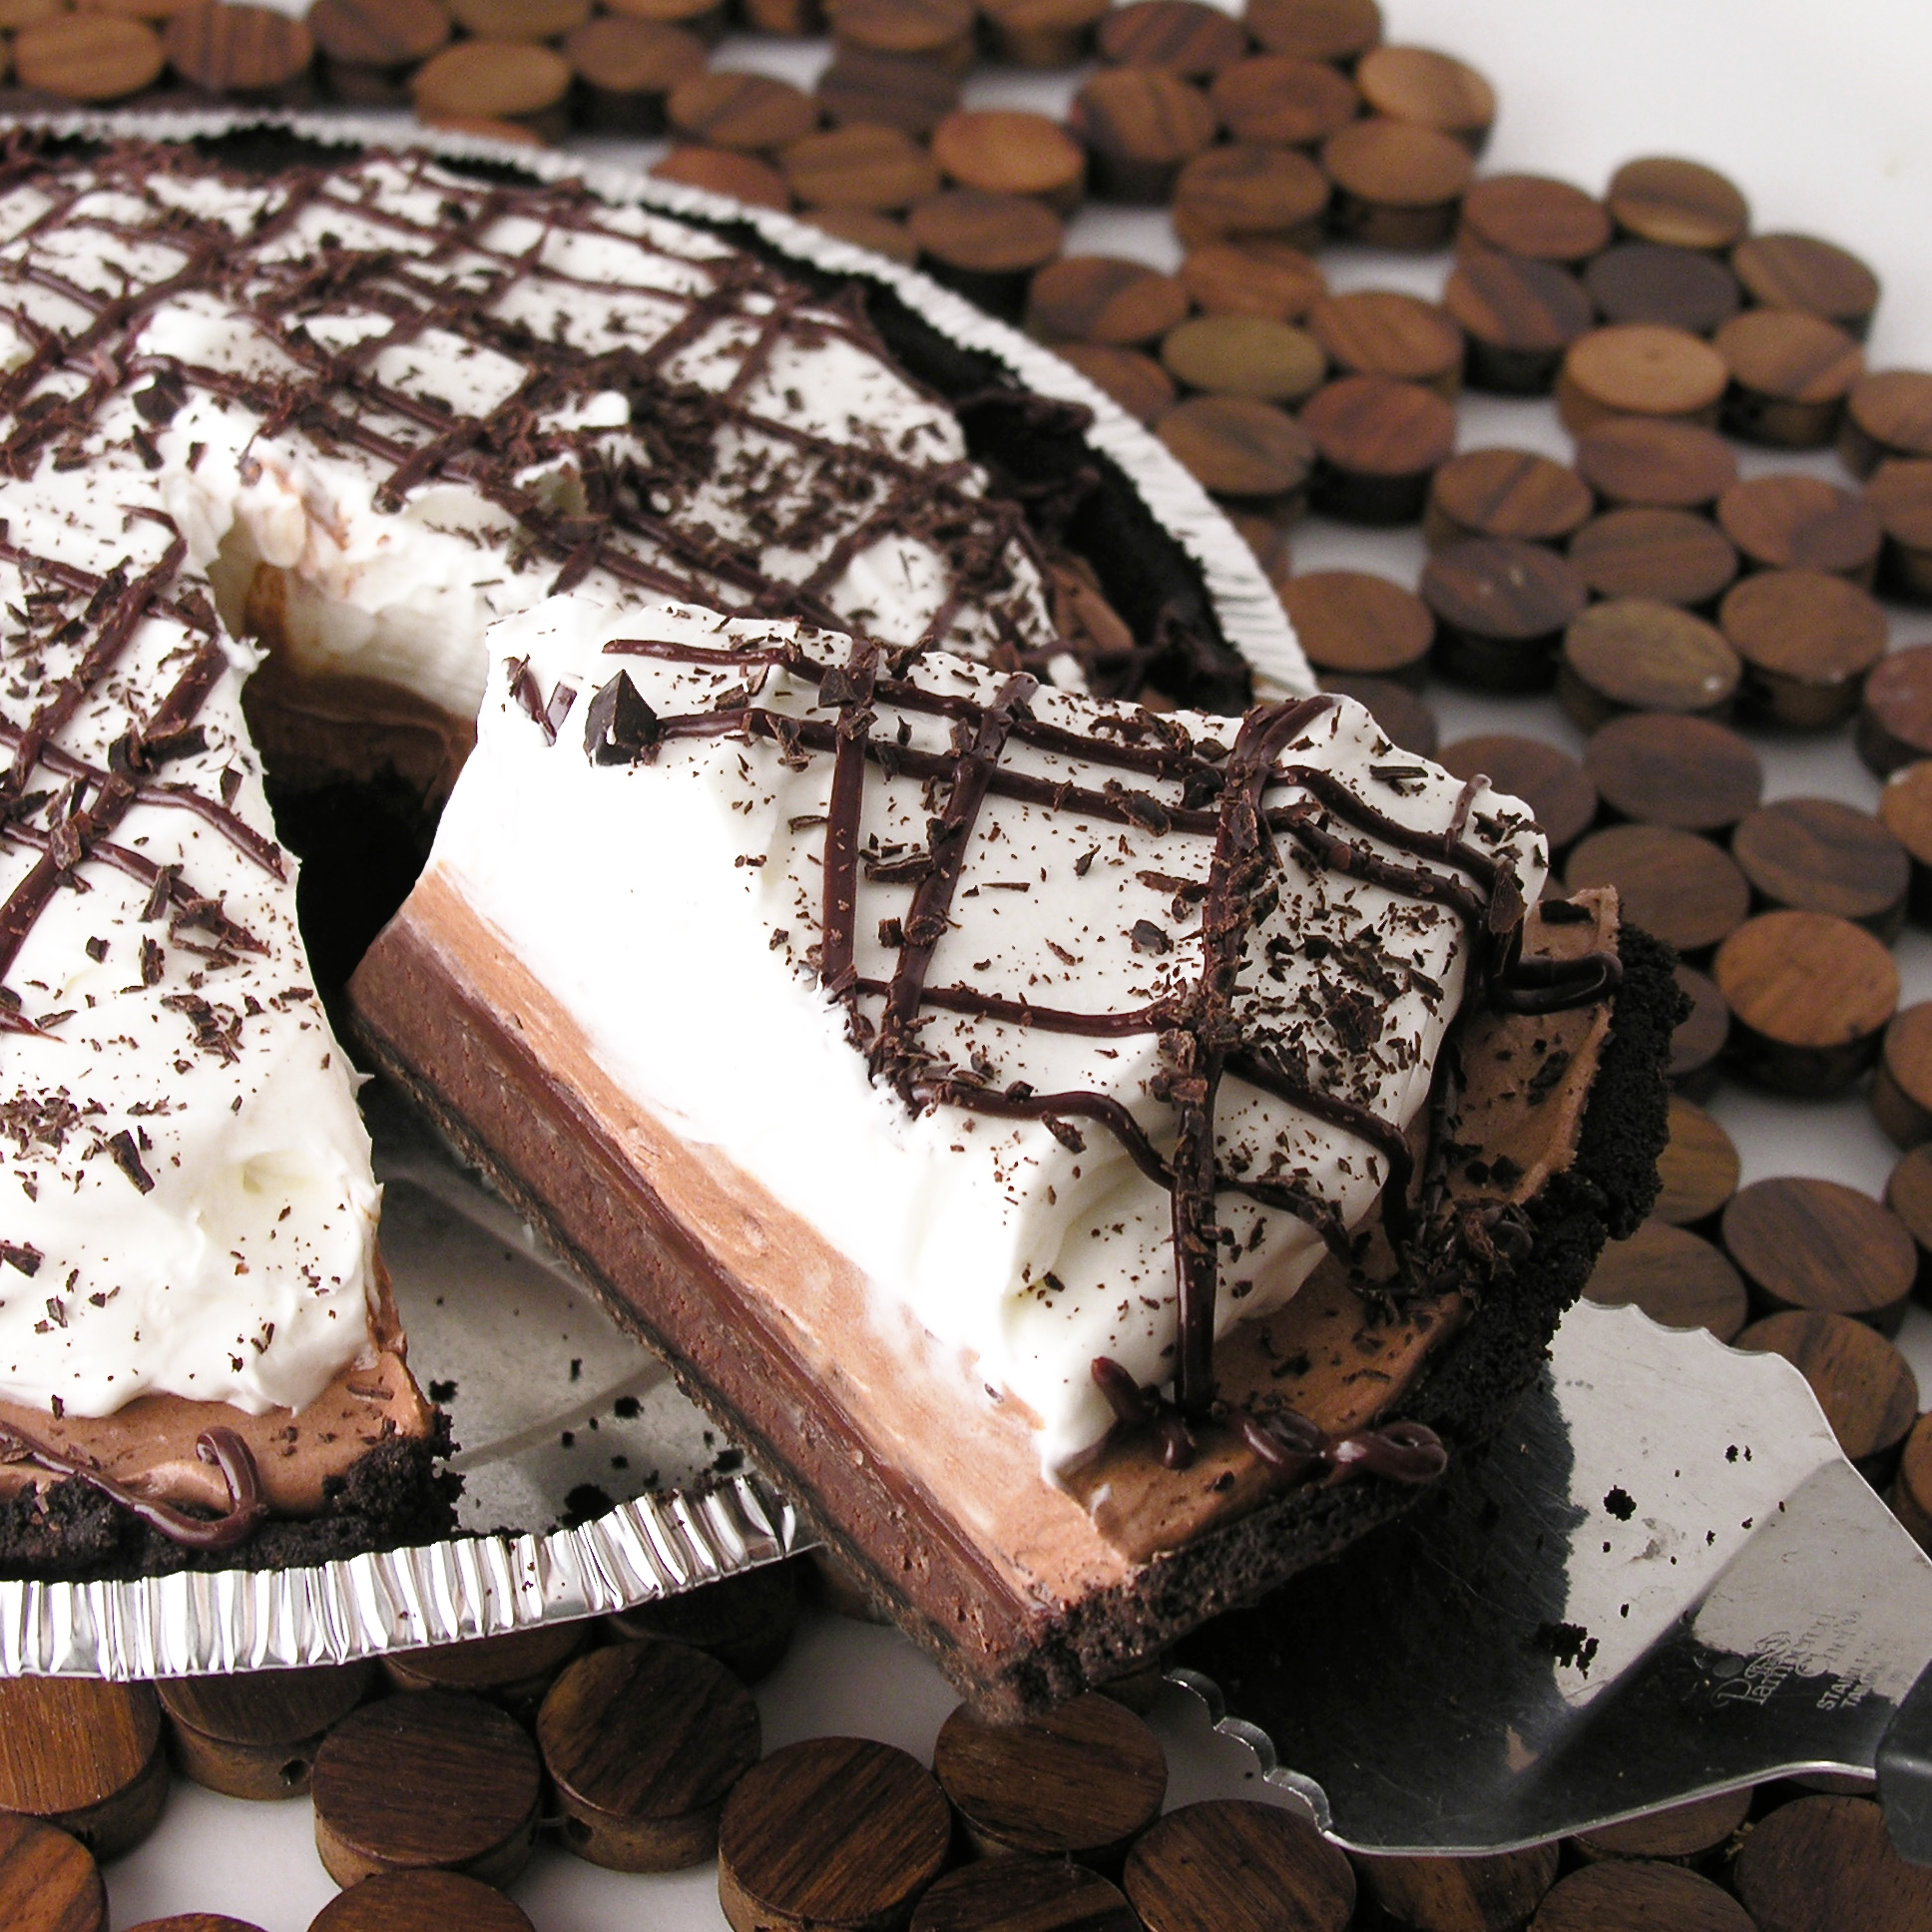
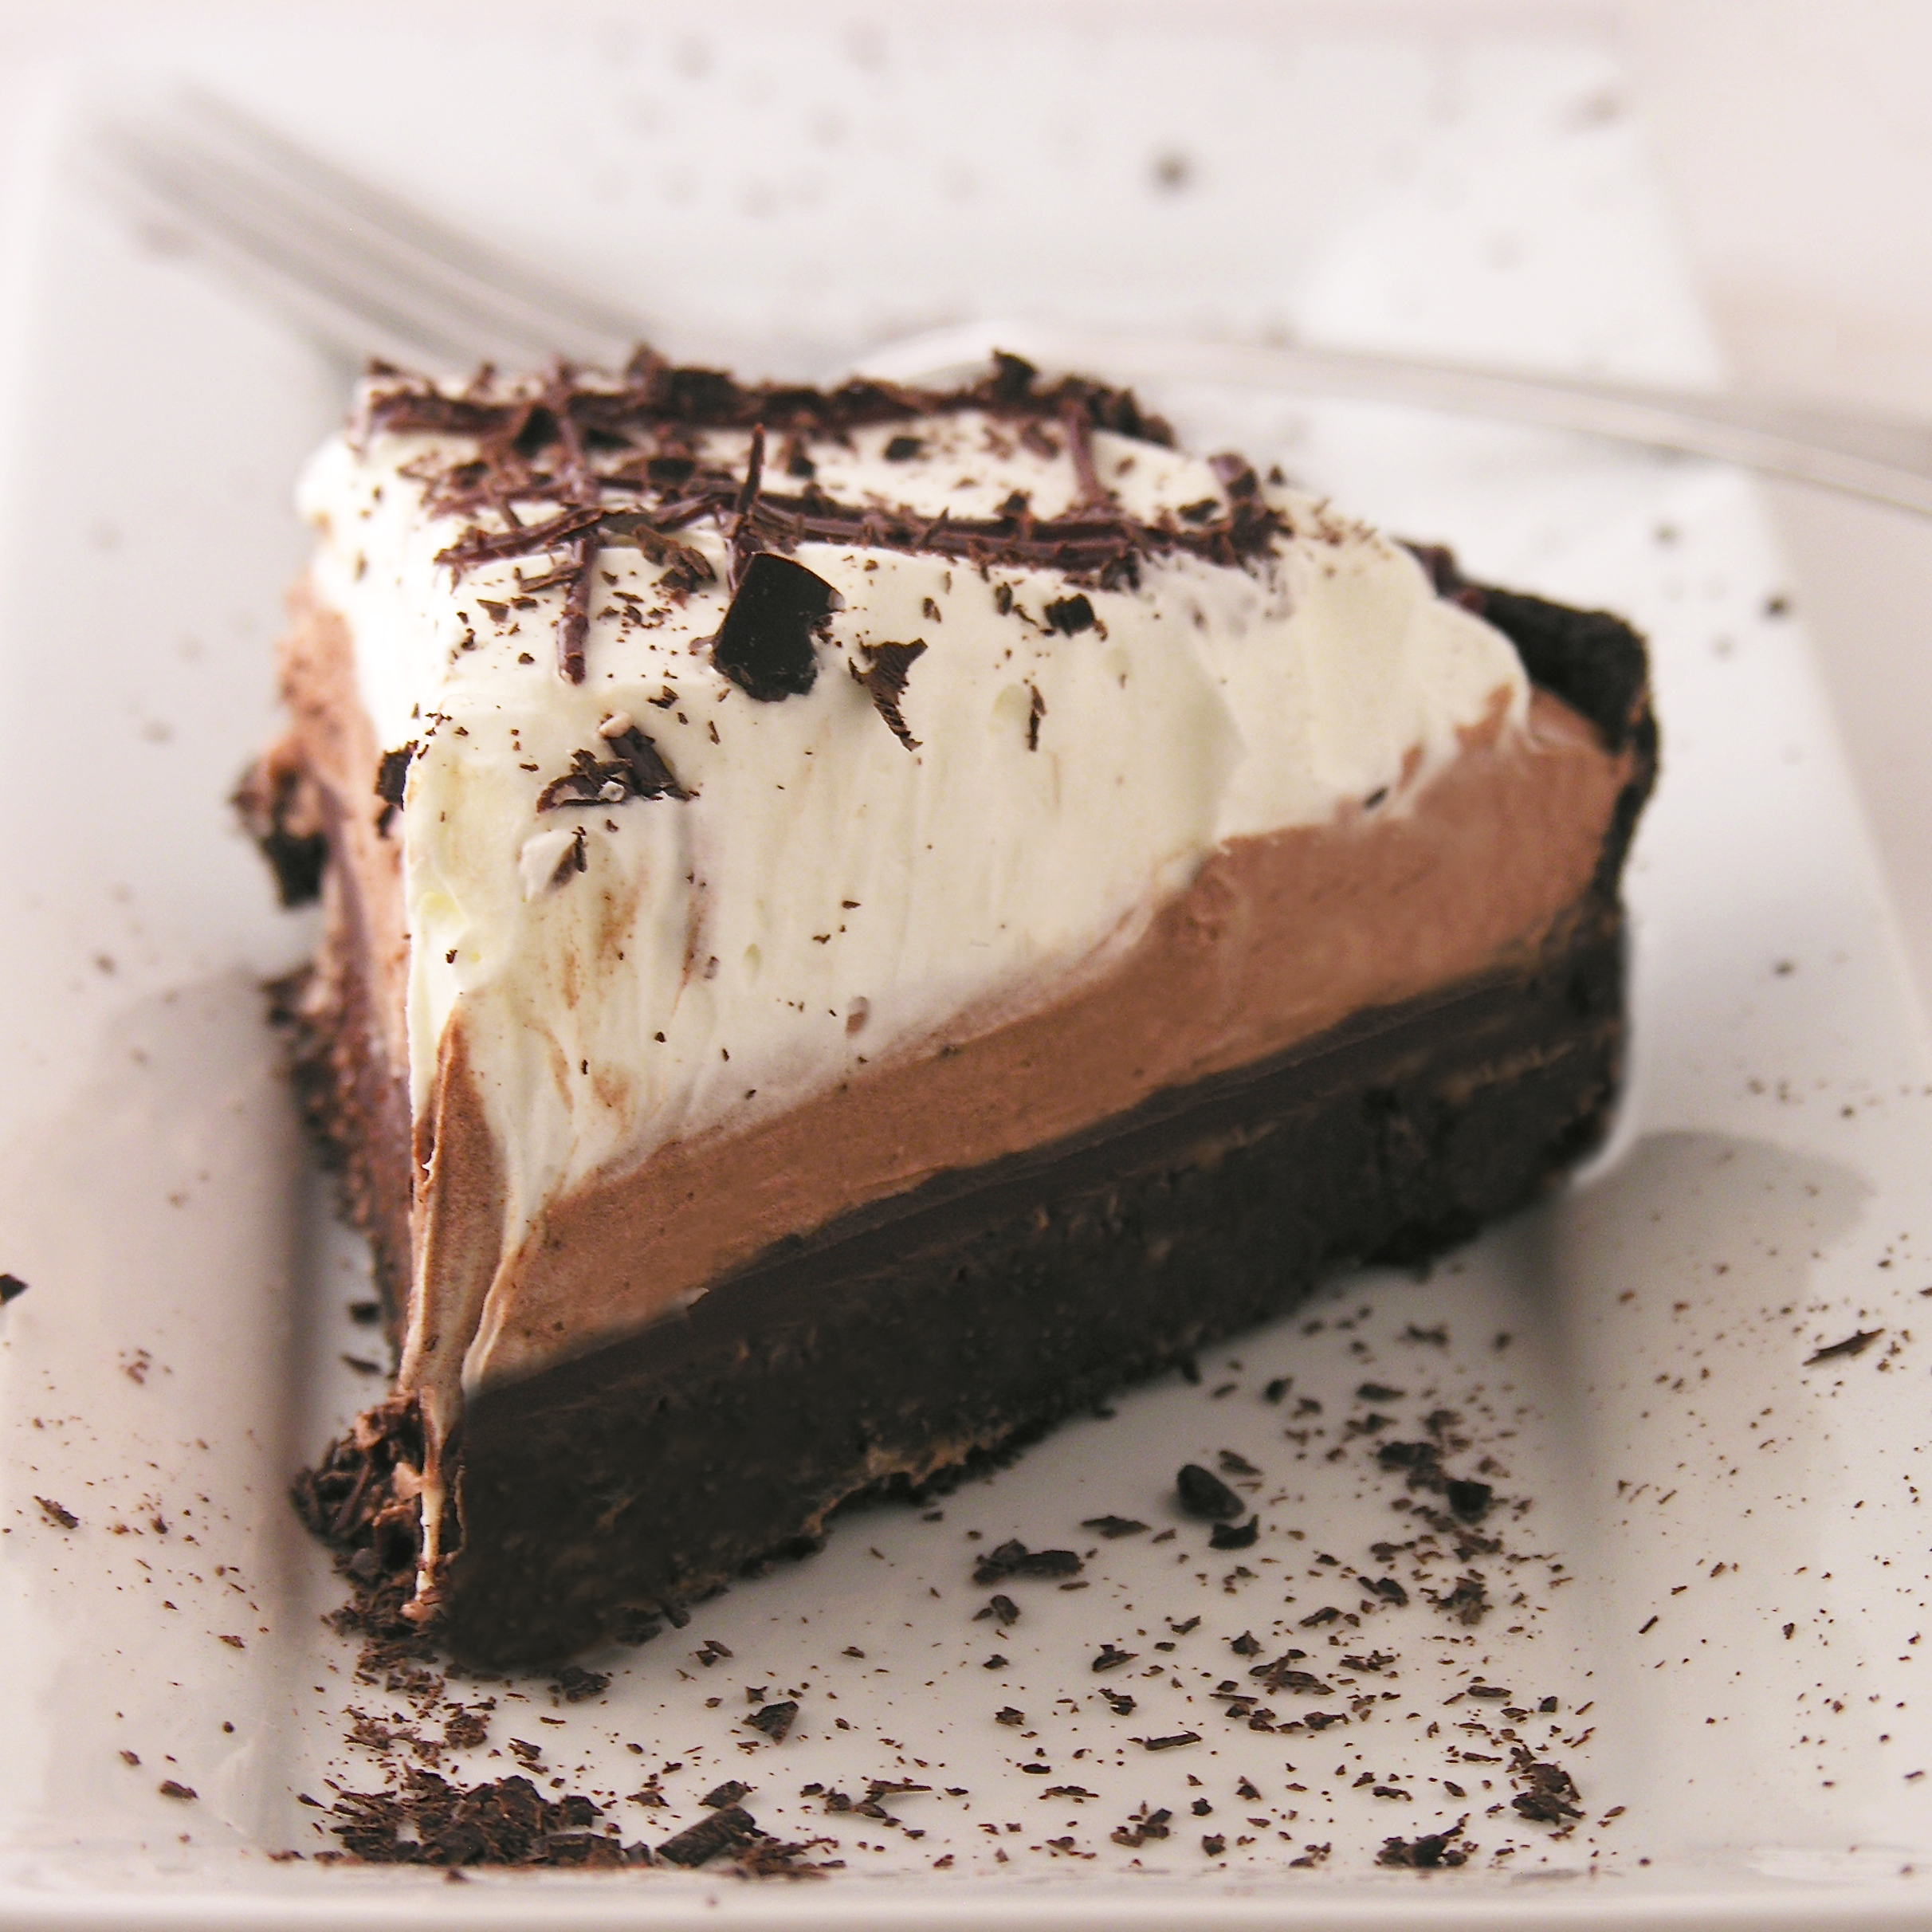
A layer of dense cake, topped with fudge, chocolate mousse and whipped cream. Yum.

Life is mud right now. At least if you live in the midwest and regularly walk a dog. My pup’s little white paws and belly are just caked in mud after every trip down our walking trail. There’s one kind of mud I don’t mind though- the edible kind!

Have you ever tried Mississippi Mud pie? I feel like there’s not an “official” recipe for this pie- sometimes pudding, sometimes marshmallow…I just put several things I love into an Oreo crust and called it mud. And it is delicious. I really think you’ll like it!

Mud Pie

Here’s how we did it: (printable recipe)

INGREDIENTS:

  • One pre-made Oreo crumb crust

Cake layer:

  • 1/2 bag of Nestle dark chocolate chips (this ends up being just a little less than 1 cup)
  • 2 egg yolks
  • 2 Tablespoons vanilla
  • 3 Tablespoons of heavy cream
  • 3 Tablespoons of powdered sugar

Fudge layer:

  • remaining 1/2 bag of Nestle dark chocolate chips (this ends up being just a little less than 1 cup)
  • 1/2 cup of heavy cream

Chocolate Mousse Layer:

  • 1 Packet of Dream Whip
  • 1/3 cup milk
  • 1/4 cup cocoa
  • 1/2 cup powdered sugar

White whipped topping:

  • 1 packet of Dream Whip
  • 1/2 cup milk

DIRECTIONS:

Cake Layer:

  • Unwrap Oreo crust and preheat oven to 350F degrees
  • Melt chocolate chips in the microwave in 30 second increments, stirring in between until smooth.
  • In a separate bowl combine eggs, cream, vanilla and powdered sugar.
  • Add cream mixture to chocolate and blend well.  Pour into crust and bake for 20 – 25 minutes until center is set. Cool completely.

Fudge Layer:

  • Melt remaining chocolate chips and cream together in microwave in 30 second increments, stirring between until melted and smooth.
  • Pour all but about 1/8 cup over cooled cake and allow this layer to firm up (I placed it in the refrigerator while I made the remaining 2 layers).
  • Pour remaining 1/8 cup into a small zip-top bag to use later for drizzle.

Chocolate Mousse Layer:

  • Add all ingredients to mixing bowl and beat on high for 3-4 minutes until light and fluffy.
  • Spoon on top of fudge layer and spread to edges.

Whipped topping:

  • Add all ingredients to mixing bowl and beat on high for 3-4 minutes until light and fluffy.
  • Spoon on top and spread to edges.
  • Take your small bag with 1/8 cup chocolate fudge filling (The one you set aside earlier), clip corner of bag and drizzle over the top. (I added a little shaved chocolate too)
  • Enjoy!

Mud Pie!

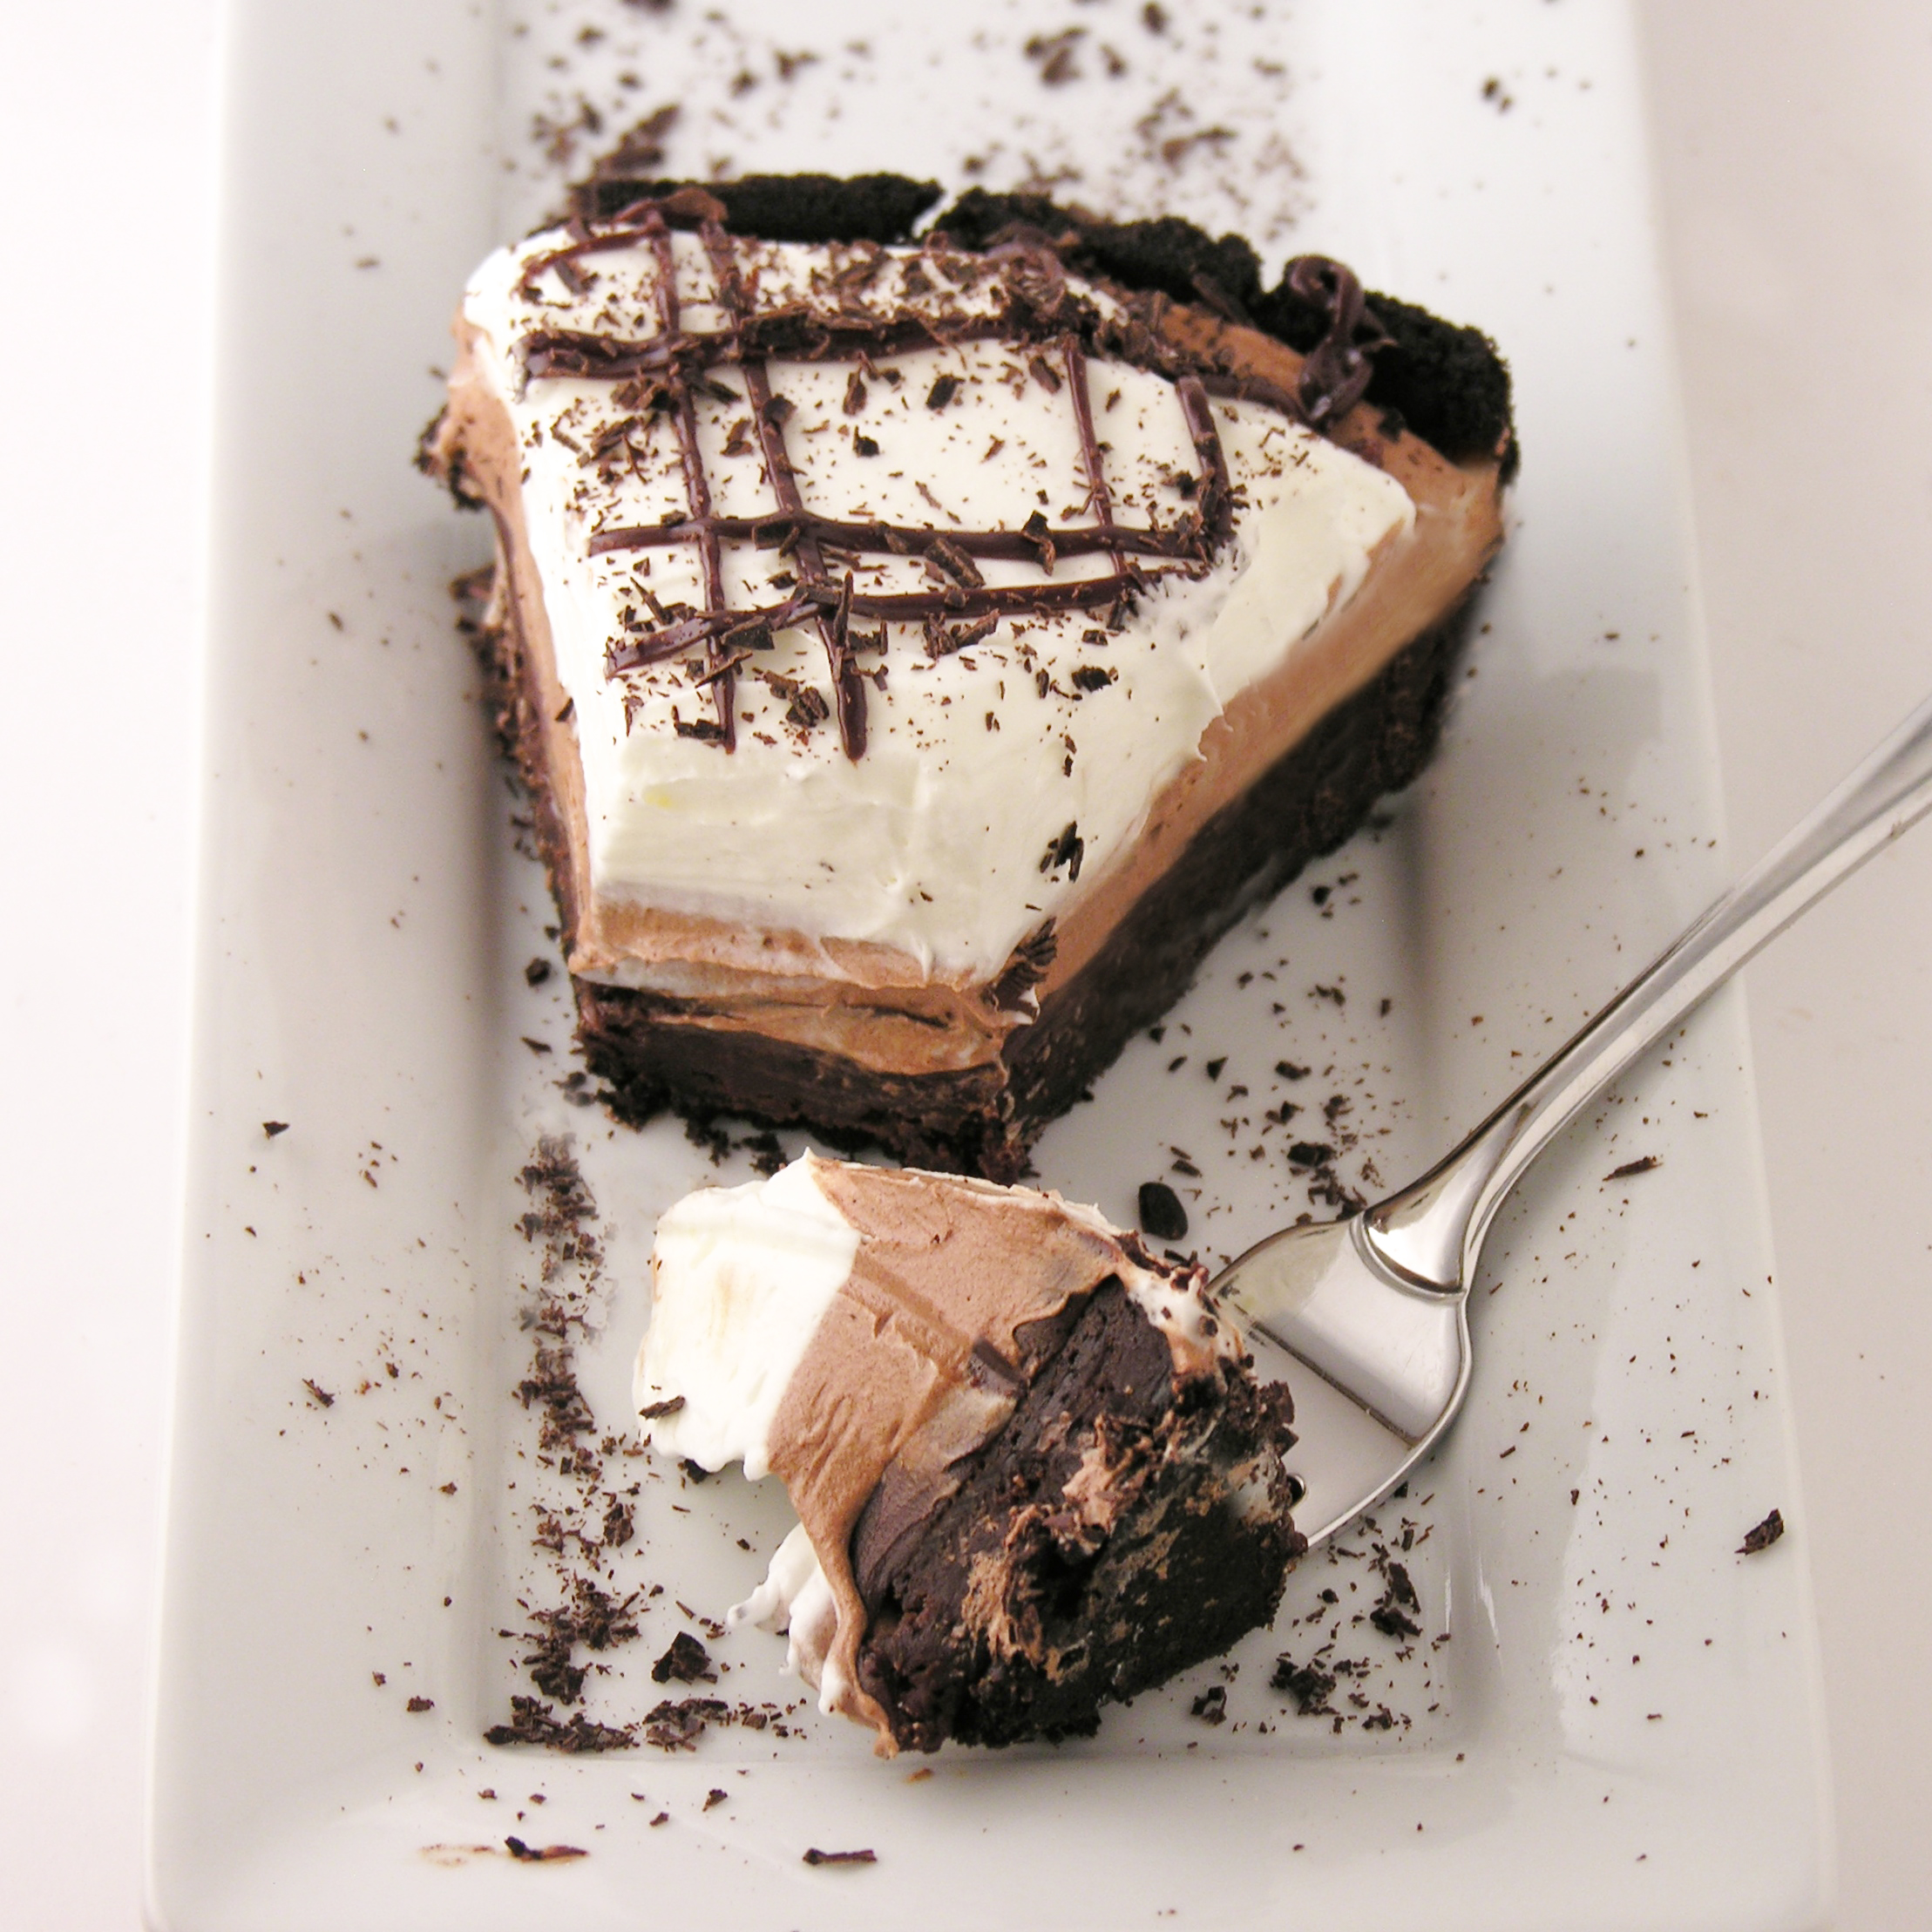
My thoughts: This is really as good as it looks…dense fudge bottom topped with the creamiest chocolate toppings. I usually eat that one bite I take off for a picture and give every bit of the rest away. But I ate the whole piece. Bad day for the diet, but a wonderful day to really savor this rich chocolate dessert. This is on my list of “must-make-again” recipes! I hope you get a chance to try it and enjoy it as much as I did!!!! Enjoy! ~r

Mud Pie!!!

Is chocolate the only way to do dessert in your house? Here are some other incredible chocolate treats from Easybaked~ just click on the photo to see the recipe!

Chocolate Mousse CakeTriple Chocolate Cheesecake 2Brownie Oreo Cookie CupGerman Chocolate Pie

Advertisement

Sunny Side Up Egg Cookies!!!

Posted on

Fried Egg Cookies

Whoever said you can’t have cookies for breakfast never tried these cookies!

A perfect April Fool’s treat!

Tomorrow is April Fool’s Day, and we all know that if you don’t catch people early, they will remember what day it is and call your bluff! That’s why these little “breakfast” cookies are the perfect trick. I served them with bacon (salty and sweet…) and toasted pound cake. They are easy to put together and they are the cutest little things in Easter baskets too!

Egg cookies for EasterTwo holidays covered by one recipe? Perfect.

These are perfectly tasty too~ and so easy to create for yourself! Here’s how we did them (printable recipe)

INGREDIENTS: (makes 24-36 cookies, depending on the size of your cookie cutter)

  • 2 sticks (1 cup) unsalted butter (softened)
  • 1 1/2 cups of granulated sugar
  • 2 eggs
  • 1 teaspoon of vanilla
  • 1 teaspoon of butter flavoring
  • 3 cups of flour
  • 1 teaspoon of baking powder
  • 1/2 teaspoon of salt
  • 3 bags of Wiltons candy melts in white
  • 1 bag of Wilton’s candy melts in yellow
  • 24-36 Nilla Wafers

DIRECTIONS:

  • Preheat oven to 350F degrees.
  • In a large mixing bowl, cream together butter and sugar until smooth.
  • Add eggs, vanilla and butter flavoring and mix well.
  • Add all dry ingredients and mix until able to knead into a firm ball of dough (add additional flour if necessary).
  • Roll out on a floured counter with a flour coated rolling pin to desired thickness.
  • Cut using an egg shaped cookie cutter.
  • Place cookies on ungreased cookie sheets and bake at 350F degrees for 8 to 10 minutes.
  • Slide baked cookies onto parchment paper to cool completely.
  • Melt 1/2 a bag of yellow candy melts in a small bowl in the microwave in 30 second increments, stirring in between, until smooth.
  • Gently dip Nilla wafers into yellow candy melts, covering completely and removing with a fork by tapping on the edge of the bowl and sliding bottom along edge. Place on parchment paper to harden completely. (I placed these in the fridge to harden more quickly so they would be ready to place on the egg “whites”)
  • Melt white candy melts in a larger bowl, using the same technique as melting the yellow ones.
  • Gently dip each cooled egg cookie into the white candy melts, using the same technique as with the Nilla Wafers. 

Fried egg cookieFried Egg Cookie

  • Place on parchment paper to harden, but before white egg hardens completely, place a yellow Nilla Wafer on top as a “yolk”.

Fried eggFried Egg cookies

  • Allow cookie to harden completely and serve up with bacon and toasted pound cake…and maybe coffee?
  • These can be placed into treat bags and put into Easter baskets too! Fun!!!

Fried egg cookie for Easter

My thoughts…oh goodness, I’ve had fun with these. They aren’t hard to make, they are very realistic, and they make everyone laugh! I think they are cute in little treat bags too. Have fun- April Fool’s!!! ~r

Fried egg cookies!We have lots of fun Easter treats here on Easybaked! Check them out by clicking on a photo to see the recipe!

Jelly Bean Cookies!!!!Cadbury Egg Cookie Cups!!!!Easter Cheesecake CupsEasy Easter cut out cookies

Flower Pot Cupcakes

Posted on


Flower Pot Cupcakes!!!


These cheery garden cupcakes have delicious raspberry cream filling

and fun flowers made of M& Ms!!!

HAPPY MOTHER’S DAY!!!!  This bit of cheer goes out especially to my mom this week.  I’m so far from home this year, that we will have to celebrate from a distance.

Aren’t these the cutest cupcakes ever?  I cannot take credit for the M&M flower idea, it was an idea I originally saw on a cute blog called Sara’s Shoebox.  She was copying the idea from a cookbook called “What’s New Cupcake“.  I do not own this cook book, but it is a sequel to one of my favorites, “Hello, Cupcake!”, by the same author.  In any case, Sara made hers with mini Oreos and I simply could not get mine to work with those..?  SO, I had seen marshmallows in pink lemonade flavor (who can walk by THAT without picking up a bag?) and I decided to use them instead.  They were a tiny bit too small, so I am going to recommend that you use full-size marshmallows for these.  I had to fiddle around with them awhile to get them to all stick.  I’m positive they will be easier on a full-size marshmallow!!

The cupcakes are an original though- I used a pink velvet cake mix, but you can use any flavor you like!  I filled them with a yummy raspberry cream and topped them with scoops of butter cream and either coconut or Oreos (um…I had a few of those left over from the flower attempt!)  Are you ready for a recipe for these???  Here you go: (printable version)

INGREDIENTS:

  • One boxed cake mix (in any flavor, with oil, water and eggs to make according to box)
  • One packet of Dream Whip
  • 1 cup of heavy whipping cream
  • 1/4 cup of berry jelly or jam
  • 2 sticks of salted butter (at room temp)
  • 2 sticks of unsalted butter (at room temp)
  • 3 cups of powdered sugar
  • 2 teaspoons of vanilla
  • 2 cups of shredded coconut (died green with food coloring) -OR- 2 cups of crushed Oreo Cookies
  • 24 pretzel sticks
  • Pastel M&Ms
  • 12 marshmallows
  • 1/2 cup of white Wilton’s candy melts

DIRECTIONS:

Flowers: I recommend making these ahead and storing them covered until you make your cupcakes.  They aren’t hard to make, but a little time consuming.

  • Take 12 marshmallows and cut them in half with clean kitchen scissors. Lay them on the counter with the cut side up to keep them from sticking to things.
  • Take a pretzel stick and wiggle it up into the side of each marshmallow.  
  • Melt candy melts in the microwave in 30 second increments, stirring between until completely melted and smooth.
  • The technique that worked best for me here was to lay my M&Ms out in a flower pattern (minus the center) on parchment paper, cover the sticky side of the marshmallow with candy melts and lay it (candy melt side down) on the flower until it dries.  Then I used a little of the candy melts to stick my center on.  Here’s some photos.

Flower Pot Cupcakes Flower Pot Cupcakes Flower Pot CupcakesFlower Pot Cupcakes

Just let those cute little flowers dry, and you are all set to make your cupcakes!

Cupcakes:

  • Make cake mix according to box and divide batter among 24 cupcake liners in muffin tins.
  • Bake according to box, remove from oven and cool completely.
  • Make filling by putting Dream whip powder and whipping cream in a bowl.  Mix on high until stiff peaks form.
  • Add jam or jelly and beat until well combined.  Place filling in a large zip top bag and keep refrigerated until use.
  • Core cooled cupcakes with a small knife or a cupcake corer.  I HIGHLY recommend the corer- it is super cheap and will save you time!
  • Cut a corner off the filling bag and squeeze filling into each cupcake.  
  • Place top of “core” that was removed back on top of cupcake.

Flower Pot Cupcakes Flower Pot Cupcakes Flower Pot Cupcakes

  • Make buttercream frosting by beating butters, powdered sugar and vanilla together in a large bowl on high until it is light and fluffy and smooth.
  • Use a scoop to place a mound of frosting on each cupcake.
  • Turn cupcake upside down in either coconut or crushed Oreo to coat the frosting.
  • Now pop a cute flower in, and you have an adorable treat for all sorts of occasions!!


Flower Pot Cupcakes!!!
My thoughts:  These brought smiles to so many faces!  I often share my blog creations with various families and organizations here on the Navajo Nation.  These went to the Easter party at the Senior Citizen Center here.  I got many hugs and thank yous (Ahéhee’)
 from the recipients.  I also got to watch almost 100 seniors literally running to a huge Easter egg hunt!  So fun!!!

Happy Easter!!On a recipe note:  These are little time consuming, but so worth the effort!  I made my flowers ahead and I was glad I did.  I really hope you enjoy these!

And to the best mom ever: a bouquet of M&M flowers!  I love you!!!!  ~r

M&M flower bouquet!!!
Other recipe ideas for Mother’s day:

Creamy cheesecake with sour cream toppingEspresso Cookies!!!Strawberry Lemonade Cupcakes!!!! Brownie Oreo Cookie Cup

Easter Egg Cups!

Posted on

 Cadbury Egg Cookie Cups!!These rich chocolate cookie cups are dipped in chocolate and filled with a rich cream “egg”.  A perfect Easter treat!!!

Cadbury Egg Cookie Cups!!!!

Do you love Cadbury Eggs?  I’m addicted.  That’s why I decided that there simply must be a chocolate cookie cup filled with Cadbury-like cream.  I used my favorite recipe for chocolate cut-out cookies and they baked just beautifully into firm little cups.  I dipped the tops in melted chocolate and piped yummy cream filling inside.  Fun and delicious!

Cadbury Egg Cookie Cups!!!!

Here’s the recipe: (printable recipe)

INGREDIENTS:

Cookie Cup:

  • 2 sticks (1 cup) butter, softened
  • 1 1/2 cups sugar
  • 2 eggs
  • 1 teaspoon vanilla extract
  • 2/3 cup unsweetened cocoa powder
  • 3 cups flour
  • 1/2 teaspoon salt
  • 1/2 teaspoon baking powder
  • 1 bag of Wilton’s dark chocolate candy melts.

Filling:

  • 3/4 cup light Karo syrup
  • 12 tablespoons of butter (softened)
  • 2 tablespoons vanilla
  • 4 cups powdered sugar
  • 1 to 2 tablespoons of water (for consistency)

DIRECTIONS:

  • Preheat oven to 350F degrees.
  • Add butter, sugar, eggs, vanilla and cocoa together in  large mixing bowl.
  • Blend on medium speed with a mixer until smooth.
  • Gradually add dry ingredients and mix until smooth (use clean hands at the end, to knead into a soft ball of dough)
  • Divide dough into 24 balls of equal size, and place each one in a muffin cup.
  • Press an indentation into each ball using a tart shaping tool (or the end of a wooden spoon)
  • Bake at 350F degrees for 8-10 minutes.  Press Tart shaping tool into center again, to reshape cups.
  • Allow the cups to cool for about 5 minutes in pan, then run a small paring knife around edge to pop cup out of pan.
  • Cool completely on counter.
  • Melt Wilton’s candy melts in microwave in 30 second increments, stirring between until completely melted and smooth.  Dip tops of cups into melted chocolate and allow them to harden completely.

Making cookie cupsDipping tops of cookie cups in chocolate

  • Make filling by adding all of the filling ingredients together except for the water and sugar.
  • Beat these on high until smooth and creamy.
  • Add sugar and beat on high until creamy
  • Add water until it is a nice spreadable, but not runny, consistency.
  • Beat until very smooth.
  • Take about 1/4 out and color with yellow food color gel.
  • Pipe white filling into cups 1st and then add a fun yellow “yolk” on top.
  • Enjoy!!

Cadbury Egg Cookie Cups!!!!My thoughts:  These are so0000  yummy.  If you want to save time, skip the chocolate dip on the edges.  This cookie recipe is just so tasty- and so versatile.  I’ve used it for so many things now.  Your family will gobble these up (once you convince the kids they aren’t really eggs!)  I hope you enjoy them! ~r

Other fun spring recipe ideas:

Strawberry Cookies with Sweet Tart FrostingChocolate cut-out cookiesStrawberry Lemonade Birthday CakeBubble Gum Cupcakes!


Jelly Bean Cookies

Posted on

Jelly Bean Cookies!!!!These cookies deliver a big Easter surprise~ jelly beans in the middle!  Pretty on the outside and sweet surprises on the inside?  These are a must-try Easter treat!

These really are just the cutest thing…but fair warning: I brought these to church and overheard the following conversation between an 8 year old and a 6 year old:

“There’s jelly beans in the middle!”
“And the cookie tastes like Play-Doh!!”
“I want another one!”

So…maybe this is a bigger hit with the under 12 set…?

I thought they tasted ok.  The cookies are very dense and full of white chocolate, but colored like Play-Doh…I can see the connection.  I really don’t like jelly beans either…so I wasn’t a very objective taste-tester.  But they are super cute…

Jelly Bean5In any case, if you are up for an adventure and you have lots of kids to entertain with something new….here’s the recipe: (printable version)

INGREDIENTS: (makes about 36 cookies)

  • One bag of Nestle white chocolate morsels.
  • One can (14oz.) of sweetened condensed milk
  • 2 teaspoons of vanilla
  • 2 cups of flour
  • Food coloring gels
  • One bag of large jelly beans (I used Brach’s Classic Jelly Bird Eggs)
  • One bag of Wilton’s white chocolate candy melts
  • Sprinkles

DIRECTIONS:

  • Carefully melt Nestle morsels in the microwave in 30 second increments, stirring between until completely melted and smooth.
  • Add sweetened condensed milk and vanilla, mixing until well combined.
  • Add flour and mix, eventually using clean hands to knead dough into a ball.
  • Divide dough into parts and knead in food color gels until you get the colors you want.
  • *Note* This dough is very oily, because of all that white chocolate.  This is ok.  Just keep a paper towel handy to wipe your hands on during this process.
  • Preheat oven to 350F degrees.
  • Take about a tablespoon of dough and roll it into a ball.  Then press it flat, lay two jelly beans on it and pull dough up around the jelly beans to cover them.  Pinch cracks and seams closed and then roll into a ball again to make it smooth.

Making jelly bean cookiesMaking Jelly Bean cookiesMaking Jelly Bean CookiesMaking Jelly Bean Cookies

  • Place on a cookie sheet that has been covered in parchment paper.  These don’t spread, so you can place cookies very close together.
  • Bake at 350F degrees for 10-12 minutes.
  • Remove from oven and slide parchment paper (cookies and all!) off the sheet and onto a counter to cool.  There will be oil from the white chocolate on the paper- this is ok.
  • After cookies have cooled completely, melt white candy melts in the microwave in 30 second increments, stirring between until completely melted and smooth.
  • Lay a fresh sheet of parchment paper on the counter, and get a clean paper towel.
  • If needed, dab the bottom of each cookie on the paper towel to remove any excess oils. Then, dip the top of the cookie into the candy melts, set on the clean parchment paper and sprinkle with decorations before the chocolate hardens.
  • Enjoy!!!

Jelly Bean Cookies!!!!

My thoughts:  I’m not sure what to say about these…I asked for honest opinions from the adults that tried them and they all said they loved them.  Then I caught one person chucking his out the back door….so much for honesty…!  If you like jelly beans (and apparently Play-Doh…) you should give these a try.  They are a little time consuming, but not difficult at all.  Who knows?  It might be a new family Easter favorite?  Or maybe just a good laugh…?  Enjoy!!!! ~r

Jelly Bean Cookies!!!

Other Easter treats I would wholeheartedly recommend:

Coconut Cupcakes!!Easy Easter cut out cookiesChocolate Easter Eggs with Peanut Butter FillingRaspberry Lemonade Truffles

Rainbow Oreo Pops~ and a celebration of all things OREO!!!

Posted on

Rainbow Oreo Pops!!!!You’ll feel like you’ve struck gold when you bite into one of these fun rainbow Oreos.  A perfect way to celebrate St. Patrick’s day and SO easy to make!

Prepare yourself.

National Oreo Day is just two days away.  This year, the momentous occasion falls on Thursday, March 6th.  There isn’t a store-bought cookie that I like better than an Oreo. All the fun flavors (cookie dough, peanut butter, birthday cake, mint, marshmallow…) are great- but I like mine just plain double stuf (I just realized they left an “f” off of stuf last week!)  I’m not alone in my passion for this little cookie- over 362 billion cookies have been sold since it was first introduce in 1912!

This week I created these little rainbow Oreo pops in honor of the day (and to give you a head start on your St. Patrick’s Day ideas!)

Rainbow Oreo Pops!!!!They are incredibly easy to make.  Once your Oreo has been dipped, those rainbow stripes are just painted on with gel food coloring.

Painting Rainbows on Oreos!!!

Here’s the recipe: (for a printable recipe click here, for a picture tutorial click here)

INGREDIENTS:

  • One package of Double Stuf Oreos
  • 2 (12oz.) bags of Wilton White Candy Melts
  • 24 Lollipop sticks
  • Food color gels in purple, blue, green, yellow, orange and red -I used these

DIRECTIONS:

  • Carefully twist apart all of the Oreo cookies
  • Using one of the pop sticks, make an indentation in the white filling of each cookie.
  • Melt the Candy Melts in the microwave in 30 second increments, stirring until completely melted and smooth.
  • Dip the end of one stick into the melted white chocolate, drizzle a little in the center of the white cookie filling and then gently press it into the indentation made.
  • Place the top of the cookie back on and allow white chocolate to harden (10 minutes or so), cementing the cookie back together with a stick inside.
  • Holding the stick, lower the entire Oreo into the bowl of melted white chocolate, spooning it over the top and sides to cover it completely.
  • Allow the excess white chocolate to drain off and gently place covered Oreo on a piece of parchment paper to harden.
  • Allow white chocolate to harden and cool completely.
  • Using a small paint brush (you can get one specifically made for food that won’t shed bristles- like a Wilton 7-Piece Decorating Brush Set), start in the middle of the cookie using the yellow, and paint a stripe across. Paint a yellow stripe on all cookies.
  • Wash and dry your brush and paint the other colors, working from lightest colors to darkest.
  • Allow the “paint” to dry for several hours.
  • Eat and enjoy!!!

Aren’t they fun?????

Rainbow Oreo Pops!!!

My thoughts: You can see that I sprinkled a little bit of edible glitter on top when I was done.  You have to do this before the paint completely dries.  It makes them very fun and sparkly- more fun and sparkly than you can see in the pictures!  Just an option, if you want to add it.  You can also see that I didn’t agonize over painting perfect lines and not going over the edges.  I really liked the messy paintbrush look of these. Put on your artist hat and have some fun!!!

Rainbow Oreo Pops~ YUM!!!!!

Here’s a little collection of all things Oreo on Easybaked…as you can see, we love Oreos around here!  Just click on a photo to see the recipe!

Oreo Pops…so many possibilities!

Original Oreo pops!!!!!Patriotic Oreo Pops- yum!!!

Mummy Oreo Pops!Snowman Oreo PopsLadybug Oreo Pops!Reindeer Oreo Pops!!!

Nothing makes a crust like a crushed up Oreo cookie!!!

Creamy Coconut CheesecakeFrosty Almond Joy Cups!

Frosty Candy Corn Dessert!Ice Cream Cake

And my favorite Oreo dessert?

Brownie Oreo Cookie Cup2

These yummy Brownie Oreo Cookie Cups!!!!!!

Happy Oreo day to you!!!  I hope you have time to stop and enjoy some this week!!!! ~r

%d bloggers like this: