RSS Feed

Tag Archives: chocolate dessert

Chocolate Cake Roll with a Cinnamon Caramel Filling

Posted on

Cake Roll1I love my pumpkin roll recipe. It’s one of my favorite parts of baking in the Fall. I’ve been highly unsuccessful, however, in finding a chocolate cake roll recipe that I love- either it tastes great but cracks like crazy, or it rolls well buts tastes like cardboard. One of my goals over the past 2 years of blog-absence was to create a chocolate cake roll recipe that works AND tastes great.

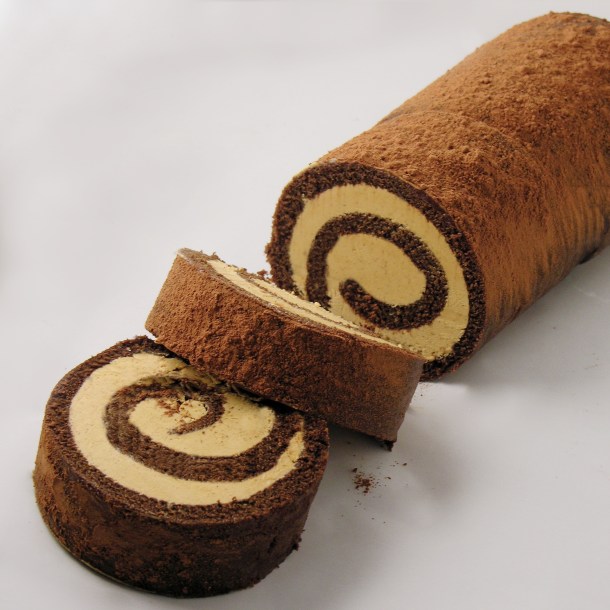
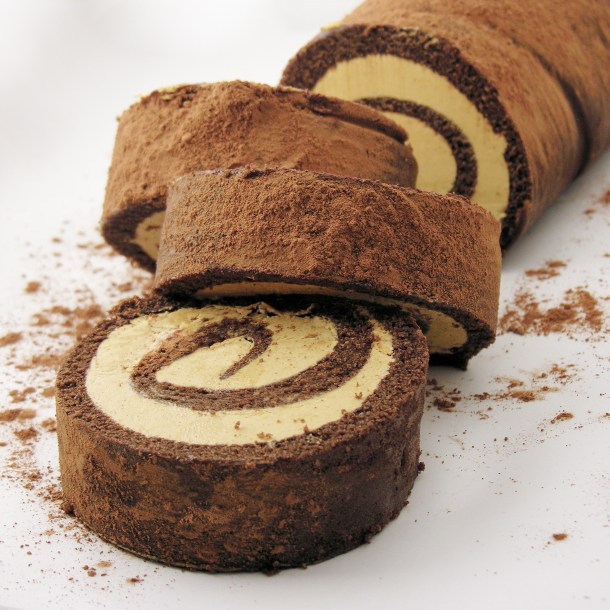
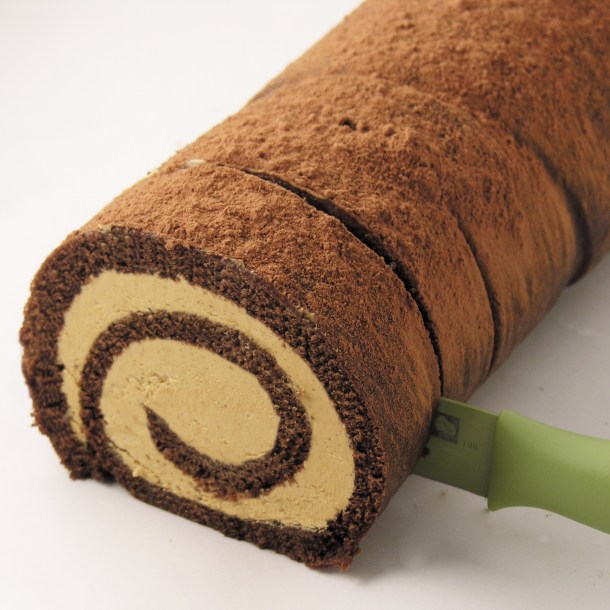
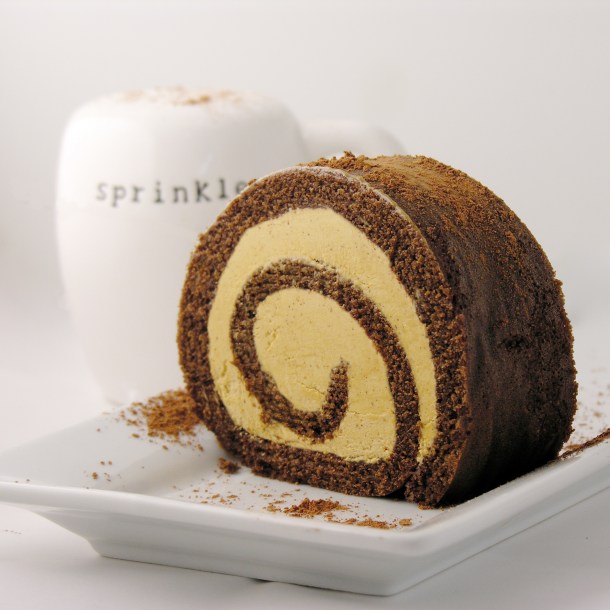
This is it! It rolls beautifully (I had only one small crack) and tastes like a rich, but not-too-sweet, fudge brownie. Perfect!

Of course you can fill this roll with a multitude of things, but I chose a creamy Dulce de Leche caramel filling with cinnamon.

Cake Roll3

Ready to try this? Here’s the recipe: (printable version)

Ingredients: 

Cake:

  • 2/3 cup flour
  • 1/3 cup unsweetened cocoa powder
  • 1 ½ teaspoon baking powder
  • 1 ½ teaspoon salt
  • 5 eggs
  • 2/3 cup sugar
  • 3 tablespoons vegetable oil
  • 2 teaspoons vanilla

Filling:

  • 3 sticks (1.5 cups) of salted butter, softened to room temperature
  • One can (13.4 oz) Dulce de Leche (I used Nestle’s La Lechera)
  • 1 1/2 teaspoons of cinnamon

Topping:

  • 1 Tablespoon of cinnamon
  • 2 Tablespoons of cocoa powder (mix them together in a small dish)

Directions:

Cake:

  • Heat oven to 350 degrees F and lightly spray a 17 x 12 inch jelly roll pan with non-stick cooking spray. Line the pan with parchment paper with about an inch of extra paper on the 17-inch sides (so you can lift the cake out of the pan easily once it bakes). Note: make sure your paper is nice and flat- the non-stick spray will help hold it down. Mine folded a little and you can see a few bumps on my roll where the batter baked over the fold.
  • Add flour, cocoa powder, baking powder, and salt in a medium bowl stirring gently until just combined.
  • In a large bowl, beat eggs and granulated sugar for about 1 minute until thick. Add in the oil and vanilla extract, and beat together until combined.
  • Add dry ingredients to wet, and mix gently until just combined. The batter will be like a runny brownie batter.
  • Spread the batter evenly into prepared pan, and bake for 12-16 minutes, or until top of cake springs back when touched.
  • Carefully lift the parchment paper and cake out onto a flat (and heat-safe) surface. Then slowly, using your hands (careful, it will be hot!), roll the cake  – rolling from one short (12-inch) end to the other— until it is completely rolled up.
  • Wrap tightly in a towel and place in refrigerator until completely cooled (an hour or so).

CakeRoll6Cake Roll5

  • While the cake is cooling, make the caramel and cinnamon filling (see below).
  • Once the cake has cooled completely, place it on a flat surface, remove the towel, and unroll it carefully until it is flat again (it’s ok if the ends curl up a bit).

Filling: (make while cake cools)

  • Place butter in mixing bowl and beat on high until whipped and smooth.
  • Add Dulce de Leche and cinnamon to butter and beat on high for about 2 minutes until smooth and creamy.

Assembly: 

  • Spread the filling evenly over unrolled cake, leaving a small border on all sides (the filling will spread out as you roll it back up).  Then carefully re-roll the cake, gently peeling away the parchment paper as you roll until you can completely remove and discard it. Tightly wrap the chocolate roll in plastic wrap or Press-n-Seal and refrigerate at least one hour until completely set.

Cake Roll8Cake Roll7

  • Lightly dust with cocoa powder and cinnamon mixture (you could also add a chocolate glaze to the top if you have cracks or you want the dessert to be sweeter).
  • To serve, remove and unwrap the chocolate roll, transfer it to your serving dish and slice.
  • Keep leftovers tightly wrapped and refrigerated for up to 4 days.

Cake Roll2

My thoughts: Yum! I loved this cake roll- I almost feel like it should be called a brownie roll because it is so dense and rich. This is not a super sweet dessert- my husband said it would be better with a sweet chocolate glaze on top- but I loved the rich cocoa/cinnamon flavor. If you like a not-so-sweet but rich and cocoa-y dessert, this one’s for you! Enjoy!! ~r

Cake Roll4

Advertisement

Peanut Butter Bomb Brownies

Posted on

Peanut Butter Bomb

What could be more yummy than a chocolate brownie covered in creamy peanut butter ganache and topped with a chocolate covered peanut butter mousse bomb?  If you are addicted to chocolate and peanut butter, this dessert is for you!

Peanut Butter Bomb Brownies

Chocolate and peanut butter are a timeless combination, and these brownies combine those flavors in such a fun way!

The homemade brownies are dense, but not too rich. They compliment that sweet creamy peanut butter mousse perfectly and are such a pretty dessert!

You will need a silicone bomb mold for this, and a brush for coating it in chocolate. I found both of these at a local cake-decorating shop and they were really inexpensive.

Want to see how we did these? Here’s the recipe: (printable version)

INGREDIENTS: (makes 18-24 brownie cups)

Brownie:

  • Two sticks (1 cup) butter
  • 2 cup sugar
  • 3 eggs
  • 2 teaspoons vanilla
  • 1/2 cup cocoa
  • 1/2 teaspoon salt
  • 2 cups flour
  • 1 cup milk

Ganache: 

  • 1 cup of peanut butter baking chips
  • 1/2 cup of heavy cream

Bombs:

  • 1 to 2 cups of dark chocolate candy melts
  • 1 c. creamy peanut butter
  • 8 oz. Philadelphia Cream Cheese (softened to room temperature)
  • 1/2 c. sugar
  • 8 oz. Cool Whip topping

DIRECTIONS:

Bomb: 

  • Make these first, so they are ready to use once you need them.
  • Melt chocolate candy melts in 30 second increments in the microwave, stirring between until melted and smooth.
  • Use a brush (clean, food brush) to brush the inside of each cavity of the bomb mold with melted chocolate.
  • Freeze for about 3 minutes and repeat, to give a nice thick layer of chocolate. Re-freeze for another 4-5 minutes.


PBbomb1

  • Make filling by beating together peanut butter, cream cheese and sugar.
  • Gently fold in the container of whipped topping.
  • Place filling in a large zip-top bag and keep in the fridge until use.
  • Cut a corner off the bag, and squeeze filling into each chocolate coated bomb mold. Smooth tops with a spatula.

PB Bomb4    PB Bomb3

  • Refreeze for about 15 minutes- until filling is hardened.
  • Gently peel mold away from bomb. Place each one on a plate covered in parchment paper and freeze until use.

PB Bomb2

Brownie:

  • Preheat oven to 350.
  • Cream butter and sugar together. 
  • Beat in eggs, cocoa, vanilla and salt.
  • Add flour and milk (alternating them and mixing well in between)
  • Spoon into 18-24 cupcake liners placed in a muffin tin (only fill 1/3 to 1/2 full)
  • Bake at 350 degrees for 12-14 minutes or until a tooth pick inserted in the center comes out clean.

Ganache:

  • While brownies bake, heat peanut butter chips and heavy cream in a microwave safe bowl in 30 second increments. Stir and repeat until smooth and creamy.
  • When brownies are out of oven, carefully remove them from muffin tins and spoon warm ganache over warm brownies. Allow both to cool until ganache is firm but still a bit sticky.
  • Gently place a chocolate bomb on top of each brownie, and press gently into ganache.
  • Drizzle a bit of white chocolate on top if you desire.
  • Keep refrigerated. Leave at room temperature for a few minutes to warm before serving. Yum.

Peanut Butter Bomb Brownies3

My thoughts: Yum!!! These were a huge hit among my friends and family. They do take a little extra time to make that bomb on top– but the wow factor is worth it!  I will definitely be using these little silicone molds again- they are easy to use and I love that fun dome of chocolate! I hope you get a chance to try these!! Enjoy!!! ~r

Peanut Butter Bomb Brownies2

Other yummy peanut butter treats on Easybaked:

Peanut butter cup cheesecakePeanut Butter Cupcakes!!Peanut Butter Fudge Brownies!!!!Peanut butter Acorn Cookies!

Mud Pie!

Posted on

Mud Pie!

A layer of dense cake, topped with fudge, chocolate mousse and whipped cream. Yum.

Life is mud right now. At least if you live in the midwest and regularly walk a dog. My pup’s little white paws and belly are just caked in mud after every trip down our walking trail. There’s one kind of mud I don’t mind though- the edible kind!

Have you ever tried Mississippi Mud pie? I feel like there’s not an “official” recipe for this pie- sometimes pudding, sometimes marshmallow…I just put several things I love into an Oreo crust and called it mud. And it is delicious. I really think you’ll like it!

Mud Pie

Here’s how we did it: (printable recipe)

INGREDIENTS:

  • One pre-made Oreo crumb crust

Cake layer:

  • 1/2 bag of Nestle dark chocolate chips (this ends up being just a little less than 1 cup)
  • 2 egg yolks
  • 2 Tablespoons vanilla
  • 3 Tablespoons of heavy cream
  • 3 Tablespoons of powdered sugar

Fudge layer:

  • remaining 1/2 bag of Nestle dark chocolate chips (this ends up being just a little less than 1 cup)
  • 1/2 cup of heavy cream

Chocolate Mousse Layer:

  • 1 Packet of Dream Whip
  • 1/3 cup milk
  • 1/4 cup cocoa
  • 1/2 cup powdered sugar

White whipped topping:

  • 1 packet of Dream Whip
  • 1/2 cup milk

DIRECTIONS:

Cake Layer:

  • Unwrap Oreo crust and preheat oven to 350F degrees
  • Melt chocolate chips in the microwave in 30 second increments, stirring in between until smooth.
  • In a separate bowl combine eggs, cream, vanilla and powdered sugar.
  • Add cream mixture to chocolate and blend well.  Pour into crust and bake for 20 – 25 minutes until center is set. Cool completely.

Fudge Layer:

  • Melt remaining chocolate chips and cream together in microwave in 30 second increments, stirring between until melted and smooth.
  • Pour all but about 1/8 cup over cooled cake and allow this layer to firm up (I placed it in the refrigerator while I made the remaining 2 layers).
  • Pour remaining 1/8 cup into a small zip-top bag to use later for drizzle.

Chocolate Mousse Layer:

  • Add all ingredients to mixing bowl and beat on high for 3-4 minutes until light and fluffy.
  • Spoon on top of fudge layer and spread to edges.

Whipped topping:

  • Add all ingredients to mixing bowl and beat on high for 3-4 minutes until light and fluffy.
  • Spoon on top and spread to edges.
  • Take your small bag with 1/8 cup chocolate fudge filling (The one you set aside earlier), clip corner of bag and drizzle over the top. (I added a little shaved chocolate too)
  • Enjoy!

Mud Pie!

My thoughts: This is really as good as it looks…dense fudge bottom topped with the creamiest chocolate toppings. I usually eat that one bite I take off for a picture and give every bit of the rest away. But I ate the whole piece. Bad day for the diet, but a wonderful day to really savor this rich chocolate dessert. This is on my list of “must-make-again” recipes! I hope you get a chance to try it and enjoy it as much as I did!!!! Enjoy! ~r

Mud Pie!!!

Is chocolate the only way to do dessert in your house? Here are some other incredible chocolate treats from Easybaked~ just click on the photo to see the recipe!

Chocolate Mousse CakeTriple Chocolate Cheesecake 2Brownie Oreo Cookie CupGerman Chocolate Pie

Andes Mint Layer Cake

Posted on

Andes Mint Layer Cake!

This rich chocolate cake has a huge layer of Andes Mint whipped filling and is drizzled with fudge topping.  The perfect chocolate dessert!

Tah Dah!!!  One last melted frosting recipe…for now…This one has yummy melted chocolate frosting inside and poured all over the top.  YUM!!!!!!

I love making this cake in various forms.  It is SO quick and easy to put together and everyone loves it! This time I added Andes mint candies for a refreshing mint twist to this recipe.  I think you will love it!! Andes Mint Cake!!

Here’s the recipe:  (printable version)

INGREDIENTS:

  • 1 boxed chocolate cake mix (with oil/eggs/water to make according to directions)
  • 2 packets of Dream Whip  (found near the jello/pudding boxes at the grocery)
  • 3/4 cup milk
  • 1 teaspoon vanilla
  • 3 tablespoons cocoa powder
  • 3 tablespoons powdered sugar
  • Andes Baking Chips 10 oz
  • One container of pre-made chocolate frosting

DIRECTIONS:

  • Make cake mix according to box and bake in 2 – 8 or 9 inch round pans (I cut parchment paper to fit, spray the pan with non-stick spray, and place it in the bottom of each pan so that the cake comes out easier).
  • Cool cakes completely on a wire rack and while they are cooling make your whipped filling:
  • Put Dream Whip, milk, vanilla, cocoa powder and powdered sugar into a mixing bowl and blend together.
  • Using a mixer, beat until stiff peaks form (3-4 minutes)
  • Fold in Andes mint baking chips, saving aside a few for topping.
  • Scoop chocolate frosting into a microwave safe bowl and heat for only about 20-30 seconds in the microwave.  Heat until frosting is melted into a hot fudge consistency.
  • Use a large serrated knife to level your two cakes.
  • Place 1st cake on serving plate, leveled edge up.
  • Pour about 1/4 of melted frosting on top of cake and spread to cover (I put this layer in the fridge for about a minute just to cool the warm frosting down before adding the mousse layer)
  • Spoon all of the mousse on top of the cake and spread it ALMOST to the edges.
  • Top with second cake– put the leveled edge against the mousse…this keeps all the crumbs in the middle and leaves a nice flat surface on the top of your cake. Gently press top layer down to squeeze the mousse all the way to the edges.
  • Pour the rest of the melted frosting over the entire cake and let it drip over the edges.
  • Sprinkle the remaining Andes Mint bits on top.
  • Refrigerate until serving, this will make the middle layer firm and easy to cut.

Andes Mint Cake!!!!

My thoughts:  I love this cake.  It is a beautiful dessert that is just so quick and easy to put together!

That creamy mint filling….oh my. I hope you get a chance to try it!  Enjoy!  ~r

Andes Mint cake!!!!

Other yummy chocolate treats here on easybaked:

Brownie Oreo Cookie CupGerman Chocolate PieRich Chocolate Ganache Mini CupcakesCaramel Fudge Brownies!!

%d bloggers like this: