Tag Archives: October

A bowl of eyeball cookies!

Posted on

eyeball-cookies

These delicious little cookies are the perfect creepy treat for October!

Ah…these were fun to make and really fun to share! They definitely gave kids a pause. I heard one little girl say, “Mom- I’m a little scared of those cookies because they are looking at me!”

Love it.

Ok- so these don’t involve baking. You could certainly bake cookies and decorate them this way- but if you are like me and you needed a recipe at 10pm the night before- Nilla Wafers and Ritz crackers will do just fine (and taste GREAT!)

Here is how we put them together (and there is no printable recipe- because there isn’t really a recipe for these- just a technique!)

eyeball cookies

INGREDIENTS:

  • Nilla Wafers (and some mini-Nilla wafers, if you’ve got them!)
  • Ritz crackers
  • Wilton Candy melts in green, blue, white and black
  • Candy eyes (although these aren’t technically necessary, since you have the white and black candy melts).

DIRECTIONS:

  • Melt candy melts, one color at a time, in the microwave in 30 second increments, stirring in between until melted and smooth.
  • Spoon into a zip-top bag and cut a corner off. (Or use a squeeze bottle fitted with a decorating tip if you have one)
  • Use green to outline the edges of the Ritz crackers and then fill in. Use white to outline and fill in the tops of the Nilla wafers.

eyeball-cookieseyeball-cookies

  • Draw eyes of different sizes on the Ritz crackers, using a toothpick to make the tiny pupils in black (use candy eyes if you have them, for one size) I even added some little green blotches on these just to make them more weird.
  • Use blue and black candy melts to make eyes on the Nilla Wafers.

eyeball-cookieseyeball-cookies6

  • Let these harden and then serve them up in a fun bowl- or maybe put them in little cello bags and tie them with ribbon!
  • Enjoy!

eyeball-cookies

My thoughts: Aren’t they fun? You don’t have to be fussy about making them perfect- the crazier the better! Those Ritz crackers are especially yummy with the sweet candy on top. Yum. Enjoy these quick and easy treats!!!  ~r

Other creepy recipes for your October: click on a photo to see the recipe.

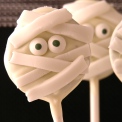
Spider EggsEdible Jello Earthworm CupcakesBroken glass Cupcakes!!!Mummy Oreo Pops!

Spider Egg Cupcakes

Posted on

Spider Eggs4

These delicious little chocolate cupcakes are topped with terrifyingly cute little spiders, webs and egg sacs. A perfect Halloween treat!

There is nothing worse than finding spiders hatching somewhere in or around your house. Spiders are bad. Baby hatching spiders? Way worse. That’s what makes these fun little cupcakes so terrifying! That little egg sac? A Lindt white chocolate truffle. The spiders? Drizzled chocolate and mini M&Ms. Easy, fun and so cute that you almost start liking spiders! Almost.

Spider Eggs2Aren’t they fun??? All by themselves, on cookies, on cupcakes… so many ways you could use these.

Here’s the recipe: (printable version)

INGREDIENTS:

  • One boxed cake mix (plus water, oil and eggs to make according to package)
  • One tub of white frosting
  • 1/4 cup of Wilton’s candy melts in dark chocolate
  • 1 cup of Wilton’s candy melts in white chocolate
  • One bag of mini M&M’s (usually found by the chocolate chips)
  • Orange food coloring
  • Purple food coloring
  • 24 Lindt white chocolate truffles

DIRECTIONS:

  • Make spiders and egg sacs 1st, to give them time to harden up.
  • Melt the Wiltons dark chocolate candy melts in the microwave in 3o second increments, stirring in between until completely melted and smooth.
  • Clip a corner off a small zip top bag, and place a small round decorating tip in the corner.
  • Spoon melted chocolate into bag, and pipe spider “legs” onto parchment paper, topping each set with a brown mini M&M. Pipe spider legs directly on each Lindt Chocolate and add the M&M on top. You’ll need 24 Lindt truffles and 24 extra spiders. I made about 40, and I was glad I did because some of their legs fell off as I pulled them off the parchment paper.
  • Allow these to harden completely (you can put this in the fridge to speed this process up if needed)

Spider eggsSpider Eggs

  • Make cake mix according to package and bake in 24 cupcake liners placed in muffin tins. Cool completely.
  • Divide the frosting into two parts. Soften it a little bit (10 seconds or so) in the microwave, and color it with purple and orange food coloring.
  • (Optional) Cut a small, (the size of the Lindt Truffle) and shallow hole into the top of each cupcake.  I did this so that the truffle would settle a little “into” the cupcake rather than just perching on top. It makes frosting these a little messy with crumbs, but I liked the way it looked a little better.
  • Dip the top of each cupcake into frosting, covering the top (and inside the little “dent” on top) completely.
  • Place a spider “egg sac” on top of each cupcake.
  • Melt Wiltons White Candy Melts in the microwave in 30 second increments, stirring in between until completely melted and smooth. 
  • Place in a zip-top bag, clip a corner and drizzle liberally over the top of each cupcake in a web-like pattern.
  • Before the Candy melts firm up, place a couple of spiders on top.
  • Allow frosting and candy melts to firm up.
  • Enjoy!

SPider Eggs3

My thoughts: These are fun, easy and just a tiny bit creepy. A perfect October treat. The spiders take a little time and patience, but they can be made ahead of time and won’t hold you up when you go to make the cupcakes. I hope you have as much fun as I did with these! Enjoy!! ~r

Spider egg5

Other creepy and fun October treats you might enjoy: (click on a photo to see the recipe)

Edible Jello Earthworm CupcakesRadioactive Cupcakes filled with SLIME!Broken glass Cupcakes!!!Halloween Bundt Cake

Jeepers Creepers Oreo Pops!

Posted on

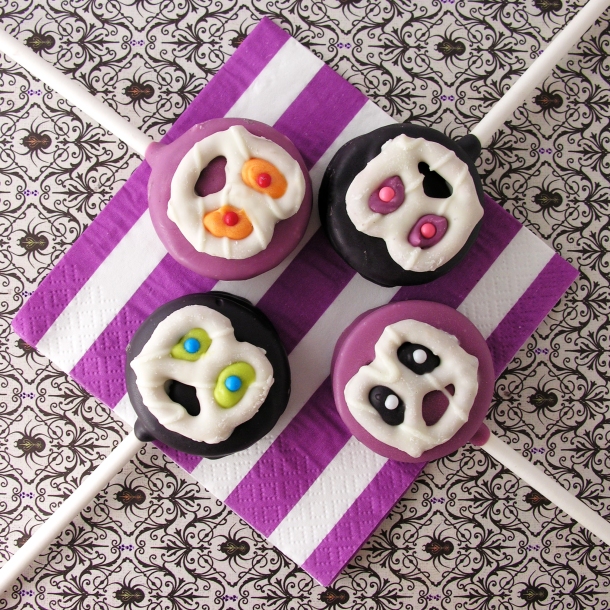
Scary Oreo popsThese scared little pretzel monster Oreo pops are not only adorable but a perfect salty and sweet combination!

Because I love desserts and I obviously blog about them all the time, my friends are often pointing out cute ideas they find online. That was the case with these cute little pretzel monsters. A friend found them in Family Fun Magazine and posted a picture on my Facebook wall. As soon as I saw them I knew they belonged on an Oreo pop!  Aren’t they so cute?!?

Monter Oreo PopsThey are also very easy, and a great make-ahead treat for fall parties!

Here’s how to create them for yourself: (printable recipe)

INGREDIENTS: (makes about 26-30 pops)

  • One box of Oreo Double Stuff cookies
  • 30 lollipop sticks
  • 1 bag of Wilton’s Candy Melts in black or purple (or both, if you want both colors!)
  • Small amounts of Wilton’s Candy Melts in other halloween colors (for the “eyes”)
  • Round sprinkles
  • 30 Flipz white chocolate covered pretzels

DIRECTIONS: (Need a visual for making Oreo pops?  Click here.)

  • Make pretzel monsters first by laying all 30 Flipz out on a piece of parchment paper.
  • Melt a small amount (maybe 1/3 cup) of any Candy Melt color for the eyes, and spoon into a small zip top bag.
  • Zip bag closed and clip a corner off.  Pipe color into top two holes of pretzel and gently set a sprinkle “iris” in place.
  • Repeat with other colors and allow eyes to harden completely.
  • For Oreo pops, carefully twist apart all of the Oreo cookies
  • Using one of the lollipop sticks, make an indentation in the white filling of each cookie.
  • Melt the about 1/4 of the black or purple Candy Melts in the microwave in 30 second increments, stirring until completely melted and smooth.
  • Dip the end of one stick into the melted candy, drizzle a little in the center of the cookie filling and then gently press it into the indentation made.
  • Place the top of the cookie back on and allow candy melts to harden (20 minutes or so), cementing the cookie back together with a stick inside. (Freeze for 5-10 minutes to speed this process up)
  • Melt remaining black or purple Candy Melts in the same manner.
  • Holding the stick, lower the entire Oreo into the bowl of melted Candy Melt, spooning it over the top and sides to cover it completely.
  • Allow the excess to drain off and gently place covered Oreo on a piece of parchment paper.
  • Immediately place a pretzel monster on top and allow the Oreo to harden completely.

Alien Oreo Pops!

My thoughts: These are cute and yum yum yummy!  I like the cute little surprised looks on the pretzel monsters, and they taste GREAT! Wrap these up in cello bags with cute ribbons and you have a fun party treat to share!  Enjoy!  ~r

Jeepers Creepers Oreo Pops

A few other October treats here on Easybaked (click on photo to see recipe):

Inside-out Caramel Apple!!Peanut butter caramel Sundae- yum!Sweet Tart and Pixie Stix CakeHalloween Bundt Cake

Fall Apple Cupcakes

Posted on

Apple CupcakesCelebrate fall with these cute little apple cupcakes! Filled with a chocolate chip “seed” core, these are sure to make everyone smile!

Well. Fall is here. I just began to notice the changing leaves this week, and of course every morning it’s a little bit darker on my drive to work.

Every fall, our family makes a special trip to a local orchard to sample apples, doughnuts and cider. As the temperatures drop I find myself looking forward to pumpkins and rustling leaves and all the fun flavors that come with this new season! These little cupcakes don’t taste like apples, but they sure do look like them!  I even added a fun seeded core to these, using my trusty cake pop maker.

Apple cupcakes filled with seeds

How fun is that? Surprise chocolate chips are always a plus in my book! You can skip the “core” if you want- just make solid-colored cupcakes instead of using my added steps in the recipe. Either way, these are a lot of fun and easy to make!

Here’s the recipe: (printable recipe)

INGREDIENTS:

  • 1 boxed white cake mix (plus oil, water and eggs to make according to package)
  • Food coloring gels in desired colors.
  • 1/2 cup of mini chocolate chips (if making core)
  • 2 sticks (1 cup) salted butter, softened
  • 2 sticks (1 cups) unsalted butter, softened
  • 3 cups powdered sugar
  • 2 tablespoons of vanilla
  • Colored sugar sprinkles (in desired colors)
  • Fondant for stems and leaves (or use pretzel sticks for the stems and spearmint gummy leaves instead!)

DIRECTIONS:

  • Make cake mix according to package
  • Remove one cup of batter and place in a separate bowl.
  • Mix in mini chocolate chips.
  • Bake in cakepop maker (or use a small mini-muffin tin), making 24 cake pops (or mini-muffins)
  • Divide remaining batter into separate bowls and color using color gels. I did green, red and yellow apples, but you can do just one of those colors if you want.
  • Place cupcake liners into tins and spoon just a small amount of batter into each liner.
  • Use a cake pop to spread batter evenly into bottom of liner and then leave the cake pop in the center.
  • Spoon remaining batter evenly over the cake pops, covering each pop completely.

Cake pop apple coresCake pop apple cores

  • Bake at 350F degrees for 15-18 minutes.
  • Cool completely.
  • Make frosting by placing butters, powdered sugar and vanilla in a large mixing bowl and beating on high for 3-4 minutes until very light and fluffy.
  • Use a medium cookie scoop to scoop frosting on each cupcake, and then turn cupcake upside down into a bowl of decorating sugar, pressing until all of frosting is covered in sugar.
  • Decorate with fondant leaves and stems, or use pretzels and spearmint leaves.
  • To use fondant, you can buy it already made in white and color it with gel in green and brown, or you can make it from scratch and color it the same way. 
  • Use a leaf fondant cutter to make leaves and just roll and cut the stems.
  • If you are new to fondant, we did a tutorial on it here.  It is MUCH easier than it seems like it would be, and you can make such cute decorations with it!

Apple Cupcakes

My thoughts: These are such a happy fall treat! You can go all- out and make little chocolate chip cores, or just make plain cupcakes in various colors.  Either way, they are a yummy, easy, fall treat that look beautiful on a fall-themed table.  Hope you get a chance to try these!  Enjoy!! ~Ruthanne

Apple Cupcakes!

Other fun fall recipes here on easybaked:

Honey cut-out cookiesFall Acorn Cupcakes!German Chocolate CookiePeanut butter Acorn Cookies!

Creepy Broken Glass Cupcakes!

Posted on

Broken glass Cupcakes!!!
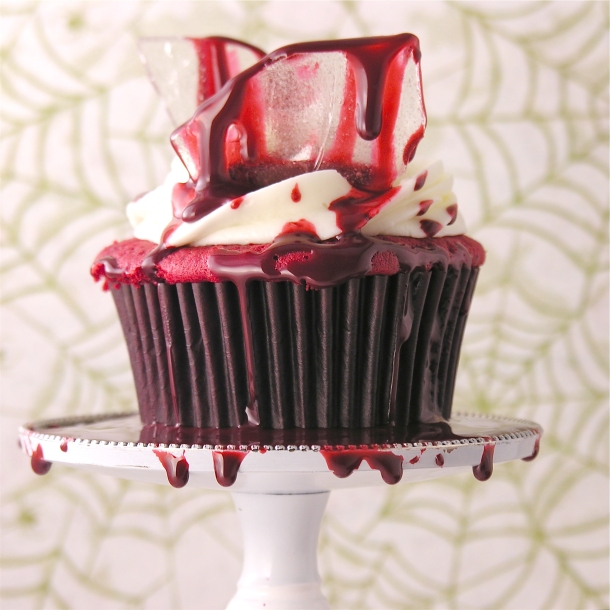
These delicious Red Velvet cupcakes with smooth cream cheese icing are topped with all the makings of a horror movie (or, according to my friend Ricky, a Stephen King novel!).  These are just in time for your creepy October festivities!!

[and if you aren’t a fan of the decorations, they are an amazing cupcake all by themselves!]

Ok.  These were really fun to make.  I’d seen SO many examples of these online– this is not an original idea.  However, I made it my goal to create these in the easiest possible way, with the fewest steps and NO candy thermometers!  Not original, but EASY!!!
Broken glass Cupcakes 2
Note:  I did a cake mix fix by swapping out the water and oil for milk and butter and adding one extra egg.  It was SO good!  (Thanks for the idea Rex!) Heavy and moist cupcakes with exceptional flavor.  I highly recommend it, but you can certainly make the mix as directed for these cupcakes.

Here’s how they are made: (printable recipe)

INGREDIENTS:

The cupcakes:

  • One boxed Red Velvet cake mix
  • Milk (in the same amount as the water required by the mix)
  • Eggs (in the same amount as required by the mix PLUS one extra egg)
  • Butter (twice the amount of oil required by mix- for example if the box calls for 1/2 cup of oil you would use 1 cup of butter).  Measure and then melt before adding to mix.

The icing:

  • 1 package (8 oz) cream cheese (softened)
  • 1/2 cup of butter (softened)
  • 1 teaspoon vanilla
  • dash of salt
  • 4 cups powdered sugar
  • 1 cup white chocolate chips (melted)

The glass candy:

  • 1 cup of granulated sugar
  • 1/2 cup of light corn syrup
  • 1 teaspoon of clear flavoring (I used raspberry)

The edible blood:

  • 1 (14 oz.) can of sweetened condensed milk
  • Red gel food coloring
  • Black gel food coloring
  • 1 teaspoon of clear flavoring (I used raspberry)

DIRECTIONS:

I recommend making the decorations 1st (the glass and “blood”) and keeping them until just before your party to decorate with.  They will both keep for several days, so you can make them ahead of time.

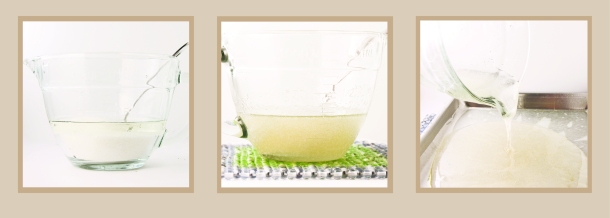
Candy Glass:

  • Cover a cookie sheet with wax paper and spray the wax paper liberally with non-stick spray.
  • Place granulated sugar and corn syrup into a microwave safe bowl and mix them together.
  • Cover bowl with plastic wrap.
  • Microwave on high for 3 minutes.
  • Remove from Microwave and CAREFULLY remove plastic  wrap (beware of hot steam!)
  • Stir well and re-cover with fresh plastic wrap.
  • Microwave on high for another 3 minutes, but watch mixture after about 2 minutes. Because microwaves vary, you need to watch it to make sure it doesn’t start to turn color.  If you cook it too long it will be an amber color instead of the nice clear glass you want.  My microwave was perfect at 2 and 1/2 minutes.
  • CAREFULLY remove from microwave and CAREFULLY remove plastic wrap.
  • This is soooo hot and sticky– using caution to not touch any of the hot candy, pour it out over the greased wax paper and allow it to sit and harden completely (at least a couple of hours)
Candy Glass How-To Pics

  • When candy glass is hard, tap a knife tip into glass to break it into sharp pieces.  
  • Carefully (the pieces are actually sharp!) push pieces up off of wax paper and onto a plate.
  • Candy glass can be kept in a zip top bag or an air tight container for about a week. Moisture (including the moisture from the frosting on the cupcakes) will eventually start to break the glass down.

Candy Glass How-To

Edible Blood:

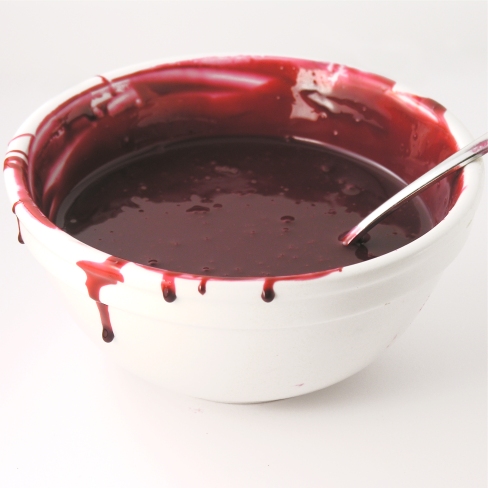
  • Place sweetened condensed milk into a small bowl and mix in red food color gel and flavoring until you get a brilliant red color.  Add a TINY bit of black (use a toothpick- black goes a long way!).
  • Mix and adjust until you get a nice dark red color.
  • Spoon “blood” into a zip-top bag and seal TIGHTLY.  Keep refrigerated until use.
Edible Blood!Cupcakes:

  • Make cake mix according to box (swapping in cake mix “fix” ingredients if desired)
  • Divide equally into 24 cupcake liners in cupcake tins.
  • Bake at 350F degrees according to times on box.
  • Remove cupcakes from oven and cool completely.

Frosting:

  • On medium speed, beat together cream cheese, butter, vanilla, and salt until creamy.
  • Gradually add powdered sugar, beating until smooth.
  • Melt white chocolate chips in the microwave in 30 second increments, stirring between, until smooth.
  • Add melted white chocolate to icing and beat on low until completely combined.
  • Place in a zip-top bag fitted with a decorating tip and pipe frosting on top of cooled cupcakes.

Decorating:

  • Put parchment paper on a counter to protect it from all that red food coloring. 
  • [or- use a large platter or tray that you will serve the cupcakes on- blood splatter and all!]
  • Place frosted cupcakes on protected surface and press 2 to3 pieces of glass into the top of each.
  • Clip the corner on the bag of edible blood and drizzle over the top of the glass and the cupcakes, allowing it to drip down the sides of both.
  • Serve the same day after decorating.
  • Use care transporting and serve with plates and forks, or you will all have red fingers!!

Broken Glass Cupcakes3

My thoughts: These are such yummy cupcakes all by themselves.  But the decorating was SO much fun!  My friend Amber helped and we both were a little in awe of how realistic they looked…and how yummy they tasted!  I wasn’t sure how the sweetened condensed milk would taste on the cupcakes, but I added a little raspberry flavor and oh my…so good!

Setting up for photos was fun too…splattering fake blood everywhere and letting it drip off my cupcake stand was interesting…not my typical cupcake photo shoot!

I really hope you get a chance to try these– even if you just go for the yummy cupcake recipe minus the drama!

I will leave you with a little insiders look at my picture-taking experience:

Broken glass cupcakes-- food photography at its finest....lol!

So fun!!!

Here are some other fun “creepy” October recipes to try:
Mummy Oreo Pops!Spider Cupcakes!MISfortune cookies with caramel apple cupcakesHalloween Bundt Cake