RSS Feed

Tag Archives: creative cookies

Maracas Oreo Pops!

Posted on

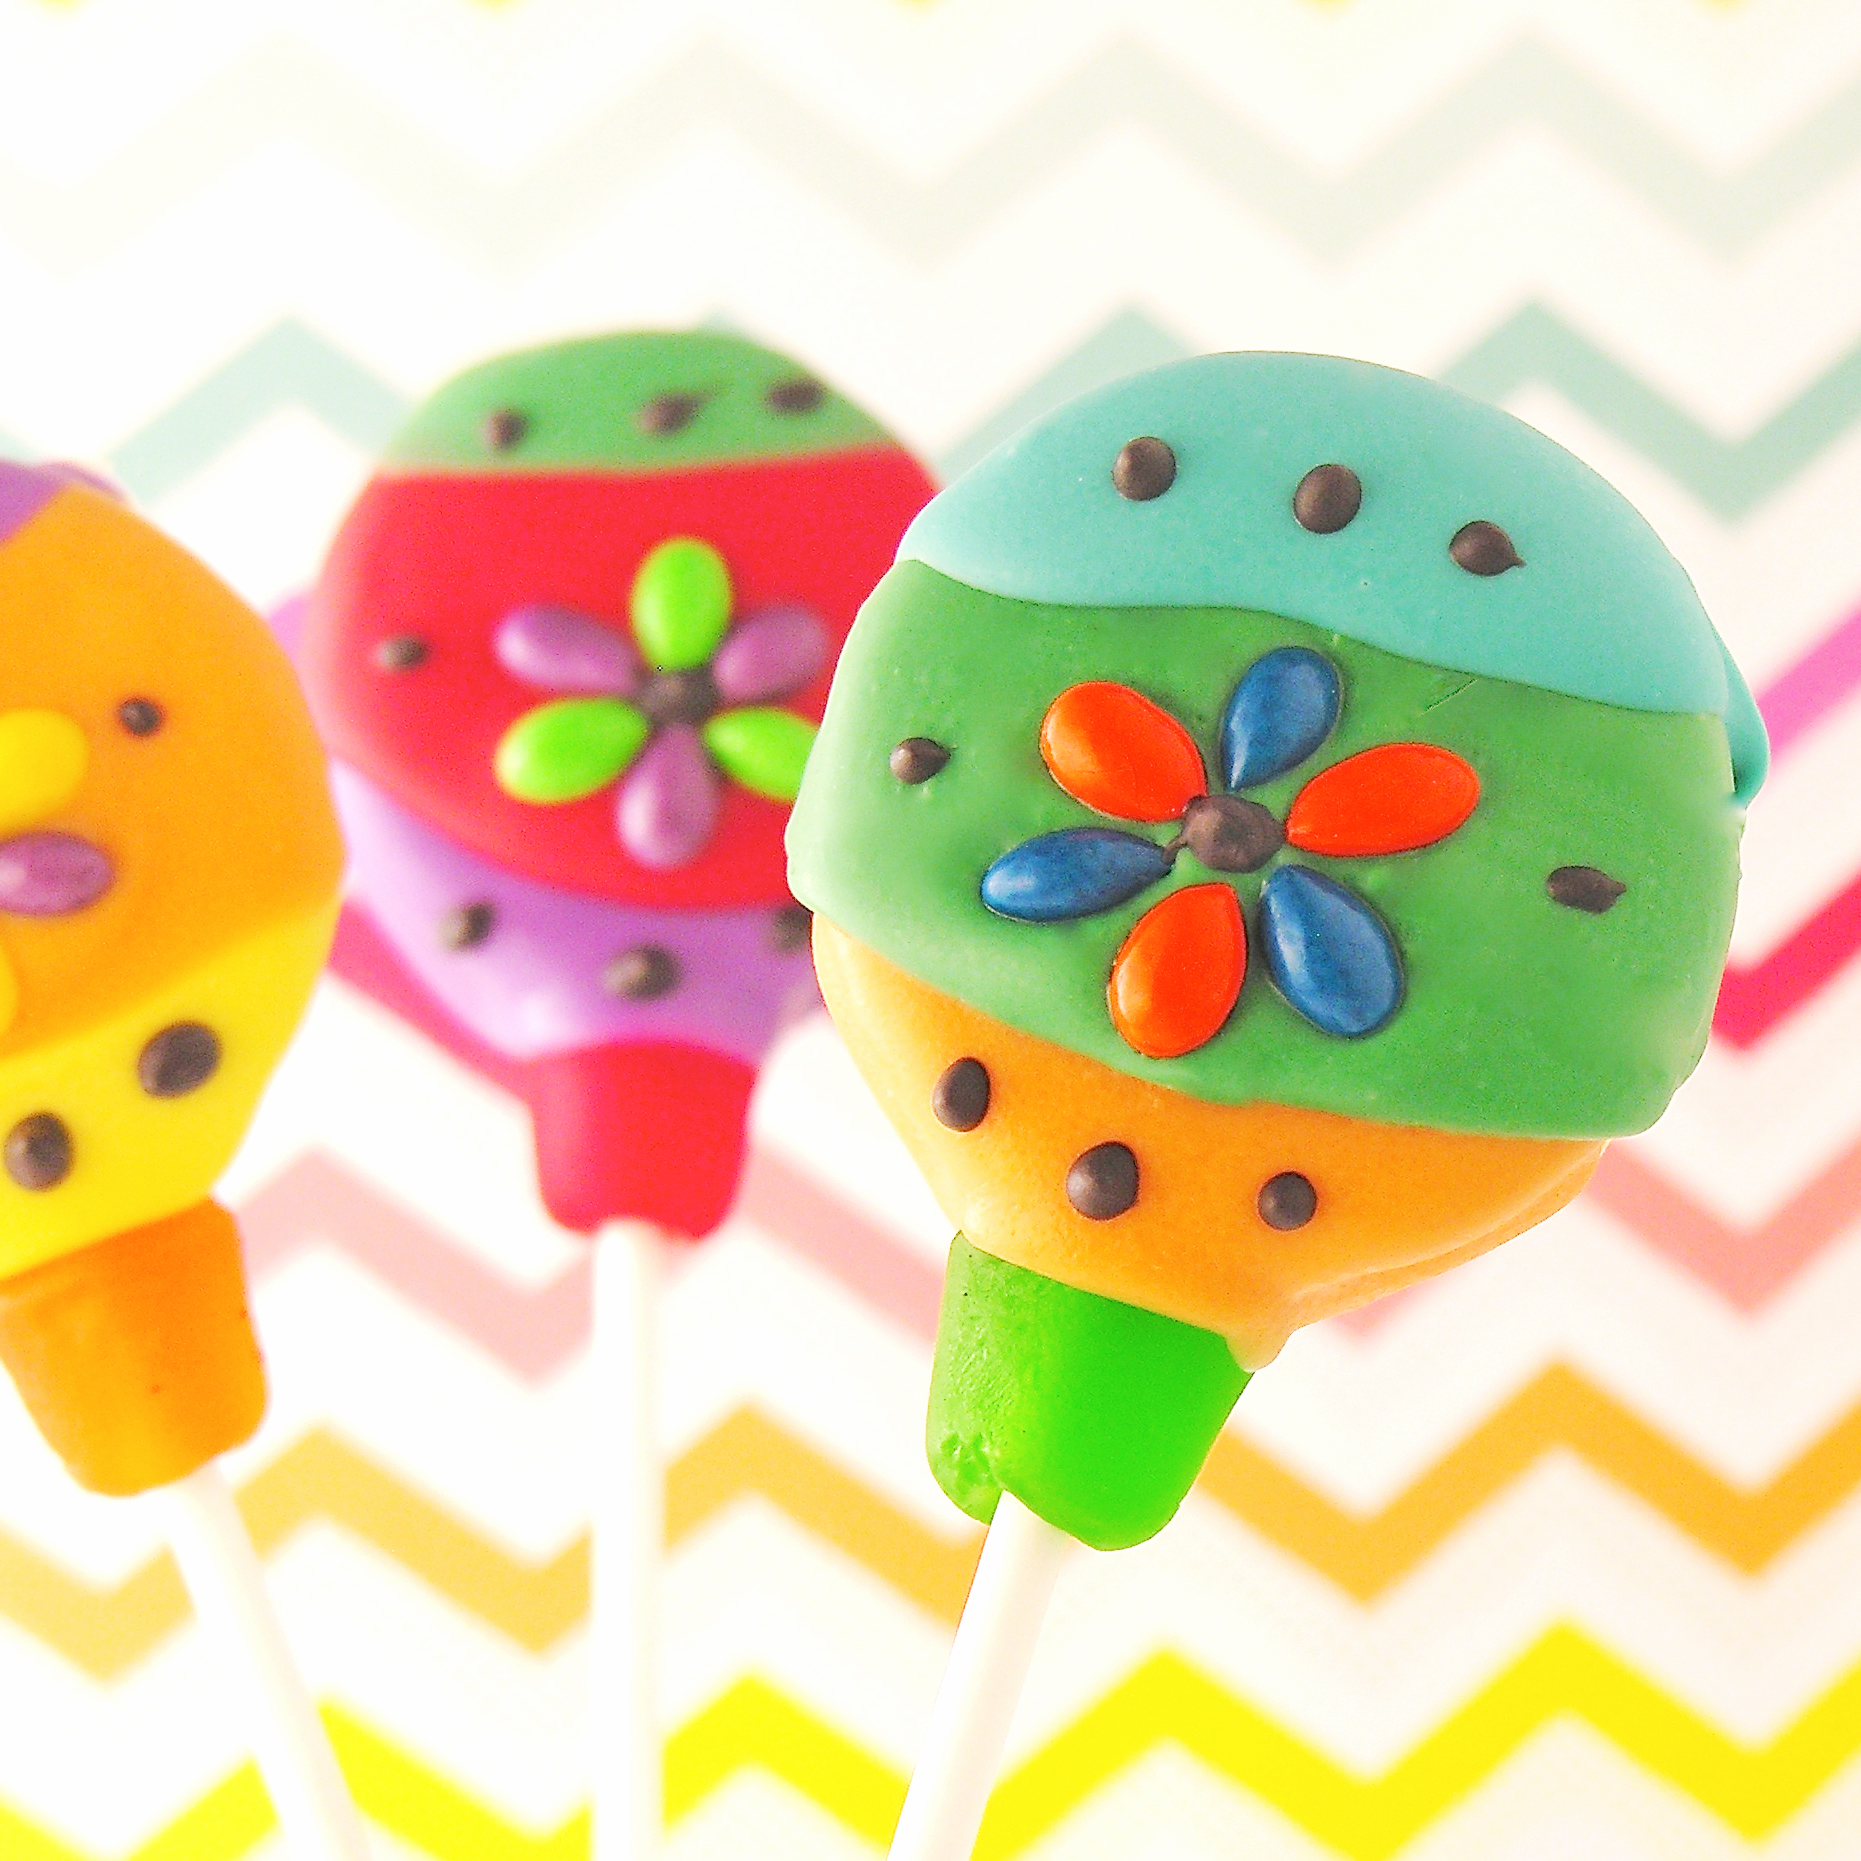
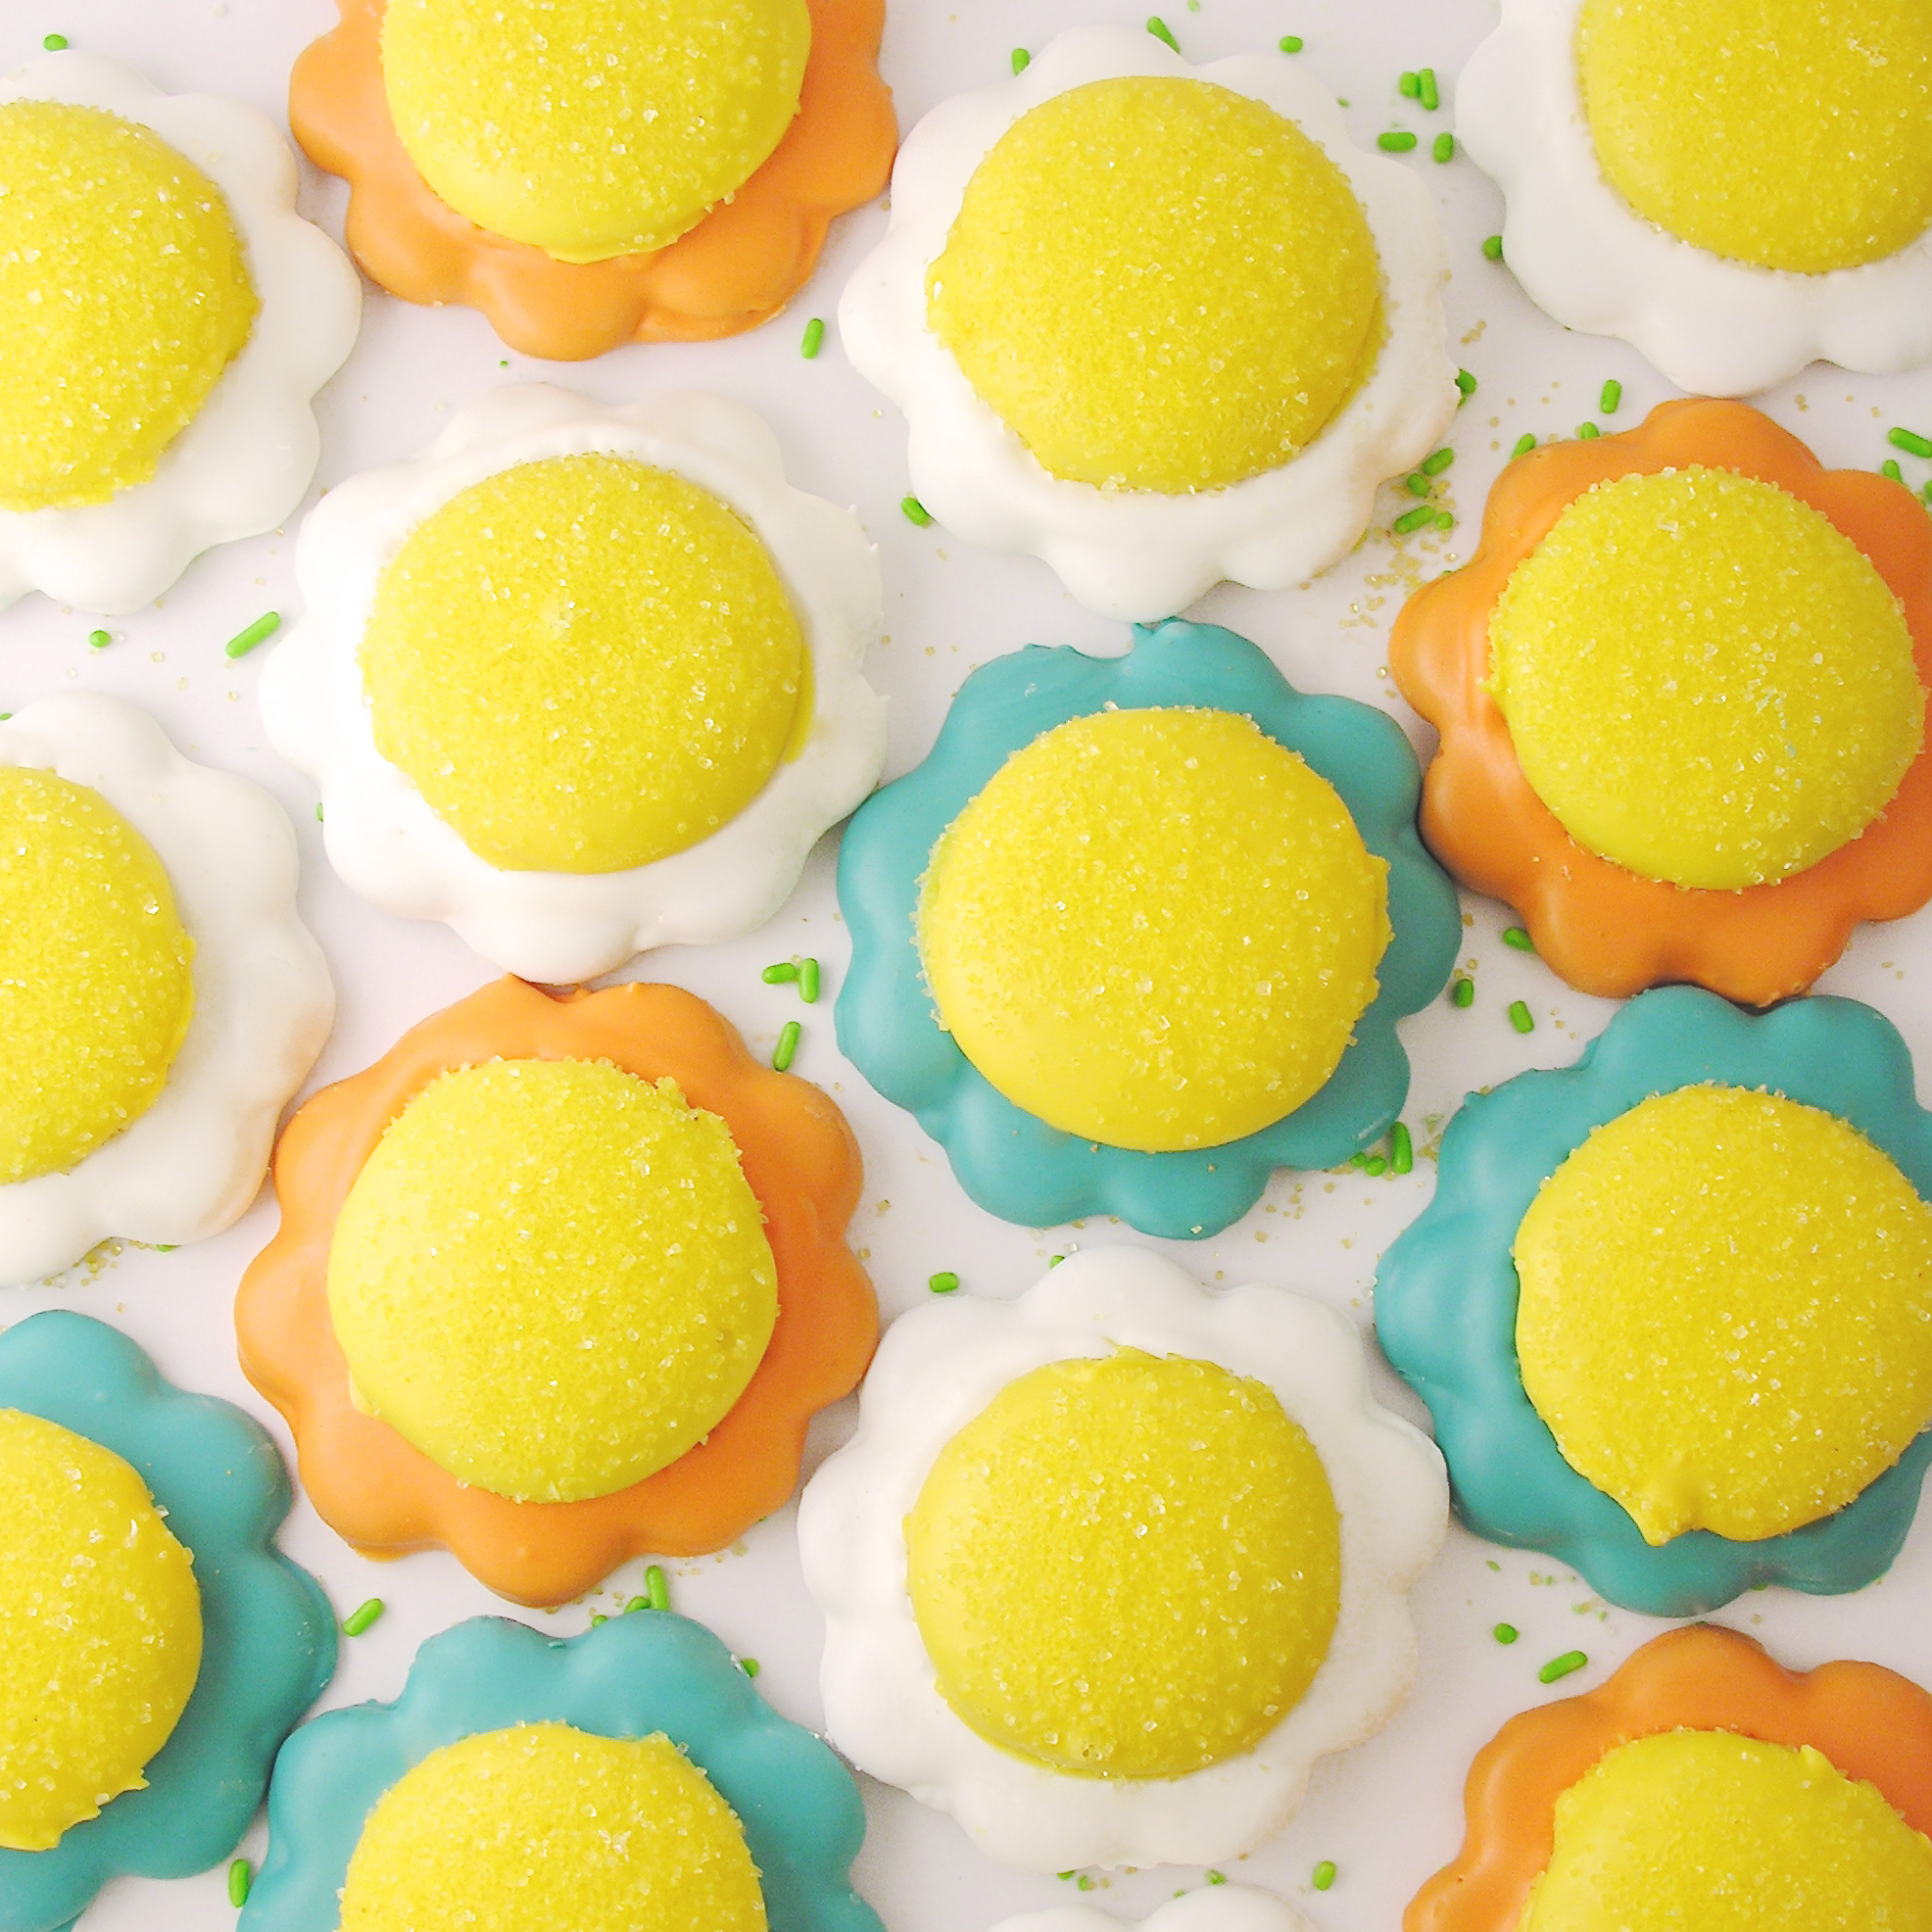
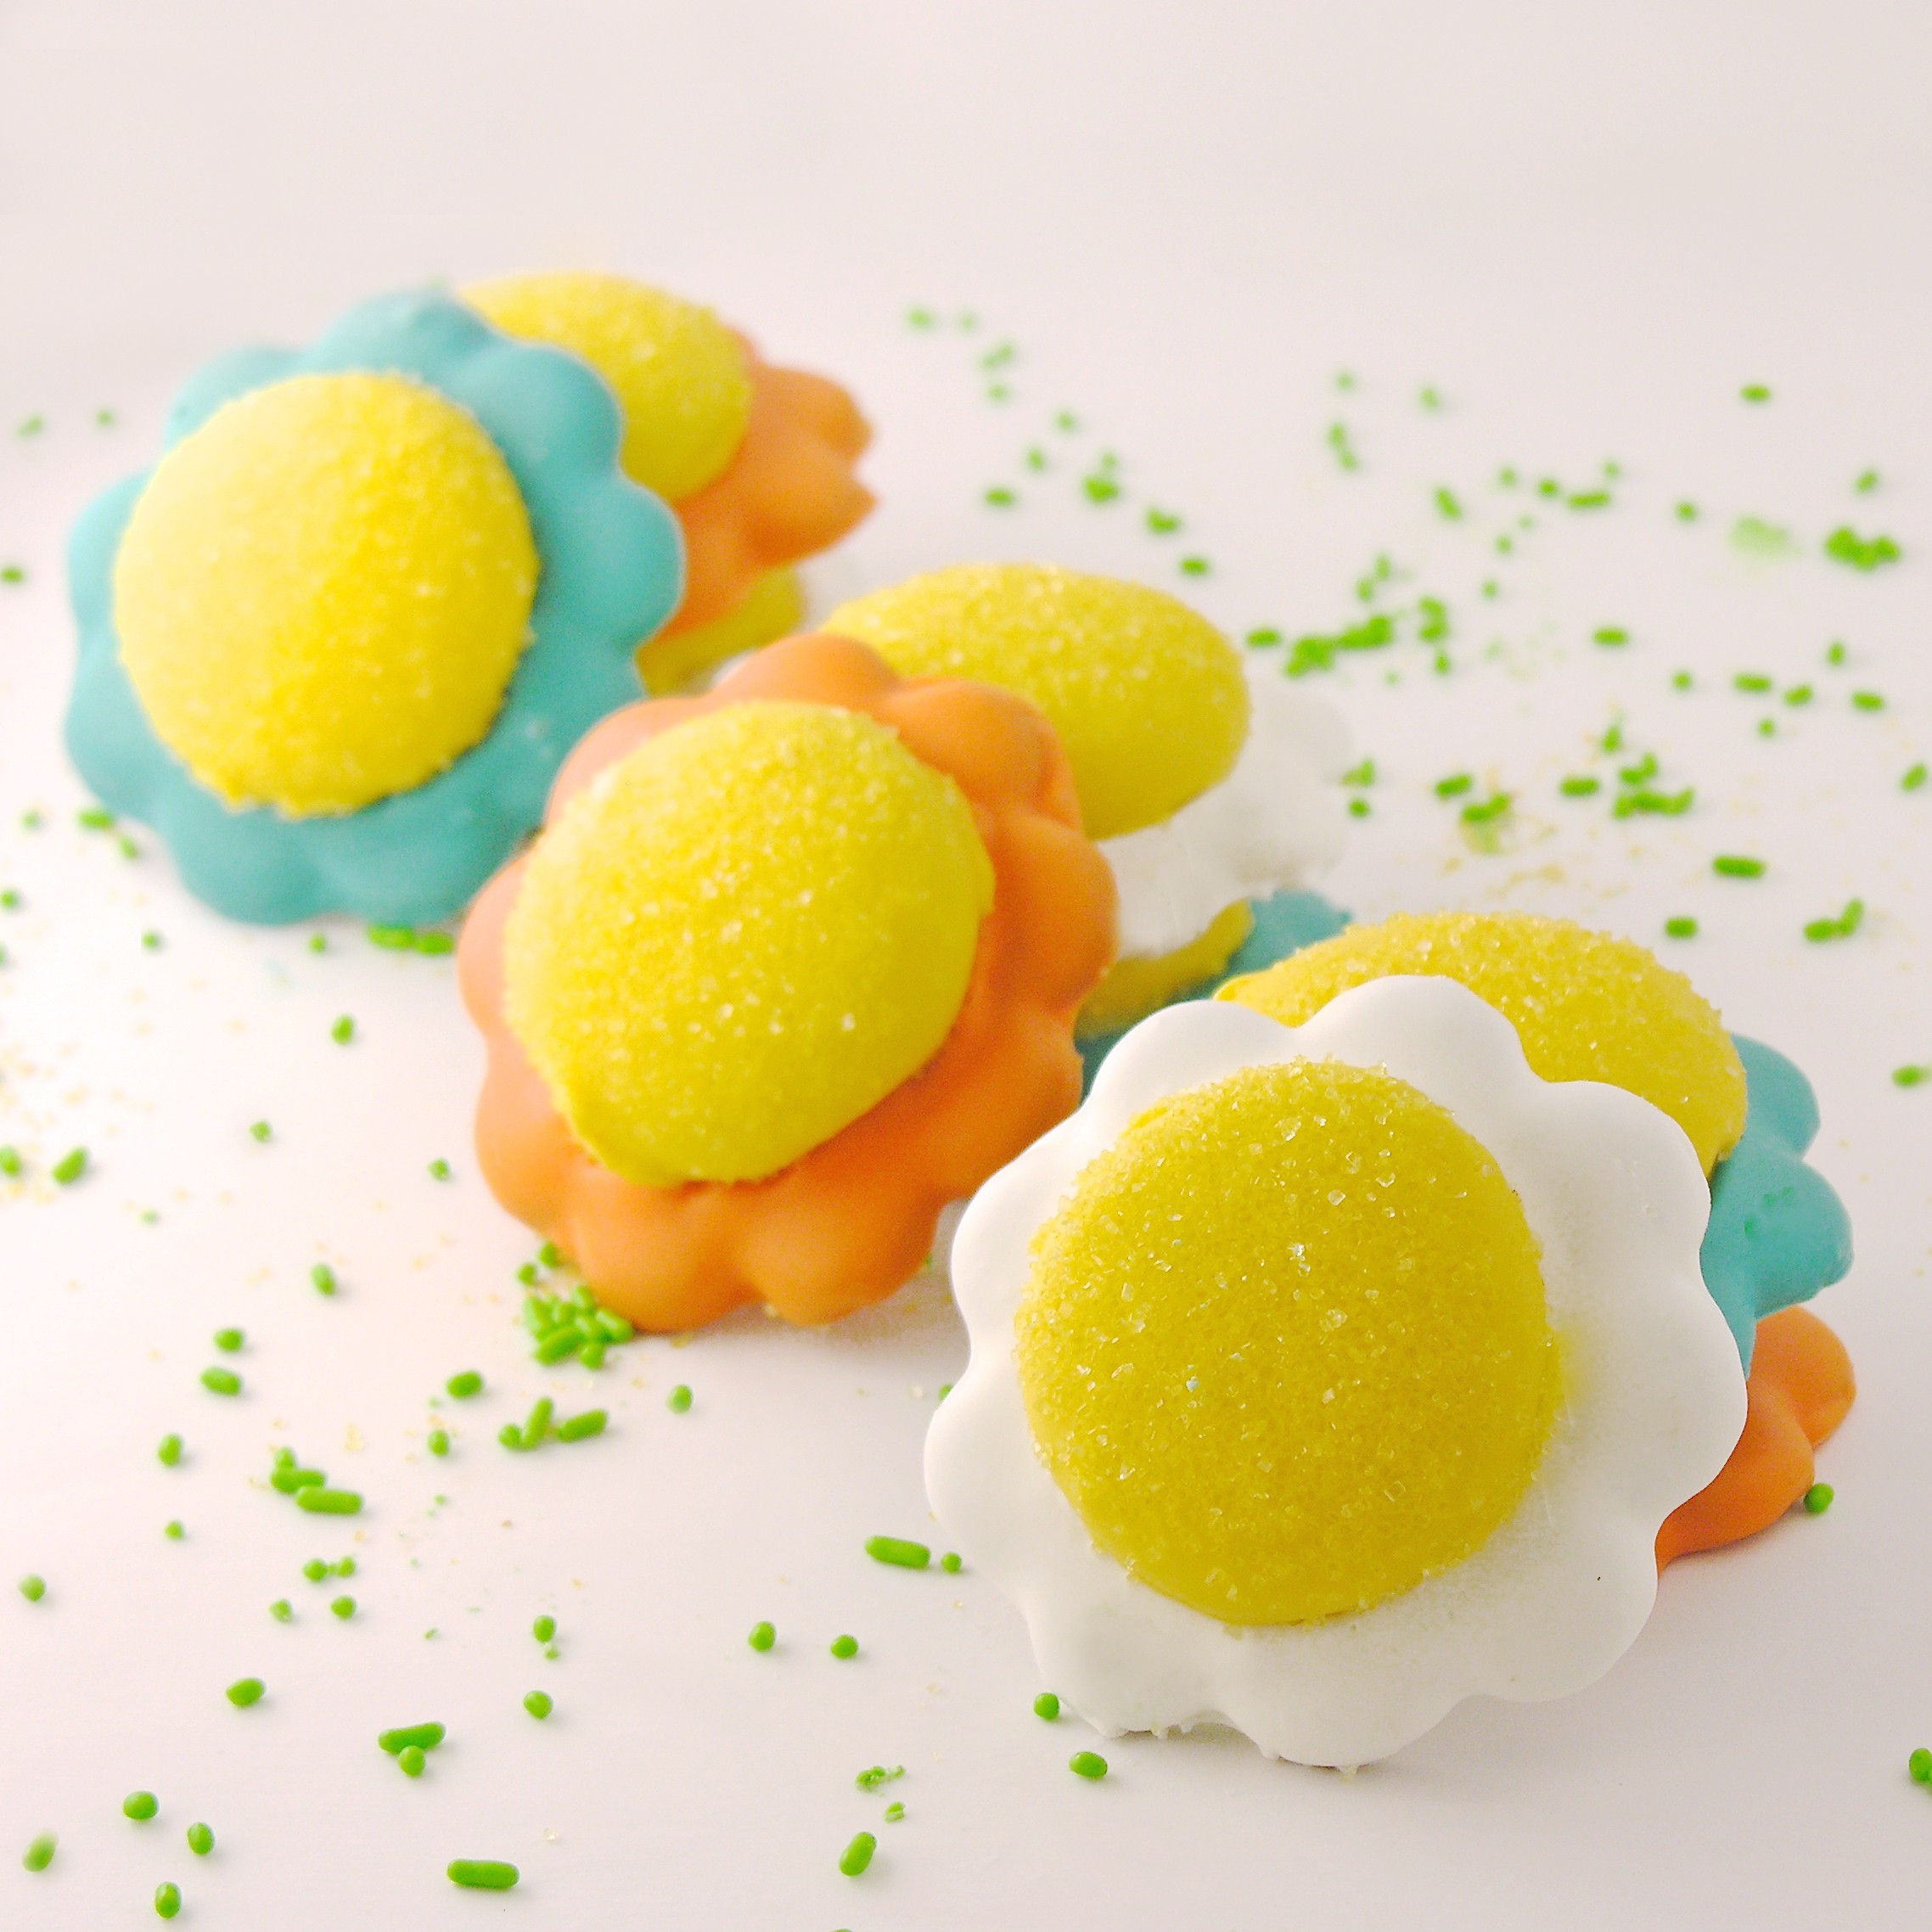
Celebrate Cinco de Mayo with these adorable maracas made with Oreos and candy sunflower seeds!

I love Mexico! I’ve been there on vacation, and I’ve been there many times to work alongside the people of a little town called Siete Ejidos in Sinaloa. I love the food, the beautiful people, the music, and the bright, fun colors that are everywhere! Seriously- why is it unacceptable to paint a house bright blue and orange in the States? (or at least in my neighborhood…)

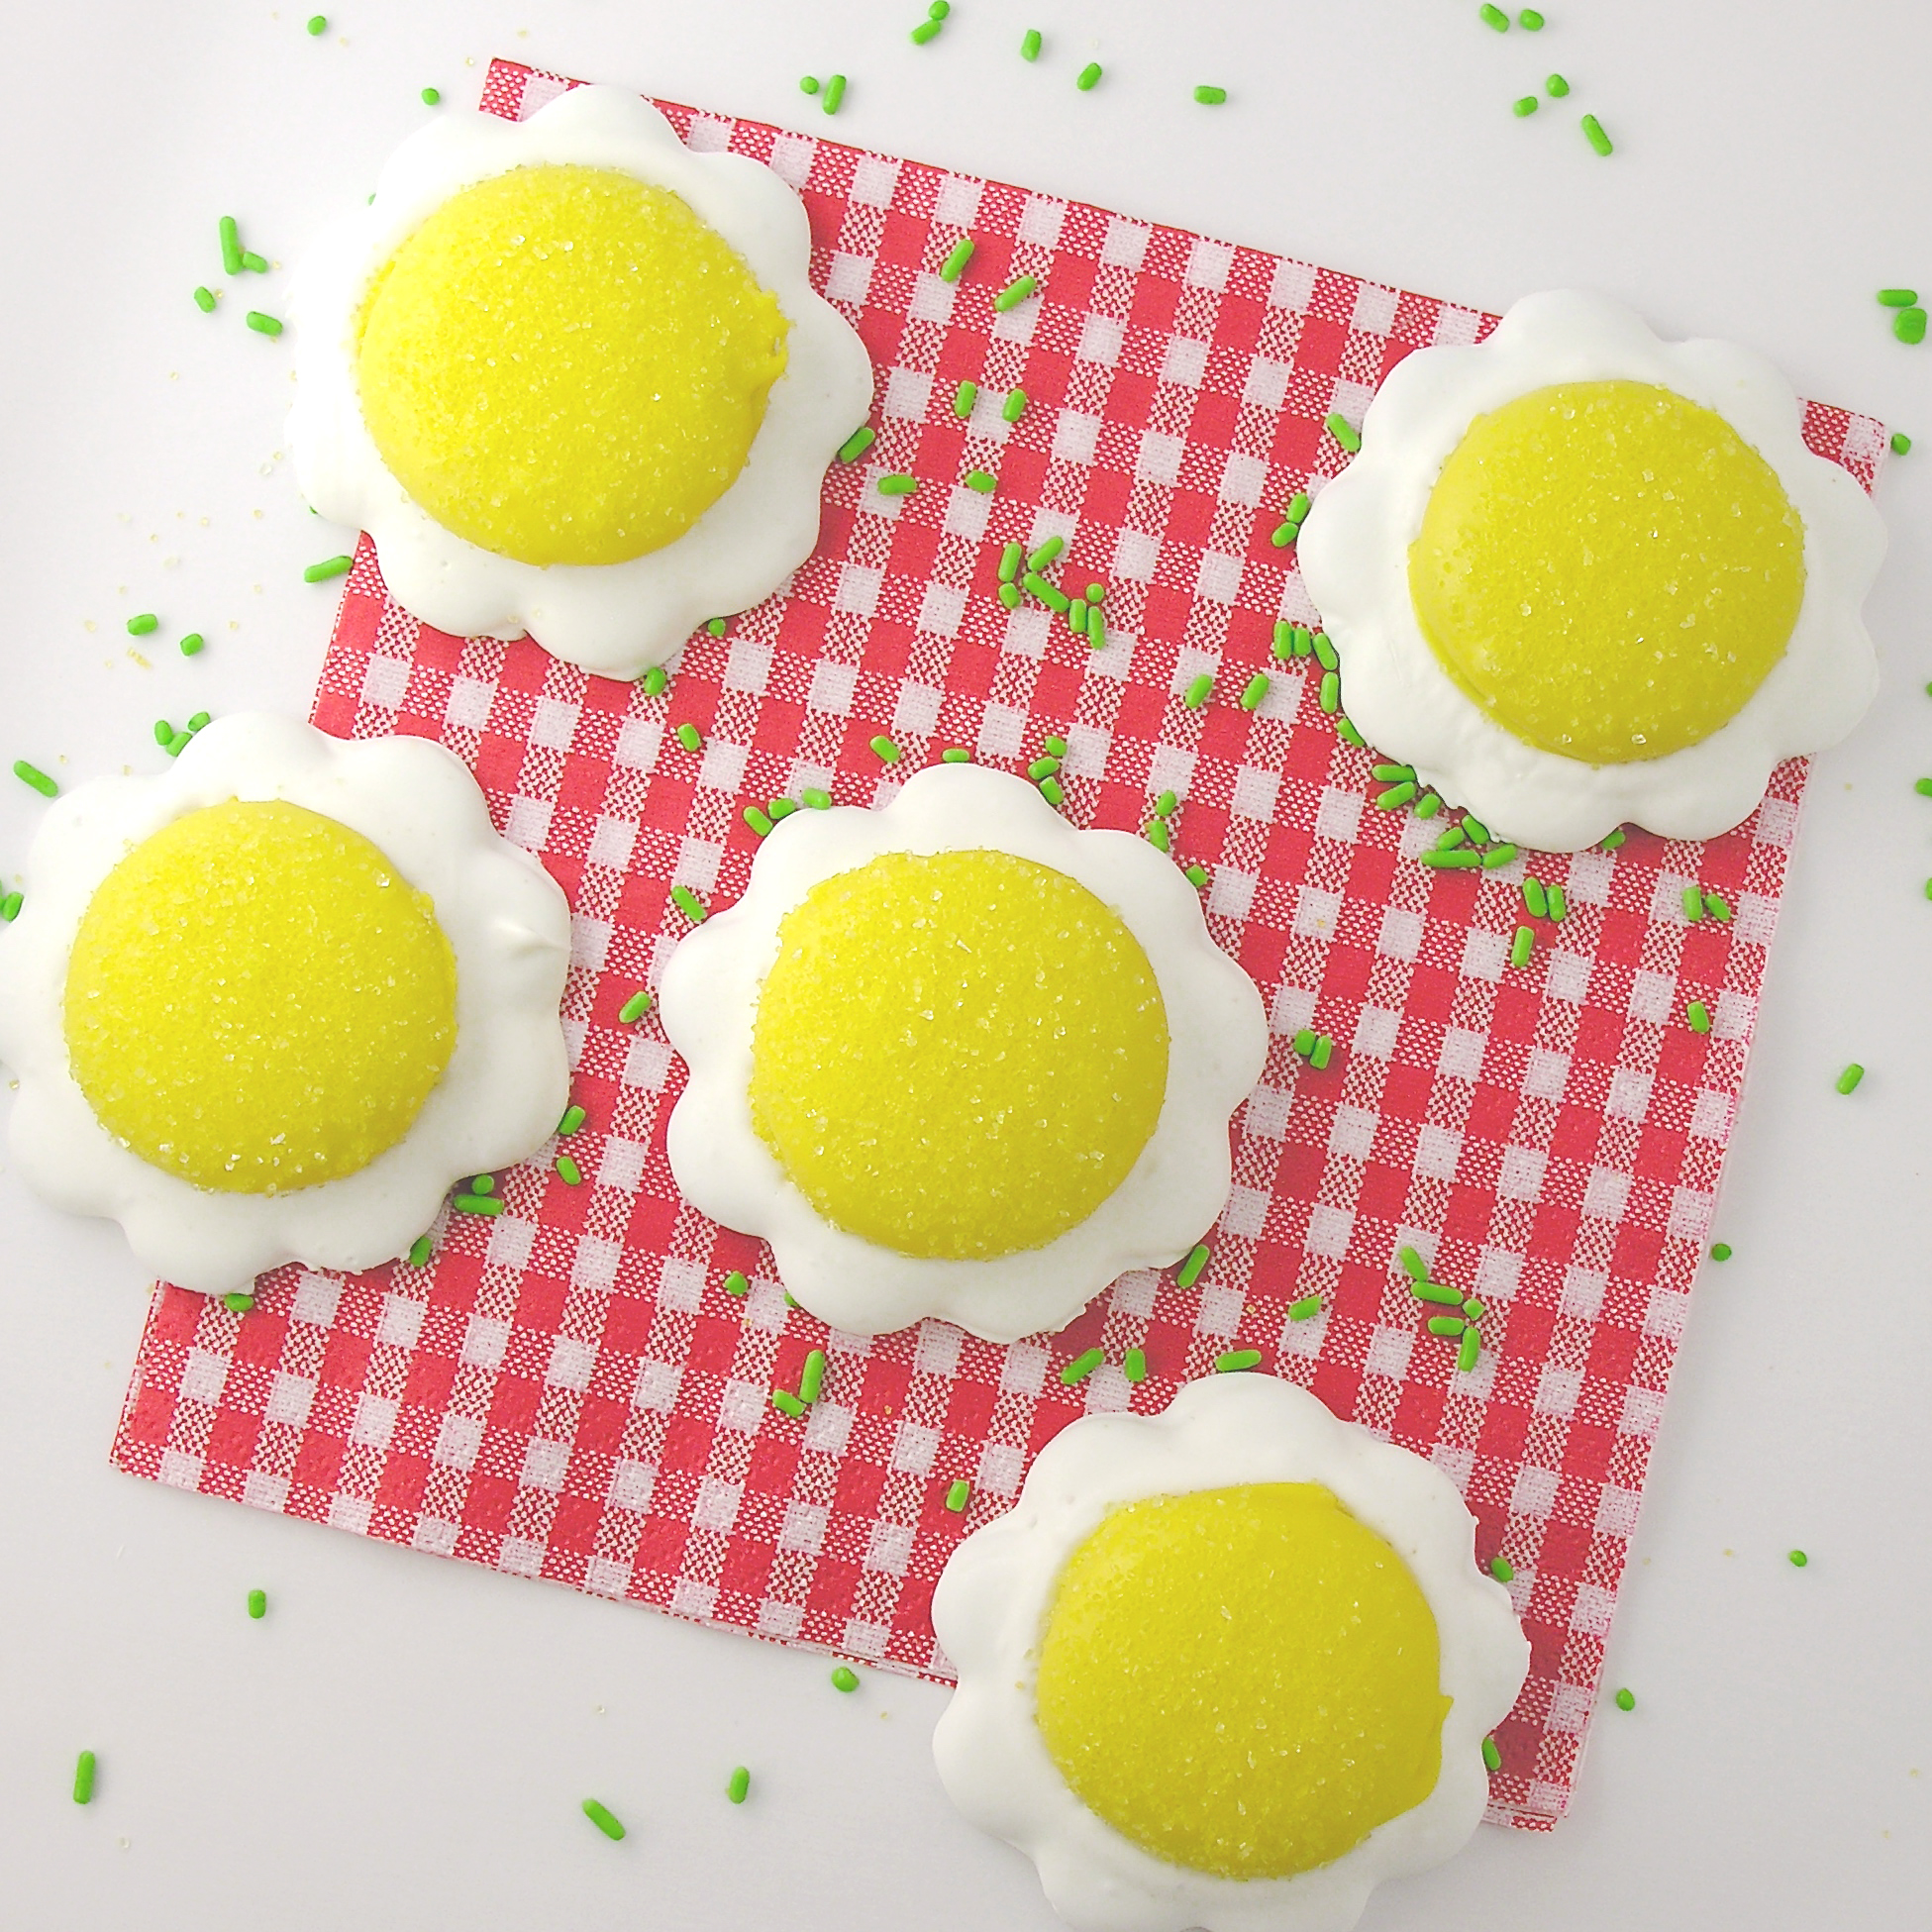
These were such fun cookies to make because you can just go crazy with color and make any design you want! Use sprinkles or candy…I used chocolate covered sunflower seeds on mine, and I love how they turned out! They have that “bead” look you often see on maracas and other art in Mexico.

Here’s how we made these (printable recipe here)

(If you have never made Oreo Pops before, check out our tutorial here.)

INGREDIENTS: (makes 24-30 Oreo pops)

  • One box of Double Stuff Oreos
  • 1/4 cup of Wilton’s Candy Melts in white.
  • Wilton’s Candy Melts in a variety of colors (you’ll need at least 3 bags of them)
  • One box of Dots Candy

DIRECTIONS:

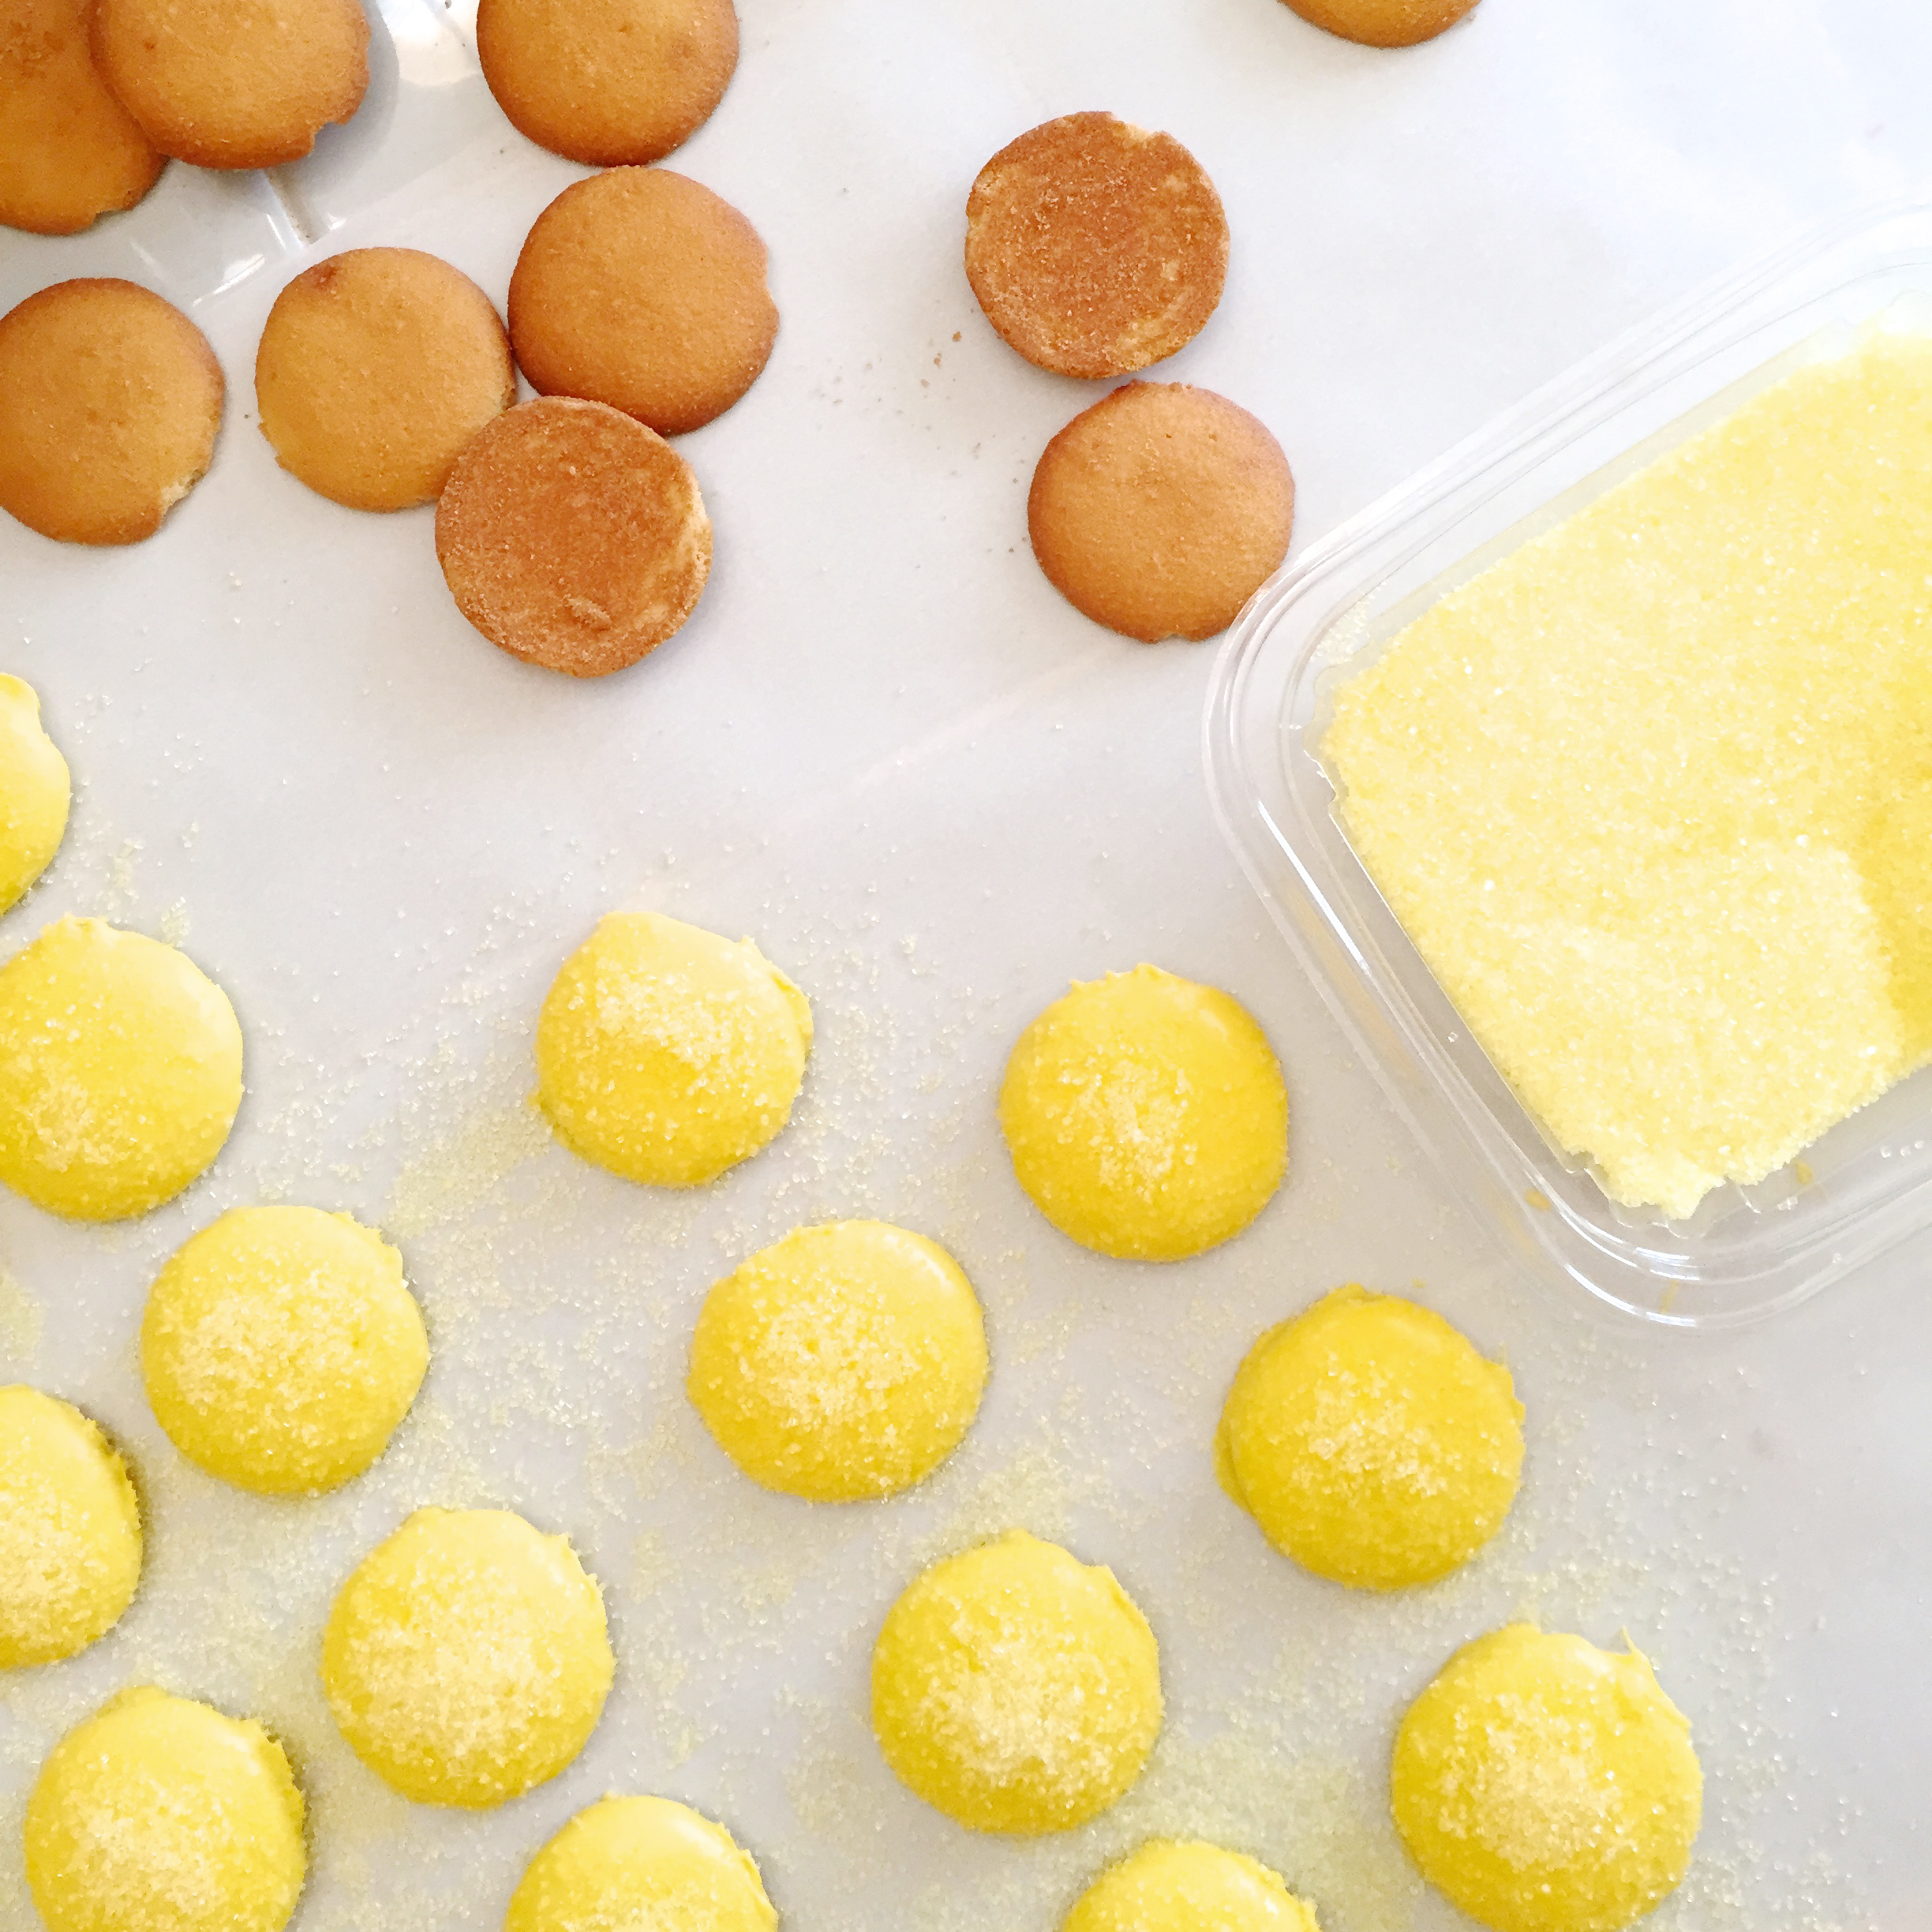
  • Gently twist apart all Oreos.
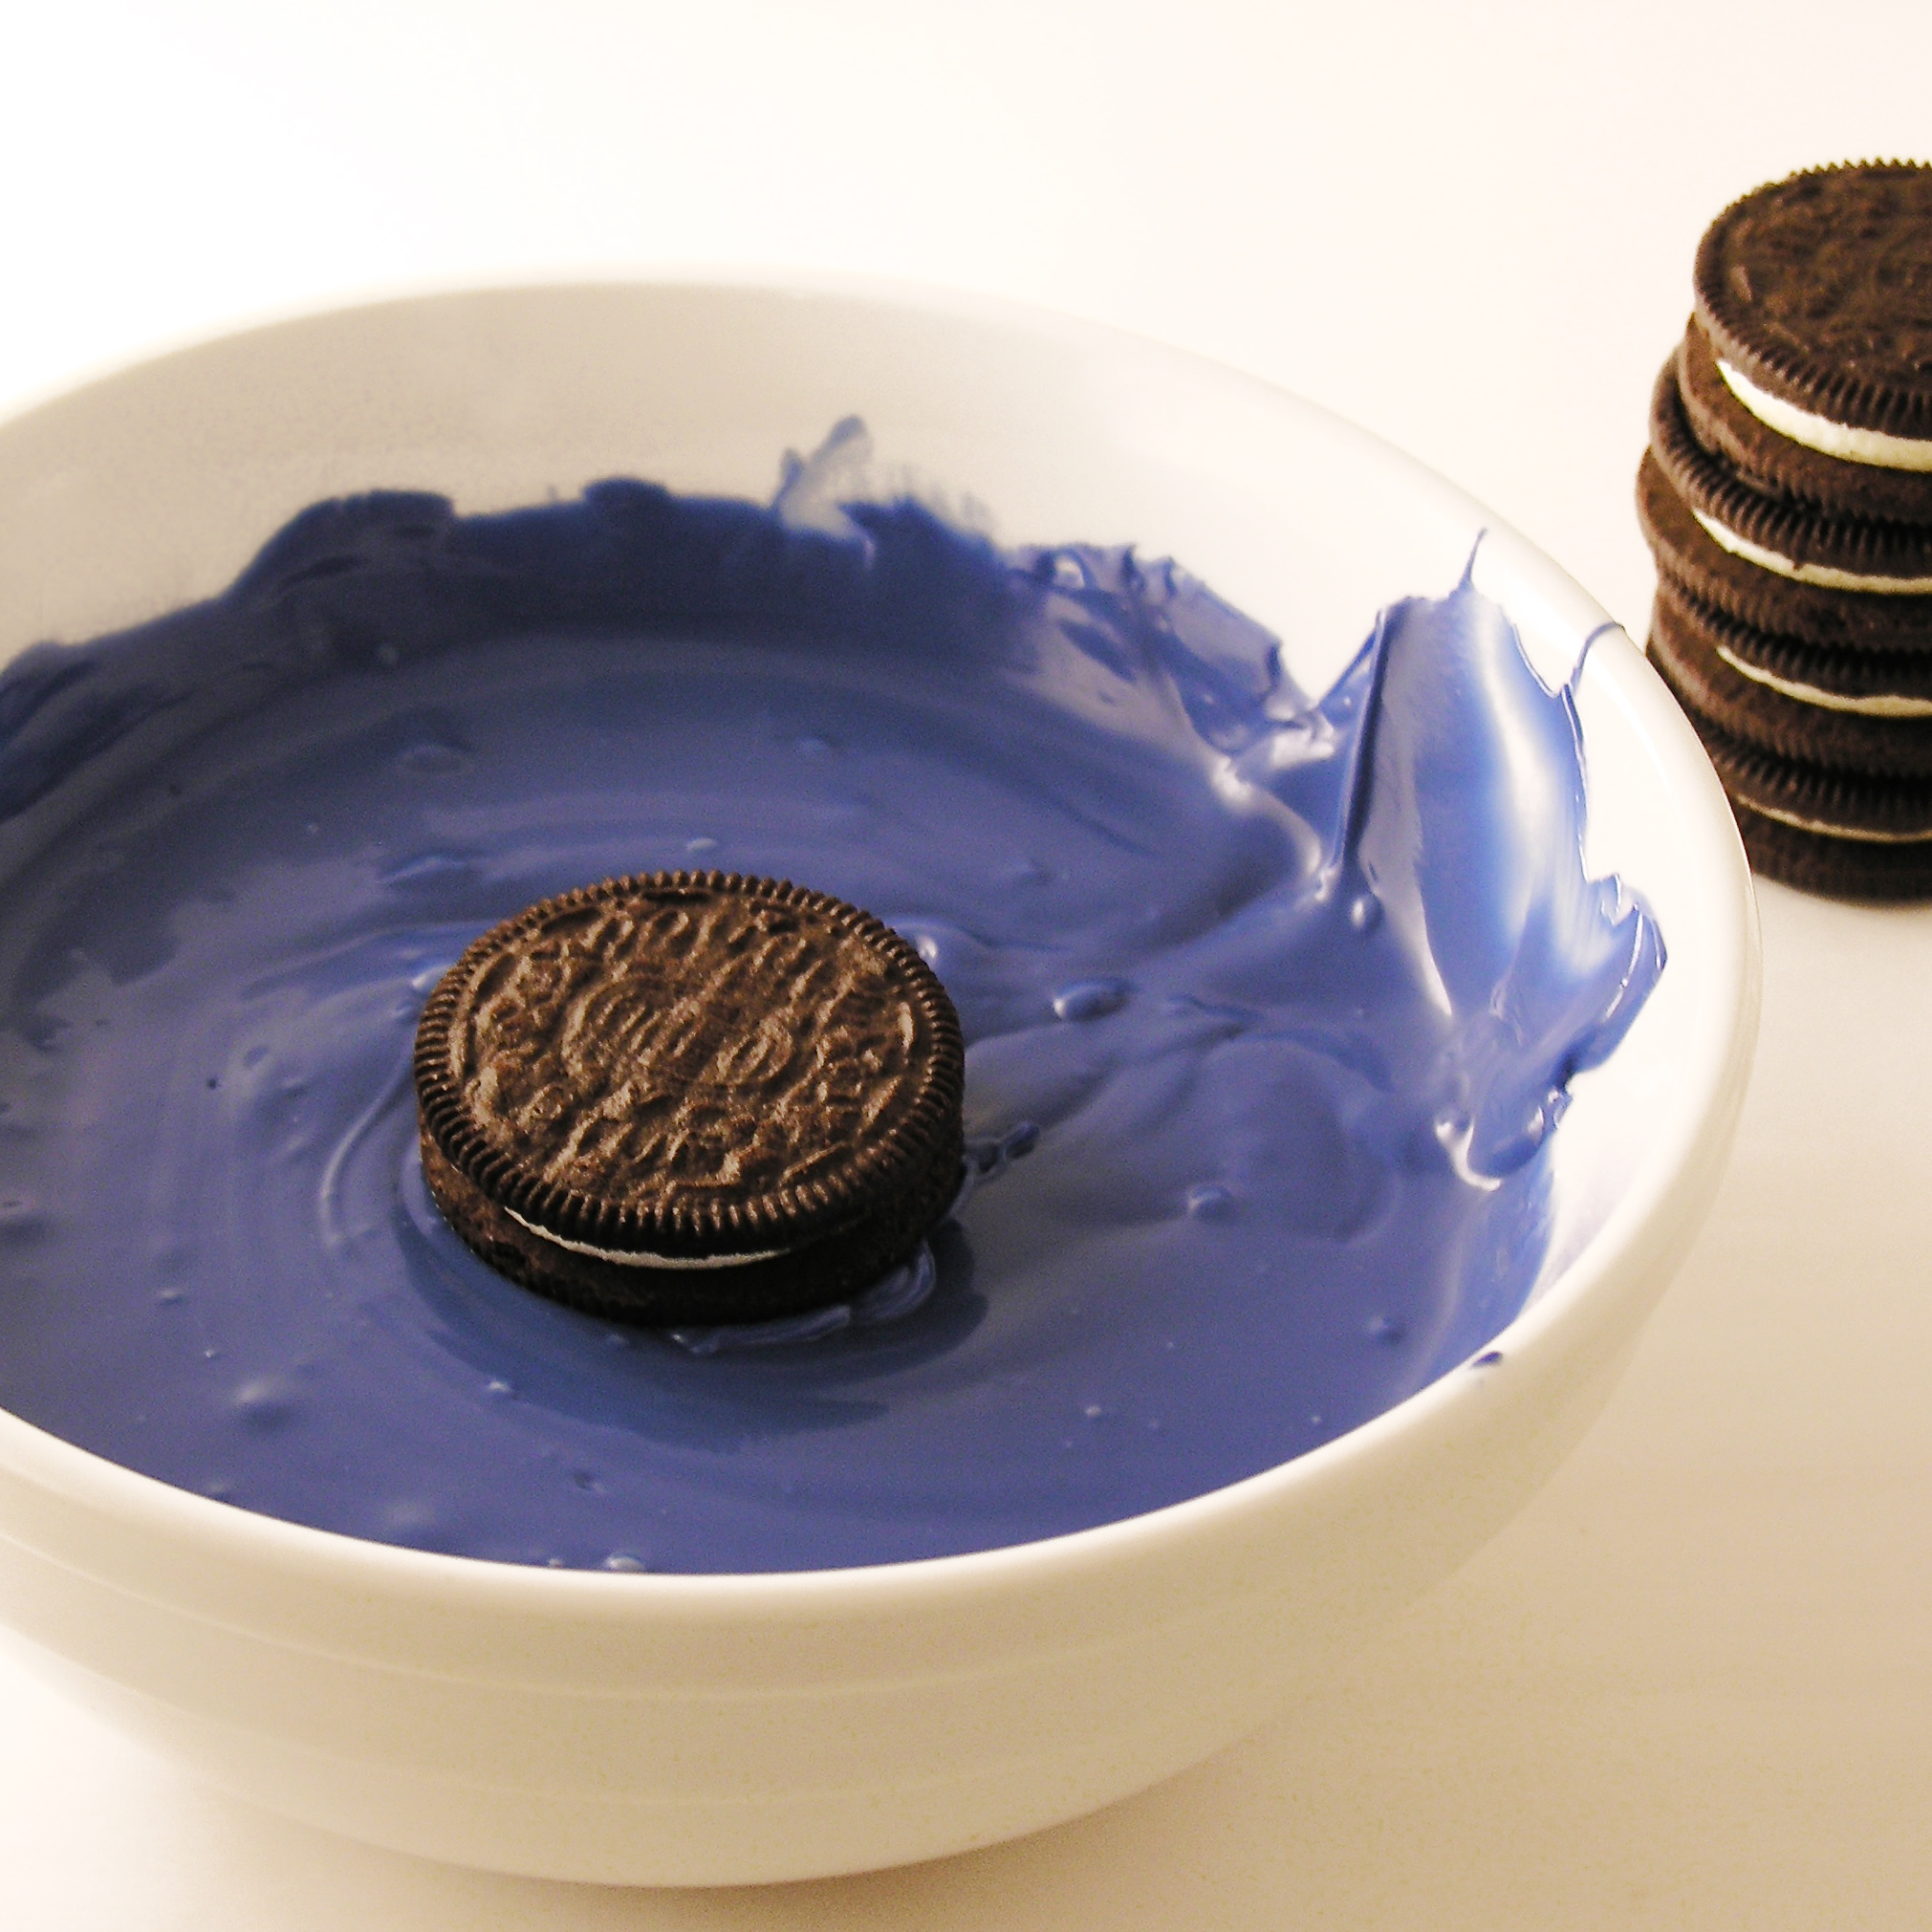
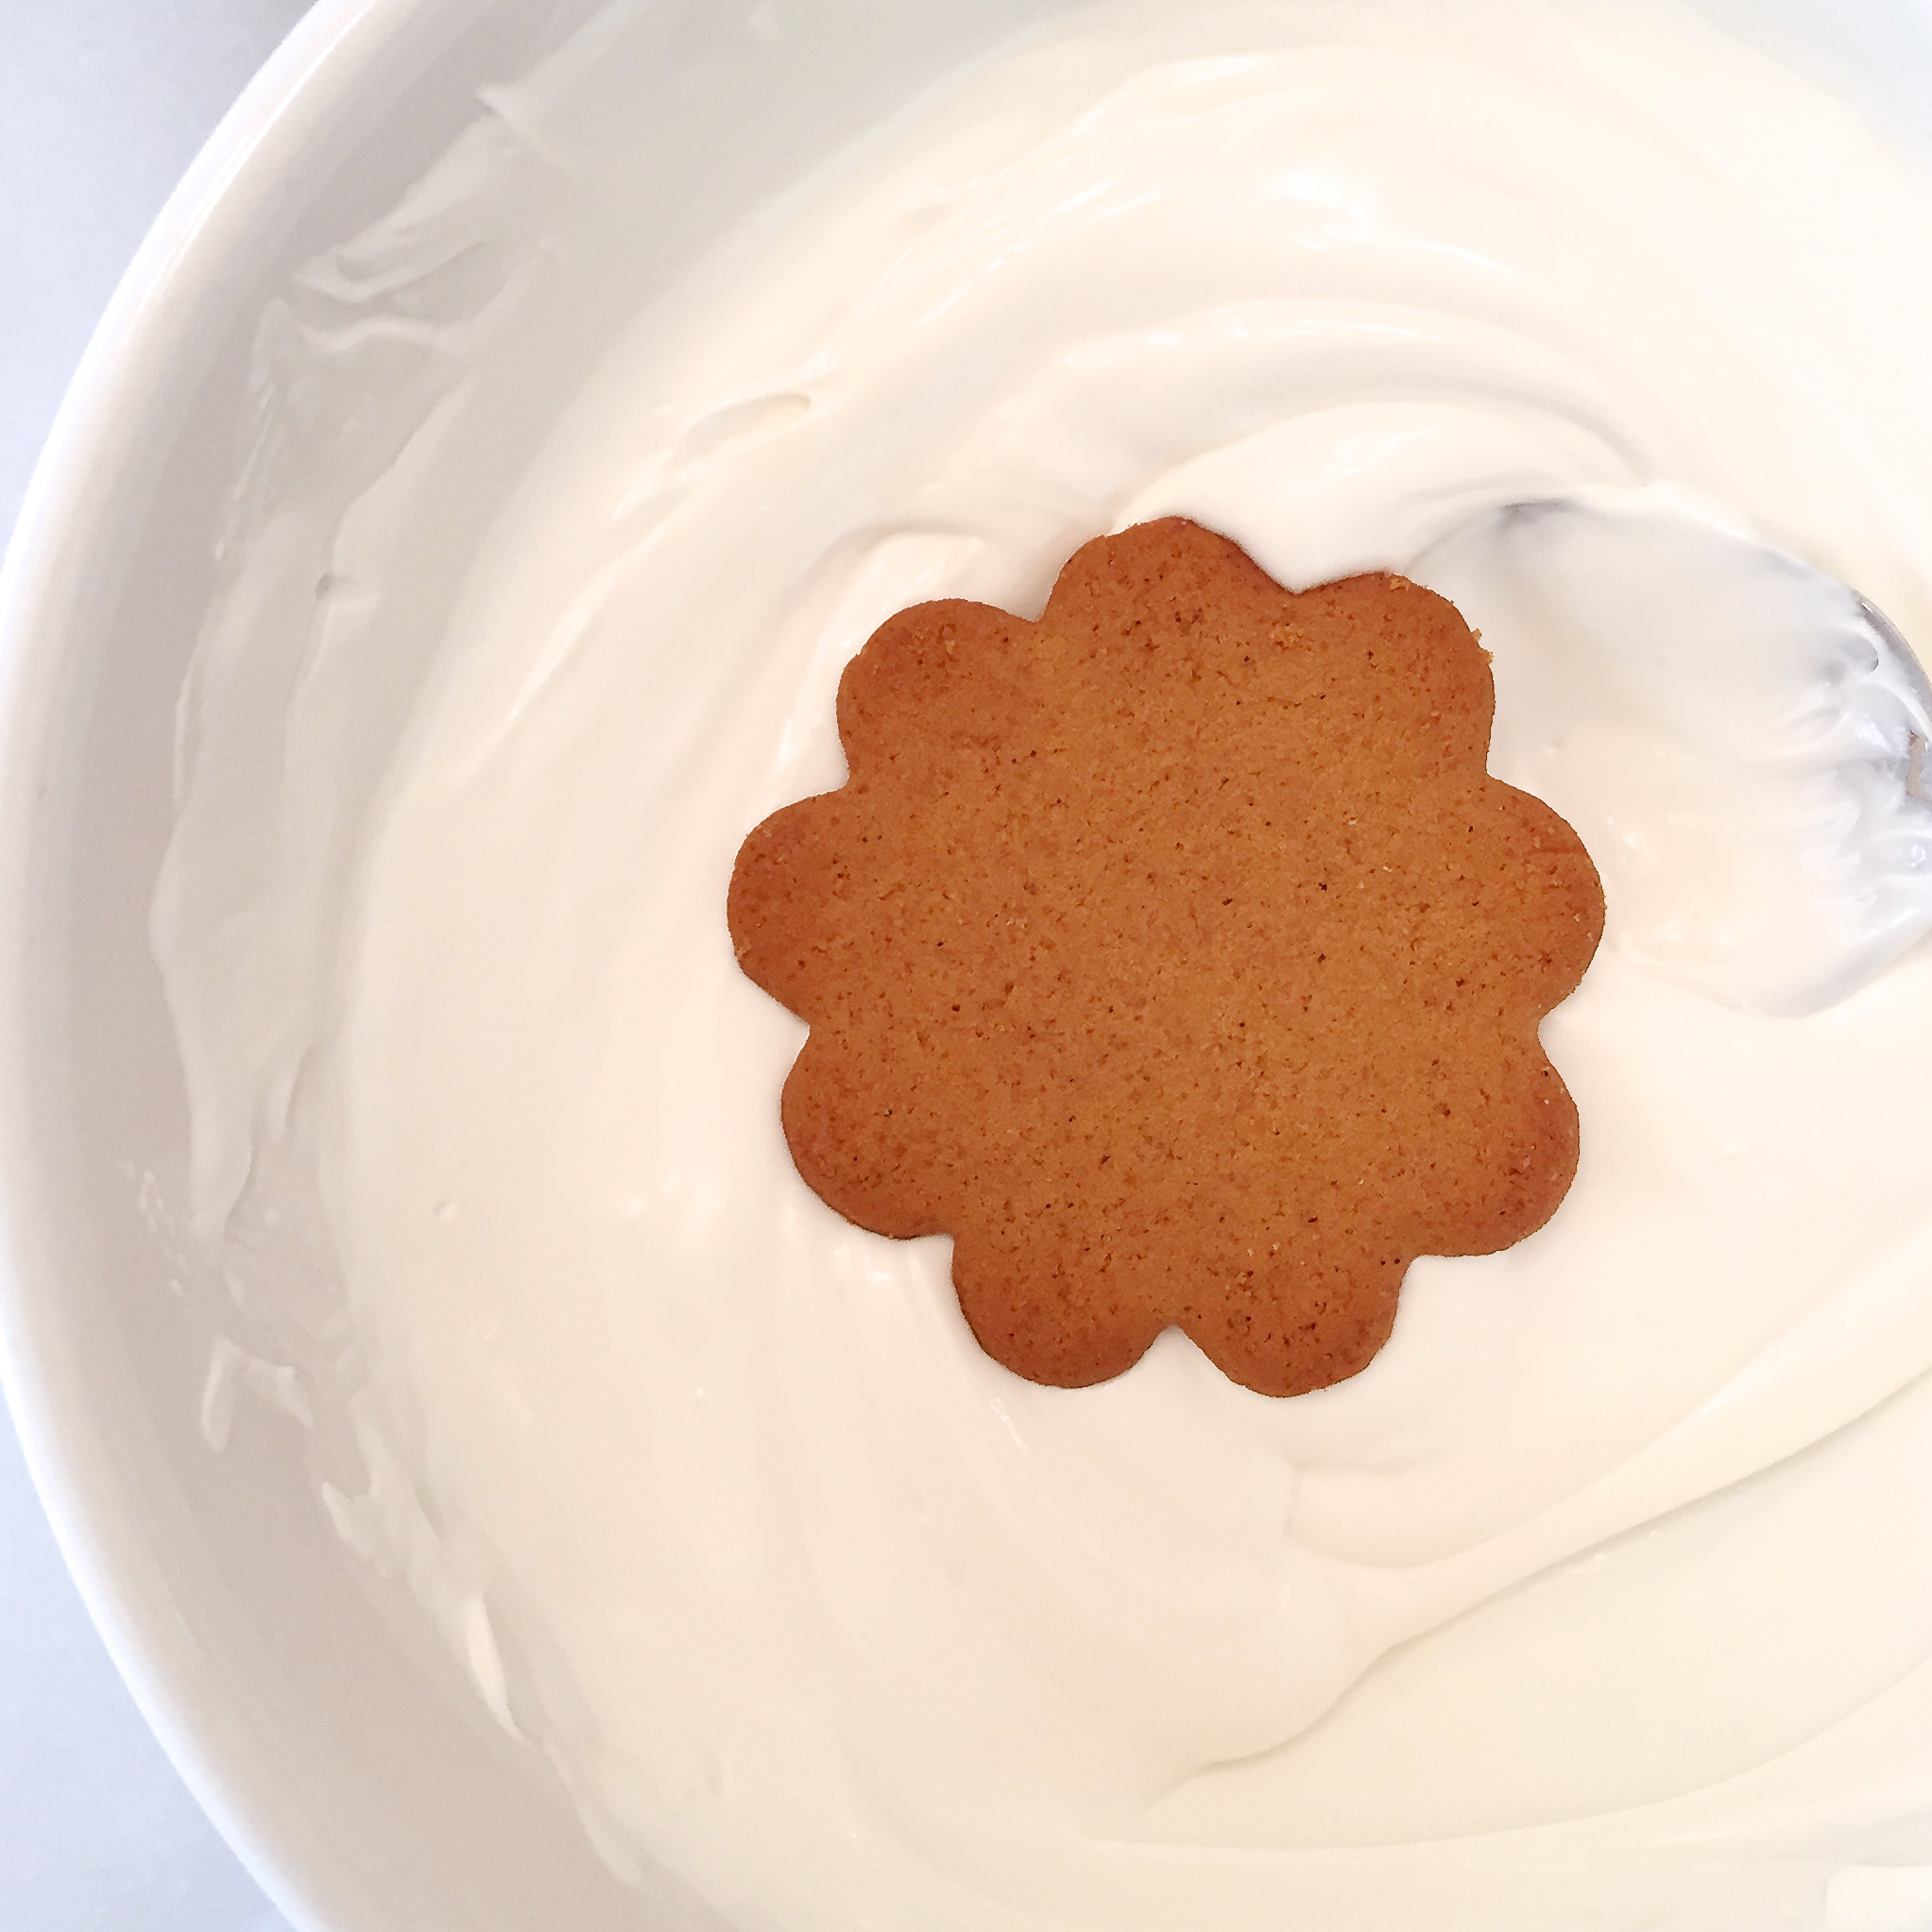
  • Melt white candy melts in the microwave in 30 second increments, stirring between until melted and smooth.
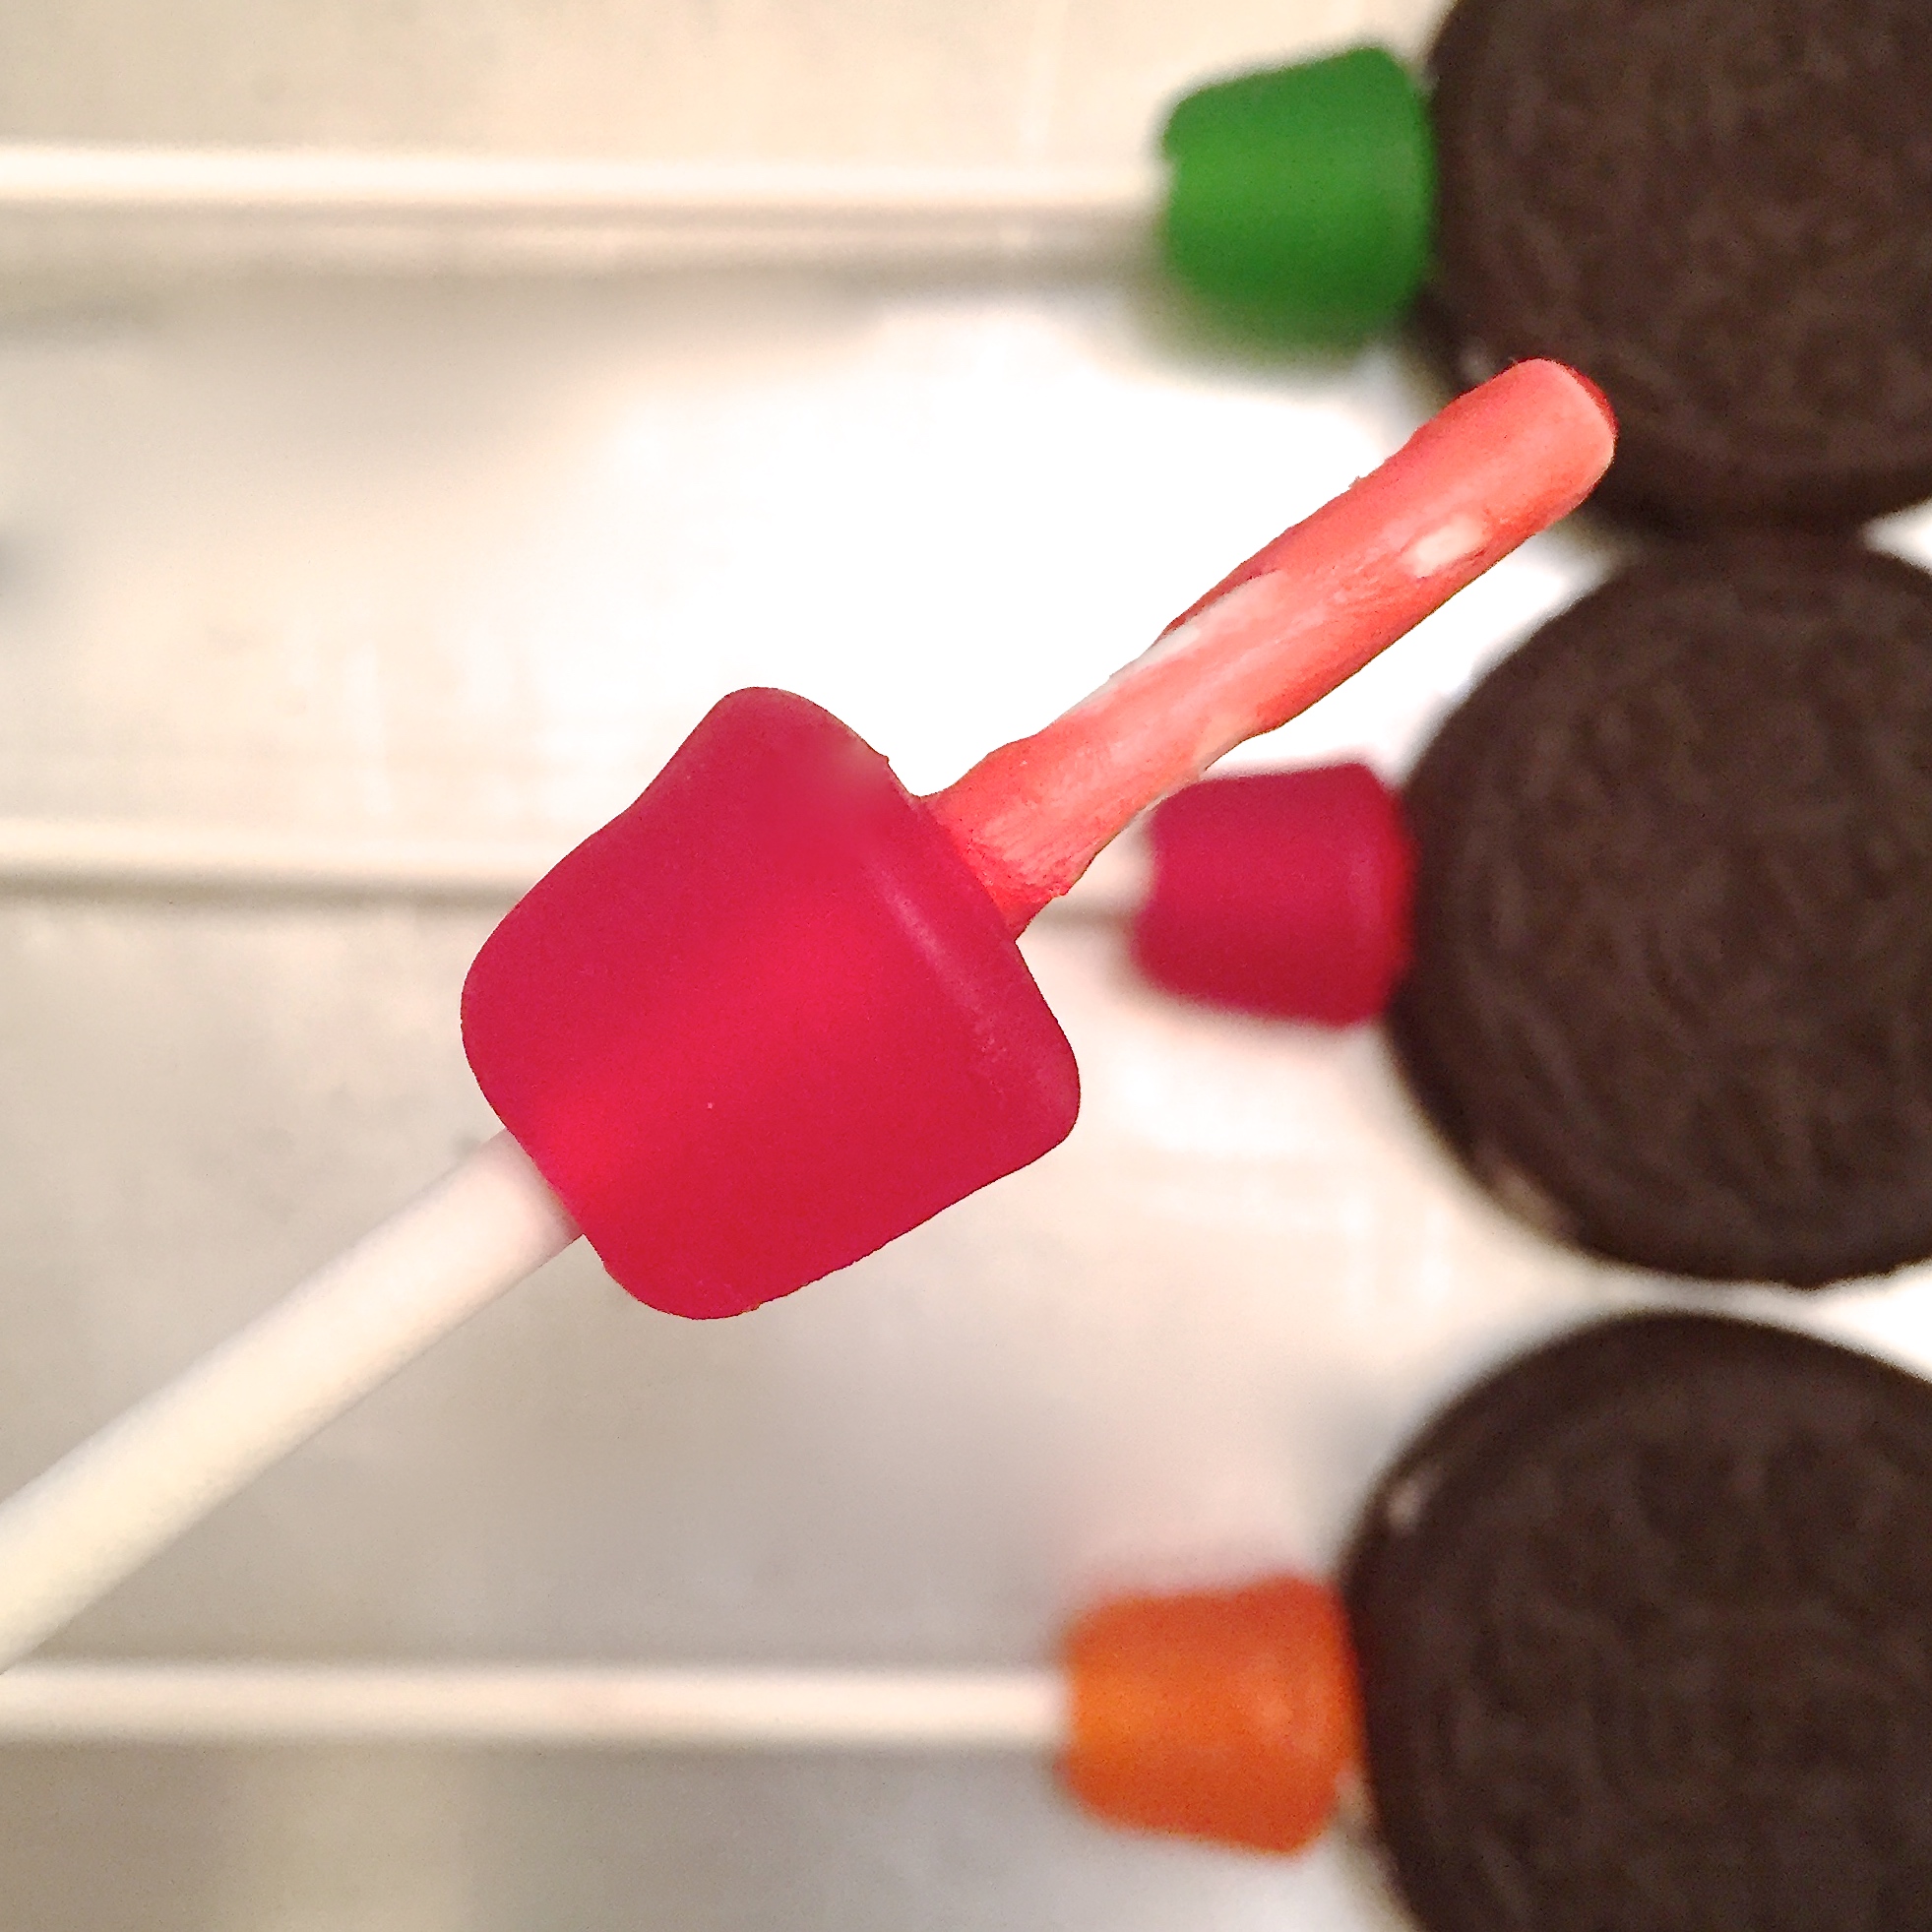
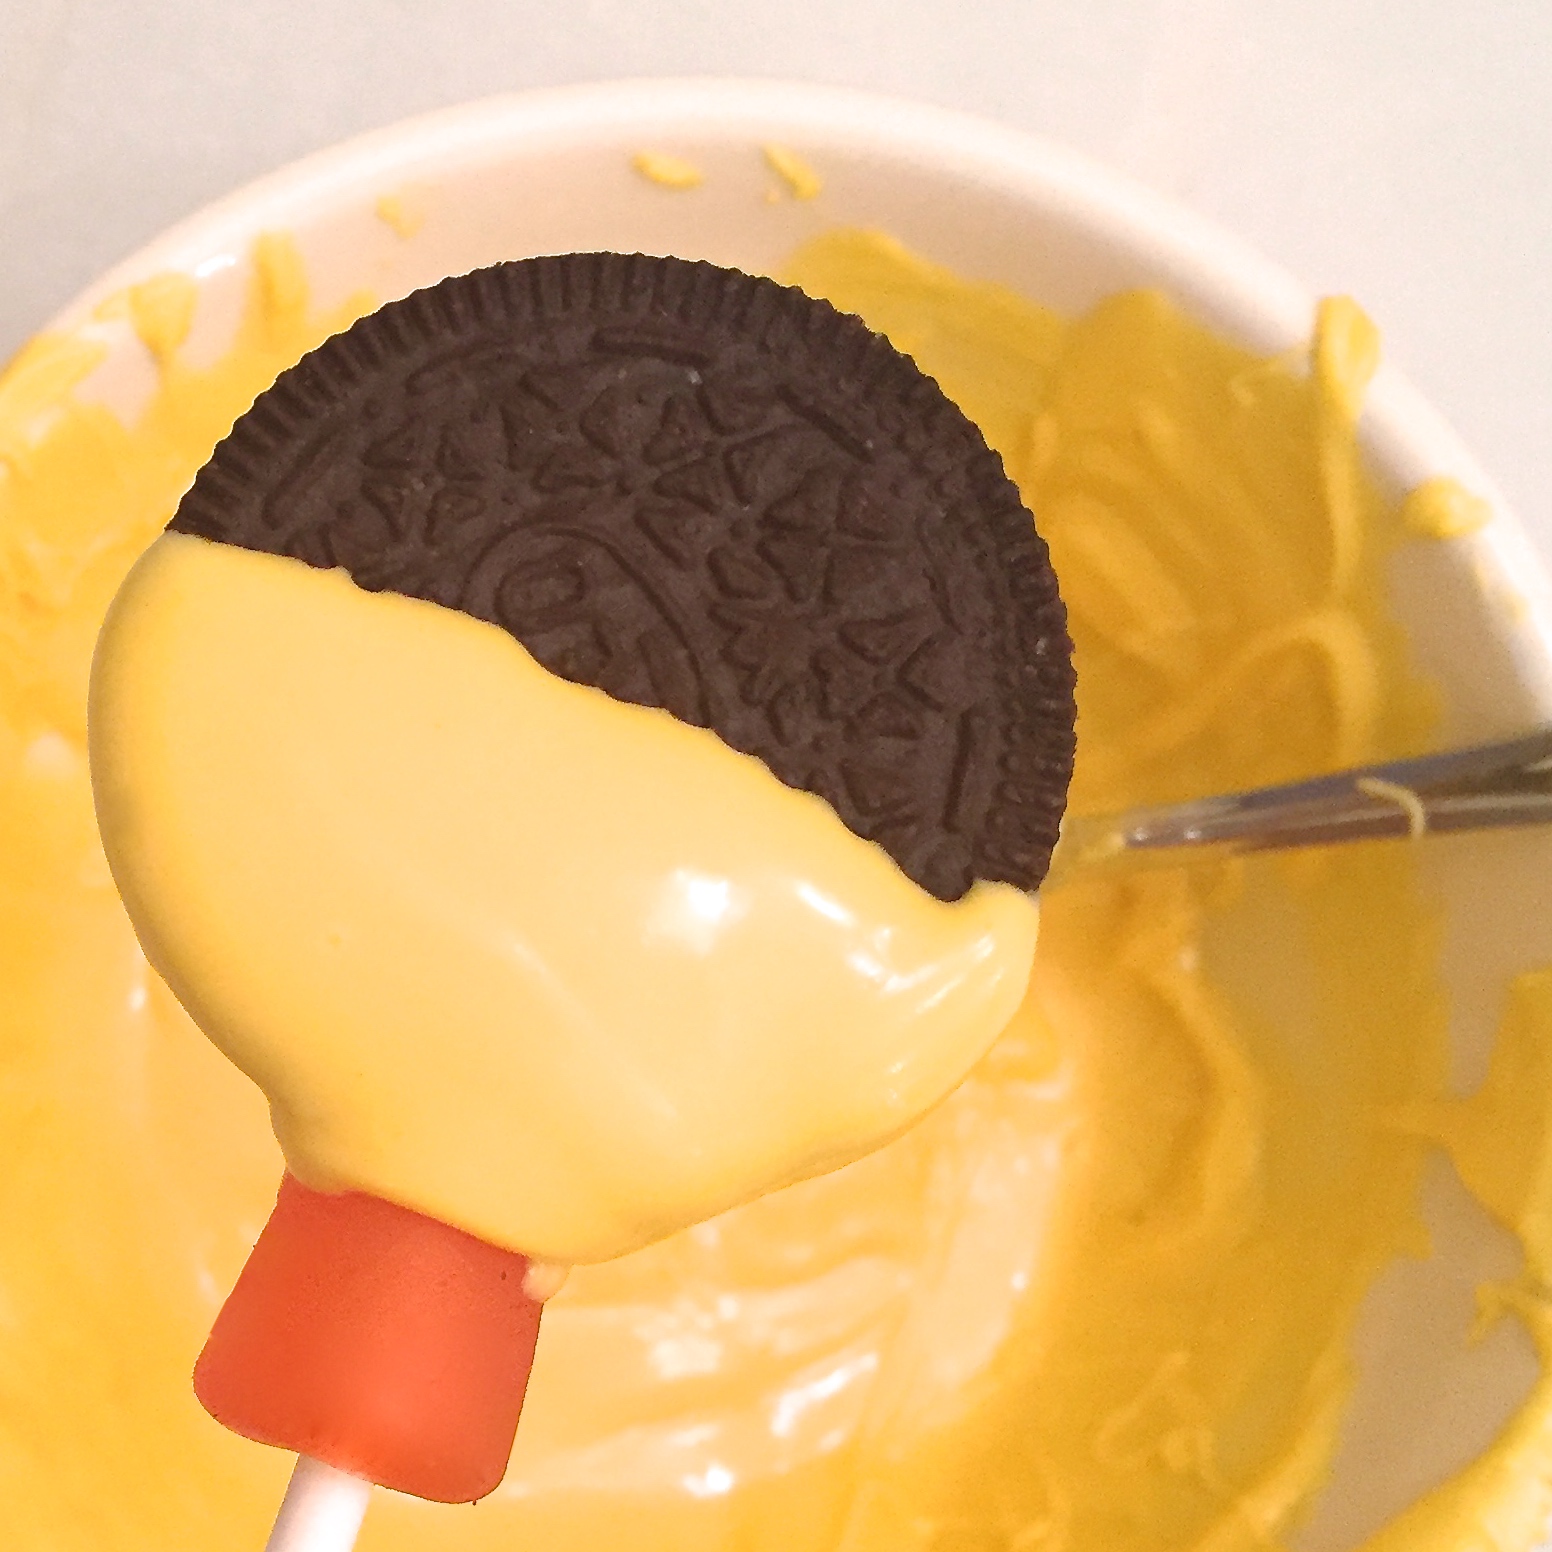
  • Press a lollipop stick through a Dots candy until about 1 inch of the stick is out of the other side (see photo below).
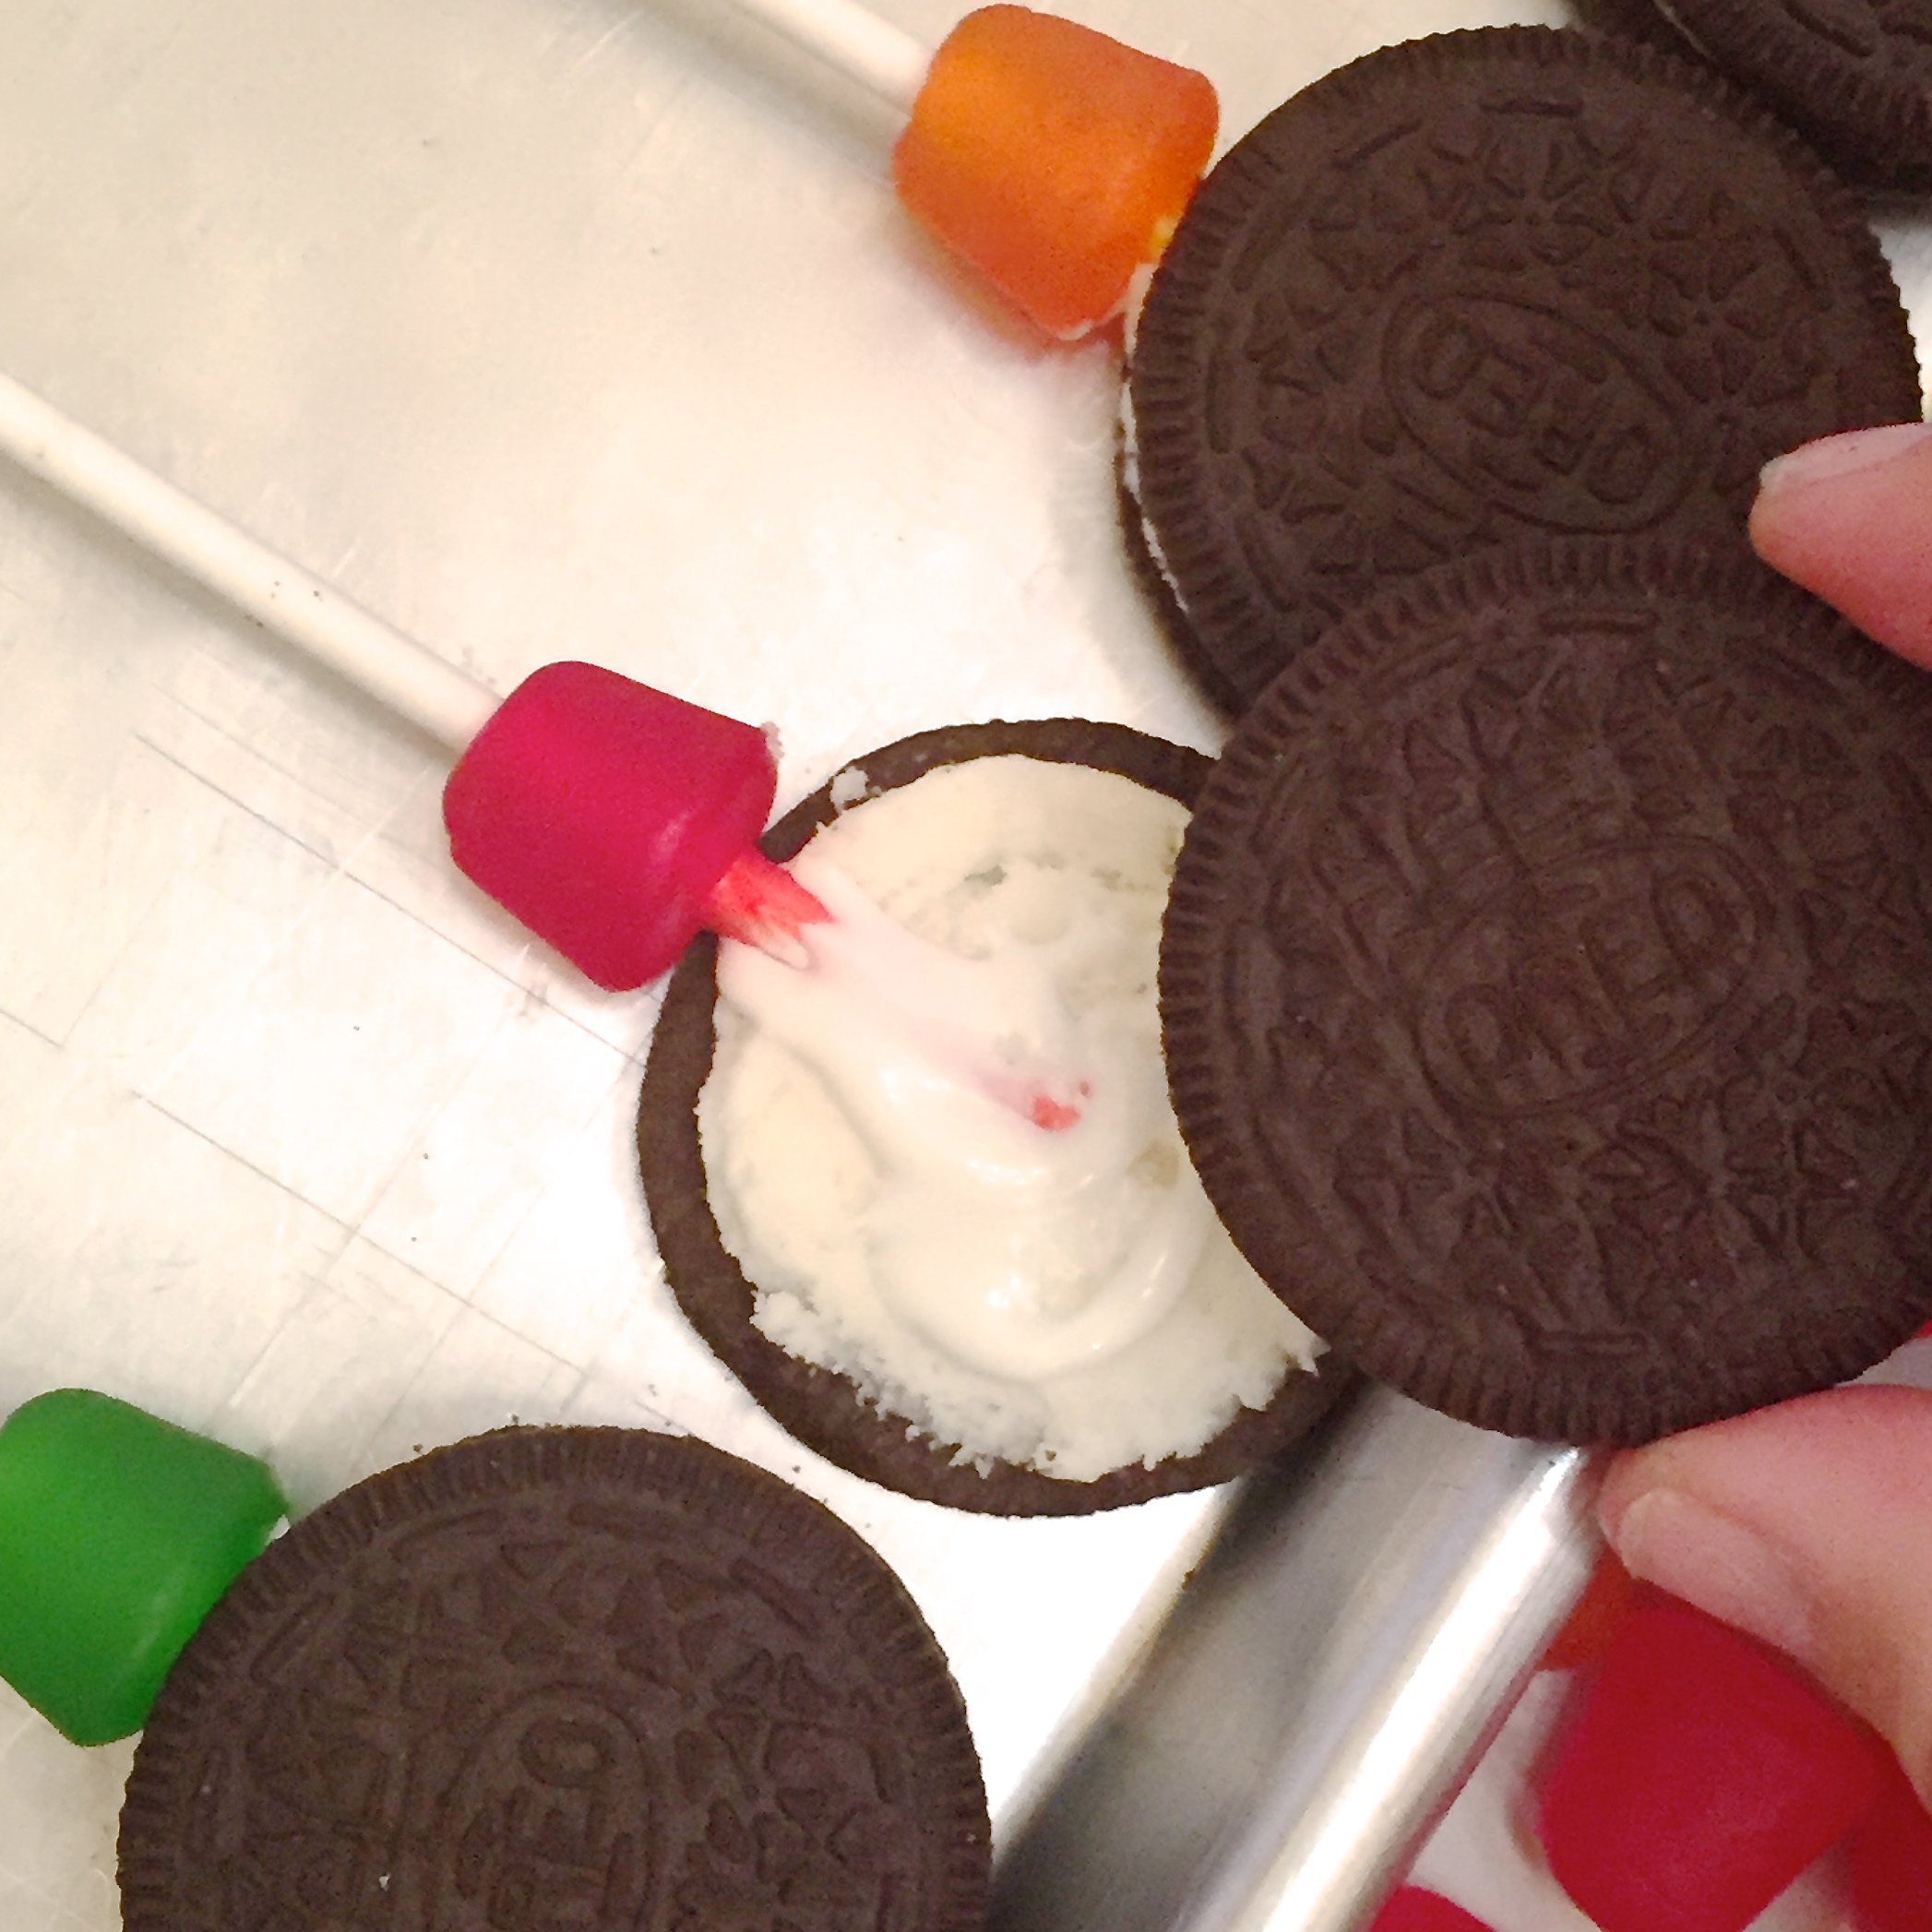
  • Dip end of a lollipop stick into the white chocolate, spread a little on the top of the white Oreo filling and then press the stick flat into the center of the filling.
  • Place top of Oreo on, and set on a cookie sheet. When all Oreos have sticks inserted, pop these in the freezer for 15-20 minutes (until they are nice and firmly set).

  • Melt one color of Candy Melts in the microwave in 30 second increments, stirring between until melted and smooth.
  • Gently spoon color over bottom 1/4 of Oreo (see photos below).  I gently turned the stick so I could spoon color on the back too- then tap stick against side of bowl to drain excess. Set on parchment paper and allow this to harden up.
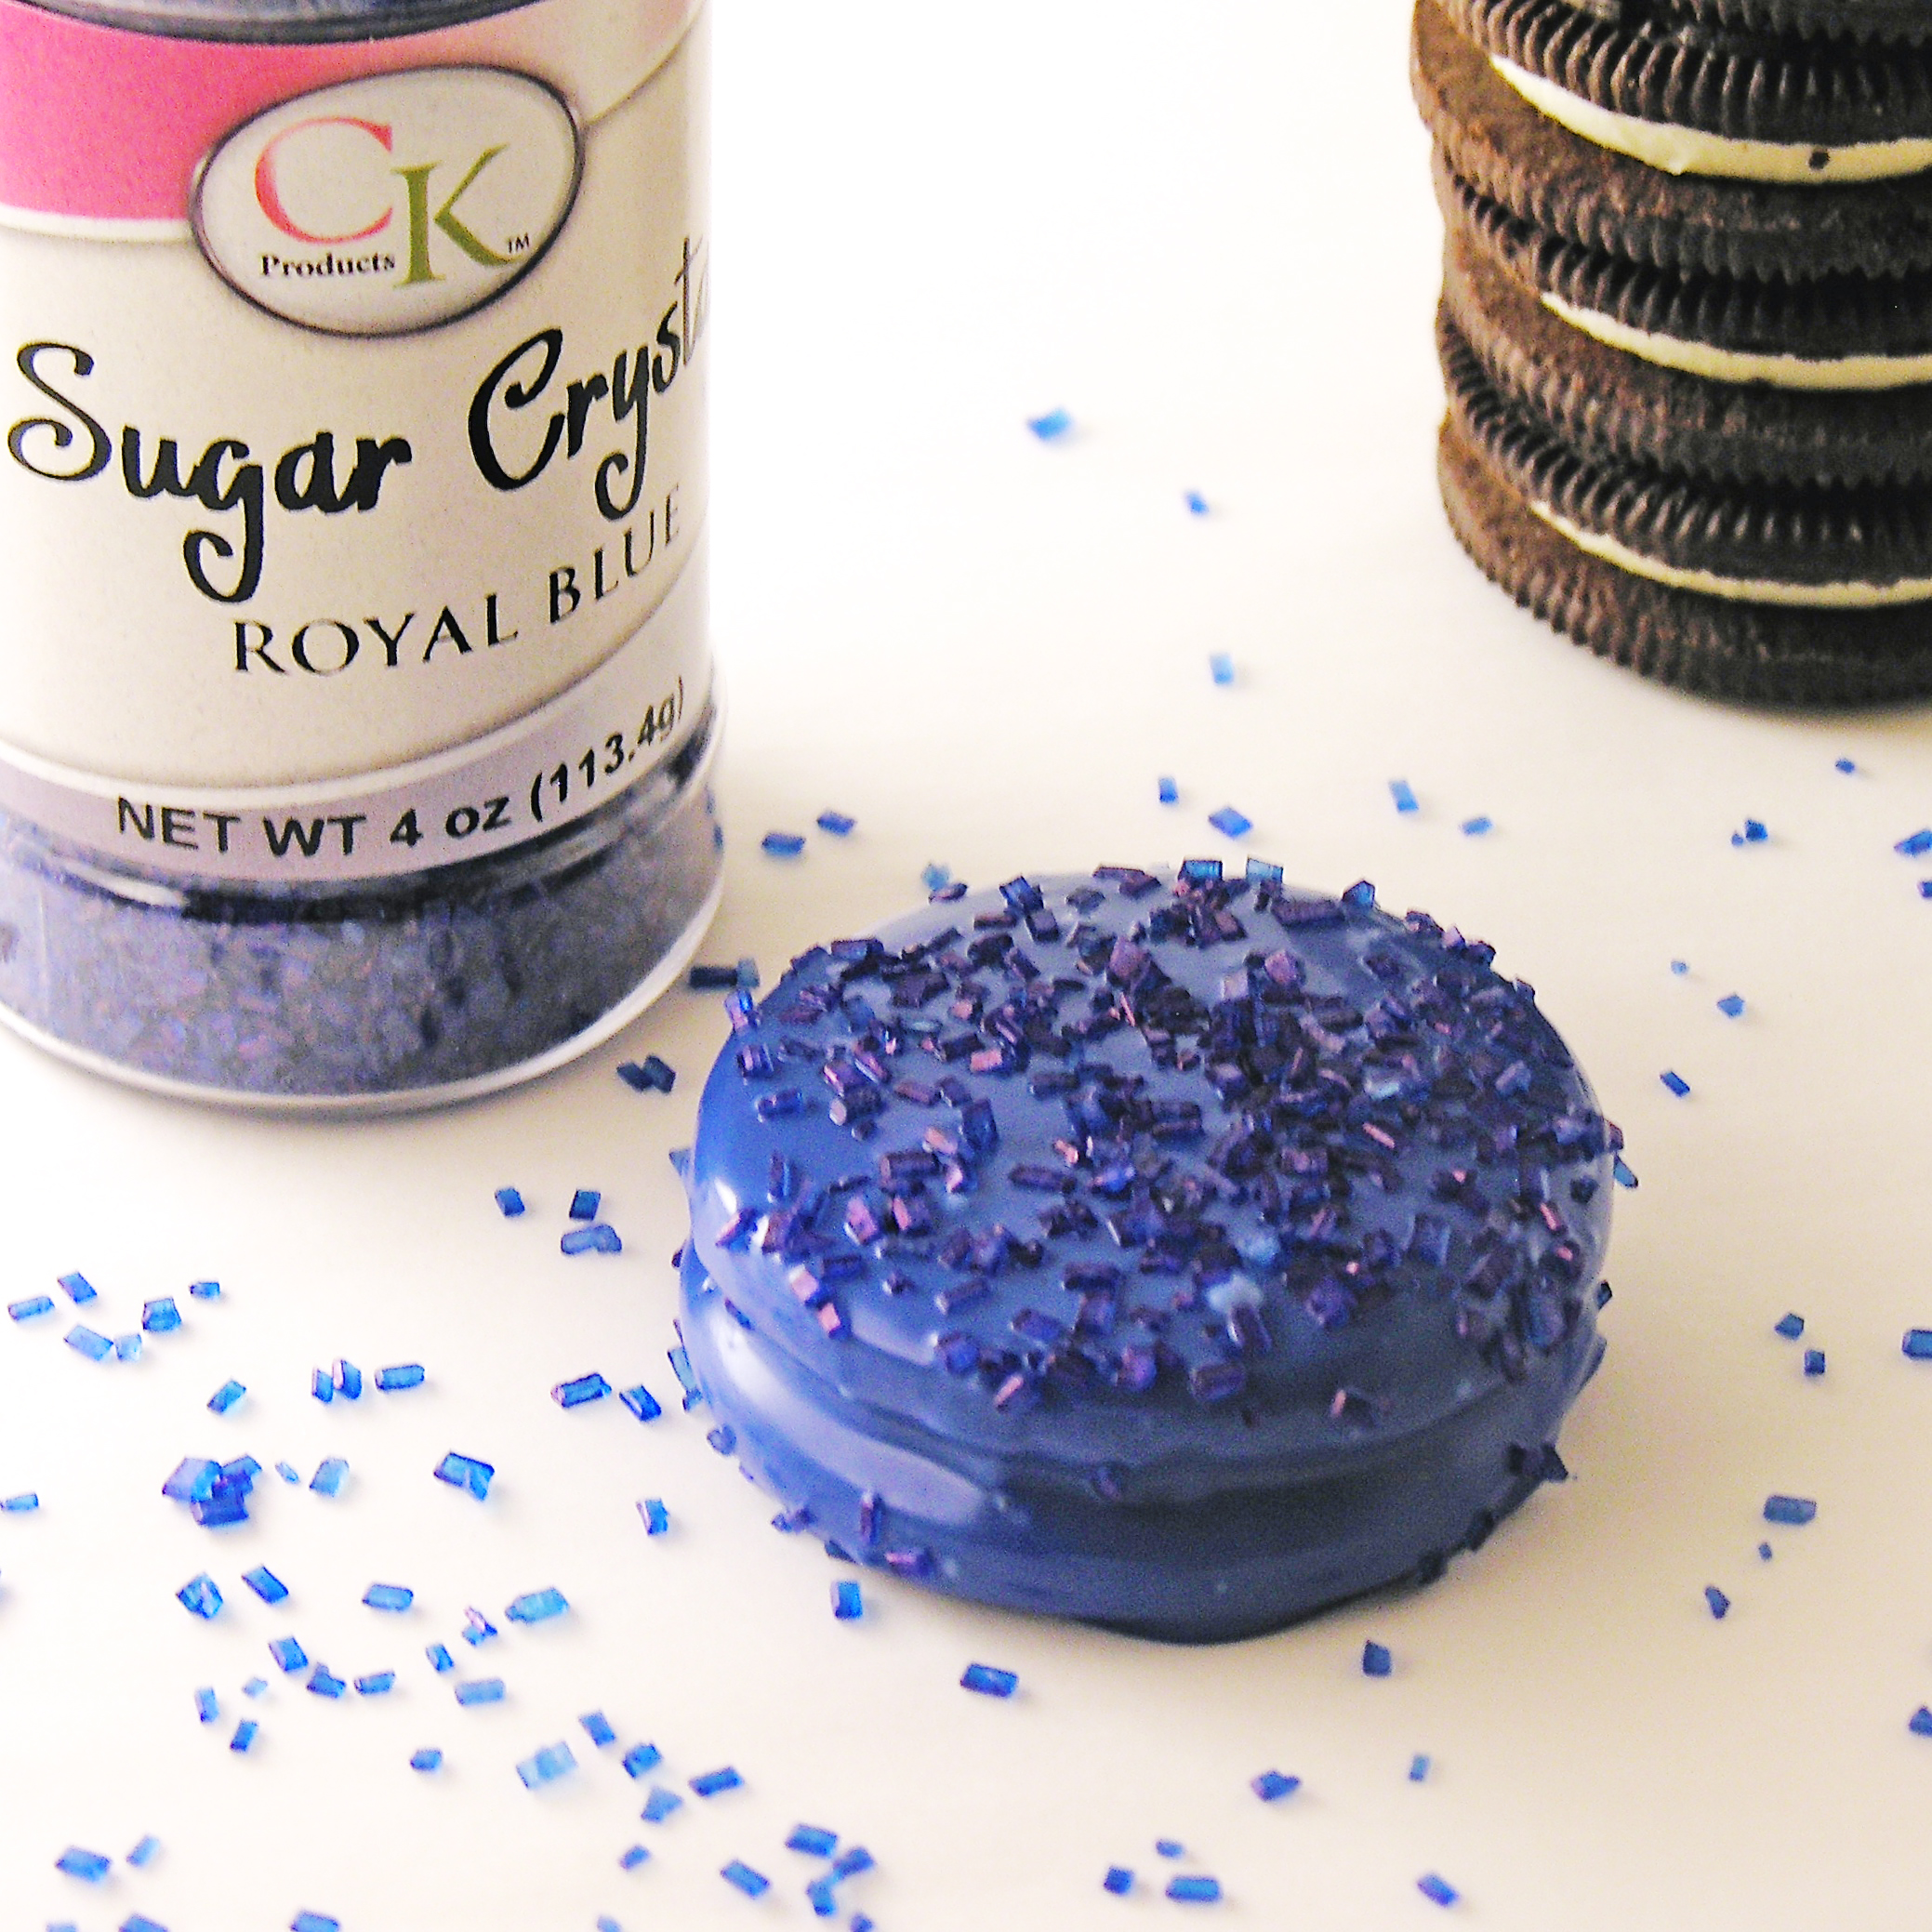
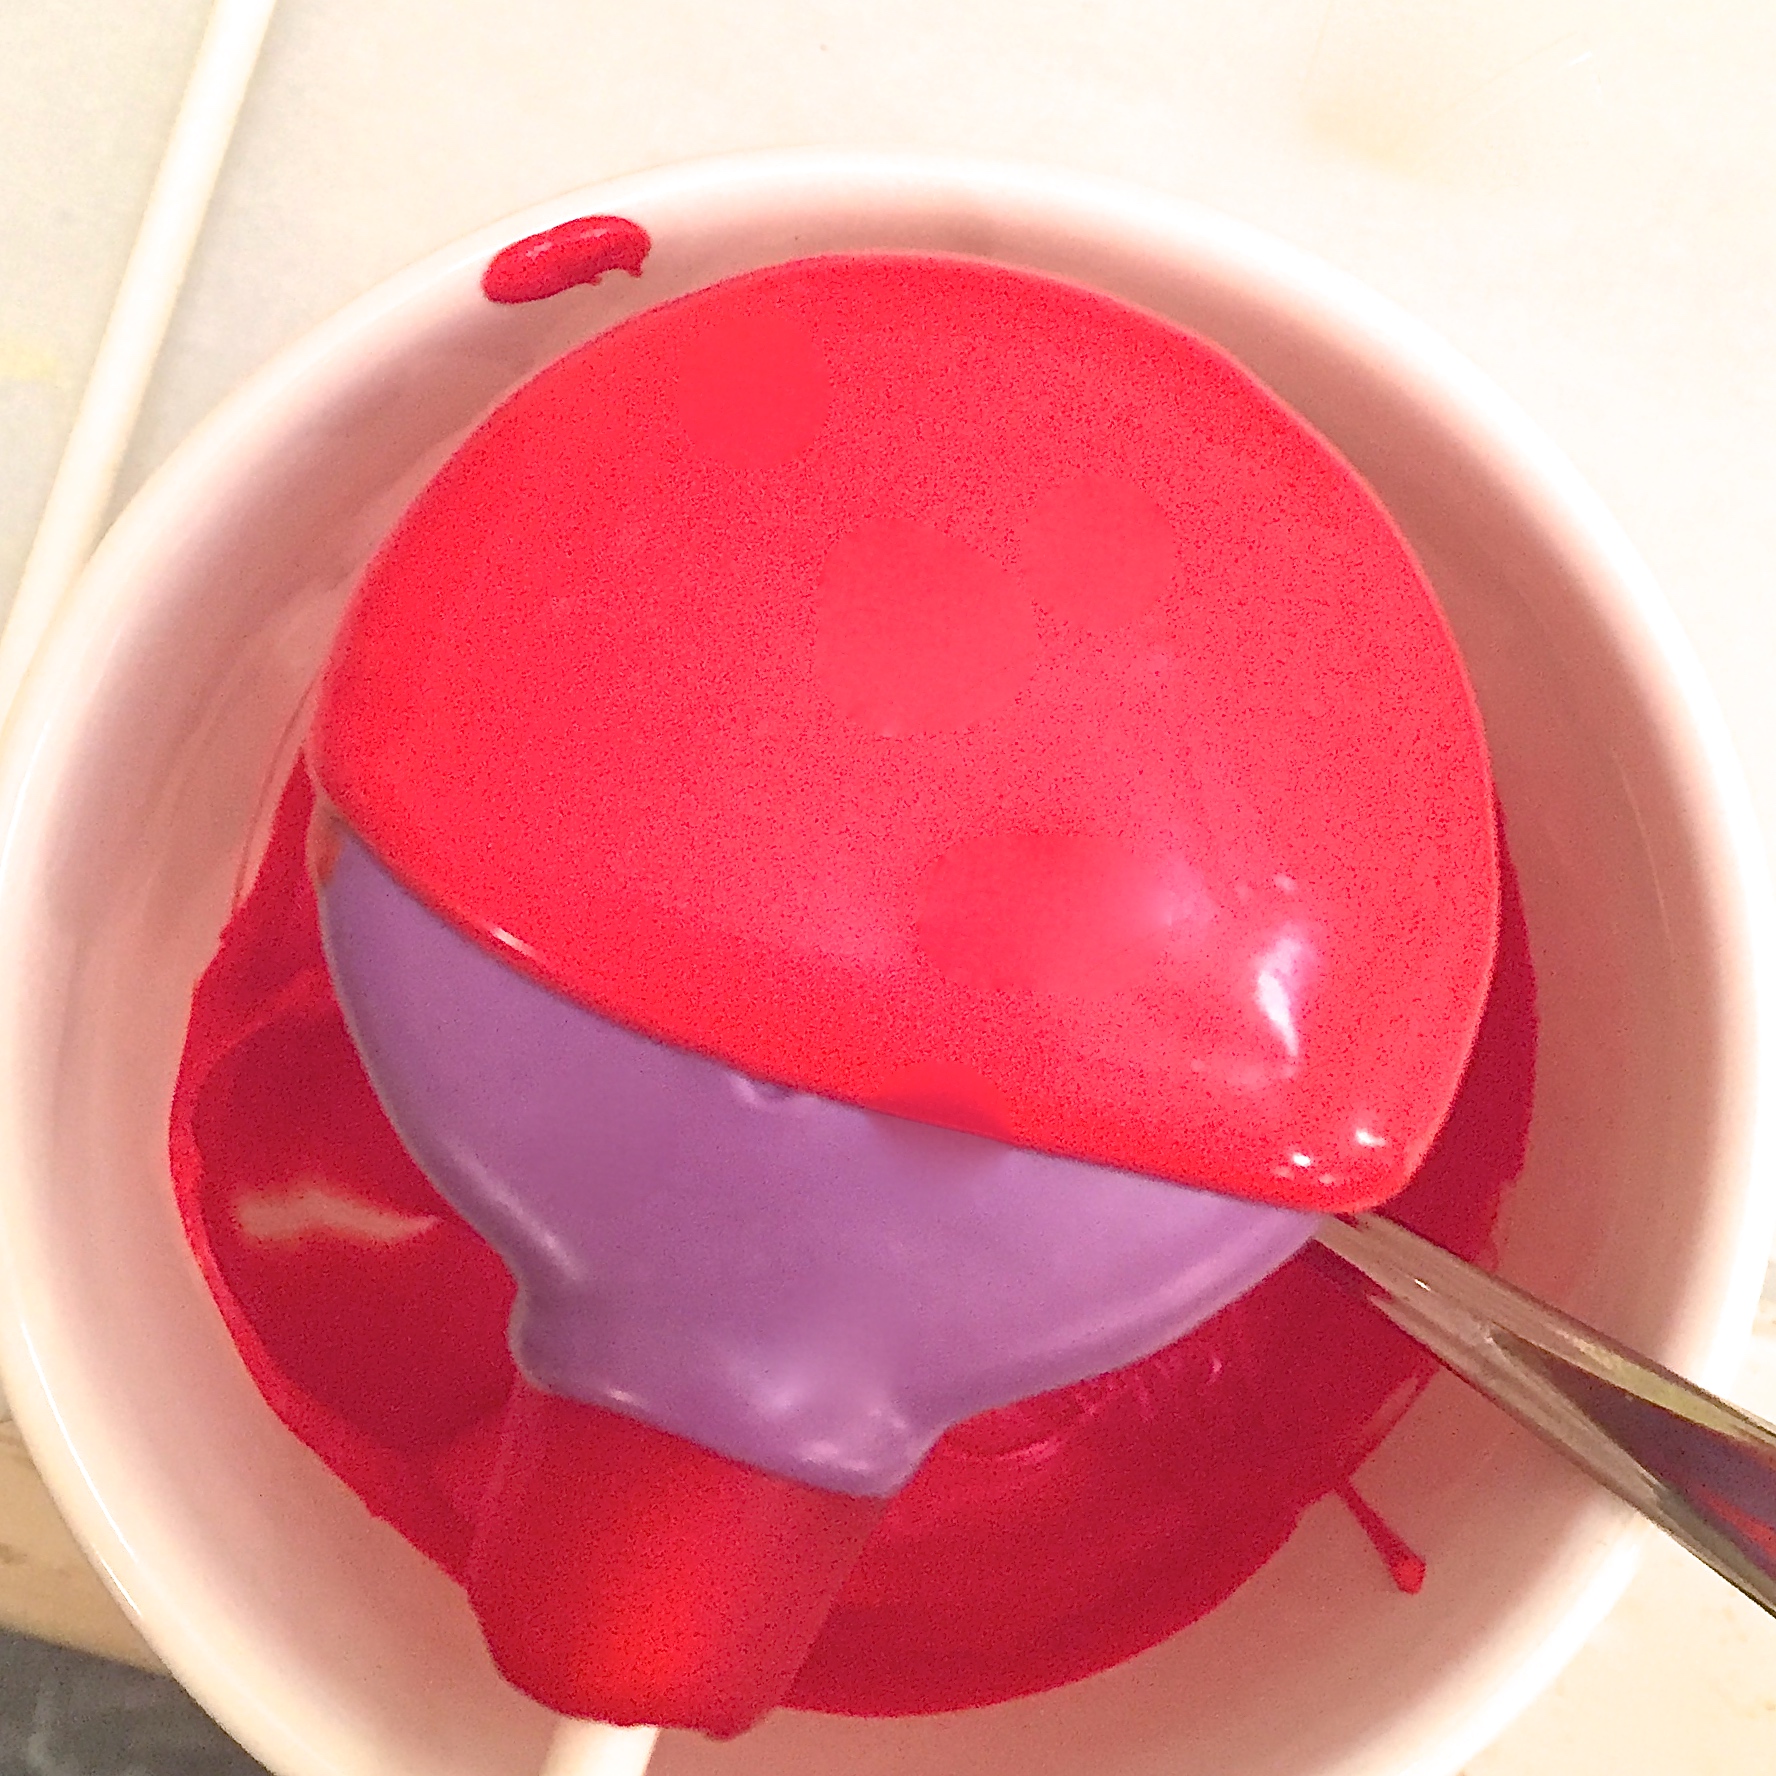
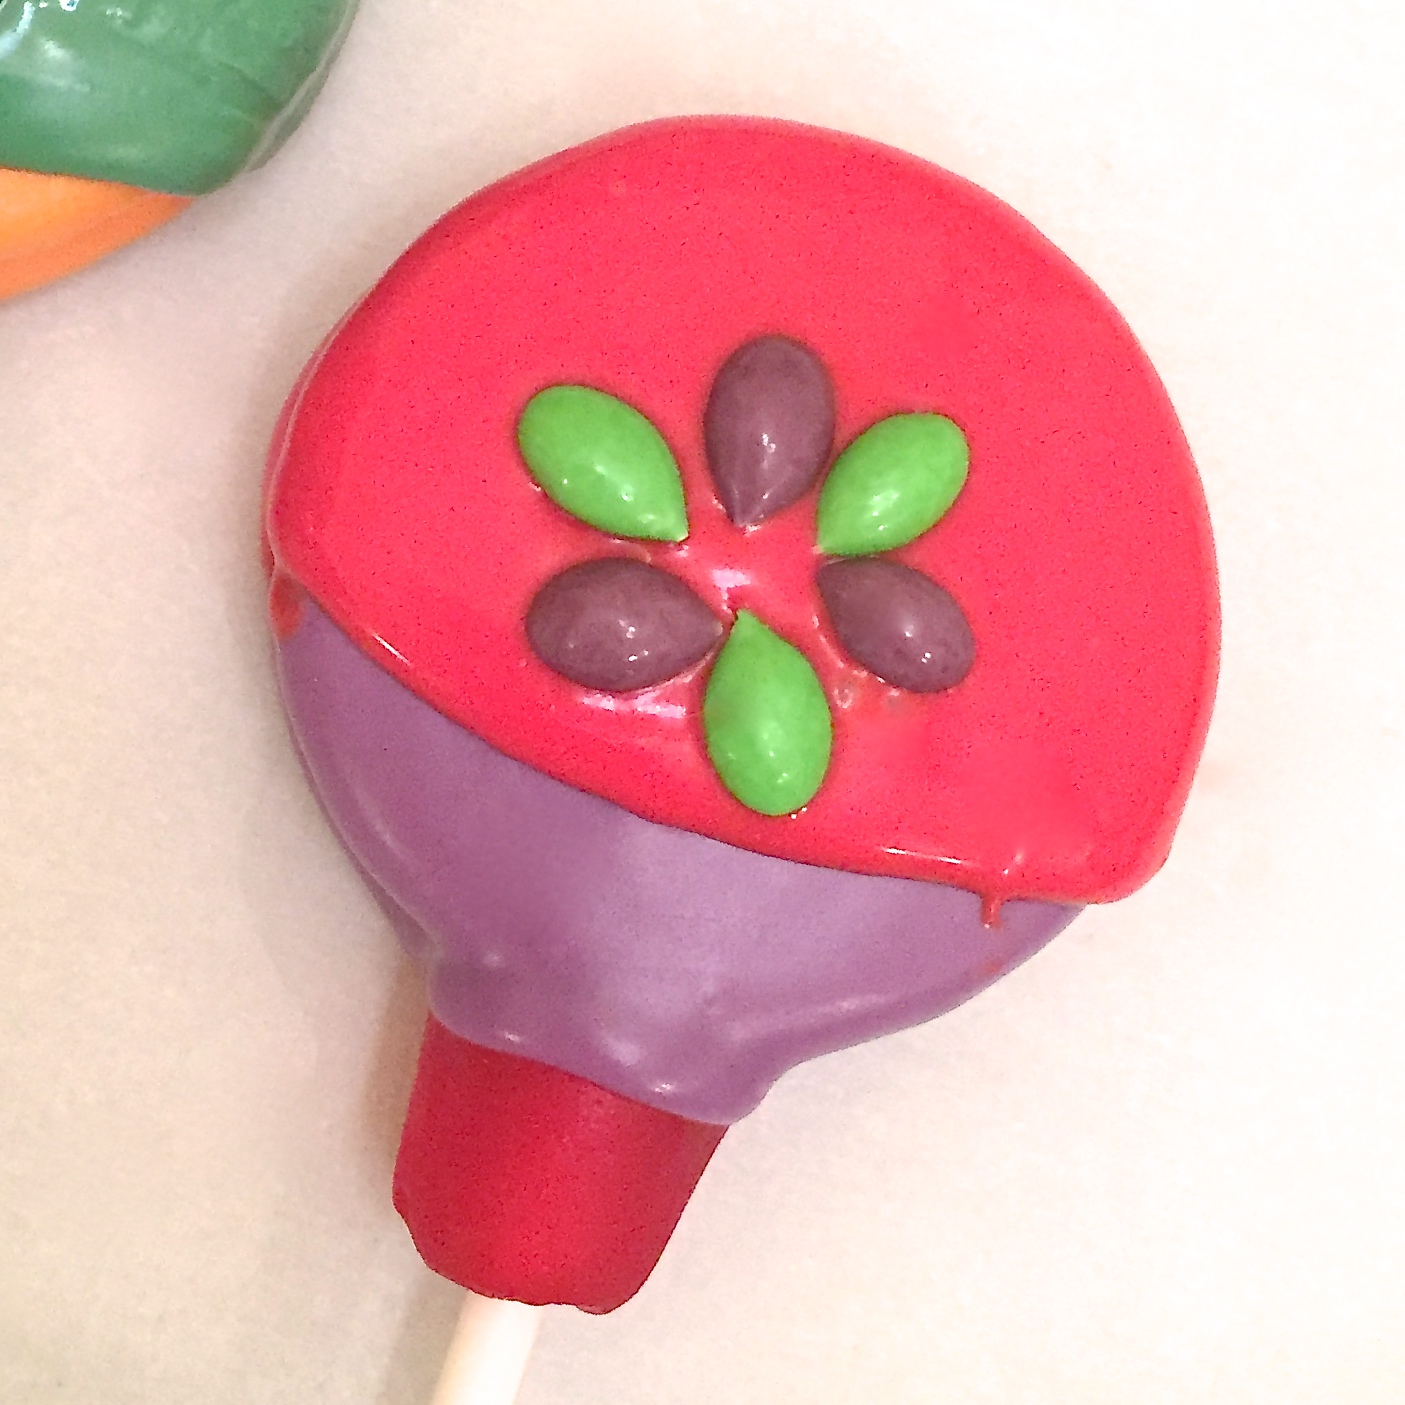
  • Melt second color of Candy Melts as above. Spoon color over the rest of the Oreo, tap stick against bowl to drain away excess, place on parchment paper, and gently place sunflower seeds in flower pattern in the center (or add sprinkles…or drizzle chocolate…). Allow this to harden.
  • Melt third color of Candy Melts and spoon over top 1/4. Tap stick against bowl to drain excess and set on parchment paper to harden.
  • Allow candy melts to harden completely, and then pipe line/dots on in any color (I used black).
  • ENJOY!

My thoughts: These are a delicious little way to celebrate Cinco de Mayo! Once they are hardened up, you can tie them into little individual cello bags and they will keep for weeks. I love make-ahead treats! 

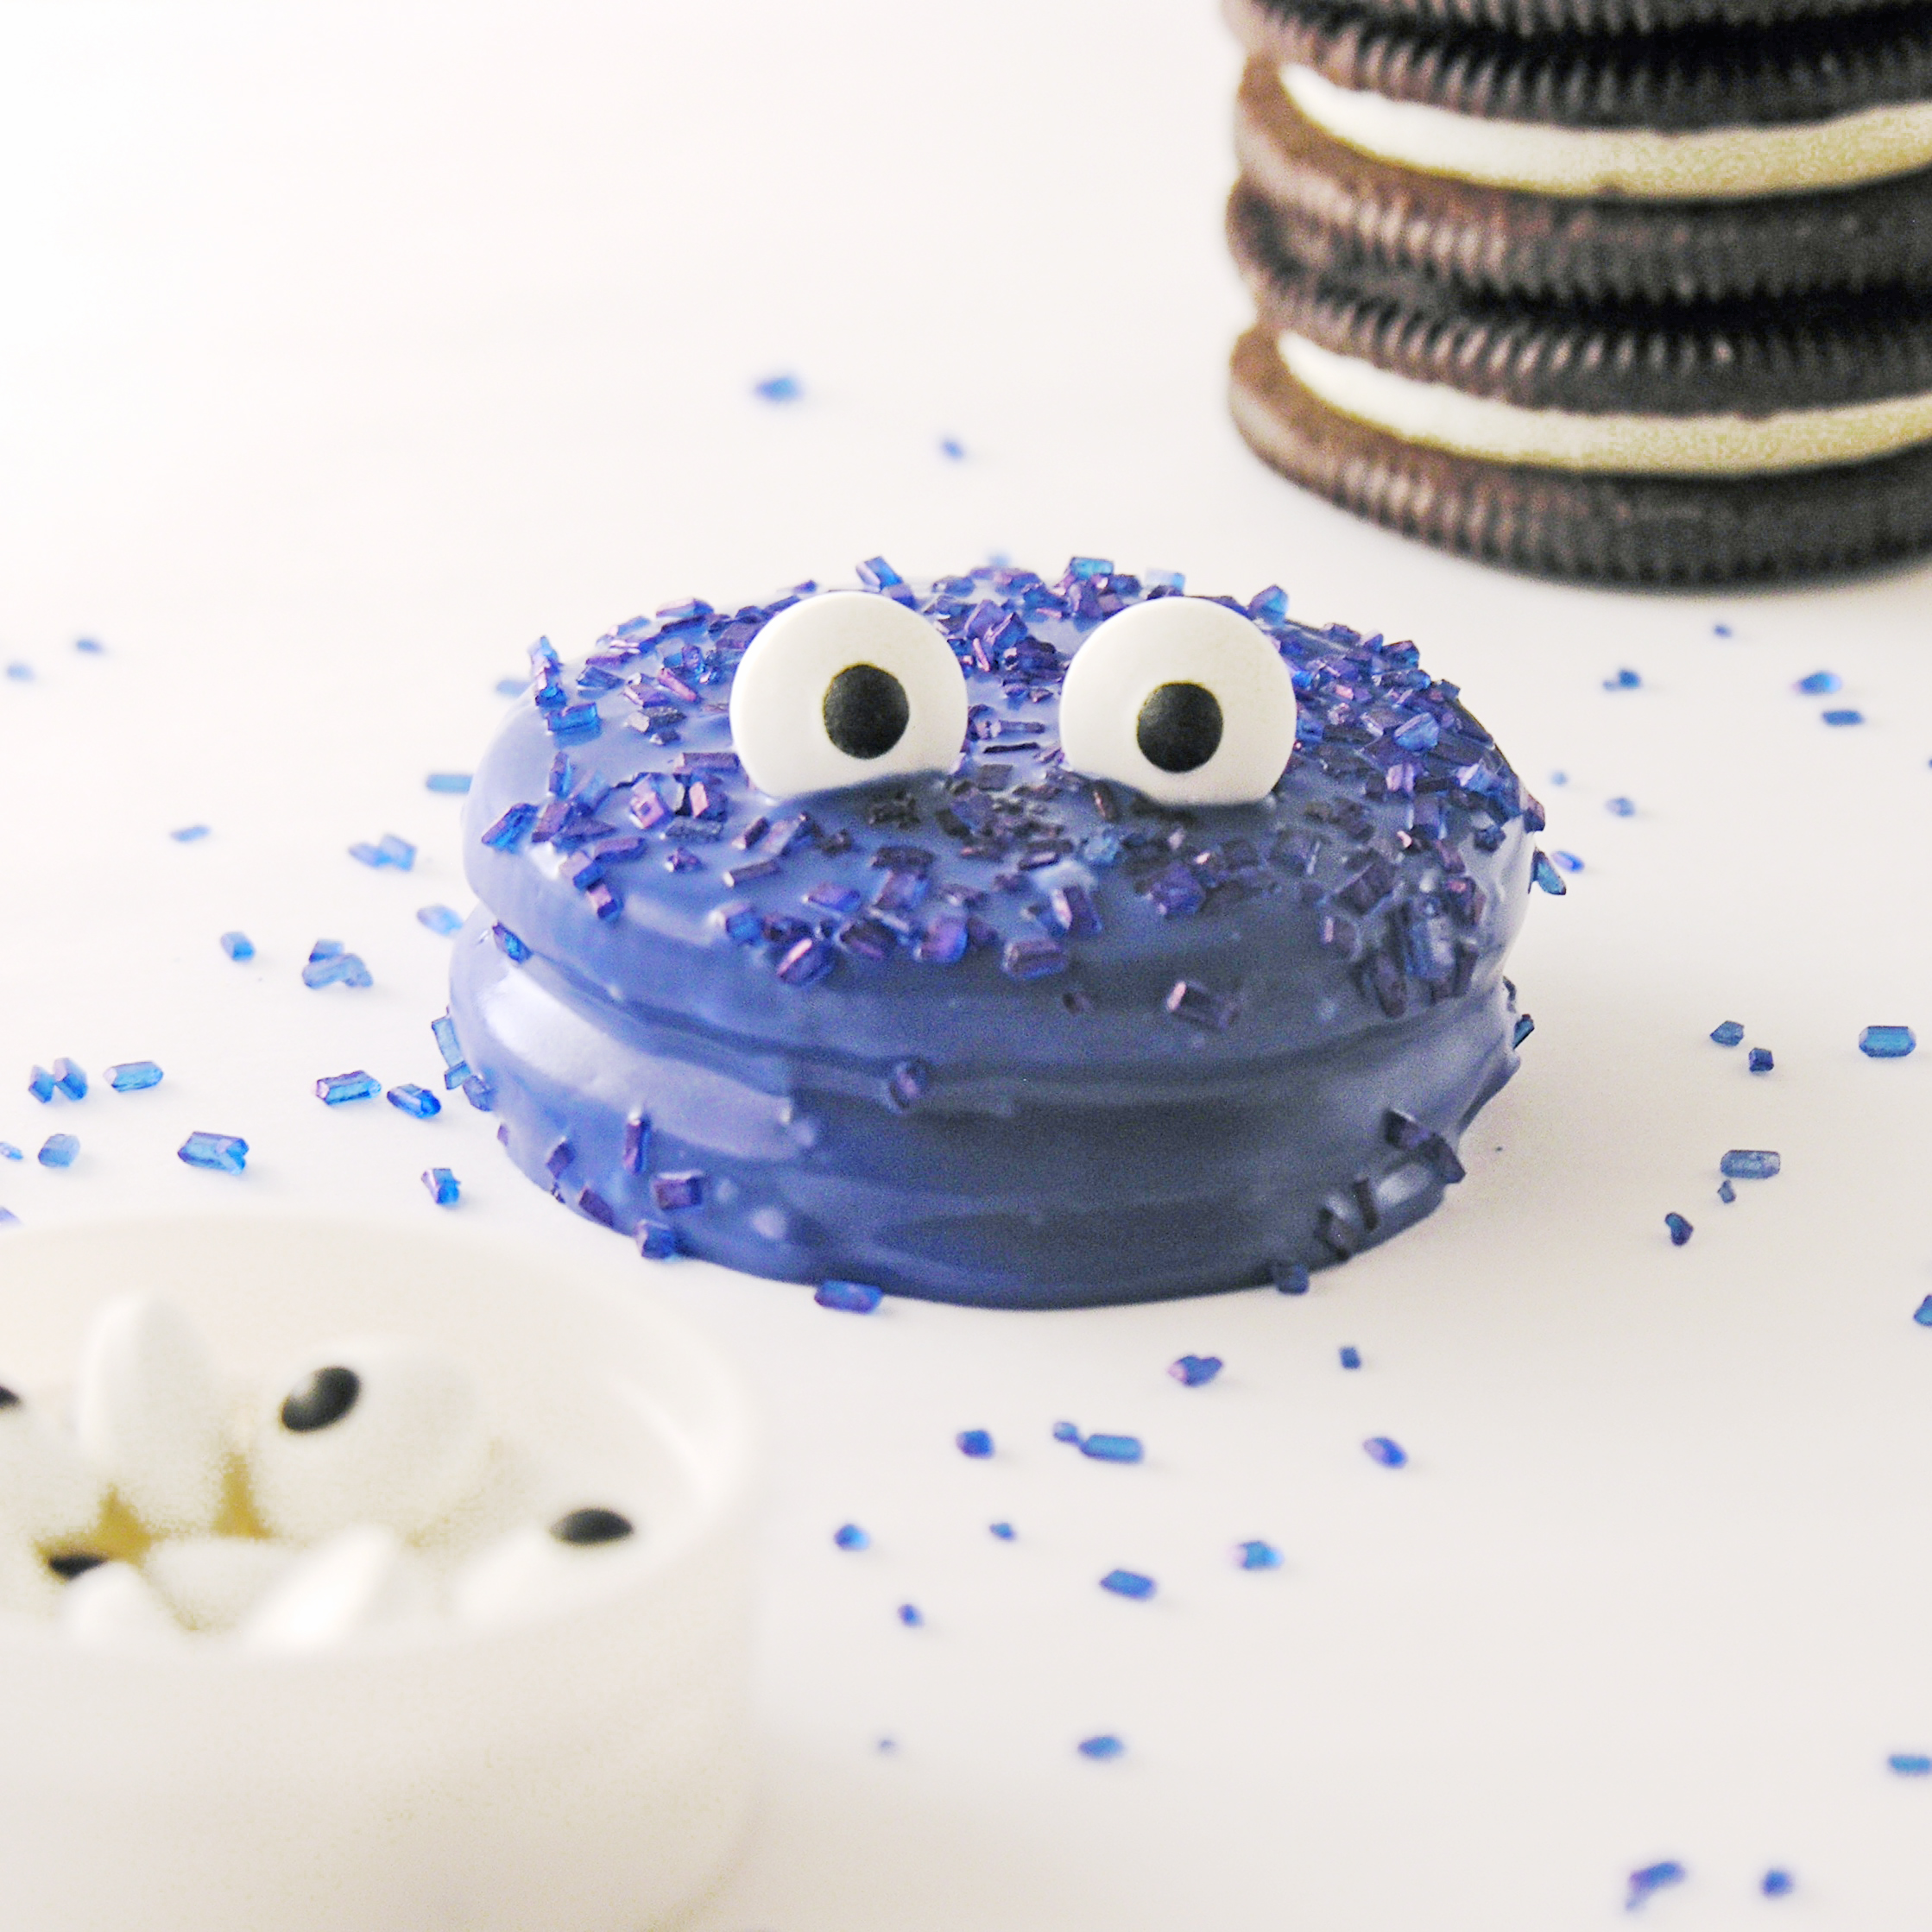
Are you a recent arrival to the incredible fun of Oreo Pops?? They are one of our favorite things to make here on Easybaked- and we have them for every possible occasion! Here are a few to try: (click on photo to see recipe)

Or are you looking for great recipes for Cinco de Mayo?? We have those too! We love to celebrate this holiday here!!

Advertisement

Easy Daisy Cookies!

Posted on

Daisy Cookies6

Vanilla wafers and ginger cookies are covered in fun colored candy melts to make these cheery daisy cookies! 

These are less recipe and more edible craft project- and they are SO fun! 🙂 I love (lovelovelove) Anna’s Swedish cookies. They are available in Ginger, Orange, Almond and Mint Chocolate. I get mine at Walmart- but you can find them on Amazon to0- right here. They are less expensive at Walmart though! Every flavor comes in an adorable flower shape that lends itself to making these cute little cookies! Make them in any color you want- and use any flavor cookie! So fun.

Daisy Cookies1

Daisy Cookies

Here is how we made them: (printable recipe)

INGREDIENTS:

  • 1 box of Anna’s Swedish Ginger Thins (I found mine at Walmart)
  • 1 box of Nilla wafers
  • Wilton’s Candy Melts in a variety of colors (I used up some of my half-filled bags with this recipe!)
  • Sugar Sprinkles as desired (shown in yellow)

DIRECTIONS:

  • Melt Wilton’s candy melts (in the center color- I used yellow!) in the microwave in 30 second increments, stirring between until smooth.
  • Dip Nilla Wafers into the melted candy, lifting them up with a fork and tapping the fork on the side of the bowl to allow excess candy melts to drain away. 
  • Pull bottom of cookie along edge of bowl to remove excess candy melts and slide coated cookie off fork onto parchment paper.
  • Sprinkle with jimmies or sugar to give it that “rough” center-of-a-flower look, and allow these to harden.

Daisy Cookies3

  • Melt candy melts in other colors, using the same technique. Dip an Anna’s cookie in whatever color you are using and use a similar technique to tap excess off and slide bottom against edge of bowl.

Daisy Cookies2

  • Place coated Anna’s cookie on parchment paper and before it hardens, place a “center” on it.
  • Allow cookie to harden up before serving.
  • Enjoy!

Daisy Cookies

My thoughts: These are just plain fun to make. They are great for practicing your chocolate dipping skills, since these are nice hard cookies without any fillings that get soft. You can do them in any colors you want- and a variety of flavors. My only warning…… Everyone loved these and exclaimed over the cute FLOWERS unless they saw a white and yellow one 1st. Then they asked if it was an egg 🙂 Sigh. Maybe a mini- Nilla wafer would be better as a “center” for those? However you decorate them, I hope you enjoy these fun summer cookies!  ~r

Daisy Cookies7

Eggs? Daisies? Haha…..

Other fun flower ideas here on Easybaked: (click on a photo to see the recipe)

Flower Pot OreosChocolate cut-out cookiesSugar cookie cut-outsM&M flower bouquet!!!


Caramel Armadillos

Posted on

Caramel Armadillos1

Caramel Armadillos. Because Caramel Turtles are soooooo yesterday.

I have this great, really easy, caramel filling. It’s great on ice cream, in brownies, in cupcakes and even by the spoonful. I love it. I decided this week that I wanted to make turtle cookies with it, and I was struck by how boring and predictable caramel turtles are. Why turtles? Who started this trend? I turned to Wikipedia for answers. I was still bored.

I decided to make caramel armadillos instead. Not only are they WAY cuter than turtles, but it’s really fun to say “caramel armadillos”.

Try it… five times fast!

You know you want to… 🙂

Caramel ArmadilloA couple weeks ago I was waiting for a friend to meet me for coffee and I stumbled upon these cute little chocolate molds on Amazon. They are supposedly Easter eggs, but when I decided to make Armadillos they came to mind as the perfect thing to use! All I needed was a tail and ears… and a tootsie roll would suffice!

SO caramel armadillos were born- and they are neither boring nor predictable!

Armadillo3Here’s how I made them: (printable recipe)

INGREDIENTS: (makes about 20 armadillos)

  • 32 Kraft Caramels (unwrapped)
  • 1 can (14 oz.) of sweetened condensed milk
  • 1 stick (1/2 cup) of butter
  • Whole pecans- about 3 per armadillo
  • 1 bag (32 oz/2lbs) of Merckens Milk chocolate wafers. 
  • about 40 candy eyes
  • 20 pink candy balls for noses
  • at least 25 tootsie rolls, unwrapped

DIRECTIONS:

  • Make caramel in a large saucepan over the stove by heating together the caramels, condensed milk and butter. Stir constantly until melted and smooth.
  • Pour into a small bowl and allow mixture to cool a bit (so it doesn’t melt chocolate when poured in).
  • Melt chocolate wafers in the microwave in 30 second increments, stirring in between until melted and smooth.
  • Use a food-grade brush, or pastry brush to “paint” the inside of the egg mold with chocolate. Paint two layers to make it nice and thick- you should not be able to see any of the mold showing through. 
  • Freeze until hard (5 minutes or so)
  • Place cooled caramel into a large zip-top bag, zip tightly closed and clip a corner off the bag using a pair of kitchen scissors.
  • Squeeze a little bit of caramel in each cup, set three pecans on the caramel, pushing them gently into it, then fill the remainder of the cup up with caramel.

**Note: If you are making just armadillos, don’t fill to the top because you will add a layer of chocolate on top once the caramel is hard. If you are placing these on cookies, you can fill to the top and spread flat with a knife.

Caramel ArmadillosCaramel Armadillos

  • Place these in the freezer to harden (5-10 minutes) and then paint a layer of chocolate on the top of the hardened caramel and freeze again until hard.
  • Gently peel silicone mold away from chocolate and set on a plate to be decorated!
  • Unwrap 20 tootsie rolls and place for just a few seconds in the microwave to soften a little.
  • Pull and roll these into tails and use the side of a knife to press grooves along the length. Keep these on parchment paper until they harden up. 
  • Unwrap 4 to 5 tootsie rolls and cut them into little circles. Shape these into ears and keep with tails on parchment paper.

Caramel Armadillos!

  • To assemble, use dabs of melted chocolate to attach ears, candy eyes, nose and tails.

I made cookies for them to sit on. My original idea was for caramel turtle cookies, so I went ahead with the cookie plan and it does add stability to that tail (otherwise they are a little awkward to pick up!)

  • I used my favorite chocolate cookie cut-out recipe from here, and it made a few more cookies than I had armadillos for, but they are yummy cookies all alone!!
  • I used an egg-shaped cookie cutter a bit larger than the armadillo.
  • I added melted green candy wafers to the top- just spooned some on and spread it near the edges- and set a “open” caramel armadillo on top. The green wafers seal up the bottom and keep caramel from leaking out!
  • I set the tail on the melted green wafers and added flower sprinkles! Once everything hardened up I added the eyes, ears and nose.

Caramel Armadillo!

So….cookies??? Candies????  It’s up to you! I think they would be fun on a cake.

How awkwardly wonderful would a caramel armadillo cake be???

Caramel Armadillo Cookie

My thoughts: These are delicious. They are also a lot of work (being honest!). It would help to have your tails and ears shaped ahead of time and I was wishing SO hard for an additional mold. That would save time too. That said- I will totally make these again!!!! They were well- loved by adults and kids alike!  If this recipe seems like too much craziness for you, just make the caramel. Put it on ice cream and be happy!  Enjoy!!  ~r

Dulce de Leche caramel sauce form a can

Other recipes kids will love (click on a photo to see the recipe!):

Polka Dot Cake!!!Pile of Cupcakes!Hamburger Cookie!Edible Jello Earthworm Cupcakes

Cookie Monster Oreos!!!!!

Posted on

Cookie Monster Oreos

Turn your cookies into Cookie Monsters with these adorable Oreo treats!

So, Valentine’s Day happened last month, and I have started a tradition of making my Oreo Prince Charming Frogs as little Valentines for friends and family. As I was popping little red M&Ms into like 100 little frog “mouths”, it suddenly occurred to me that they looked a little like Cookie Monster. I brainstormed for a cute little cookie, got myself some blue candy melts, and had so much fun making these little guys this week!!!!!

Cookie Monster Oreos7

Ah….so cute and fun! I gave them as gifts to as many kids as I could… and the smiles…. 🙂 You need to try these…!!!!!!

Here’s how we put them together (I took pictures as I went!)

INGREDIENTS: (makes 24-28 cookies)

  • One package of Double Stuff Oreos (you need that wide opening to fit a mini-cookie!)
  • One bag of Wilton’s Candy Melts in royal blue
  • Candy eyes
  • Royal Blue decorating sugar (I had such a time finding this- I wanted blue jimmies, but settled on these sugar crystals from CK Products.)
  • A box of Cookie Crisp cereal.
  • Several drinking straws.

DIRECTIONS:

  • Place Candy eyes, and about 24-28 pieces of cookie cereal into two small bowls. 
  • Place parchment paper over flat working surface.
  • Melt Candy Melts in microwave in 30 second increments, stirring between until melted and smooth.
  • Dip Oreo in melts and use a fork to lift out. Tap firmly against side of bowl to remove excess candy and slide along bowl edge as you remove it.
  • Gently slide covered Oreo onto parchment paper. Immediately sprinkle with sugar, and place eyes (a tweezer helps with this).

Cookie Monster Oreos1Cookie Monster Oreos2

Cookie Monster Oreos10Cookies Monster Oreos9

  • Place a piece of cookie cereal in “mouth”. You may need to wait a little bit until the melts harden up a bit and get sticky. I found that a drinking straw placed in front of each one helped hold the cookie in place until it hardened.

Cookie Monster Oreos3

  • Allow little monsters to harden and then share them with anyone who needs a smile 🙂

Cookie Monster Oreos4

My thoughts: SO. FUN. I really loved making these and sharing them. I packaged them up in little cello bags that I got at Michaels, and I made stickers for the back using Avery square labels (#22806). I will attach the pdf for these here. Be sure when you print them on these labels to print them as “actual size”.  Sometimes printers will automatically shrink an image to fit a page better, and if you let it do that they won’t line up with the stickers. I also tied up a few bags of just cookie cereal to go along with them. It was really fun.

Cookie Monster Oreos11

The perfect finishing touch!  Enjoy these dear readers!!!!!!  ~r

Other desserts for the Cookie Monster in you! (Click on a photo to see the recipe)

Chocolate chip cookies!!!Mini chocolate chip cookie cheesecakesChocolate Chip Oatmeal CookiesMini Cookie Dough Cheesecake


%d bloggers like this: