Category Archives: Cookies

Love Bug Oreo Pops!

love-bug-oreo-pops

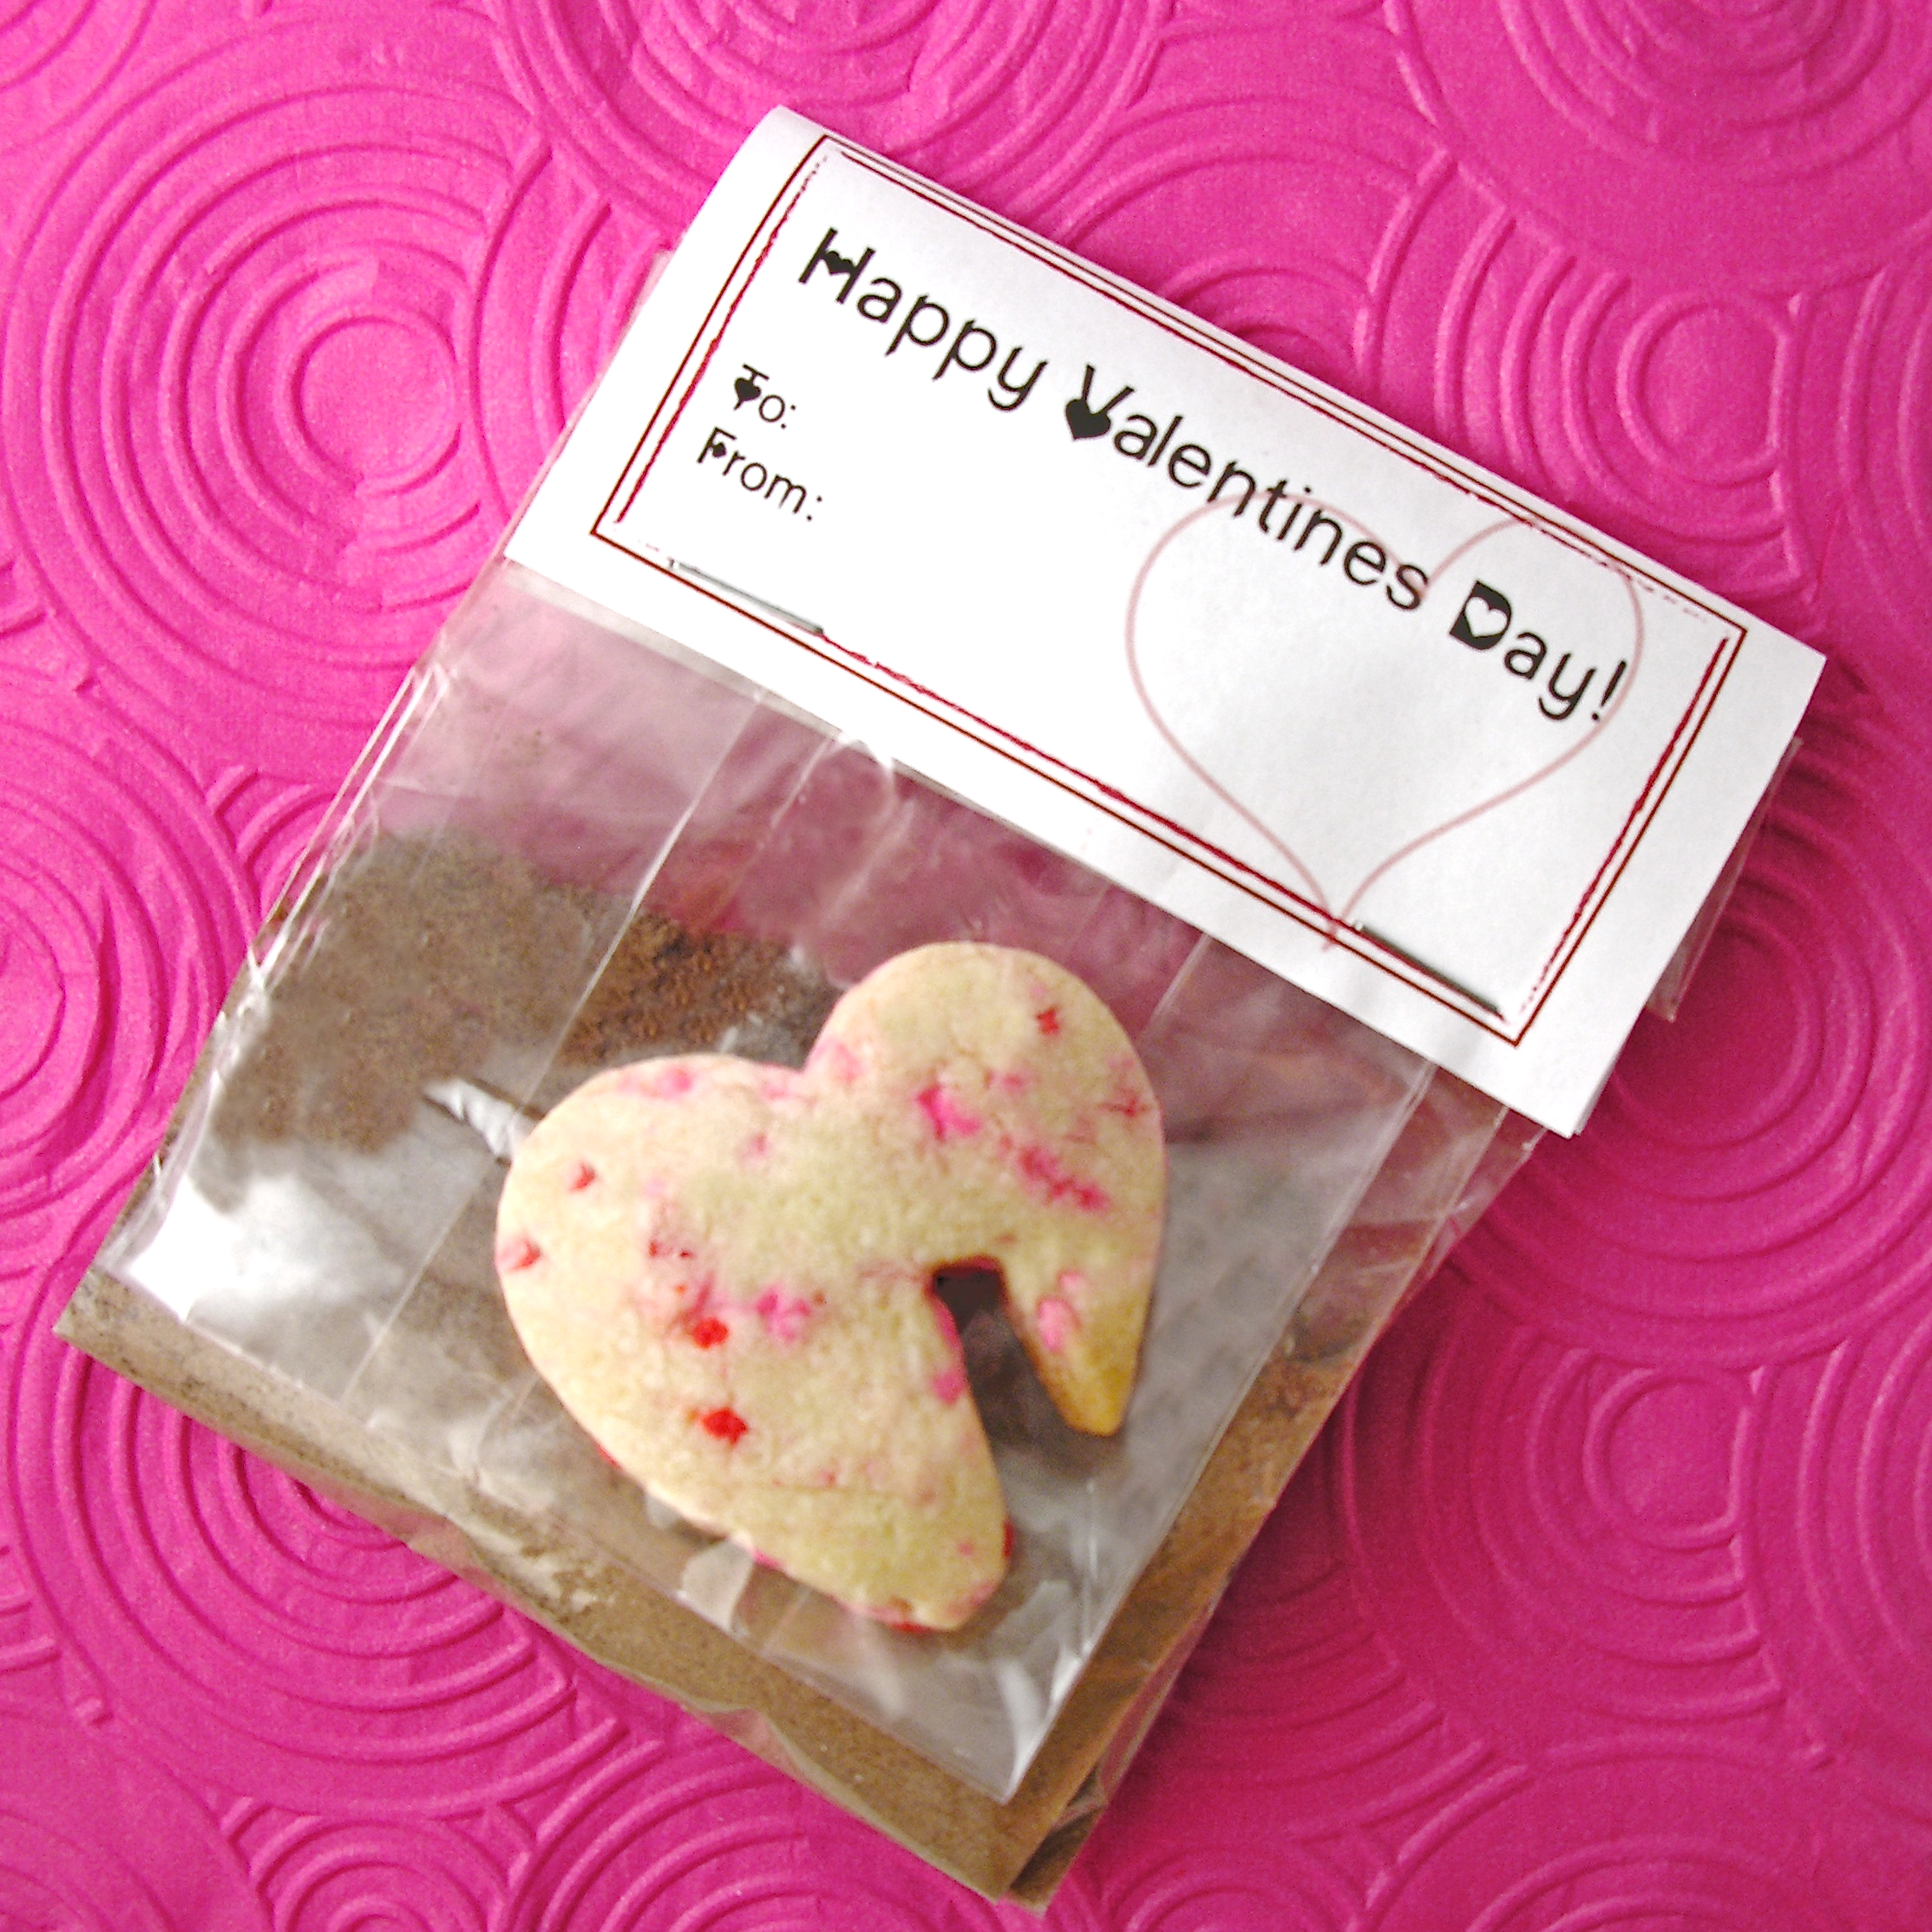
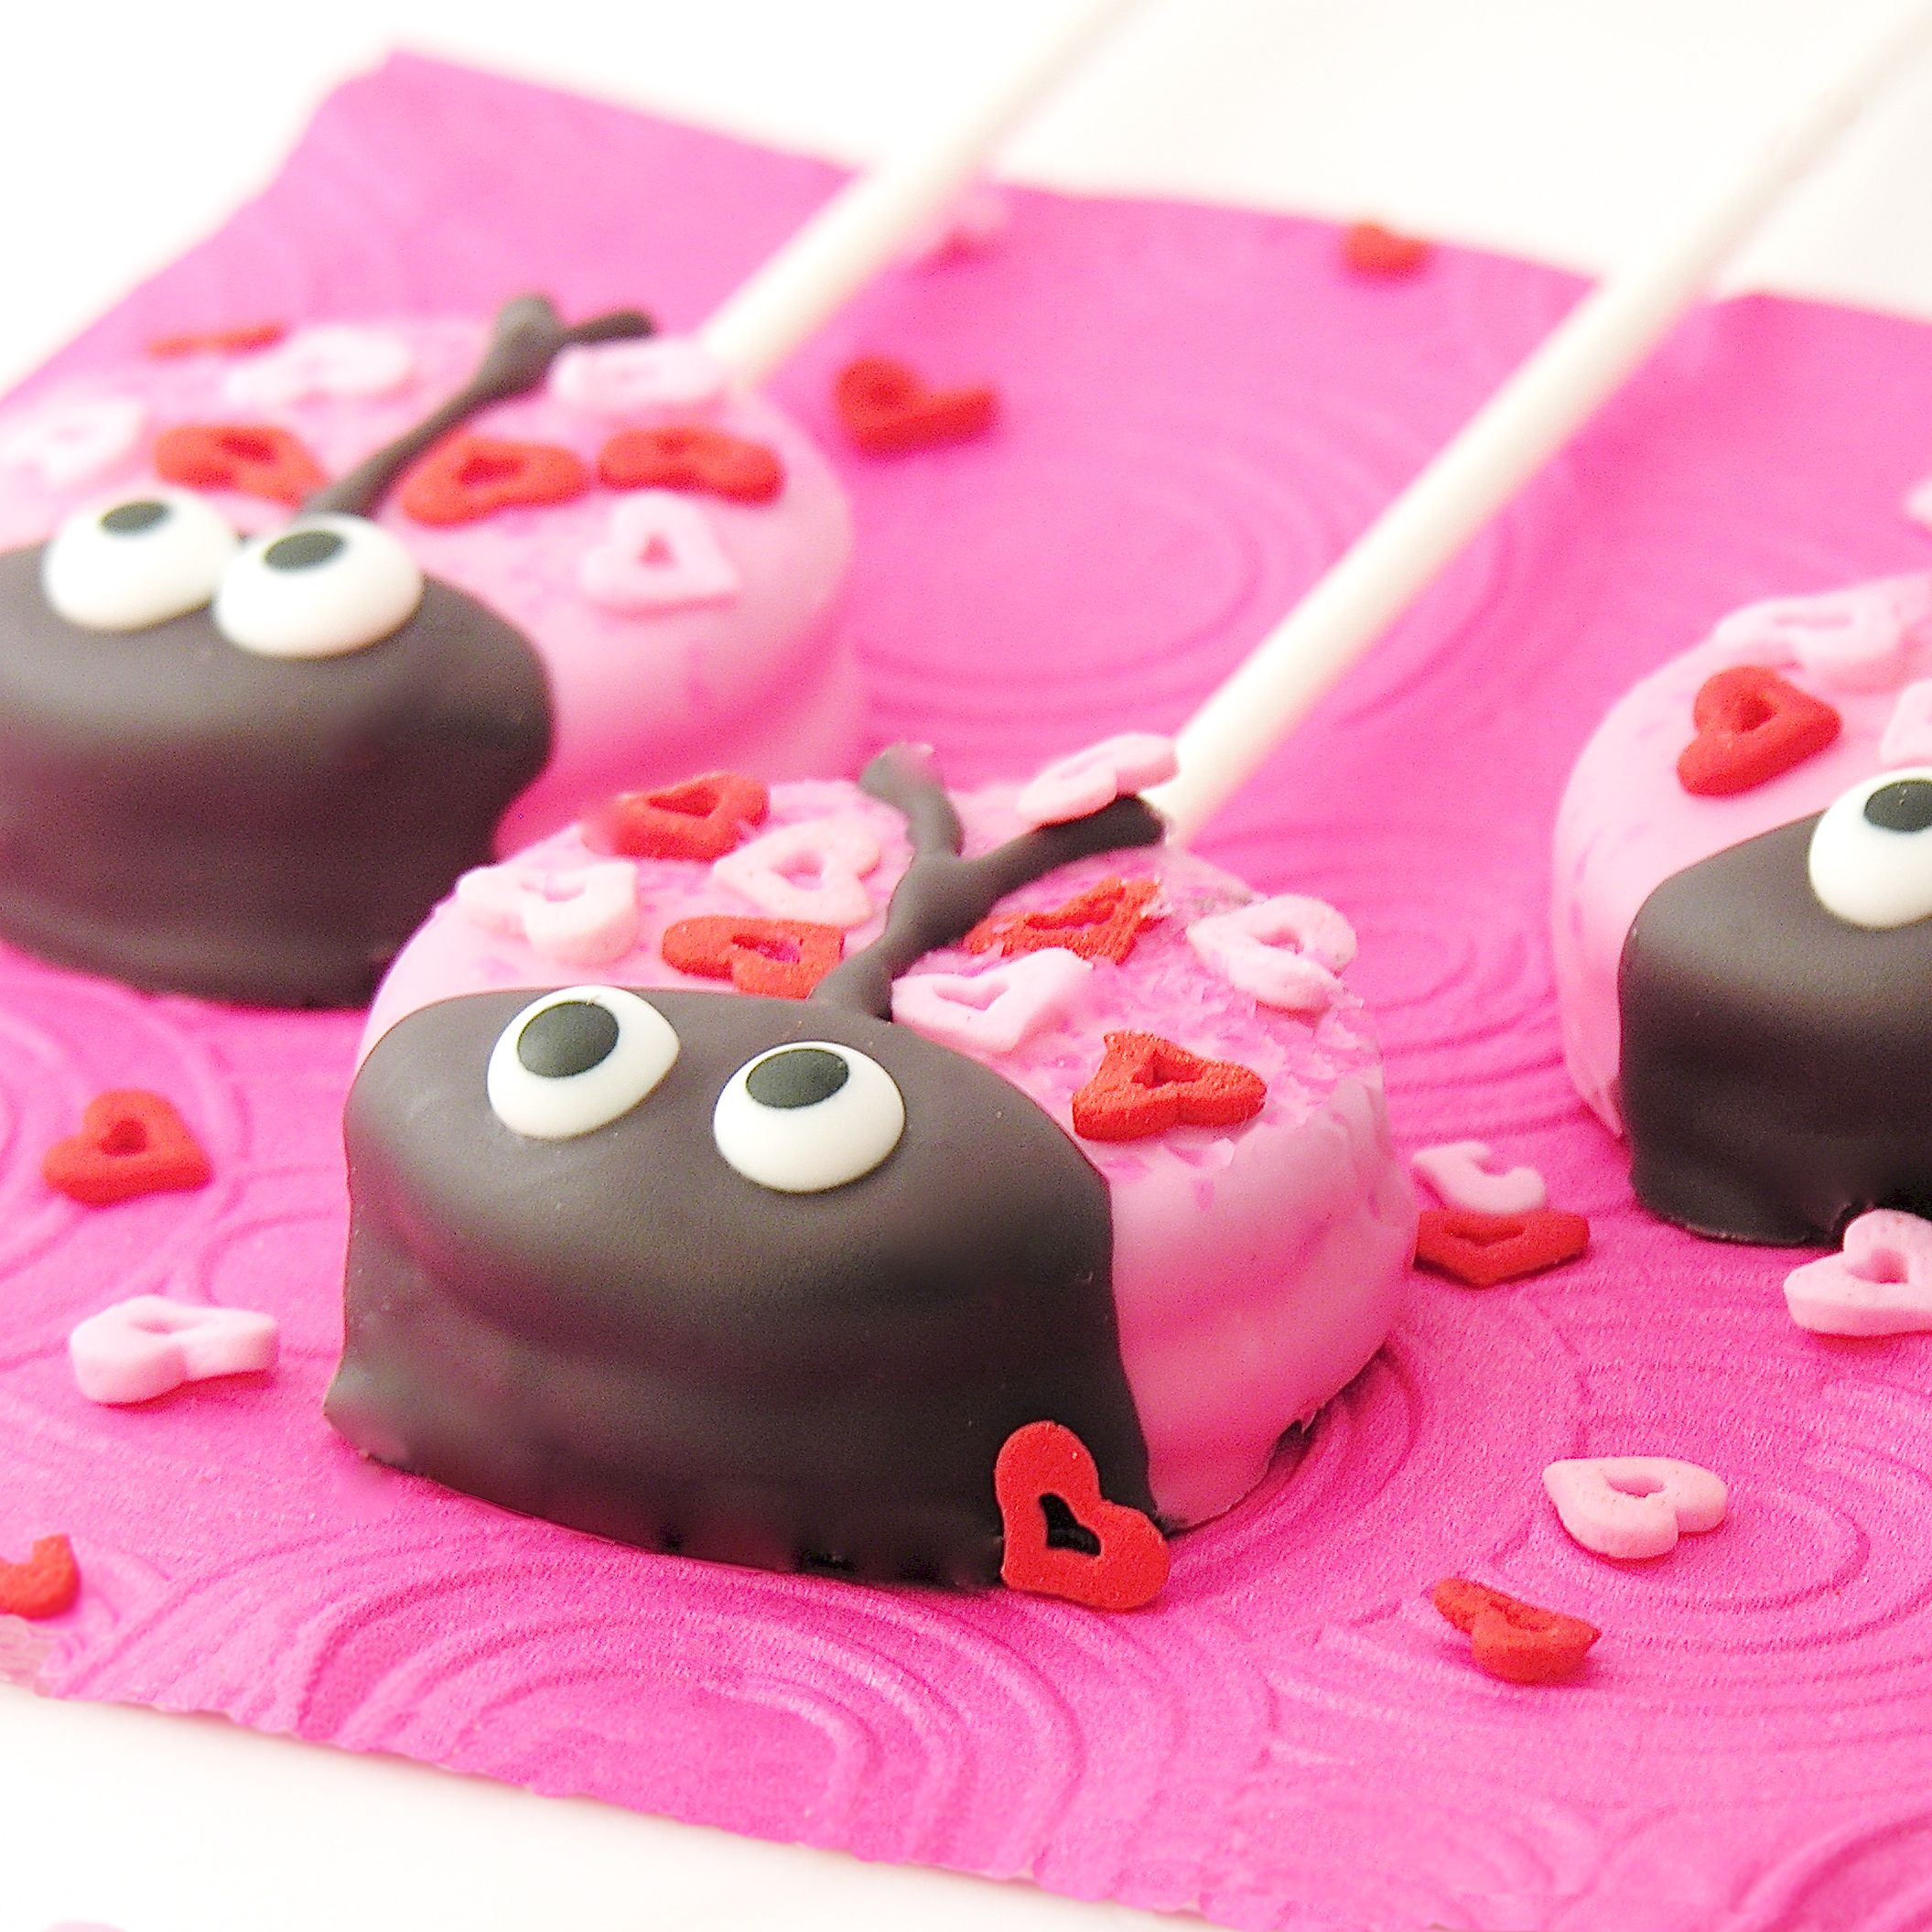
Show a little love this Valentine’s Day with these Oreo Love Bugs!

Easy to make ahead and wrap up as gifts!

I just have to keep making Oreo Pops… there are so many possibilities and all of them are yummy and cute! I’ve pretty much failed at cake pops, but these? My favorite!

I made Lady Bugs Oreo Pops a couple of years ago, and when I was visiting Florida last month I was subjected to everyone’s horror stories about some awful little bug called a Love Bug. I guess people hate them down south, but when I heard “Love Bug” I immediately pictured these. Sweet little pink bugs with hearts and sprinkles!

love-bug-oreo-pops

Aren’t they fun? Cuteness overload….! These really aren’t hard to put together- especially if you’ve made Oreo Pops in the past. (If you haven’t ever made them, click here for a tutorial).

Here’s how we created these little love bugs! (printable recipe here)

INGREDIENTS: (makes 25-30 Oreo Pops)

  • 1 package of Oreo Double Stuff cookies
  • 1/2 bag of Wilton’s candy melts in white
  • 1 bag of Wilton’s candy melts in bright pink
  • 1/2 bag of Wilton’s candy melts in black
  • Heart-shaped sprinkles (I used these), pink/red jimmies or sugars
  • Candy eyes

DIRECTIONS: 

(If you want to simplify these- don’t add a stick. Just dip the Oreos using a fork, and skip the following steps for inserting a stick!)

  • Gently twist apart all Oreos.
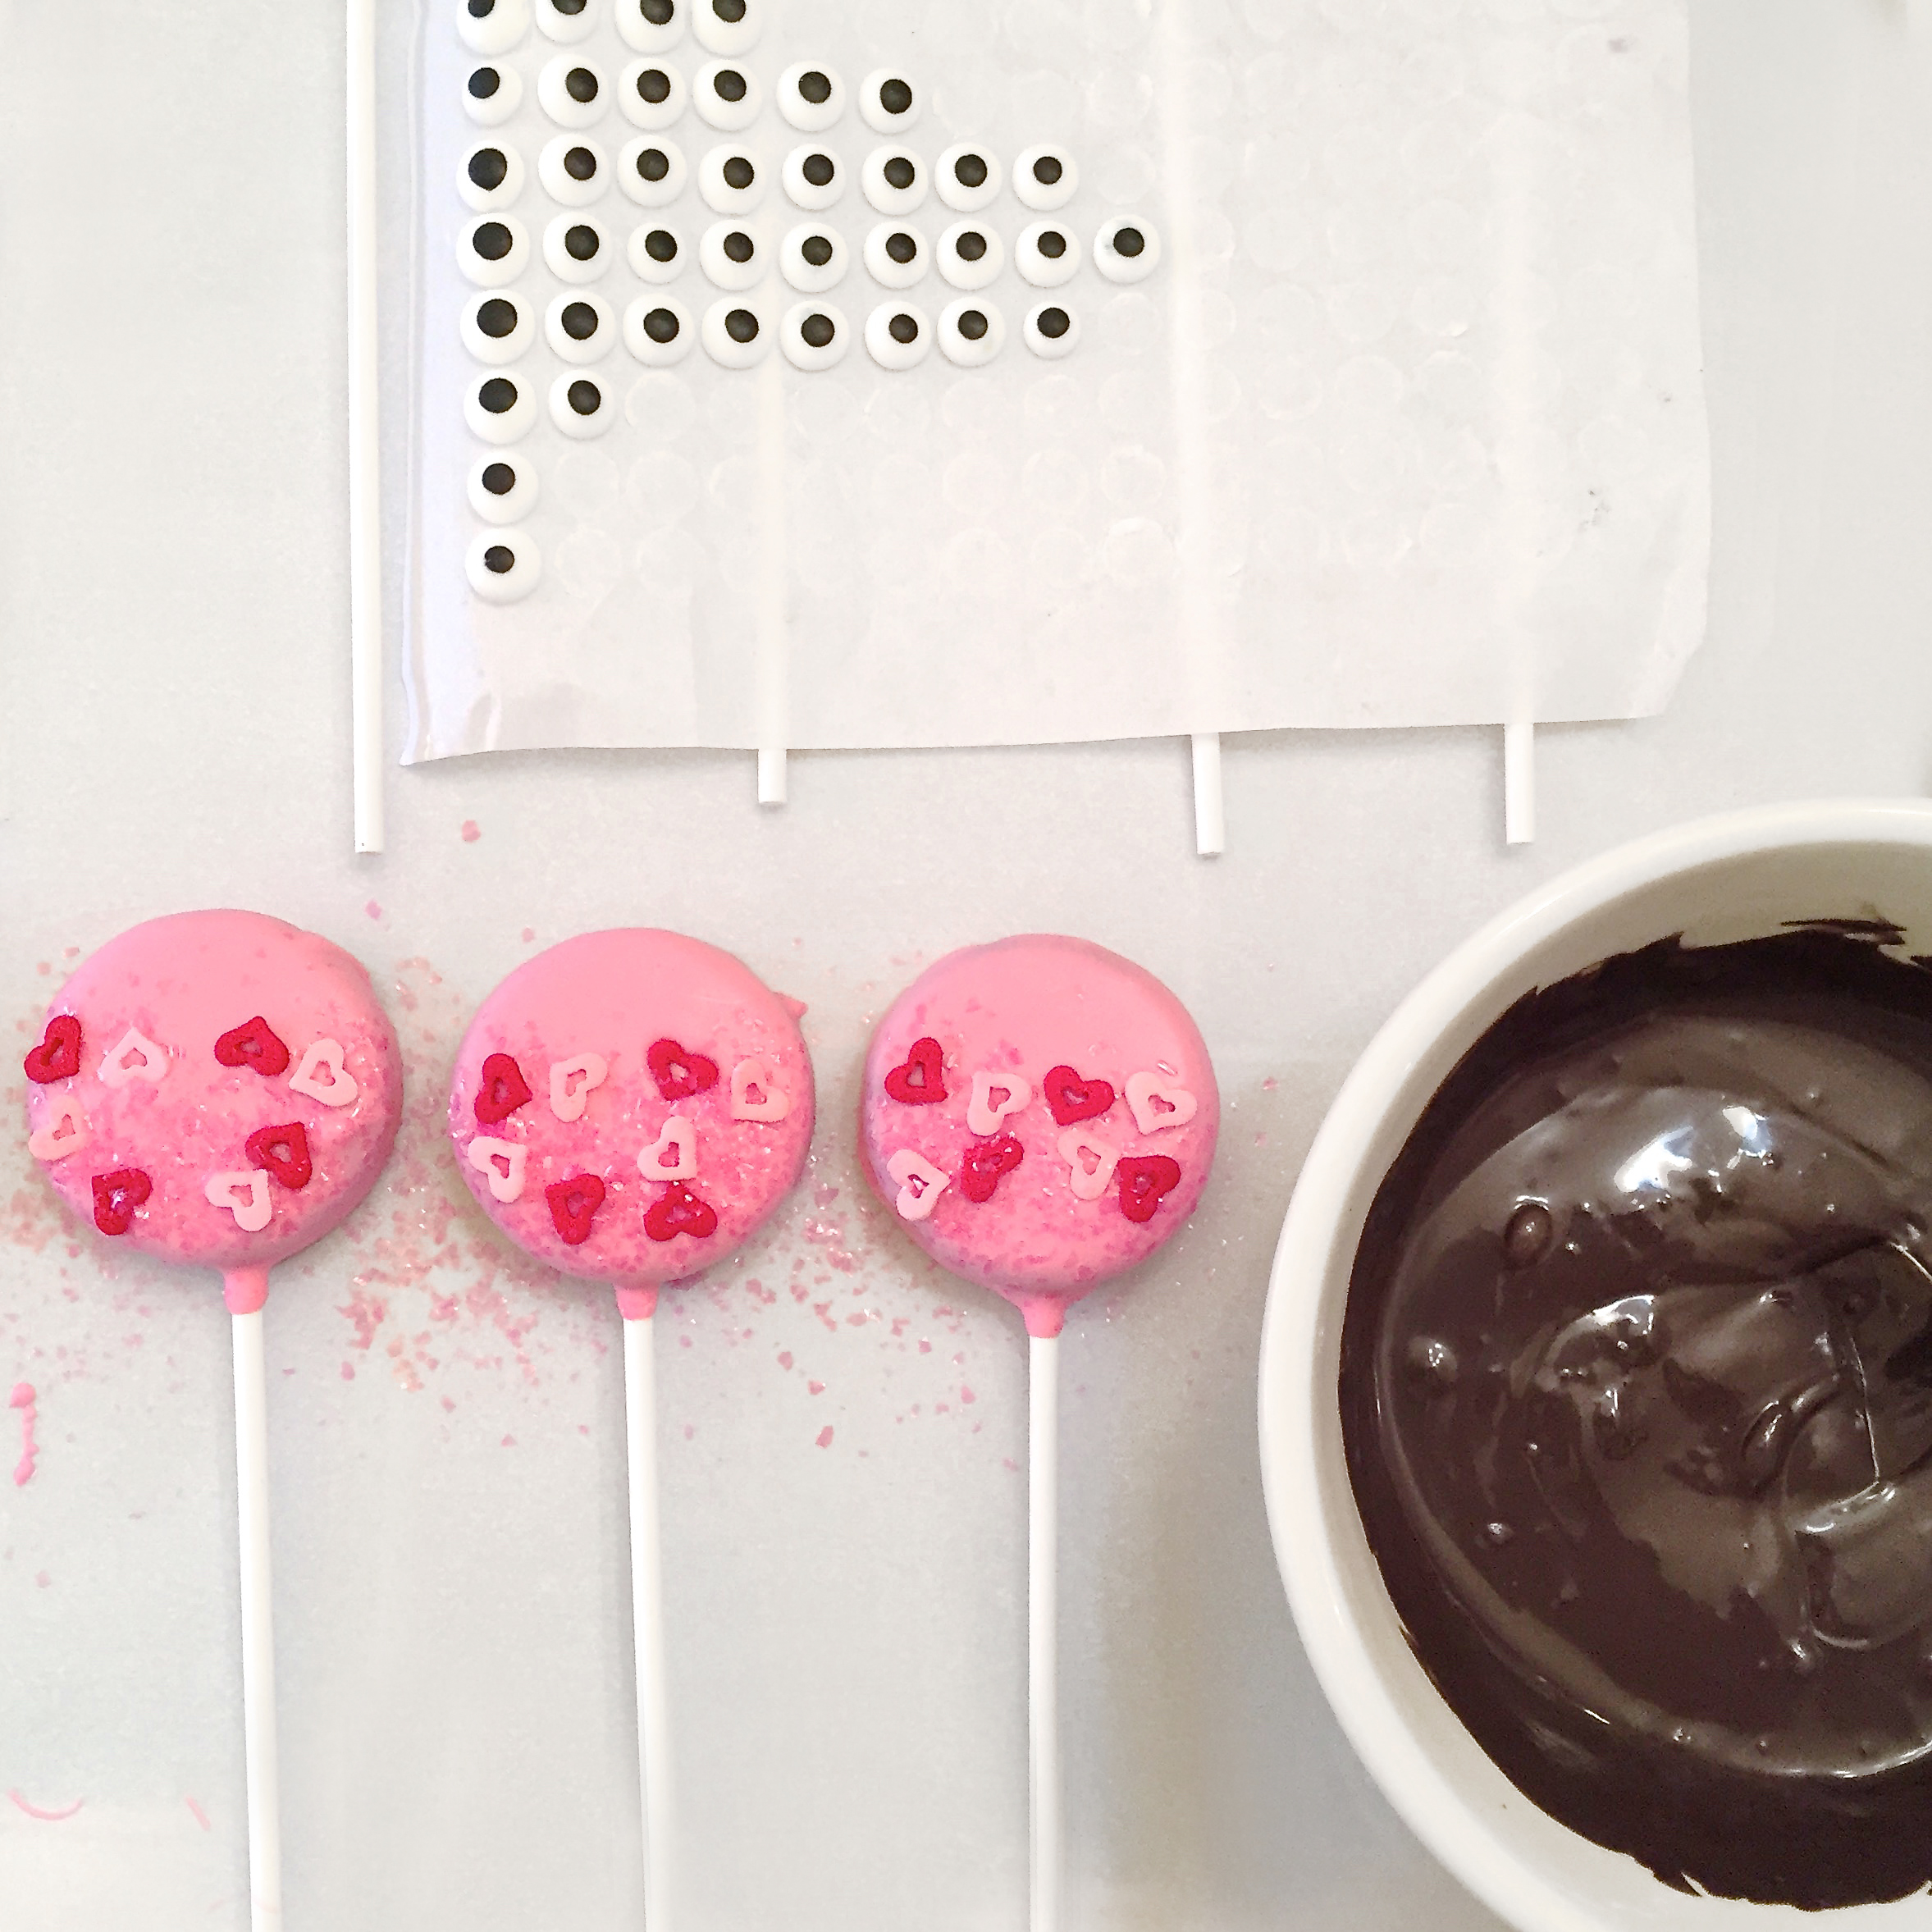
  • Melt white candy melts in the microwave in 30 second increments, stirring between until melted and smooth.
  • Dip one end of a lollipop stick into the white chocolate, spread a little on the top of the white Oreo filling and then press the stick flat into the center of the filling.
  • Place top of Oreo on, and set on a cookie sheet. When all Oreos have sticks inserted, pop these in the freezer for 15-20 minutes (until they are nice and firmly set).
  • Melt pink candy melts in the microwave in 30 second increments, stirring between until melted and smooth.
  • Have parchment paper spread on your countertop and have your sprinkles ready. 
  • Dip an Oreo into the pink melts, spooning melts over top and sides. Tap on edge of bowl to get rid of excess and slide bottom of Oreo along edge of bowl to remove drips.
  • Place on parchment paper and while melts are still soft, sprinkle with hearts and sugar or jimmies, leaving these OFF the top 1/3 of the cookie. Allow these to harden.

love-bug-oreo-pops

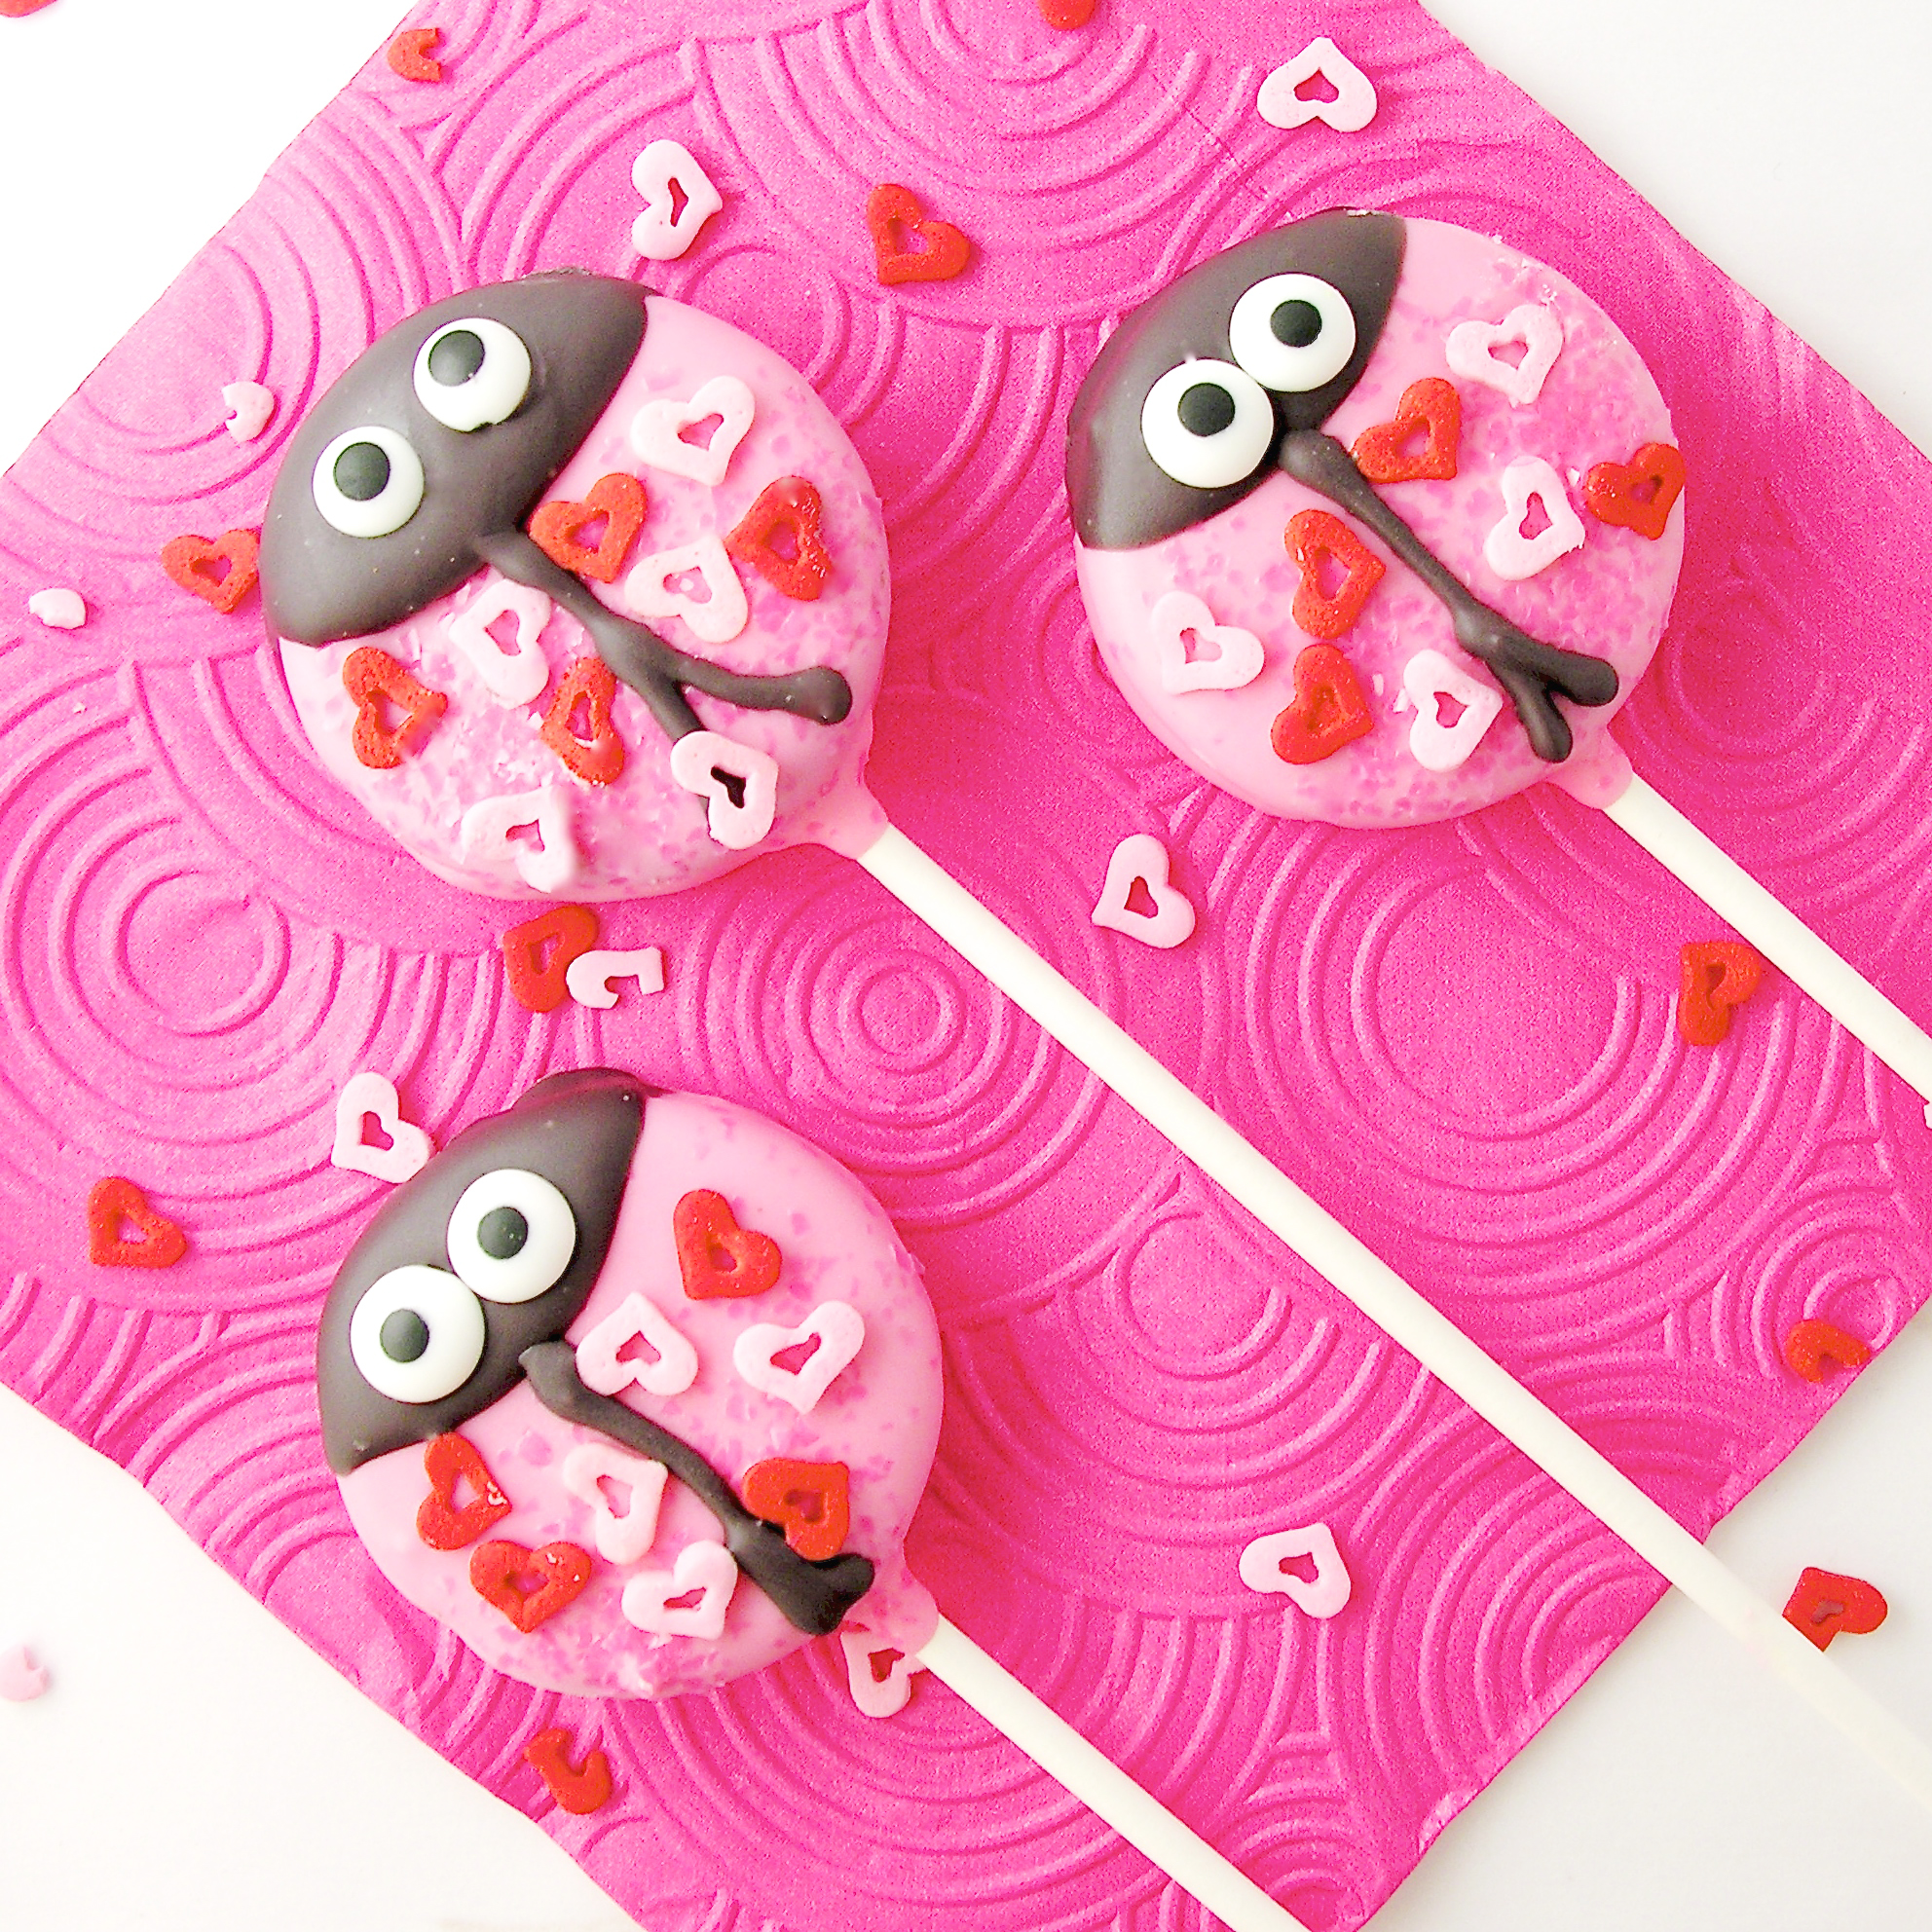
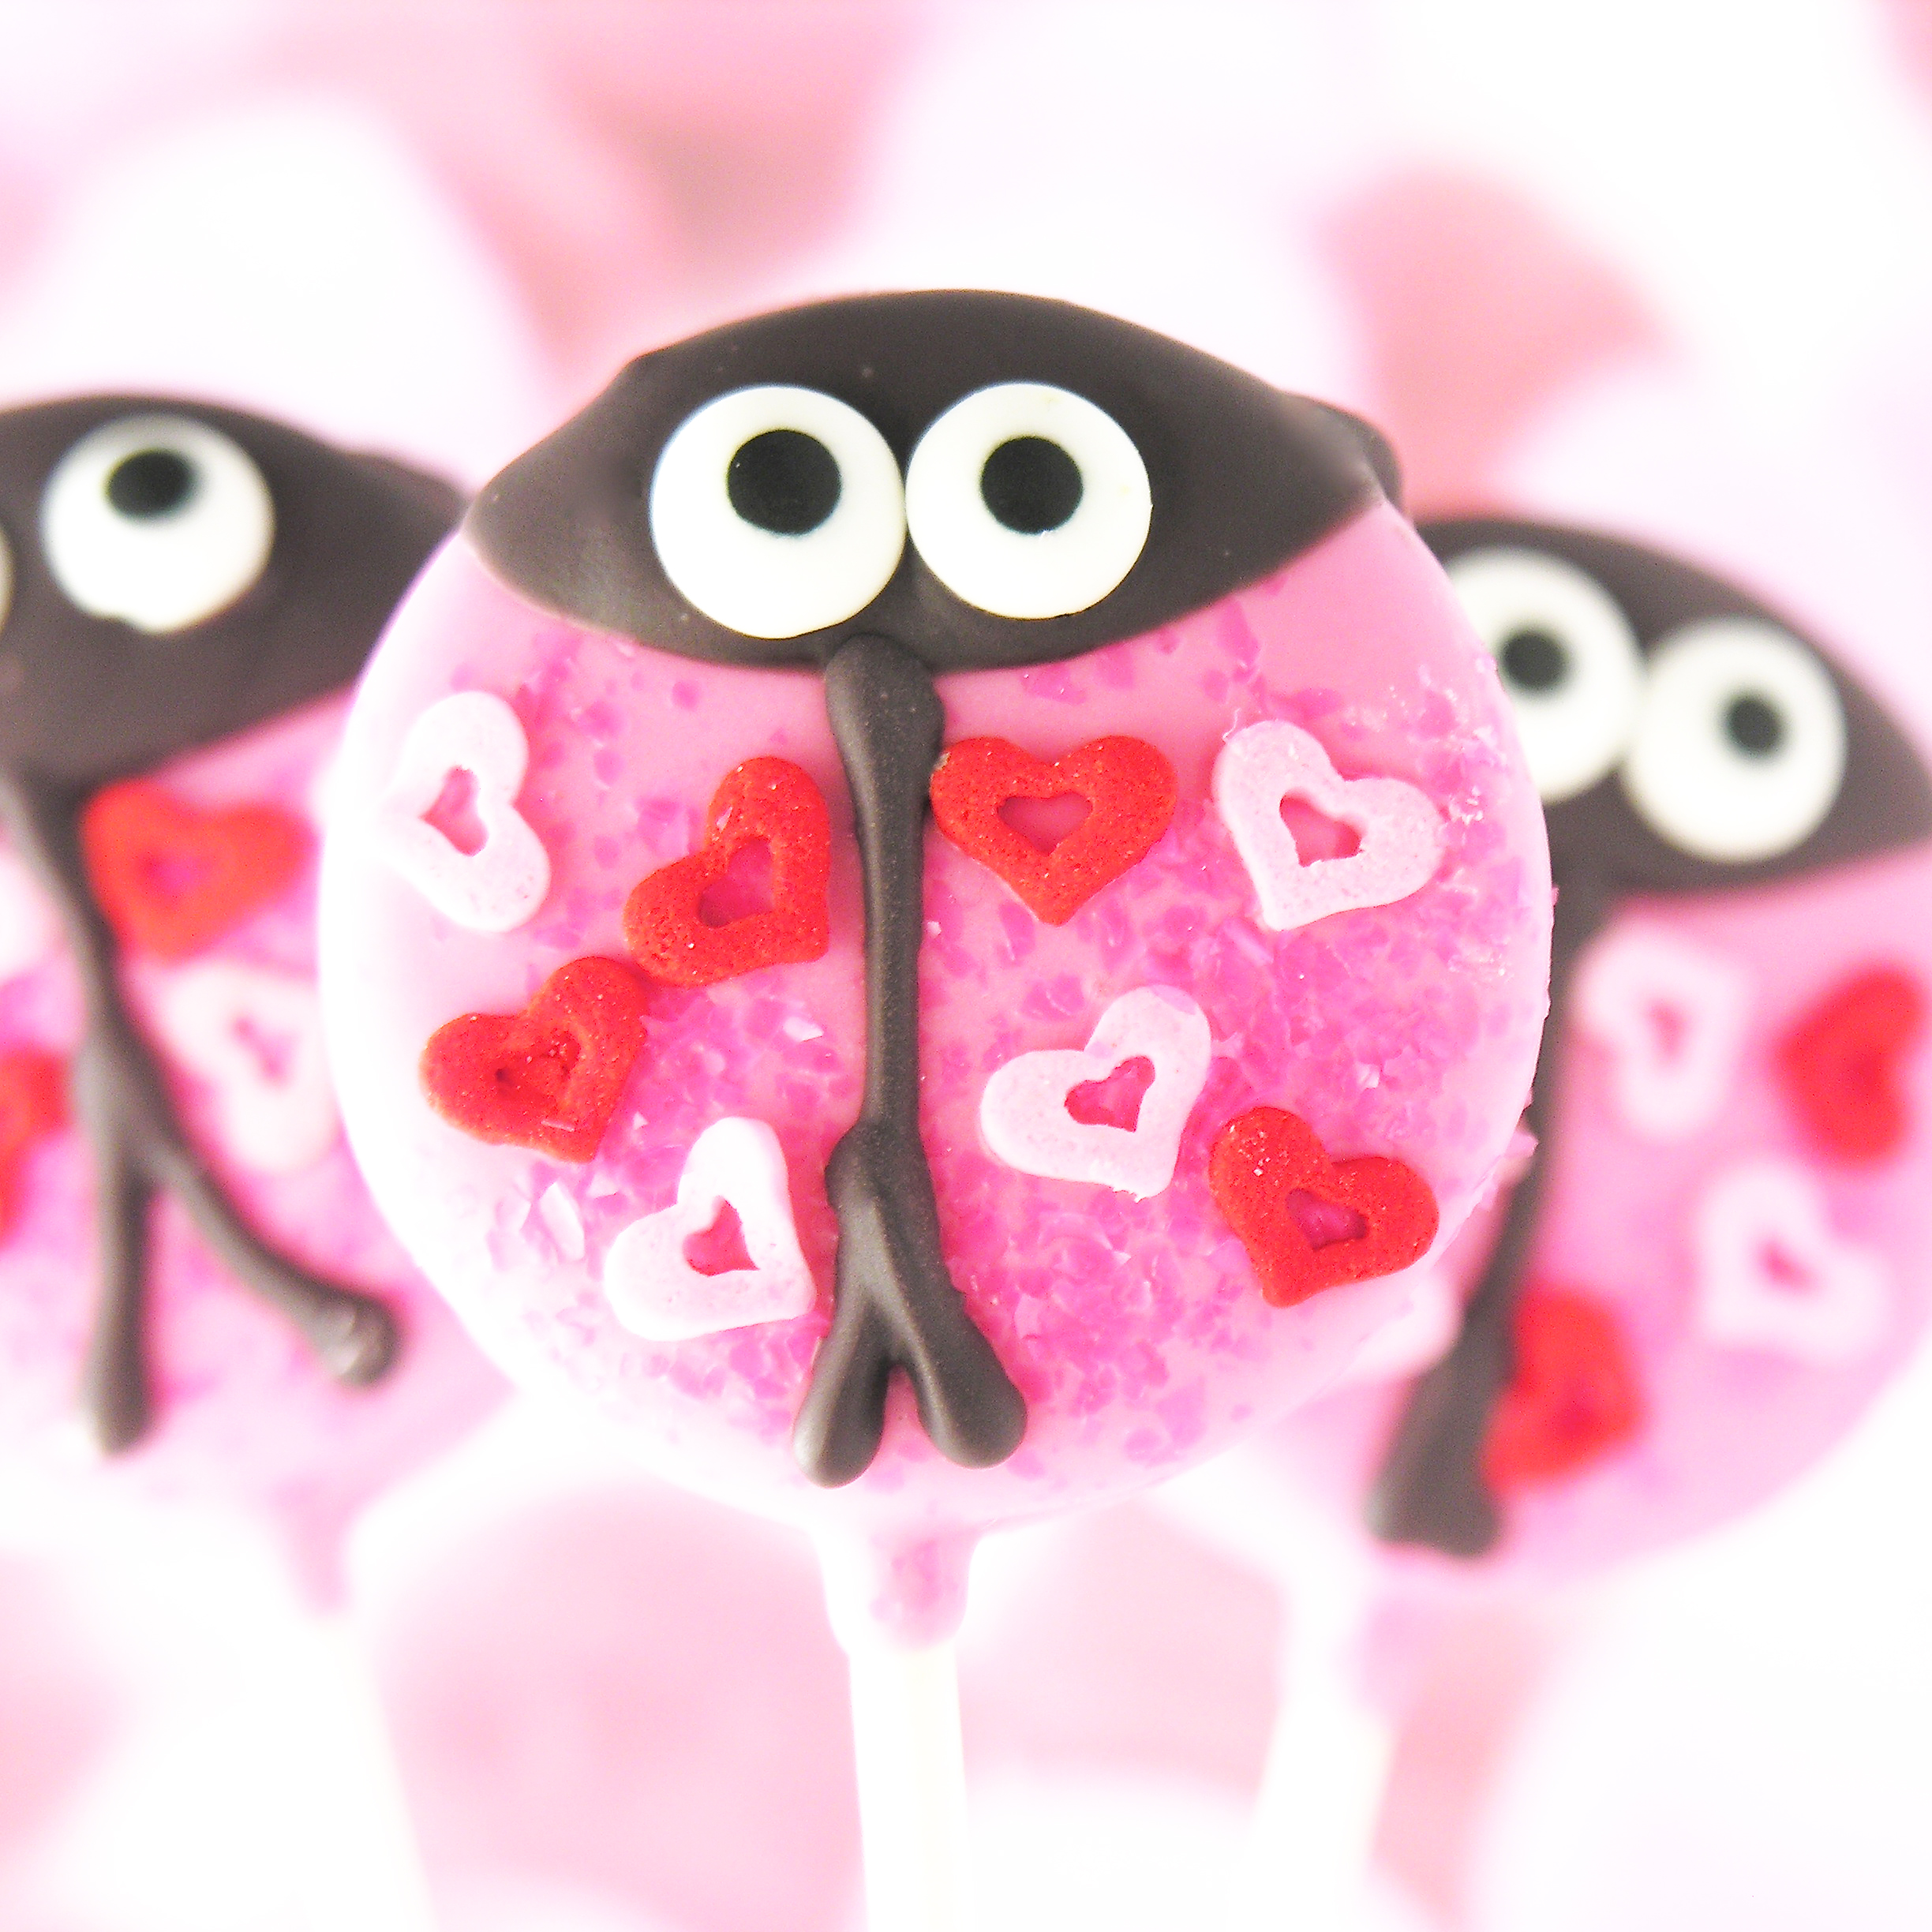
  • Melt black candy melts in the microwave in 30 second increments, stirring between until melted and smooth.
  • Spoon black melts over the top 1/4 of the cookie and then tap to remove excess and slide bottom across bowl edge to remove drips.
  • Set on parchment paper and place two eyes on top.
  • Once all heads and faces are done, spoon remaining black melts into a small zip-top bag. Clip a corner, and pipe a center line down the middle of the cookie as pictured. 
  • Allow Oreo pops to harden. Bag them up individually or store them in an air-tight container. 
  • Enjoy!!

love-bug-oreo-pops

My thoughts: One of the main reasons I love Oreo Pops is that you can make them ahead for events. I’m baking quite a few things for an orientation next week and these are DONE. Wrapped in cute bags, tied with cute ribbons and ready to go. Cross one thing off my list! I also made some of my personal favorite Valentine’s treats: Frog Prince Oreos. If you need hearts for the 14th, you have these Love Bugs. If you’ve kissed one too many Frogs this year… well. These other Oreos are for you:)

Frog Oreos!!

Happy Valentine’s Day !!!!

love-bug-oreo-pops

Other Valentine treats here on Easybaked (click on a photo to see the recipe):

Raspberry Truffle TartRaspberry Confetti KissesChocolate covered strawberry Cake roll!!Red velvet cookies with cream cheese icing!!

Valentine’s Day Mug Topper Cookies!

Posted on

Mug Topper Cookies

These adorable little cookies hang on the edge of a cup of coffee, cocoa or milk. Handy for dipping, and a perfect Valentine’s Day treat!

Aren’t these fun? When I have a few minutes of spare time, I like to wander around online looking for fun new kitchen and baking tools. I saw these cookie cutters and had to click on the photo to read more, because they didn’t make sense to me. They had several cute little shapes- but each one had a wedge cut out on one side. WHY?? I quickly discovered that the little wedge makes them not just cookie cutters- but mug-hanging cookie cutters! I happen to love dunking cookies in my coffee- so I knew I had to try them!

Valentine Mug hanging cookie

Does a cookie get more fun than that? I think not.

I was already making two different sorts of cut-out cookies for an event, so I set aside a little dough from each batch to make these. Here are the two recipes I used:

  1. Chocolate Espresso Cut-out cookies (recipe here)
  2. Buttery Cut-out cookies (recipe here)

Chocolate Espresso Cookies!!!  Butter Cut-out cookies

I kneaded some red and pink jimmies into the buttery cut-out dough before I rolled it out to cut it.

valentine-cookies3

You can use either of my recipes, or use your own- but you must choose a recipe that doesn’t puff up and get bigger in the oven. I have a fabulous gingerbread cookie recipe that would never work with these. If the dough changes shape as it bakes, that little wedge will not be big enough to slide onto the edge of a mug.

I also baked these on parchment paper, so I could slide them all off the cookie sheet and onto a counter to cool, without having to use a spatula to pick them up.

  1. Because they are tiny little cookies to handle.
  2. Because the wedge makes them more fragile until they cool and harden up.

Those are my “helpful hints”. They really are easy to make and so fun!

So a Valentine idea?

  1. Make some of my Spiced Mocha Mix (recipe here).
  2. Spoon 3-4 teaspoons into a cello bag.
  3. Place a cookie into a second cello bag.
  4. Print these tags (open link here).
  5. Staple tag over the tops of the two bags.
  6. Give away as a fun Valentine gift! (instructions for making mocha are on back of tag)

Valentine gift idea

I hope you get a chance to try this little cookie cutter idea out! If you were careful, I suspect you could even use a knife to cut a little wedge out of a plain old heart cookie too…? More time consuming, but then you don’t need to purchase a new cookie cutter. Enjoy!!  ~r

valentine-cookies4

Other Valentine’s treats here on Easybaked (click on a photo to see the recipe)

Berry Bomb CupcakesRaspberry Fudge Layer Cake1White Chocolate Strawberry Cookies!!Old fashioned Red velvet cake


A New Year’s Collection of Top Recipes on Easybaked!!

new-years-collection

Happy New Year, friends! One of my favorite parts of marking the end of one year and the beginning of the next is looking back at all the things that made the previous year wonderful! One of the really fun things to look at is my statistics for this blog. A LOT of you visited us here this year!  Thank you!!!  I am always fascinated by which recipes really took off and became HUGE hits- and I’m always a tiny bit disappointed by the ones that I thought were AMAZING, that didn’t really catch anyone’s attention.

I have lots of fun recipes lined up to share with you in January, but this week- as we welcome 2017- here are the top picks from 2016.

Just click on a photo to see the recipe- and enjoy!!! ~r

new-years-collection2

Strawberry Lemonade layer cake

Viewed 203,655 times in one month alone! The cupcake version of these is really popular too.

Classic Cheesecake with Sour Cream topping

Seriously, that cheesecake is maybe the best recipe on this blog. You have GOT to try it!!!! 🙂

Oreo pops

When this was 1st posted, there were NO other Oreo Pops on the internet- so I like to think that the Oreo Pop craze started here! We certainly have had fun creating all sorts of them for every holiday!

Bailey's Cupcakes

This recipe was from a failed audition for The Great American Baking Show, and a new friend!

Turtle Bundt

This is the most recent big hit on Easybaked- and it is really easy to make!

So, those were the top 5 in all-time views this year… but what were my favorites from 2016? These three!

new-years-collection8

new-years-collection9

This is the star of 2016. It is SO yummy and got rave reviews every time I made it. A massive layer of cookie dough in the middle of a cake? Does it get any better than that???

Marshmallow Stuffed Oreos

2016 was also my year to turn those healthy little Oreo Thins into amazing stuffed Oreos! These marshmallow ones… oh my! We also stuffed Oreos with Key Lime Pie, Pumpkin Pie and Cookie Butter!

Cookie Monster Oreos!

These win my personal “cutest” recipe award for 2016! I loved making them and making cute little stickers to seal the bags I gifted them in too! So fun!

I’ve been asked many times what my all-time favorite recipe on Easybaked is. I’ve got SO many favorites- but if I had to pick one, it would be my Caramel Fudge Brownies. I love them because they are my mom’s famous mint brownies with my favorite caramel added in place of the mint- and they are just the BEST chocolate fix ever.

Caramel Fudge Brownies!!

I hope you have enjoyed this round-up of recipes!

HAPPY NEW YEAR!!!!!!


Sparkling Glass Christmas Cookies!

Stained glass Christmas Cookie

Buttery cut-out tree cookies with sparkling candy-glass ornaments! Not only beautiful Christmas treats- but delicious ones!

These fun candy-filled cookies are not an original idea- just an idea I’ve seen around for years and always wanted to try. These turned out great. You need a cut-out recipe that holds it’s shape and size well- otherwise when the cookie bakes, those little holes will expand shut and you won’t have any room to put candy. You also need a cookie that tastes AWESOME without icing. I think these accomplished both goals!!! These were just delicious 🙂

stained glass cookies

Here is how we made them: (printable recipe here)

 INGREDIENTS: (makes about 24 cookies- depending on the size cutter you use)

  • 2 sticks (1 cup) unsalted butter (softened)
  • 1 1/2 cups of granulated sugar
  • 2 eggs
  • 1 teaspoon of vanilla
  • 1 teaspoon of butter flavoring
  • 3 cups of flour
  • 1 teaspoon of baking powder
  • 1/2 teaspoon of salt
  • Green food coloring
  • 1 large bag of Jolly Rancher candies
  • Star sprinkles (if desired- plus a tiny bit of melted chocolate to attach them)

DIRECTIONS:

  • Unwrap candy and divide into colors.
  • Use a hammer on a solid surface (one that can’t be damaged by a hammer) to crush the candy. Crush it very finely- mine was a little big still, and it made it harder to spoon into the openings. Set aside.
  • Preheat oven to 350F degrees.
  • In a large mixing bowl, cream together butter and sugar until smooth.
  • Add eggs, vanilla and butter flavoring and mix well.
  • Add all dry ingredients and mix until able to knead into a firm ball of dough (add additional flour if necessary).
  • Add green food coloring and knead with hands until dough reaches desired shade. 
  • Roll out on a floured counter with a flour coated rolling pin to desired thickness (I made them fairly thick)
  • Cut into Christmas tree shapes
  • Place on a parchment paper-covered baking sheet.
  • Use a straw to poke “ornament” holes. I used a small straw and a jumbo one to give different sizes. 
  • Bake at 350F degrees for 4-5 minutes.
  • Remove from oven and use a small spoon (I used a tiny little appetizer spoon) to spoon candy colors into each hole.

sparkling-christmas-cookies4sparkling-christmas-cookies3

  • Bake at 350F degrees for an additional 4-5 minutes until candy is entirely melted. Check after 2-3 minutes and add a little candy if needed, as the pieces melt and settle. 
  • Remove cookies from oven and slide the parchment papers off the cookie sheet onto a counter to cool. 
  • Use a bit of melted chocolate to attach a star on top (if desired).
  • Enjoy!

sparkling-christmas-tree-cookies

My thoughts: These were fun to make and they are just so cute and yummy! A few changes I will make the next time: I’d use bigger straws. The larger size was fine, but the mini size holes were hard to fill. I would also crush the candy to a sugar consistency. I had a few bigger pieces that made it harder to fill those tiny holes. I loved the flavor of those buttery cookies with the sweet fruity candy bits- I will definitely make these again!  Enjoy! ~r

Other fun treats for Christmas: (click on a photo to see the recipe)

Opera Cream CandyPeppermint Hot Chocolate CupcakesChocolate Bon-bonsHot Chocolate Pops!

Oreo Ornament Pops!

Oreo Ornament Pops

Celebrate the Christmas season with these fun ornament pops.

Made with Oreos, mini peanut butter cups and sprinkles, they are sure to make everyone in your family smile!

Goodness. I love cute Christmas cookies. These were SO fun to make, and decorating them is a blast. I pulled out all of those Christmas sprinkles and just went crazy. I highly recommend these for a fun project with your kids!!

The dilemma for making an edible ornament is always that little cap. I solved the problem by painting mini peanut butter cups with a little bit of edible gold dusting powder (the same stuff I used on my shortbread cookies last week). I love how they turned out! Happy shiny tops for these!

Oreo Ornament Pops!

Here is how we made them: (printable recipe here)

INGREDIENTS: (makes about 24-28 pops)

  • One package of Oreo Double Stuff cookies.
  • 2 bags of Wilton’s Candy Melts. As you can see, I used pink and aqua, plus I had a little green and red extra from other projects. You can use as many colors as you want- but you will need at least 2 full bags to cover the Oreos. 
  • One bag (8 oz) of Reese Peanut Butter Cup Minis- in white chocolate
  • Edible gold dusting powder (I used this brand)
  • Fun Christmas sprinkles and jimmies

DIRECTIONS:

Make gold “caps” for ornaments first.

  • Spoon a little of the gold powder into a small bowl or plate, and add a bit of water until it is the consistency of a thick paint. 
  • Use a food-grade brush to paint the gold on the bottom and sides of 24-28 peanut butter cups. Paint them all and then go back and give them a second coat to smooth out the parts that didn’t stick the 1st time.
  • Set aside to dry.

Prepare Oreo Pops (there is a tutorial for these, if you have never done them, here)

  • Twist apart all of your Oreos.
  • Melt a small amount of Candy Melts (<1/4 cup) in the microwave in 3o second increments, stirring between until smooth.
  • Dip the end of a lollipop stick into the melts, and press into white filling of Oreo. Place other half of cookie back on top and press together.
  • Place Oreo and stick on a cookie sheet. Repeat this process with remaining Oreos, and then freeze all Oreos until firm (10-15 minutes).
  • Melt remaining Candy Melts using method from above.
  • Once Oreos are chilled, hold with stick and dip into Candy Melts until completely coated.
  • Tap on side of bowl to get excess off, and drag across lip of bowl to scrape excess off back of cookie.

Ornament OreosOreo Ornaments

  • Set on parchment paper  and immediately set a gold “cap” on the top edge to harden there as the candy melts solidify.
  • If you want to add sprinkles, do so before the Candy Melts get hard (stripes in other colors can be added later)

Oreo Ornamentoreo-ornament-pop

  • Allow Oreo Pop to harden completely
  • Decorate with other colors of Candy Melts, as desired. To make the stripes, I placed melted candy in a small zip top bag, clipped a corner and piped lines onto the Oreos. 
  • Once everything has completely hardened, place into individual cello bags, or into an air-tight bag or container. These will stay good for weeks when sealed up. 
  • Enjoy!

oreo-ornament-pops

My thoughts: Well, by now you know how much I love my Oreo Pops! These were fun to make and a little peanut butter on top of that Oreo? Yes, please! 🙂 These make great little gifts and stocking stuffers! Enjoy! ~r

oreo-ornament-pops

Don’t stop with just ornaments! We have two other fun Christmas Oreo Pops! (click on the photo to see the recipe)

Reindeer Oreo Pops!!!Snowman Oreo Pops

Shortbread Christmas Cookies

Posted on

shortbread4

These pretty shortbread cookies are delicious all on their own- but topped with a piece of gold-dusted chocolate? Then they are perfect. 

I’d never made shortbread before. Crazy, I know. The inspiration was those AMAZING Starbucks snowmen cookies. You know.. the ones that are soooo cute and topped in chocolate rather than icing?

snowman

I was telling a friend about my love for those little Starbucks cookies and she said, “I know! Shortbread cookies are the best!” and I thought to myself…. “Shortbread? What exactly is a shortbread cookie?” So I investigated and tried a few recipes and FELL IN LOVE with these cookies!!!  Buttery and flakey happiness with every bite!

Shortbread cutout cookies

I wanted to add chocolate on top, and found these ADORABLE silicone molds by Silikomart. (and then I got sucked into the world of Silikomart and all the beautiful things they make that are mostly available only in Italy….) I found these on Amazon though. I dusted them with a little bit of edible gold dust to give them an especially elegant feel.

So. Much. Christmas. Fun.

Here’s the recipe: (printable version here)

INGREDIENTS: (makes 24-30 cookies)

  • 1 cup unsalted butter (at room temperature)
  • 3/4 cup powdered sugar
  • 1 tablespoon vanilla
  • 2 cups flour
  • 1 teaspoons baking powder
  • About 16 oz of dark chocolate wafers. You can use Wiltons candy melts, but for these cookies I used Ghirardelli Melting Wafers. They cost more- but they are SO good!
  • Edible gold dusting powder (I used this brand)

DIRECTIONS:

  • Place butter and sugar into a mixing bowl and using a mixer, beat until light and fluffy (think buttercream frosting…!)
  • Add vanilla and mix until well combined.
  • Add flour and baking powder to butter/sugar mixture and beat on low speed until incorporated well (don’t over-beat this).
  • Use clean hands to form this mixture into a ball. Wrap it in plastic wrap and refrigerate for at least 30 minutes.

While dough is chilling, make chocolate toppers.

  • Melt chocolate wafers in the microwave in 30 second increments, mixing in between until melted and smooth.
  • Spoon into a large zip-top bag and seal it well.
  • Place mold on a cookie sheet to keep it flat and easy to move.
  • Carefully pipe chocolate into molds, filling them up to the top and then tap entire cookie sheet on counter to remove bubbles.
  • Freeze for 5-8 minutes until they can be peeled out of the molds. Repeat until you have about 24-30 toppers.
  • Squeeze extra chocolate back into a small bowl and set aside.

Chocolate molds for Christmas

Set toppers aside, and cut/bake cookies.

  • Preheat oven to 350 F degrees.
  • Remove dough from refrigerator and roll out on a floured countertop. Cut into rectangles. I used this cookie cutter set and I needed 2 different sizes because the molds are different in size. Place on a cookie sheet that has parchment paper laid on top. 
  • Bake at 350F degrees for 10-12 minutes.
  • Slide parchment paper (with cookies on top) off baking sheet and onto a clean counter. Cool completely.

Assemble cookies.

  • Re-heat the extra chocolate you set aside from earlier, using instructions given earlier for melting.
  • Use a knife to spread melted chocolate onto the back of a chocolate topper, and gently place it on top of a cooled cookie. (I used gloves to handle the chocolate so I wouldn’t leave fingerprints on it!)
  • Allow topper to harden- sticking it firmly to the top of the cookie.
  • Use a food-grade brush to gently brush gold dusting powder over each chocolate piece. You can skip this step– but the wow factor increases A LOT with this touch of gold glitter!!!
  • Enjoy!!!!

Starbucks cookie recipe

My thoughts: These are SO (soooooooooooo!) yummy! I keep kicking myself for never making shortbread before this! These are a fragile cut-out cookie. The chocolate on top adds much-needed stability, but be gentle with them before that chocolate is added. They are fragile because they are a light, flaky, buttery piece of heaven- but they are fragile nonetheless. I made these in early November- working ahead for Christmas blogging- but I am definitely making these as one of my Christmas cookies this year- this is a do-not-miss recipe!  Hope you and your family enjoy them as much as I did!!!  ~r

Shortbread cutout cookies with chocolate on top.

Need Christmas cookie ideas?? We have SO many here!  Here’s a few to get you started: (click on photo to see recipe)

Decorated bonbonsSnowman Oreo PopsCaramel Ritz CookiesChristmas Card Cookies

Pumpkin-stuffed Oreos

pumpkin stuffed oreos

Why have plain old pumpkin pie, when you can have these Oreos- filled with pumpkin and dipped in white chocolate?!?

Admission: I don’t like pumpkin pie. I never have and probably never will. I don’t like pumpkin spice anything either. The best way to ruin a Starbucks drink is to add pumpkin spice. Ew.

So I made these for you. All of you lovers of pumpkin out there! I also distributed these to as many pumpkin-addicted friends as possible, to get their thoughts. They LOVED them. I like that they are cute. Cute is always good.

pumpkin filled oreo

Like that photo, pumpkin people??? 🙂 I bet you do…. If you love pumpkin pie- you will go crazy over these fun little cookies!

Here is how we made them (printable recipe here)

INGREDIENTS: (makes about 20 cookies- but see notes at end of recipe)

  • 1 (15 oz) can of pumpkin
  • 1 (14 oz) can of sweetened condensed milk
  • 3 eggs 
  • 1 1/2 teaspoons of pumpkin spice seasoning
  • 1/2 teaspoon salt
  • 1 refrigerated pie crust
  • 1-2 boxes of Oreo Thins in vanilla (see notes)
  • 1-2 bags of Wilton’s Candy Melts in white (see notes)

DIRECTIONS:

  • Preheat oven to 375F degrees.
  • Place pumpkin, condensed milk, TWO eggs (save one), pumpkin spice, and salt into a medium mixing bowl and blend well using a whisk.
  • Pour into a baking dish (a pie plate works perfectly!)
  • Bake at 375 for 45-50 minutes- until a toothpick inserted into the center comes out clean. 
  • Remove from oven, spoon into a clean mixing bowl and blend until fairly smooth (it’s pumpkin, so it won’t be creamy smooth- but without big lumps).
  • Freeze for 30 minutes- until chilled through.
  • While baking /freezing pumpkin, make pie crust toppers.
  • Unroll pie crust and use a small cookie cutter to cut shapes out. Place these on a parchment paper-covered cookie sheet.
  • Separate remaining egg and keep just the white. Use a brush to coat top of each pie piece with egg-white. (I added a bit of orange and green food coloring in separate bowls to give them a hint of color- but this is optional!)
  • Bake at 375F for 7-8 minutes. Keep an eye on them! Mine got a little too brown.  I just popped these in while my pumpkin was still baking. Cool on counter.
  • Place 1/2 of Oreo Thins on a small cookie sheet. 
  • Scoop cooled pumpkin on top of each and gently press second Oreo on top.

pumpkin pie cookiesimg_0116

  • Freeze for at least 30 minutes (until pumpkin in the center is fairly hard).
  • Melt Candy Melts in a bowl the microwave in 30 second increments, stirring until smooth.
  • Set a pumpkin-stuffed Oreo into candy melts and spoon over the top and sides. 
  • Remove using a fork. Tap against edge of bowl to drain excess away and gently slide onto parchment paper. 
  • Before candy hardens, place a pie piece on top and sprinkle with a little pumpkin spice seasoning. 
  • Allow candy to fully harden ( a couple of hours).
  • Serve in a pie plate- or bag them up in cute cello bags with ribbon. 
  • Enjoy!

Pumpkin pie oreos

My thoughts: Honestly, these take a little time. You bake a pie and then turn it into cookies. Everyone loved the HUGE amount of pie filling in each cookie- but if you haven’t done much dipping in chocolate before, I highly recommend you get a second box of Oreo Thins and put less in between each cookie. The hardest part of this process was coating such a tall cookie in white chocolate. If I made these again I would use less pumpkin filling to make that easier. If you do this, you will need a second bag of candy melts as well.

pumpkin-oreo3

See… half that amount would still be enough! Once these were hardened, I placed them in little cello bags and tied them with ribbon. They were still yummy (to my pumpkin loving friends) several days later. Because of the moist pumpkin filling, I recommend you serve these fairly soon after making them though. Within a few days. Enjoy!!!  ~r

Pumpkin filled oreos

Other fun recipes for Thanksgiving! (click on a photo to see the recipe)

Pecan Pie CupcakesTepee CupcakesHoney cut-out cookiesPeanut butter cup cheesecake

Spiderweb Oreo Pops

Posted on

spiderweb-oreo-pops

These web-wrapped Oreos with M&M spiders are not only cute fall treats- but delicious ones!

It’s that time of year again. That time when spiders think it’s too cold outside, and find little cracks around my windows and doors to creep in through. There’s nothing worse than sitting here, innocently blogging about a dessert recipe, only to be shocked by a giant black spider racing out from behind the couch. Seriously- they move so fast!

In any case, I make a lot of spider-themed treats. Maybe because candy spiders are so cute- and they don’t move. These are especially cute little guys- and they are perfect on top of these web-coated Oreos! Plus, as is true with all Oreo pops, you can make them weeks ahead and have them all wrapped in pretty bags and ready for a party. I love recipes like that.

spiderweb-oreo-pops

Here is how we made them: (printable recipe available here)

INGREDIENTS: (makes about 24 pops)

  • One box of Double Stuff Oreos
  • 24 lollipop sticks
  • 2 bags of Wilton’s Candy Melts in white
  • 1/4 cup of Wilton’s candy melts in dark chocolate
  • 36-ish dark brown M&Ms (no worries–you can eat the rest of the bag while you work 🙂 )

DIRECTIONS:

  • Make your spiders 1st.
  • Melt dark chocolate melts in microwave in 30 second increments, stirring in between until melted and smooth. Spoon into a small zip-top bag and clip a tiny corner off (or use a decorator tip, if you have one). 
  • Pipe spider legs on parchment paper (see photo) and place an M&M in the center. I make more than 24, because the legs sometimes break when you peel them off.

The photos below are from my recipe for Spider Eggs, and some of them are piped on Lindt truffles. You can see how I piped them on parchment paper though.

Spider eggsSpider Eggs

  • Let spiders harden while you assemble your Oreos.
  • Twist apart all of your Oreos.
  • Melt a small amount of candy melts (<1/4 cup) in the microwave in 3o second increments, stirring between until smooth.
  • Dip the end of a lollipop stick into the melts, and press into white filling of Oreo. Place other half of cookie back on top and press together.
  • Place Oreo and stick on a cookie sheet. Repeat this process with remaining Oreos, and then freeze all Oreos until firm (10-15 minutes).
  • Melt one and a half bags of white Candy Melts using method from above.
  • Once Oreos are chilled, hold with stick and dip into Candy Melts until completely coated.
  • Tap on side of bowl to get excess off, and drag across lip of bowl to scrape excess off back of cookie.
  • Set on parchment paper to harden.
  • Melt remaining white Candy Melts and place in a zip-top bag. Clip the corner off and drizzle over each Oreo to make a messy web-like pattern.
  • Immediately place a “spider” on this melted drizzle and allow everything to harden up for at least a couple of hours. 
  • Once hardened, store in an air-tight container or tie up in little cello bags. 
  • Enjoy!!!

spiderweb-oreo-pops

My thoughts: *Smile*!!! These are fun little treats- and not too difficult to make. I always love my Oreo pops. One of these days I should put all of them in one post since I’m getting such a large collection of them! I hope you get a chance to try these fun little treats! And I hope they are the only spiders you find in your home this fall!!!  ~r

spiderweb-oreo-pops

Other spider-y treats found on Easybaked: (click on a photo to see the recipe)

Spiderweb CookiesSpider Cupcakes!Spider Eggs Cupcakesspiderweb brownie

A bowl of eyeball cookies!

Posted on

eyeball-cookies

These delicious little cookies are the perfect creepy treat for October!

Ah…these were fun to make and really fun to share! They definitely gave kids a pause. I heard one little girl say, “Mom- I’m a little scared of those cookies because they are looking at me!”

Love it.

Ok- so these don’t involve baking. You could certainly bake cookies and decorate them this way- but if you are like me and you needed a recipe at 10pm the night before- Nilla Wafers and Ritz crackers will do just fine (and taste GREAT!)

Here is how we put them together (and there is no printable recipe- because there isn’t really a recipe for these- just a technique!)

eyeball cookies

INGREDIENTS:

  • Nilla Wafers (and some mini-Nilla wafers, if you’ve got them!)
  • Ritz crackers
  • Wilton Candy melts in green, blue, white and black
  • Candy eyes (although these aren’t technically necessary, since you have the white and black candy melts).

DIRECTIONS:

  • Melt candy melts, one color at a time, in the microwave in 30 second increments, stirring in between until melted and smooth.
  • Spoon into a zip-top bag and cut a corner off. (Or use a squeeze bottle fitted with a decorating tip if you have one)
  • Use green to outline the edges of the Ritz crackers and then fill in. Use white to outline and fill in the tops of the Nilla wafers.

eyeball-cookieseyeball-cookies

  • Draw eyes of different sizes on the Ritz crackers, using a toothpick to make the tiny pupils in black (use candy eyes if you have them, for one size) I even added some little green blotches on these just to make them more weird.
  • Use blue and black candy melts to make eyes on the Nilla Wafers.

eyeball-cookieseyeball-cookies6

  • Let these harden and then serve them up in a fun bowl- or maybe put them in little cello bags and tie them with ribbon!
  • Enjoy!

eyeball-cookies

My thoughts: Aren’t they fun? You don’t have to be fussy about making them perfect- the crazier the better! Those Ritz crackers are especially yummy with the sweet candy on top. Yum. Enjoy these quick and easy treats!!!  ~r

Other creepy recipes for your October: click on a photo to see the recipe.

Spider EggsEdible Jello Earthworm CupcakesBroken glass Cupcakes!!!Mummy Oreo Pops!

Hairy Monster Oreo Pops

Posted on

hairy-monster-oreo-pops

These fuzzy Oreo monsters aren’t TOO scary- and they taste delicious!

Oh Oreo Pops… I love you! So many possibilities and so little time! Aren’t these so cute? They remind me of the little pom-poms with eyes that we used to put on the tops of pencils. Yes..pencils…back in the olden days when we used paper 😉

In any case- these are perfect for Halloween and even for just fun fuzzies at kids parties! The only requirement??? You need to like coconut!  I know that eliminates a few of you out there…but believe me- if you like coconut, you will LOVE these! Coconut plus Oreos?? Bam!

monster-oreo-pops

Here’s how we made these fun little guys: (printable recipe available here)

INGREDIENTS: (for about 24 cookies)

  • One package of Double Stuff Oreos
  • Wilton’s Candy Melts– you need about a bag and 1/2- so if you do all three colors you need 1/2 bag of each.
  • Candy eyes
  • About 3 cups of shredded, sweetened coconut
  • Food coloring in desired shades
  • About 24 lollipop sticks

DIRECTIONS: (if you’ve never made Oreo Pops, check out our tutorial here)

  • Place coconut in small zip-top bags and add food coloring in desired shades. Zip bag shut and shake and squeeze until coconut is completely colored. Set aside.
  • Twist apart all of your Oreos.
  • Melt your candy melts in the microwave in 30 second increments, stirring in between, until melted and smooth.
  • Dip the end of a lollipop stick into the melts, spread a little on the top of the white filling of the Oreo and then press the stick into the white filling.
  • Place the top of the Oreo back on so that the stick is in the middle with the filling.
  • Do this for all the Oreos, and set them on a large plate or cookie sheet to FREEZE for about 10 minutes.
  • Hold a chilled pop by the stick, and spoon candy melts (in desired color) over the top, bottom and sides of the Oreo.
  • Tap stick against the side of the bowl to get extra melts off, and gently pull the bottom of the Oreo along the edge of the bowl, scraping off excess melts.

hairy-monster-oreo-popshair-monster-oreo-pops

  • Set Oreo on parchment paper to harden- but before it hardens, sprinkle a generous amount of coconut on the top of the candy melts, and gently press it up against the sides.
  • When all Oreos of a given color are dipped and covered, take the remaining candy melts and use a dab on the back of each candy eye-ball to “glue” these on top of the coconut. I used a toothpick to add this dab of candy melt to the eyeball.
  • Continue until you have all colors finished. Allow Oreo pops to completely harden (a couple of hours). You can freeze them to speed up this process. 
  • The BEST way to serve these is to wrap them in cello bags and tie them with a ribbon. This keeps all that coconut in place (and not all over the other colors of coconut!)

hairy-monster-oreo-pops

hairy-monster-oreo-pops

My thoughts: These are quick, but a little messy to put together, They are adorable and delicious though– so well worth the effort in my opinion!!! I liked them even better after a couple of days- when the coconut gets a little firmer in texture from sitting out and it’s less oily. These will keep for at least a week (maybe longer?) when wrapped up in cello bags. I do hope you get a chance to try them!  Enjoy!!  ~r

hairy-monster-oreo-pops

We specialize in making kids smile here at Easybaked. Here are a few more ideas: (click on photo to see recipe)

Cookie Monster OreosFish Pond CupcakesTepee CupcakesPile of Cupcakes!