RSS Feed

Tag Archives: christmas

Reindeer Oreo Pops!

Posted on

Reindeer Oreo Pops!!!
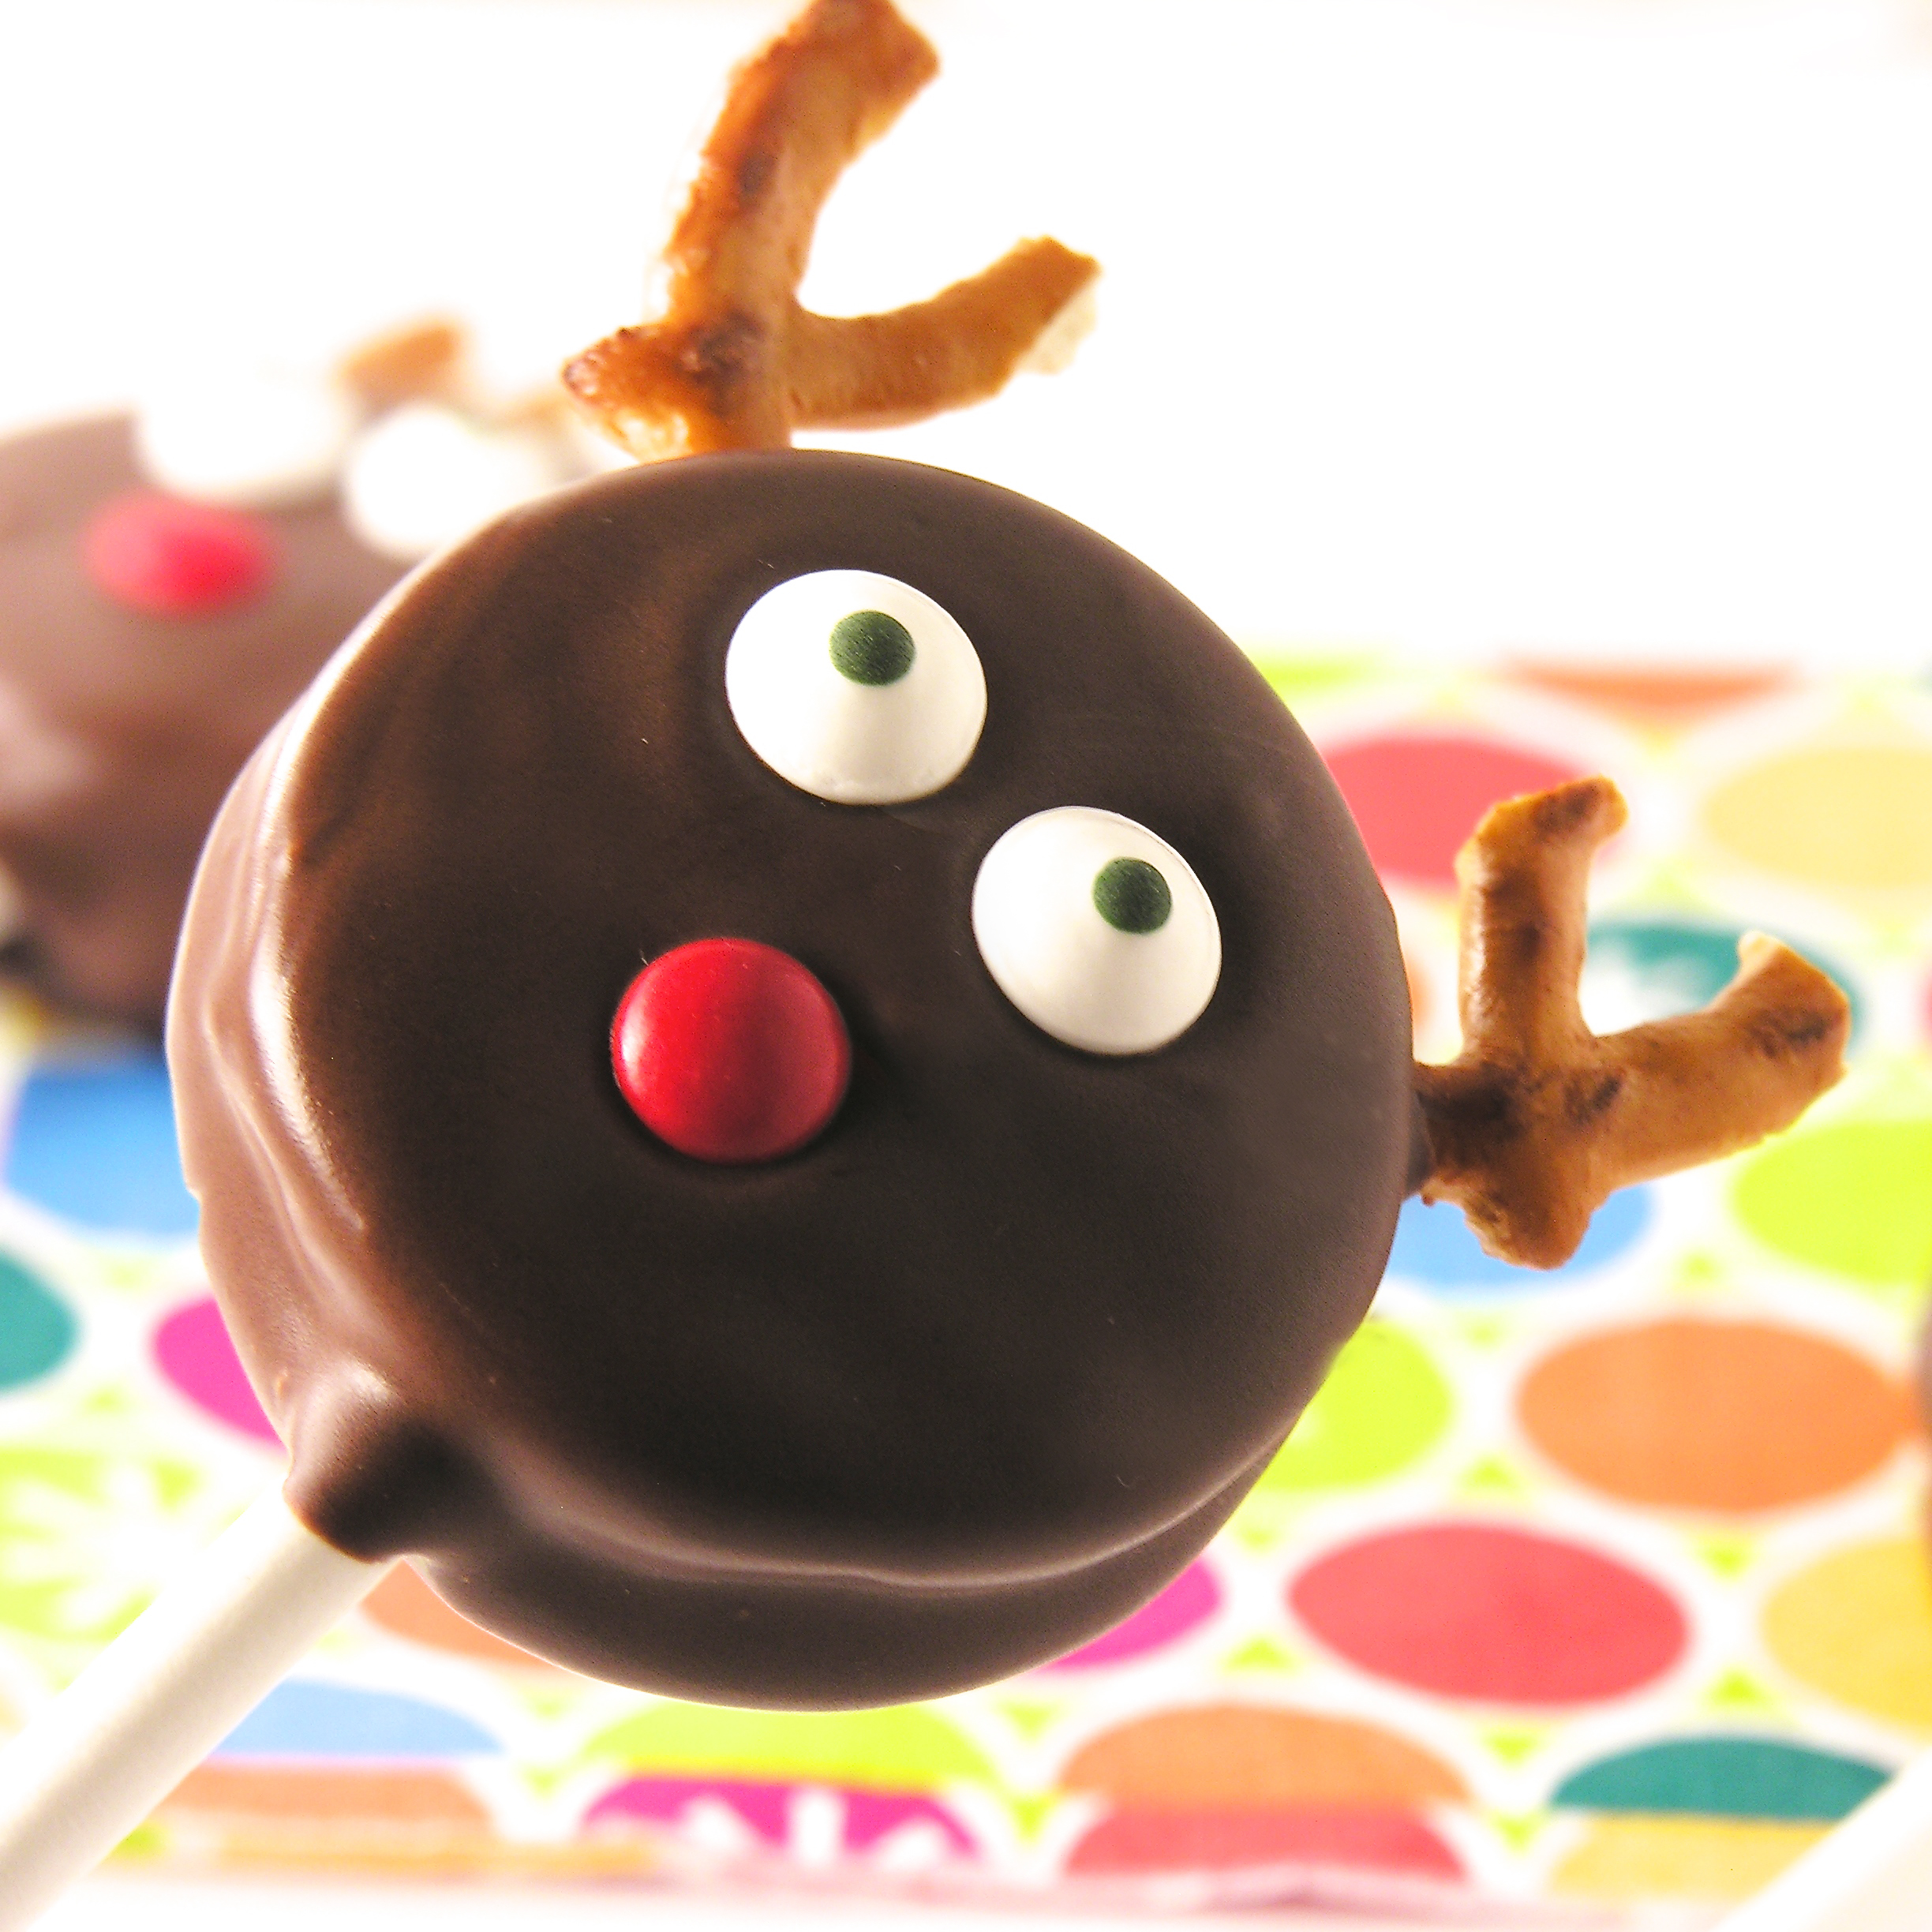
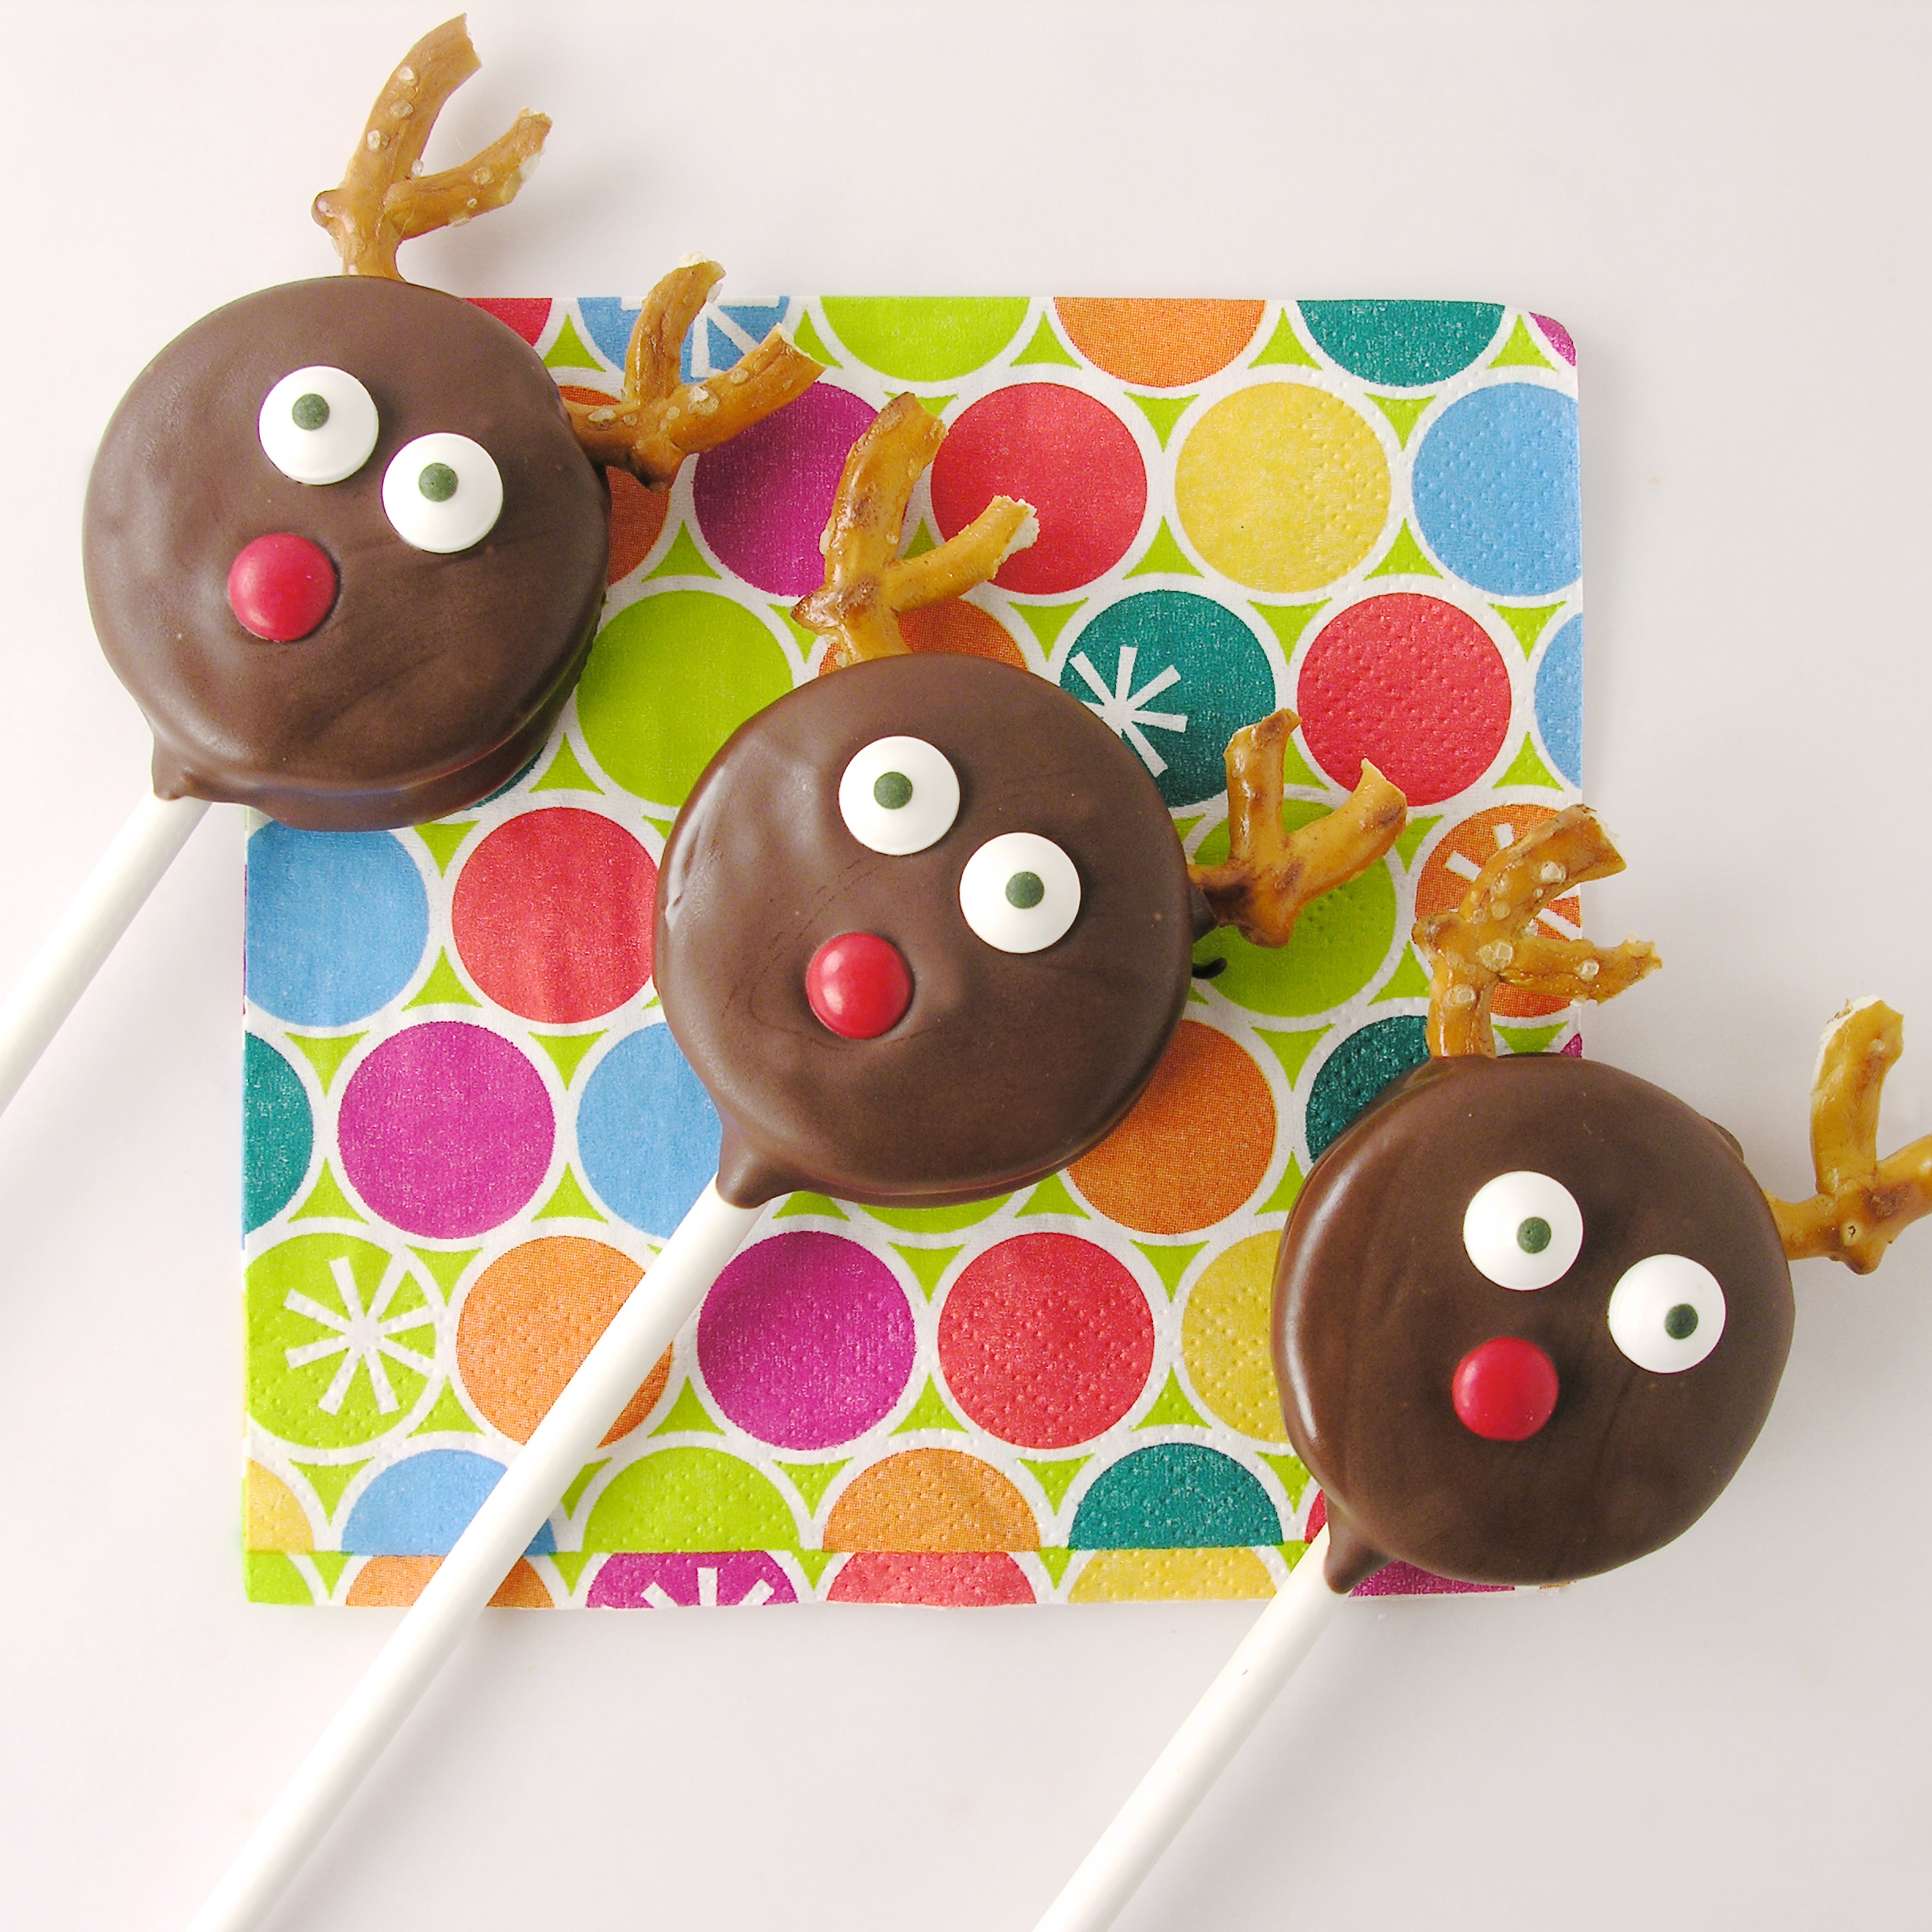
These chocolate covered Oreos are so full of holiday cheer!  Wrap them in little cello bags for a quick and fun Holiday gift!

I confess.  I am addicted to making Oreo pops.  I can’t stop.  They are so easy and fun.  They give me an excuse to buy a package of my favorite cookies.  They make people smile.

Original Oreo pops!!!!!Mummy Oreo Pops!Snowman Oreo PopsLadybug Oreo Pops!

I have the art of “stick-placing” and “dipping” Oreos to coat them in chocolate down.

Click here for a printable sheet that takes you through the basic process step by step.

INGREDIENTS:

  • 1 package of Double Stuff Oreos
  • 2 bags (12oz each) of milk chocolate candy melts (I use Wilton’s)
  • 24 lollipop sticks
  • 1 small bag of mini-pretzels
  • Candy eyes
  • Mini M&Ms

DIRECTIONS:

  • Gently twist apart Oreos.  Some will break.  No stress.  Eat them.
  • Break apart pretzels by using a sharp knife to carefully cut them top to bottom through the center.  Then cut the round tops off, leaving a “Y” shape.
  • Put eyes and red mini M&Ms into small bowls, ready to use.
  • Place candy melts into a bowl.
  • Melt candy melts in the microwave in 30 second increments, stirring between, until completely melted and smooth.
  • Press a lollipop stick into white filling, making an indentation.
  • Dip stick into melted chocolate and spread chocolate on top of white filling.
  • Place stick into indentation and set top of cookie back on, cementing the cookie back together around the stick.
  • Allow chocolate to harden.  If you set cookies on a large plate as you put them together, you can place the entire plate into the fridge to speed the hardening process up.
  • Once hardened, pick the cookie up using the lollipop stick and set into melted chocolate.
  • Spoon melted chocolate over the Oreo to coat it.
  • Gently tap the stick on the bowl’s edge to allow excess chocolate to drip off.
  • Slide bottom of cookie along edge of bowl to remove excess chocolate.
  • Set cookie on parchment or waxed paper.
  • Put pretzel “antlers” into the top of the Oreo, and set two eyes and a nose on the front of the Oreo.
  • Allow chocolate to harden completely.
  • Serve as-is, or tie up in cello treat bags to give as gifts!

Reindeer Oreo Pops!!!
My thoughts:  What to do you get when you combine an Oreo with melted chocolate and salty pretzels?  Deliciousness!!!!!!  Use them as place settings on each plate for Christmas! Make reindeer, snowmen and red/green sprinkle Oreo pops and create a bouquet of pops in a cute Christmas planter for your Christmas celebration!  Use them as stocking stuffers or teacher gifts….the possibilities are endlessly fun!  Enjoy!  ~r


Reindeer Oreo Pops

Advertisement

Peanut Brittle

Peanut Brittle!!
This thick and crunchy peanut brittle just melts in your mouth, and it’s one of our family’s favorite Christmas treats!

This is the best peanut brittle I’ve ever had.  My wonderful Aunt Beth has brought it to our family Christmas celebrations since I was just a tiny girl.  I remember being SO full after dinner and no matter how full I got,  I always had to have a piece of Aunt Beth’s peanut brittle.  I have vivid memories of opening presents one-handed because I had peanut brittle in the other hand.  It is THAT GOOD.

Aunt Beth

Aunt Beth and Uncle Keith

I think what makes it perfect is that it isn’t really hard to bite into or a “teeth-stuck-together” kind of candy.  It just kind of melts in your mouth…and oh my….

I’d never made it, because there has always been this aura of “impossibly difficult recipe” surrounding it.  First of all, you need a candy thermometer and I think that discourages many a would-be peanut brittle maker.  Second, it takes some stirring time over a hot stove.  This isn’t a quick recipe- but it is so sooooooo worth it!

Aunt Beth issued two warnings to me when I embarked on the mission to try her recipe:

1.  Once you add the peanuts you have to stir constantly or the brittle will burn.

2. Be incredibly careful handling the pans and especially the candy, as it is SO hot and sticky and you could easily burn yourself.  Use caution stirring and pouring.

I put on safety glasses and got out a big pan…..

RuthanneIt wasn’t nearly as scary as I thought it would be.  It was actually really fun, and it turned out GREAT!

Ready for the recipe?  Here you go:  (printable recipe)

INGREDIENTS:

  • 1 cup water
  • 1 cup Light Karo Corn Syrup
  • 2 cups granulated sugar
  • 1 lb. raw peanuts (be sure to use raw- I found mine in the produce section of my grocery)
  • 1/4 teaspoon salt
  • 2 Tablespoons butter (plus enough to coat a large jelly roll pan)
  • 2 heaping teaspoons baking soda

DIRECTIONS:

  • Liberally butter a large jellyroll pan (this is just a cookie sheet with sides- the bigger, the better!) and set it on a towel or potholders (it will get very hot when you pour the brittle in).
  • In a large saucepan (I used a dutch oven pan) place water, Karo syrup and sugar.
  • Place a candy thermometer in the pan (I clipped mine to the side)
  • Heat on high and boil until soft ball stage (238F degrees), stirring occasionally.
  • While this is boiling, measure out the remaining ingredients and have them ready to add.
  • At 238F degrees, add the peanuts, salt and butter and carefully STIR continually until mixture reaches brittle stage (310F degrees).  This took me about 15-20 minutes.

How-to-make peanut brittleHow-to-make peanut brittle

  • Add baking soda and stir until it disappears.  The mixture will foam up and double in size (that’s why you need a big pan!). Give it  few seconds to get nice and foamy.
  • CAREFULLY, using oven mitts, pour mixture onto your buttered jelly roll pan.  Do not spread it out, just let it spread it out on its own.  Allow brittle to cool for several hours (don’t rush this part– it is worth the wait!)

How-to-make peanut brittleHow-to-make peanut brittle

  • Once it is completely cool, break it up into chunks and enjoy!!!!!!

Peanut Brittle!!
My thoughts: This isn’t a difficult recipe- it is just hot and time consuming.  Now that I’ve made it, I will make it again though- it is SO worth the effort!  I know there are much simpler recipes (even ones in the microwave!) for peanut brittle, and I’m all about simple.  But this is an exception to the rule of keeping things simple.  I really think you will love it!  Thanks so much for sharing your wonderful recipe Aunt Beth!  Love you!  ~R

Peanut Brittle
Other Christmas recipe ideas:

Snowman Oreo PopsChocolate Pecan TartChocolate Bon-bonsPeanut butter cup cheesecake

Creamy Chocolate Pie

Creamy Chocolate Pie
This is a new take on a chocolate pudding pie.  So incredibly rich in chocolate flavor that you will never go back to just plain pudding!

This week’s family recipe comes to us from Florida…or Yellowstone…or Peru….or wherever my wonderful adventurous Aunt Paula might be.  She and my Uncle Jim have literally travelled the world and done the most interesting things.  They are great story tellers and a family meal with them is a treasure.

4769_1062312648969_4724662_n

I had never tried this recipe before, but Paula and Jim submitted it to our family cookbook and titled it “The Best Chocolate Pie in the World”.  How can you resist trying a pie with a name like that?!??

Paulas Pie 4
The chocolate flavor in this pie filling is extraordinarily good.  Very rich and dark.  I’m really not a pie person (check the rest of this blog….not too many pies…) but this one is worth trying, it’s very yummy!

Here’s is the recipe: (printable version)

INGREDIENTS:

  • 1 1/2 cups sugar
  • 2 tablespoons cornstarch
  • 5 tablespoons of cocoa
  • 3 egg yolks, beaten
  • 2 cups hot milk
  • 1 stick (1/2 cup) butter. melted
  • 1 1/2 teaspoons of vanilla

DIRECTIONS:

  • Prepare a graham cracker or a plain baked pie crust.  Since I rarely make pie, I just used a refrigerated pie crust and baked it according to the package.  If you have a favorite crust recipe, now’s the time.
  • In a large, heavy saucepan, combine dry ingredients together.
  • Heat milk over stove or in the microwave and add it gradually to the dry ingredients, stirring as you add.

Not-so-homemade pie crustAdd hot milk slowly...

  • Add butter and egg yolks and mix well.
  • Cook on stove over low heat until thickened, stirring constantly. (I did not allow mine to cook long enough the first time I made this and it didn’t firm up very well.  Cook it until it is a very thick custard like consistency.  Mine actually boiled before it thickened enough.)
  • Remove from heat
  • Mix in vanilla.
  • Pour into prepared pie crust and chill several hours or overnight.
  • Enjoy!

Creamy Chocolate Pie!


My thoughts: Such an easy way to get your chocolate fix!  This pie is  soooo good with a cup of coffee and a little whipped cream on top…YUM!  Thank you for sharing your wonderful dessert with us Aunt Paula!  Enjoy your latest Caribbean adventure!! ~r  

The other lonely (yet yummy!) pie recipes of Easybaked:

Fruit Loop Pie!German Chocolate PiePecan and chocolate pieRaspberry Truffle Tart

Gingerbread Cake Roll with Maple Cream Filling

Gingerbread Cake Roll A moist gingerbread cake rolled around sweet maple cream filling– a perfect Christmas treat!

Over a year ago I made gingerbread cookies with a maple cream filling for Halloween.  I’ve had so many requests for those cookies that I decided to use those flavors again in a cake form.  If you’re turning your nose up at the ginger/ maple flavor combination you simply MUST try one of these two recipes.  The flavors together are wonderful!  Cake rolls are really very easy to make. If you’ve never made one click here to get some photos of my technique with a pumpkin cake roll.

INGREDIENTS:

Roll:

  • 1 1/4c. flour
  • 1 1/4 t. baking soda
  • 1 T. ground ginger
  • 1 T. ground cinnamon
  • 1 t. ground cloves
  • 1 egg
  • 1/2 c. warm water
  • 1/3 c. sugar
  • 1/3 c. molasses

Filling:

  • 2 c. powdered sugar
  • 1/3 c. butter (melted)
  • 1 t. maple flavoring
  • 1/2c. white chocolate chips (melted)
  • 1-2 T. water to get spreadable consistency.

DIRECTIONS:

  • Preheat oven to 350F degrees. Line a 10×15 inch jellyroll pan with waxed paper and spray lightly with non-stick spray.
  •  Blend together flour, baking soda, ginger, cinnamon and cloves.
  • Beat together egg and warm water in a large bowl, then whisk in white sugar, and molasses.
  • Fold in the blended dry ingredients until smooth, then pour batter into prepared pan.
  • Bake for 15 minutes (until the cake springs back to the touch).
  • Remove from oven and immediately -with wax paper on- roll gingerbread cake up from short end of pan to short end of pan (you will probably burn your fingers a little- I usually do!) Roll this up in a clean towel to hold it tightly together.
  • Refrigerate for 1 hour.
  • While roll is chilling, make filling:
  • Add powdered sugar, melted butter, melted chips and maple flavoring together and blend.
  • Add a little bit of water to make filling into a spreadable consistency.
  • After one hour, remove roll and unroll it carefully.
  • Spread filling over top of opened roll and then re-roll this up *removing the wax paper as you roll*
  • Place this back in the refrigerator for about 4-6 hours minimum.
  • Drizzle with a little powdered sugar glaze or sprinkle with powdered sugar and cut into slices to serve.

Gingerbread Cake RollMy thoughts:  YUM!!!  I can’t wait to make this again- its really fun to put together and to serve.  It’s such a unique and memorable dessert.  If you want something that will stand out on the dessert table this Christmas, this is it!  ENJOY!!!  ~r

Want to try this in cookie form?  I made these with Halloween Linzer cookie cutters, but they would be really fun with Christmas ones!  Click on the photo and you’ll be taken to the recipe….enjoy!

Ginger Maple Cookies

Peppermint Hot Chocolate Cupcakes

Posted on

Rich chocolate cupcakes filled with peppermint cream and topped with a chocolate frosting made with hot chocolate mix ~ a perfect winter treat!

(the hot cocoa frosting is to DIE for…just thought you should know that right up front….!)

I love hot chocolate…. it is one of my favorite parts of winter.  My friend Dawn recently suggested we participate in a Hot Chocolate Run.  If you’ve never heard of this (I hadn’t!) let me show you a little of the amazingness that makes up a Hot Chocolate Run.

Hot Chocolate RaceStarting line of the Hot Chocolate Race

Finisher's MugYUM!!!!

Nothing motivates better than chocolate, I always say!  Who needs a medal when you can have a big cup of cocoa and warm chocolate fondue after a race?

In any case, I’ve been moderately addicted to hot cocoa ever since that weekend.  We all know what happens when I get a flavor stuck in my mind right?  Cupcakes happen.  Hot Chocolate Cupcakes in this case– with some peppermint as a bonus.  If you don’t like peppermint you can easily leave it out of this recipe, but I love the combination!  Are you ready to make these?  Here we go.

INGREDIENTS:

  • One boxed dark chocolate cake mix (plus oil, water and eggs needed to make mix according to box)
  • One packet of Dream Whip (what is Dream Whip? Click HERE)
  • 1/2c. cold milk
  • 3 t. vanilla (divided)
  • 3 tablespoons of finely crushed peppermint candies (I used Peppermint Sprinkles )
  • 1 stick (4 oz.) of salted butter at room temp.
  • 1 stick (4 oz.) of unsalted butter at room temp.
  • 1 cup powdered sugar
  • 1/2 cup of hot cocoa mix (I used Nestle)
  • Kraft Mallow Bits  and peppermint candies to decorate as desired.

DIRECTIONS:

  • Make cake mix according to box, and bake in 24 cupcake liners in muffin tins.
  • Cool cupcakes completely.
  • Make cream filling by placing Dream whip, milk and 1 t. vanilla in a mixing bowl and beating on high until light and fluffy.
  • Add finely crushed  peppermint candy and gently fold in until well combined.
  • Hollow a core out of each cupcake (I used a Chicago Metallic Cupcake Plunger that was recommended to me by a friend– LOVED it!)

Chicago Metallic Cupcake PlungerSo easy to core cupcakes!

(If you have baking friends this is SUCH an inexpensive and fun stocking stuffer idea– it only took me about 5 minutes to core all 24 cupcakes– and I stopped to take pictures!)

  • Pipe filling into each cupcake core.
  • Make frosting by combining butters, powdered sugar, cocoa mix and 2 t. vanilla in a large bowl and beating on high until fluffy.
  • Pipe frosting over cupcakes and decorate as desired.  (The mallow bits were really yummy with this frosting!


Peppermint Hot Chocolate Cupcakes!!!

My thoughts:  Fun and yummy winter treat!!  Not a fan of peppermint?  Just leave the crushed peppermint out of the filling and you have a yummy whipped cream taste with your hot chocolate frosting instead!  

One note:  Put the peppermints on just before serving as the frosting eventually makes them a little sticky.  I hope you and your family love these little treats!  Enjoy!!!  ~r

DIY Caramel Corn and other great gift ideas from Easybaked!

I love making and getting creative edible gifts. I’m not talking just a plate of Christmas cookies here…I’m talking unique and different.  Take Caramel Corn, for example.  It is my grandmother’s favorite and I remember spending long evenings watching my parents try various caramel corn recipes in search of the perfect (yet not too messy!) one.  There was the giant brown sack method (where you shake the caramel in) and the cookie sheet one where you pour the caramel on and try to mix it on the sheet (my dog liked that method– lots of popcorn on the floor!)

A few years ago a friend handed me an adorable little Christmas package with mysterious items inside (all tied up with a cute tag and bow) and when I opened it I found ingredients for caramel corn.  All I needed was butter….. I promptly made it and YUM!!!  Quick, easy, delicious and SUCH a creative gift.  This post is dedicated to the recipes you can use this Christmas to make creative and memorable gifts for your friends and families.

CARAMEL CORN:

  • Place  1/2c. packed brown sugar in a small bag and zip or tie it tightly.
  • Place 8 large marshmallows in a small bag and zip or tie it tightly.
  • Place both of the above ingredients in a larger bag or gift box with one packet of microwave popcorn.


Close the bag or box with the following directions:

  • Pop corn in microwave according to package
  • Place brown sugar, marshmallows and 1/2 stick (4T) butter into a 2 qt. bowl
  • Microwave for 3 minutes, stirring well at 1 and 1/2 minutes.  Syrup should be smooth and bubbly.
  • Pour over popped corn and enjoy!

Click on the photo below to get free printable tags to use with this gift:

OREO POPS:

These fun chocolate-covered Oreos on a stick are great for any season.  I made them for the 1st time last spring for a baby shower.  Change up the sprinkles and tie some cute Christmas tags on and you have a great stocking stuffer- or even a holiday centerpiece bouquet!  All the how-to tips, including pictures are available if you just click HERE.  I also made up some free tags for you to tie on your pops~   Click on the picture below to get the free printable file:

HOT CHOCOLATE POPS:

I made these as gifts for SO many people last year.  I made extra for myself.  These are so easy and SO delicious~ everyone will LOVE them.  What are they?  Chocolate (in a variety of flavors and colors) hardened over a marshmallow on a stick.  You stir them into hot milk and make the most creamy, delicious hot chocolate ever.  The best part?  You can make them WAY ahead.  I made some in December and used them in March…still wonderful.  The recipe and directions can be found by clicking HERE.  If you want to print some free tags to tie on your pops click on the image below:

SPICED MOCHA MIX:

My cousin Eden made little jars of this wonderful mix for us several years ago at Christmas and I’ve used the recipe ever since.  It’s just wonderful, easy to make, keeps for months in a sealed bag or jar and makes a great gift.  Want the recipe and easy directions?  Click HERE.  Free printable tags?  Click on the picture below to get them: (I actually printed these on full-sheet labels, cut them apart and made stickers for my jars…just another idea…)

I hope that these ideas have inspired you to create your own fun and unique Christmas gifts!!!  Enjoy!  ~r

Want to try some other fun Christmas recipes by Easybaked?  Click on an image below to be taken to the recipe:

Shop Amazon – Black Friday Deals Week

Hot Chocolate Pops!

You’ve heard of cake pops, cookie pops, brownie pops, doughnut pops and even pie pops— but have you ever tried a Hot Chocolate Pop?  Creamy chocolate surrounding a marshmallow surprise center- pop it into a cup of hot milk and YUM- a perfect yummy creamy cup of cocoa.  Wrap them up and they make the PERFECT winter gift!

Ingredients:

  • Wilton White Candy Melts and Wilton Dark Candy Cocoa Melts.  You will need about one 12 oz. bag per 8 pops.
  • Marshmallows (one for every pop you intend to make!)
  • Stir sticks (I found these cute dowels at Michaels)
  • Small plastic cups (I used 3 oz. clear plastic cups by Solo)
  • Clear plastic bags I used Wilton Lollipop Bags -they are so easy- perfect size and come with a bow!
  • Cute tags– use mine if you want or make your own!! 🙂

Hot Chocolate Pop Labels

Hot Chocolate Pop Labels- Mint

Hot Chocolate Pop Labels- Instructions for use.

Instructions:

  • Melt candy melts in the microwave in 30 second increments, stirring between until smooth.
  • Spoon melted candy into a zip-top bag and seal.
  • Clip a corner off and squeeze about a teaspoon of chocolate into the bottom of each cup.  Tap cup against counter to spread chocolate and remove bubbles.
  • Place cups in the refrigerator for about 5 minutes until chocolate is hard.
  • Press dowels or stir sticks into marshmallows
  • Squeeze about 2 teaspoons of chocolate (I used a contrasting color) into cup and while it is still melted, press marshmallow into cup (this will squeeze the chocolate up along the sides of the cup.) Tap to remove bubbles.
  • Top with chocolate until marshmallow is completely covered -or—
  • (If you are using contrasting chocolates) Refrigerate about 10 minutes until second layer is hard and then add contrasting chocolate over the top, completely covering marshmallow.
  • Place cups in fridge for about 30 minutes to an hour.
  • Clip top of cup with scissors and tear it down the side which will release the pop.
  • Serve or gift wrap!  Enjoy!!!
  • To eat pop: Use a BIG mug (20 oz.) and heat up about 10oz. of milk in it.  Place pop in hot milk and stir until smooth and creamy!

My thoughts:  I love these so much…I love to come up with fun and creative edible gifts each year for giving in bulk (Bible studies, family get-togethers, hair stylist etc…) and these are just FUN!!!  I am wholeheartedly a blonde and my 1st use of these involved a full cup of hot milk plus a pop -resulting in  a huge lake of hot milk on the counter…so learn from me and use a big cup with room in it for the pop- lol!  

Also– I found MINT Wiltons candy melts and that is how I got the mint cocoa flavor.  I just added a little layer of green candy melt before I put lots of white melts and a marshmallow– I like how it turned out!  I wish I’d thought to take pictures as I went for you- I just forgot!  (NOTE: see below!!) Experiment with colors and flavors- these are pretty forgiving projects!

Enjoy– and a very Merry Christmas to you!!!!  -R

Ok– I had to make a second batch because I ran out.  Since I was making them again I took the time to take some pictures for you of the process:

A little bit of chocolate in the bottom of a 3 oz. cup.

White chocolate added over dark and marshmallow pressed into center.

Dark chocolate added over white and marshmallow– don’t forget to tap the bubbles out!

Everything is so pretty set up for pictures….this is what my counter ACTUALLY looked like at the end!

Pops ready to go in the fridge to harden!

Clip the top of the cup and tear down the side to release. (I used paper cups too this second time and they worked great– you just have to peel them off a little more.)

I hope these help– have fun!!  r-

Pecan Pie Cookie Cups

Dark chocolate and pecans baked in a soft sugar cookie cup–yum!

INGREDIENTS:

  • One tube of Pillsbury Refrigerated Sugar Cookie Dough
  • About 2 cups of pecan halves
  • 2/3 c. dark chocolate chips (I use the Ghirardelli 60% Cacao Bittersweet Chips)
  • 1 T. corn syrup
  • 1/4 c. heavy whipping cream

DIRECTIONS:

  • Preheat oven to 350 degrees.
  • Spoon about 1 T. of cookie dough into a ball in 24 mini-muffin cups.
  • Press into bottom and sides of cup (I use a Mini Tart Shaper )
  • Place one pecan half in the bottom of each cup.
  • Chop one cup of pecan halves into tiny pieces.
  • Mix together chopped pecans, corn syrup, whipping cream and melted bittersweet chocolate.
  • Use a zip-top bag to pipe pecan mixture into cups (just clip a nice big corner off so that the pecan pieces can fit through!)
  • Top with another pecan half
  • Bake at 350 degrees for about 16-18 minutes.
  • Allow cups to cool completely in pan.
  • Once completely cool, twist each cup a bit to free it from the pan and removeMy thoughts:  I usually love my experiments…but I didn’t really like these (just being honest here…)  My friends and co-workers LOVED them though…  I think I just needed milk chocolate instead of the bittersweet.  I need my sweet!  These were a huge hit though- so the bittersweet apparently works for most people.  ENJOY!!

Chocolate Cut-out Cookies

These easy-to-make chocolate cut-outs can be used to create so many wonderful Christmas treats.  Here, I used Christmas Linzer Cookie Cutters to make fun Christmas sandwich cookies.  These rich, cocoa-flavored cookies just might be your family’s new favorite cookie!

INGREDIENTS:

  • 1/4 c. margarine
  • 1/2 c. brown sugar (packed)
  • 1/4 c. cocoa powder
  • 1 T. milk
  • 1/4 t. baking soda
  • 2/3 to 1 c. flour

DIRECTIONS:

  • Preheat oven to 375 degrees
  • Beat together all ingredients but soda and flour, mixing until smooth and creamy.
  • Add soda and flour.  Add flour until dough can be handled and rolled into a ball.
  • On a lightly floured surface, roll out dough and cut. Place cookies on ungreased cookie sheet.
  • Bake for 5 to 6 minutes.
  • Allow cookies to cool on cookie sheet completely.
  • Gently remove  and decorate. I used Wiltons Candy Melts between my sandwich layers, but you could use frosting as well

My thoughts:  These have such a wonderful cocoa flavor and they are very easy to make.  They roll out nicely and bake without rising too much.  If you are using a Linzer cutter, make sure you don’t roll your dough too thin- the top cookies (the ones with the shapes cut out) may break once they are baked.  Thicker worked better for me.

Also– this is a small batch of cookies.  If you are making sandwich cookies like mine you will only get about 20 cookies.  You can easily double the recipe for more though.  I hope you and your family love these– enjoy!

Spiced Mocha Mix (and how to do a TimTam SLAM!)

This spiced mocha mix is a perfect gift or party treat.  Its also the perfect hot beverage for Tim Tam SLAMS!

INGREDIENTS:

  • 1 cup dry non-dairy creamer
  • 1c. hot cocoa mix
  • 2/3 c. instant coffee
  • 1/2 c. sugar
  • 1/2 tsp cinnamon
  • 1/4 tsp nutmeg

DIRECTIONS:

  • Combine all ingredients together in a big bowl.
  • Add 3-4 heaping tsp. of mix to 8 oz. of hot water to serve.
  • Or…put mix in a fun jar or tin to give as a homemade gift!

You can use Splenda for the sugar, decaffeinated instant coffee and low-fat hot cocoa mix for a guilt-free treat!


How to do a Tim Tam Slam.

What are Tim Tams?   They are a chocolate cookie that (I’m told) originated in Australia.  In America they are made by Pepperidge Farm and they are a wafer/mousse cookie covered in chocolate.

To do a Slam:  Bite off the corners on two opposite sides (diagonal from each other).  Place one bitten off corner in a hot chocolate or mocha and drink up some of the hot beverage through the other bitten off corner– pulling the hot beverage up through the cookie like a straw.  Pop the WHOLE cookie in your mouth and it EXPLODES in warm gooey chocolate happiness! 🙂  (If you don’t pop the whole thing in your mouth you will have chocolate running all over you…just FYI).  In our area, Tim Tams are only available near Christmas, so Tim Tam Slams have become a fun Christmas tradition!

Miranda

Ryan

Me!

Megan

Ben


My thoughts:  Thanks to my cousin-in-law Eden for the yummy mocha recipe and to my friend Andreya for showing us all how to do Tim Tam Slams….I am forever indebted for the hours of fun and laughter!!!

%d bloggers like this: