Tag Archives: chocolate

Toxic Slime-filled Cupcakes!

Posted on


Toxic Slime-filled Cupcakes!
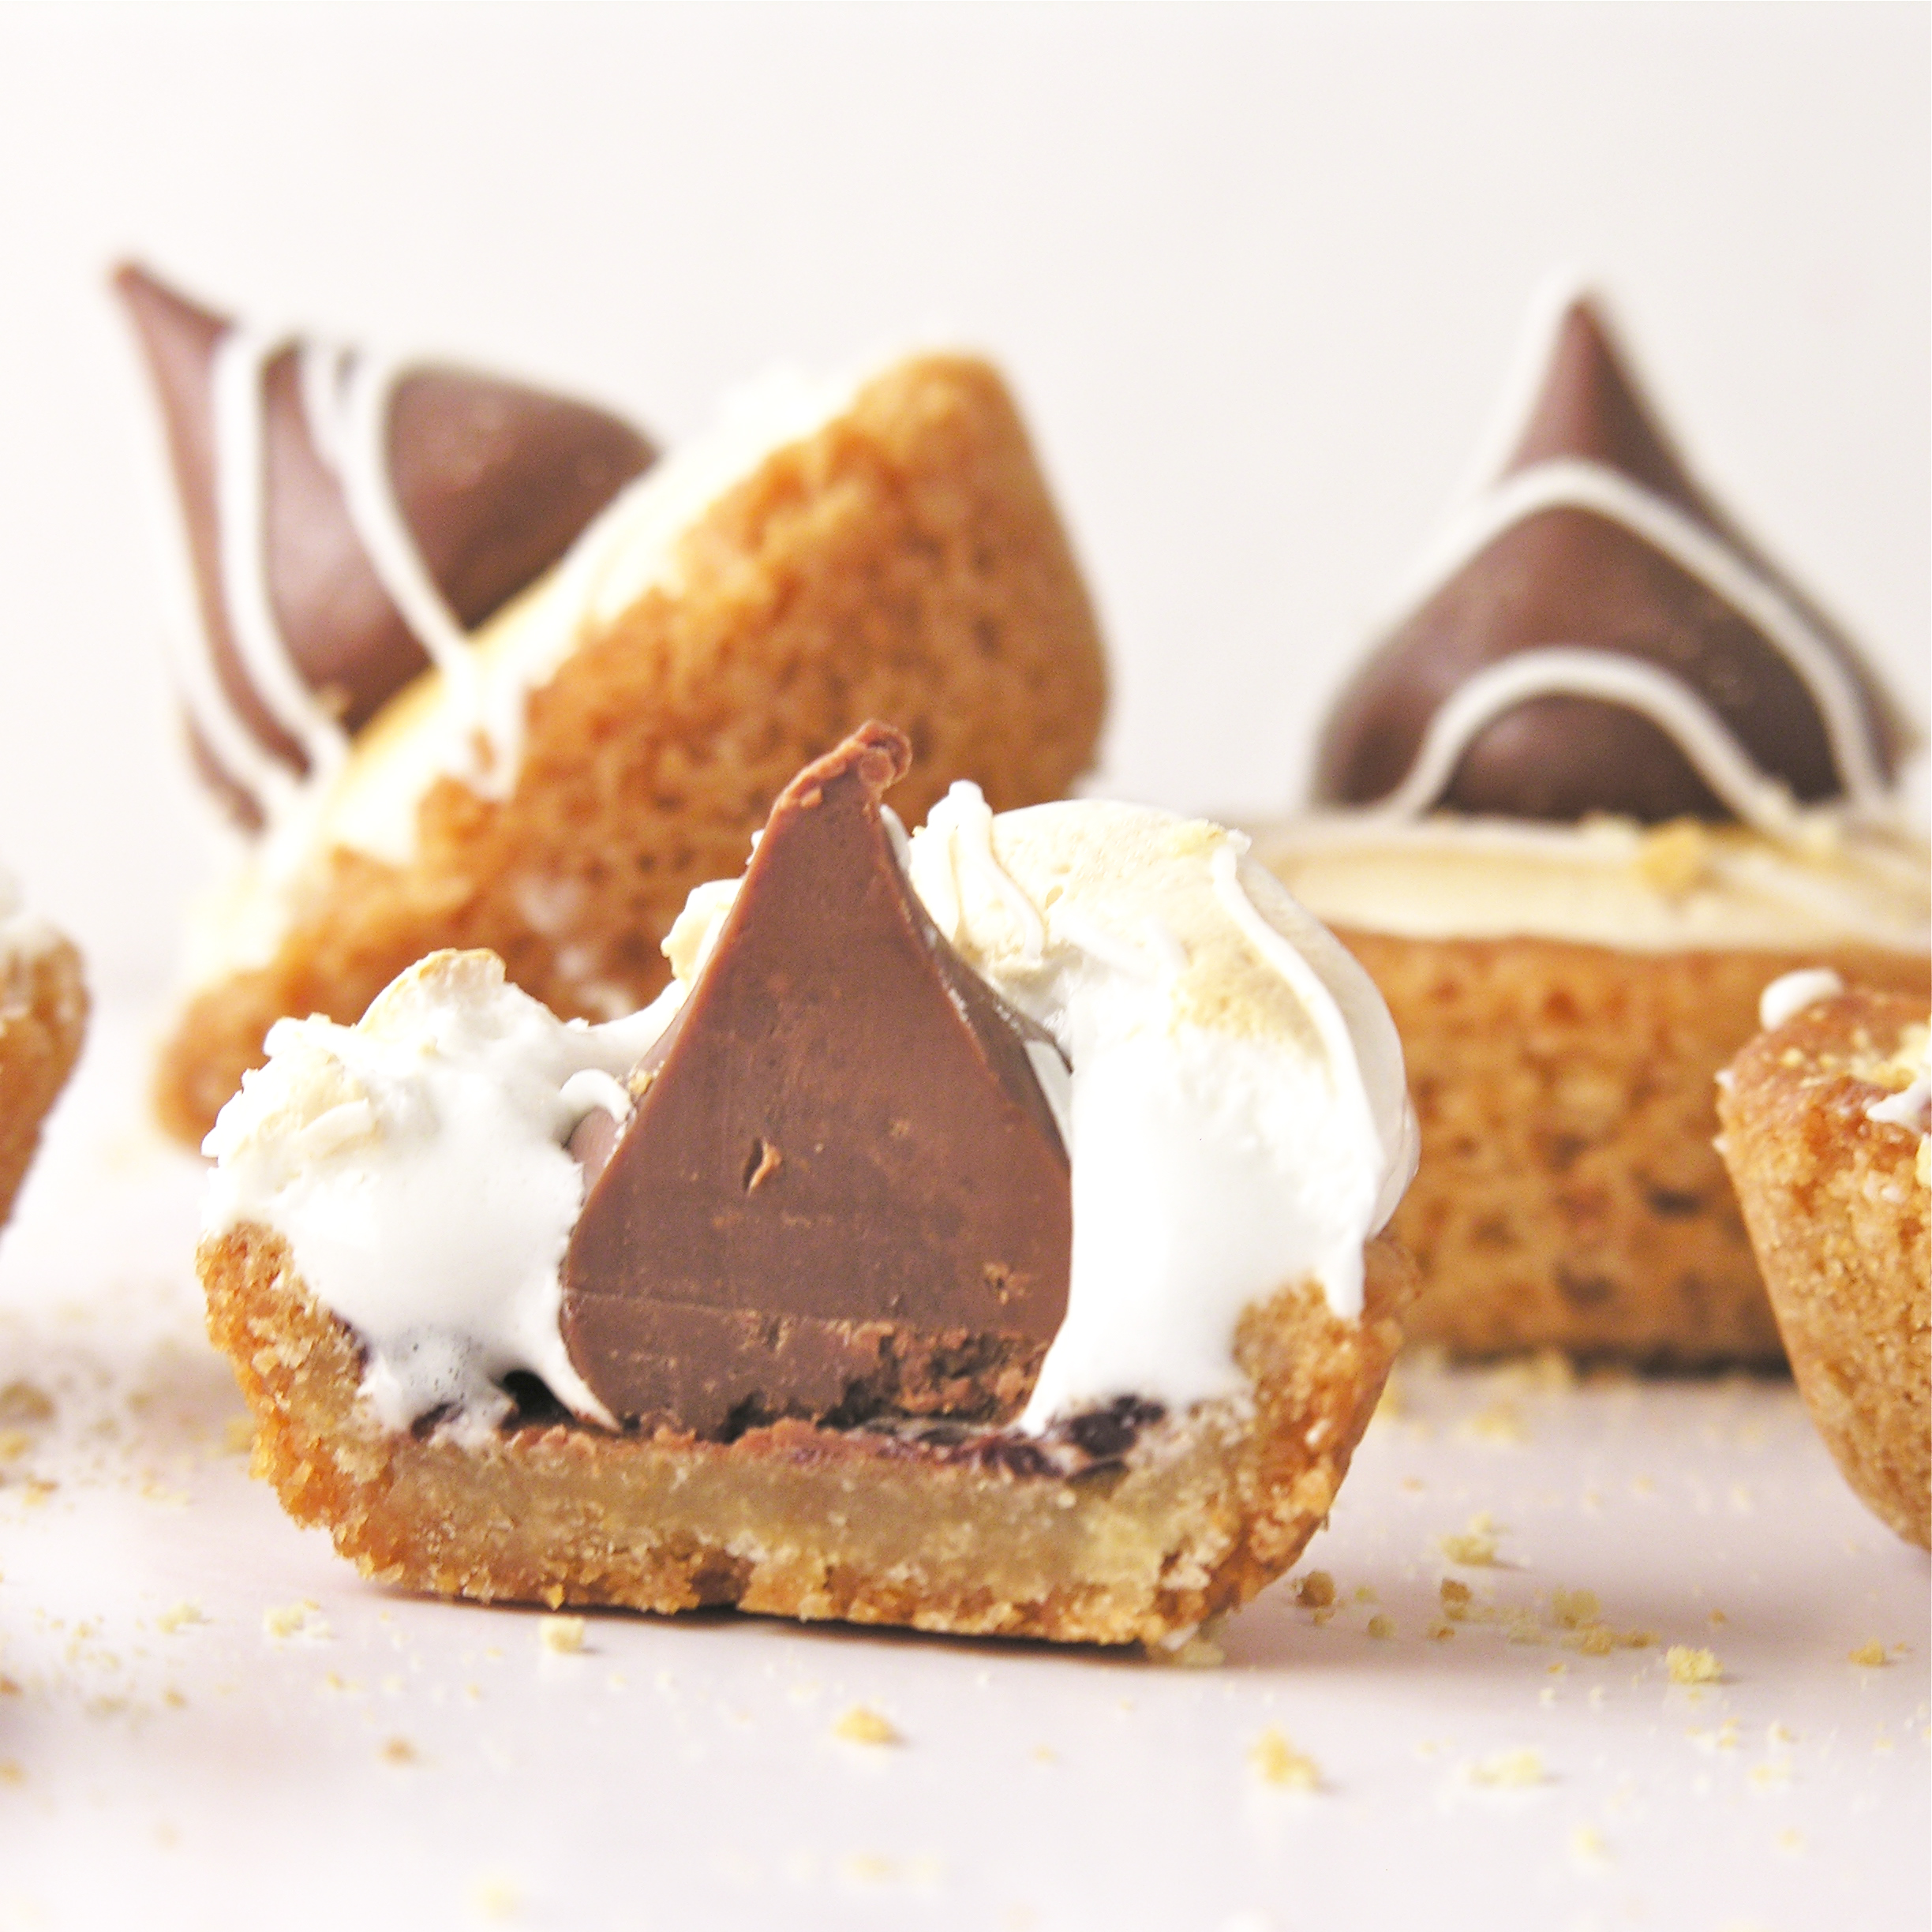
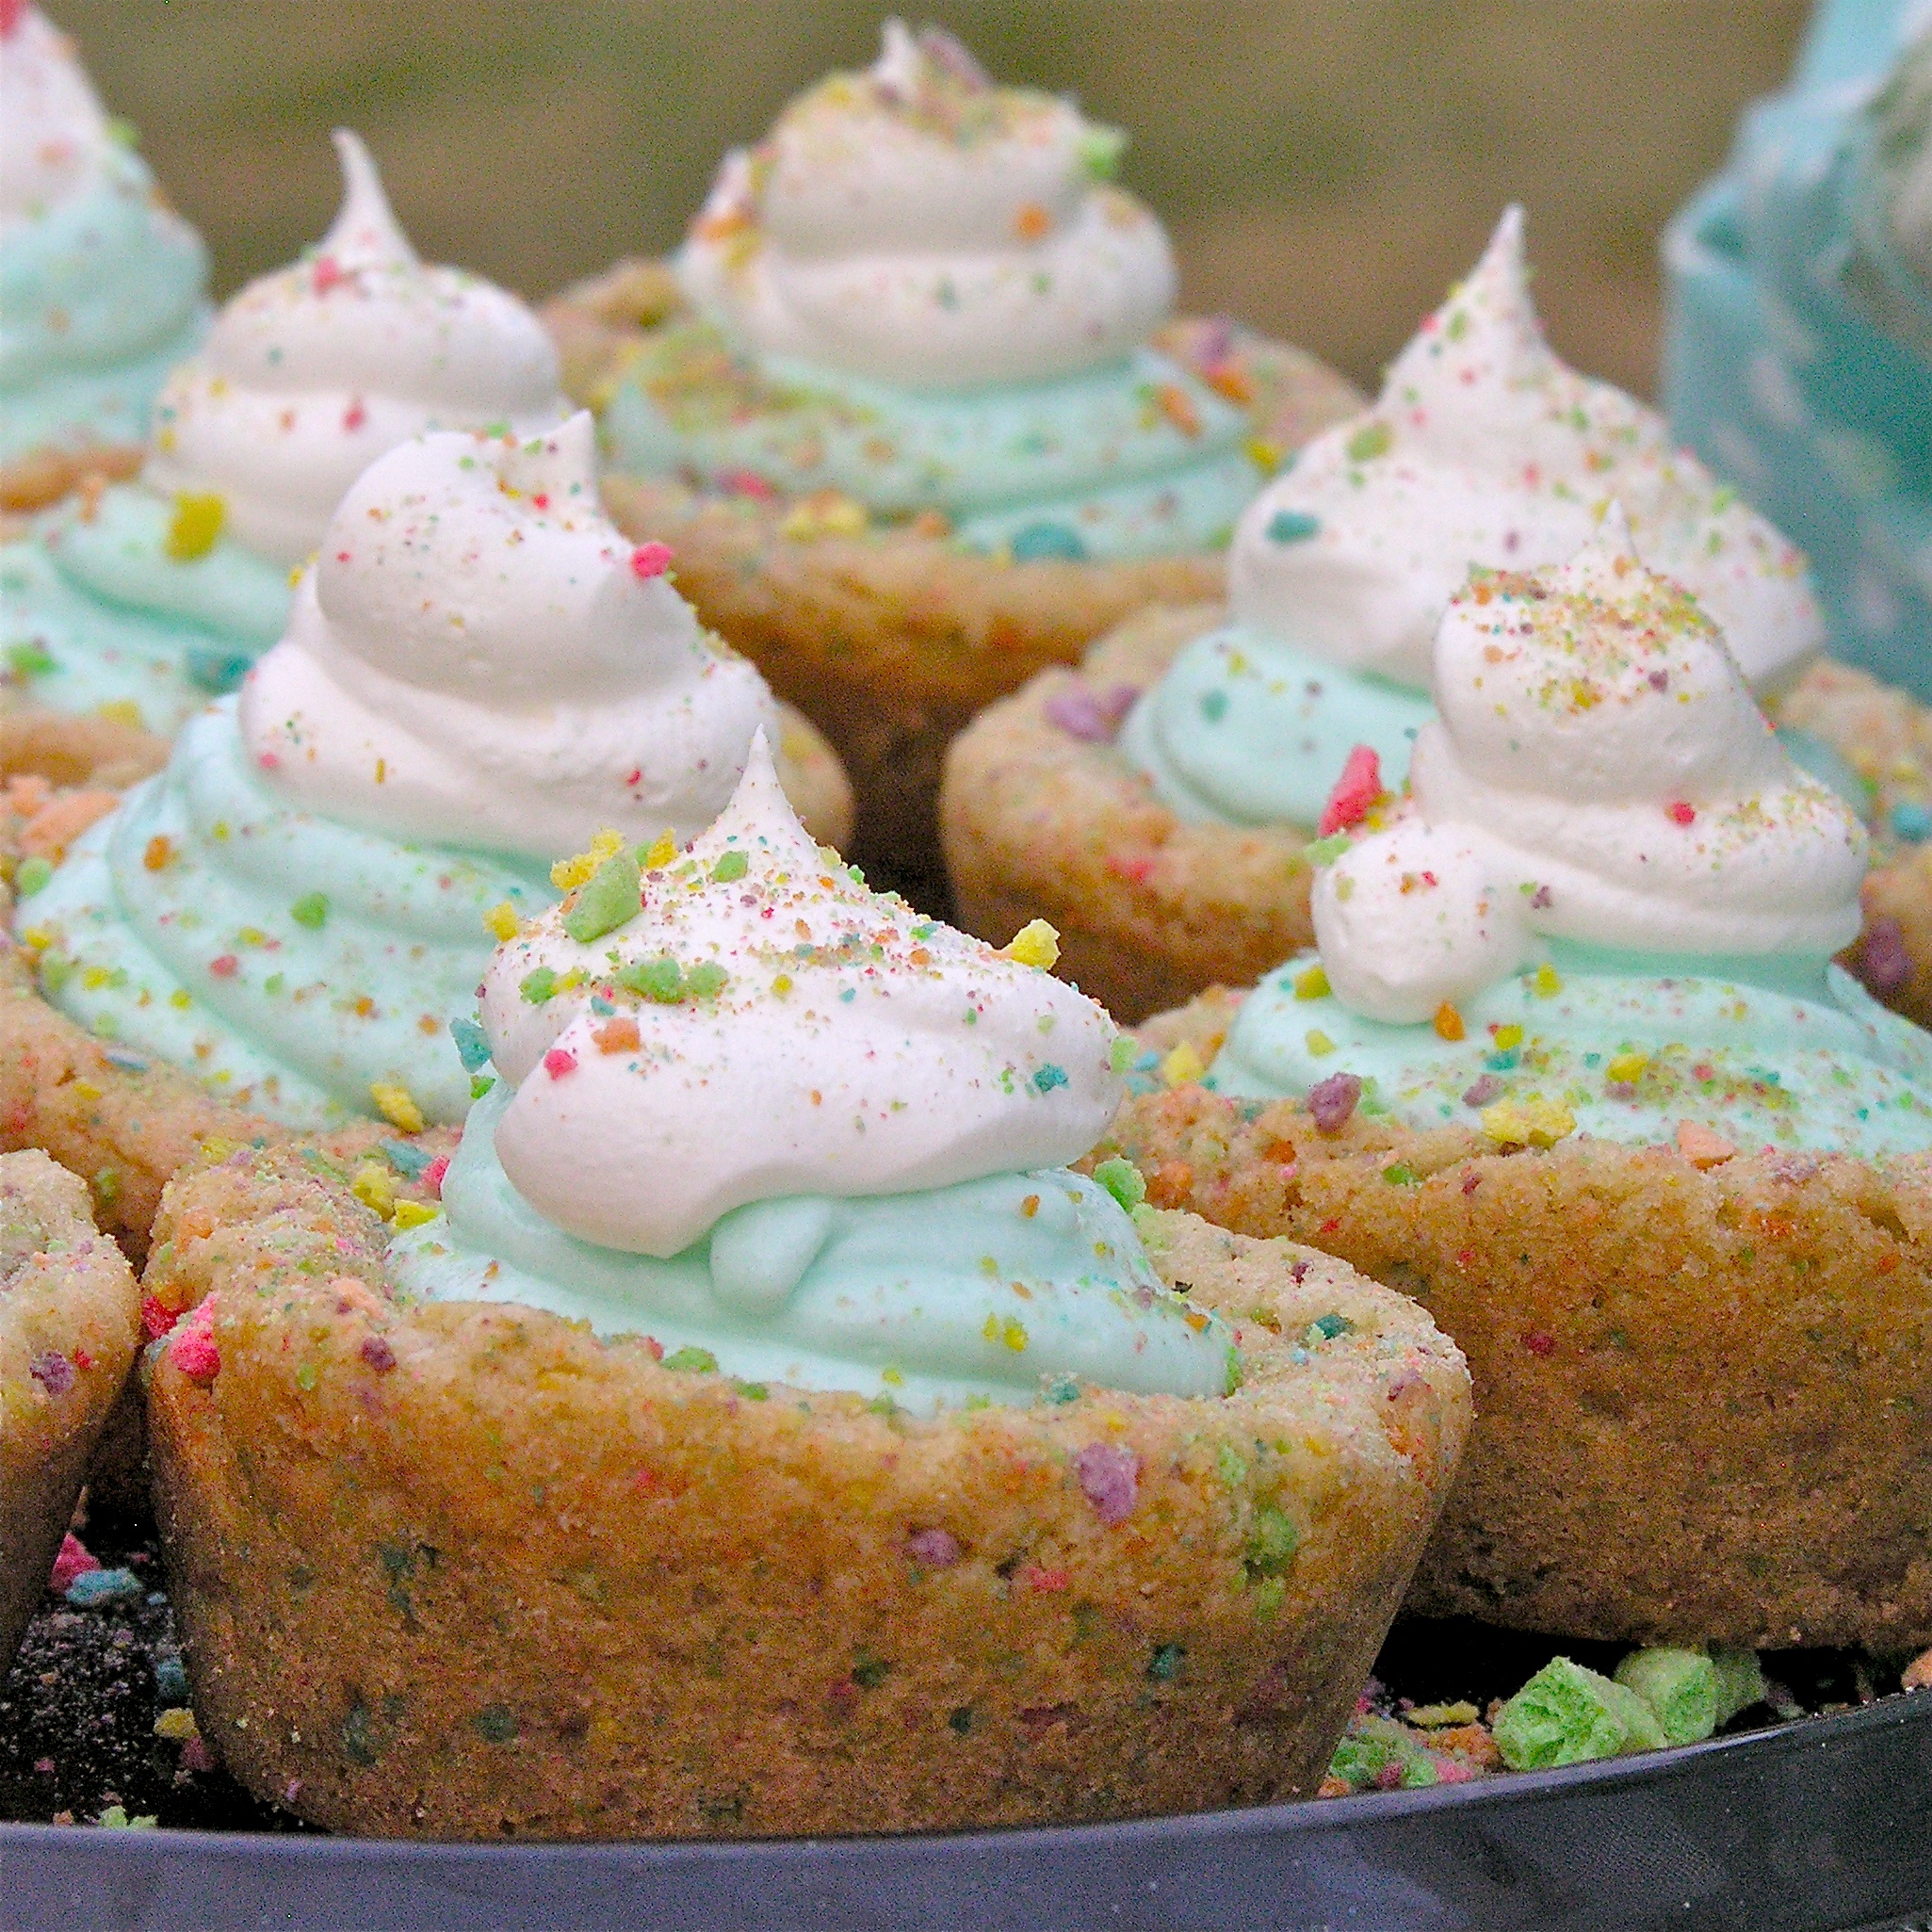
Fudge cupcakes filled with toxic green slime!  Yummy white chocolate pudding makes the slime and fun buttercream and bones complete this mad-scientist dessert.  Print some free radioactive cupcake toppers and you have such a fun October treat!!

These cupcakes are delicious…..  I know the green slime might throw you off, but that slime is the creamiest pudding filling….oh my.  It is like a custard filled doughnut…but better.

I’m a scientist in my day job, so when thinking creepy I tend toward the blood and guts variety more than ghosts and monsters.  I knew I wanted green slime, so I looked up recipes for ideas (realistic slime….it needed to be realistic….)  and I came across an adorable blog with the idea of using plain old pudding with green food coloring– easy! Plus I loved her frosting “blob” technique, so a few parts of this recipe are borrowed from ideas on Make Bake Celebrate.

I also created some free printable “radioactive” cupcake toppers for you.  Just click here for the link, print 2 pages on card stock, cut them out and use double-sided tape to stick them back-to-back over a toothpick.    Easy-peasy and a perfect finish on these!  Aren’t they fun?!???

Radioactive Cupcakes3
Lets make these cute little cupcakes together!  (printable recipe)

INGREDIENTS:

  • One boxed cake mix (plus water, oil and eggs to make according to box)
  • One box (3.3 oz.) Jello Brand White Chocolate Pudding (instant)
  • Milk (to make pudding according to package)
  • Green food coloring gel
  • Purple food coloring gel
  • 2 sticks (1 cup) salted butter
  • 2 sticks (1 cup) unsalted butter
  • 1 teaspoon clear vanilla
  • 3 cups powdered sugar
  • Sprinkles/ decorations for tops of cupcakes  (I used Wilton Bones Sprinkles)

DIRECTIONS:

  • Preheat oven to 350F degrees.
  • Make cupcakes according to box and divide evenly into 24 cupcake liners placed in cupcake tins.
  • Bake according to times given on boxed mix.
  • Remove from oven and cool completely.
  • Make pudding according to package and at the end add green food color gel (I used Leaf green by WIlton ) until it looks like radioactive slime!!!  Carefully spoon into a zip-top bag.
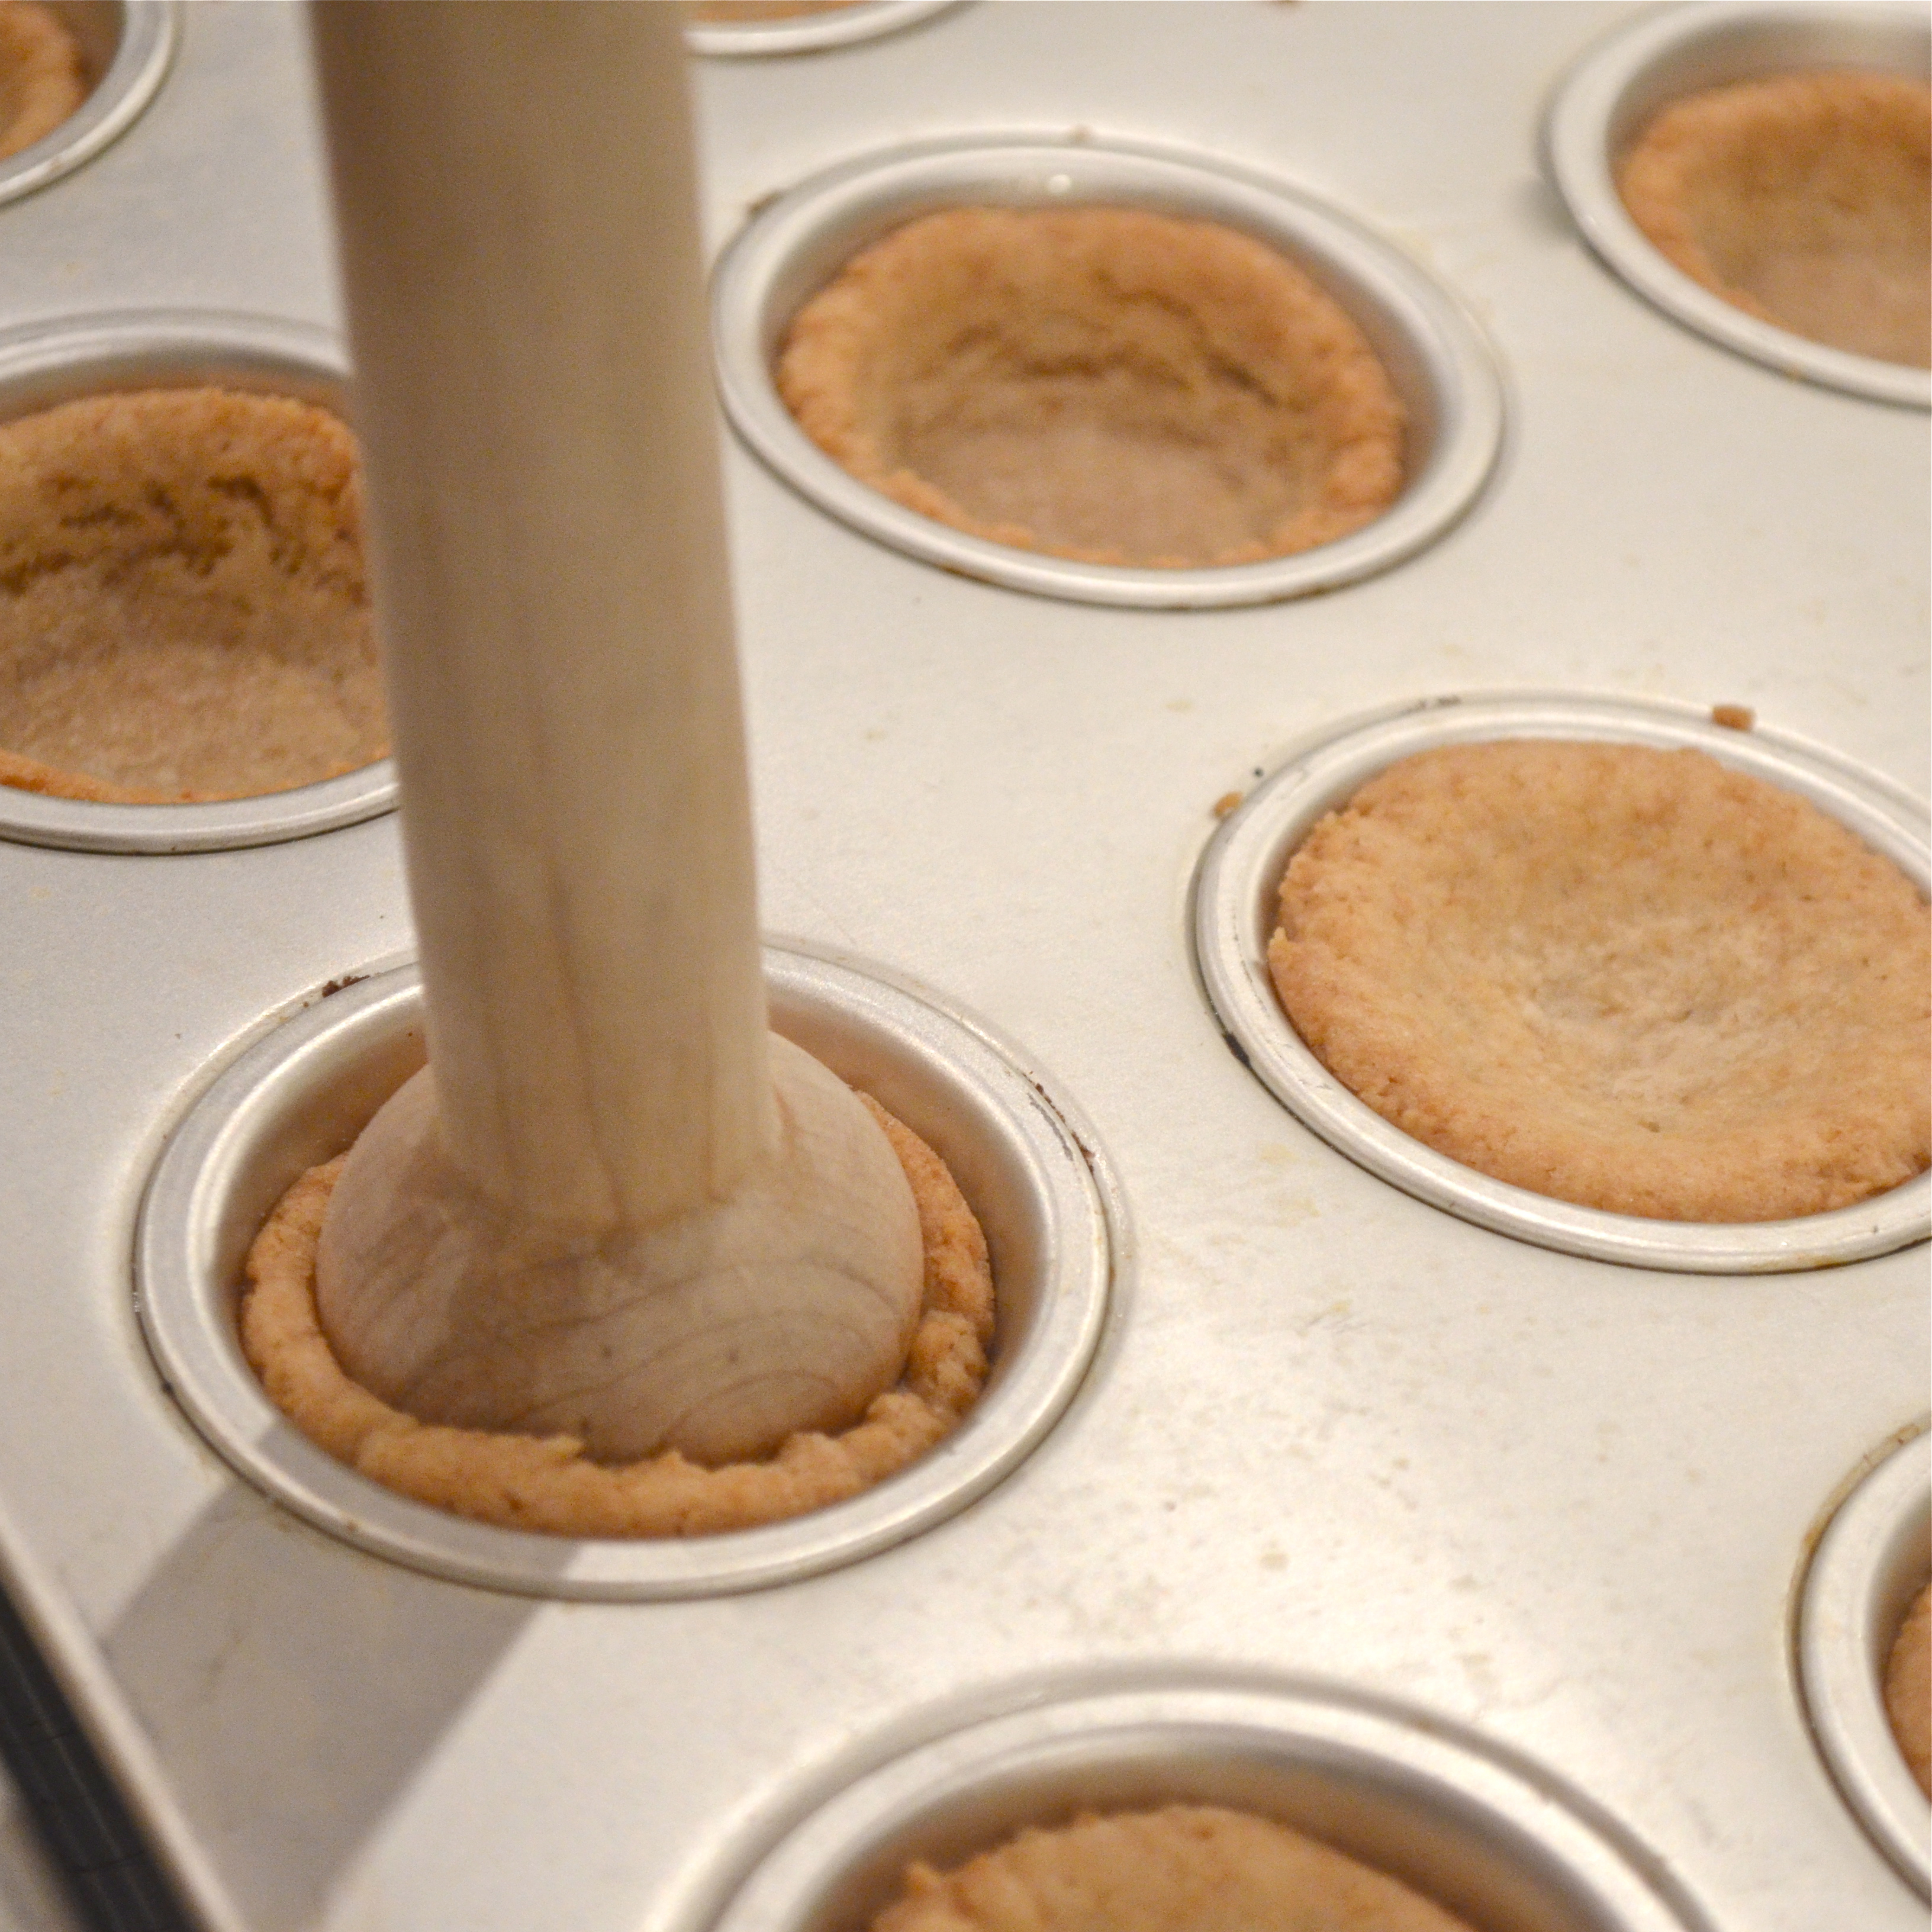
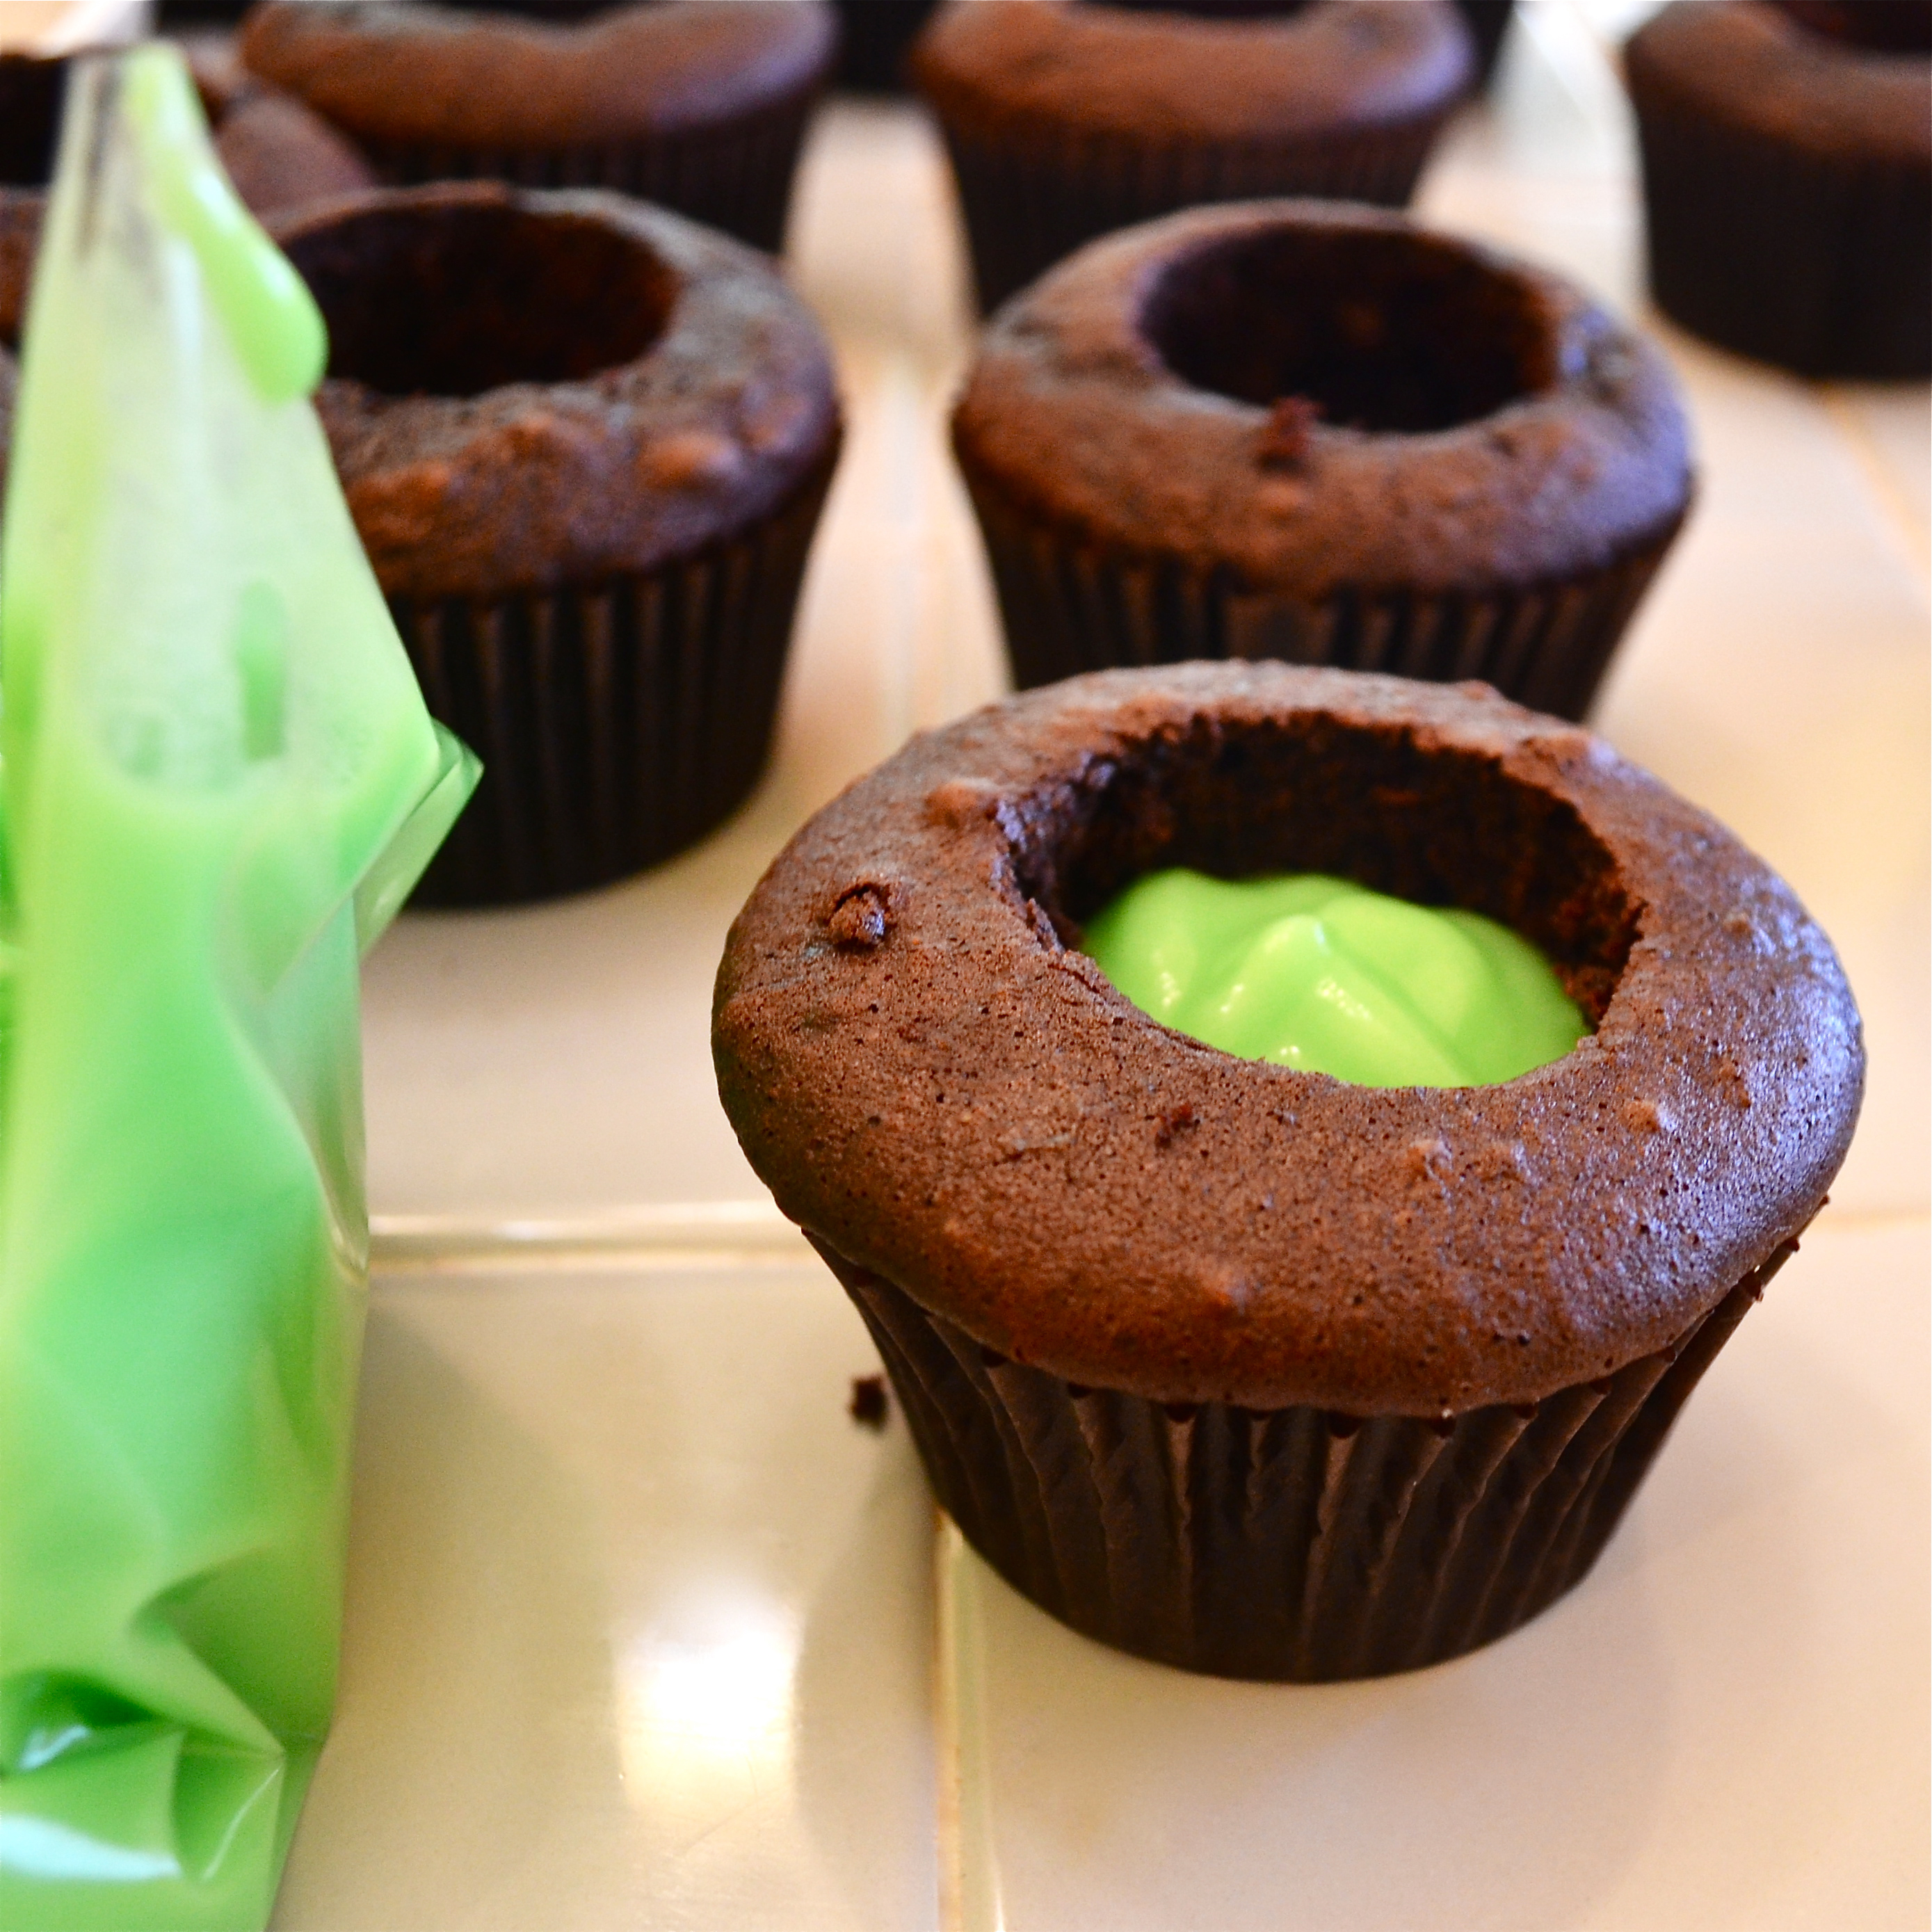
  • Core your cooled cupcakes- you can use a paring knife to just remove a core, but a cupcake corer is much faster and more uniform.  I use the Chicago Metallic Cupcake Plunger and it is cheap and small and perfect for the job!
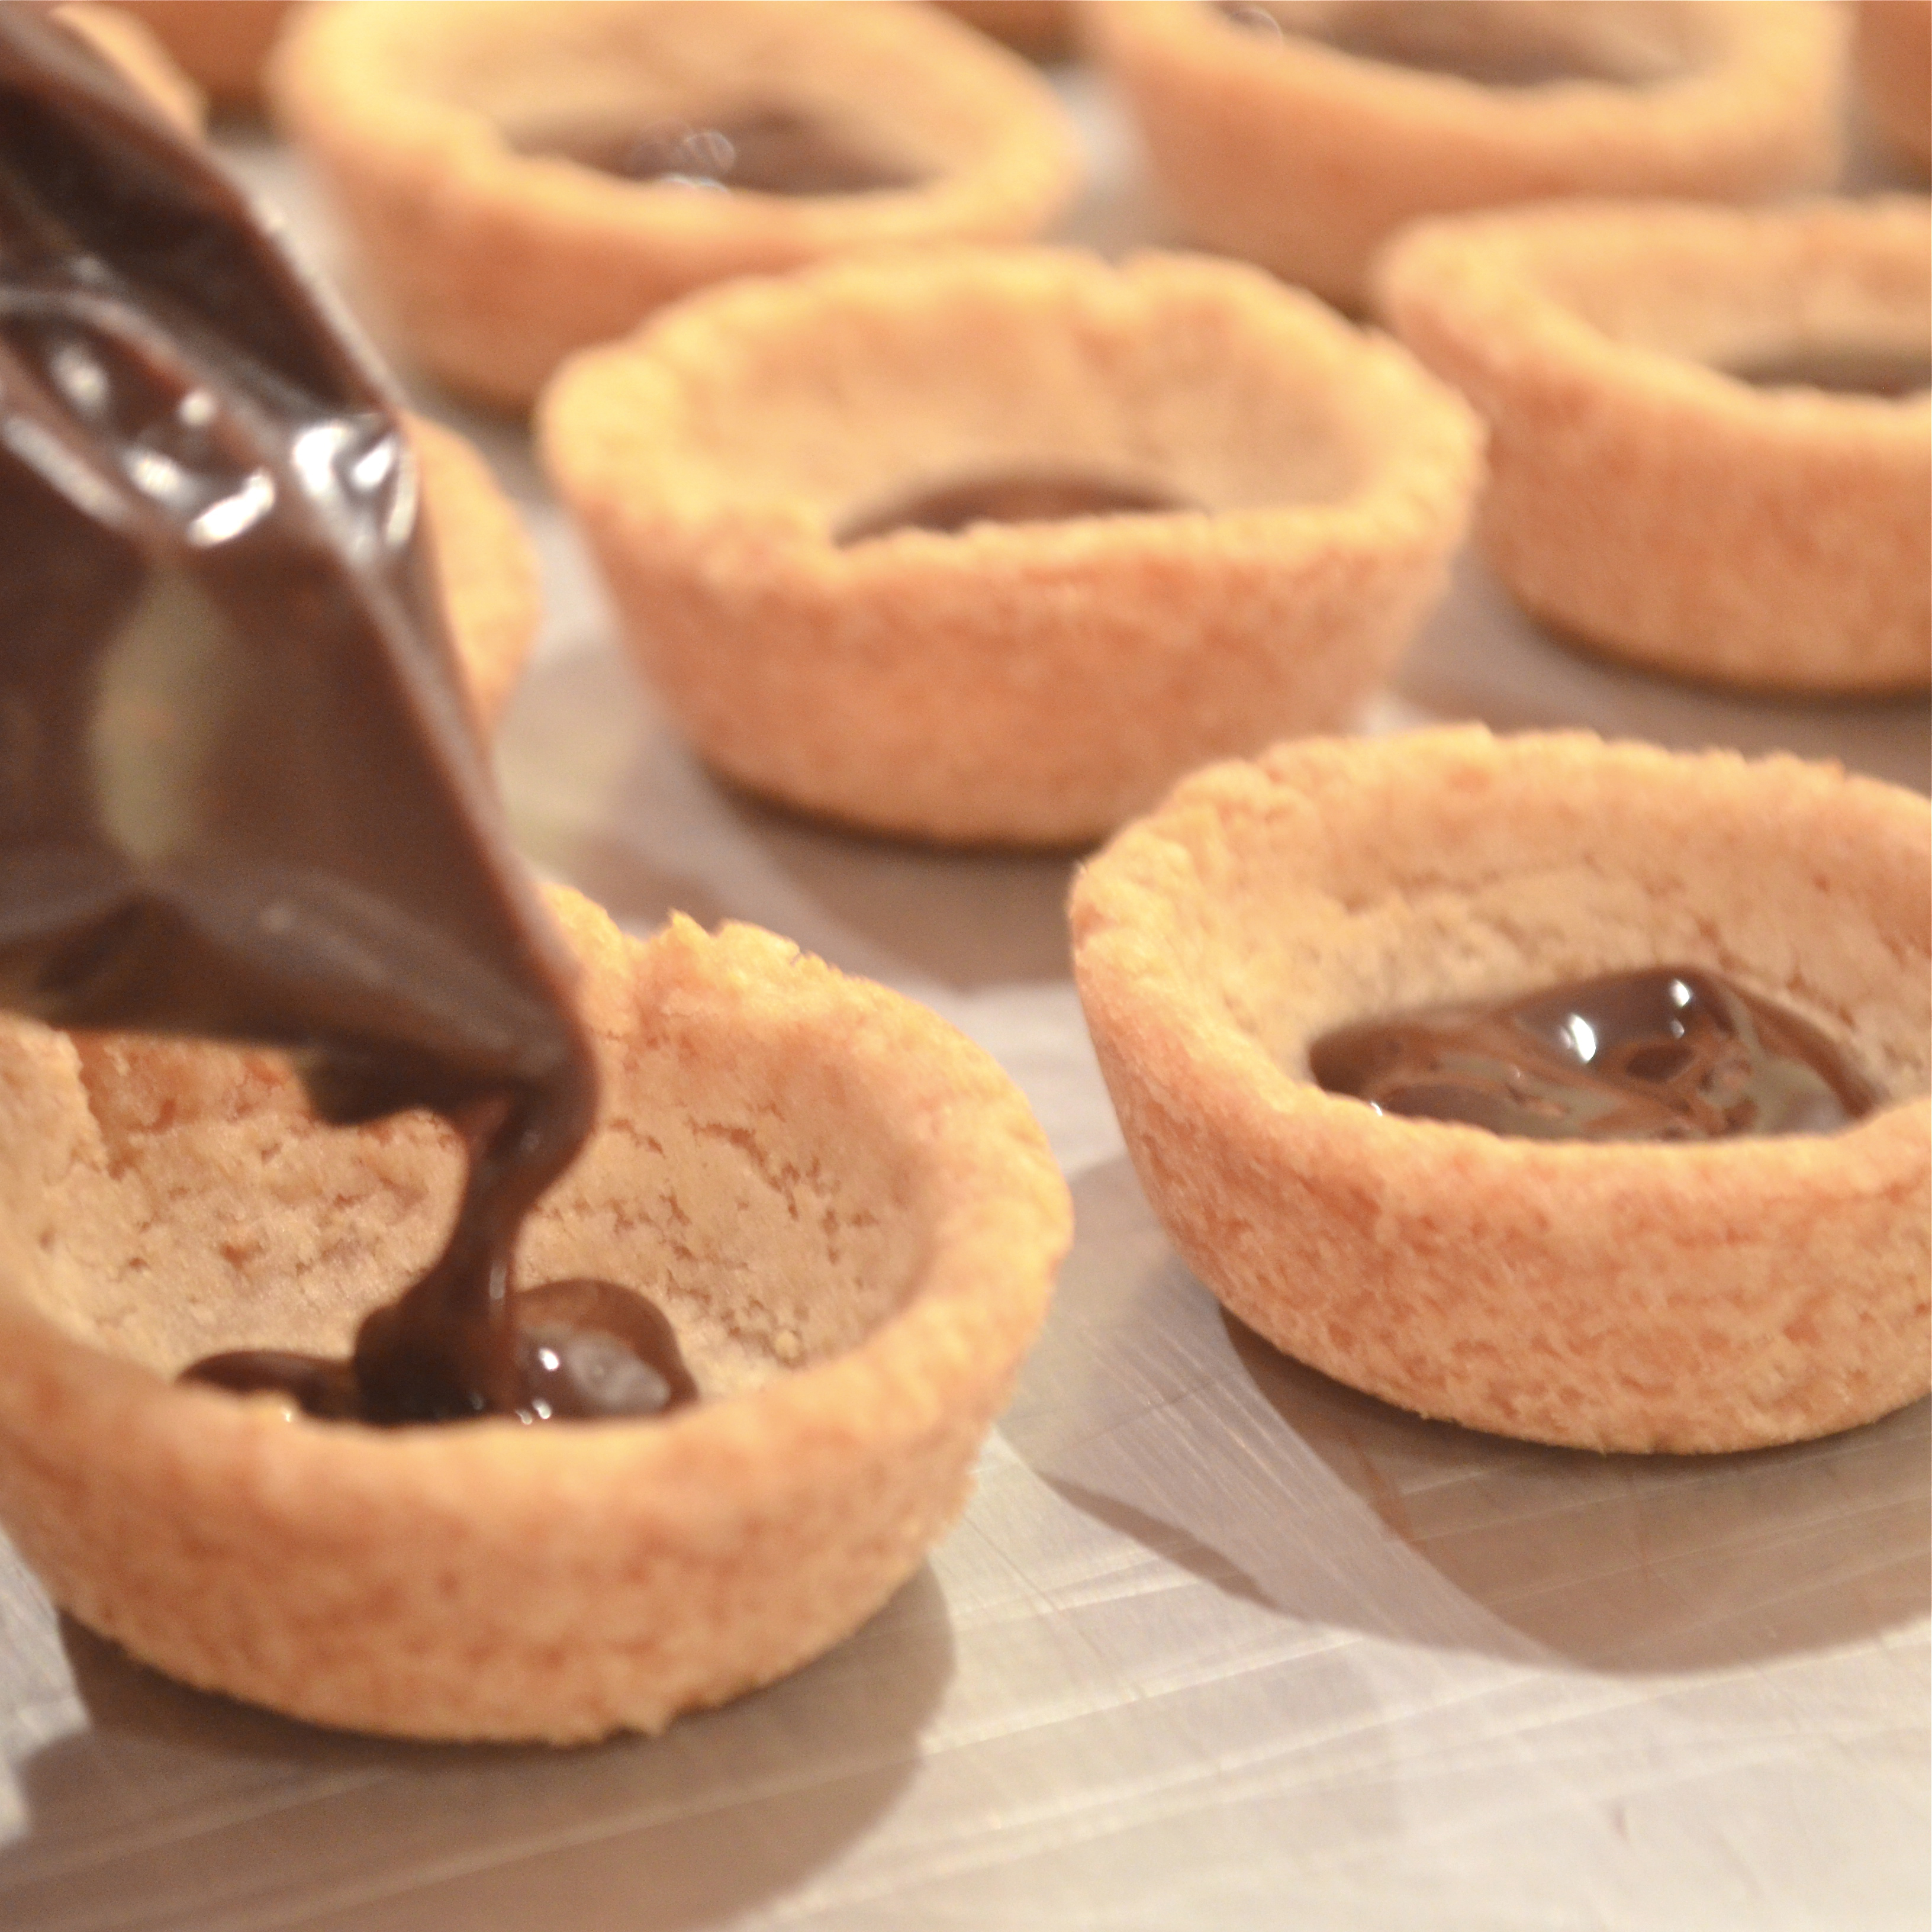
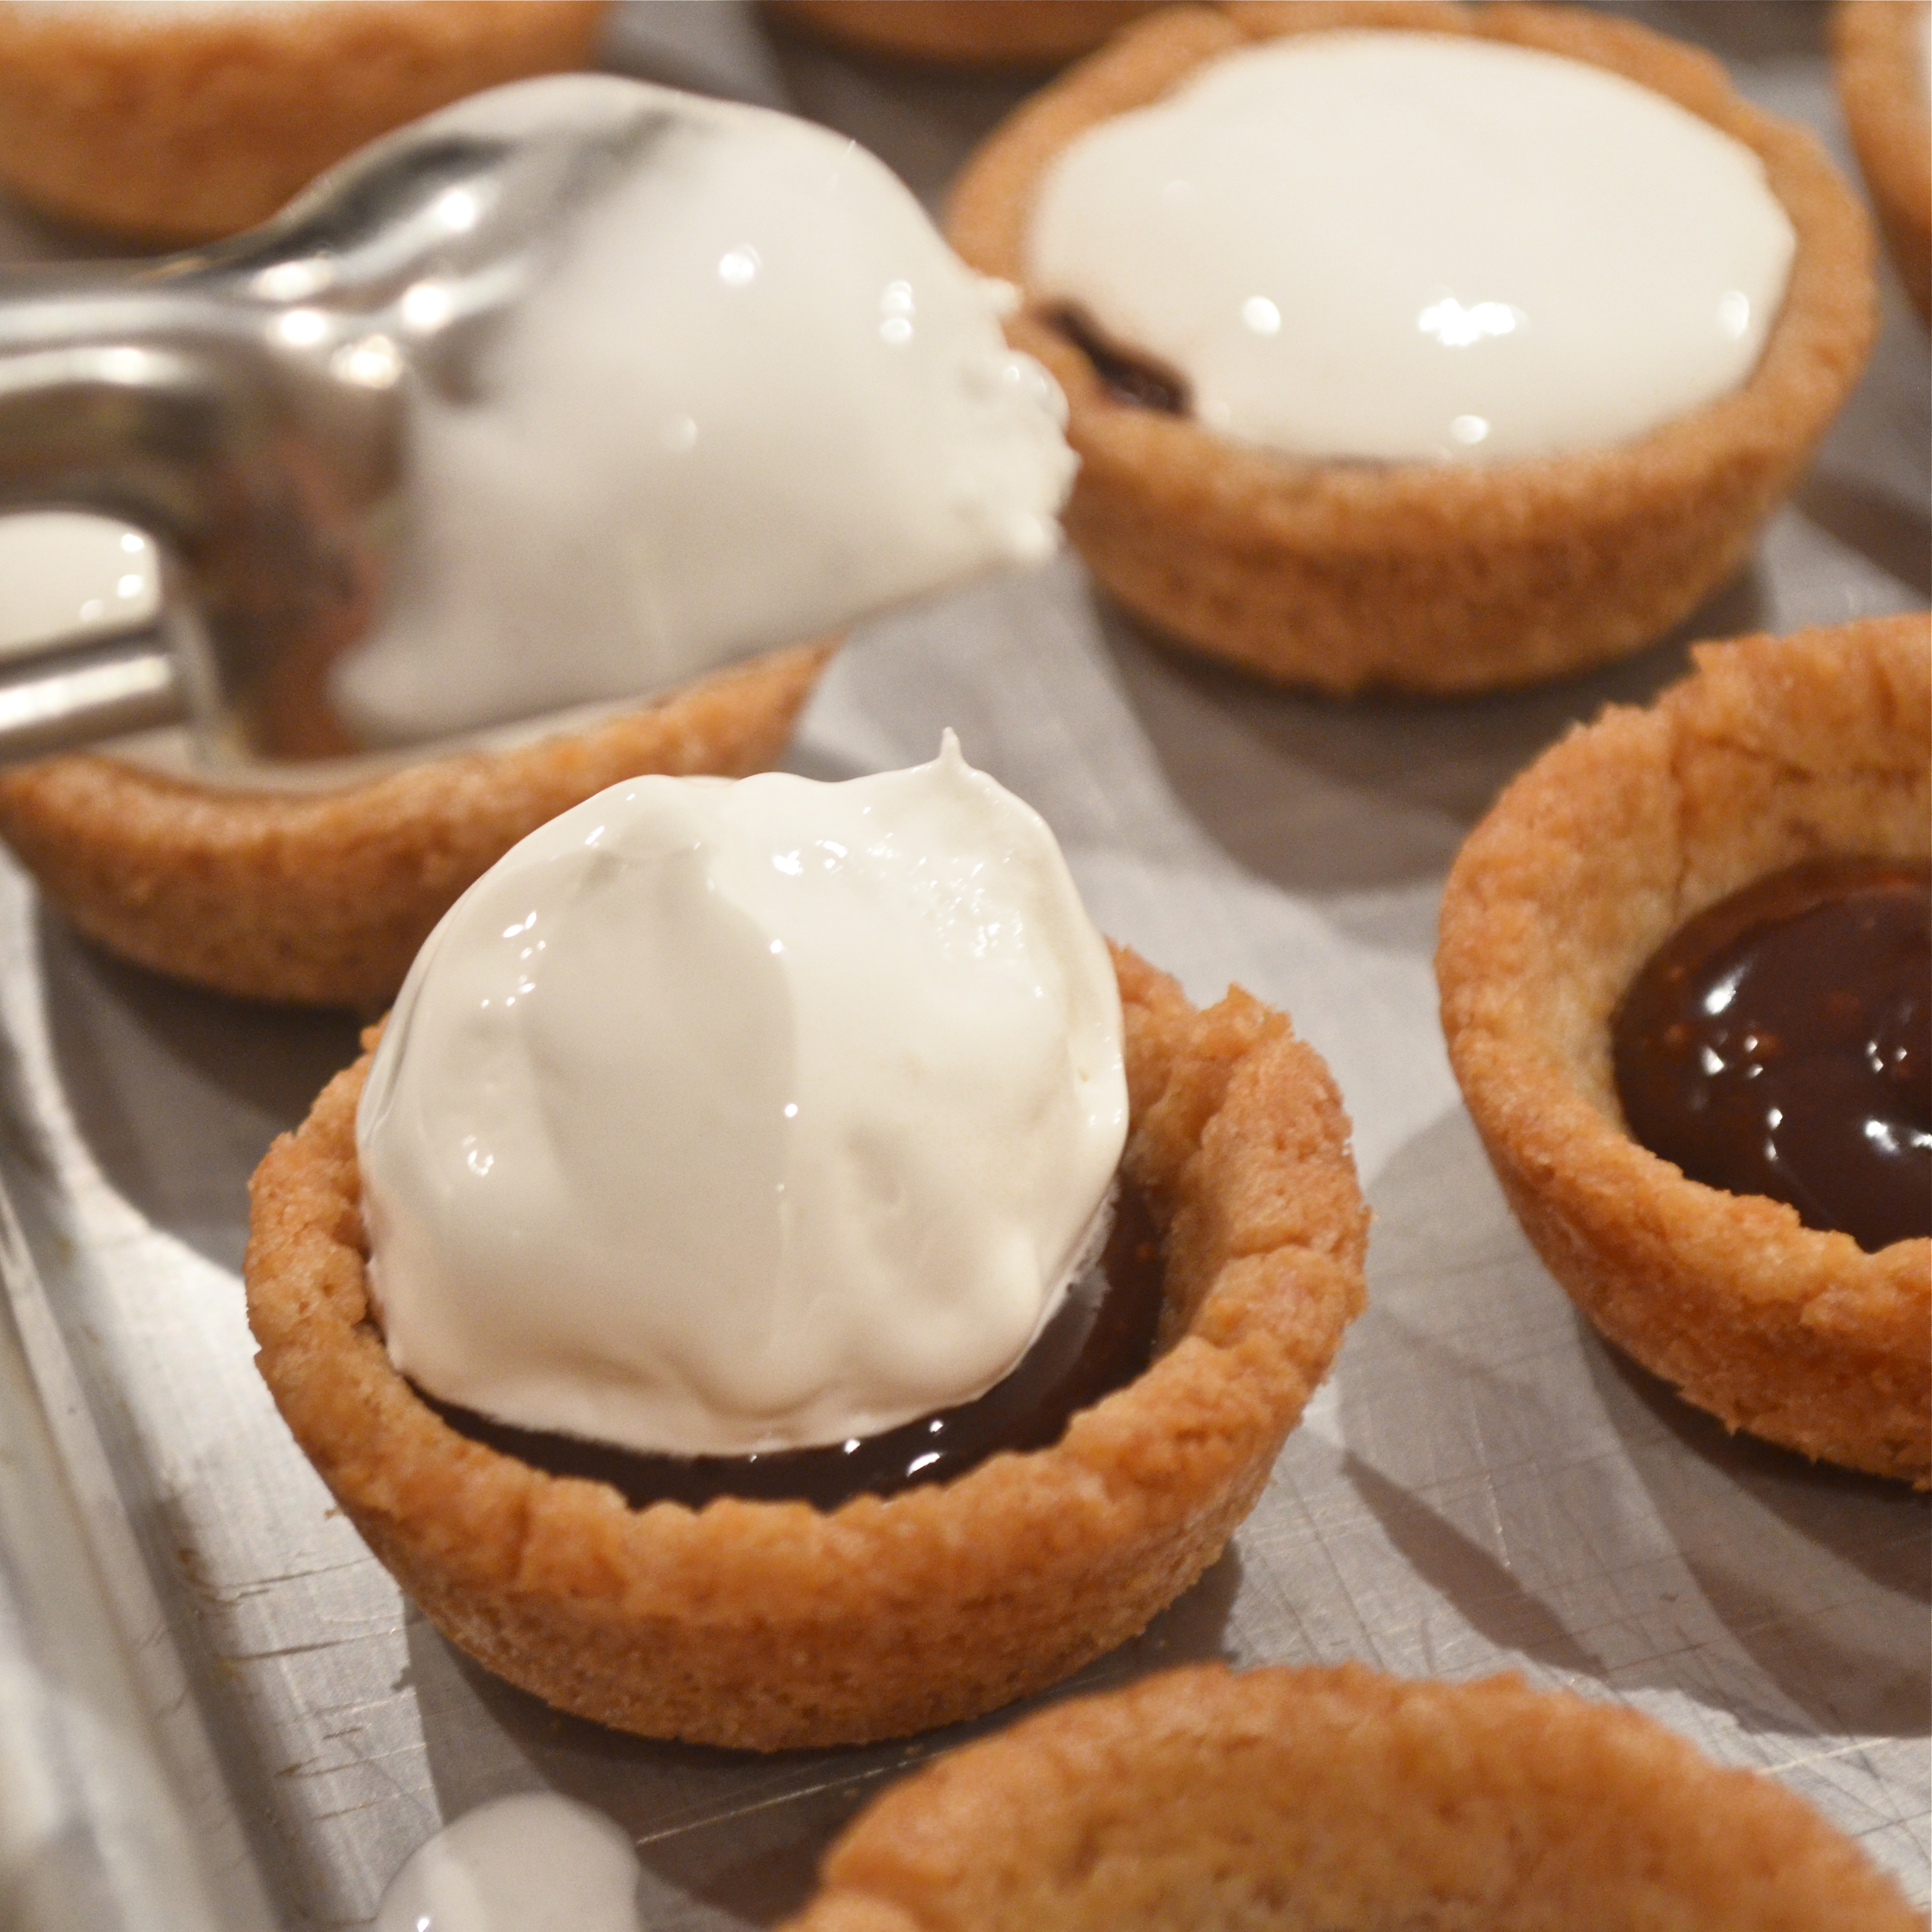
  • Carefully clip a corner of your green slime (pudding) bag and fill each cupcake cavity about half full of “slime”.
  • Trim a little off the bottom of the “core” you removed and place it back on top of the filling- like a little cupcake cork!

Filling Cupcakes with Slime!Filling cupcakes with slime!

  • Make frosting by combining butters, powdered sugar and vanilla in a large mixing bowl and beating it on high until light and fluffy.
  • Divide frosting in half and mix green into one half and purple into the other half until fully combined.
  • Place each color of frosting in a bag that has been fitted with a Wilton 2A round decorating tip.  Pipe round dots of frosting in alternating colors all over each cupcake top.

Frosting creepy cupcakes!

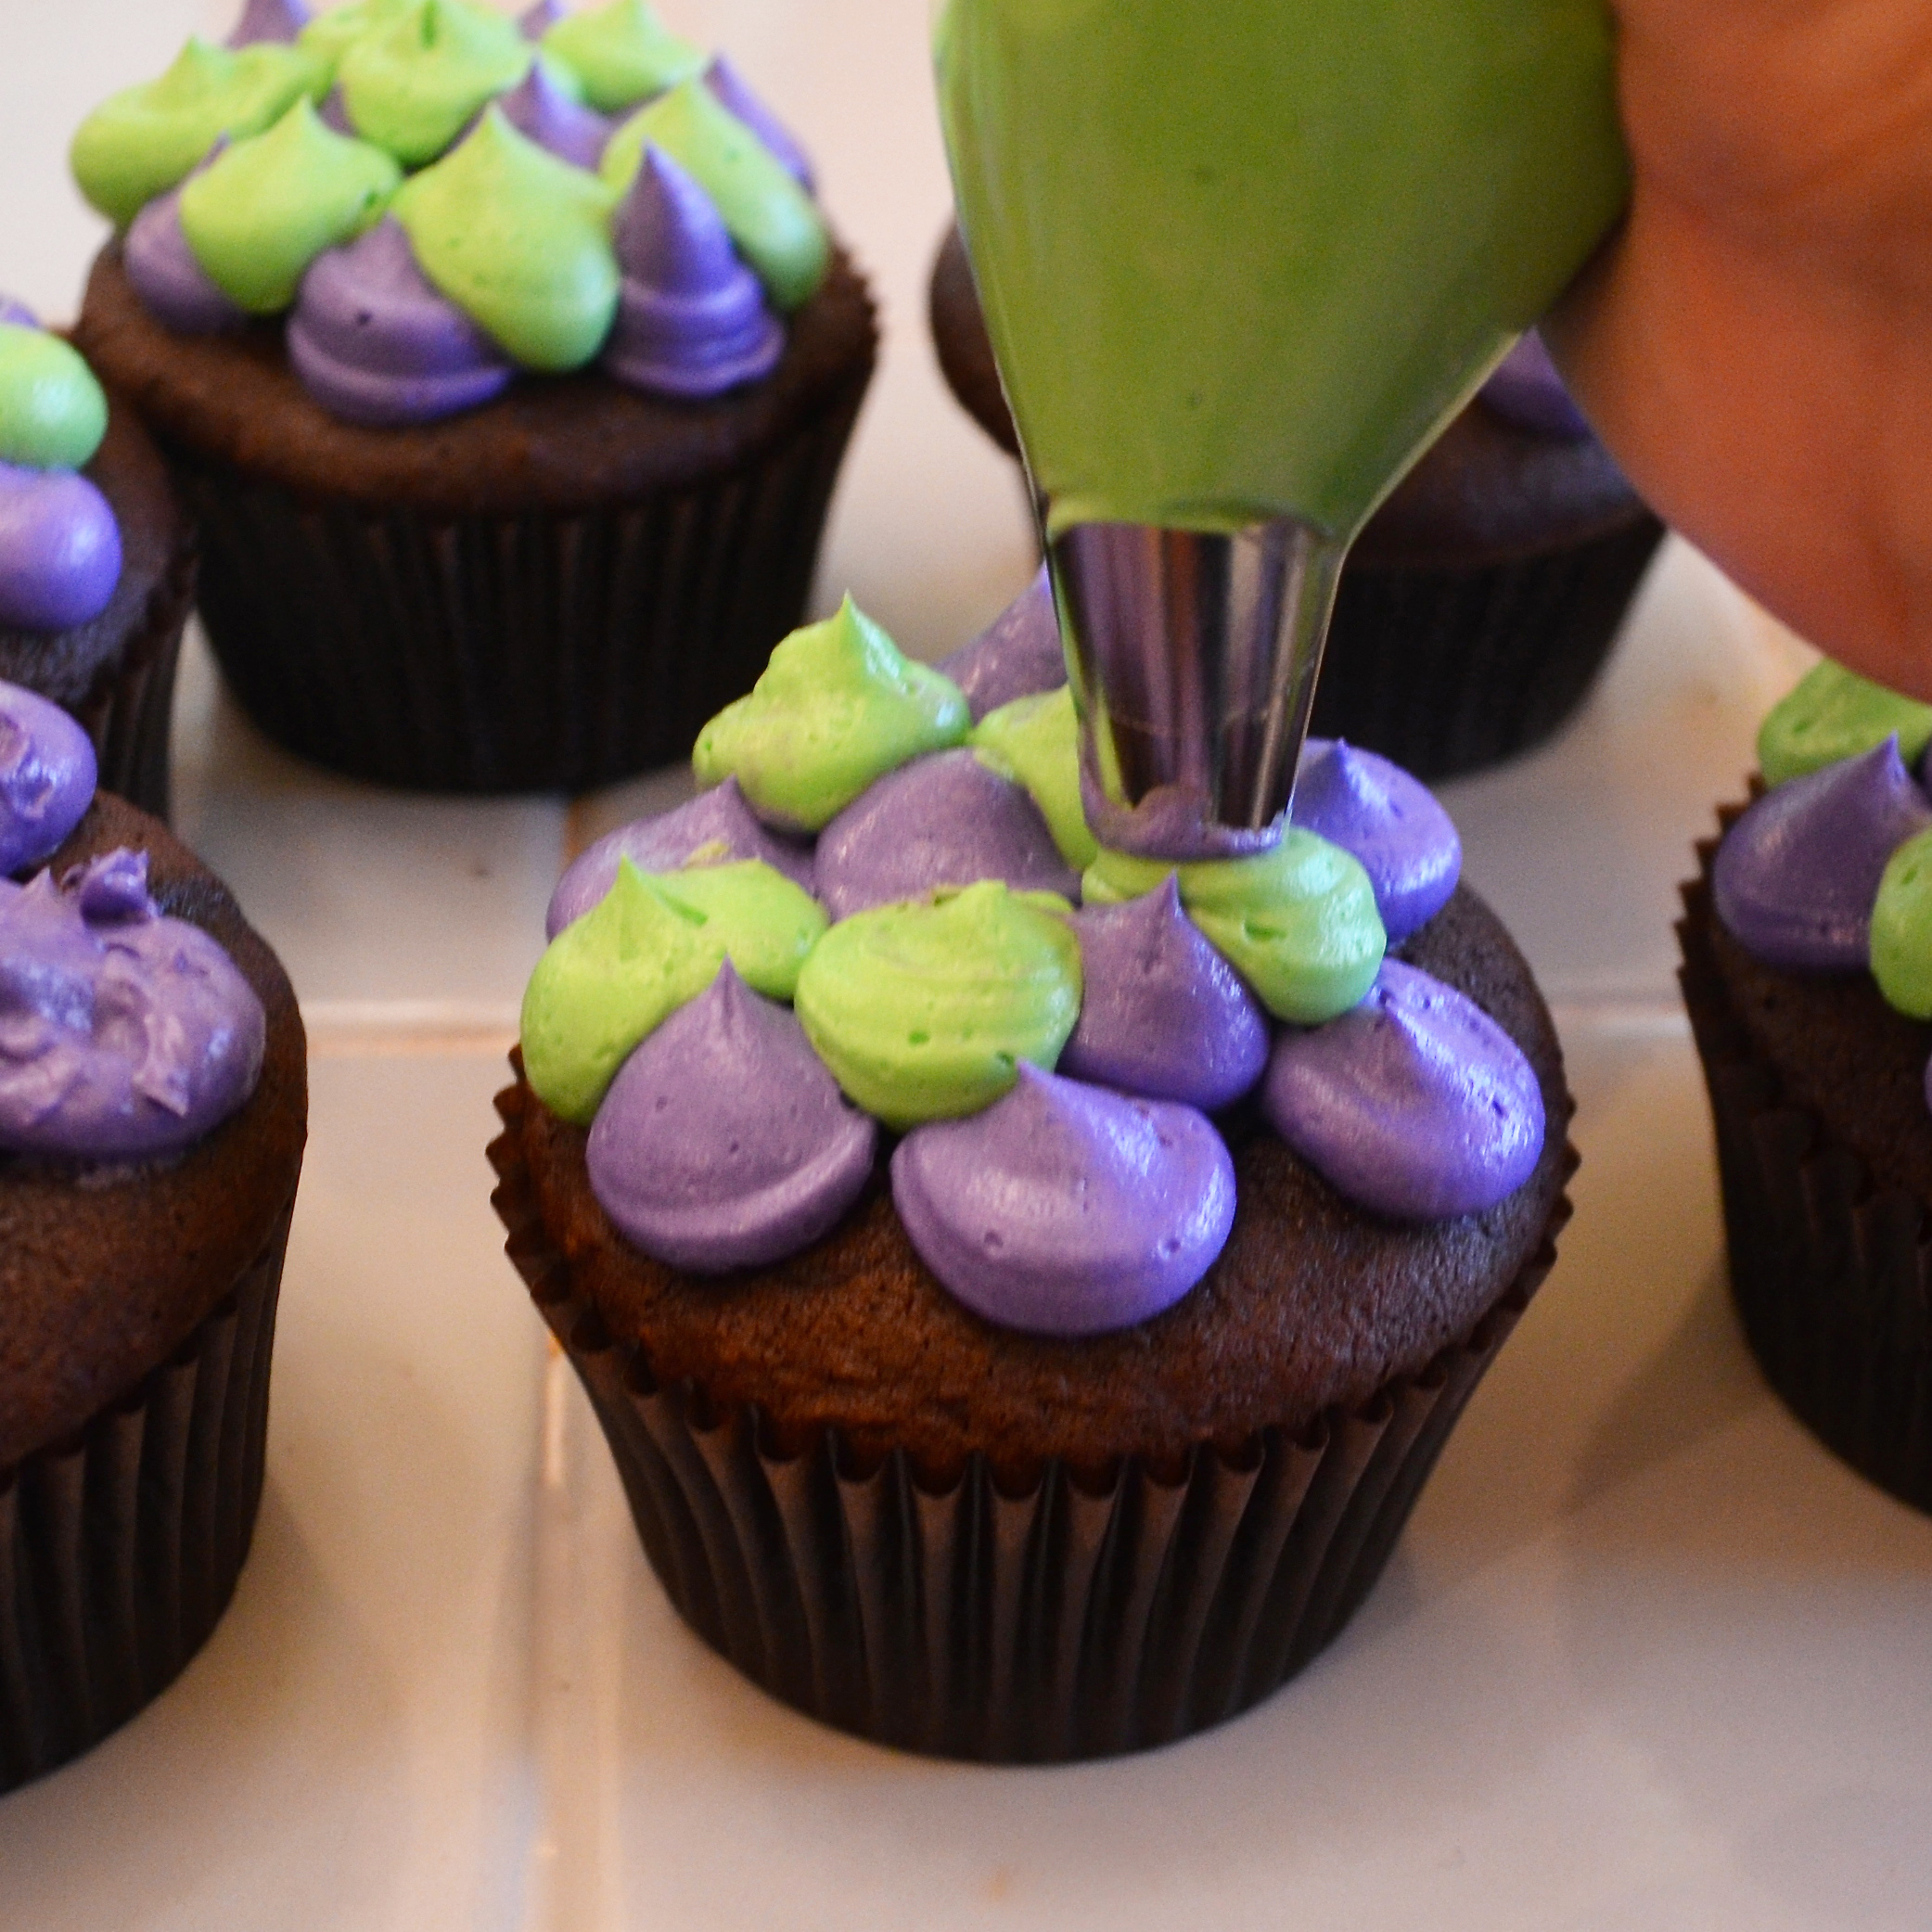
  • Add sprinkles, bones, skulls, eyeballs…. any cool and creepy decorations you want!
  • Top each cupcake with a free printable topper and ENJOY!!!!

Radioactive Cupcakes filled with SLIME!
My thoughts:  I would make these again in a heartbeat.  I might make them again this weekend.  Yes, they are super fun, but the pudding is really SO good inside!  I feel like every cupcake should have pudding inside…!  I always love to watch the reactions when people bite into things for the first time– and these don’t disappoint!!!  Lots of laughter and smiles at this yummy green slime!  Enjoy!!!!!! ~r

Radioactive Cupcakes!!!

Other fun Halloween treats to try!!

Sweet Tart and Pixie Stix CakePeanut Butter Caramel SauceHalloween Bundt CakeFall acorn cupcakes!

Creepy Broken Glass Cupcakes!

Posted on

Broken glass Cupcakes!!!
These delicious Red Velvet cupcakes with smooth cream cheese icing are topped with all the makings of a horror movie (or, according to my friend Ricky, a Stephen King novel!).  These are just in time for your creepy October festivities!!

[and if you aren’t a fan of the decorations, they are an amazing cupcake all by themselves!]

Ok.  These were really fun to make.  I’d seen SO many examples of these online– this is not an original idea.  However, I made it my goal to create these in the easiest possible way, with the fewest steps and NO candy thermometers!  Not original, but EASY!!!

Broken glass Cupcakes 2
Note:  I did a cake mix fix by swapping out the water and oil for milk and butter and adding one extra egg.  It was SO good!  (Thanks for the idea Rex!) Heavy and moist cupcakes with exceptional flavor.  I highly recommend it, but you can certainly make the mix as directed for these cupcakes.

Here’s how they are made: (printable recipe)

INGREDIENTS:

The cupcakes:

  • One boxed Red Velvet cake mix
  • Milk (in the same amount as the water required by the mix)
  • Eggs (in the same amount as required by the mix PLUS one extra egg)
  • Butter (twice the amount of oil required by mix- for example if the box calls for 1/2 cup of oil you would use 1 cup of butter).  Measure and then melt before adding to mix.

The icing:

  • 1 package (8 oz) cream cheese (softened)
  • 1/2 cup of butter (softened)
  • 1 teaspoon vanilla
  • dash of salt
  • 4 cups powdered sugar
  • 1 cup white chocolate chips (melted)

The glass candy:

  • 1 cup of granulated sugar
  • 1/2 cup of light corn syrup
  • 1 teaspoon of clear flavoring (I used raspberry)

The edible blood:

  • 1 (14 oz.) can of sweetened condensed milk
  • Red gel food coloring
  • Black gel food coloring
  • 1 teaspoon of clear flavoring (I used raspberry)

DIRECTIONS:

I recommend making the decorations 1st (the glass and “blood”) and keeping them until just before your party to decorate with.  They will both keep for several days, so you can make them ahead of time.

Candy Glass:

  • Cover a cookie sheet with wax paper and spray the wax paper liberally with non-stick spray.
  • Place granulated sugar and corn syrup into a microwave safe bowl and mix them together.
  • Cover bowl with plastic wrap.
  • Microwave on high for 3 minutes.
  • Remove from Microwave and CAREFULLY remove plastic  wrap (beware of hot steam!)
  • Stir well and re-cover with fresh plastic wrap.
  • Microwave on high for another 3 minutes, but watch mixture after about 2 minutes. Because microwaves vary, you need to watch it to make sure it doesn’t start to turn color.  If you cook it too long it will be an amber color instead of the nice clear glass you want.  My microwave was perfect at 2 and 1/2 minutes.
  • CAREFULLY remove from microwave and CAREFULLY remove plastic wrap.
  • This is soooo hot and sticky– using caution to not touch any of the hot candy, pour it out over the greased wax paper and allow it to sit and harden completely (at least a couple of hours)

Candy Glass How-To Pics

  • When candy glass is hard, tap a knife tip into glass to break it into sharp pieces.  
  • Carefully (the pieces are actually sharp!) push pieces up off of wax paper and onto a plate.
  • Candy glass can be kept in a zip top bag or an air tight container for about a week. Moisture (including the moisture from the frosting on the cupcakes) will eventually start to break the glass down.

Candy Glass How-To

Edible Blood:

  • Place sweetened condensed milk into a small bowl and mix in red food color gel and flavoring until you get a brilliant red color.  Add a TINY bit of black (use a toothpick- black goes a long way!).
  • Mix and adjust until you get a nice dark red color.
  • Spoon “blood” into a zip-top bag and seal TIGHTLY.  Keep refrigerated until use.

Edible Blood!Cupcakes:

  • Make cake mix according to box (swapping in cake mix “fix” ingredients if desired)
  • Divide equally into 24 cupcake liners in cupcake tins.
  • Bake at 350F degrees according to times on box.
  • Remove cupcakes from oven and cool completely.

Frosting:

  • On medium speed, beat together cream cheese, butter, vanilla, and salt until creamy.
  • Gradually add powdered sugar, beating until smooth.
  • Melt white chocolate chips in the microwave in 30 second increments, stirring between, until smooth.
  • Add melted white chocolate to icing and beat on low until completely combined.
  • Place in a zip-top bag fitted with a decorating tip and pipe frosting on top of cooled cupcakes.

Decorating:

  • Put parchment paper on a counter to protect it from all that red food coloring. 
  • [or- use a large platter or tray that you will serve the cupcakes on- blood splatter and all!]
  • Place frosted cupcakes on protected surface and press 2 to3 pieces of glass into the top of each.
  • Clip the corner on the bag of edible blood and drizzle over the top of the glass and the cupcakes, allowing it to drip down the sides of both.
  • Serve the same day after decorating.
  • Use care transporting and serve with plates and forks, or you will all have red fingers!!

Broken Glass Cupcakes3

My thoughts: These are such yummy cupcakes all by themselves.  But the decorating was SO much fun!  My friend Amber helped and we both were a little in awe of how realistic they looked…and how yummy they tasted!  I wasn’t sure how the sweetened condensed milk would taste on the cupcakes, but I added a little raspberry flavor and oh my…so good!

Setting up for photos was fun too…splattering fake blood everywhere and letting it drip off my cupcake stand was interesting…not my typical cupcake photo shoot!

I really hope you get a chance to try these– even if you just go for the yummy cupcake recipe minus the drama!

I will leave you with a little insiders look at my picture-taking experience:

Broken glass cupcakes-- food photography at its finest....lol!

So fun!!!

Here are some other fun “creepy” October recipes to try:

Mummy Oreo Pops!Spider Cupcakes!MISfortune cookies with caramel apple cupcakesHalloween Bundt Cake

Peanut Butter Fudge Cupcakes

Peanut Butter Fudge Cupcakes
These mini fudge cupcakes are topped with the creamiest peanut butter frosting ever!  If you like peanut butter and chocolate together you will LOVE this recipe!!

Ah peanut butter… I just crave it sometimes!  Add chocolate and you pretty much have achieved perfection in the dessert world (at least in my humble, not-allergic-to-peanuts, view).  These cupcakes are easy to make and they won’t last long!  Here’s how to make them: (printable recipe)

Peanut Butter Fudge Cupcakes!!!

INGREDIENTS: (makes about 40 mini cupcakes)

Cupcakes:

  • 1 1/2 cups of dark chocolate chips
  • 1 stick (4 oz.) salted butter
  • 2 T. cocoa powder
  • 4 egg yolks
  • 6 egg whites
  • pinch of salt
  • 1/2 c. sugar

Frosting:

  • 3 sticks (1 1/2 cups) butter (softened to room temperature)
  • 1 cup of creamy peanut butter
  • 3 cups powdered sugar
  • 1 Tablespoon vanilla 
  • One bag of mini Reese cups (optional for decoration)

DIRECTIONS:

  • Preheat oven to 350 degrees
  • In a microwave safe bowl, melt chocolate with butter in 30 second increments, stirring between until smooth and creamy.
  • Whisk cocoa powder into melted chocolate.
  • Add egg YOLKS and whisk until smooth.  Set aside.
  • Add a pinch of salt to the egg whites and whisk until foamy.
  • Add sugar gradually to egg whites while beating on high until medium peaks form.
  • Add 1/3 of egg whites to chocolate and mix well- until completely combined and smooth.
  • Add remainder of egg whites and fold in gently until completely incorporated.
  • Spoon batter into mini-cupcake liners in tins (fill about 3/4 full) and bake at 350 degrees for 10-12 minutes.
  • Remove from oven and cool completely.
  • To make frosting, place butter, vanilla, and peanut butter into a large bowl and mix on high until smooth (about a minute)
  • Add powdered sugar and beat on low until combined and then on high until light and fluffy.
  • Place frosting in a zip-top bag fitted with a decorating tip and pipe on top of each cooled cupcake.
  • Top each cupcake with a mini Reese Cup and a sprinkle of cocoa powder (as desired)
  • Enjoy!

Peanut Butter Fudge Cupcakes!!
My thoughts:  Yum….!  Yep, that pretty much sums up my thoughts…mmmmm….!  I hope you enjoy these as much as I am right now!!!

Other peanut butter-y recipes you will love:

Peanut Butter Cup Layer CakePeanut butter cup cheesecakePeanut butter Acorn Cookies!Peanut Butter Caramel Sauce

Salty Caramel Cheesecake Bars

Caramel Cheesecake6

Creamy caramel cheesecake over a pretzel crust is topped with a layer of dulce de leche and dark chocolate.  Sweet and salty perfection!

I’ve been craving caramel lately.  Maybe because it’s fall now and caramel seems to be a fall treat.  Whatever the reason, I went on a hunt for caramel cheesecake and found this one at Bon Appetite.  I wanted to add salty to the recipe, so I used a pretzel crust instead of grahams and added dark chocolate.  It is really good.  A subtle caramel flavor with just a hint of salt from the crust.

Caramel Cheesecake5

Want to know how these are made?  Here you go:  (Printable recipe)

INGREDIENTS: (makes 24 cheesecake squares)

Crust:

  • 3 cups of crushed pretzels
  • 2 Tablespoons of sugar
  • 1  stick (1/2 cup) of butter

Cheesecake:

  • 3 packages of cream cheese (8 oz.), softened to room temperature.
  • 1 cup sugar
  • 3 eggs
  • 2 teaspoons of vanilla
  • 1 can (13.4 oz) of Nestle La Lechera Dulce de Leche (or 1 cup of your own- find recipe here)

Topping:

  • 1 bag (10 oz.) Nestle Dark Chocolate Morsels.
  • 12 Tablespoons of butter

DIRECTIONS:

  • Preheat oven to 325F degrees.
  • Make crust by combining crushed pretzels, butter and sugar together and pressing into a greased 9×13 pan.
  • Bake at 325F for about 10 minutes.  Cool completely.
  • In a large bowl, cream together sugar with cream cheese.
  • Add eggs, one at a time, beating on low speed between each one.
  • Add vanilla and 1/2 of the can (about 1/2 cup) of Dulce de Leche.
  • Beat on medium until completely combined.
  • Pour cheesecake over cooled crust and bake at 325F for 45 minutes. (Until center is set)
  • Cool at room temperature.
  • Carefully spread remaining Dulce de Leche over the top of the cooled cheesecake.
  • Melt 12 Tablespoons of butter with dark chocolate chips until smooth.
  • Pour over top, carefully spreading chocolate to cover entire cheesecake.
  • Carefully set pretzels on top of chocolate.  Each one will be in the center of one piece when it is cut, so place them according to how big you want your pieces.
  • Lightly sprinkle with coarse salt.
  • Refrigerate overnight.
  • Before serving, allow cheesecake to warm a little and then using a sharp knife, cut into squares with a pretzel centered in each.
  • Enjoy!

Salted Caramel Cheesecake

My thoughts:  These are really so yummy.  My only problem?  The crust was a little crumbly (you can see in the pictures).  I’m almost positive I didn’t get my pretzels chopped fine enough.  Make sure you chop/food process them into FINE bits- not coarse.

If you don’t want a salty crust just use graham crackers– or Oreos…oh my, caramel cheesecake over Oreos?  Yes, please!  The cheesecake is delicious.  It would be good over any crust.  I hope you enjoy trying it!!!  ~r

Salted Caramel Cheesecake!

Other caramel desserts you might enjoy:

Salted Caramel Cookie Cups (2)Inside-out Caramel Apple!!Caramel Fudge Brownies!!Turtle Cheesecake

Lady Bug Oreo Pops!!

Ladybug Oreo Pops!
What could be better than a cute ladybug cookie on a stick?  Biting in and finding an OREO!!!!!

These cookies are such a fun treat!  Perfect as favors and prizes at parties- they just make you smile.

We’ve done lots of Oreo Pops here at Easybaked.  The technique is the same for these as for our Original Oreo pops.  To see the how-to photos and technique, click here.

Here’s what you will need for about 24 Oreo Pops.

INGREDIENTS:

  • One box of Double Stuff Oreos
  • One 12 oz. bag of Wiltons candy melts in yellow
  • One 12 oz. bag of Wiltons candy melts in red
  • One 12 oz. bag of Wiltons candy melts in dark chocolate.
  • One bag of mini M&Ms.
  • 24 lollipop sticks
  • Candy Eyes (if desired)

Oreo Pops!

DIRECTIONS:

  • Carefully twist apart all of the Oreo cookies.
  • Using one of the pop sticks, make an indentation in the white filling of each cookie.
  • Melt the red Candy Melts in the microwave in 30 second increments, stirring until completely melted and smooth.
  • Dip the end of one stick into the melted candy melts, drizzle a little in the center of the white cookie filling and then gently press it into the indentation made.
  • Place the top of the cookie back on and allow white chocolate to harden (5 minutes or so), cementing the cookie back together with a stick inside.
  • Holding the stick, lower the entire Oreo into the bowl of melted red chocolate, spooning it over the top and sides to cover it completely.
  • Allow the excess chocolate to drain off and gently place covered Oreo on a piece of parchment paper to harden.  
  • Add two brown mini M&Ms to each half of the pop (use the photos as a guide– leave room for the top to be dipped in chocolate and for a line to be drawn down the middle.)
  • Dip half of the pops in the red chocolate and then melt the yellow chocolate and repeat the process with the 2nd half of the pops.
  • When candy melts have completely hardened, melt a the dark chocolate melts.  
  • Use a spoon to gently scoop chocolate over the top tip of the cookie, making a head on your ladybug.
  • Set each pop on parchment paper and add candy eyes (if desired) before chocolate hardens.  
  • After dipping the tops of all pops, and placing eyes, spoon remaining chocolate into a small ziptop bag and clip a corner.
  • Pipe a line from the head of the ladybug across the top toward the stick.  (use photos as a guide).
  • Allow pops to harden completely.
  • Enjoy!!!

Ladybug Oreo Pops!!!
My thoughts:  I’m addicted to Oreos.  I keep making Oreos into pops because it gives me an excuse to eat the extra Oreos that break.  

True confession.  

The other reason: they make people smile.  It never fails, you hand one of these crazy fun pops to anyone and they smile.  Even if they can’t or won’t eat dessert….they smile.  These pops are like puppies.  They make people happy!  Every few months I feel an overwhelming urge to make a different variety to share with you….so I hope that you enjoy them– and that you smile 🙂  ~r

Lady bug Oreo Pops!
Other Oreo Pop ideas we have tried:

Original Oreo pops!!!!!Mummy Oreo Pops!Snowman Oreo PopsPatriotic Oreo Pops- yum!!!

Dark Chocolate Espresso Cookies

Posted on

Espresso Cookies!!!

Dark chocolate cookies infused with espresso powder.  Once you’ve had one you will be craving a plateful!!!  They are really easy to make, and since they are a cut-out cookie they can be made in any shape you want.  Aren’t the plain round ones so fun though???

Espresso Cookies!!!

Here’s how to make them:  (printable recipe)

INGREDIENTS: (makes 36 medium cookies)

  • 2 sticks (1 cup) butter, softened
  • 1 1/2cups sugar
  • 2 eggs
  • 3 teaspoons vanilla extract
  • 3 teaspoons instant Espresso Powder
  • 2/3 cup unsweetened cocoa powder
  • 3 cups flour
  • 1/2 teaspoon salt
  • 1/2 teaspoon baking powder

DIRECTIONS:

  • Cream together butter and sugar in a large mixing bowl.
  • Mix in eggs and then cocoa.
  • Place vanilla and Espresso Powder together in a small cup until coffee dissolves.  Add this mixture to the batter and mix until completely incorporated.
  • Gradually add dry ingredients and mix until smooth (use clean hands at the end, to knead into a soft ball of dough)
  • Wrap in plastic and chill for at least one hour.
  • Allow cookie dough to soften a little at room temperature
  • Preheat oven to 350F degrees.
  • Roll out cookie dough on floured counter.  
  • Cut into desired shapes and place on a parchment-lined baking sheet.  
  • Bake for 8 to 11 minutes until the edges are firm.
  • Gently slide parchment paper off of cookie sheet and onto a flat surface.  Cool completely before removing cookies from paper.

Dark Chocolate Espresso Cookies!

You can serve these cookies plain, or with a little cocoa powder sprinkled on top, or you can ice them.

I iced these with royal icing that I added a little espresso powder to.

For my royal icing recipe and techniques, click here.

To get the tiny heart shape at the center I used a little melted chocolate.  While the icing is still liquid, pipe a little circle just a bit above the center of the cookie.  Use a tooth pick to pull down through the icing and the chocolate, making a heart.  Allow the icing and chocolate to harden completely.  Enjoy!!

Chocolate Espresso Cookies!!!

My thoughts:  These are SO GOOD!!!!  I’m on a diet….and I wanted to eat them all….but I didn’t.  I gave them away.  sigh.  

These are simple to make and probably the easiest cut-out cookie dough I’ve ever worked with.  Not sticky or fussy at all!  I adore anything with coffee in it, so I would add even more espresso powder next time.  Make them to your taste by adjusting the amount you add.  Paired with a cup of coffee, they are  just…..perfect!  Enjoy!!!  ~r

Espresso Cookies!!!

A few other desserts that would go well with your coffee:

Brownie Oreo Cookie CupCinnamon Roll Cheesecake!!Chocolate molten lava cupcakesGerman Chocolate Pie!

Red Velvet Cookies with Cream Cheese Icing

Posted on

Red Velvet Cookies!!

These rich red velvet cookies are covered in a smooth cream cheese icing.  Add a glass of milk and you have the perfect dessert!

I like to experiment in the kitchen.  Usually it takes a few tries before I get something exactly the way I like it (ok, sometimes more than a few tries!)  These cookies were perfect the 1st time.  They are just beautiful cake-like cookies right out of the oven, and they are sooo easy to make.  They honestly could stand alone if you aren’t an icing fan.  The cream cheese icing is incredibly yummy though….so if you are like me and want icing on everything you eat, be sure to try this one!

Red Velvet Cookies!!!

Here’s how to make these yummy cookies: (printable recipe)

INGREDIENTS: (makes 24 medium cookies)

Cookies:

  • 1 cup brown sugar
  • 1 stick (1/2 cup) of butter (softened)
  • 1 egg (beaten)
  • 1/2 cup evaporated milk
  • Red food coloring (to desired shade)
  • 2 cups flour
  • 1/2 teaspoon baking soda
  • 1/2 teaspoon salt
  • 2 squares (1 oz. each) of unsweetened baking chocolate (melted)
  • 1 teaspoon of vanilla

Icing:

  • 4 oz (1/2 package) cream cheese (softened)
  • 1/4 cup of butter (softened)
  • 1/2 teaspoon vanilla
  • dash of salt
  • 2 cups powdered sugar
  • 1/2 cup white chocolate chips (melted)

DIRECTIONS:

Cookies:

  • Preheat oven to 375F degrees.
  • Cream together butter and brown sugar.
  • Add egg and blend well.
  • Put evaporated milk into a small bowl and stir in food color until a deep shade of red.
  • Add dry ingredients, alternating with the red evaporated milk.  (I used a mixer at this point to fully incorporate the red)
  • After batter is well combined, add the vanilla and melted chocolate and blend on low speed until completely combined.
  • Cover cookie sheets with parchment paper and use a medium cookie scoop to spoon dough on sheets.
  • Bake at 375F degrees for 10 minutes.
  • Slide cookies off sheet with parchment paper and allow them to cool on paper completely.

Icing:

  • On medium speed, beat together cream cheese, butter, vanilla, and salt until creamy.
  • Gradually add powdered sugar, beating until smooth.
  • Melt white chocolate chips in the microwave in 30 second increments, stirring between, until smooth.
  • Add melted white chocolate to icing and beat on low until completely combined.
  • Place in a zip-top bag fitted with a decorating tip and pipe frosting on top of cooled cookies.

Red velvet cookies with cream cheese icing!!

My thoughts:  These are easy and really so moist and flavorful.  Perfect with a cold glass of milk or a cup of coffee!  Hope you enjoy them!  ~r

Other fun cookie ideas:

Chocolate Chip Oatmeal CookiesGerman Chocolate CookieGingerbread Cookies!New Zealand Chocolate cookies

Malted Milkshake Cupcakes

Posted on

Malted Milkshake Cupcakes

Dark chocolate cupcakes topped with the creamiest malt frosting ever.  Like a malted milkshake minus the cup!

I have an addiction to chocolate malts.  Not chocolate shakes, just malts.  The creamy, chocolatey kind that you drink through a striped straw at the pool.  My mom makes the best chocolate malts ever.  They are really simple to make, but there’s just something about her leaning out of the patio door and asking, “Anyone want a malt?” that makes me smile.  It’s one of our summer traditions.

Moms Malts!!{Her easy recipe? Ice cream, malt powder, cocoa and milk~ a blender full of ice cream plus cocoa and malt to taste, and milk to desired consistency}

I wanted to make a frosting that tastes like a malt.  It took me a couple of tries, but I finally hit the mark.  It’s wonderfully creamy and smooth.  It is also a very soft whipped icing that must be kept refrigerated because it has milk in it, and because it will not keep a pretty piped finish if it gets warm.

Believe me, the flavor and texture are worth it!

Malted Milk Cupcakes

Here’s how to make these yummy cupcakes! (printable recipe)

INGREDIENTS:

  • One boxed dark chocolate cake mix (plus water, eggs and oil to make according to box)
  • 4 packets of Dream Whip
  • 1 1/2 cups of cold milk
  • 6 Tablespoons of unsweetened cocoa powder
  • 6 Tablespoons of malt powder
  • 1/2 -1 cup of powdered sugar (to desired consistency)

DIRECTIONS

  • Make cake mix according to box and bake in 24 cupcake liners placed in muffin tins.
  • Cool cupcakes completely.
  • Put Dream Whip, milk, cocoa powder, malt powder and powdered sugar into a mixing bowl and blend together.
  • Using a mixer, beat until stiff peaks form (3-4 minutes) 
  • Add extra powdered sugar if needed, to desired consistency.  This is a soft whipped frosting, so it won’t be the consistency of a stiff buttercream~ even with lots of powdered sugar.  (believe me, I tried!)
  • Spoon frosting into a zip-top bag fitted with a decorating tip and pipe frosting on cupcakes.
  • Refrigerate until serving and just before serving add a malted milk ball and sprinkle with cocoa powder if desired for garnish.

ENJOY!!!

Malted milk cupcakes!!!!

My thoughts:  these are *almost* as good as my moms malts.  This frosting is really yummy.  It would be a great filling for a layer cake too~ or even a filling for cupcakes.  You could fill chocolate cupcakes with this and then just spoon some chocolate ganache over the top.  Oh the possibilities!  Hope you get to try these and enjoy them as much as we did!  ~r

Malted Milk Cupcakes!!!More recipes you might like:

Chocolate Mousse CakeStrawberry layer cakeMini chocolate chip cookie cheesecakesCake balls filled with cream cheese frosting

S’mores Cookie Cups

Posted on

S'more Cookie Cups!!

These mini graham cracker cookie cups are overflowing with soft marshmallow and chocolate~ a perfect replica of the summertime favorite~ in cookie form!!

These little cookie cups were eaten up faster than any dessert I can remember.  You simply can’t stop at one!  I guess that’s because they are made with all the ingredients used in S’mores!  The marshmallow stays soft, and the  soft chocolate layer on the inside….?  Oh my.

S'more cookie cups!

Here’s how to make them: (printable recipe)

INGREDIENTS: (makes 48 mini cups)

  • One tube of refrigerated sugar cookie dough
  • 1 cup of finely crushed graham crackers
  • 1/4 cup of heavy cream
  • 1/2 cup semi-sweet chocolate chips
  • 1  (13oz) jar of Jet-Puffed Marshmallow fluff
  • 48 Hershey Kisses (unwrapped!)

DIRECTIONS:

  • Preheat oven to 350F degrees.
  • Place cookie dough and crushed grahams (save 2 to 3 tablespoons of crumbs to sprinkle over cups at end) in a mixing bowl and using hands, combine crushed grahams with cookie dough until completely incorporated.
  • Evenly divide dough into mini muffin tins (I used a medium cookie scoop to do this and got about 48 cookies)
  • Bake at 350F degrees for 7 to 9 minutes, until turning a light brown at edges.
  • Remove from oven and immediately press centers in using a mini tart shaper (or a wooden spoon~ although I highly recommend the tart shaper as it is a small and inexpensive tool that I love and use all the time!)
  • Allow cups to cool for 2-3 minutes and then gently run a small knife around the edges and pop the cup out of the tin.  Allow cup to completely cool on counter.
  • Place all cups on a cookie sheet (preferably one with raised edges)
  • In a small sauce pan, heat up heavy cream until just bubbling at the edges (20 seconds or so).
  • Add chocolate chips, cover and allow them to sit for 5 minutes.
  • Stir melted chips with cream until smooth (turn heat back on if needed)
  • Place chocolate sauce in a zip-top bag, clip a corner and pipe chocolate evenly into each cup.

Graham cookie cupsPiping chocolate into cookie cup

  • Fill a mug or small bowl with HOT water, and place a medium cookie scoop into it.  Shake off excess water and scoop one scoop of marshmallow fluff into each cookie cup.  Place scoop back in hot water as soon as the fluff starts to stick to the scoop.

Scoop Marshmallow into cookie cupSmores cookie cups--yum!!

  • Turn broiler on high and place entire cookiesheet full of cookies in the oven under the broiler.  WATCH the cookies– in about 30 seconds the marshmallows will start to brown.  Take the cookie cups out and immediately place a Hershey kiss on the top of each hot marshmallow top.  Sprinkle with graham crumbs (and drizzle with a little white chocolate if you like).
  • Let these sit for about an hour.  The bottom of the kiss will melt and attach to the marshmallow.
  • You can serve these warm, or at room temp.
  • Once they are cooled, you can store them in an airtight container for about a week.

S'mores cookie cups!

My thoughts~ These cookie cups were a big hit.  They really capture the flavor of a s’more and they aren’t very difficult to make.  The marshmallow fluff was a little fussy, just because it is so sticky.  I highly recommend it though- it was perfect biting into the gooey soft cream rather than an actual marshmallow.  It captured that melted marshmallow feel.  I *highly* recommend you use a cookie scoop for these.  You can get a scoop almost anywhere these days, but if you can’t find one, try ordering one at Amazon.  I hope you really enjoy making (and eating!) these yummy little treats!!! ~r

Melted Smores cup

Other cookie cup recipes you might enjoy:

Gooey filling in Seven layer cups!Fruit Loop Confetti Cups!!Caramel Coconut Creme CupsSalted Caramel Cookie Cup!!!

Oreo Pops~ a recipe revisited!

Posted on

RR HeaderDay #4 of our celebration of past recipes.  This week is going fast!  Today’s recipe is the 4th most viewed recipe on the Easybaked site.  It has had nearly 60,000 visits since it was published in February of 2012.  Can you guess what it is????

Oreo pops - a revisited recipe!These little treats are a favorite of mine.  They have been remade as mummies and snowmen already- the decorating possibilities are just endless!

These have been the star attraction at birthdays, showers, picnics, retirement parties, and even as favors at weddings.  They have been decorated in flowers and butterflies and school colors and even with Barney the Dinosaur!  The end of July they will be featured in Women’s World Magazine (so be on the look-out and grab a copy!).

For the Fourth of July holiday I simply dipped them in red white and blue and decorated with drizzles and sprinkles.  SO easy.  I tied these up in little favor bags and they are all set to travel to all of my upcoming holiday parties and picnics!  I just love things you can make ahead!

To see the original recipe and get directions for how to insert the stick and dip these, click here.

To print a copy of the recipe and directions, click here.

Patriotic Oreo Pops!!!

Patriotic Oreo Pops!!!

Patriotic Oreo Pops- yum!!!Don’t miss our very last recipe remake tomorrow morning~ you’re going to love it!!!

Want to know what our other most-visited recipes are?  Here’s what’s at the top of the list:

Strawberry-Lemonade Layer CakeFrozen S'mores CupsRaspberry Confetti KissesSalted Caramel Cookie Cups (2)