Tag Archives: dessert

Caramel Pecan Marshmallow Pops

Posted on


Marshmallow Turtle Pops!

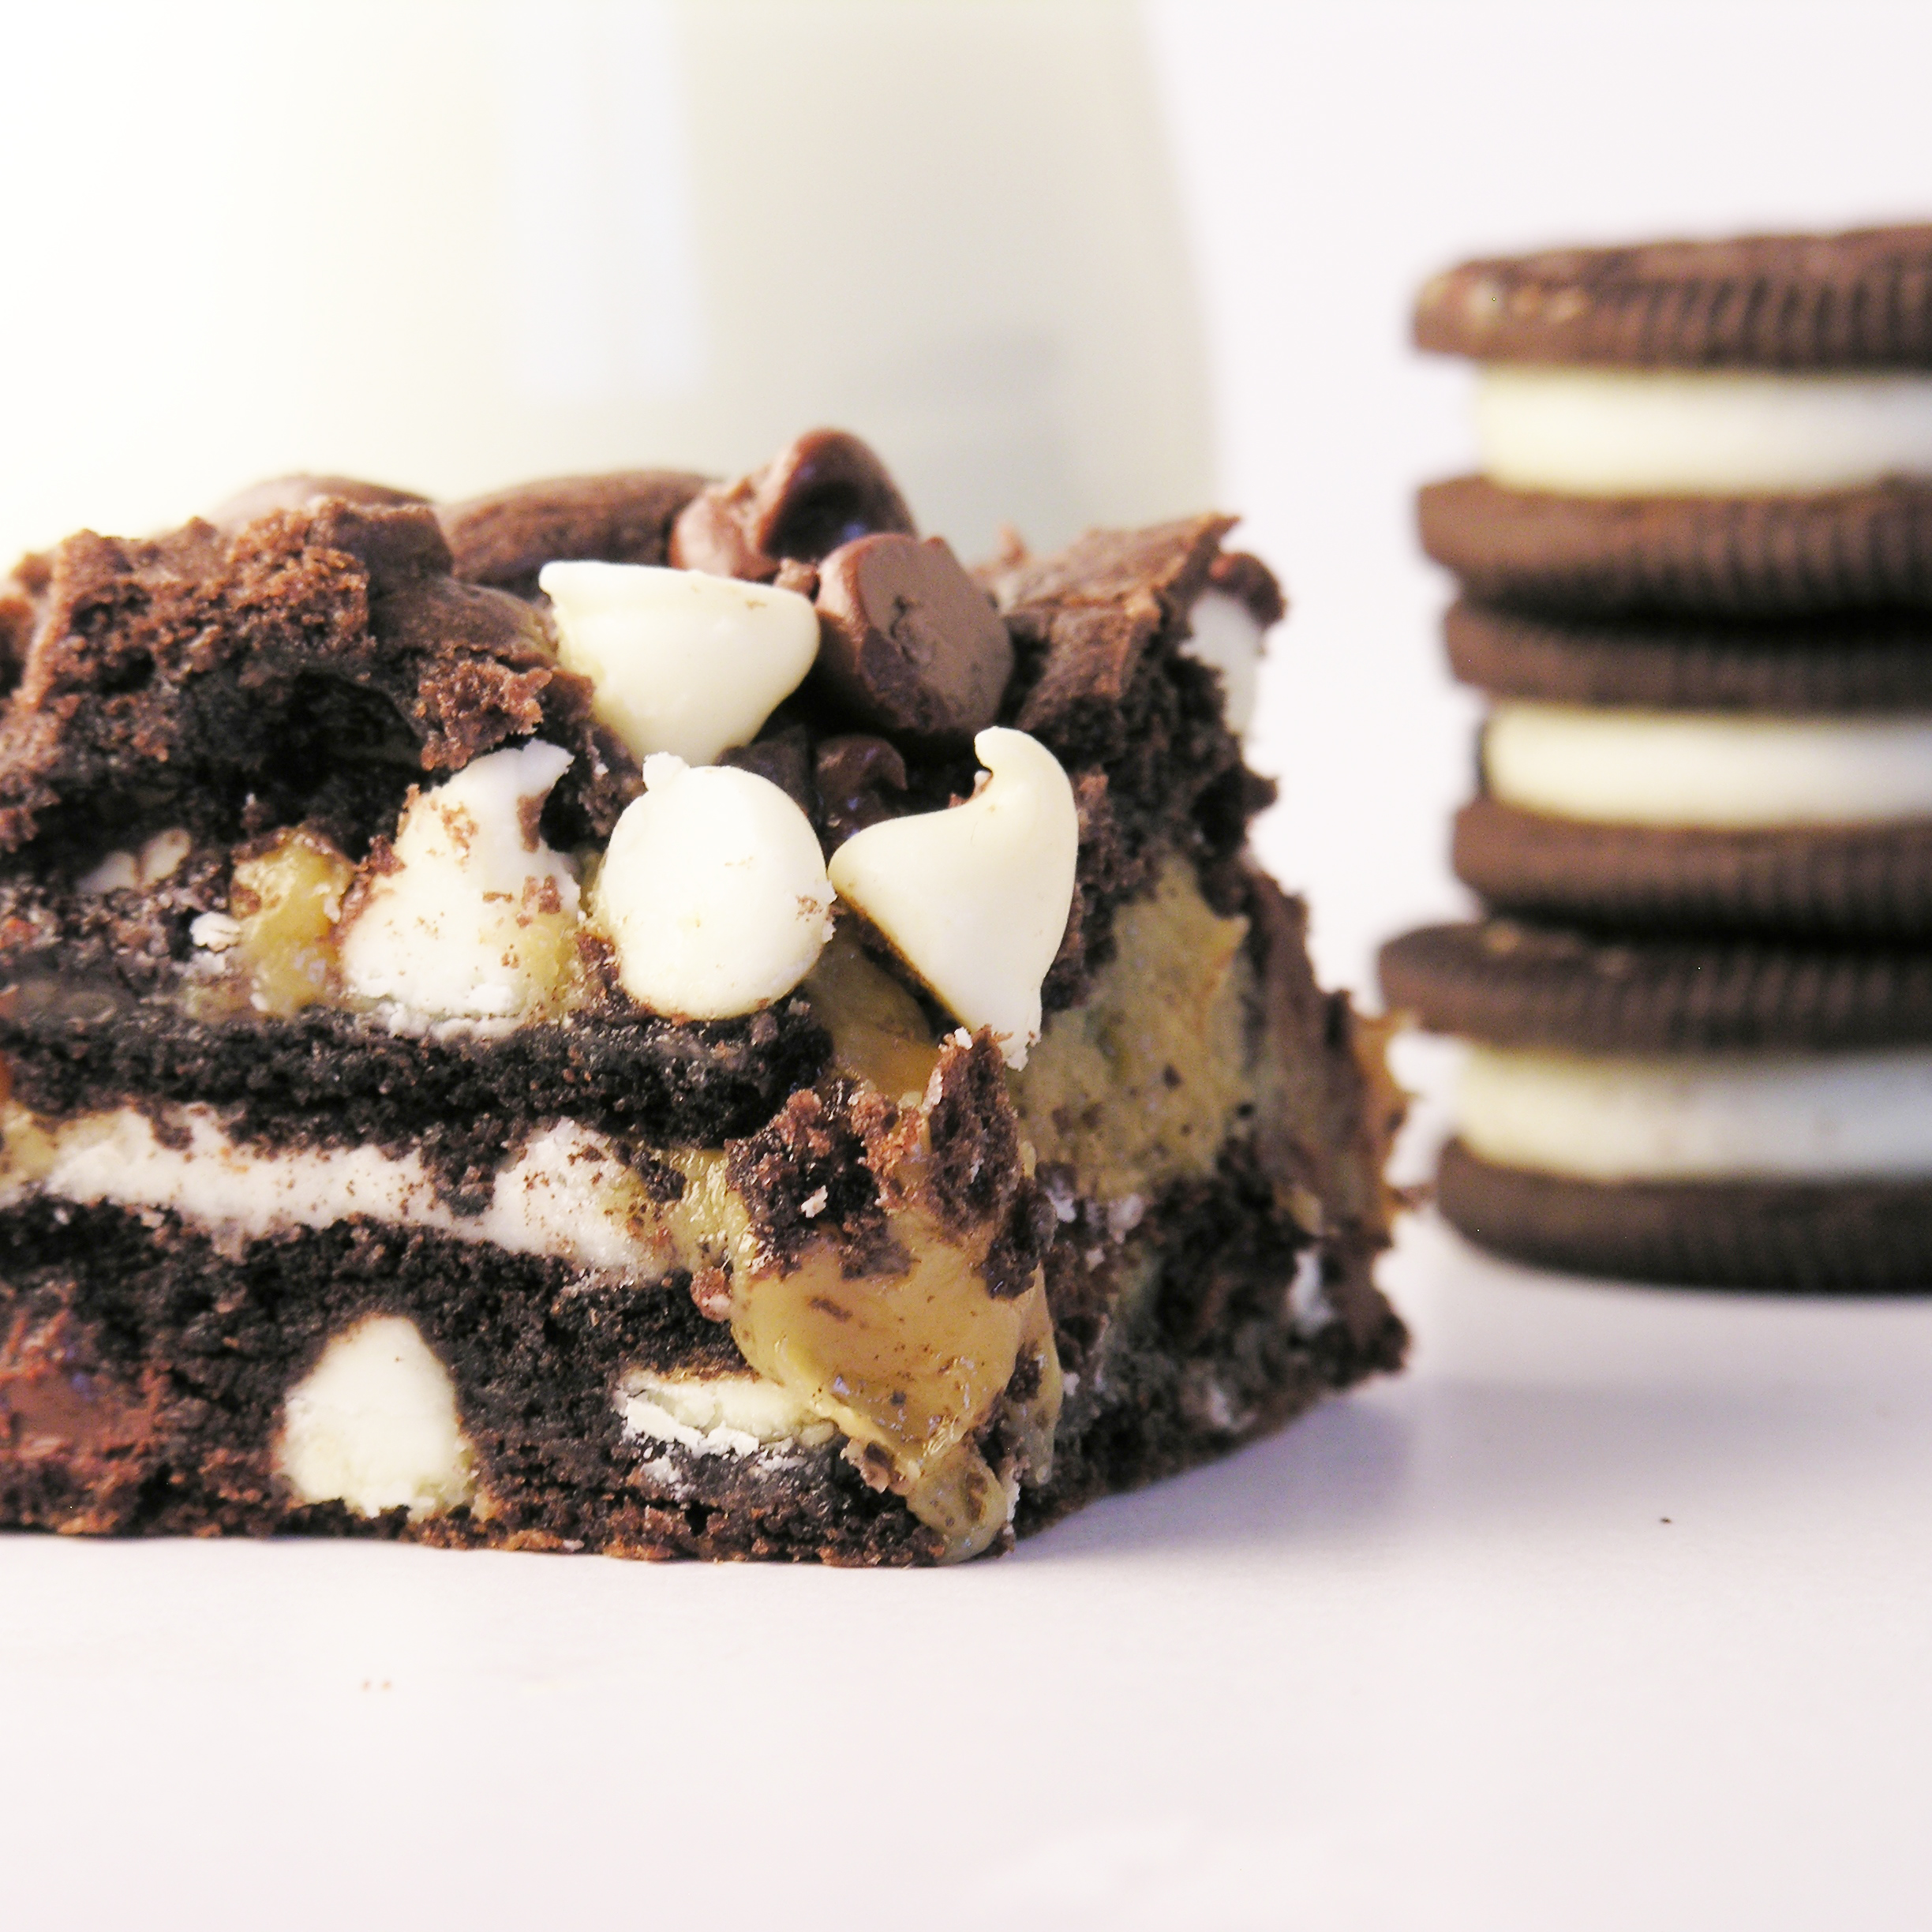
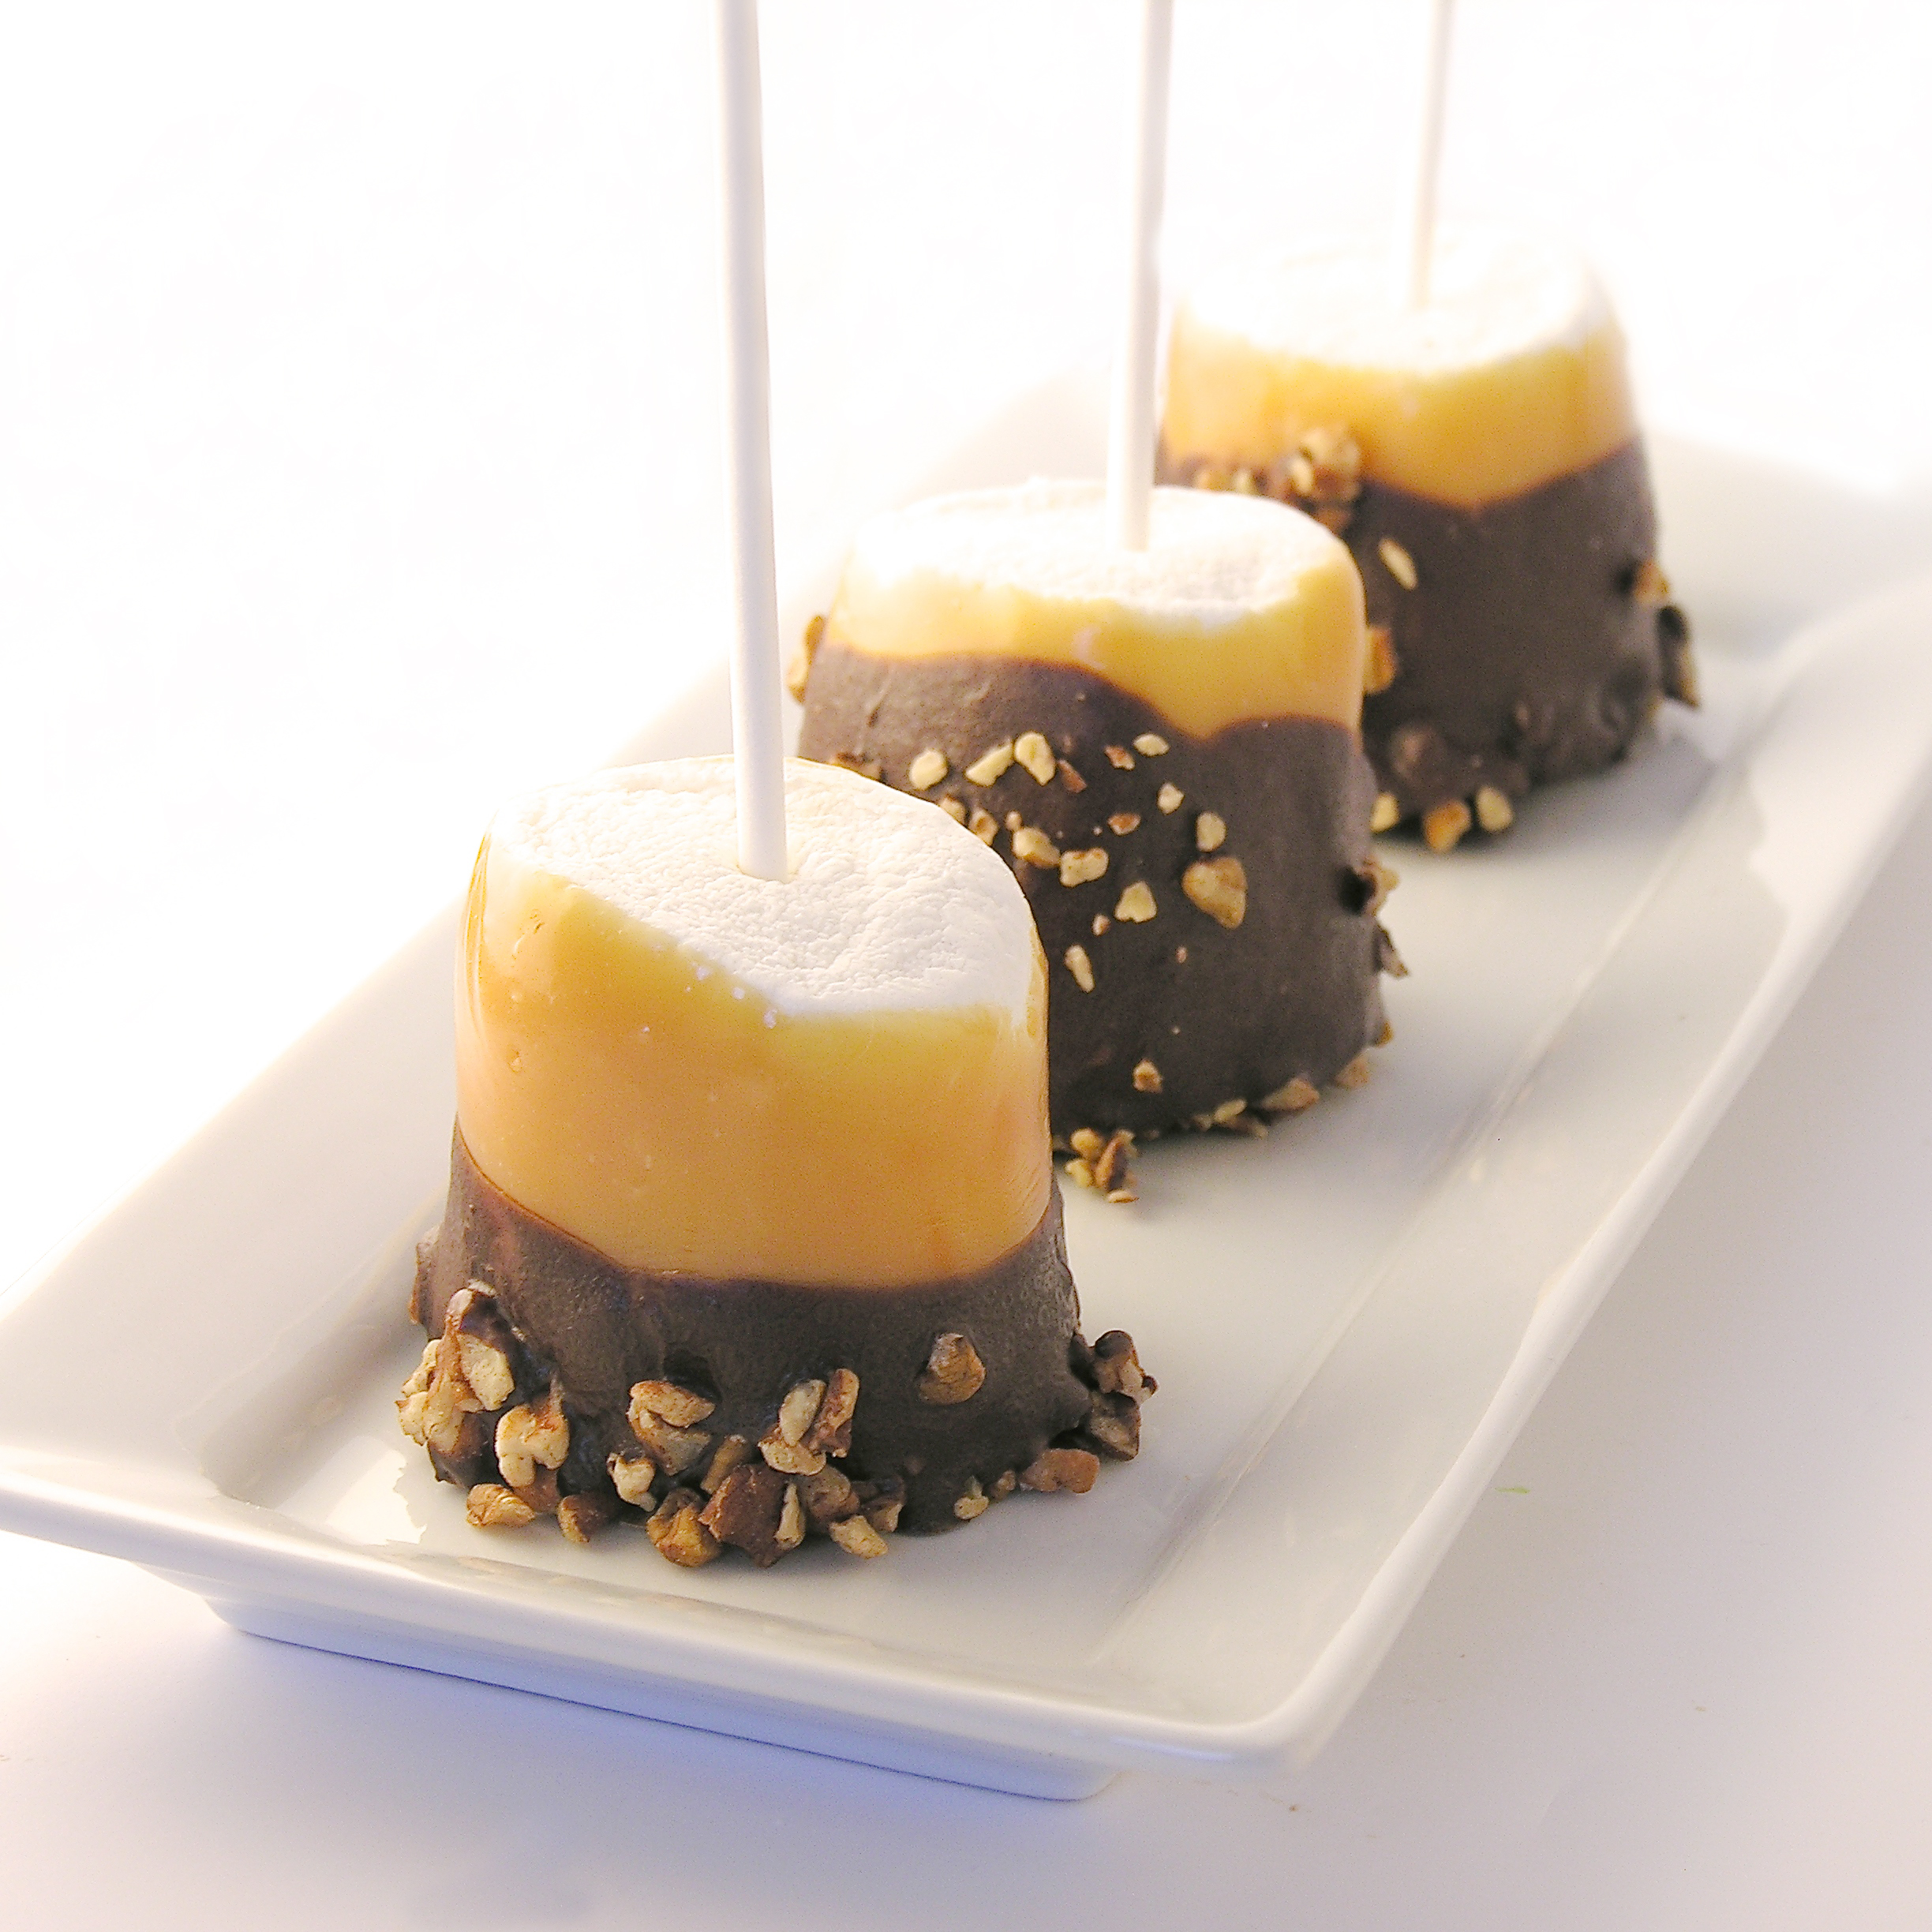
  Big marshmallows covered in creamy caramel and chocolate are dipped in pecans to make an incredibly decadent treat!

These are unbelievably good.  I was visiting my friend Andreya in San Diego last weekend and we passed a store while window shopping in La Jolla that had all sorts of dipped marshmallows.  I started craving them and had to try this.   These are like yummy caramel apples- but with a soft marshmallow inside, instead of an apple.  If you are looking for a really unique treat that is easy to put together, this is your recipe!!!  I couldn’t believe how easy and yummy  these were.

Caramel Pecan Dipped Marshmallows

Here’s the recipe: (printable version)

INGREDIENTS:

  • 2 bags of jumbo marshmallows (24 marshmallows)
  • 24 lollipop sticks
  • 32 Kraft caramels, unwrapped
  • 1 (14 oz) can of sweetened condensed milk
  • 1/2 cup of butter
  • 1 bag of dark chocolate Wilton’s candy melts
  • 2 cups of chopped pecans

DIRECTIONS:

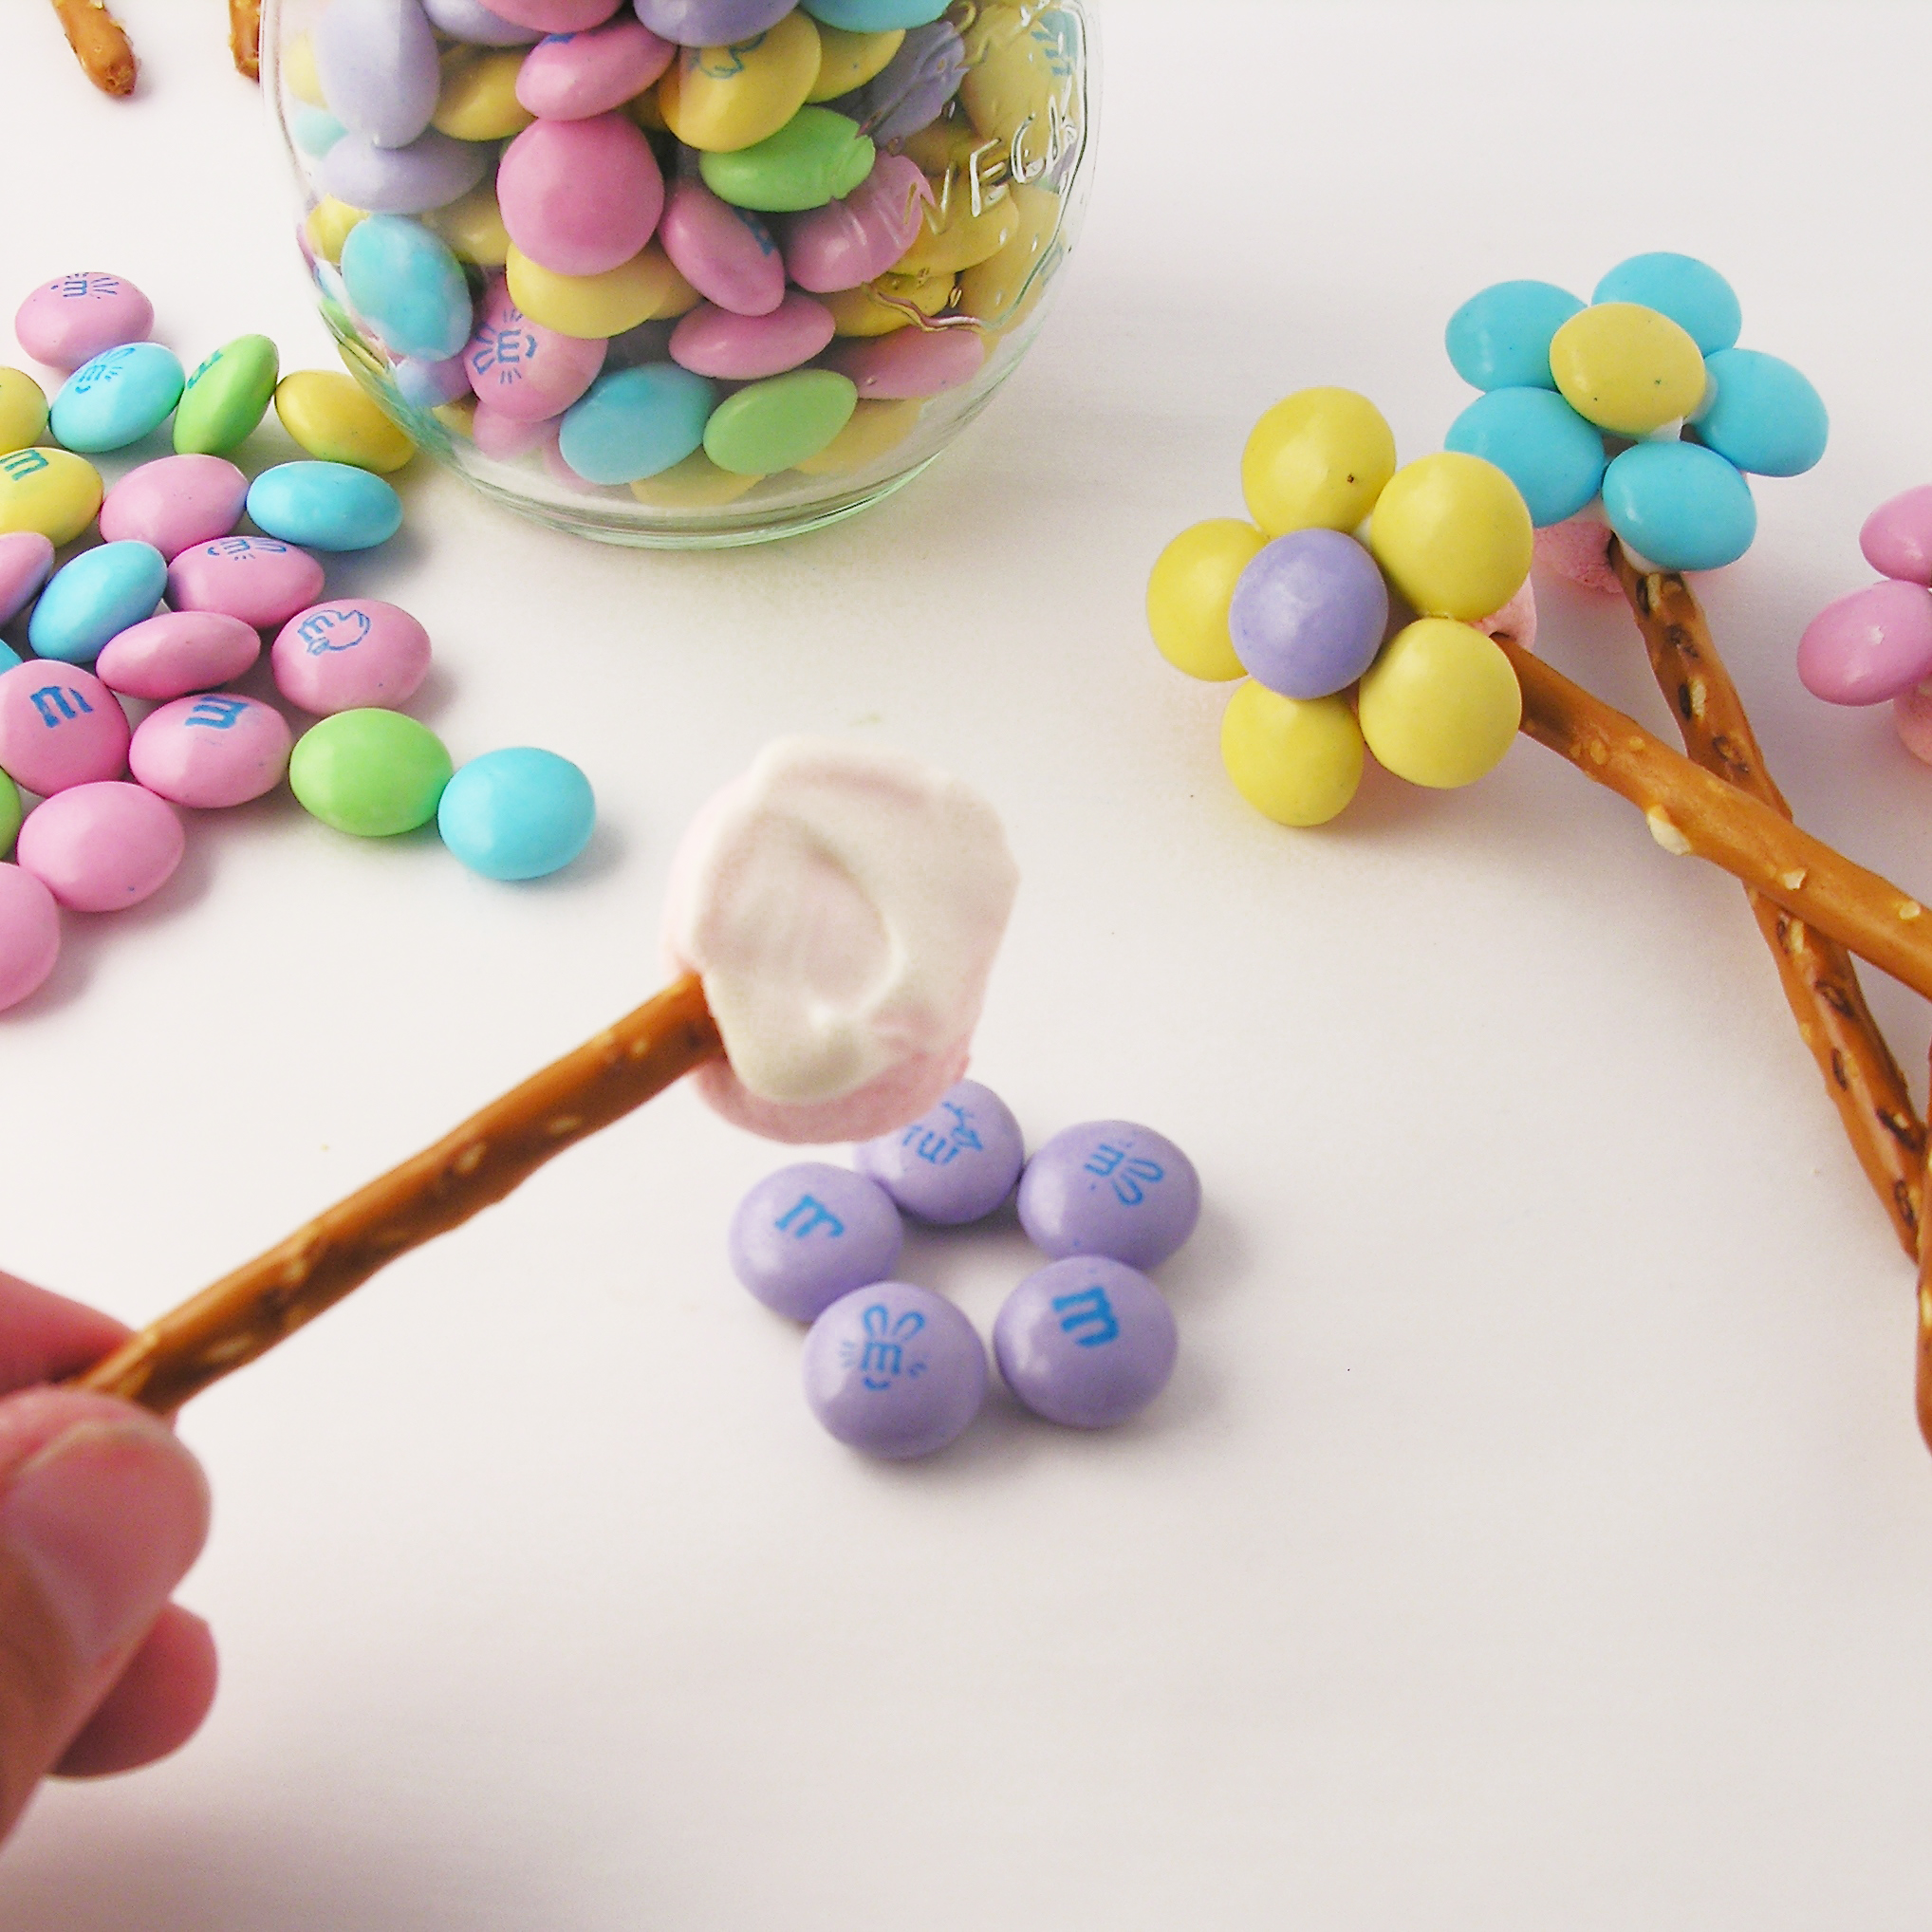
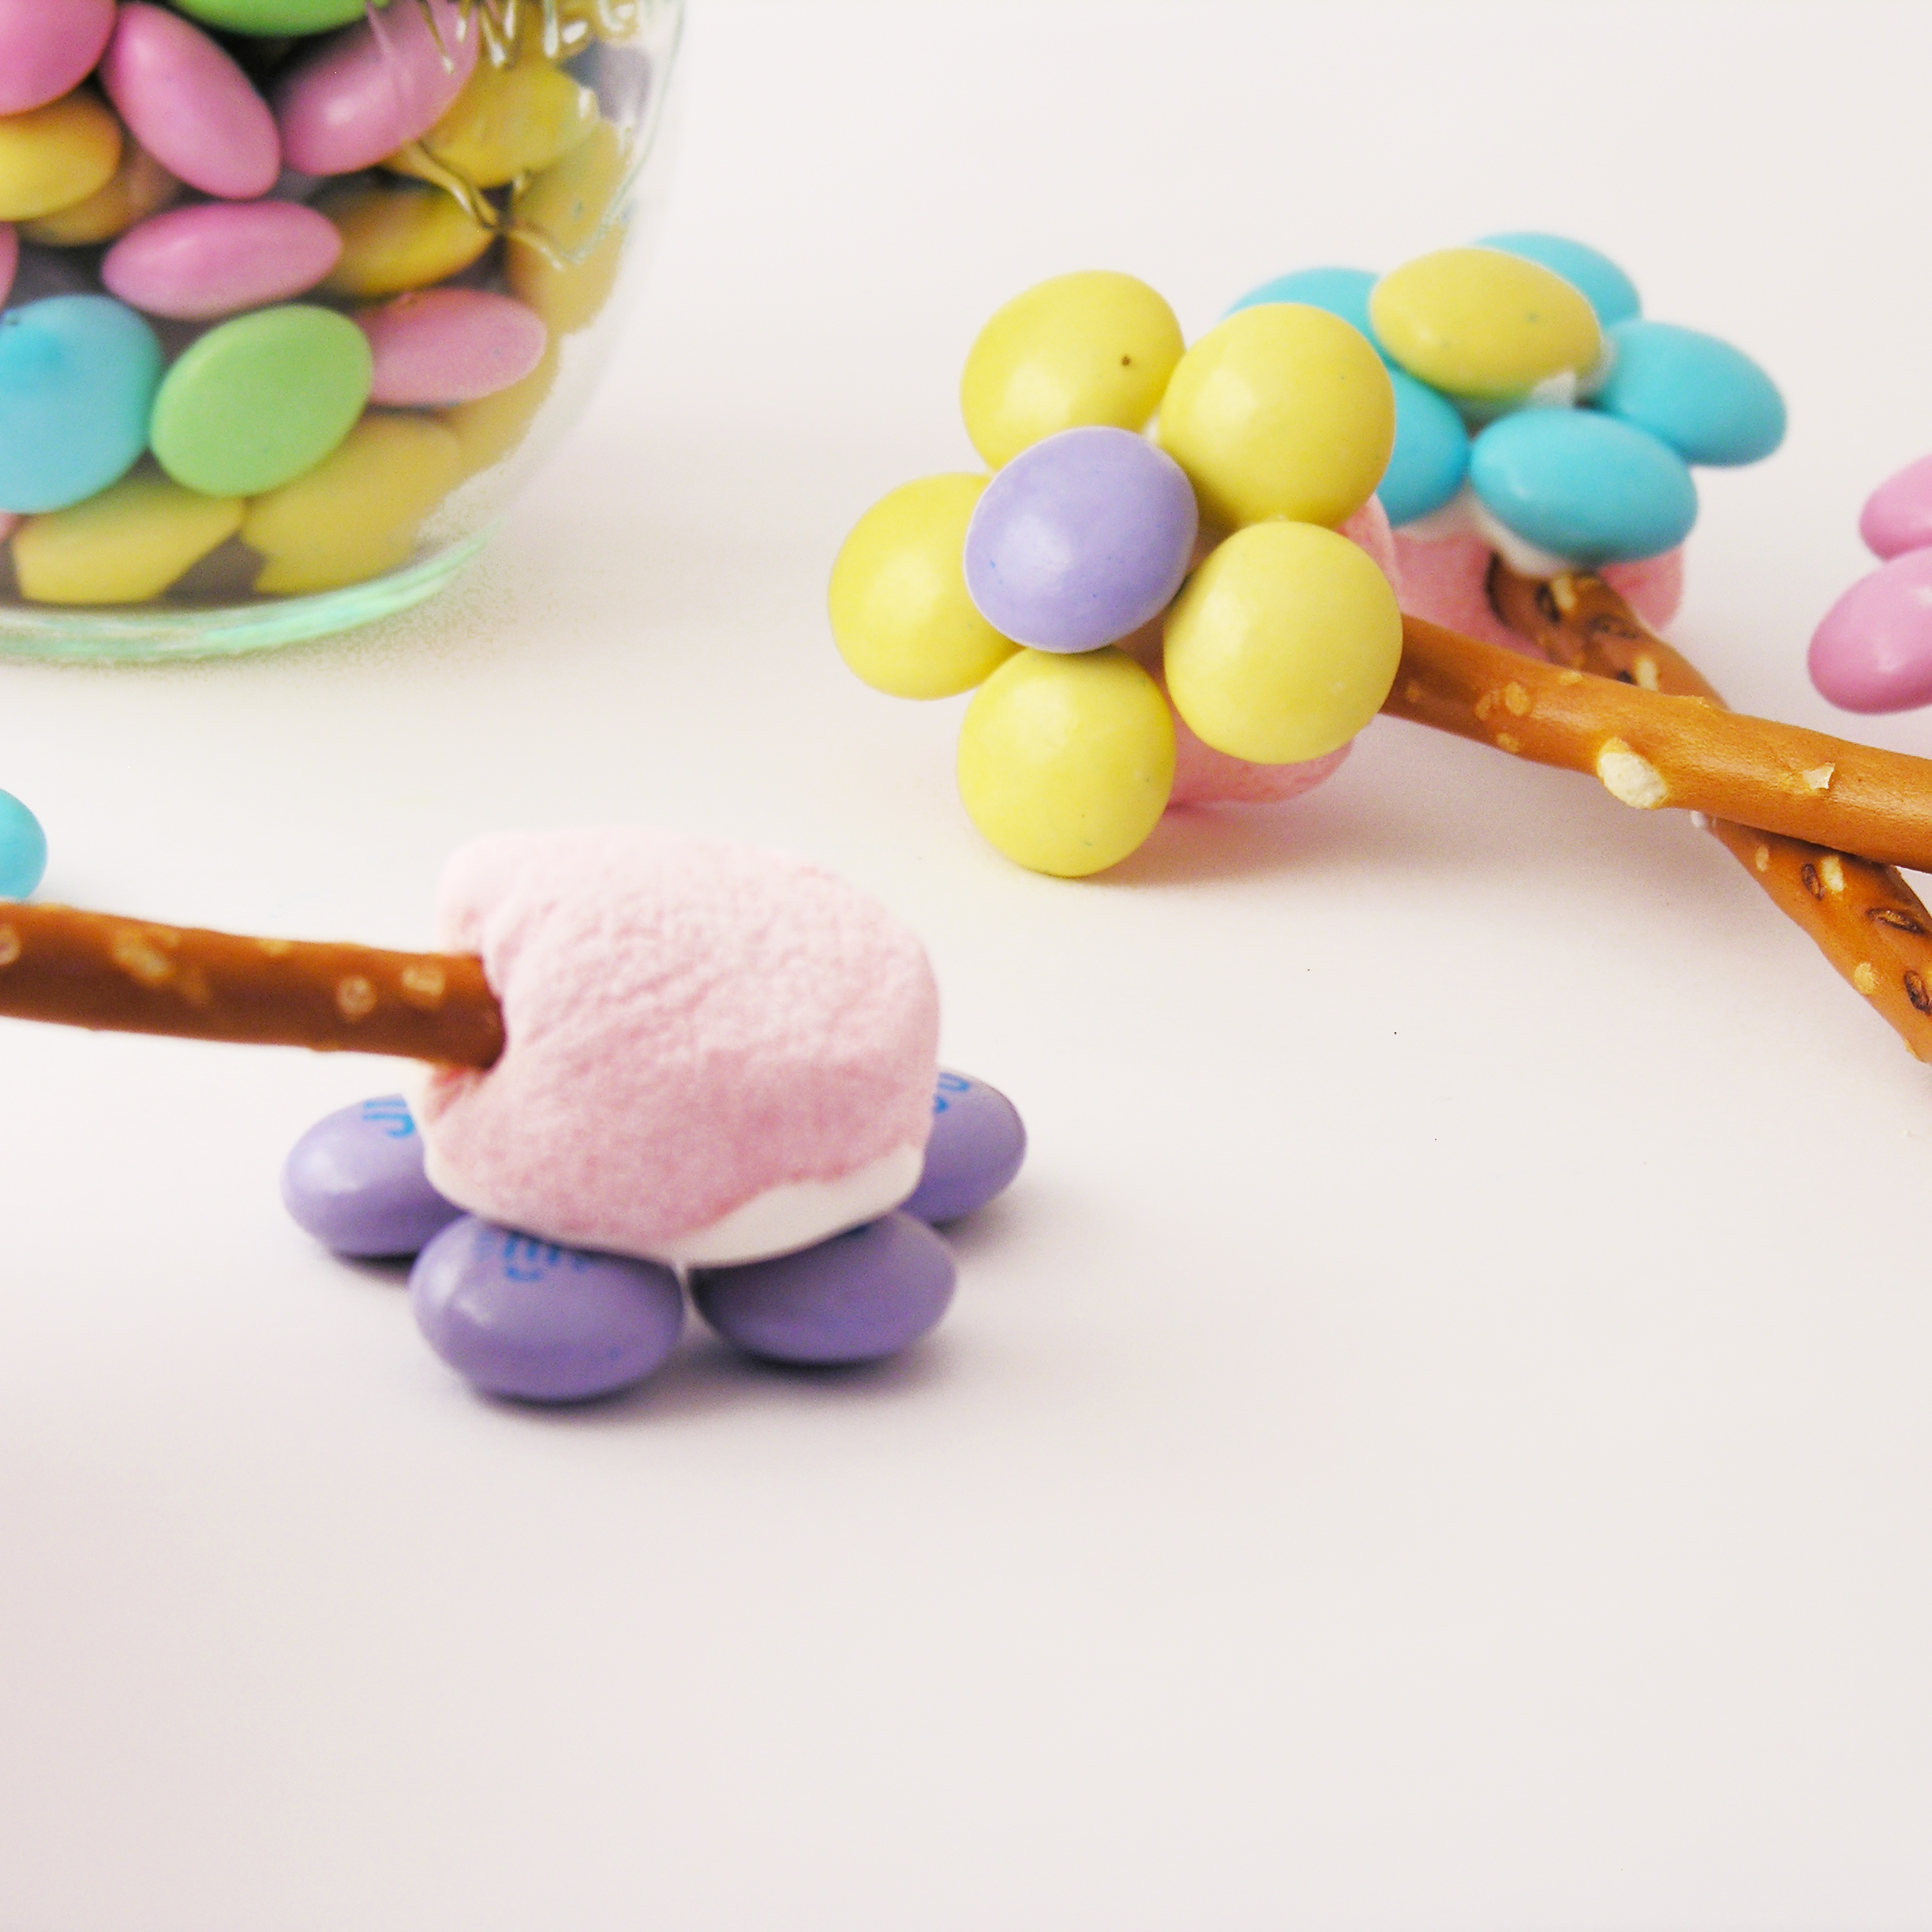
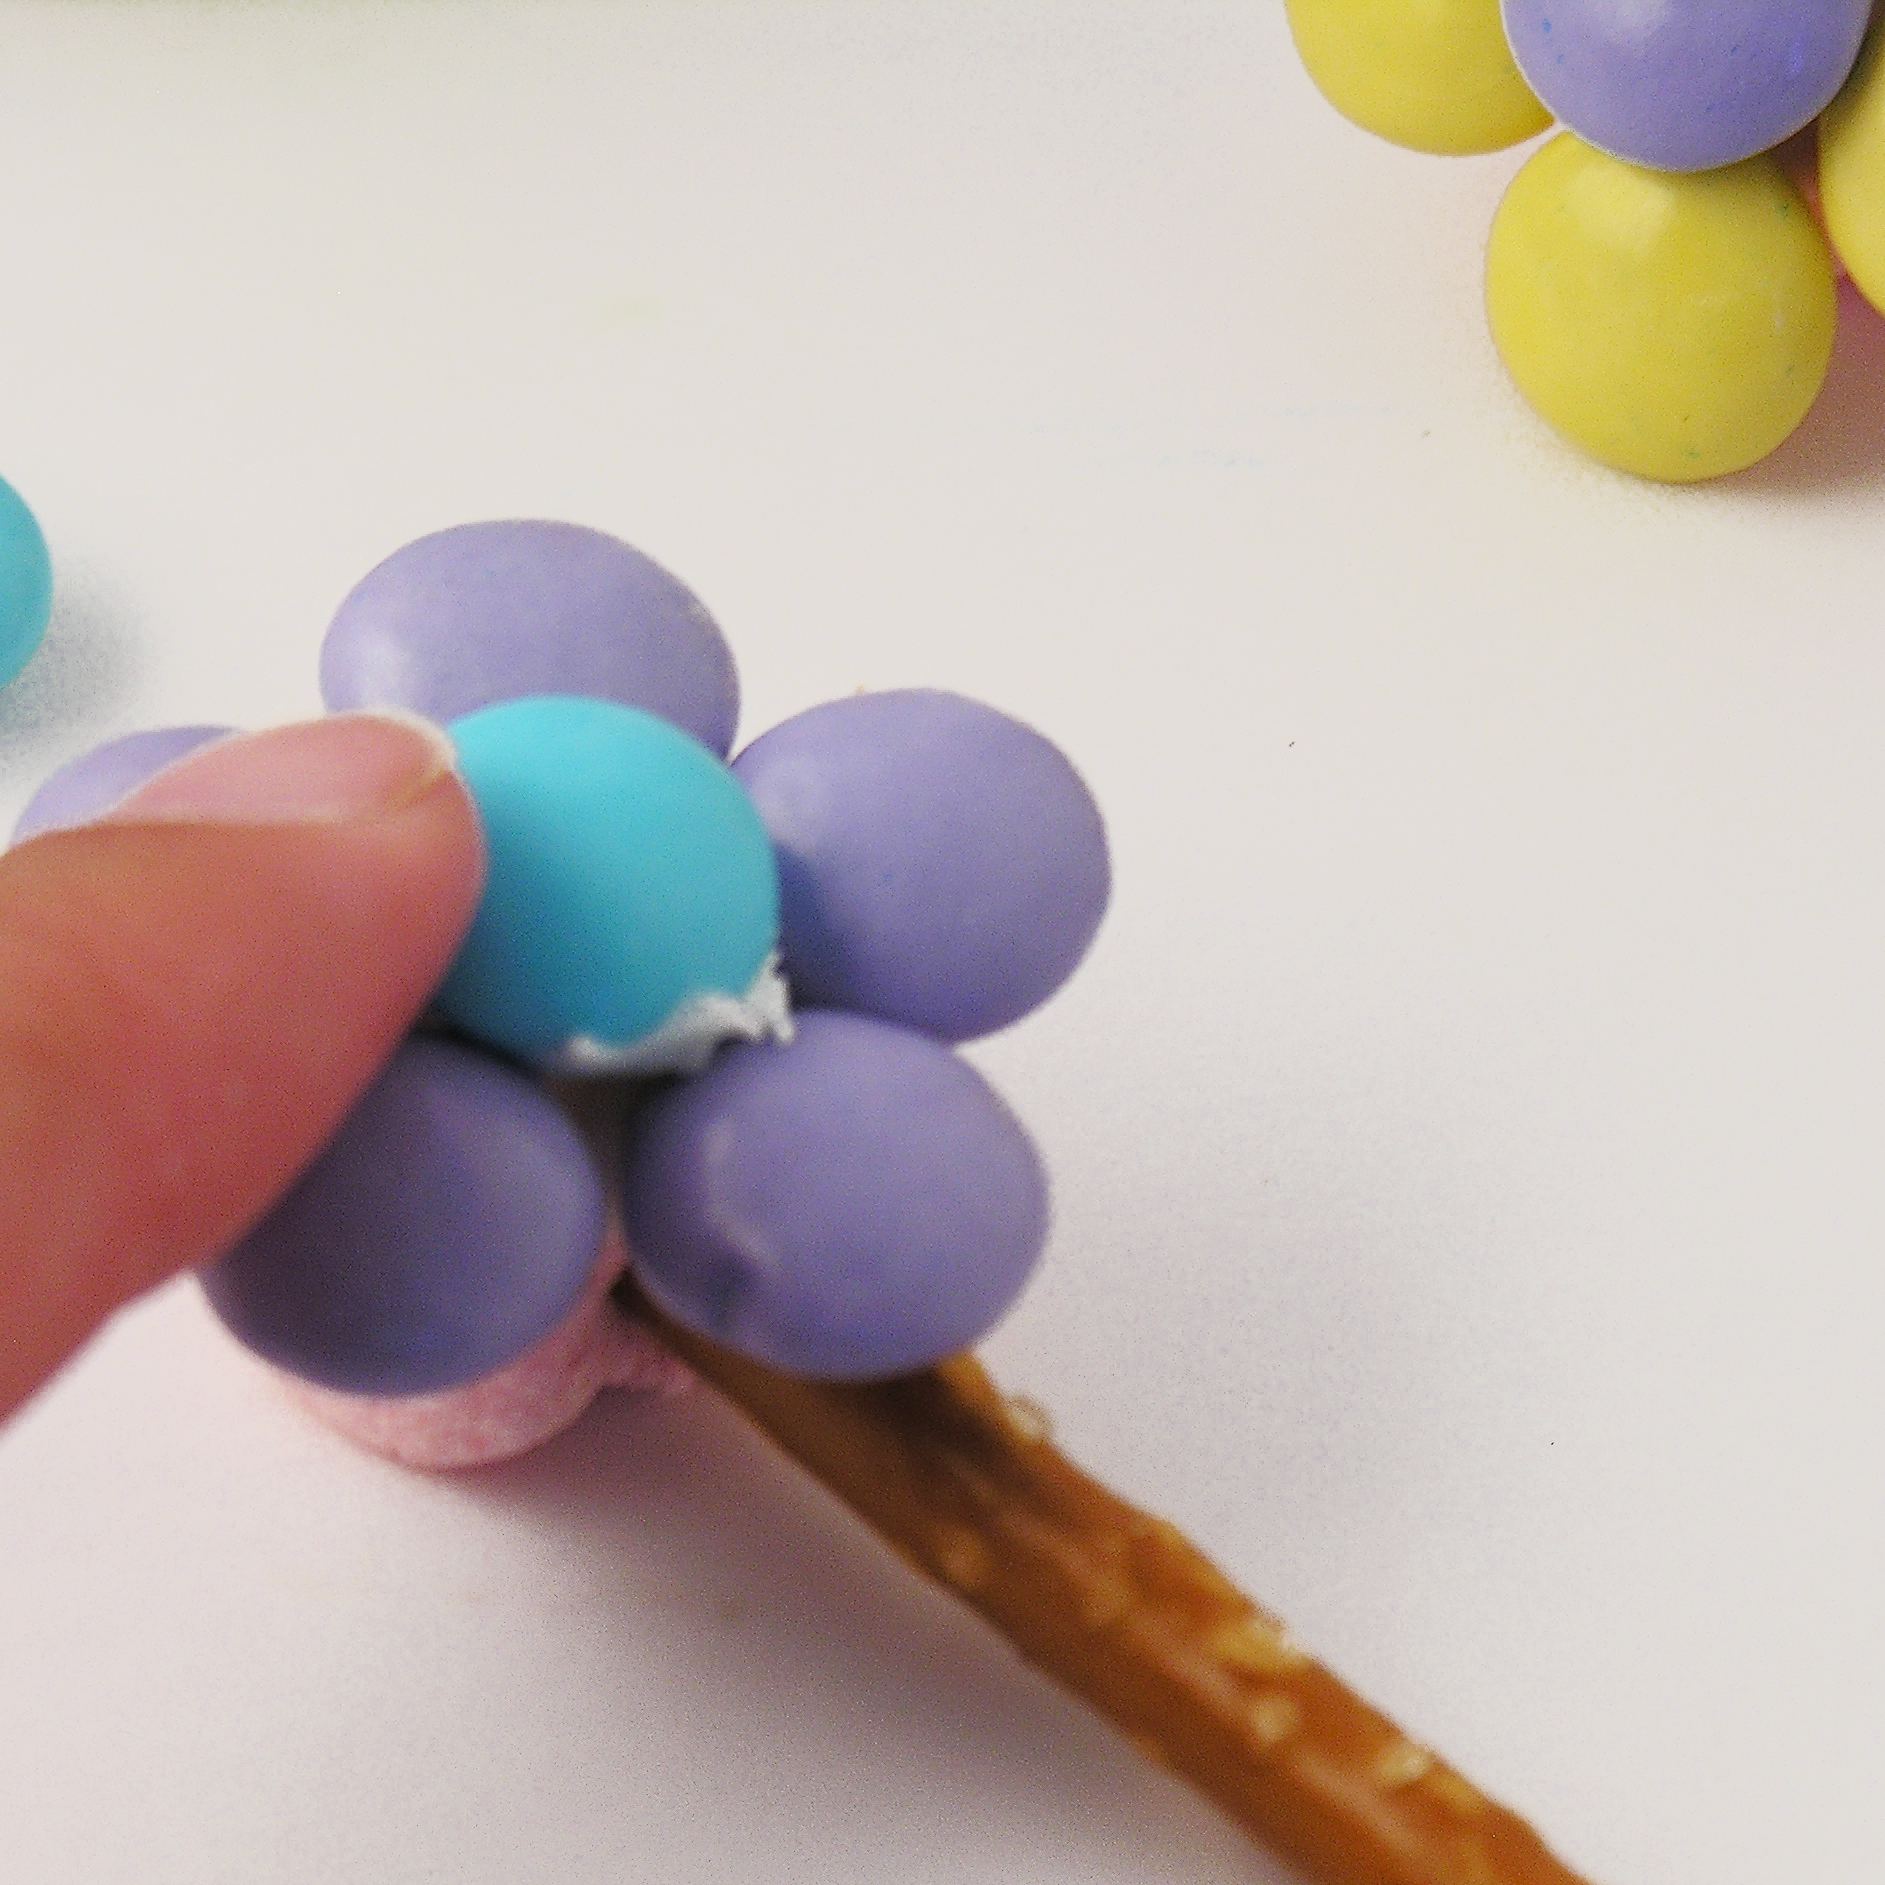
  • Set marshmallows out on parchment paper and stick one lollipop stick into the flat side of each one.
  • In a medium saucepan, melt together caramels, butter and sweetened condensed milk, stirring constantly, until completely smooth (takes about 5 minutes)
  • Pour caramel mixture into a bowl.
  • Using stick, carefully dip each marshmallow into caramel, coating it to the top.  Gently tap stick against side of bowl to remove excess caramel and then slide bottom of marshmallow along bowl’s edge to remove most of caramel.  (It is ok if you remove it down to the marshmallow- the chocolate will cover this up!
  • Place upright on a sheet of parchment paper and cool.
  • Place chocolate candy melts into a bowl, and melt them in the microwave in 30 second increments, stirring in between, until completely melted and smooth.
  • Lay a fresh sheet of parchment paper out before beginning next step.
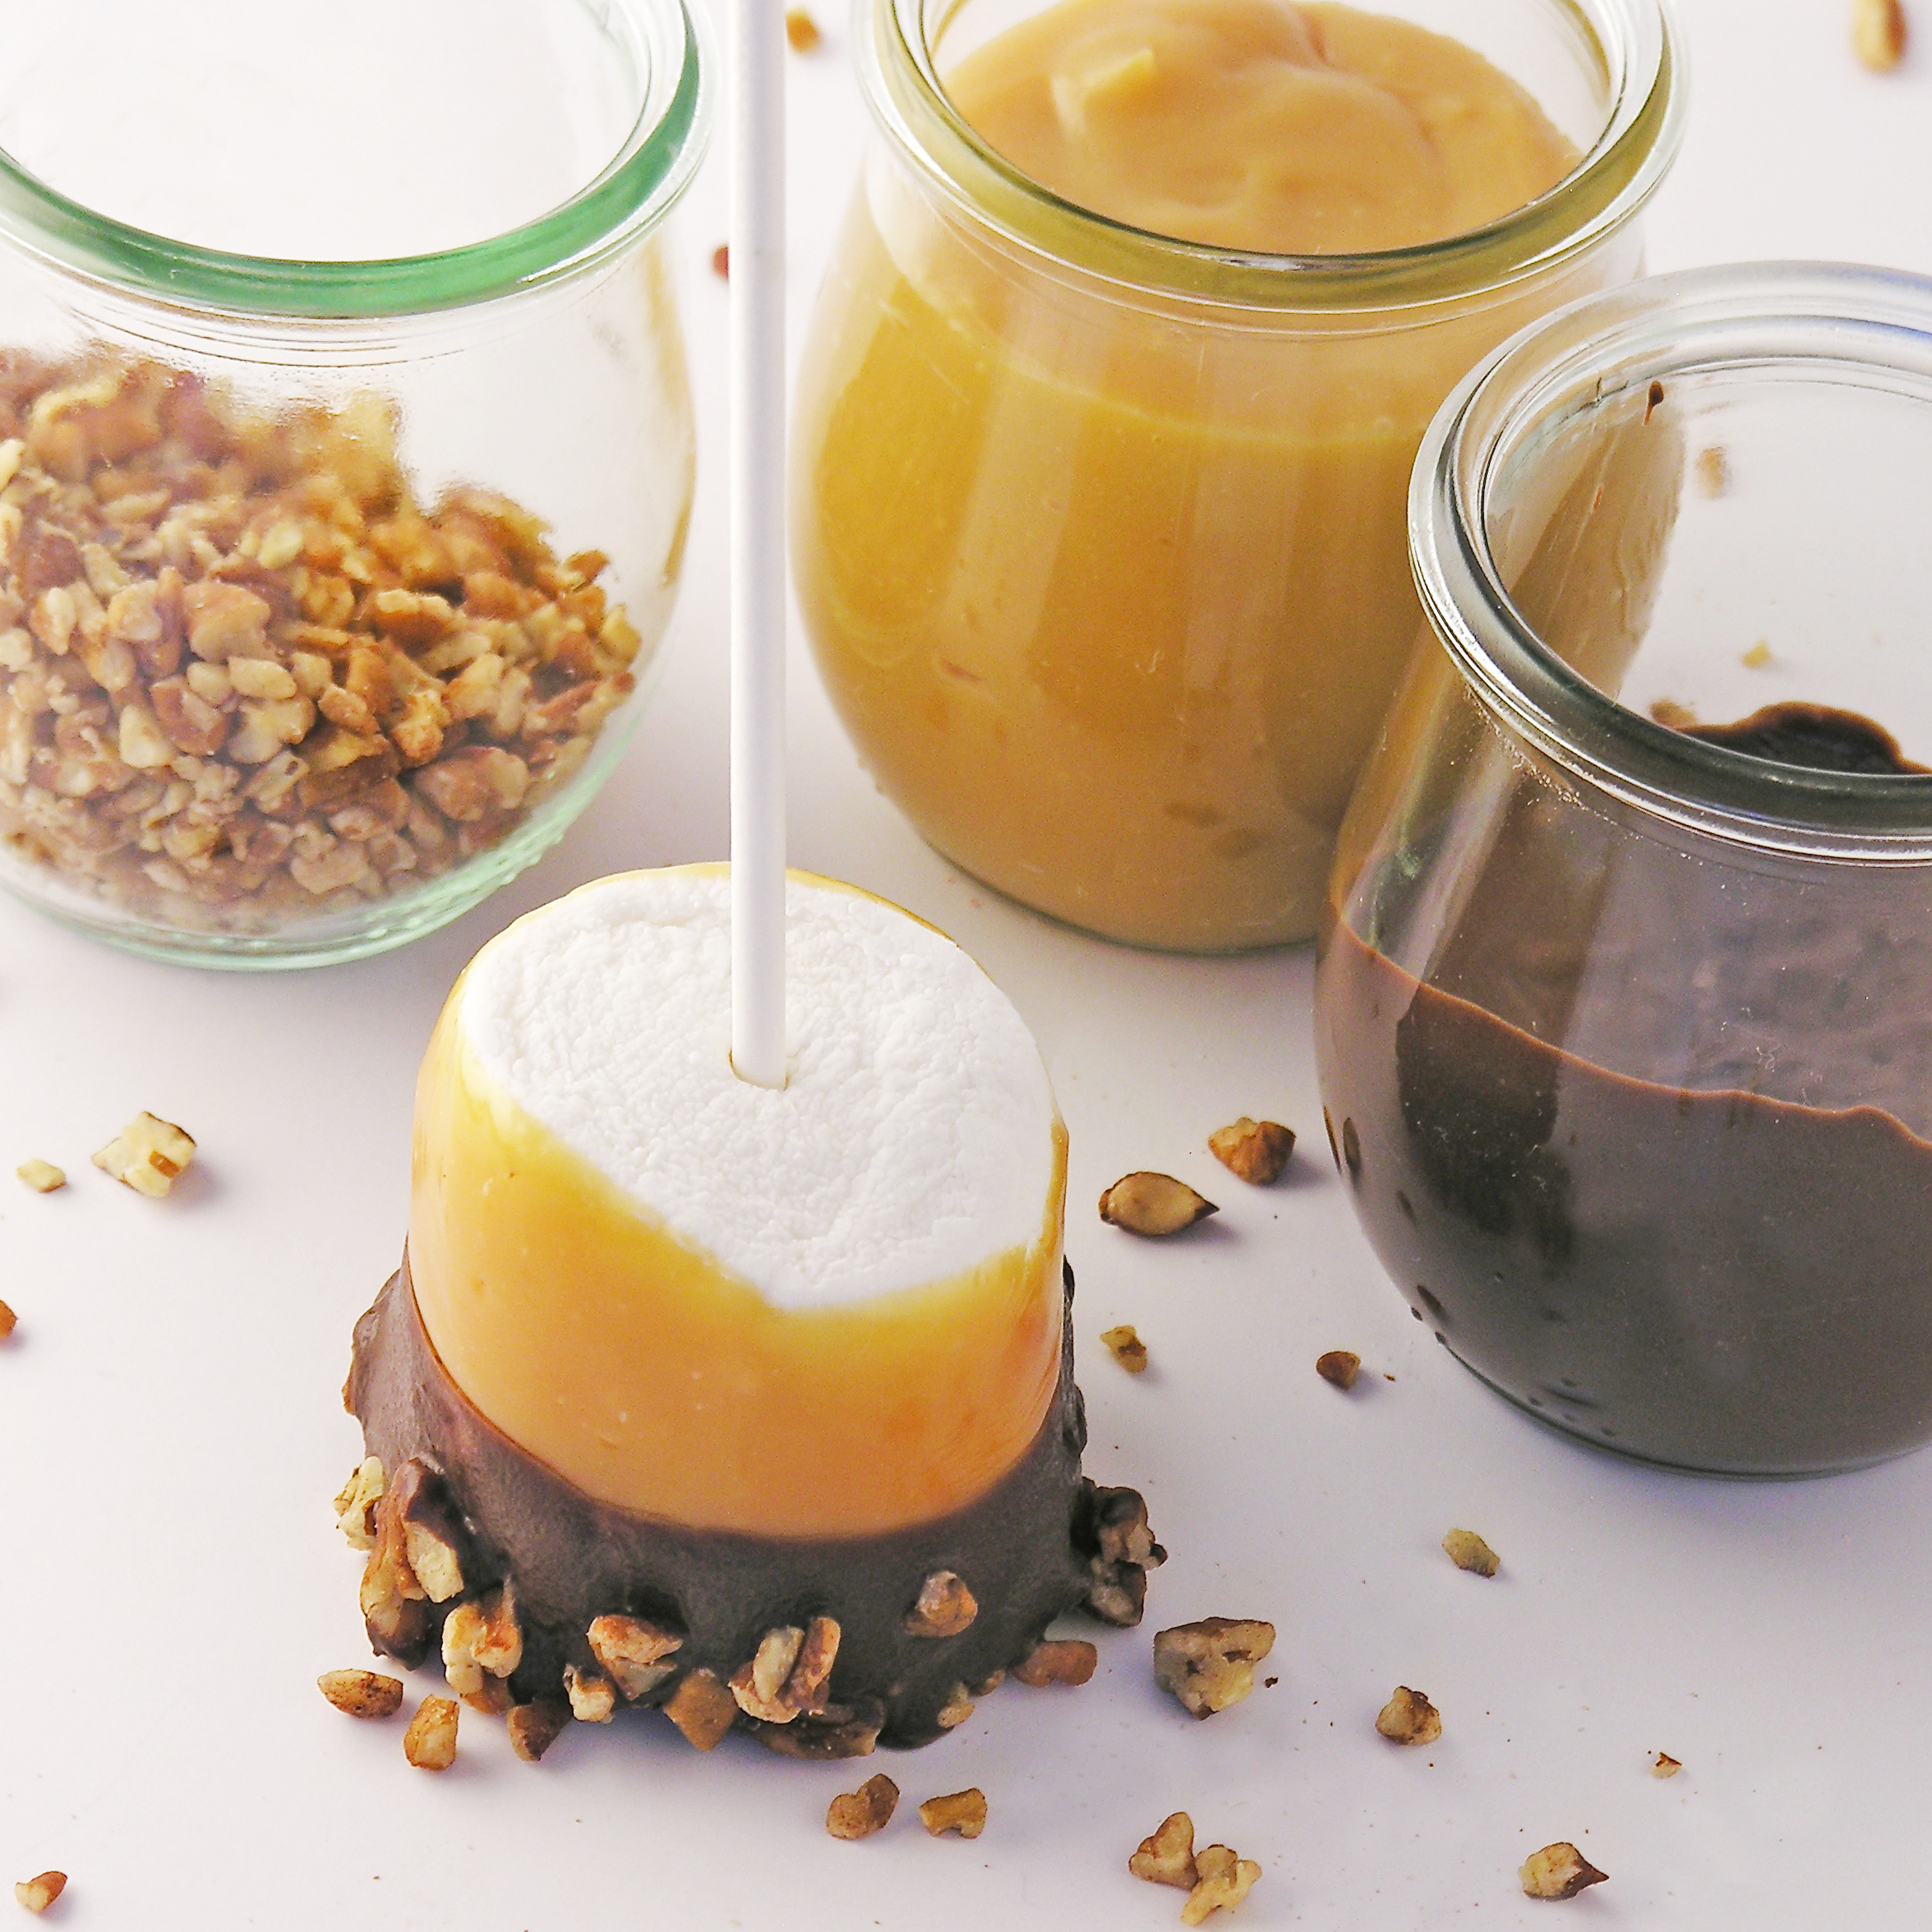
  • Place pecans in a small bowl.
  • Gently peel a marshmallow away from the parchment paper. This is a little tricky, as it will still be a bit gooey.  I held the stick, lifted, and peeled the paper away from the marshmallow.
  • Dip bottom of marshmallow into melted chocolate and slide bottom along edge of bowl to remove excess.
  • Dip bottom of coated marshmallow into pecans and set on fresh parchment paper to harden.

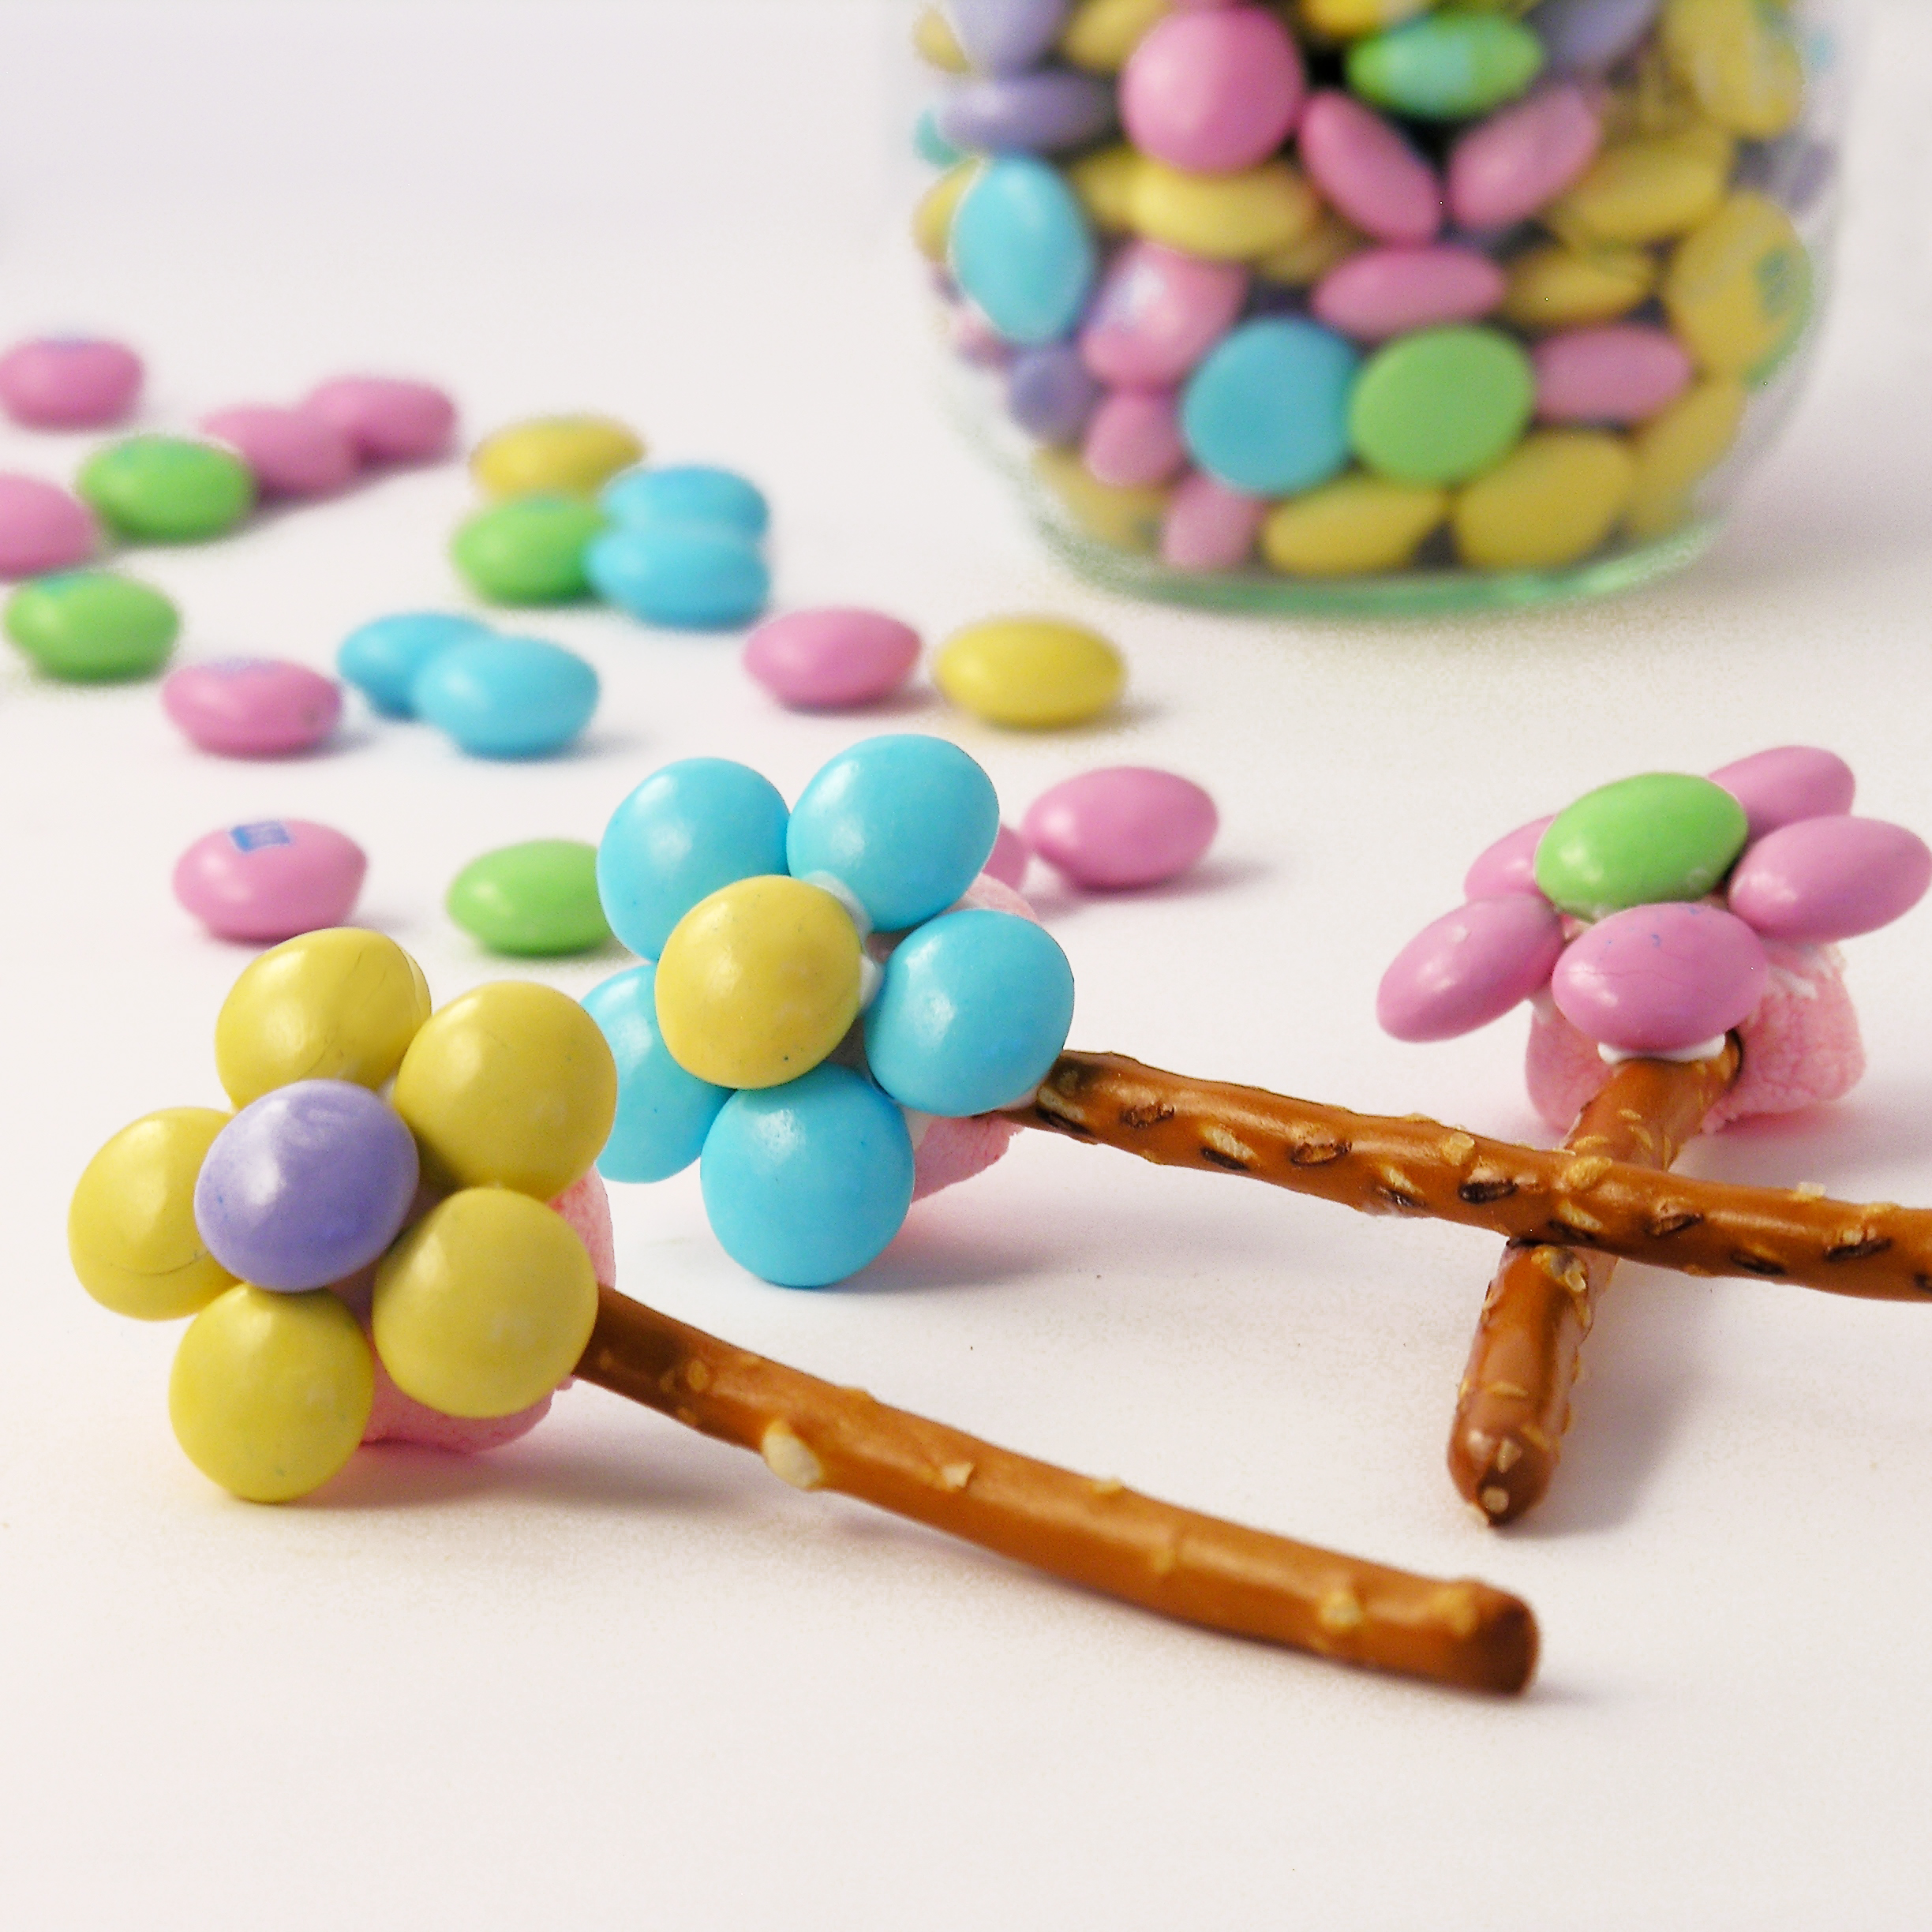
Once these are hardened up, you can serve them up on a pretty plate, or wrap them in cello bags to use as gifts or favors.
If you aren’t serving them right away, be sure to cover them so the marshmallows don’t harden up.

Caramel Pecan Marshmallow Pops!

My thoughts: These are a recipe I will make again.  I had fun putting them together and everyone who tried them asked me to make them again.  Easy. Yummy. Beautiful.  My kind of recipe!  Enjoy!! ~r

Other unique recipes you might enjoy:

Fruit Loop Pie!Raspberry Lemon Cream Cups!!!Cookie Dough Whoopie Pie!Doughnut cupcakes!!

Flower Pot Cupcakes

Posted on


Flower Pot Cupcakes!!!


These cheery garden cupcakes have delicious raspberry cream filling

and fun flowers made of M& Ms!!!

HAPPY MOTHER’S DAY!!!!  This bit of cheer goes out especially to my mom this week.  I’m so far from home this year, that we will have to celebrate from a distance.

Aren’t these the cutest cupcakes ever?  I cannot take credit for the M&M flower idea, it was an idea I originally saw on a cute blog called Sara’s Shoebox.  She was copying the idea from a cookbook called “What’s New Cupcake“.  I do not own this cook book, but it is a sequel to one of my favorites, “Hello, Cupcake!”, by the same author.  In any case, Sara made hers with mini Oreos and I simply could not get mine to work with those..?  SO, I had seen marshmallows in pink lemonade flavor (who can walk by THAT without picking up a bag?) and I decided to use them instead.  They were a tiny bit too small, so I am going to recommend that you use full-size marshmallows for these.  I had to fiddle around with them awhile to get them to all stick.  I’m positive they will be easier on a full-size marshmallow!!

The cupcakes are an original though- I used a pink velvet cake mix, but you can use any flavor you like!  I filled them with a yummy raspberry cream and topped them with scoops of butter cream and either coconut or Oreos (um…I had a few of those left over from the flower attempt!)  Are you ready for a recipe for these???  Here you go: (printable version)

INGREDIENTS:

  • One boxed cake mix (in any flavor, with oil, water and eggs to make according to box)
  • One packet of Dream Whip
  • 1 cup of heavy whipping cream
  • 1/4 cup of berry jelly or jam
  • 2 sticks of salted butter (at room temp)
  • 2 sticks of unsalted butter (at room temp)
  • 3 cups of powdered sugar
  • 2 teaspoons of vanilla
  • 2 cups of shredded coconut (died green with food coloring) -OR- 2 cups of crushed Oreo Cookies
  • 24 pretzel sticks
  • Pastel M&Ms
  • 12 marshmallows
  • 1/2 cup of white Wilton’s candy melts

DIRECTIONS:

Flowers: I recommend making these ahead and storing them covered until you make your cupcakes.  They aren’t hard to make, but a little time consuming.

  • Take 12 marshmallows and cut them in half with clean kitchen scissors. Lay them on the counter with the cut side up to keep them from sticking to things.
  • Take a pretzel stick and wiggle it up into the side of each marshmallow.  
  • Melt candy melts in the microwave in 30 second increments, stirring between until completely melted and smooth.
  • The technique that worked best for me here was to lay my M&Ms out in a flower pattern (minus the center) on parchment paper, cover the sticky side of the marshmallow with candy melts and lay it (candy melt side down) on the flower until it dries.  Then I used a little of the candy melts to stick my center on.  Here’s some photos.

Flower Pot Cupcakes Flower Pot Cupcakes Flower Pot CupcakesFlower Pot Cupcakes

Just let those cute little flowers dry, and you are all set to make your cupcakes!

Cupcakes:

  • Make cake mix according to box and divide batter among 24 cupcake liners in muffin tins.
  • Bake according to box, remove from oven and cool completely.
  • Make filling by putting Dream whip powder and whipping cream in a bowl.  Mix on high until stiff peaks form.
  • Add jam or jelly and beat until well combined.  Place filling in a large zip top bag and keep refrigerated until use.
  • Core cooled cupcakes with a small knife or a cupcake corer.  I HIGHLY recommend the corer- it is super cheap and will save you time!
  • Cut a corner off the filling bag and squeeze filling into each cupcake.  
  • Place top of “core” that was removed back on top of cupcake.

Flower Pot Cupcakes Flower Pot Cupcakes Flower Pot Cupcakes

  • Make buttercream frosting by beating butters, powdered sugar and vanilla together in a large bowl on high until it is light and fluffy and smooth.
  • Use a scoop to place a mound of frosting on each cupcake.
  • Turn cupcake upside down in either coconut or crushed Oreo to coat the frosting.
  • Now pop a cute flower in, and you have an adorable treat for all sorts of occasions!!


Flower Pot Cupcakes!!!
My thoughts:  These brought smiles to so many faces!  I often share my blog creations with various families and organizations here on the Navajo Nation.  These went to the Easter party at the Senior Citizen Center here.  I got many hugs and thank yous (Ahéhee’)
 from the recipients.  I also got to watch almost 100 seniors literally running to a huge Easter egg hunt!  So fun!!!

Happy Easter!!On a recipe note:  These are little time consuming, but so worth the effort!  I made my flowers ahead and I was glad I did.  I really hope you enjoy these!

And to the best mom ever: a bouquet of M&M flowers!  I love you!!!!  ~r

M&M flower bouquet!!!
Other recipe ideas for Mother’s day:

Creamy cheesecake with sour cream toppingEspresso Cookies!!!Strawberry Lemonade Cupcakes!!!! Brownie Oreo Cookie Cup

Tres Leches Layer Cake

Posted on


Tres Leches Cake!!!!

This traditional sponge cake is soaked in a vanilla 3-milk sauce and layered with dulce de leche.  Topped with whipped cream and fresh fruit, it is a light and refreshing dessert.

It’s nearly Cinco de Mayo time!  I first tried Tres Leches cake in Mexico.  I had taken a group from our church down to a tiny village in Sinaloa.  We had spent the week building, painting, doing electrical work and laying cement.  It was my birthday while I was there, and some of the ladies from the church made me a HUGE tres leches cake.  It was DELICIOUS!  When I asked for the recipe, they all looked at me funny and said- it’s tres leches cake..? (like everyone knows how to make that!!!)

Tres Leche Cake in MexicoSince then, I’ve tried this cake at other places in Mexico and in the states.  I’ve noticed that there are two kinds:  The firm, sweet and moist kind, and the dripping with milk kind.  I really don’t like the dripping with milk kind…that consistency is really gross to me- and cake should never be gross!

I researched lots of recipes, and discovered that there are two varieties: a butter based sponge cake and an egg based sponge cake.  The egg based one is the one I liked.  It soaks up all that yummy sauce and stays firm, while the other just sits in a puddle of sauce…YUCK!

Tres Leches Cake!!!!All of that said, this is an egg based recipe that I found on a lovely blog called Pati’s Mexican Table.  My research paid off- this was a FABULOUS cake!  Here’s the recipe: (printable version)

INGREDIENTS

Cake

  • 9 eggs, separated
  • 1 cup sugar
  • 1 tablespoon vanilla extract
  • 2 cups all purpose flour

Vanilla Sauce:

  • 1 (14oz) can sweetened condensed milk (I used La Lechera brand)
  • 1 (12oz) can evaporated milk
  • 1/2 cup heavy cream
  • 1 tablespoon vanilla extract

Topping/filling

  • 2 cups heavy whipping cream
  • 1/4 cup confectioners’ sugar
  • fresh fruit for garnish
  • 1 (13.4 oz) can of La Lechera Dulce de Leche (or make your own here)

DIRECTIONS:

  • Preheat oven to 360F degrees and spray two 8 or 9 inch cake pans with non-stick spray.  Cut a circle out of parchment paper to place in the bottom of each pan to help these cakes come out of the pan cleanly.
  • Divide eggs into 2 bowls.  Put the egg whites into a large mixing bowl and the yolks into a medium bowl.
  • Beat the egg whites on medium-high until they form soft peaks.  Add sugar and beat on high until they form stiff peaks (this will take 4-5 minutes, depending on your mixer).
  • Beat the egg yolks on high for 5 to 6 minutes until they increase in volume and turn a creamy yellow.
  • Beat the vanilla into the egg yolks until combined.
  • Add the yolks to the whites and use a spatula or large spoon to gently fold them together.
  • Add flour and gently mix until completely combined.
  • Divide batter evenly between the 2 pans and bake for 20-25 minutes.  The tops should be golden and when a toothpick is inserted in the center, it should come out clean.
  • Cool completely, run a small knife around the edges and tip cakes over on a plate.  Remove parchment paper.
  • Make sauce by combining the 3 milks (condensed, evaporated and cream) together with the vanilla.
  • Poke (lots!) of holes in the top of each cake with a fork and carefully pour sauce over the top, dividing it evenly between the 2 cakes.
  • Place one cake on a serving plate, spread dulce de leche caramel over the top, stack second cake on top.
  • Make frosting by beating together the whipping cream and powdered sugar, until stiff peaks form.
  • Frost cake and serve with fresh fruit. Refrigerate until serving.

Tres Leches Cake with caramel and fruitMy thoughts:  I was so pleased with how yummy this cake was.  The sponge cake is very firm and easy to work with, even when it’s soaked with sauce.  You can make this in a 9×13 inch pan too- I just wanted the tall layer cake look~ and that caramel in the middle?  Oh my… take a look at my pictures- it partially soaks in to that bottom layer and gives it a rich caramel flavor.  I think you all are going to love this cake!!  I hope you get a chance to try it!!!  Enjoy!!!!  ~r

Tres Leches Cake!!!!Other cinco de Mayo recipe ideas:

Alfajores-- yummy dulce de leche filling!Confetti Cake Filled with CandyCreamy Mango Pops!Mexican Chocolate Milk

Rocky Road Cupcakes!

Posted on

Rocky Road Cupcakes!!!!These chocolate cupcakes are filled with creamy marshmallow and topped with a rich ganache frosting, marshmallows and almonds! YUM!!!!!

These are fork-eating cupcakes!  You’ll love that combination of rocky road flavors in these rich and messy-to-eat cupcakes.

Rocky Road Cupcakes4I absolutely love this frosting.  I have used ganache for many recipes, but I’d never taken the time to whip it up into a frosting.  Now that I’ve tried it, I will be back for more- this frosting is so rich and chocolatey!!! Ready for a recipe?

Here you go: (printable version)

INGREDIENTS:

  • One box of chocolate cake mix (with oil, water and eggs to make according to package)
  • One large jar (13 oz) of Jet-Puffed Marshmallow Creme
  • One bag of semi-sweet chocolate chips *
  • 1/2 cup of whipping cream *

(*double these two ingredients if you want to pile your frosting high like mine is)

  • One bag of mini-marshmallows
  • 1 cup of slivered or sliced almonds
  • a little white chocolate to drizzle on top, if desired

DIRECTIONS:

  • Start your frosting first, as it needs to chill before you beat it, and double the recipe if you want piles of frosting like mine.  I went a little overboard for fun pictures!! 🙂
  • Place 1/2 cup of whipping cream into a medium saucepan and heat it on the stove until the cream starts to bubble just a bit on the edges, stirring as it heats.  Turn off the heat, add the chocolate chips and cover for 5 minutes.
  • Stir melted chocolate and warm cream together until completely smooth (a “ganache”).  Put it in a medium bowl and refrigerate until it is a cool, spoonable consistency (30 minutes to an hour).
  • Make cake mix according to box, and divide equally into 24 cupcake lines placed in a muffin tin.
  • Bake as directed on box, and cool completely.
  • Core cupcakes using a small knife, or a cupcake corer.  I used the Chicago Metallics one, and for $4 there is just no reason to not get one- it makes filling cupcakes SOOOO easy!  Isn’t your birthday coming up???

So easy to core cupcakes!

  • Spoon entire jar of marshmallow fluff into a gallon-size zip-top bag and clip a corner off with scissors.  Squeeze the marshmallow into the middle of each cupcake and then trim a little of the core you removed and place the “lid” back on top of the filling.
  • Remove cooled chocolate ganache from refrigerator and beat on high until light and fluffy.
  • Place icing in a gallon size zip-top bag that has been fitted with a decorating tip in one corner, and pipe icing onto the cupcakes.
  • Decorate with almonds, and mini marshmallows.  I also added some mini chocolate chips (because I had some leftovers from another recipe) and I melted some white chocolate to drizzle on top.  Be creative and make these little marshmallow-y cupcakes irresistible!!!!


Rocky Road Cupcakes!!!!!


My thoughts:  These are FABULOUS cupcakes.  I love the gooey marshmallow creme surprise in the middle!  And that frosting….. oh my.  A few tips:  the frosting does harden up, so get those almonds and marshmallows placed in it as soon as you are done piping the frosting on.  This is good, because it holds all those yummy toppings in place!  Also, store these all sealed up.  You know what happens when you leave the bag of marshmallows open?  Yucky, rubbery, dried up marshmallows!  The same will happen if you just let these set out. 

I hope you love these little yummy desserts!!!!  ~r

Rocky Road Cupcakes with marshmallow filling!!!!Want some other ideas for that new cupcake corer?  We love filled cupcakes here at Easybaked!  Here’s a few of our favorites:

Cinnamon Roll Filling in a yummy cupcake!Peppermint Hot Chocolate Cupcakes!!!Toxic Slime-filled Cupcakes!Mocha caramel filled cupcakes3

Baked Alaska Cupcakes

Posted on

Baked Alaska Cupcakes!!!!Rich chocolate cupcakes topped with a scoop of ice cream and a cloud of toasted marshmallow meringue. Best. Dessert. Ever!!!!!

Every year for Christmas our family goes out to an incredible restaurant near Marshall, MI called Win Schulers. They have the most amazing prime rib…oh my.  Anyway, within a week of Christmas it is my birthday, my mom’s birthday and my sister-in-law’s birthday.  Schuler’s gives you a Baked Alaska for your birthday….so it’s a feast of Baked Alaska and it is SO good.  About 2 weeks ago I was craving it and suddenly was struck by the idea of making it in cupcake form.  A.M.A.Z.I.N.G.  Just go and make these.  Use your favorite ice cream.  You will love them…!

Baked Alaska Cupcakes!

Here’s the recipe: (printable version)

INGREDIENTS:

  • One boxed chocolate cake mix (plus the oil, water and eggs to make according to package)
  • One quart of your favorite ice cream (I used mint chip)
  • 8 egg whites
  • 2 cups of granulated sugar
  • 1/4 teaspoon of cream of tartar

DIRECTIONS:

  • Make cake mix according to box directions and divide equally into 24 cupcake liners in cupcake tins.
  • Bake according to package.
  • Cool completely (I refrigerated mine to get them nice and cold before adding the ice cream)
  • While they are baking and cooling, make the marshmallow meringue (I got my recipe here)

(Don’t be afraid….I was afraid to try this, it sounded complicated, but it isn’t hard- it just takes time with a mixer in your hand if you are like me and not fortunate enough to have a stand mixer!  It is actually kind of fun!  Make sure your bowl and beaters are free of any oils.  I swiped mine with a little lemon juice 1st)

  • Place egg whites, sugar and cream of tartar in a medium heat-proof bowl that will set on the top of a sauce pan of boiling water without touching the water.  (I had to experiment a bit to find a good fit)
  • Bring water to a boil in the saucepan and set the bowl on top.
  • Whisk ingredients together for about 3-4 minutes.  Sugar will be dissolved and egg whites should be heated to 145F degrees.
  • Remove bowl from top of sauce pan and beat on low until the mixture thickens a little, then beat on high for about 10 minutes.  The meringue will become the most beautiful, white, glossy mixture.  It should form stiff peaks before you stop beating it.
  • Spoon all that wonderful marshmallow yumminess into a bag fitted with a decorating tip.
  • Assemble one cupcake at a time, and then pop it into the freezer immediately.
  • Take a cupcake, use a small cookie scoop or melon baller and place a scoop of ice cream in the center of the cupcake.  Pipe meringue all around it, being careful to seal up all the ice cream at the bottom and them working your way up to a swirled top!

Marshmallow Meringue!Marshmallow Meringue!Marshmallow Meringue!!

  • When all cupcakes are prepared and in the freezer, use a kitchen torch
    to toast the marshmallow just before serving.
  • These are best served within a couple of hours of making them.  

Since they are a fork-eating-cupcake anyway, I see no harm in adding hot fudge….

Baked Alaska Cupcakes!!My thoughts: I loved them.  They satisfied my craving for a baked Alaska plus they have the cute factor of a cupcake!  Fun, fun, FUN!!!!! Enjoy!!!  ~r

Baked Alaska Cupcakes!!!Other yummy cupcakes:

Peanut Butter Cupcakes!!Key Lime Cupcakes!Doughnut cupcakes!!Chocolate molten lava cupcakes

Easter Egg Cups!

Posted on

 Cadbury Egg Cookie Cups!!These rich chocolate cookie cups are dipped in chocolate and filled with a rich cream “egg”.  A perfect Easter treat!!!

Cadbury Egg Cookie Cups!!!!

Do you love Cadbury Eggs?  I’m addicted.  That’s why I decided that there simply must be a chocolate cookie cup filled with Cadbury-like cream.  I used my favorite recipe for chocolate cut-out cookies and they baked just beautifully into firm little cups.  I dipped the tops in melted chocolate and piped yummy cream filling inside.  Fun and delicious!

Cadbury Egg Cookie Cups!!!!

Here’s the recipe: (printable recipe)

INGREDIENTS:

Cookie Cup:

  • 2 sticks (1 cup) butter, softened
  • 1 1/2 cups sugar
  • 2 eggs
  • 1 teaspoon vanilla extract
  • 2/3 cup unsweetened cocoa powder
  • 3 cups flour
  • 1/2 teaspoon salt
  • 1/2 teaspoon baking powder
  • 1 bag of Wilton’s dark chocolate candy melts.

Filling:

  • 3/4 cup light Karo syrup
  • 12 tablespoons of butter (softened)
  • 2 tablespoons vanilla
  • 4 cups powdered sugar
  • 1 to 2 tablespoons of water (for consistency)

DIRECTIONS:

  • Preheat oven to 350F degrees.
  • Add butter, sugar, eggs, vanilla and cocoa together in  large mixing bowl.
  • Blend on medium speed with a mixer until smooth.
  • Gradually add dry ingredients and mix until smooth (use clean hands at the end, to knead into a soft ball of dough)
  • Divide dough into 24 balls of equal size, and place each one in a muffin cup.
  • Press an indentation into each ball using a tart shaping tool (or the end of a wooden spoon)
  • Bake at 350F degrees for 8-10 minutes.  Press Tart shaping tool into center again, to reshape cups.
  • Allow the cups to cool for about 5 minutes in pan, then run a small paring knife around edge to pop cup out of pan.
  • Cool completely on counter.
  • Melt Wilton’s candy melts in microwave in 30 second increments, stirring between until completely melted and smooth.  Dip tops of cups into melted chocolate and allow them to harden completely.

Making cookie cupsDipping tops of cookie cups in chocolate

  • Make filling by adding all of the filling ingredients together except for the water and sugar.
  • Beat these on high until smooth and creamy.
  • Add sugar and beat on high until creamy
  • Add water until it is a nice spreadable, but not runny, consistency.
  • Beat until very smooth.
  • Take about 1/4 out and color with yellow food color gel.
  • Pipe white filling into cups 1st and then add a fun yellow “yolk” on top.
  • Enjoy!!

Cadbury Egg Cookie Cups!!!!My thoughts:  These are so0000  yummy.  If you want to save time, skip the chocolate dip on the edges.  This cookie recipe is just so tasty- and so versatile.  I’ve used it for so many things now.  Your family will gobble these up (once you convince the kids they aren’t really eggs!)  I hope you enjoy them! ~r

Other fun spring recipe ideas:

Strawberry Cookies with Sweet Tart FrostingChocolate cut-out cookiesStrawberry Lemonade Birthday CakeBubble Gum Cupcakes!


Jelly Bean Cookies

Posted on

Jelly Bean Cookies!!!!These cookies deliver a big Easter surprise~ jelly beans in the middle!  Pretty on the outside and sweet surprises on the inside?  These are a must-try Easter treat!

These really are just the cutest thing…but fair warning: I brought these to church and overheard the following conversation between an 8 year old and a 6 year old:

“There’s jelly beans in the middle!”
“And the cookie tastes like Play-Doh!!”
“I want another one!”

So…maybe this is a bigger hit with the under 12 set…?

I thought they tasted ok.  The cookies are very dense and full of white chocolate, but colored like Play-Doh…I can see the connection.  I really don’t like jelly beans either…so I wasn’t a very objective taste-tester.  But they are super cute…

Jelly Bean5In any case, if you are up for an adventure and you have lots of kids to entertain with something new….here’s the recipe: (printable version)

INGREDIENTS: (makes about 36 cookies)

  • One bag of Nestle white chocolate morsels.
  • One can (14oz.) of sweetened condensed milk
  • 2 teaspoons of vanilla
  • 2 cups of flour
  • Food coloring gels
  • One bag of large jelly beans (I used Brach’s Classic Jelly Bird Eggs)
  • One bag of Wilton’s white chocolate candy melts
  • Sprinkles

DIRECTIONS:

  • Carefully melt Nestle morsels in the microwave in 30 second increments, stirring between until completely melted and smooth.
  • Add sweetened condensed milk and vanilla, mixing until well combined.
  • Add flour and mix, eventually using clean hands to knead dough into a ball.
  • Divide dough into parts and knead in food color gels until you get the colors you want.
  • *Note* This dough is very oily, because of all that white chocolate.  This is ok.  Just keep a paper towel handy to wipe your hands on during this process.
  • Preheat oven to 350F degrees.
  • Take about a tablespoon of dough and roll it into a ball.  Then press it flat, lay two jelly beans on it and pull dough up around the jelly beans to cover them.  Pinch cracks and seams closed and then roll into a ball again to make it smooth.

Making jelly bean cookiesMaking Jelly Bean cookiesMaking Jelly Bean CookiesMaking Jelly Bean Cookies

  • Place on a cookie sheet that has been covered in parchment paper.  These don’t spread, so you can place cookies very close together.
  • Bake at 350F degrees for 10-12 minutes.
  • Remove from oven and slide parchment paper (cookies and all!) off the sheet and onto a counter to cool.  There will be oil from the white chocolate on the paper- this is ok.
  • After cookies have cooled completely, melt white candy melts in the microwave in 30 second increments, stirring between until completely melted and smooth.
  • Lay a fresh sheet of parchment paper on the counter, and get a clean paper towel.
  • If needed, dab the bottom of each cookie on the paper towel to remove any excess oils. Then, dip the top of the cookie into the candy melts, set on the clean parchment paper and sprinkle with decorations before the chocolate hardens.
  • Enjoy!!!

Jelly Bean Cookies!!!!

My thoughts:  I’m not sure what to say about these…I asked for honest opinions from the adults that tried them and they all said they loved them.  Then I caught one person chucking his out the back door….so much for honesty…!  If you like jelly beans (and apparently Play-Doh…) you should give these a try.  They are a little time consuming, but not difficult at all.  Who knows?  It might be a new family Easter favorite?  Or maybe just a good laugh…?  Enjoy!!!! ~r

Jelly Bean Cookies!!!

Other Easter treats I would wholeheartedly recommend:

Coconut Cupcakes!!Easy Easter cut out cookiesChocolate Easter Eggs with Peanut Butter FillingRaspberry Lemonade Truffles

Hamburger Cookies!

Posted on

Hamburger Cookie!These cute little burgers are a fun April Fools treat.  They look like a little burger, but they taste like a yummy peppermint cookie!

I’ve been making these since I was a little girl.  They are so easy to put together and so fun to share with people!  Both kids and adults will smile when they see these on the table or tucked into a lunch box!

Hamburger Cookies!!Want to know how to make these cute little treats?  Here’s the recipe: (printable version)

INGREDIENTS:

  • 1 box of Nilla Wafers
  • 1 bag of York Peppermint Patties
  • 1/3 cup each of red, green and yellow Wilton’s candy melts.

DIRECTIONS:

  • Preheat the oven to 350F degrees
  • Unwrap all of your peppermint patties. (Usually there are 24-26 of them per bag)
  • Count out twice that many Nilla Wafers (choose the pretty and unbroken ones!)
  • Place half of the Nilla Wafers, flat side up, on a cookie sheet.
  • Set one peppermint patty on each Nilla wafer.
  • Carefully place the cookie sheet in the oven for 1 to 2 minutes, just long enough to melt the chocolate coating on the peppermint patty. (This will melt the bottom of the peppermint to the Nilla wafer).
  • In 3 small bowls, melt the Candy Melts in the microwave in 30 second increments, stirring between until completely melted and smooth.
  • Place each of the 3 melted colors in separate zip-top bags.
  • Clip one corner and drizzle one color across tops of each peppermint.  Repeat this with other two colors.

Hamburger Cookies!!!

  • Gently press a Nilla wafer, flat side down, on top of the drizzled candy melts. Press to gently squeeze the “ketchup, lettuce and cheese” colors out at the edge of the cookie “bun”.
  • Allow cookies to harden completely.

I like to serve them with those little mini potato sticks.  I wanted to take some pictures with some, but I couldn’t find any at the grocery store here.  Trust me, the salty and sweet is a yummy combination.

Hamburger Cookies!!!!My thoughts:  My mom was downright mischievous on April Fools Day.  I had green milk and no meat on my sandwich and holes poked in my apple.  This is a fun “eating hamburgers for dessert” prank that will make your family smile.  Plus they are SO yummy!  Enjoy!!! ~r

Other fun treats you might like:

Patriotic Flip Flop Cookies!!!!Toxic Slime-filled Cupcakes!Ladybug Oreo Pops!Pile of Cupcakes!


Caramel Oreo Brownie Bars

Posted on

Caramel Oreo Brownie BarRich and gooey, these brownies are filled with soft caramel and Oreo cookies.  Does dessert get any better than this?!?

Wow…this was an experiment, and I’m almost speechless about how good these are.  It is hard to describe the yumminess…You need to try these.  I need to make these again, because they are already gone.

Caramel Oreo Brownie Bars!I’ve shared this recipe before on Easybaked, a very long time ago.  It is a wonderful recipe I called caramel chip bars.  This was one of my very first recipes on this blog, and if you click on the link you can see the recipe AND my awful beginning photography!!!  Lol.

These are very versatile brownie bars.  I make them all the time with a variety of cake mix flavors and chips.  It is a perfect way to use up half-empty bags of chips.

Caramel Oreo Brownie Bars!!!This time….I added Oreos, and the result was too incredibly yummy to not share with you all.  So here you go: (printable recipe)

INGREDIENTS:

  • 1 box of chocolate cake mix
  • 1/3c. oil
  • 2 eggs
  • 1 bag of semi sweet chocolate chips
  • 1 bag of white chocolate chips
  • 1 box of Double Stuf Oreos
  • 1/2 cup of butter
  • 32 unwrapped Kraft caramels
  • 1 (14oz.) can of sweetened condensed milk

DIRECTIONS:

  • Preheat oven to 350 degrees.  
  • Line a 9×13″ cake pan with foil.  
  • Combine cake mix, oil and eggs.  
  • Blend well and stir in all of the chips (mixture will be very thick).  
  • Press a little less than half of the mixture into bottom of pan (it will press into a very thin layer and you might be able to see the bottom of the pan, but when it bakes it will fill in).  
  • Bake for 10 minutes.
  • While this is baking, in a medium saucepan, combine butter, caramels and condensed milk.  
  • Cook over low/medium heat until melted and smooth (stir constantly!)
  • When cake has baked for 10 minutes, remove from oven and place 24 Oreo cookies over the top of the partially baked cake.

Oreo Caramel BrowniesOreo Caramel Brownies

  • Spread caramel over Oreos.  
  • Top with remaining cake/chip mixture.
  • There is a technique to this- you cant just spoon the batter on top or it will just mix in with the melted caramel.  Instead, take a small ball of dough/chips and press it very flat between your hands. Lay this on top of the caramel and repeat the process, like a patchwork quilt, until the entire top is covered.  It is ok to have a few gaps.

Oreo Caramel BrowniesOreo Caramel Brownies

  • Bake an additional 25 to 30 minutes.  
  • Remove from oven and cool 20 minutes.  
  • Gently lift from pan and peel foil from edges.  
  • Cool completely before cutting. Makes about 24 bars.

Caramel Oreo Brownie Bars!!!

My thoughts:  You have to make these!!!!!!! YUM!!!!!

Caramel Oreo Brownie BarsLove caramel?  We do too!!!  Here’s a few more caramel- filled recipes from Easybaked:

Caramel Cheesecake!!Dulce de Leche caramel sauce form a canSalted Caramel Cookie Cups (2)Caramel Fudge Brownies!!

Shamrock Parfaits…the unplanned dessert.

Posted on

Shamrock Parfaits!!!!These lovely layered St. Patty’s Day treats were supposed to be a cake…but ended up even better!

I am in the middle of the Navajo Nation without a Bundt cake pan.  That is how this tale begins.  I am almost 3 hours from a store that sells Bundt pans.  In my mind, I wanted to make a lovely bundt cake full of swirls of various shades of green, topped with melted Key Lime frosting.  SO- I did what any enterprising blogging girl would do- I ordered a pan on ebay, with free shipping.  It took a week, but once I got it I was ready to go!  I divided my cake mix into 4 parts and colored each part an increasingly darker shade of green and swirled the colors together in the pan.  After it baked, I tipped it out on a cake rack and…..Bundt Cake disaster!

Sadness.

I let the disaster cool and re-thought my recipe.  I brought my favorite little Weck jars with me, and I had some heavy cream to whip… how about parfaits!!

Shamrock Parfaits!!!Here’s the recipe: (printable version)

INGREDIENTS: (makes 10-12 small parfaits)

  • One boxed white cake mix (Plus water, oil and eggs to make according to box)
  • Green food coloring gel
  • One tub of Pillsbury Key Lime Frosting
  • 2 cups heavy whipping cream
  • 3 Tablespoons of powdered sugar

DIRECTIONS:

  • Make cake according to boxed mix, adding green food color to make batter green (you can make several shades of green if you want, but you don’t have to).
  • Bake as directed in any cake pan you want (lol!)
  • Allow cake to cool completely.
  • Put heavy cream and powdered sugar in a large mixing bowl and beat on high until cream is whipped and light, holding stiff peaks.
  • Take the lid and foil wrap off the tub of frosting, and heat in the microwave for 20-30 seconds.  Stir until it is a nice smooth liquid.
  • Assemble your parfaits by spooning a bit of frosting into each glass, followed by a bit of crumbled cake, followed by a dollop of whipped cream.  Repeat these layers until you are at the top.
  • End with a swirl of whipped cream and some sprinkles.
  • Enjoy!

Shamrock Parfait!!!My thoughts:  These ended up being the yummiest dessert!  I had a family over to visit that night and they gobbled up every last bit of it and loved it.  That key lime frosting is the BOMB!  Yum!  Anyway, thanks for joining me on my latest Navajo kitchen adventure!  Happy St. Patricks Day!!  ~rShamrock Parfaits!!!!Usually I give you another four recipes related to this one.  But today I leave you with one. These are seriously some of the best cupcakes I’ve ever made, and they are perfect for St. Patrick’s Day….just click on the photo and you’ll be magically transported to the yummy recipe.  I present:  Bailey’s Irish Cream Cupcakes….Enjoy!!!! ~r

Baileys Irish Cream Cupcakes